
OAuth ve Google ile Oturum Açma bağlantı türü, OAuth tabanlı yöntemlere ek olarak Google ile Oturum Açma özelliğini ekler. hesap bağlama. Bu, Google kullanıcıları için sorunsuz, ses tabanlı bağlantı sağlar aynı zamanda hizmetinize kaydolan kullanıcılar için hesap bağlamayı etkinleştirir Google dışı bir kimlikle oturum açın.
Bu bağlantı türü, Google ile Oturum Açma özelliğiyle başlar. Google ile Oturum Açma, kullanıcının Google profil bilgileri sisteminizde mevcut. Kullanıcının bilgileri bulunamadığından, standart bir OAuth akışı başlar. Kullanıcı ayrıca Google profil bilgileriyle yeni bir hesap oluşturmayı seçebilir.
OAuth ve Google ile Oturum Açma ile hesap bağlama işlemi gerçekleştirmek için aşağıdaki genel talimatları uygulayın. için şu adımları izleyin:
- İlk olarak kullanıcıdan Google profiline erişim izni vermesini isteyin.
- Kullanıcıyı tanımlamak için profilindeki bilgileri kullanın.
- Kimlik doğrulama sisteminizde Google kullanıcısı için eşleşme bulamıyorsanız
akış, Actions projenizi yapılandırıp yapılandırmadığınıza bağlı olarak devam eder
Sesle veya yalnızca açık olarak kullanıcı hesabı oluşturulmasına izin vermek için Actions konsolunda
sitenizi ziyaret edin.
- Sesle hesap oluşturmaya izin verirseniz kimliği doğrulayın Google'dan alınan simge. Daha sonra, kullandığınız kimlik jetonunda bulunan profil bilgilerini sağlayın.
- Sesle hesap oluşturulmasına izin vermezseniz kullanıcı şuraya aktarılır: bir tarayıcı kullanarak yetkilendirme sayfanızı yükleyip kullanıcıyı içerik üretme akışıyla ilgilidir.
Sesle hesap oluşturmayı destekleyin
Sesle kullanıcı hesabı oluşturulmasına izin verirseniz Asistan, kullanıcıya şunları yapmak istiyorlar:
- Google hesap bilgilerini kullanarak sisteminizde yeni bir hesap oluşturun veya
- Varsa kimlik doğrulama sisteminizde farklı bir hesapla oturum açın. mevcut bir Google dışı hesabınız olabilir.
soruna neden olabilir. Kullanıcının yalnızca ses akışını bırakması gerekir Mevcut bir Google dışı hesabını kullanarak oturum açmak istiyorlarsa.
Sesle hesap oluşturmaya izin verme
Sesle kullanıcı hesabı oluşturulmasına izin vermediyseniz Asistan kullanıcı kimlik doğrulaması için sağladığınız web sitesi. Etkileşim gerçekleşiyorsa ekranı olmayan bir cihazda; Asistan, kullanıcıyı telefona yönlendirirse devam edin.
Oluşturmaya izin vermemeniz şu durumlarda önerilir:
Google dışı hesapları olan kullanıcıların yeni bir hesap oluşturmasına izin vermek istemiyorsanız ve hesabınızındaki mevcut kullanıcı hesaplarına bağlanmasını istiyorsanız kimlik doğrulama sistemi kullanır. Örneğin, bir bağlılık programı sunuyorsanız kullanıcının puanlarını kaybetmediğinden emin olmak isteyebilirsiniz. mevcut hesabınızda oturum açın.
Hesap oluşturma akışı üzerinde tam kontrole sahip olmanız gerekir. Örneğin herkesin sırasında kullanıcıya hizmet şartlarınızı göstermeniz gerekiyorsa içerik oluşturulmasına izin vermeme hesap oluşturma.
OAuth ve Google ile Oturum Açma hesap bağlamayı uygulama
Hesaplar, endüstri standardı OAuth 2.0 akışlarına bağlıdır. Actions on Google, örtülü ve yetkilendirme kod akışlarını destekler.
In the implicit code flow, Google opens your authorization endpoint in the user's browser. After successful sign in, you return a long-lived access token to Google. This access token is now included in every request sent from the Assistant to your Action.
In the authorization code flow, you need two endpoints:
- The authorization endpoint, which is responsible for presenting the sign-in UI to your users that aren't already signed in and recording consent to the requested access in the form of a short-lived authorization code.
- The token exchange endpoint, which is responsible for two types of exchanges:
- Exchanges an authorization code for a long-lived refresh token and a short-lived access token. This exchange happens when the user goes through the account linking flow.
- Exchanges a long-lived refresh token for a short-lived access token. This exchange happens when Google needs a new access token because the one it had expired.
Although the implicit code flow is simpler to implement, Google recommends that access tokens issued using the implicit flow never expire, because using token expiration with the implicit flow forces the user to link their account again. If you need token expiration for security reasons, you should strongly consider using the auth code flow instead.
Projeyi yapılandırma
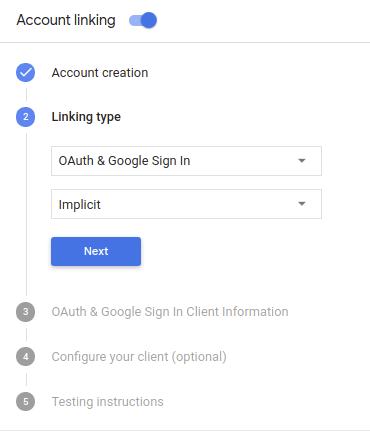
Projenizi OAuth ve Google ile Oturum Açma hesabını kullanacak şekilde yapılandırmak için aşağıdaki adımları uygulayın:
- Actions konsolunu açın ve kullanmak istediğiniz projeyi seçin.
- Geliştir sekmesini tıklayıp Hesap bağlama'yı seçin.
- Hesap bağlama'nın yanındaki anahtarı etkinleştirin.
- Hesap oluşturma bölümünde Evet'i seçin.
Bağlantı türü'nde OAuth ve Google ile Oturum Açma ve Dolaylı.
İstemci Bilgileri bölümünde aşağıdakileri yapın:
- Aşağıdakileri belirlemek için Actions'ınız tarafından Google'a verilen Client-ID'ye Google'dan gelen isteklerle karşılaşıyorum.
- Yetkilendirme ve Token Exchange uç noktalarınızın URL'lerini ekleyin.
Kaydet'i tıklayın.
OAuth sunucunuzu uygulama
To support the OAuth 2.0 implicit flow, your service makes an authorization endpoint available by HTTPS. This endpoint is responsible for authenticating and obtaining consent from users for data access. The authorization endpoint presents a sign-in UI to your users that aren't already signed in and records consent to the requested access.
When your Action needs to call one of your service's authorized APIs, Google uses this endpoint to get permission from your users to call these APIs on their behalf.
A typical OAuth 2.0 implicit flow session initiated by Google has the following flow:
- Google opens your authorization endpoint in the user's browser. The user signs in if not signed in already, and grants Google permission to access their data with your API if they haven't already granted permission.
- Your service creates an access token and returns it to Google by redirecting the user's browser back to Google with the access token attached to the request.
- Google calls your service's APIs, and attaches the access token with each request. Your service verifies that the access token grants Google authorization to access the API and then completes the API call.
Handle authorization requests
When your Action needs to perform account linking via an OAuth2 implicit flow, Google sends the user to your authorization endpoint with a request that includes the following parameters:
| Authorization endpoint parameters | |
|---|---|
client_id |
The client ID you assigned to Google. |
redirect_uri |
The URL to which you send the response to this request. |
state |
A bookkeeping value that is passed back to Google unchanged in the redirect URI. |
response_type |
The type of value to return in the response. For the OAuth 2.0 implicit
flow, the response type is always token. |
For example, if your authorization endpoint is available at https://myservice.example.com/auth,
a request might look like:
GET https://myservice.example.com/auth?client_id=GOOGLE_CLIENT_ID&redirect_uri=REDIRECT_URI&state=STATE_STRING&response_type=token
For your authorization endpoint to handle sign-in requests, do the following steps:
Verify the
client_idandredirect_urivalues to prevent granting access to unintended or misconfigured client apps:- Confirm that the
client_idmatches the client ID you assigned to Google. - Confirm that the URL specified by the
redirect_uriparameter has the following form:https://oauth-redirect.googleusercontent.com/r/YOUR_PROJECT_ID
- Confirm that the
Check if the user is signed in to your service. If the user isn't signed in, complete your service's sign-in or sign-up flow.
Generate an access token that Google will use to access your API. The access token can be any string value, but it must uniquely represent the user and the client the token is for and must not be guessable.
Send an HTTP response that redirects the user's browser to the URL specified by the
redirect_uriparameter. Include all of the following parameters in the URL fragment:access_token: the access token you just generatedtoken_type: the stringbearerstate: the unmodified state value from the original request The following is an example of the resulting URL:https://oauth-redirect.googleusercontent.com/r/YOUR_PROJECT_ID#access_token=ACCESS_TOKEN&token_type=bearer&state=STATE_STRING
Google's OAuth 2.0 redirect handler will receive the access token and confirm
that the state value hasn't changed. After Google has obtained an
access token for your service, Google will attach the token to subsequent calls
to your Action as part of the AppRequest.
Handle automatic linking
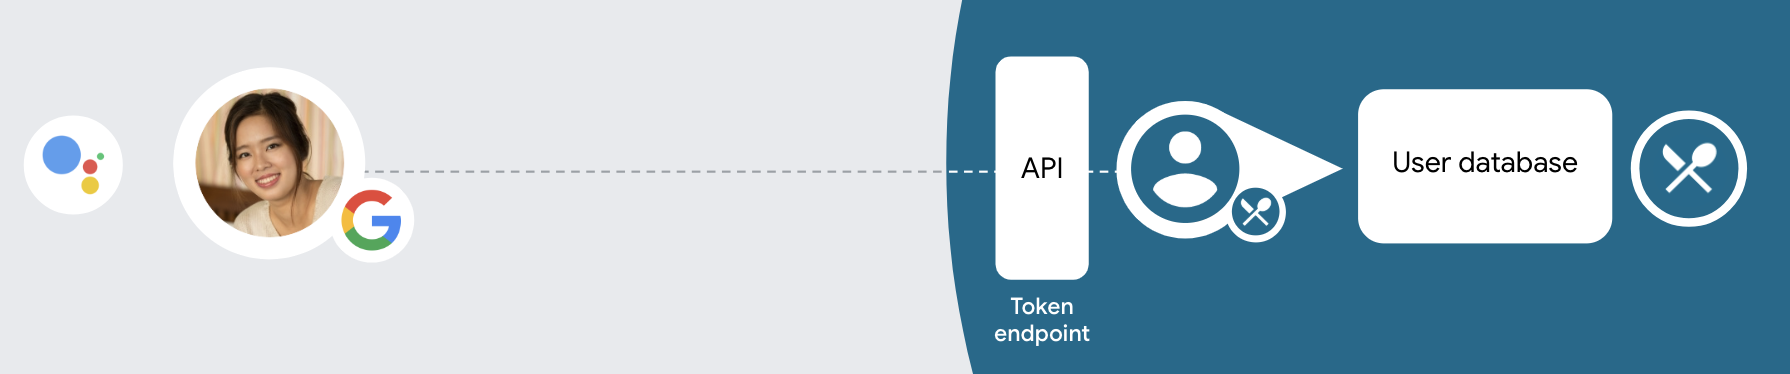
After the user gives your Action consent to access their Google profile, Google sends a request that contains a signed assertion of the Google user's identity. The assertion contains information that includes the user's Google Account ID, name, and email address. The token exchange endpoint configured for your project handles that request.
If the corresponding Google account is already present in your authentication system,
your token exchange endpoint returns a token for the user. If the Google account doesn't
match an existing user, your token exchange endpoint returns a user_not_found error.
The request has the following form:
POST /token HTTP/1.1
Host: oauth2.example.com
Content-Type: application/x-www-form-urlencoded

grant_type=urn:ietf:params:oauth:grant-type:jwt-bearer&intent=get&assertion=JWT&consent_code=CONSENT_CODE&scope=SCOPES
Your token exchange endpoint must be able to handle the following parameters:
| Token endpoint parameters | |
|---|---|
grant_type |
The type of token being exchanged. For these requests, this
parameter has the value urn:ietf:params:oauth:grant-type:jwt-bearer. |
intent |
For these requests, the value of this parameter is `get`. |
assertion |
A JSON Web Token (JWT) that provides a signed assertion of the Google user's identity. The JWT contains information that includes the user's Google Account ID, name, and email address. |
consent_code |
Optional: When present, a one-time code that indicates that the user has granted consent for your Action to access the specified scopes. |
scope |
Optional: Any scopes you configured Google to request from users. |
When your token exchange endpoint receives the linking request, it should do the following:
Validate and decode the JWT assertion
You can validate and decode the JWT assertion by using a JWT-decoding library for your language. Use Google's public keys (available in JWK or PEM format) to verify the token's signature.
When decoded, the JWT assertion looks like the following example:
{
  "sub": 1234567890,        // The unique ID of the user's Google Account
  "iss": "https://accounts.google.com",        // The assertion's issuer
  "aud": "123-abc.apps.googleusercontent.com", // Your server's client ID
  "iat": 233366400,         // Unix timestamp of the assertion's creation time
  "exp": 233370000,         // Unix timestamp of the assertion's expiration time
  "name": "Jan Jansen",
  "given_name": "Jan",
  "family_name": "Jansen",
  "email": "jan@gmail.com", // If present, the user's email address
  "locale": "en_US"
}
In addition to verifying the token's signature, verify that the assertion's issuer
(iss field) is https://accounts.google.com and that the audience (aud field)
is the client ID assigned to your Action.
Check if the Google account is already present in your authentication system
Check whether either of the following conditions are true:
- The Google Account ID, found in the assertion's
subfield, is in your user database. - The email address in the assertion matches a user in your user database.
If either condition is true, the user has already signed up and you can issue an access token.
If neither the Google Account ID nor the email address specified in the assertion
matches a user in your database, the user hasn't signed up yet. In this case, your
token exchange endpoint should reply with a HTTP 401 error, that specifies error=user_not_found,
as in the following example:
HTTP/1.1 401 Unauthorized
Content-Type: application/json;charset=UTF-8

{
  "error":"user_not_found",
}
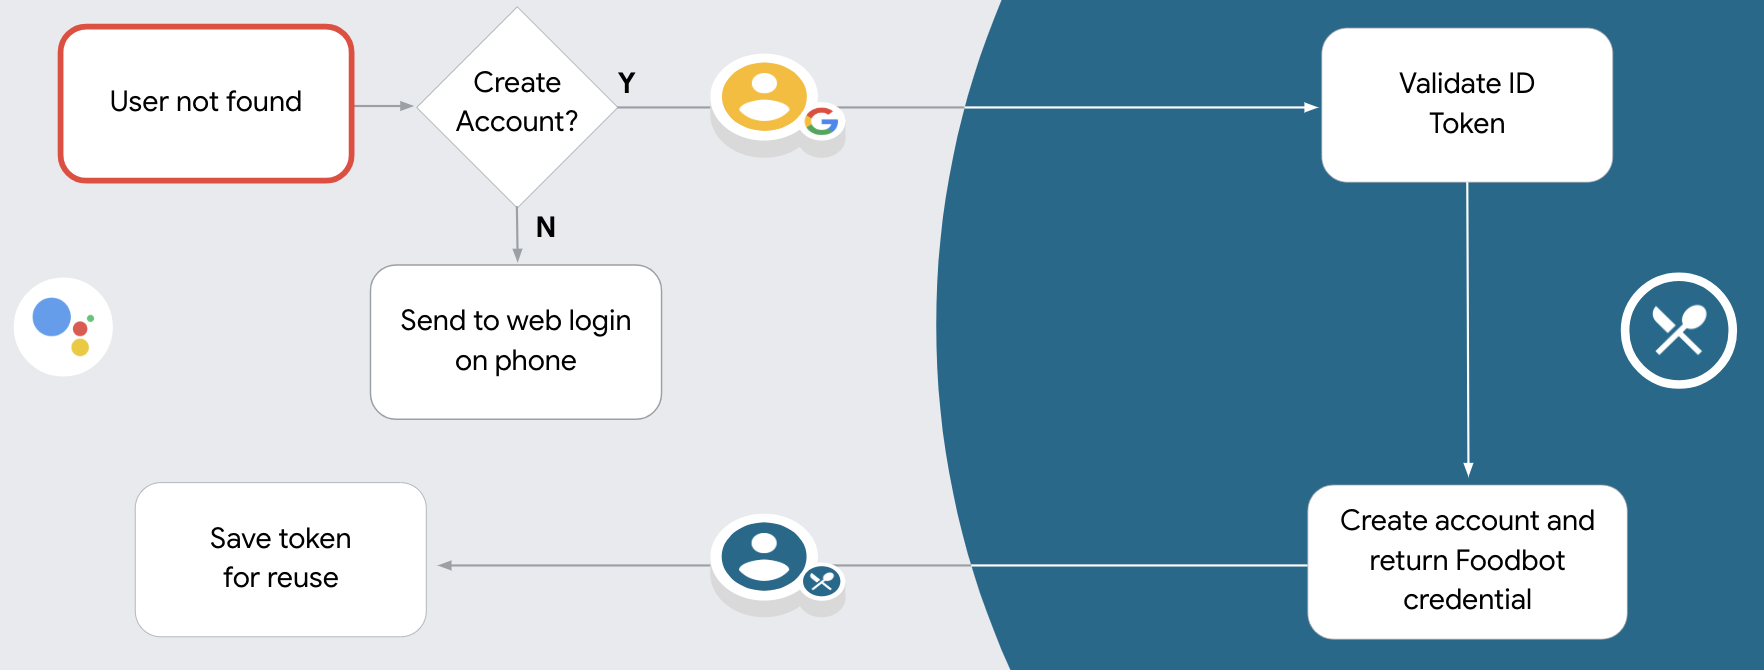
user_not_found error, Google
calls your token exchange endpoint with the value of the intent parameter
set to create and sending an ID token that contains the user's profile information
with the request.
Google ile Oturum Açma aracılığıyla hesap oluşturma
Bir kullanıcının hizmetinizde hesap oluşturması gerektiğinde Google,
intent=create, aşağıdaki örnekte gösterildiği gibi:
POST /token HTTP/1.1
Host: oauth2.example.com
Content-Type: application/x-www-form-urlencoded

response_type=token&grant_type=urn:ietf:params:oauth:grant-type:jwt-bearer&scope=SCOPES&intent=create&consent_code=CONSENT_CODE&assertion=JWT[&NEW_ACCOUNT_INFO]
assertion parametresi, şunları sağlayan bir JSON Web Token (JWT) içerir:
Google kullanıcısının kimliğinin imzalı onayı. JWT, alan adında
Kullanıcının Google Hesap kimliğini, adını ve e-posta adresini içeren
hizmetinizde yeni bir hesap oluşturun.
Hesap oluşturma isteklerine yanıt vermek için jeton değişimi uç noktanızın şunu yapması gerekir: şu:
Validate and decode the JWT assertion
You can validate and decode the JWT assertion by using a JWT-decoding library for your language. Use Google's public keys (available in JWK or PEM format) to verify the token's signature.
When decoded, the JWT assertion looks like the following example:
{
  "sub": 1234567890,        // The unique ID of the user's Google Account
  "iss": "https://accounts.google.com",        // The assertion's issuer
  "aud": "123-abc.apps.googleusercontent.com", // Your server's client ID
  "iat": 233366400,         // Unix timestamp of the assertion's creation time
  "exp": 233370000,         // Unix timestamp of the assertion's expiration time
  "name": "Jan Jansen",
  "given_name": "Jan",
  "family_name": "Jansen",
  "email": "jan@gmail.com", // If present, the user's email address
  "locale": "en_US"
}
In addition to verifying the token's signature, verify that the assertion's issuer
(iss field) is https://accounts.google.com and that the audience (aud field)
is the client ID assigned to your Action.
Kullanıcı bilgilerini doğrulayın ve yeni hesap oluşturun
Aşağıdaki koşullardan herhangi birinin doğru olup olmadığını kontrol edin:
- Onaylamanın
subalanında bulunan Google Hesabı kimliği, kullanıcı veritabanınızda yer alır. - Onaylamadaki e-posta adresi, kullanıcı veritabanınızdaki bir kullanıcıyla eşleşiyor.
İki koşul da doğruysa kullanıcıdan mevcut hesabını
isteğe bir HTTP 401 hatasıyla yanıt vererek ve
error=linking_error ve kullanıcının e-posta adresi login_hint olarak (örneğin,)
şu örneği inceleyin:
HTTP/1.1 401 Unauthorized
Content-Type: application/json;charset=UTF-8

{
  "error":"linking_error",
  "login_hint":"foo@bar.com"
}
İki koşul da doğru değilse bilgileri kullanarak yeni bir kullanıcı hesabı oluşturun bu formu doldurmanızı öneririm. Yeni hesaplarda genellikle belirlenmiş bir şifre bulunmaz. Evet kullanıcıların giriş yapmasına olanak tanımak için Google ile Oturum Açma'yı diğer platformlara eklemenizi önerdi bir ürün gösterebilirsiniz. Alternatif olarak şifre kurtarma akışınızı başlatan bir bağlantı içeren bir e-posta gönderin. diğer platformlarda oturum açmak için kullanabileceğiniz bir şifre oluşturun.
Oluşturma işlemi tamamlandığında bir erişim jetonu düzenleyin ve değerleri şurada bir JSON nesnesinin içinde döndürür: aşağıdaki örnekte olduğu gibi HTTPS yanıtınızın gövdesini yazın:
{
  "token_type": "Bearer",
  "access_token": "ACCESS_TOKEN",

  "expires_in": SECONDS_TO_EXPIRATION
}
Kimlik doğrulama akışını başlat
Hesapta Oturum Açma yardımcı amacını kullanma kimlik doğrulama akışını başlatın.
const app = dialogflow({
  // REPLACE THE PLACEHOLDER WITH THE CLIENT_ID OF YOUR ACTIONS PROJECT
  clientId: CLIENT_ID,
})

// Intent that starts the account linking flow.
app.intent('Start Signin', conv => {
  conv.ask(new SignIn('To get your account details'))
})
private String clientId = "<your_client_id>";

@ForIntent("Start Signin")
public ActionResponse text(ActionRequest request) {
  ResponseBuilder rb = getResponseBuilder(request);
  return rb.add(new SignIn().setContext("To get your account details")).build();
}
const app = actionssdk({
  clientId: CLIENT_ID,
})

app.intent('Start Signin', conv => {
  conv.ask(new SignIn('To get your account details'))
})
private String clientId = "<your_client_id>";

@ForIntent("actions.intent.TEXT")
public ActionResponse text(ActionRequest request) {
  ResponseBuilder rb = getResponseBuilder(request);
  return rb.add(new SignIn().setContext("To get your account details")).build();
}
Veri erişimi isteklerini işleme
Asistan isteği bir erişim jetonu içeriyorsa: önce erişim jetonunun geçerli olduğundan ve süresinin dolmadığından emin olun, ardından kullanıcı hesabı veritabanı, jetonla ilişkilendirilen kullanıcı hesabı.