This guide shows you how to use GMA Next-Gen SDK to load and display ads from maio using mediation, covering waterfall integrations. It covers how to add maio to an ad unit's mediation configuration, and how to integrate the maio SDK and adapter into an Android app.
The dashboard interface for maio uses Japanese text for its labels, buttons, and descriptions, and the screenshots in this guide have not been translated. In this guide's descriptions and instructions however, labels and buttons are referenced with their English language equivalents. "URL スキーム," for example, is "URL Scheme".
Supported integrations and ad formats
The mediation adapter for maio has the following capabilities:
| Integration | |
|---|---|
| Bidding | |
| Waterfall | |
| Formats | |
| Banner | |
| Interstitial | |
| Rewarded | |
| Native | |
Requirements
- Android API level 24 or higher
- maio SDK 1.0.7 or higher
Latest GMA Next-Gen SDK.
Complete the mediation Get started guide.
Step 1: Set up configurations in maio UI
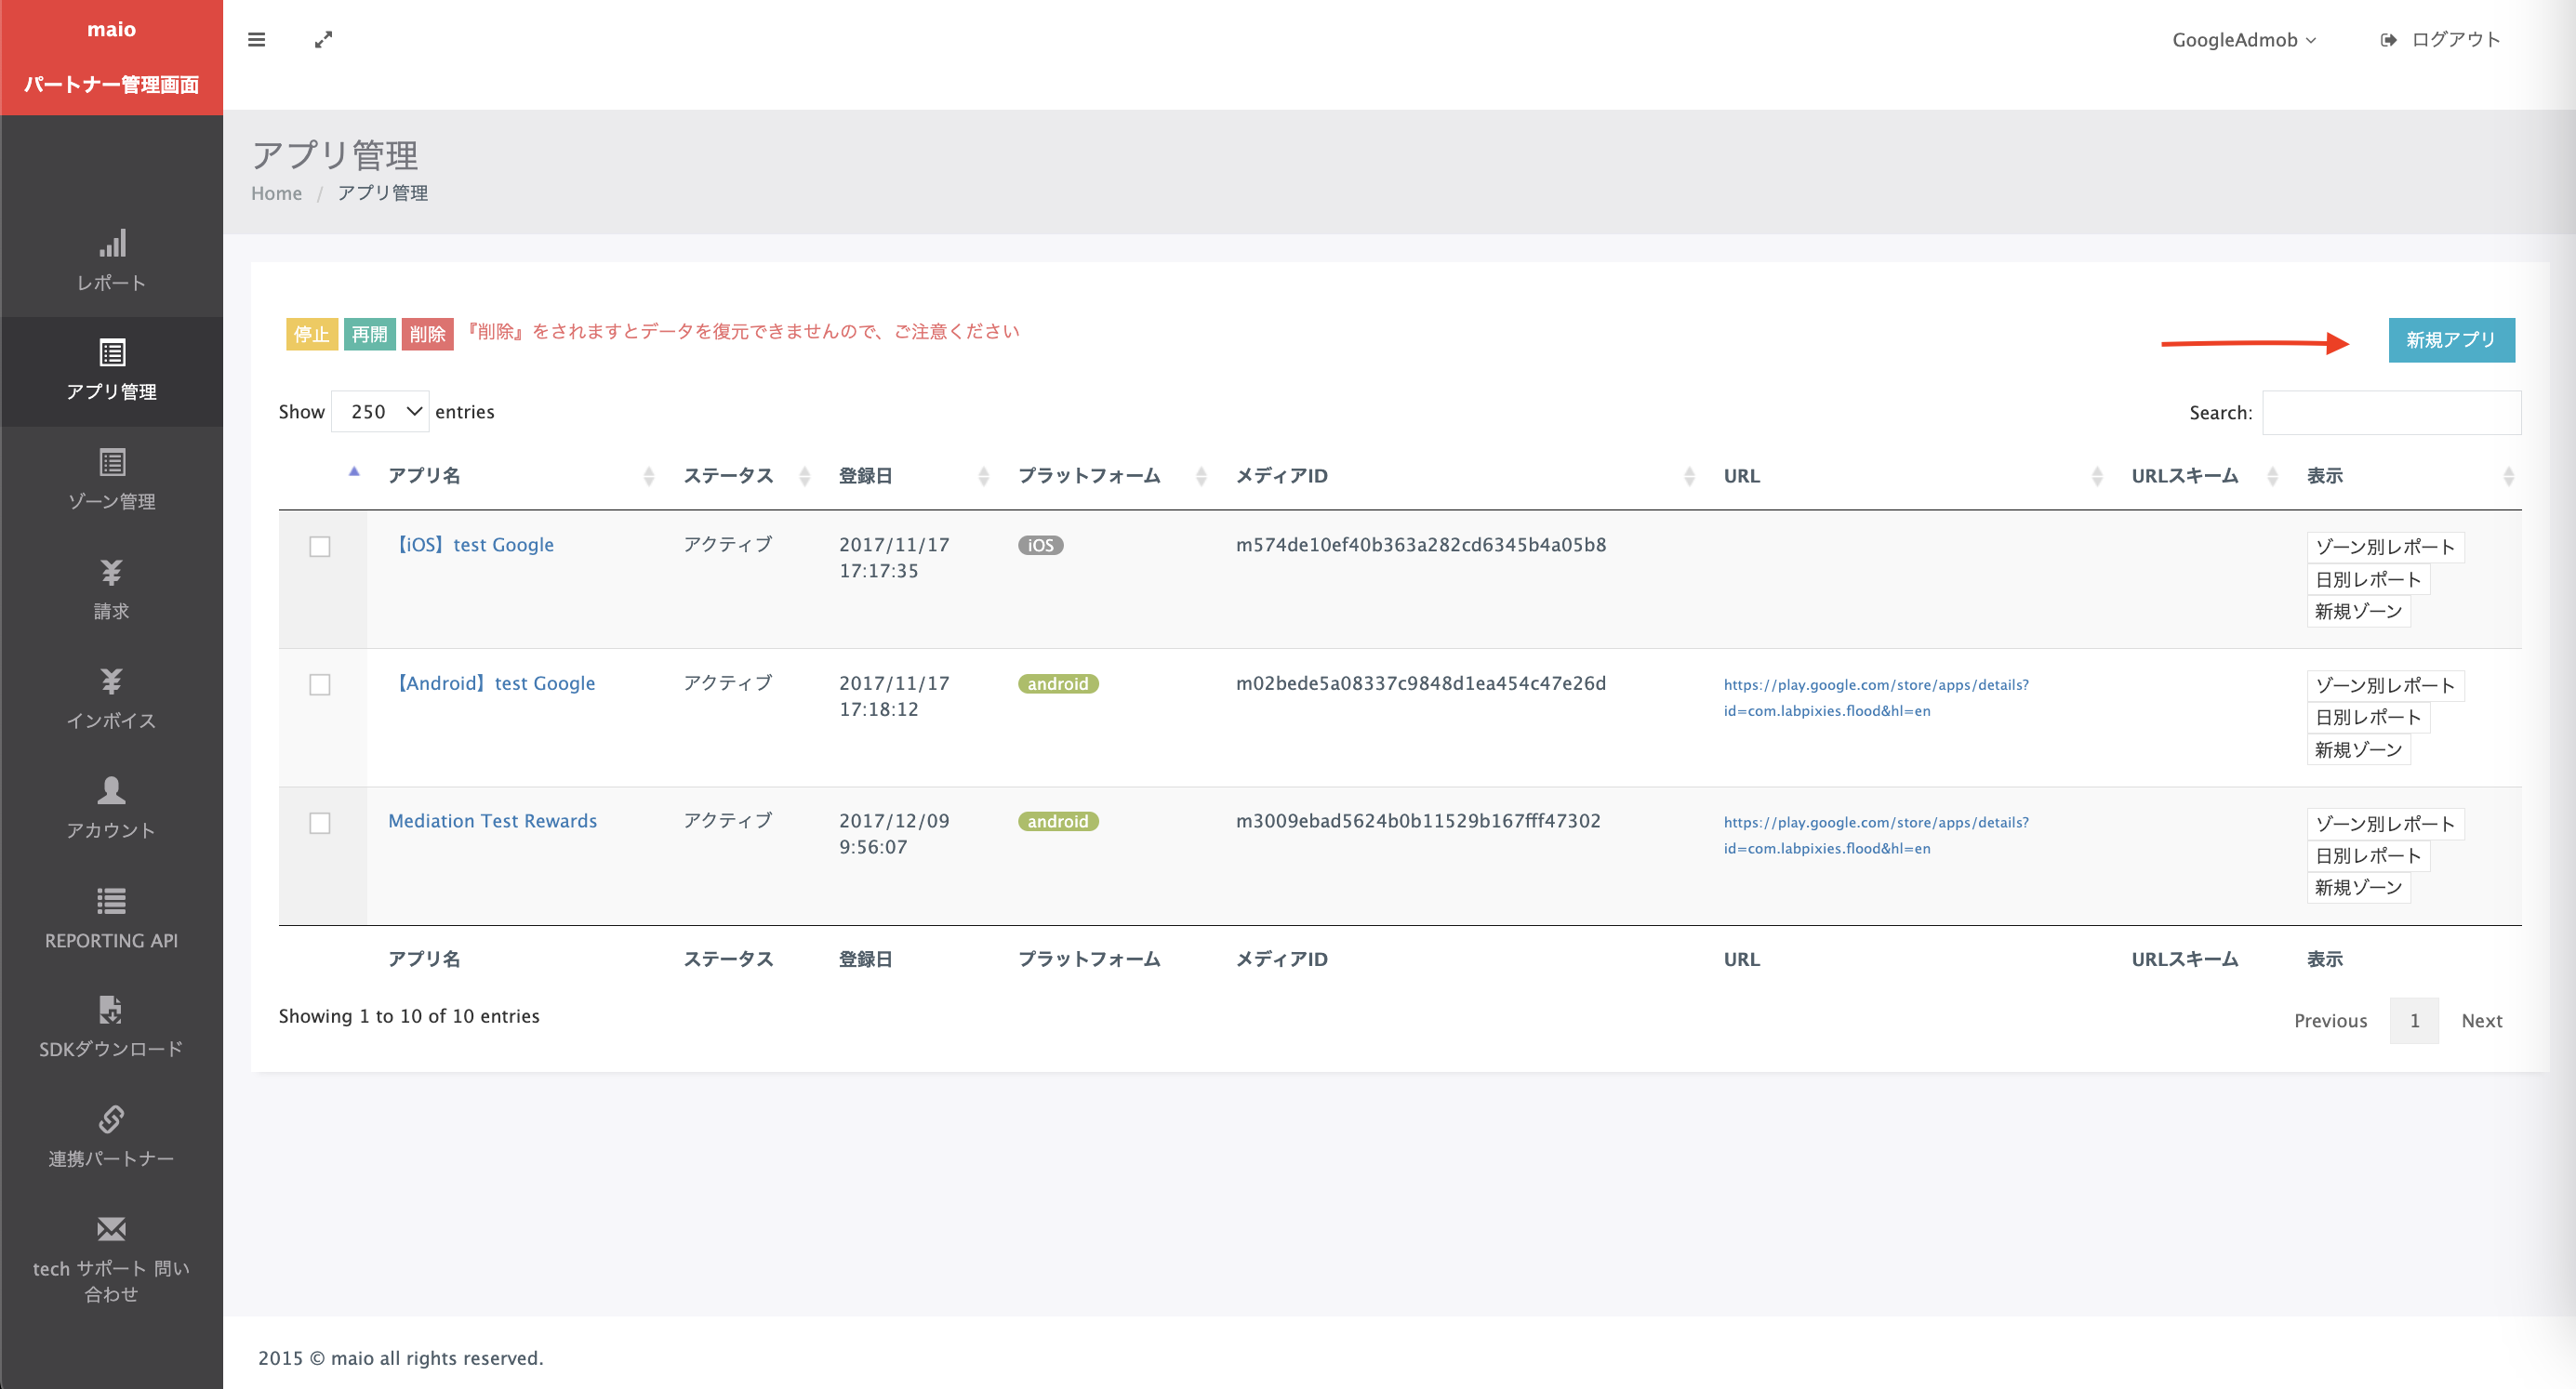
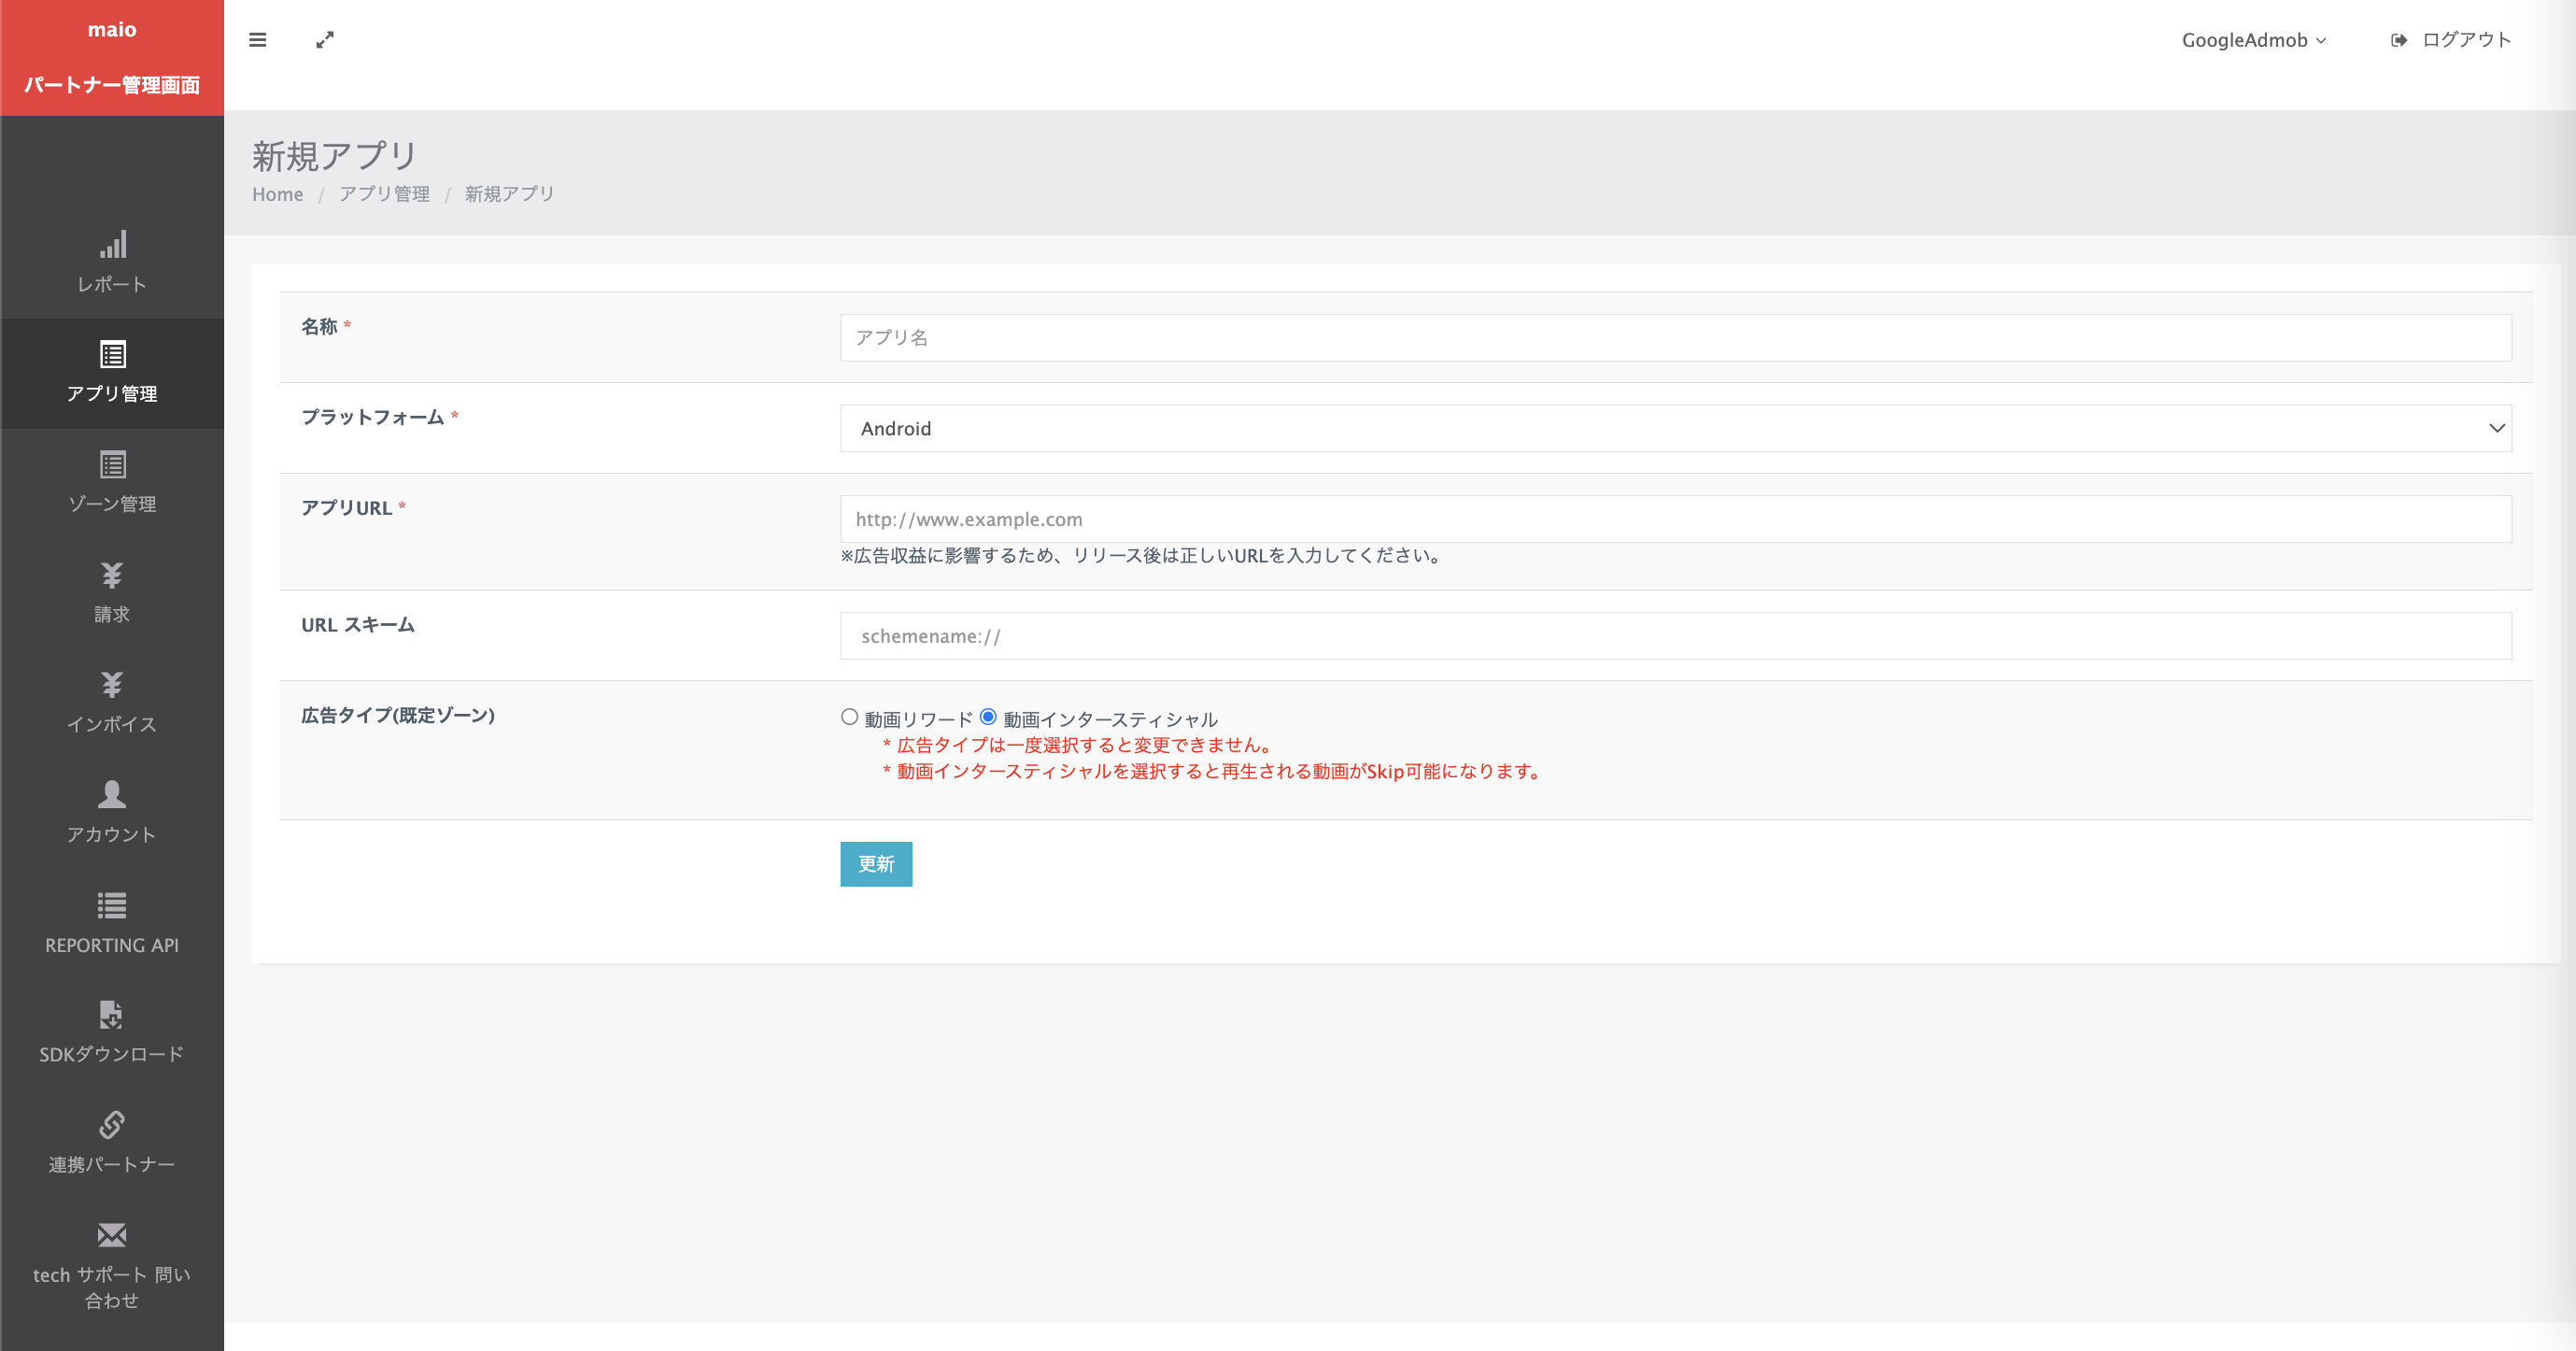
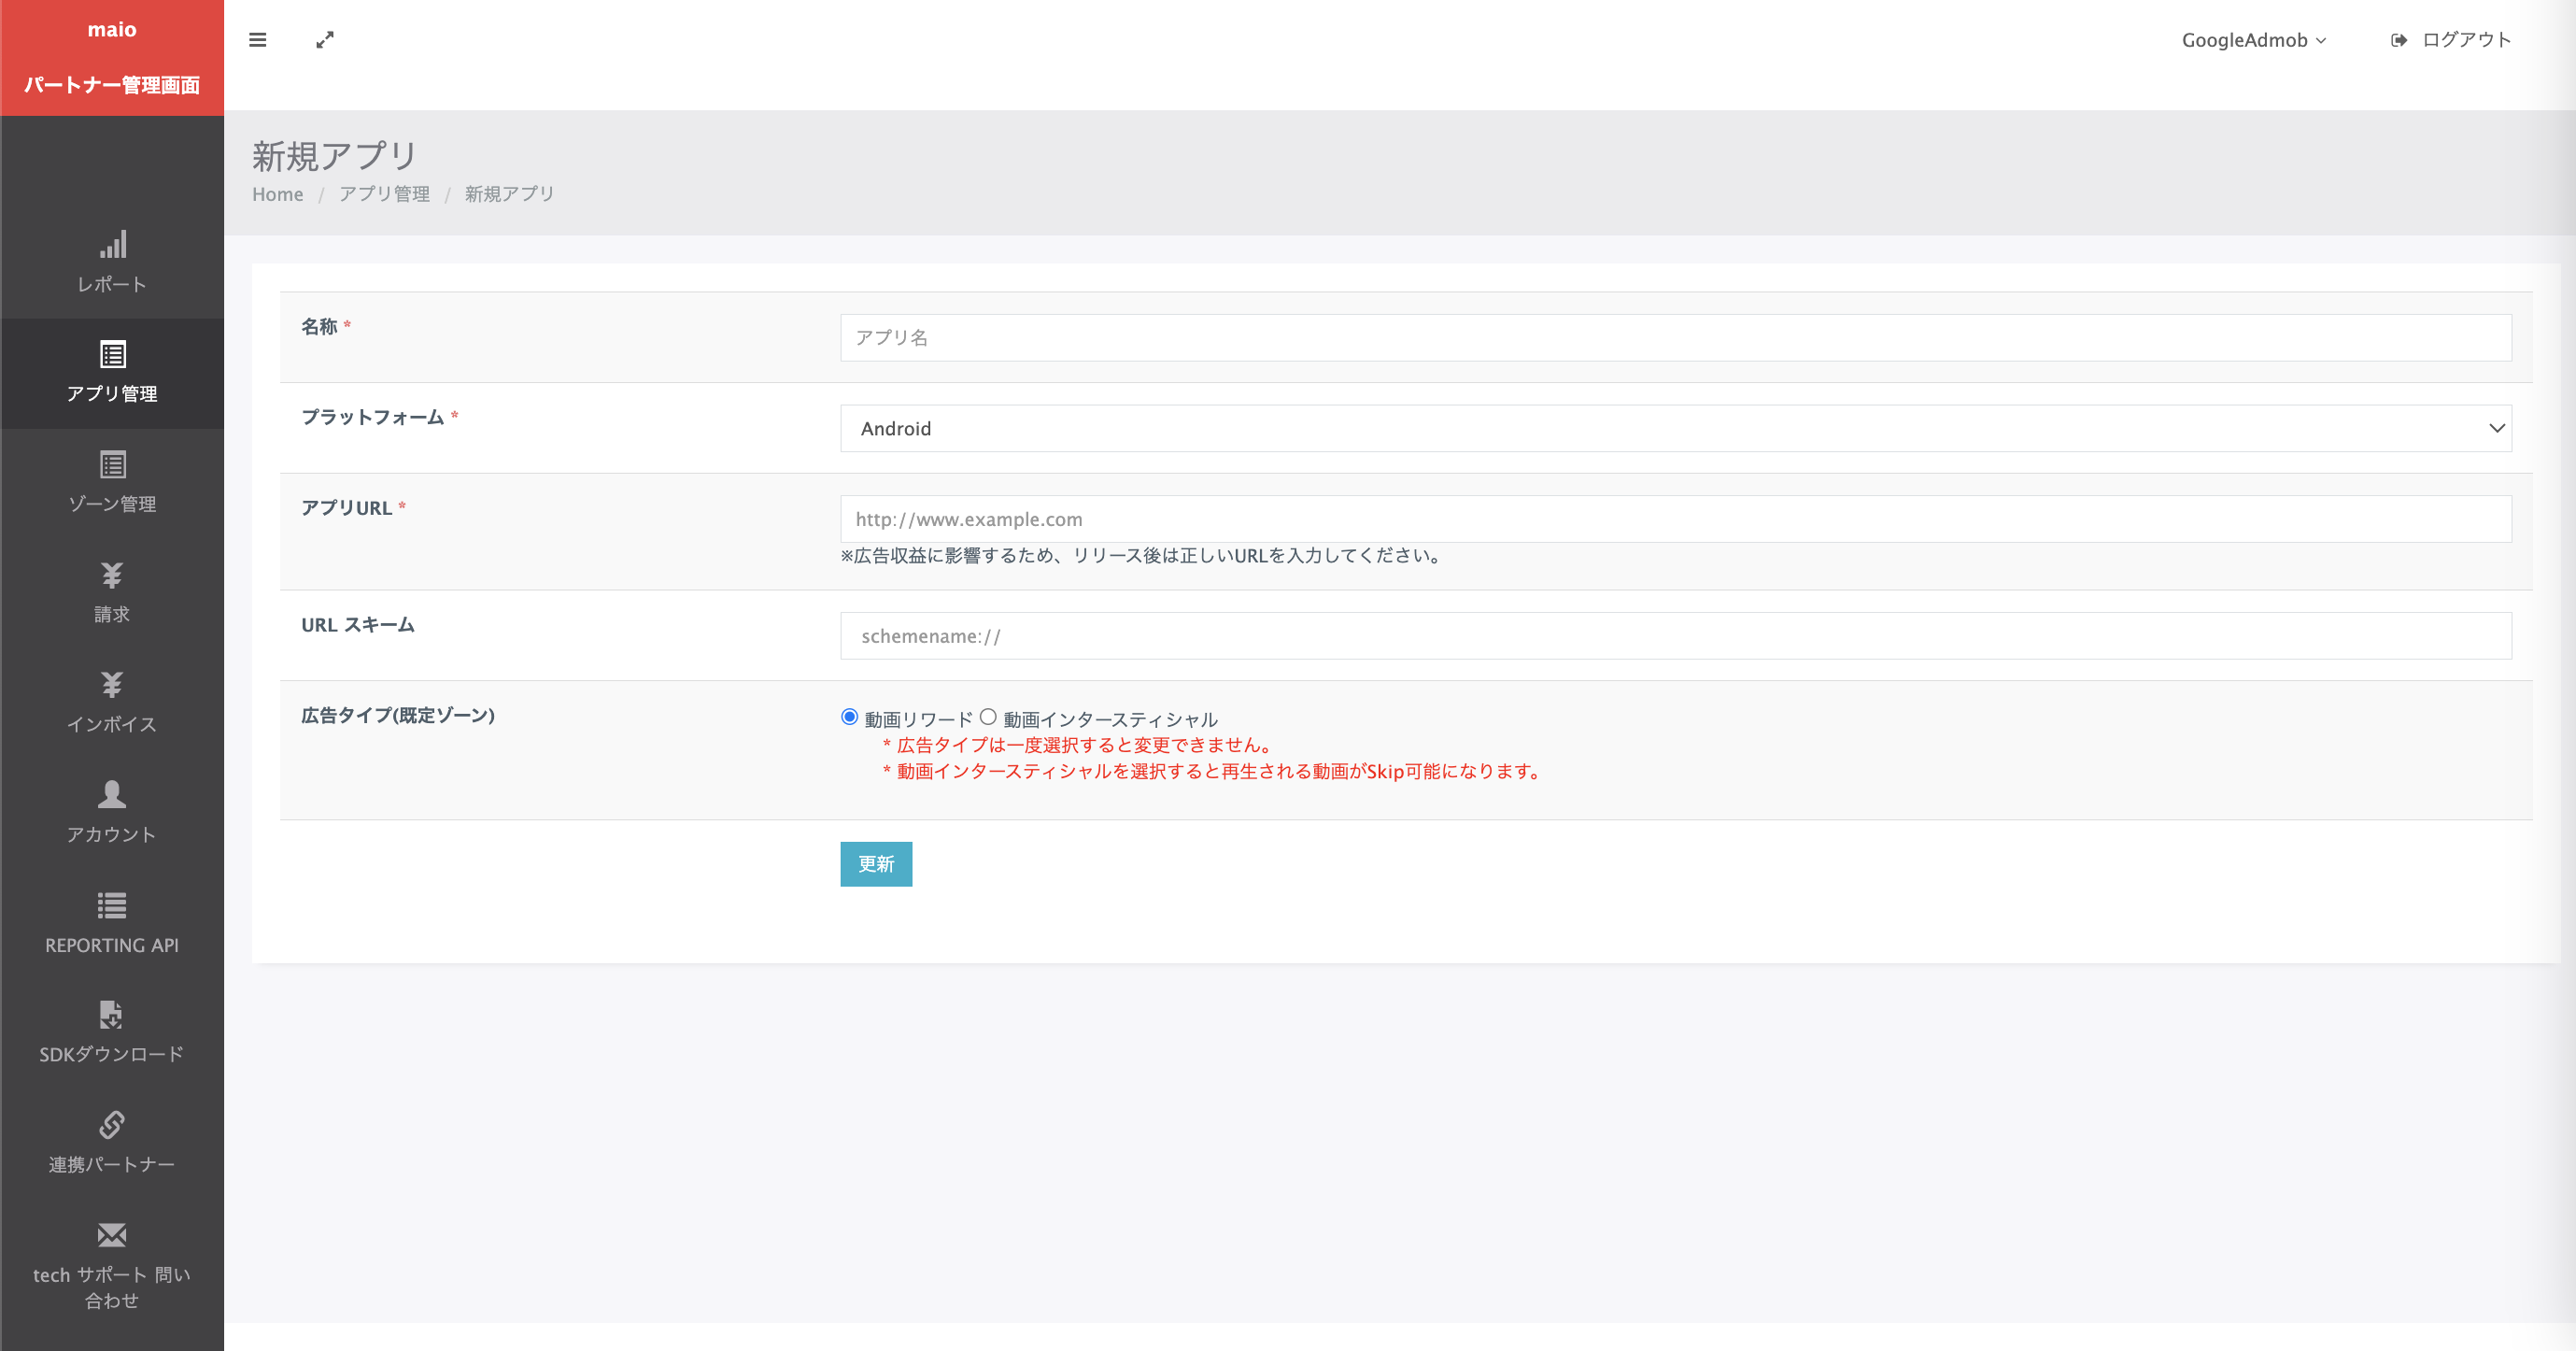
First, sign up or log in to your maio account. Click the Application management button on the left sidebar and click on New app.
Select the tab corresponding to your preferred Ad Type.
Interstitial
Enter the Name of your app, select the platform and provide your App URL. Select Video interstitial as the Ad Type, and then click Update.
Rewarded
Enter the Name of your app, select the platform and provide your App URL. Select Video Rewards as the Ad Type, and then click Update.
In the Application Management page, make a note of the Media ID. It's needed to set up your Ad Manager ad unit in the next section.
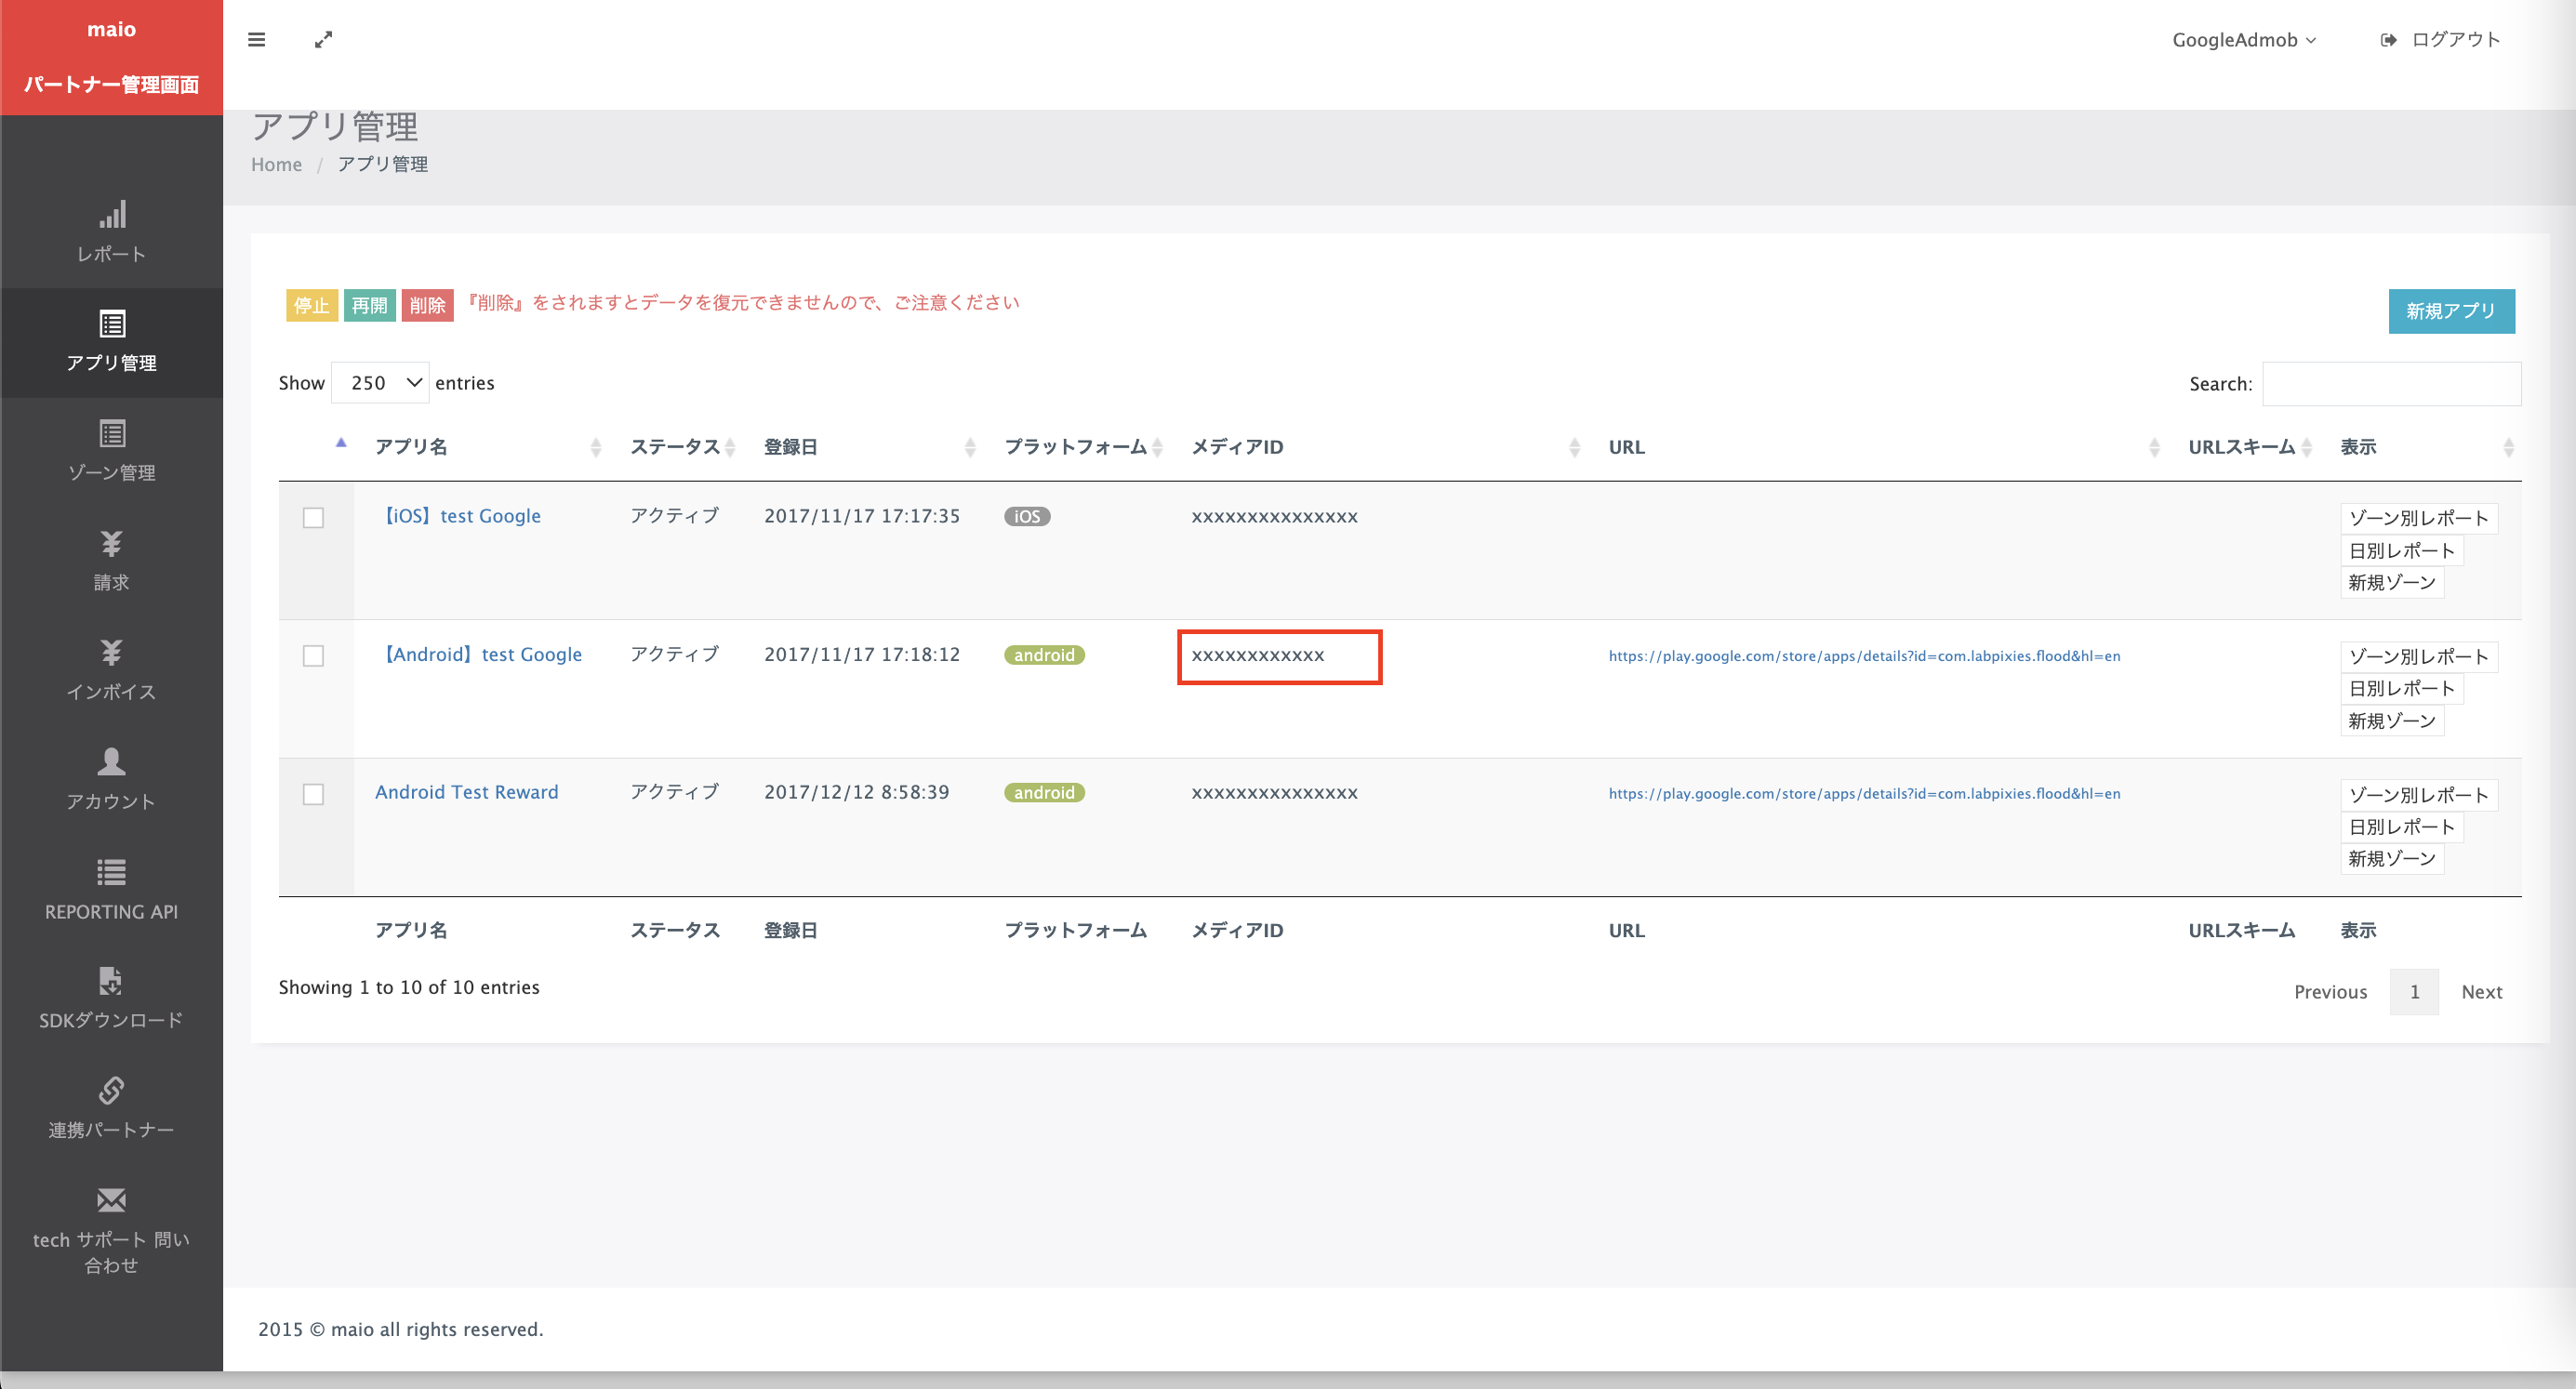
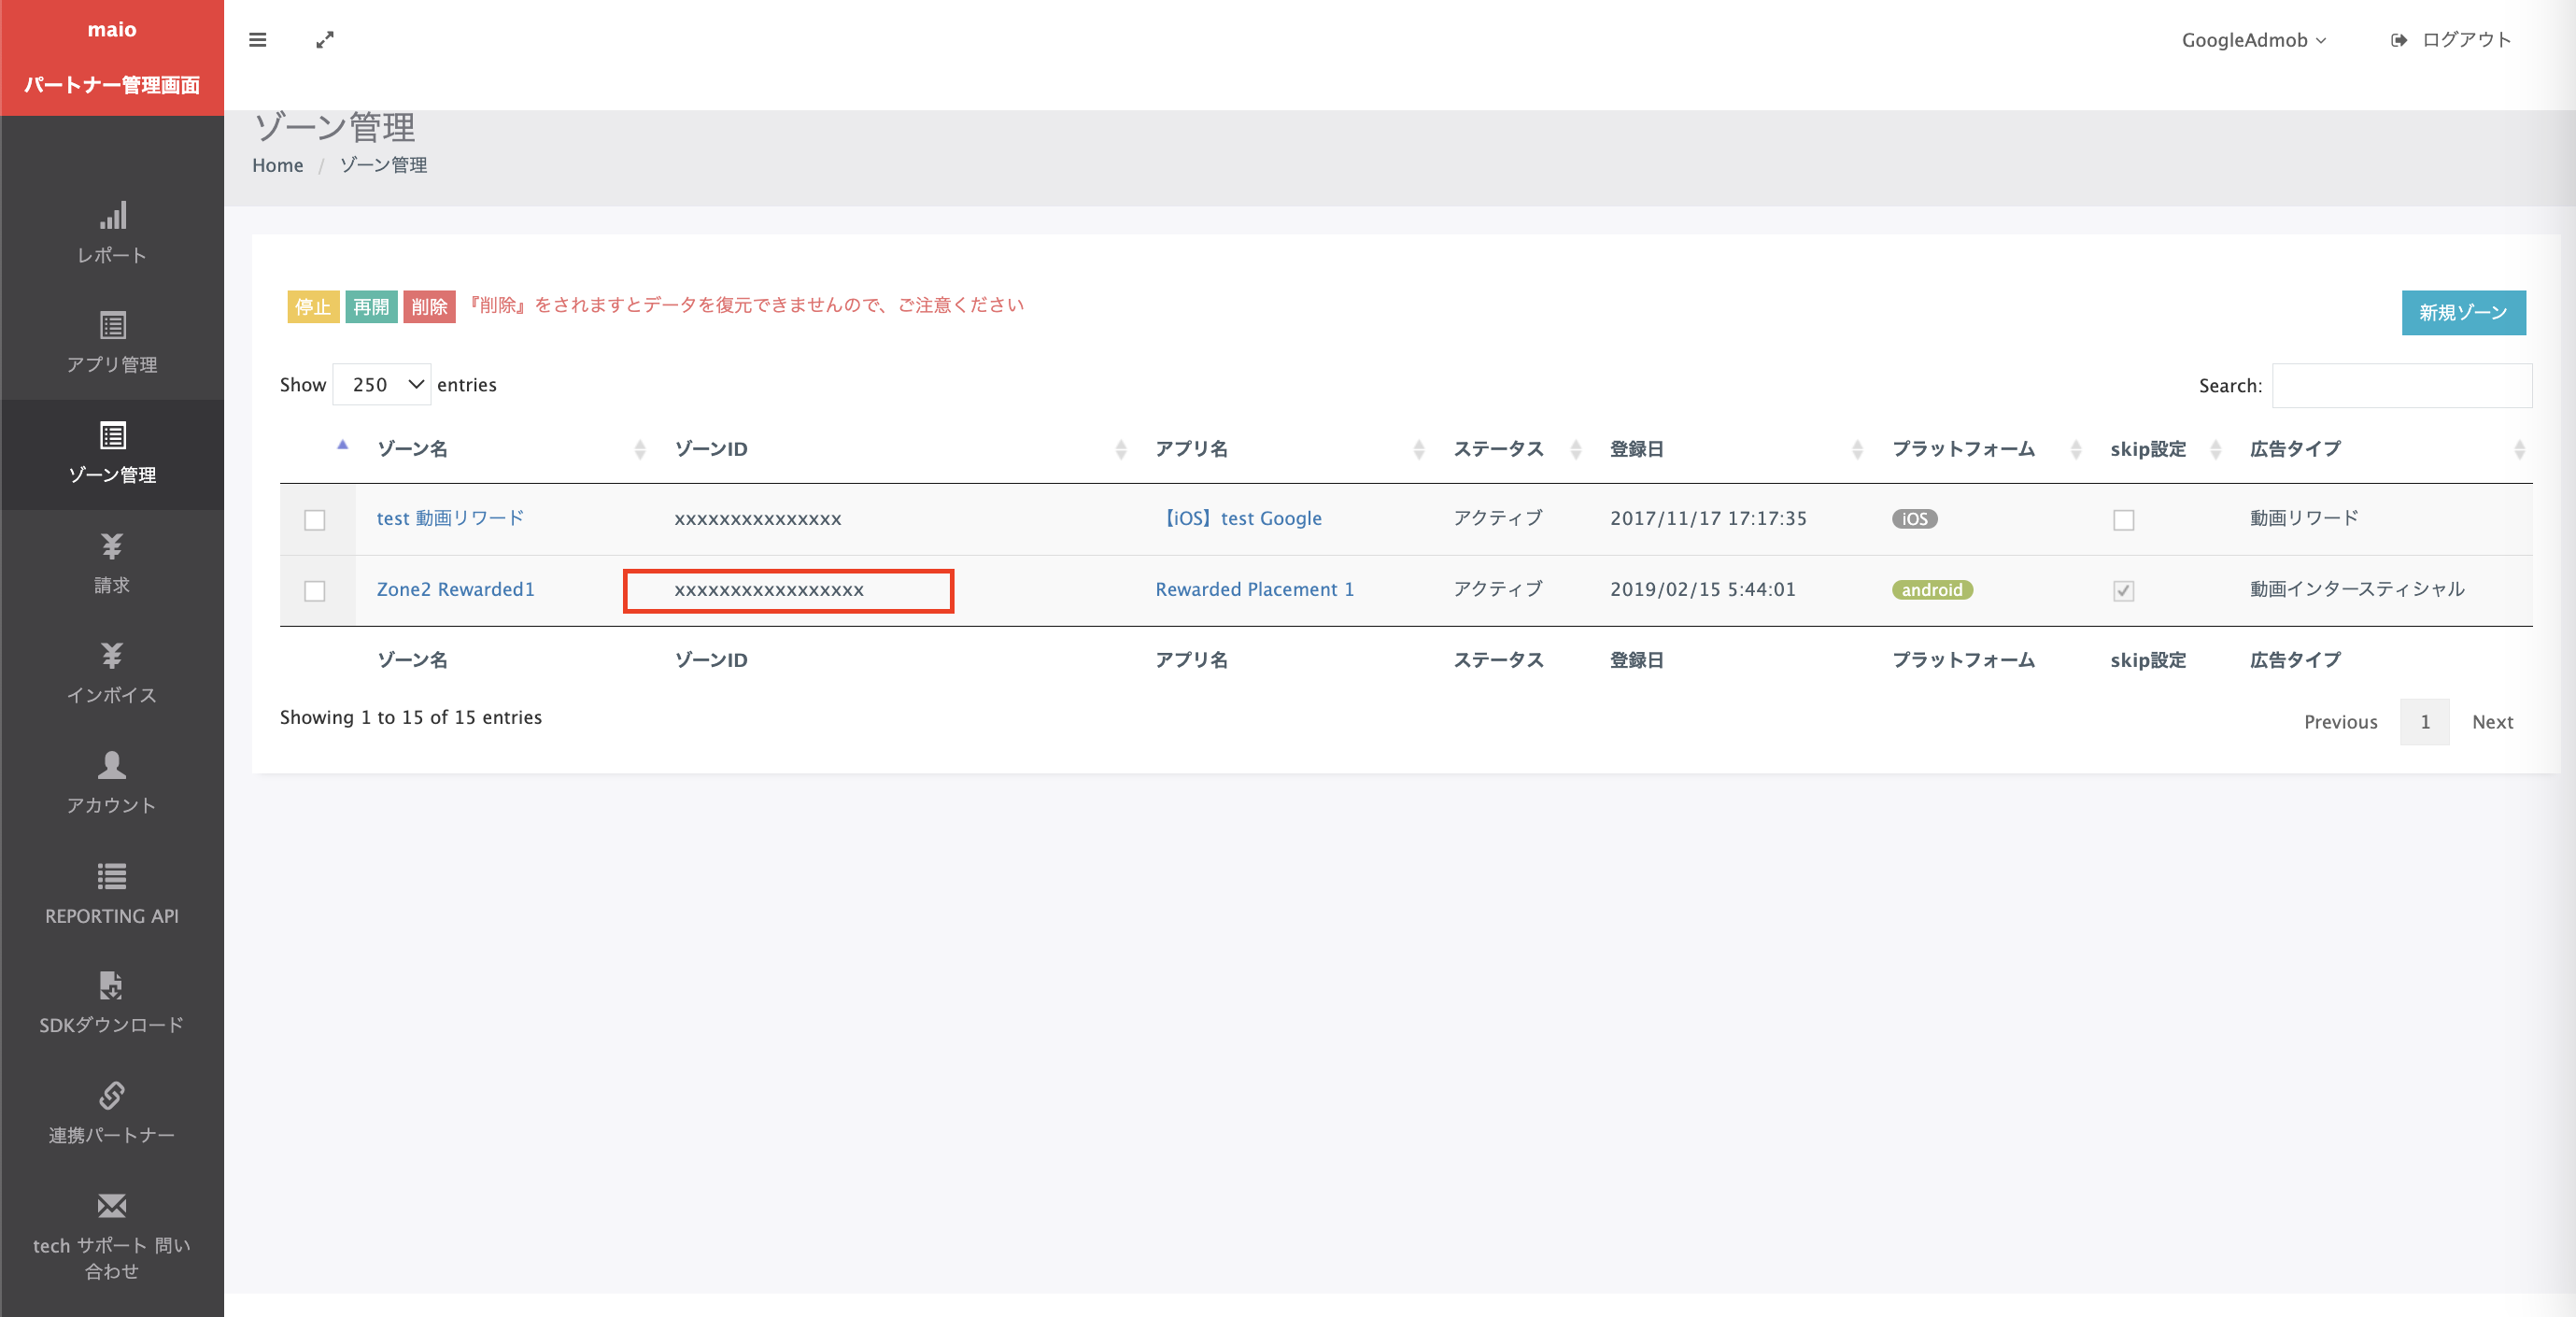
In the Zone Management page, make a note of the Zone ID. It will also be needed to set up your Ad Manager ad unit in the next section.
Step 2: Set up maio demand in Ad Manager UI
Configure mediation settings for your ad unit
Sign in to your Ad Manager account.
Navigate to Delivery > Yield groups and click the New yield group button.

Enter a unique Name for your yield group, set the Status to Active, select your Ad Format, and set the Inventory type to Mobile App. Under the Targeting > Inventory section, select the ad unit under Inventory and Mobile application to which you want to add mediation.
Next, click the Add yield partner button.
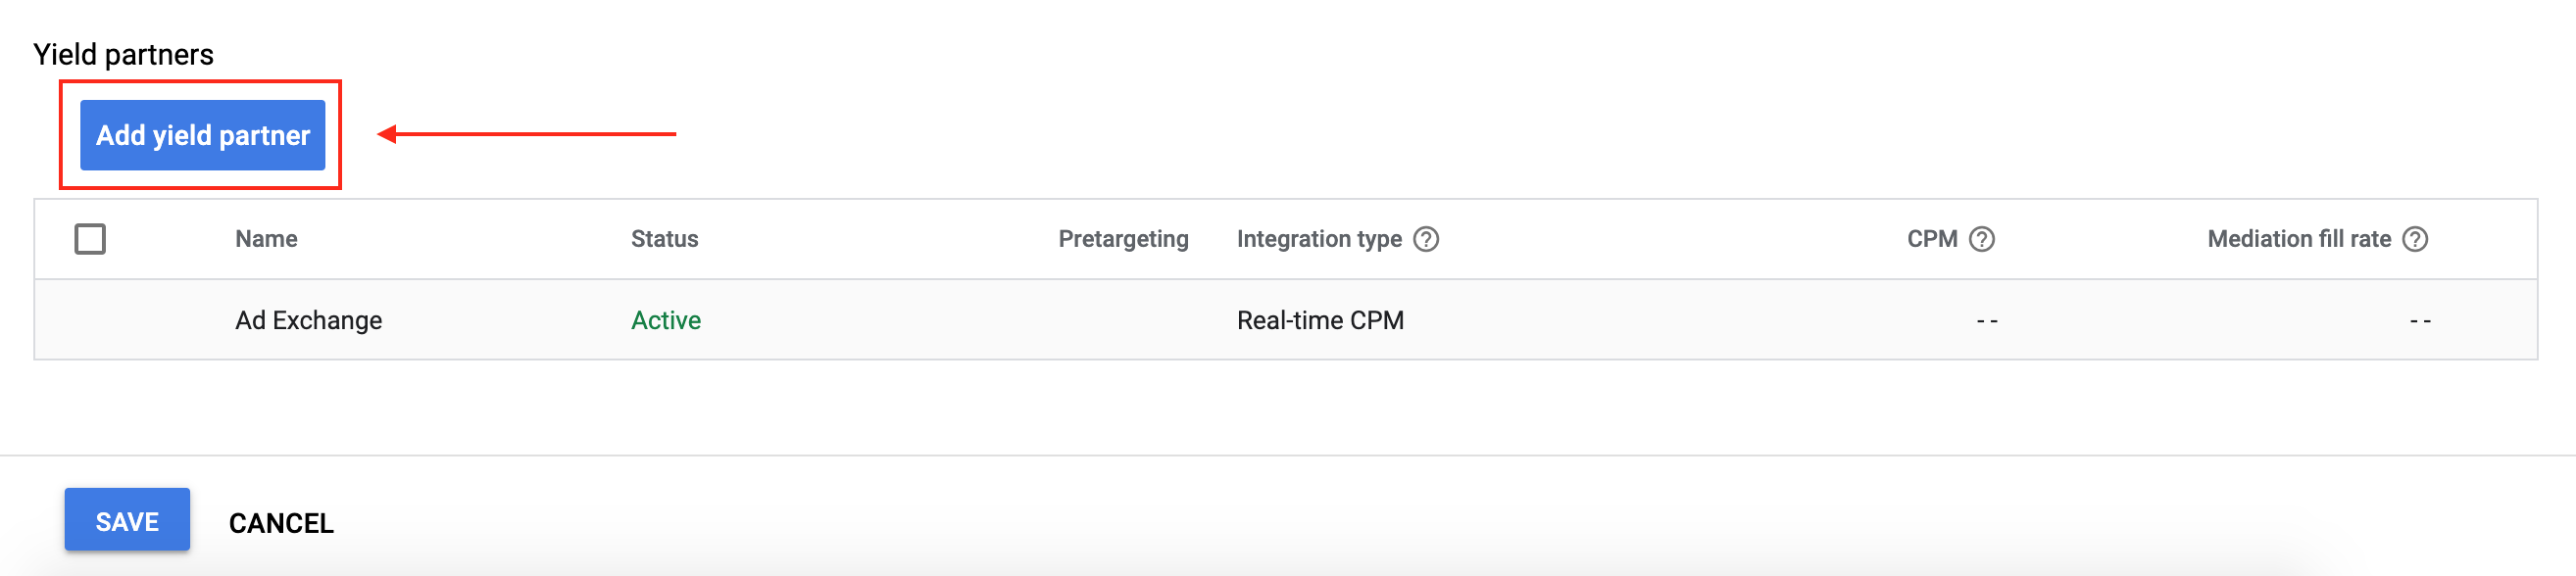
If you already have a Yield partner for maio, you can select it. Otherwise, select Create a new yield partner.
Select maio as the Ad network, enter a unique Name and enable Mediation.
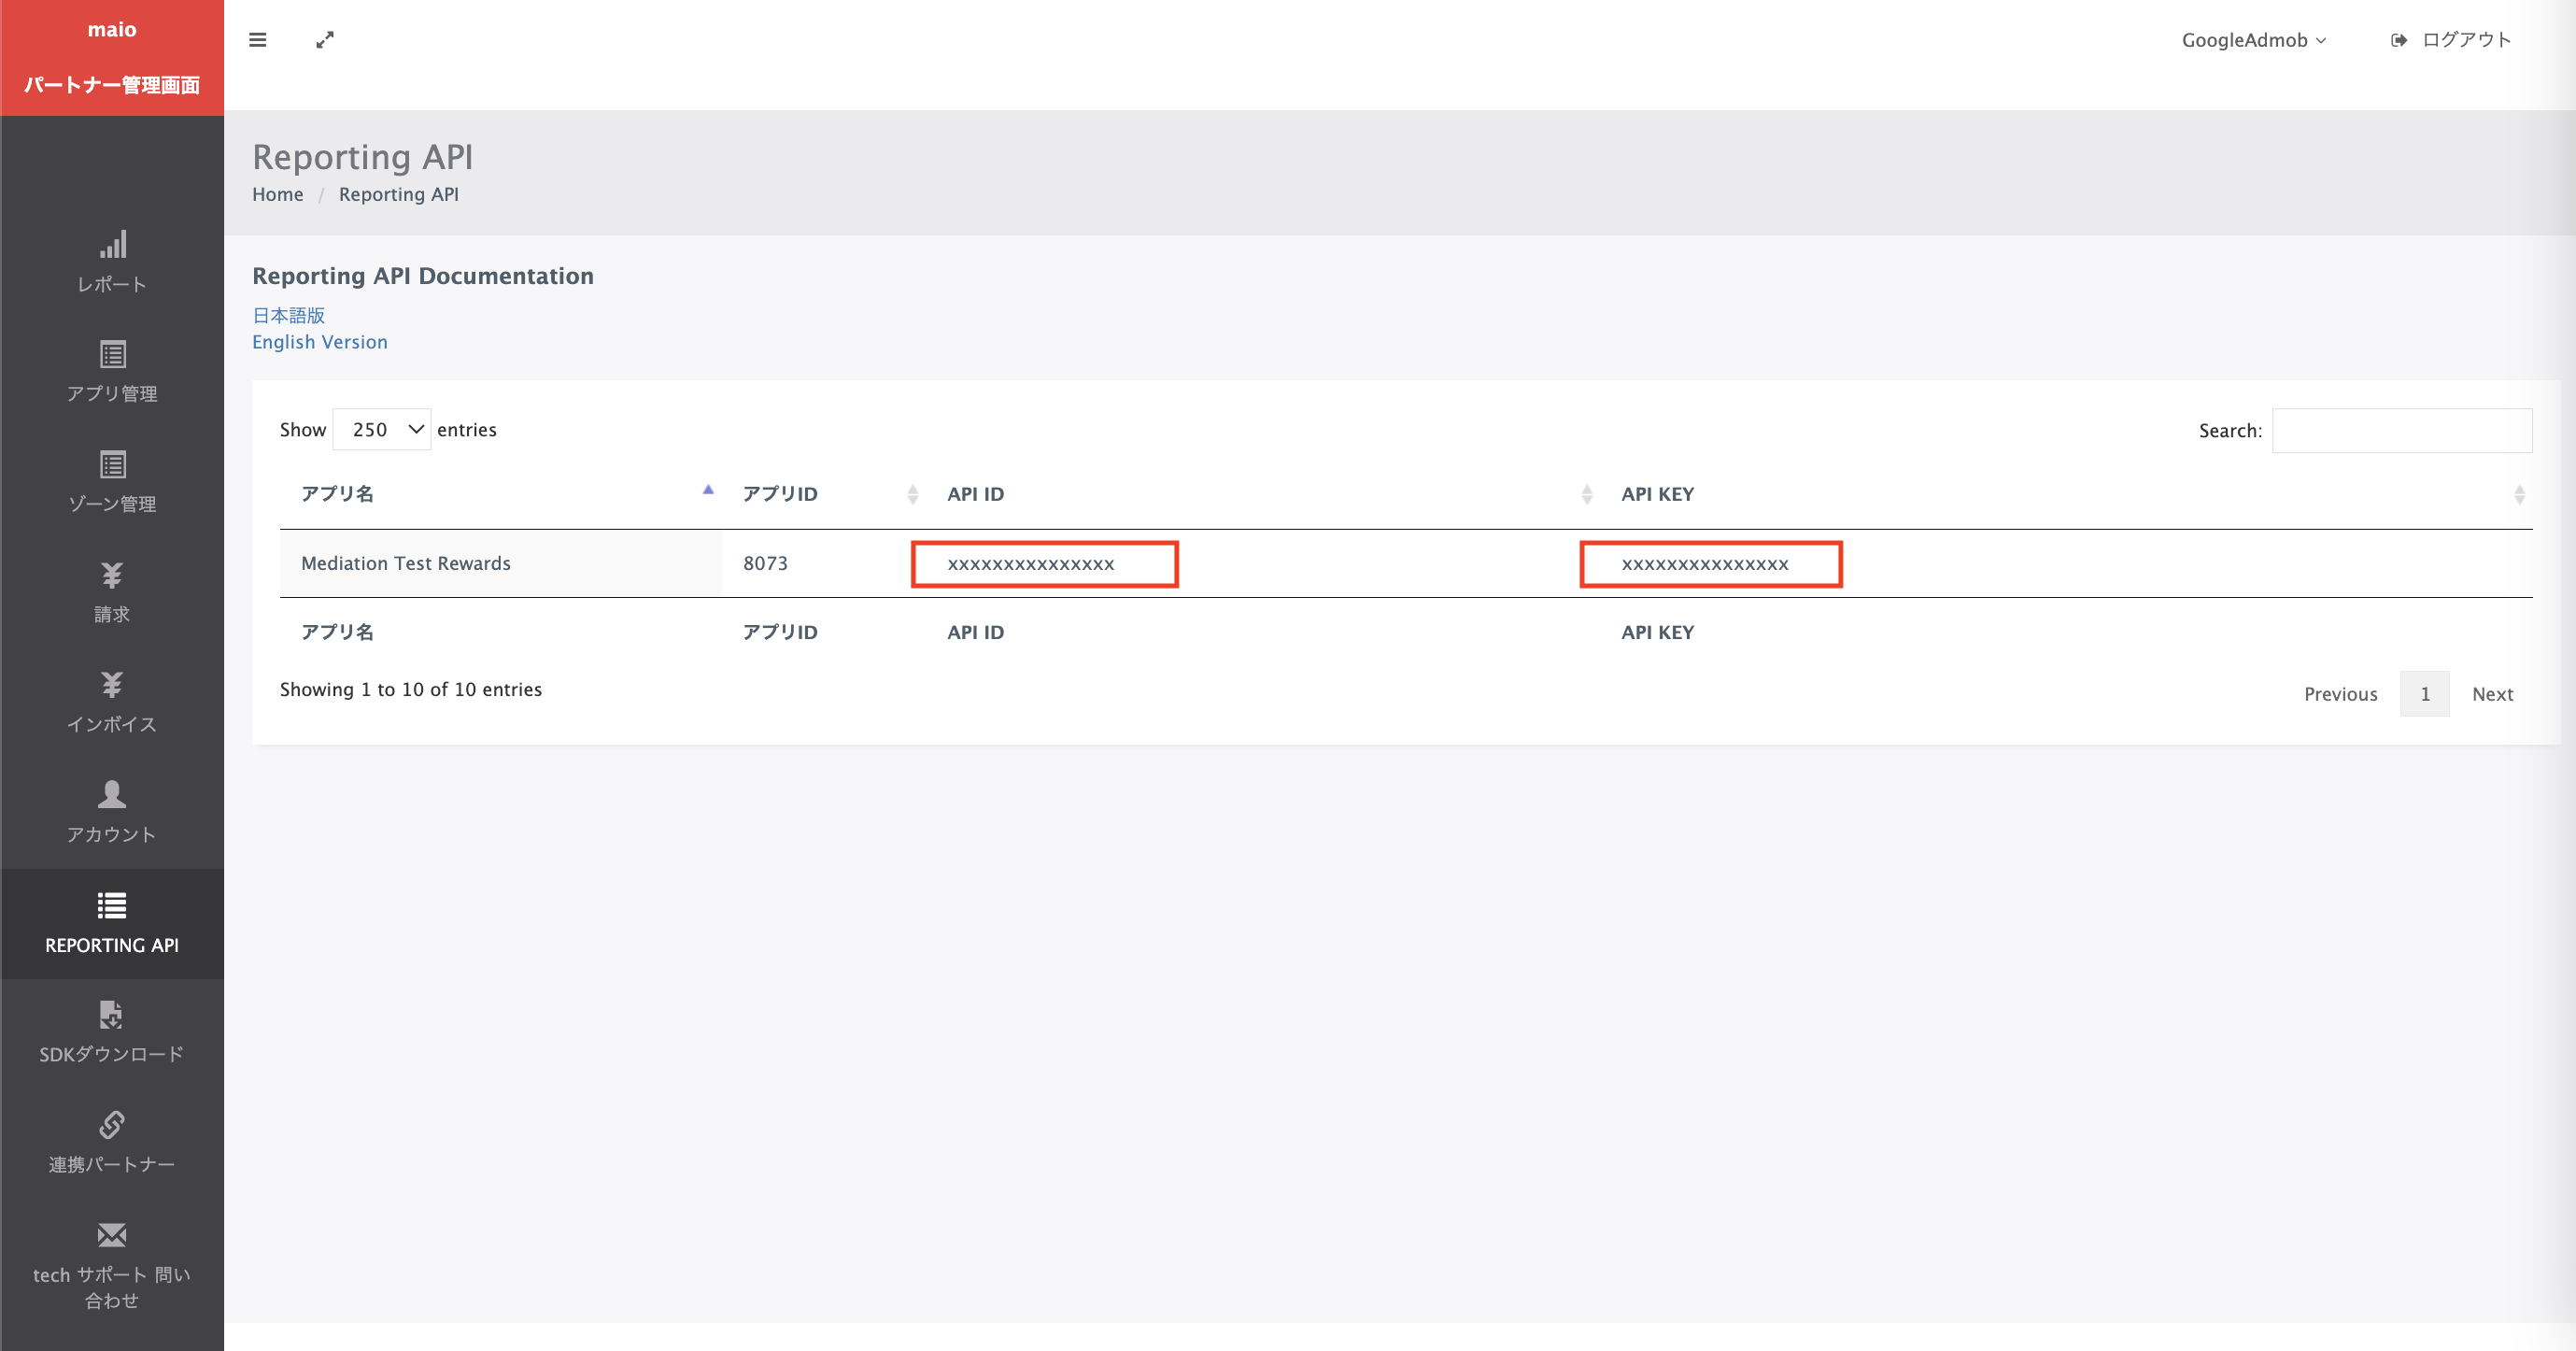
Turn on Automatic data collection, and enter the API ID and API KEY obtained in the previous section.
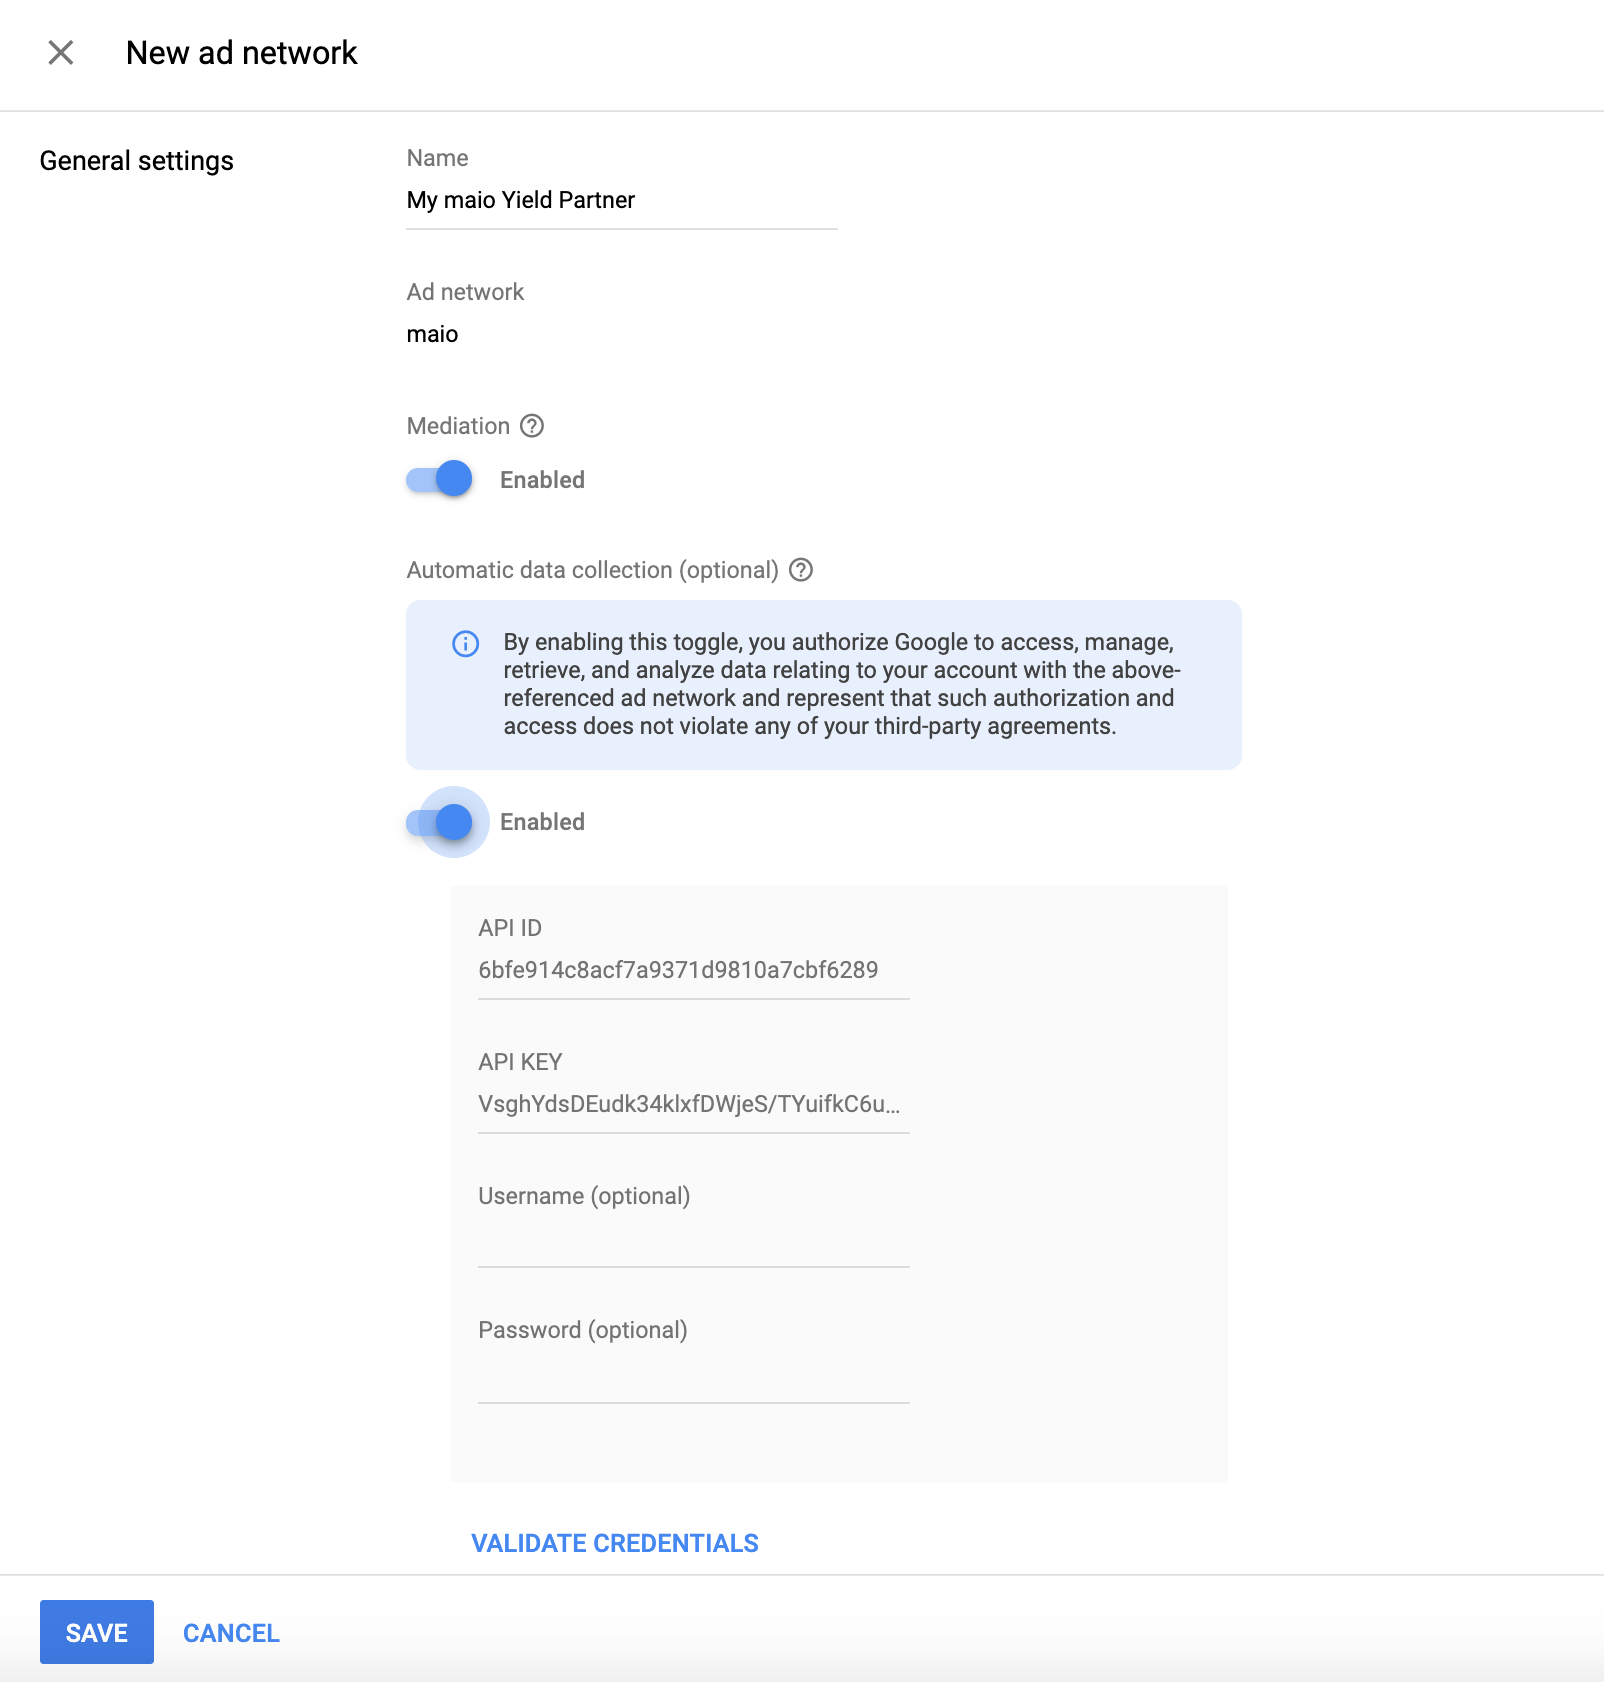
Once the Yield partner is selected, choose Mobile SDK Mediation as the Integration type, Android as the Platform, and Active as the Status. Enter the Media ID and Zone ID obtained in the previous section. Then, enter a Default CPM value.
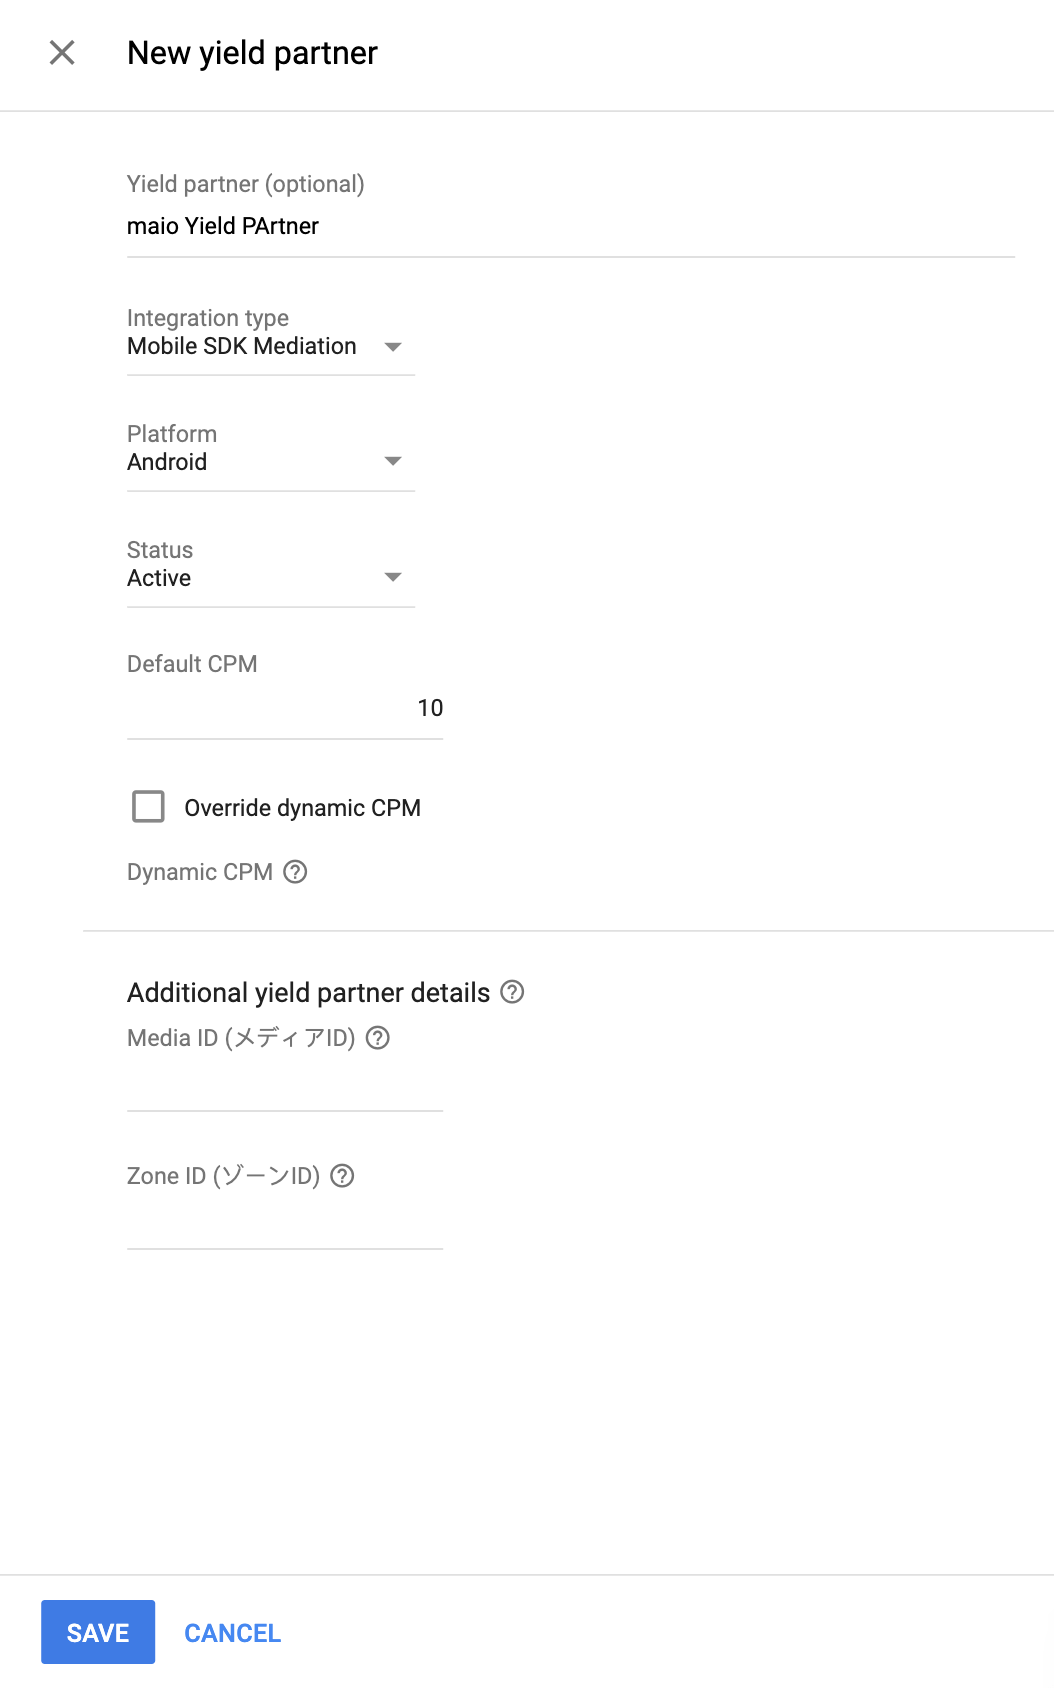
Click Save at the bottom of the page when done.
Step 3: Import the maio SDK and adapter
Android Studio integration (recommended)
In your project-level settings.gradle.kts file, add the following
repositories:
dependencyResolutionManagement {
  repositories {
    google()
    mavenCentral()
    maven {
      url = uri("https://imobile-maio.github.io/maven")
    }
  }
}
In your app-level gradle file, add the following implementation dependencies and configurations:
Kotlin
dependencies {
    implementation("com.google.android.libraries.ads.mobile.sdk:ads-mobile-sdk:1.3.0")
    implementation("com.google.ads.mediation:maio:2.0.8.2")
}

configurations.configureEach {
    exclude(group = "com.google.android.gms", module = "play-services-ads")
    exclude(group = "com.google.android.gms", module = "play-services-ads-lite")
}
Groovy
dependencies {
    implementation 'com.google.android.libraries.ads.mobile.sdk:ads-mobile-sdk:1.3.0'
    implementation 'com.google.ads.mediation:maio:2.0.8.2'
}

configurations.configureEach {
    exclude group: 'com.google.android.gms', module: 'play-services-ads'
    exclude group: 'com.google.android.gms', module: 'play-services-ads-lite'
}
Manual integration
- Download the latest version of maio Android SDK and add it to your project.
- Navigate to the maio adapter artifacts on Google's Maven Repository. Select the latest version, download the maio adapter's `.aar' file, and add it to your project.
Step 4: Add required code
No additional code is required for maio Android integration.
Step 5: Test your implementation
Enable test ads
Make sure you register your test device for Ad Manager.
Publishers using version 11.6.0 or higher of GMA Next-Gen SDK will automatically receive test ads from maio on phones and tablets registered as test devices when making requests.
Verify test ads
To verify that you are receiving test ads from maio, enable single ad source testing in ad inspector using the maio (Waterfall) ad source(s).
Error codes
If the adapter fails to receive an ad from maio,
publishers can check the underlying error from the ad response using
ResponseInfo.getAdSourceResponses()
under the following classes:
| Format | Class name |
|---|---|
| Interstitial | jp.maio.sdk.android.mediation.admob.adapter.Interstitial |
| Rewarded | jp.maio.sdk.android.mediation.admob.adapter.Rewarded |
Here are the codes and accompanying messages thrown by the maio adapter when an ad fails to load:
| Error code | Reason |
|---|---|
| 0-10 | maio returned an SDK-specific error. See code and maio's documentation for more details. |
| 101 | Maio does not have an ad available. |
| 102 | Invalid server parameters (e.g. missing Placement ID). |
| 103 | Context used to load an ad was not an `Activity` instance. |
| 104 | The request had age-restricted treatment, but maio SDK cannot receive age-restricted signals |
maio Android Mediation Adapter Changelog
Next Version
- Filter age-restricted requests for maio SDK when new
AgeRestrictedTreatmentis set toCHILD.
Version 2.0.8.2
- Filter age-restricted requests for maio SDK because it cannot receive age-restricted signals.
- Added property to build the adapter with GMA Next-Gen SDK dependency.
Built and tested with:
- Google Mobile Ads SDK version 25.1.0.
- Google Mobile Ads Next-Gen SDK version 1.1.0.
- Maio SDK version 2.0.8.2.
Version 2.0.8.1
- Added Banner ad format support
Built and tested with:
- Google Mobile Ads SDK version 25.0.0.
- Maio SDK version 2.0.8.1.
Version 2.0.8.0
- Verified compatibility with maio SDK version 2.0.8.
Built and tested with:
- Google Mobile Ads SDK version 24.9.0.
- Maio SDK version 2.0.8.0.
Version 2.0.7.0
- Verified compatibility with maio SDK version 2.0.7.
Built and tested with:
- Google Mobile Ads SDK version 24.7.0.
- Maio SDK version 2.0.7.0.
Version 2.0.6.0
- Removed class-level references to Context. Can help reduce memory leak issues
- Verified compatibility with maio SDK version 2.0.6.
Built and tested with:
- Google Mobile Ads SDK version 24.6.0.
- Maio SDK version 2.0.6.0.
Version 2.0.5.0
- Verified compatibility with maio SDK version 2.0.5.
Built and tested with:
- Google Mobile Ads SDK version 24.4.0.
- Maio SDK version 2.0.5.0.
Version 2.0.4.0
- Verified compatibility with maio SDK version 2.0.4.
Built and tested with:
- Google Mobile Ads SDK version 24.3.0.
- Maio SDK version 2.0.4.0.
Version 2.0.3.1
- Updated the minimum required Android API level to 23.
- Updated the minimum required Google Mobile Ads SDK version to 24.0.0.
Built and tested with:
- Google Mobile Ads SDK version 24.0.0.
- Maio SDK version 2.0.3.0.
Version 2.0.3.0
- Verified compatibility with maio SDK version 2.0.3.0.
Built and tested with:
- Google Mobile Ads SDK version 23.6.0.
- Maio SDK version 2.0.3.0.
Version 1.1.16.3
- Updated the minimum required Google Mobile Ads SDK version to 23.0.0.
- Verified compatibility with maio SDK version 1.1.16.
Built and tested with:
- Google Mobile Ads SDK version 23.0.0.
- Maio SDK version 1.1.16.
Version 1.1.16.2
- Updated adapter to use new
VersionInfoclass. - Updated the minimum required Google Mobile Ads SDK version to 22.0.0.
Built and tested with:
- Google Mobile Ads SDK version 22.0.0.
- Maio SDK version 1.1.16.
Version 1.1.16.1
- Updated
compileSdkVersionandtargetSdkVersionto API 31. - Updated the minimum required Google Mobile Ads SDK version to 21.0.0.
- Updated the minimum required Android API level to 19.
Built and tested with:
- Google Mobile Ads SDK version 21.0.0.
- Maio SDK version 1.1.16.
Version 1.1.16.0
- Updated error codes to capture additional maio errors.
- Verified compatibility with maio SDK version 1.1.16.
- Updated the minimum required Google Mobile Ads SDK version to 20.4.0.
Built and tested with:
- Google Mobile Ads SDK version 20.4.0.
- Maio SDK version 1.1.16.
Version 1.1.15.0
- Verified compatibility with maio SDK version 1.1.15.
- Updated the minimum required Google Mobile Ads SDK version to 20.0.0.
Built and tested with:
- Google Mobile Ads SDK version 20.0.0.
- Maio SDK version 1.1.15.
Version 1.1.14.0
- Added standardized adapter error codes and messages.
- Verified compatibility with maio SDK version 1.1.14.
- Updated the minimum required Google Mobile Ads SDK version to 19.8.0.
Built and tested with:
- Google Mobile Ads SDK version 19.8.0.
- Maio SDK version 1.1.14.
Version 1.1.13.0
- Verified compatibility with maio SDK version 1.1.13.
- Updated the minimum required Google Mobile Ads SDK version to 19.5.0.
Built and tested with:
- Google Mobile Ads SDK version 19.5.0.
- Maio SDK version 1.1.13.
Version 1.1.12.0
- Updated the minimum required Google Mobile Ads SDK version to 19.4.0.
Built and tested with:
- Google Mobile Ads SDK version 19.4.0.
- Maio SDK version 1.1.12.
Version 1.1.11.1
- To limit timouts, ad requests will now immediately fail if maio does not have an ad ready to be shown.
- Updated the minimum required Google Mobile Ads SDK version to 19.1.0.
Built and tested with:
- Google Mobile Ads SDK version 19.1.0.
- Maio SDK version 1.1.11.
Version 1.1.11.0
- Verified compatibility with maio SDK version 1.1.11.
- Updated the minimum required Google Mobile Ads SDK version to 18.3.0.
Built and tested with:
- Google Mobile Ads SDK version 18.3.0.
- Maio SDK version 1.1.11.
Version 1.1.10.0
- Verified compatibility with maio SDK version 1.1.10.
- Updated the minimum required Google Mobile Ads SDK version to 18.2.0.
Version 1.1.8.0
- Verified compatibility with maio SDK version 1.1.8.
- Updated the minimum required Google Mobile Ads SDK version to 18.1.0.
Version 1.1.7.0
- Bug Fixes.
- Verified compatibility with maio SDK version 1.1.7.
Version 1.1.6.1
- Updated adapter to support new Rewarded API.
- Updated the minimum required Google Mobile Ads SDK version to 17.2.0.
Version 1.1.6.0
- Verified compatibility with maio SDK version 1.1.6.
Version 1.1.5.0
- Verified compatibility with maio SDK version 1.1.5.
Version 1.1.4.0
- Verified compatibility with maio SDK version 1.1.4.
Version 1.1.3.1
- Updated the adapter to work with instance class instead of singleton.
Version 1.1.3.0
- Verified compatibility with maio SDK version 1.1.3.
Version 1.1.2.1
- Updated the adapter with updated initialize functions.
Version 1.1.2.0
- Verified compatibility with maio SDK version 1.1.2.
Version 1.1.1.1
- Updated the adapter to invoke the
onRewardedVideoComplete()ad event.
Version 1.1.1.0
- Verified compatibility with maio SDK version 1.1.1.
Version 1.1.0.0
- Verified compatibility with maio SDK version 1.1.0.
Version 1.0.8.0
- Verified compatibility with maio SDK version 1.0.8.
Version 1.0.7.1
- Fixed an issue that could cause NullPointerExceptions to occur when ads fail to load.
Version 1.0.7.0
- Added ability to enable test mode by adding test device id to
AdRequest. - Verified compatibility with maio SDK version 1.0.7.
Version 1.0.6.0
- First release!
- Added support for interstitials and rewarded video ads.