En esta página, se explican los pasos para crear rápidamente una aplicación para iOS simple que realice solicitudes a la API de YouTube Data. En este ejemplo, se muestra cómo recuperar datos sobre el canal de YouTube de GoogleDevelopers. El código también incluye comentarios que explican cómo modificar la consulta para recuperar datos sobre el canal de YouTube del usuario actual.
Requisitos previos
Para ejecutar esta guía de inicio rápido, necesitarás lo siguiente:
- Xcode 8.0 o una versión posterior
- Administrador de dependencias CocoaPods
- Acceso a Internet y un navegador web
- Una Cuenta de Google.
Paso 1: Activa la API de YouTube Data
-
Usa este asistente para crear o seleccionar un proyecto en Google Developers Console y activar automáticamente la API. Haz clic en Continuar y, luego, en Ir a Credenciales.
-
En la página Crear credenciales, haz clic en el botón Cancelar.
-
En la parte superior de la página, seleccione la pestaña OAuth consent screen. Selecciona una dirección de correo electrónico, ingresa un nombre del producto si aún no está configurado y haz clic en el botón Guardar.
-
Selecciona la pestaña Credenciales, haz clic en el botón Crear credenciales y selecciona ID de cliente de OAuth.
- Selecciona el tipo de aplicación iOS, ingresa el nombre "Guía de inicio rápido de la API de YouTube Data", el ID del paquete
com.example.QuickstartAppy haz clic en el botón Crear.
Paso 2: Prepara el espacio de trabajo
- Abre Xcode y crea un proyecto nuevo:
- Haz clic en File > New > Project, selecciona la plantilla iOS > Application > Single View Application y haz clic en Next.
- Establece el Nombre del producto como "QuickstartApp", el Identificador de organización como "com.example" y el Lenguaje comoObjective-C.
Debajo del identificador de la organización, deberías ver un identificador de paquete generado que coincida con el ID del paquete de iOS (
com.example.QuickstartApp) que ingresaste en el paso 1b. - Haz clic en Siguiente.
- Selecciona un directorio de destino para el proyecto y haz clic en Crear.
- Haz clic en File > Close Project para cerrar el proyecto.
- Abre una ventana de la terminal y navega al directorio que contiene el archivo
QuickstartApp.xcodeprojque acabas de crear. Ejecuta los siguientes comandos para crear el Podfile, instalar la biblioteca y abrir el proyecto de Xcode resultante:
cat << EOF > Podfile &&
platform :ios, '8.0'
target 'QuickstartApp' do
    pod 'GoogleAPIClientForREST/YouTube', '~> 1.2.1'
    pod 'Google/SignIn', '~> 3.0.3'
end
EOF
pod install &&
open QuickstartApp.xcworkspace
En el navegador de proyectos de Xcode, selecciona el nodo del proyecto "QuickstartApp". Luego, haz clic en el elemento de menú File > Add files to "QuickstartApp".
Busca el archivo
GoogleService-Info.plistque descargaste antes y selecciónalo. Haz clic en el botón Opciones.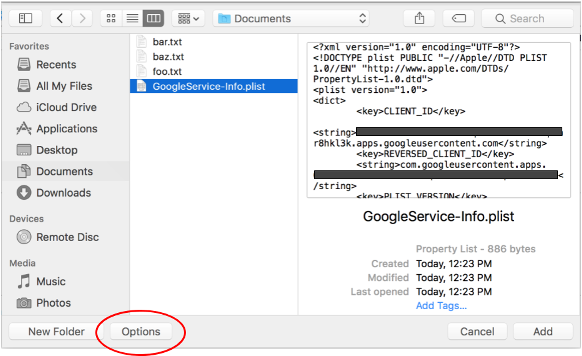
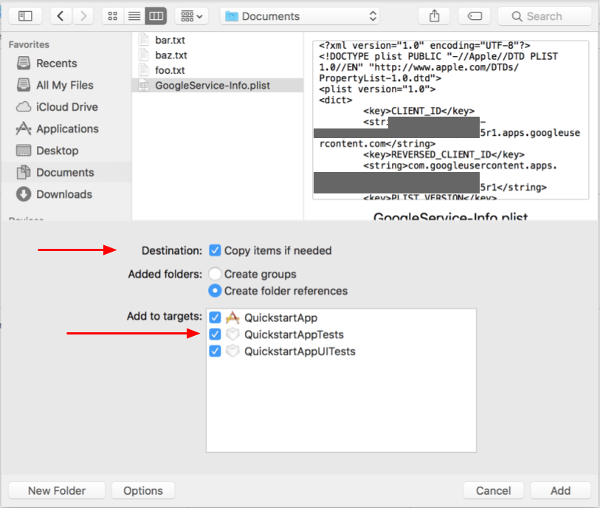
Realiza las siguientes selecciones en la ventana de opciones y, luego, haz clic en el botón Agregar:
- Marca la casilla de verificación Copiar los elementos si es necesario.
- Verifica todos los destinos que se indican en la sección Agregar a destinos.
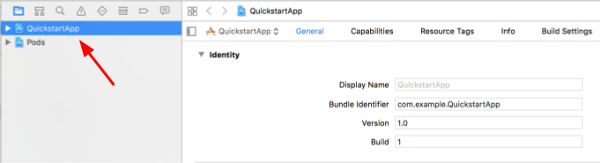
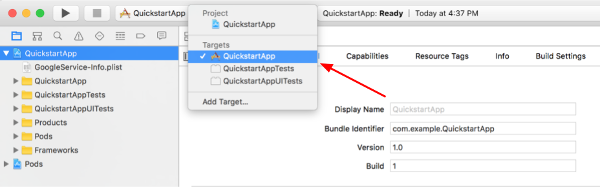
Con el nodo del proyecto aún seleccionado, elige "QuickstartApp" en la sección TARGETS, como se muestra en las dos imágenes a continuación:
Haz clic en el área que se muestra en esta captura de pantalla:
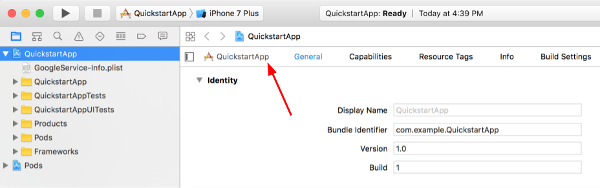
Luego, selecciona el objetivo adecuado:
Selecciona la pestaña Información y expande la sección Tipos de URL.
Haz clic en el botón + y agrega un esquema de URL para tu ID de cliente invertido. Para encontrar este valor, abre el archivo de configuración
GoogleService-Info.plistque seleccionaste en el paso 2.f. Busca la clave REVERSED_CLIENT_ID. Copia el valor de esa clave y pégalo en el recuadro Esquemas de URL en la página de configuración. Deja los demás campos en blanco.Vuelve a compilar el proyecto:
- Haz clic en Producto > Limpiar la carpeta de compilación (mientras mantienes presionada la tecla Opción).
- Haz clic en Product > Build.
Paso 3: Configura la muestra
Reemplaza el contenido de los siguientes archivos con el código proporcionado:#import <UIKit/UIKit.h> @import GoogleSignIn; @interface AppDelegate : UIResponder <UIApplicationDelegate> @property (strong, nonatomic) UIWindow *window; @end
#import "AppDelegate.h"

@implementation AppDelegate

- (BOOL)application:(UIApplication *)application
didFinishLaunchingWithOptions:(NSDictionary *)launchOptions {
    // Initialize Google sign-in.
    [GIDSignIn sharedInstance].clientID = @"<YOUR_CLIENT_ID>";

    return YES;
}

- (BOOL)application:(UIApplication *)application
            openURL:(NSURL *)url
  sourceApplication:(NSString *)sourceApplication
         annotation:(id)annotation {
    return [[GIDSignIn sharedInstance] handleURL:url
                               sourceApplication:sourceApplication
                                      annotation:annotation];
}


@end
#import <UIKit/UIKit.h>
@import GoogleSignIn;
#import <GTLRYouTube.h>

@interface ViewController : UIViewController <GIDSignInDelegate, GIDSignInUIDelegate>

@property (nonatomic, strong) IBOutlet GIDSignInButton *signInButton;
@property (nonatomic, strong) UITextView *output;
@property (nonatomic, strong) GTLRYouTubeService *service;


@end
#import "ViewController.h"

@implementation ViewController

- (void)viewDidLoad {
    [super viewDidLoad];
    // Configure Google Sign-in.
    GIDSignIn* signIn = [GIDSignIn sharedInstance];
    signIn.delegate = self;
    signIn.uiDelegate = self;
    signIn.scopes = [NSArray arrayWithObjects:kGTLRAuthScopeYouTubeReadonly, nil];
    [signIn signInSilently];

    // Add the sign-in button.
    self.signInButton = [[GIDSignInButton alloc] init];
    [self.view addSubview:self.signInButton];

    // Create a UITextView to display output.
    self.output = [[UITextView alloc] initWithFrame:self.view.bounds];
    self.output.editable = false;
    self.output.contentInset = UIEdgeInsetsMake(20.0, 0.0, 20.0, 0.0);
    self.output.autoresizingMask = UIViewAutoresizingFlexibleHeight | UIViewAutoresizingFlexibleWidth;
    self.output.hidden = true;
    [self.view addSubview:self.output];

    // Initialize the service object.
    self.service = [[GTLRYouTubeService alloc] init];
}

- (void)signIn:(GIDSignIn *)signIn
didSignInForUser:(GIDGoogleUser *)user
     withError:(NSError *)error {
    if (error != nil) {
        [self showAlert:@"Authentication Error" message:error.localizedDescription];
        self.service.authorizer = nil;
    } else {
        self.signInButton.hidden = true;
        self.output.hidden = false;
        self.service.authorizer = user.authentication.fetcherAuthorizer;
        [self fetchChannelResource];
    }
}


// Construct a query and retrieve the channel resource for the GoogleDevelopers
// YouTube channel. Display the channel title, description, and view count.
- (void)fetchChannelResource {
    GTLRYouTubeQuery_ChannelsList *query =
    [GTLRYouTubeQuery_ChannelsList queryWithPart:@"snippet,statistics"];
  query.identifier = @"UC_x5XG1OV2P6uZZ5FSM9Ttw";
  // To retrieve data for the current user's channel, comment out the previous
  // line (query.identifier ...) and uncomment the next line (query.mine ...).
  // query.mine = true;

  [self.service executeQuery:query
                    delegate:self
           didFinishSelector:@selector(displayResultWithTicket:finishedWithObject:error:)];
}

// Process the response and display output
- (void)displayResultWithTicket:(GTLRServiceTicket *)ticket
             finishedWithObject:(GTLRYouTube_ChannelListResponse *)channels
                          error:(NSError *)error {
  if (error == nil) {
    NSMutableString *output = [[NSMutableString alloc] init];
    if (channels.items.count > 0) {
      [output appendString:@"Channel information:\n"];
      for (GTLRYouTube_Channel *channel in channels) {
        NSString *title = channel.snippet.title;
        NSString *description = channel.snippet.description;
        NSNumber *viewCount = channel.statistics.viewCount;
        [output appendFormat:@"Title: %@\nDescription: %@\nViewCount: %@\n", title, description, viewCount];
      }
    } else {
      [output appendString:@"Channel not found."];
    }
    self.output.text = output;
  } else {
    [self showAlert:@"Error" message:error.localizedDescription];
  }
}


// Helper for showing an alert
- (void)showAlert:(NSString *)title message:(NSString *)message {
    UIAlertController *alert =
    [UIAlertController alertControllerWithTitle:title
                                        message:message
                                 preferredStyle:UIAlertControllerStyleAlert];
    UIAlertAction *ok =
    [UIAlertAction actionWithTitle:@"OK"
                             style:UIAlertActionStyleDefault
                           handler:^(UIAlertAction * action)
     {
         [alert dismissViewControllerAnimated:YES completion:nil];
     }];
    [alert addAction:ok];
    [self presentViewController:alert animated:YES completion:nil];
}


@end
Paso 4: Ejecuta la muestra
Haz clic en Product > Scheme > QuickstartApp para cambiar al esquema QuickstartApp y ejecuta la muestra (Cmd+R) con el simulador de dispositivos o un dispositivo configurado. La primera vez que ejecutes el ejemplo, se te pedirá que accedas a tu Cuenta de Google y autorices el acceso.
Notas
- La información de autorización se almacena en tu Llavero, por lo que las ejecuciones posteriores no solicitarán autorización.