

השלבים שמתוארים בדף הזה מסבירים איך ליצור במהירות אפליקציה פשוטה ל-iOS ששולחת בקשות ל-YouTube Data API. הדוגמה הזו מראה איך לאחזר נתונים על ערוץ YouTube של GoogleDevelopers. הקוד כולל גם הערות שמסבירות איך לשנות את השאילתה כדי לאחזר נתונים על ערוץ YouTube של המשתמש הנוכחי.
דרישות מוקדמות
כדי להפעיל את המדריך למתחילים הזה, אתם צריכים שיהיו לכם:
שלב 1: מפעילים את YouTube Data API
-
משתמשים באשף הזה כדי ליצור או לבחור פרויקט ב-Google Developers Console ולהפעיל את ה-API באופן אוטומטי. לוחצים על Continue ואז על Go to credentials.
-
בדף Create credentials, לוחצים על Cancel.
-
בחלק העליון של הדף, לוחצים על הכרטיסייה מסך הסכמה של OAuth. בוחרים כתובת אימייל, מזינים שם מוצר אם הוא עדיין לא מוגדר ולוחצים על הכפתור שמירה.
-
לוחצים על הכרטיסייה Credentials (פרטי כניסה), על הלחצן Create credentials (יצירת פרטי כניסה) ובוחרים באפשרות OAuth client ID (מזהה לקוח OAuth).
- בוחרים בסוג האפליקציה iOS, מזינים את השם "YouTube Data API Quickstart", מזהה החבילה
com.example.QuickstartApp, ולוחצים על הכפתור Create.
שלב 2: הכנת סביבת העבודה
- פותחים את Xcode ויוצרים פרויקט חדש:
- לוחצים על File > New > Project, בוחרים את התבנית iOS > Application > Single View Application ולוחצים על Next.
- מגדירים את שם המוצר ל-"QuickstartApp", את מזהה הארגון ל-"com.example" ואת השפה ל-Objective-C.
מתחת למזהה הארגון, אמור להופיע מזהה חבילה שנוצר ותואם למזהה החבילה ל-iOS (
com.example.QuickstartApp) שהזנתם בשלב 1ב'. - לוחצים על הבא.
- בוחרים ספריית יעד לפרויקט ולוחצים על Create (יצירה).
- סוגרים את הפרויקט בלחיצה על File > Close Project (קובץ > סגירת הפרויקט).
- פותחים חלון טרמינל ועוברים לספרייה שמכילה את הקובץ
QuickstartApp.xcodeprojשיצרתם. מריצים את הפקודות הבאות כדי ליצור את ה-Podfile, להתקין את הספרייה ולפתוח את פרויקט ה-XCode שנוצר:
cat << EOF > Podfile &&
platform :ios, '8.0'
target 'QuickstartApp' do
    pod 'GoogleAPIClientForREST/YouTube', '~> 1.2.1'
    pod 'Google/SignIn', '~> 3.0.3'
end
EOF
pod install &&
open QuickstartApp.xcworkspace
ב-XCode Project Navigator, בוחרים את צומת הפרויקט QuickstartApp. אחר כך לוחצים על פריט התפריט קובץ > הוספת קבצים אל QuickstartApp.
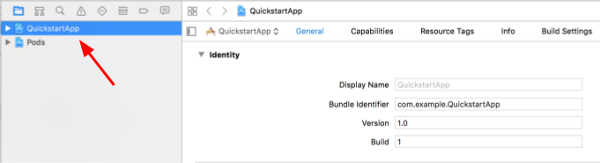
מאתרים את קובץ ה-
GoogleService-Info.plistשהורדתם קודם ובוחרים אותו. לוחצים על הלחצן אפשרויות.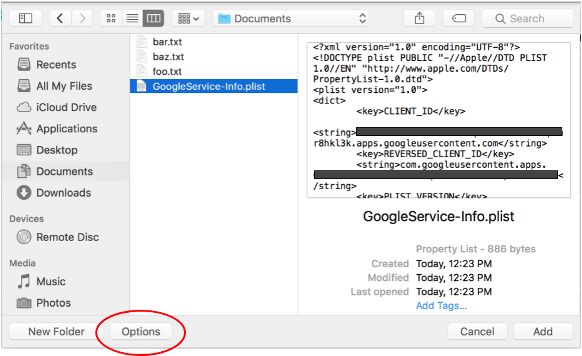
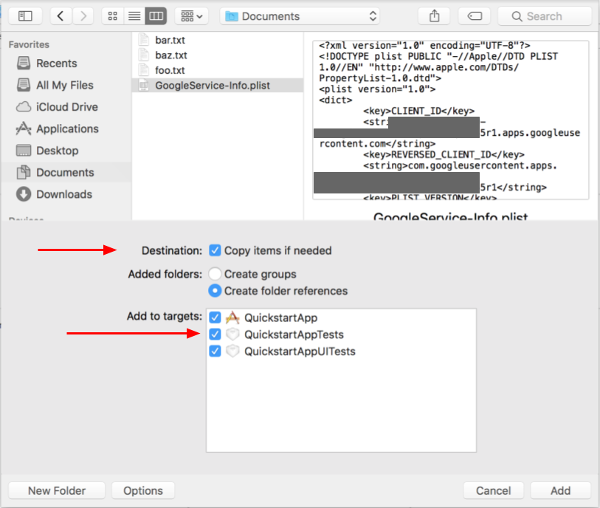
בחלון האפשרויות, בוחרים את האפשרויות הבאות ולוחצים על הכפתור Add:
- מסמנים את התיבה העתקת פריטים אם צריך.
- מסמנים את כל היעדים שמופיעים בקטע הוספה ליעדים.
כשצומת הפרויקט עדיין מסומן, בוחרים באפשרות QuickstartApp בקטע TARGETS, כמו שמוצג בשתי התמונות הבאות:
לוחצים על האזור שמוצג בצילום המסך הזה:
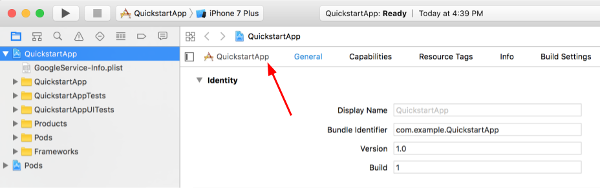
לאחר מכן בוחרים את היעד המתאים:
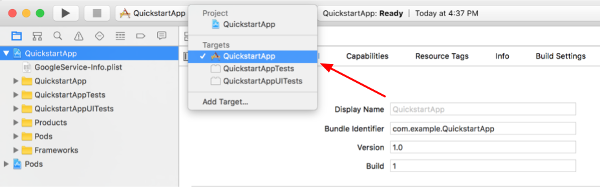
בוחרים בכרטיסייה מידע ומרחיבים את הקטע סוגי כתובות URL.
לוחצים על הלחצן + ומוסיפים סכמת URL למזהה הלקוח ההפוך. כדי למצוא את הערך הזה, פותחים את קובץ התצורה של
GoogleService-Info.plistשבחרתם בשלב 2.ו. מחפשים את המפתח REVERSED_CLIENT_ID. מעתיקים את הערך של המפתח הזה ומדביקים אותו בתיבה סכמות URL בדף ההגדרות. משאירים את שאר השדות ריקים.בונים מחדש את הפרויקט:
- לוחצים על Product (מוצרים) > Clean Build Folder (ניקוי תיקיית build) (תוך כדי לחיצה על המקש option).
- לוחצים על Product > Build.
שלב 3: מגדירים את הדוגמה
מחליפים את התוכן של הקבצים הבאים בקוד שסופק:#import <UIKit/UIKit.h> @import GoogleSignIn; @interface AppDelegate : UIResponder <UIApplicationDelegate> @property (strong, nonatomic) UIWindow *window; @end
#import "AppDelegate.h"

@implementation AppDelegate

- (BOOL)application:(UIApplication *)application
didFinishLaunchingWithOptions:(NSDictionary *)launchOptions {
    // Initialize Google sign-in.
    [GIDSignIn sharedInstance].clientID = @"<YOUR_CLIENT_ID>";

    return YES;
}

- (BOOL)application:(UIApplication *)application
            openURL:(NSURL *)url
  sourceApplication:(NSString *)sourceApplication
         annotation:(id)annotation {
    return [[GIDSignIn sharedInstance] handleURL:url
                               sourceApplication:sourceApplication
                                      annotation:annotation];
}


@end
#import <UIKit/UIKit.h>
@import GoogleSignIn;
#import <GTLRYouTube.h>

@interface ViewController : UIViewController <GIDSignInDelegate, GIDSignInUIDelegate>

@property (nonatomic, strong) IBOutlet GIDSignInButton *signInButton;
@property (nonatomic, strong) UITextView *output;
@property (nonatomic, strong) GTLRYouTubeService *service;


@end
#import "ViewController.h"

@implementation ViewController

- (void)viewDidLoad {
    [super viewDidLoad];
    // Configure Google Sign-in.
    GIDSignIn* signIn = [GIDSignIn sharedInstance];
    signIn.delegate = self;
    signIn.uiDelegate = self;
    signIn.scopes = [NSArray arrayWithObjects:kGTLRAuthScopeYouTubeReadonly, nil];
    [signIn signInSilently];

    // Add the sign-in button.
    self.signInButton = [[GIDSignInButton alloc] init];
    [self.view addSubview:self.signInButton];

    // Create a UITextView to display output.
    self.output = [[UITextView alloc] initWithFrame:self.view.bounds];
    self.output.editable = false;
    self.output.contentInset = UIEdgeInsetsMake(20.0, 0.0, 20.0, 0.0);
    self.output.autoresizingMask = UIViewAutoresizingFlexibleHeight | UIViewAutoresizingFlexibleWidth;
    self.output.hidden = true;
    [self.view addSubview:self.output];

    // Initialize the service object.
    self.service = [[GTLRYouTubeService alloc] init];
}

- (void)signIn:(GIDSignIn *)signIn
didSignInForUser:(GIDGoogleUser *)user
     withError:(NSError *)error {
    if (error != nil) {
        [self showAlert:@"Authentication Error" message:error.localizedDescription];
        self.service.authorizer = nil;
    } else {
        self.signInButton.hidden = true;
        self.output.hidden = false;
        self.service.authorizer = user.authentication.fetcherAuthorizer;
        [self fetchChannelResource];
    }
}


// Construct a query and retrieve the channel resource for the GoogleDevelopers
// YouTube channel. Display the channel title, description, and view count.
- (void)fetchChannelResource {
    GTLRYouTubeQuery_ChannelsList *query =
    [GTLRYouTubeQuery_ChannelsList queryWithPart:@"snippet,statistics"];
  query.identifier = @"UC_x5XG1OV2P6uZZ5FSM9Ttw";
  // To retrieve data for the current user's channel, comment out the previous
  // line (query.identifier ...) and uncomment the next line (query.mine ...).
  // query.mine = true;

  [self.service executeQuery:query
                    delegate:self
           didFinishSelector:@selector(displayResultWithTicket:finishedWithObject:error:)];
}

// Process the response and display output
- (void)displayResultWithTicket:(GTLRServiceTicket *)ticket
             finishedWithObject:(GTLRYouTube_ChannelListResponse *)channels
                          error:(NSError *)error {
  if (error == nil) {
    NSMutableString *output = [[NSMutableString alloc] init];
    if (channels.items.count > 0) {
      [output appendString:@"Channel information:\n"];
      for (GTLRYouTube_Channel *channel in channels) {
        NSString *title = channel.snippet.title;
        NSString *description = channel.snippet.description;
        NSNumber *viewCount = channel.statistics.viewCount;
        [output appendFormat:@"Title: %@\nDescription: %@\nViewCount: %@\n", title, description, viewCount];
      }
    } else {
      [output appendString:@"Channel not found."];
    }
    self.output.text = output;
  } else {
    [self showAlert:@"Error" message:error.localizedDescription];
  }
}


// Helper for showing an alert
- (void)showAlert:(NSString *)title message:(NSString *)message {
    UIAlertController *alert =
    [UIAlertController alertControllerWithTitle:title
                                        message:message
                                 preferredStyle:UIAlertControllerStyleAlert];
    UIAlertAction *ok =
    [UIAlertAction actionWithTitle:@"OK"
                             style:UIAlertActionStyleDefault
                           handler:^(UIAlertAction * action)
     {
         [alert dismissViewControllerAnimated:YES completion:nil];
     }];
    [alert addAction:ok];
    [self presentViewController:alert animated:YES completion:nil];
}


@end
שלב 4: מריצים את הדוגמה
עוברים לסכימה QuickstartApp בלחיצה על Product > Scheme > QuickstartApp ומריצים את הדוגמה (Cmd+R) באמצעות סימולטור המכשיר או מכשיר מוגדר. בפעם הראשונה שתריצו את הקוד לדוגמה, תתבקשו להיכנס לחשבון Google שלכם ולאשר את הגישה.
הערות
- פרטי ההרשאה נשמרים ב-Keychain, כך שלא תתבקשו לתת הרשאה בהפעלות הבאות.