איך אוספים ומנהלים אנשי קשר ב-Google Chat

במדריך הזה מוסבר איך ליצור אפליקציית Google Chat שעוזרת למשתמשי Google Chat לנהל את אנשי הקשר האישיים והעסקיים שלהם. כדי לאסוף מידע, אפליקציית Chat מבקשת מהמשתמשים למלא טופס ליצירת קשר בהודעות בכרטיסים ובתיבות דו-שיח.

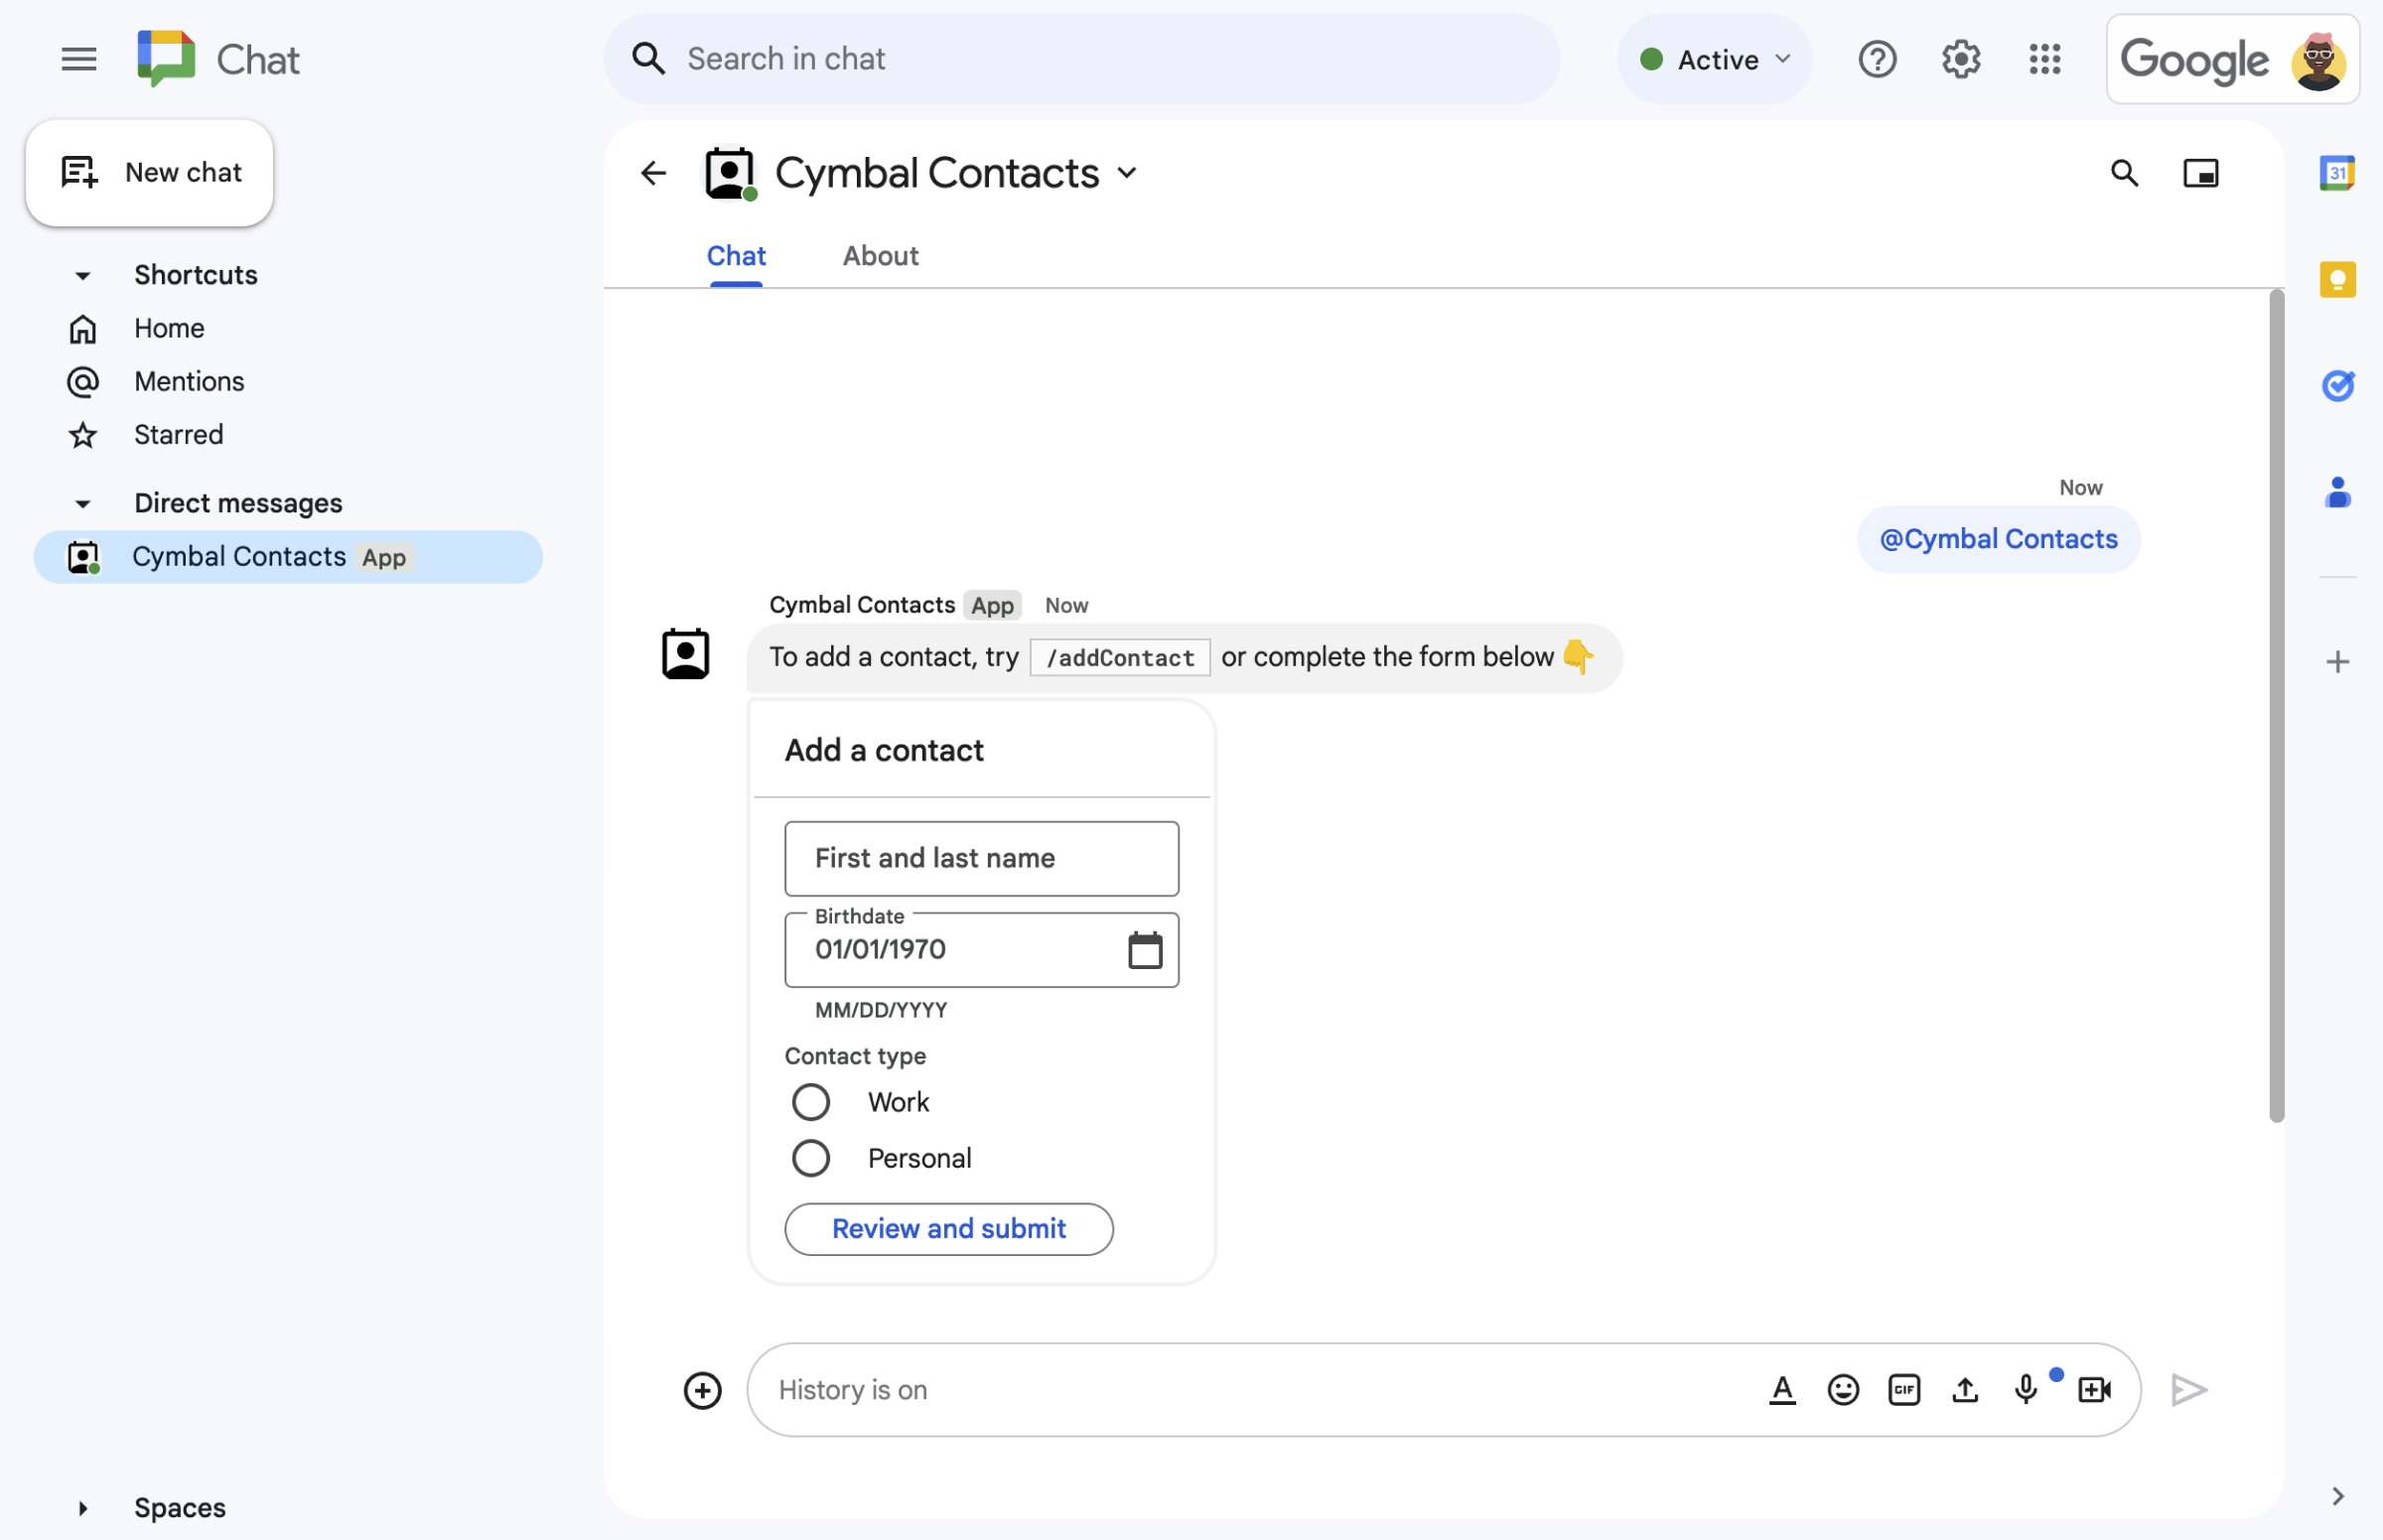
כך נראית אפליקציית Chat בפעולה:

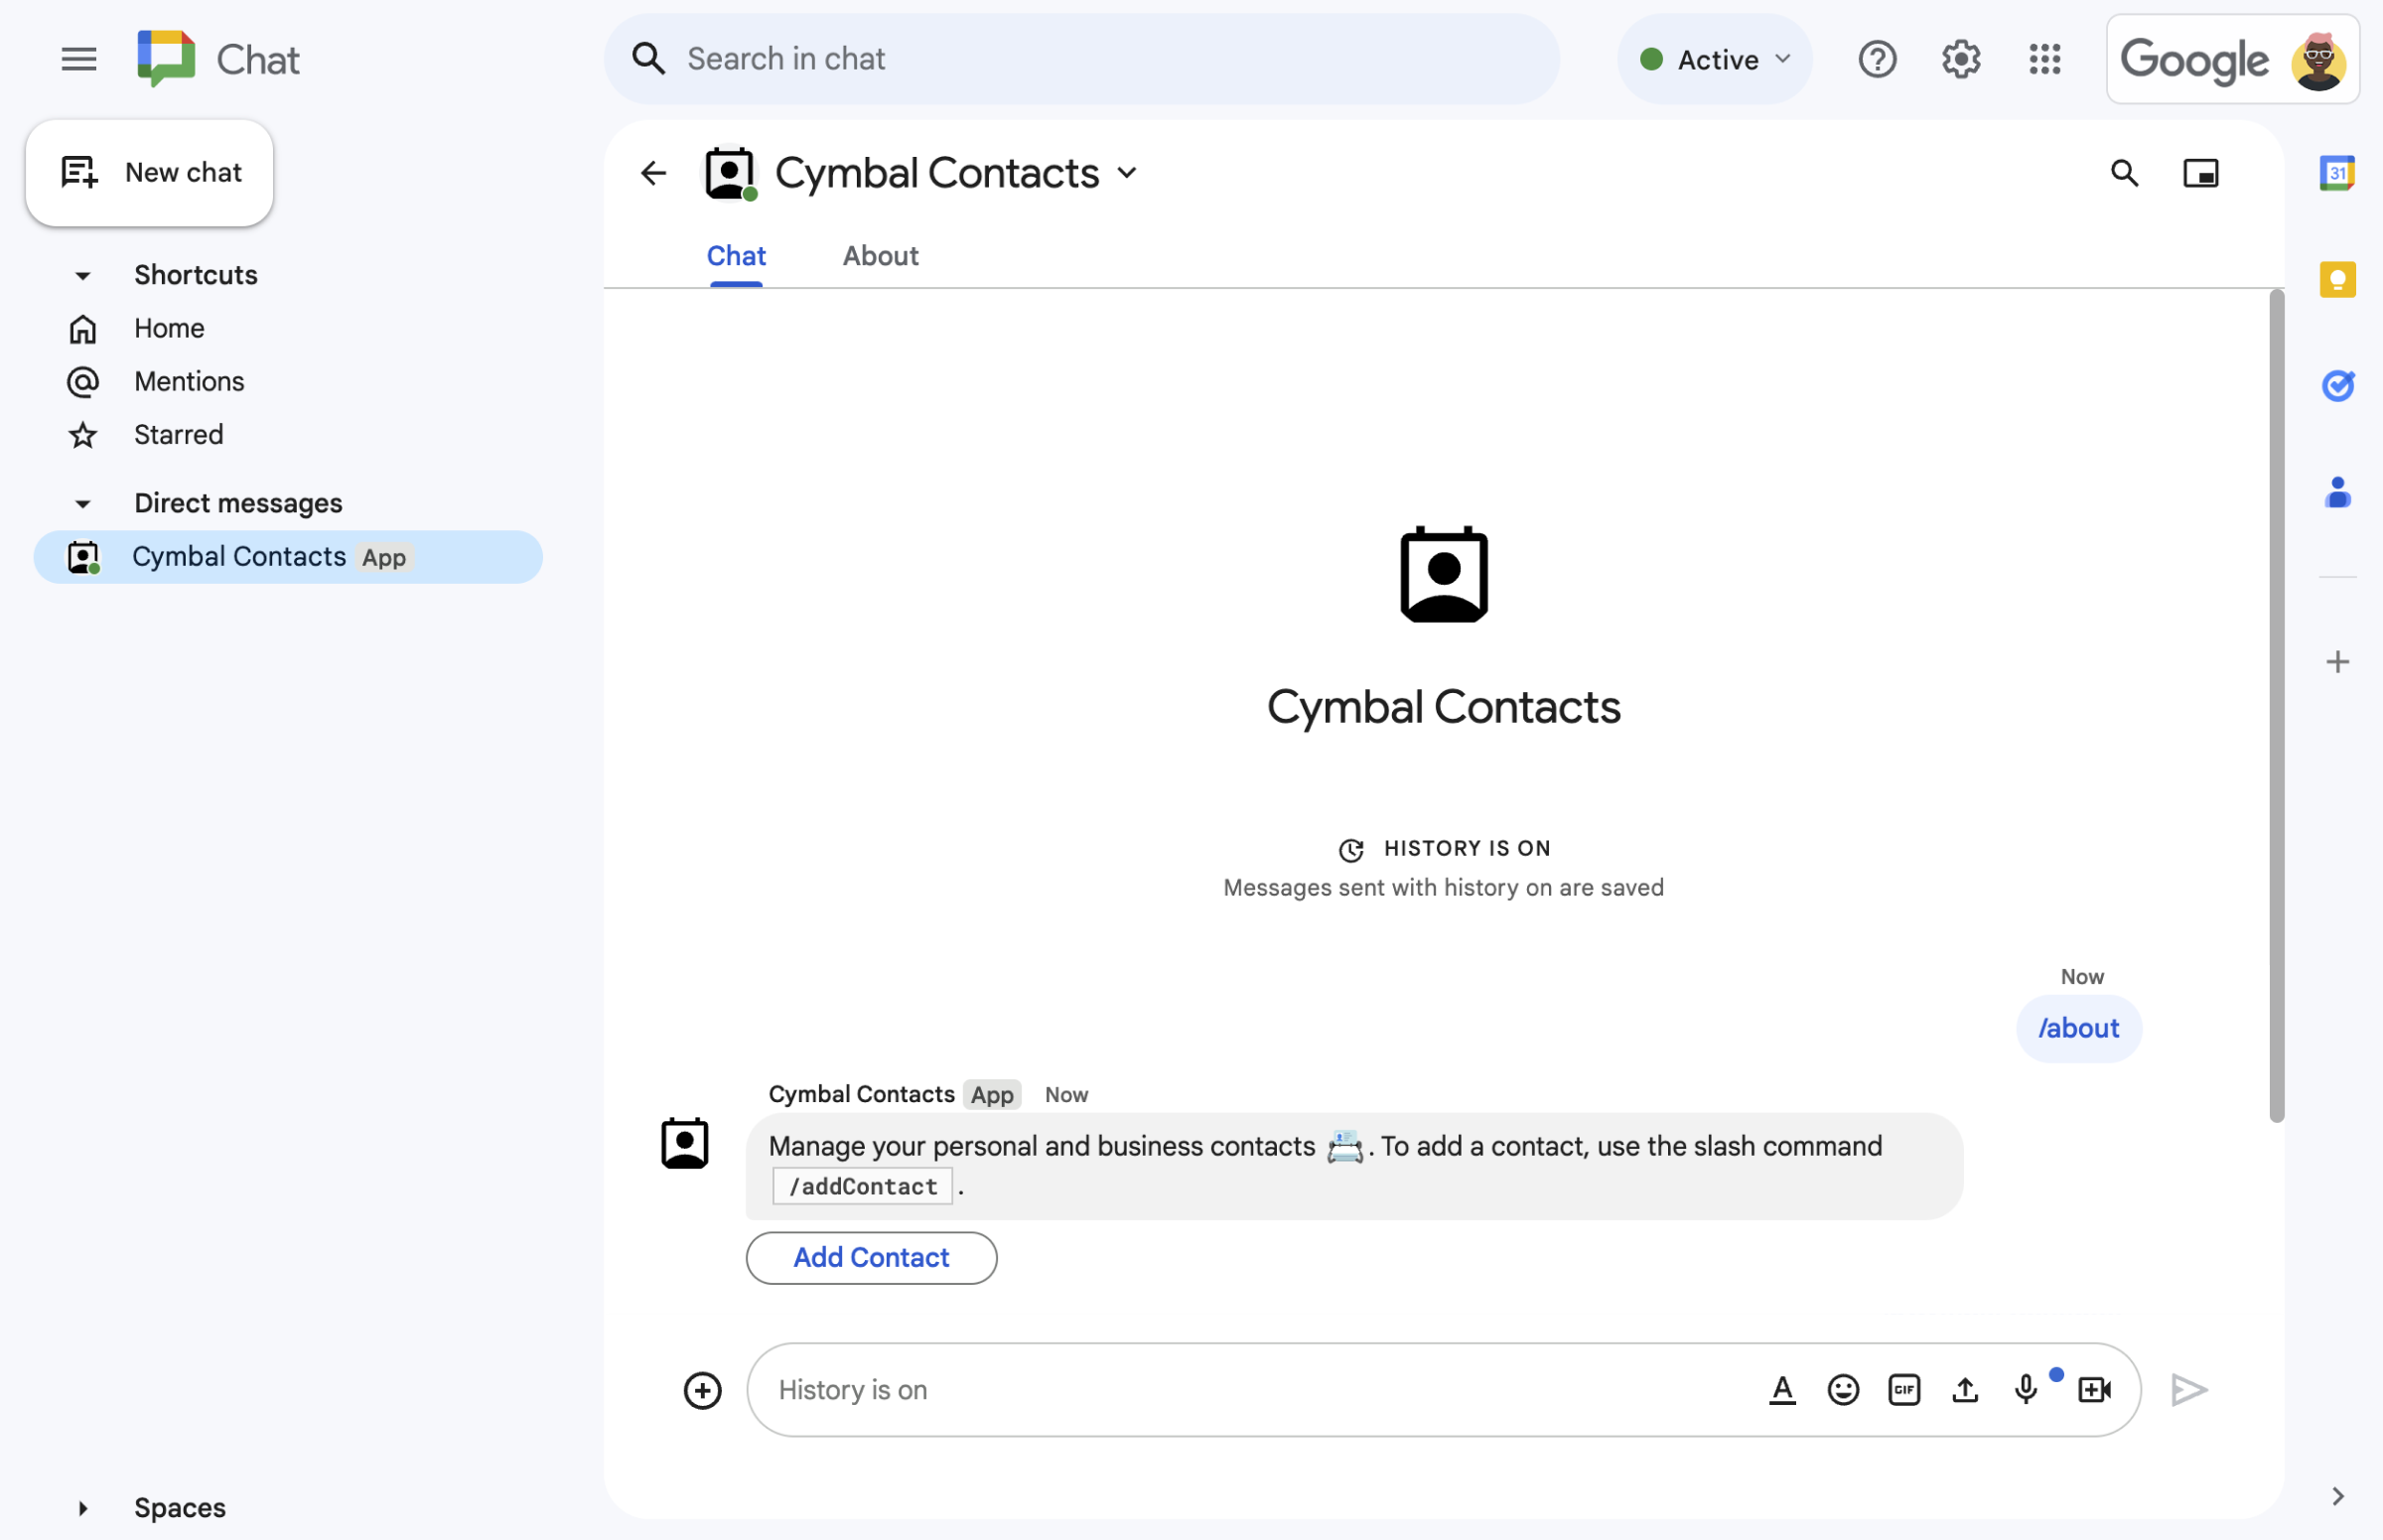
  • טופס ליצירת קשר מפקודה דרך שורת הפקודות.
    איור 1. אפליקציית Chat מגיבה לפקודת הסלאש /about בהודעת טקסט ובלחצן שפותח טופס ליצירת קשר.
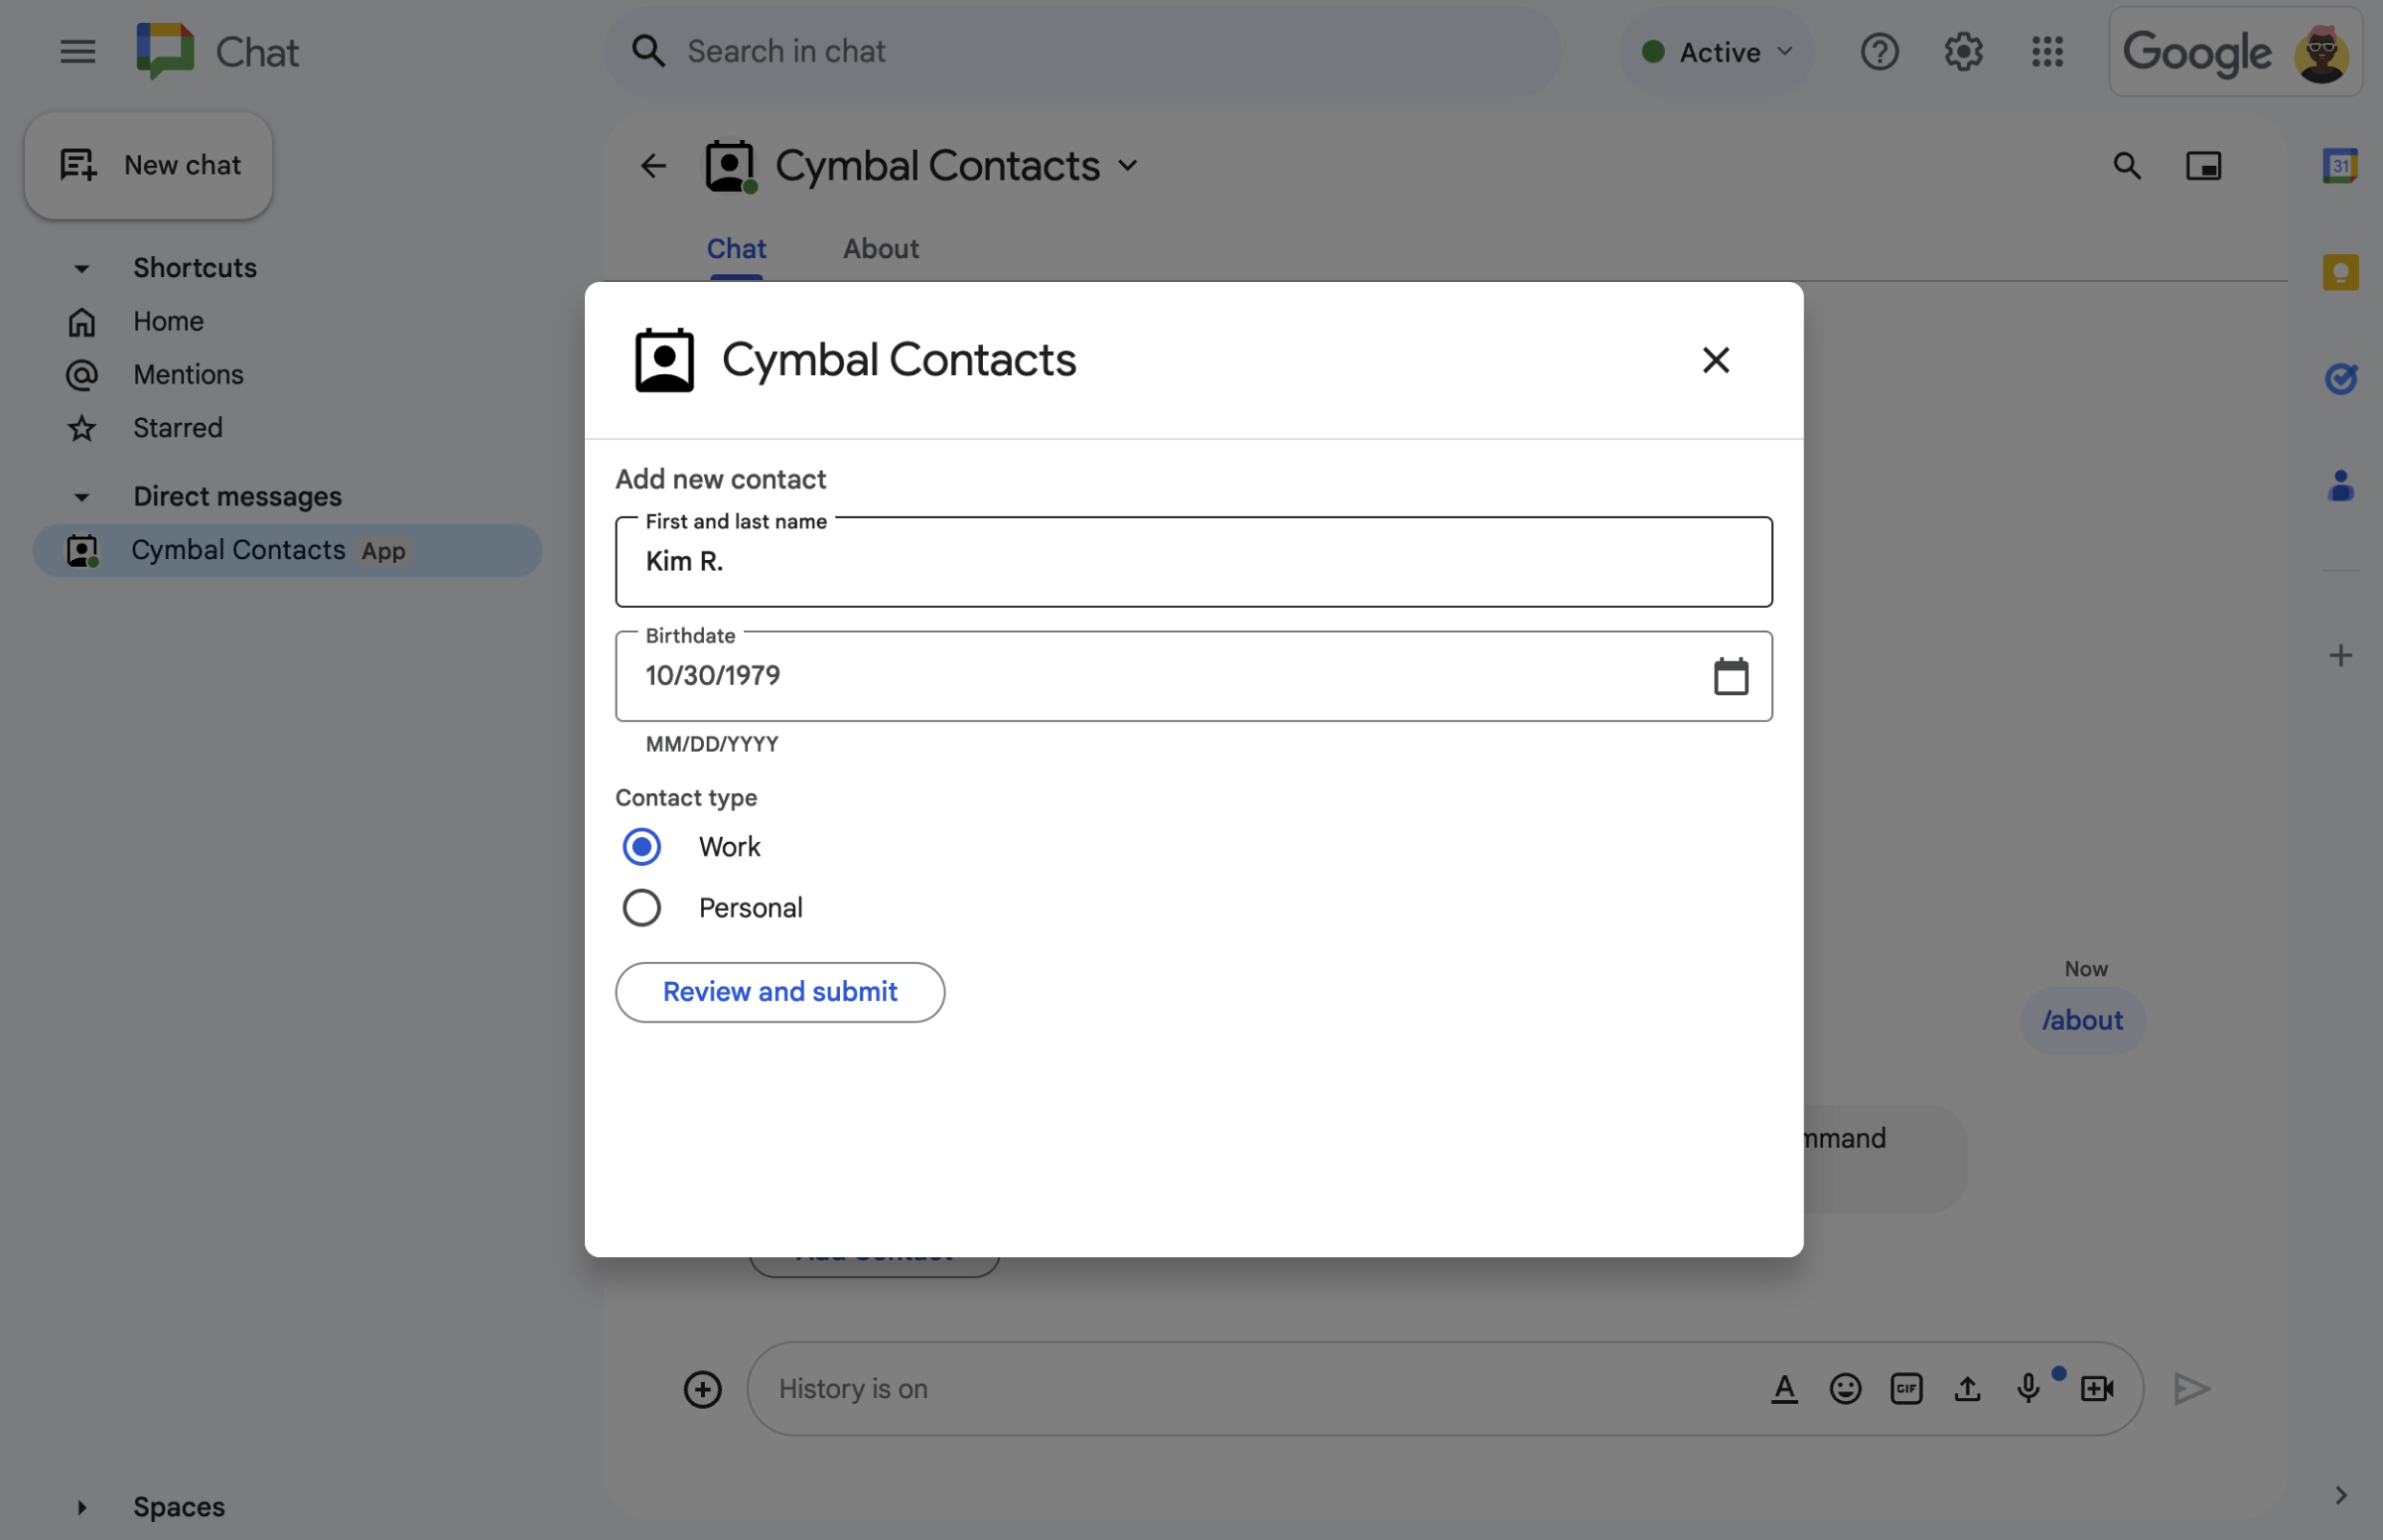
  • טופס ליצירת קשר בתיבת דו-שיח.
    איור 2. אפליקציית Chat פותחת תיבת דו-שיח שבה המשתמשים יכולים להזין מידע על איש קשר.
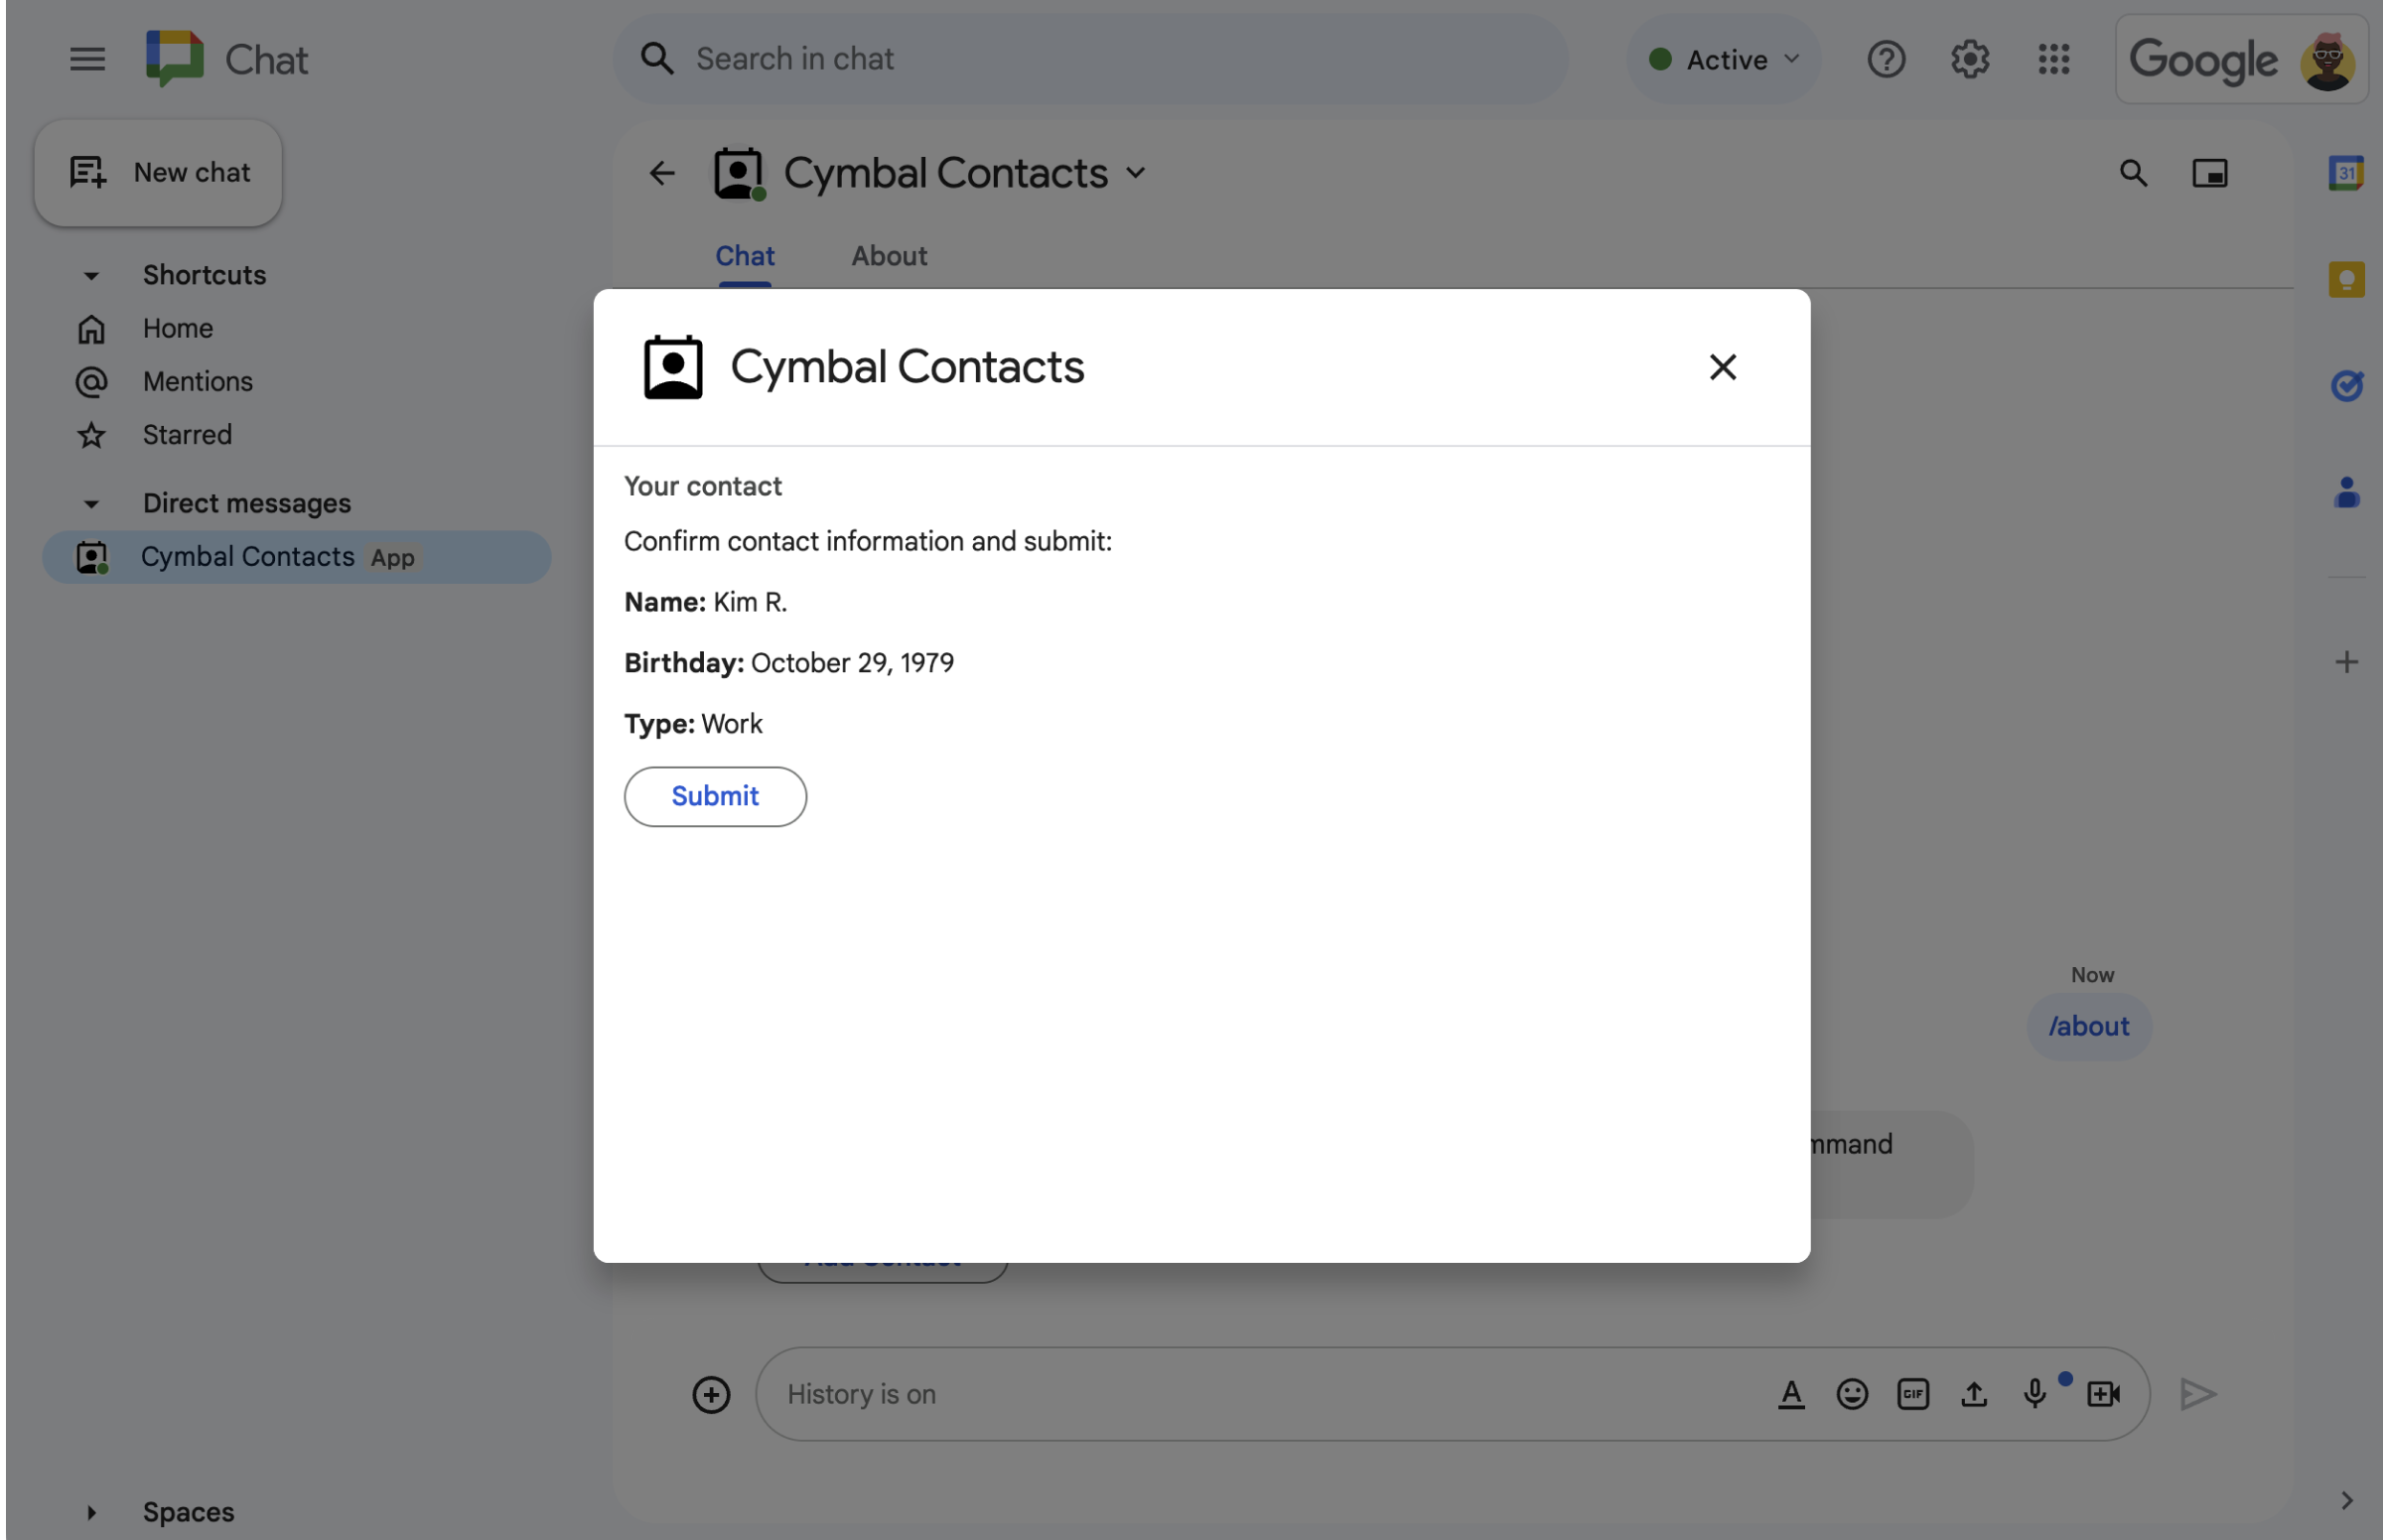
  • תיבת דו-שיח לאישור ולבדיקה.
    איור 3. אפליקציית Chat מחזירה תיבת דו-שיח לאישור, כדי שהמשתמשים יוכלו לבדוק ולאשר את המידע לפני השליחה.
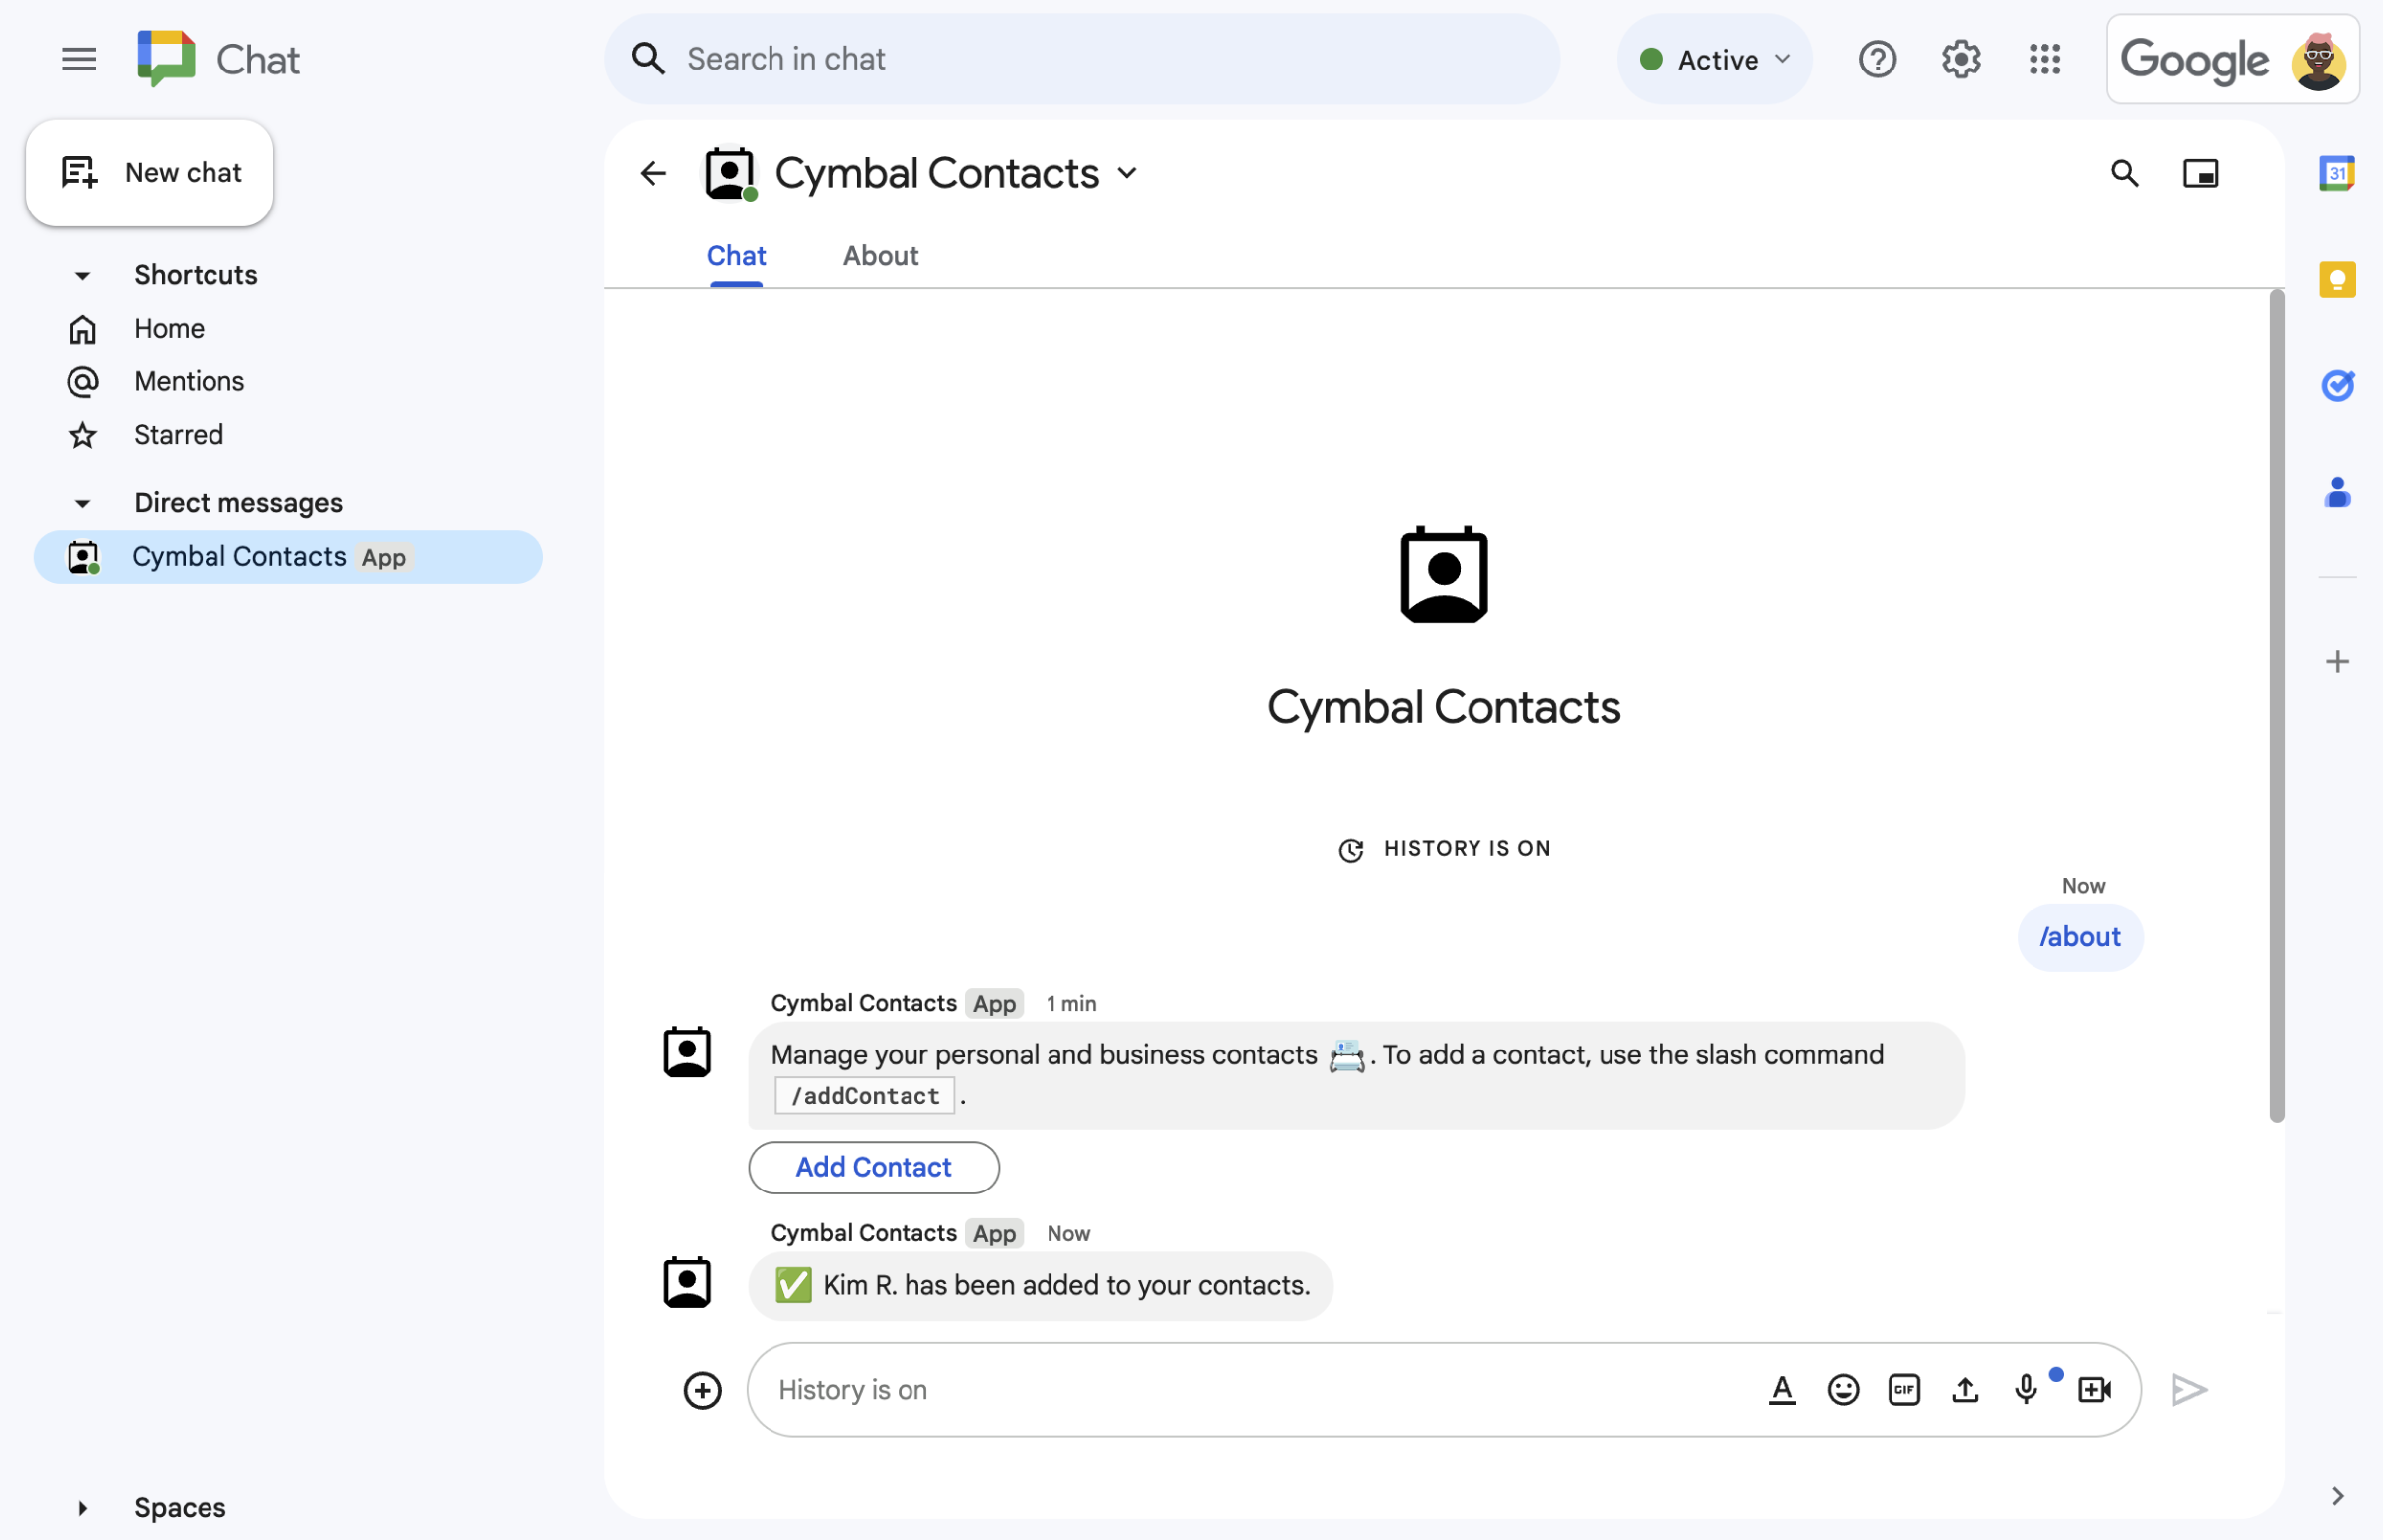
  • הודעת SMS שמאשרת את איש הקשר החדש.
    איור 4. אחרי שהמשתמש שולח את הטופס, אפליקציית Chat שולחת הודעת SMS פרטית כדי לאשר את השליחה.
  • טופס ליצירת קשר מהודעה בכרטיס.
    איור 5. האפליקציה Chat גם מציעה למשתמשים להוסיף איש קשר מכרטיס בהודעה.

דרישות מוקדמות

מטרות

ארכיטקטורה

אפליקציית Chat מובנית ב-Google Apps Script (כתוסף ל-Google Workspace שמרחיב את Google Chat) ומגיבה לאינטראקציות של משתמשים (onMessage,‏ onAppCommand ולחיצות על לחצנים שמפעילים את openInitialDialog,‏ openConfirmationDialog ו-submitForm) כדי לעבד את המידע ולהגיב למשתמשי Chat.

בדוגמה הבאה אפשר לראות איך משתמש יכול ליצור אינטראקציה עם אפליקציית Chat:

  1. משתמש פותח צ'אט ישיר עם אפליקציית Chat, או מוסיף את אפליקציית Chat למרחב קיים.

  2. אפליקציית Chat מבקשת מהמשתמש להוסיף איש קשר על ידי יצירה והצגה של טופס ליצירת קשר כאובייקט card. כדי להציג את הטופס ליצירת קשר, אפליקציית Chat מגיבה למשתמשים בדרכים הבאות:

    • משיב לתיוגים ב-@ ולהודעות ישירות (onMessage) עם הודעה בכרטיס שמכילה את טופס יצירת הקשר.
    • מגיב לפקודה דרך שורת הפקודות /addContact (onAppCommand) על ידי פתיחת תיבת דו-שיח עם טופס ליצירת קשר.
    • מגיב לפקודה דרך שורת הפקודות /about (onAppCommand) בהודעת טקסט עם הלחצן הוספת איש קשר, שהמשתמשים יכולים ללחוץ עליו כדי להפעיל את openInitialDialog ולפתוח תיבת דו-שיח עם טופס ליצירת קשר.
  3. כשמוצג למשתמש טופס ליצירת קשר, הוא מזין את הפרטים ליצירת קשר בשדות ובווידג'טים הבאים:

    • שם פרטי ושם משפחה: ווידג'ט textInput שמקבל מחרוזות.
    • תאריך לידה: ווידג'ט dateTimePicker שמקבל רק תאריכים.
    • סוג איש הקשר: selectionInputווידג'ט של כפתורי בחירה שמאפשר למשתמשים לבחור ערך מחרוזת יחיד (Personal או Work) ולשלוח אותו.
    • הלחצן בדיקה ושליחה: מערך buttonList עם הווידג'ט button שהמשתמש לוחץ עליו כדי לשלוח את הערכים שהוא מזין.
  4. אפליקציית Google Chat מפעילה את openConfirmationDialog כדי לעבד את הערכים שהמשתמש מזין, ומציגה את הערכים בכרטיס אישור.

  5. המשתמש בודק את כרטיס האישור ולוחץ על הלחצן שליחה כדי להפעיל את submitForm ולסיים את הזנת פרטי הקשר.

  6. אפליקציית Google Chat שולחת הודעת טקסט פרטית לאישור השליחה.

הכנת הסביבה

בקטע הזה מוסבר איך להגדיר פרויקט בענן של Google לאפליקציית Chat.

פותחים את פרויקט בענן ב-Google API Console.

אם הוא לא פתוח, פותחים את פרויקט בענן שרוצים להשתמש בו בדוגמה הזו:

  1. ב-Google API Console, עוברים לדף Select a project.

    בחירת פרויקט בענן

  2. בוחרים את הפרויקט בענן של Google שבו רוצים להשתמש. אפשר גם ללחוץ על Create project ולפעול לפי ההוראות במסך. אם אתם יוצרים פרויקט ב-Google Cloud, יכול להיות שתצטרכו להפעיל את החיוב בפרויקט.

הגדרת אימות והרשאה

כדי שאפליקציות ל-Google Chat יוכלו לפעול באפליקציות של Google Workspace, כולל Google Chat, צריך להגדיר מסך הסכמה ל-OAuth כדי שהמשתמשים יוכלו לאשר את האפליקציה.

במדריך הזה, אתם פורסים אפליקציית Chat שמיועדת רק לבדיקות ולשימוש פנימי, ולכן אפשר להשתמש במידע של placeholder במסך בקשת ההסכמה. לפני שמפרסמים את אפליקציית Chat, צריך להחליף את כל פרטי ה-placeholder בפרטים אמיתיים.

  1. ב-Google API Console, לוחצים על סמל התפריט > פלטפורמת אימות של Google > מיתוג.

    מעבר לדף Branding

  2. אם כבר הגדרתם את פלטפורמת האימות של Google, אתם יכולים לקבוע את ההגדרות הבאות של מסך ההסכמה ל-OAuth בקטעים Branding,‏ Audience וData Access. אם מופיעה ההודעה Google Auth platform not configured yet, לוחצים על Get Started:

    1. בקטע App Information בשדה App name, מקלידים Contact Manager.
    2. בקטע User support email, בוחרים את כתובת האימייל שלכם או קבוצה מתאימה ב-Google.
    3. לוחצים על הבא.
    4. בקטע Audience, לוחצים על Internal. אם אי אפשר לבחור באפשרות פנימי, בוחרים באפשרות חיצוני.
    5. לוחצים על הבא.
    6. בקטע Contact Information, מזינים כתובת אימייל שאליה אפשר לשלוח התראות על שינויים בפרויקט.
    7. לוחצים על הבא.
    8. בקטע Finish, קוראים את המדיניות של Google בנושא נתוני משתמשים בשירותי API. אם אתם מסכימים, מסמנים את התיבה I agree to the Google API Services: User Data Policy.
    9. לוחצים על המשך.
    10. לוחצים על יצירה.
    11. אם בחרתם באפשרות חיצוני לסוג המשתמש, מוסיפים משתמשי בדיקה:
      1. לוחצים על קהל.
      2. בקטע משתמשי בדיקה, לוחצים על הוספת משתמשים.
      3. מזינים את כתובת האימייל שלכם ושל משתמשים מורשים אחרים לבדיקה, ואז לוחצים על שמירה.

יצירה ופריסה של אפליקציית Chat

בקטע הבא, יוצרים ומעדכנים פרויקט של Apps Script עם קוד האפליקציה (Code.gs ו-appsscript.json) עבור אפליקציית Chat.

אם רוצים, אפשר לראות את הפרויקט כולו ב-GitHub.

הצגת הקוד ב-GitHub

סקירה כללית של כל קובץ:

Code.gs

מטפל בכל הלוגיקה של האפליקציה, כולל אינטראקציות עם המשתמשים (onMessage,‏ onAppCommand,‏ openInitialDialog,‏ openConfirmationDialog ו-submitForm) ווידג'טים של קלט טופס שמוצגים בכרטיסים בהודעות ובתיבות דו-שיח.

הצגת קוד (Code.gs)

apps-script/chat/contact-form-app/Code.gs
/**
 * Copyright 2025 Google LLC
 *
 * Licensed under the Apache License, Version 2.0 (the "License");
 * you may not use this file except in compliance with the License.
 * You may obtain a copy of the License at
 *
 * http://www.apache.org/licenses/LICENSE-2.0
 *
 * Unless required by applicable law or agreed to in writing, software
 * distributed under the License is distributed on an "AS IS" BASIS,
 * WITHOUT WARRANTIES OR CONDITIONS OF ANY KIND, either express or implied.
 * See the License for the specific language governing permissions and
 * limitations under the License.
 */

/**
 * Responds to a message in Google Chat.
 *
 * @param {Object} event The event object from the Google Workspace add-on.
 * @return {Object} response that handles dialogs.
 */
function onMessage(event) {
  // Reply with a message that contains a button to open the initial dialog
  return { hostAppDataAction: { chatDataAction: { createMessageAction: { message: {
    text: "To add a contact, use the `ADD CONTACT` button below.",
    accessoryWidgets: [
      { buttonList: { buttons: [{
        text: "ADD CONTACT",
        onClick: { action: {
          function: "openInitialDialog",
          interaction: "OPEN_DIALOG"
        }}
      }]}}
    ]
  }}}}};
}

/**
 * Opens the initial step of the dialog that lets users add contact details.
 *
 * @param {Object} event The event object from the Google Workspace add-on.
 * @return {Object} open the dialog.
 */
function openInitialDialog(event) {
  return { action: { navigations: [{ pushCard: { sections: [{ widgets: [
    { textInput: {
      name: "contactName",
      label: "First and last name",
      type: "SINGLE_LINE"
    }},
    { dateTimePicker: {
      name: "contactBirthdate",
      label: "Birthdate",
      type: "DATE_ONLY"
    }},
    { selectionInput: {
      name: "contactType",
      label: "Contact type",
      type: "RADIO_BUTTON",
      items: [
        { text: "Work", value: "Work", selected: false },
        { text: "Personal", value: "Personal", selected: false }
      ]
    }},
    { buttonList: { buttons: [{
      text: "NEXT",
      onClick: { action: { function : "openConfirmationDialog" }}
    }]}}
  ]}]}}]}};
}

/**
 * Opens the second step of the dialog that lets users confirm details.
 *
 * @param {Object} event The event object from the Google Workspace add-on.
 * @return {Object} update the dialog.
 */
function openConfirmationDialog(event) {
  // Retrieve the form input values
  const name = event.commonEventObject.formInputs["contactName"].stringInputs.value[0];
  const birthdate = event.commonEventObject.formInputs["contactBirthdate"].dateInput.msSinceEpoch;
  const type = event.commonEventObject.formInputs["contactType"].stringInputs.value[0];
  // Display the input values for confirmation
  return { action: { navigations: [{ pushCard: { sections: [{ widgets: [
    { textParagraph: { text: "Confirm contact information and submit:" }},
    { textParagraph: { text: "<b>Name:</b> " + name }},
    { textParagraph: { text: "<b>Birthday:</b> " + new Date(birthdate) }},
    { textParagraph: { text: "<b>Type:</b> " + type }},
    { buttonList: { buttons: [{
      text: "SUBMIT",
      onClick: { action: {
        function: "submitDialog",
        // Pass input values as parameters for last dialog step (submission)
        parameters: [
          { key: "contactName", value: name },
          { key: "contactBirthdate", value: birthdate },
          { key: "contactType", value: type }
        ]
      }}
    }]}}
  ]}]}}]}};
}

/**
 * Handles submission and closes the dialog.
 *
 * @param {Object} event The event object from the Google Workspace add-on.
 * @return {Object} close the dialog with a status in text notification or message.
 */
function submitDialog(event) {
  // Validate the parameters.
  if (!event.commonEventObject.parameters["contactName"]) {
    return { action: {
      navigations: [{ endNavigation: { action: "CLOSE_DIALOG"}}],
      notification: { text: "Failure, the contact name was missing!" }
    }};
  }

  return { hostAppDataAction: { chatDataAction: { createMessageAction: { message: {
    text: "✅ " + event.commonEventObject.parameters["contactName"] + " has been added to your contacts."
  }}}}};
}
appsscript.json

מניפסט Apps Script שמגדיר ומגדיר את פרויקט Apps Script עבור אפליקציית Chat.

הצגת קוד (appsscript.json)

apps-script/chat/contact-form-app/appsscript.json
{
  "timeZone": "America/Los_Angeles",
  "dependencies": {},
  "exceptionLogging": "STACKDRIVER",
  "runtimeVersion": "V8",
  "addOns": {
    "common": {
      "name": "Contact Form app",
      "logoUrl": "https://developers.google.com/workspace/add-ons/images/contact-icon.png"
    },
    "chat": {}
  }
}

יצירת פרויקט Apps Script

כדי ליצור פרויקט Apps Script מהקבצים Code.gs ו-appsscript.json:

  1. עוברים אל Google Apps Script ולוחצים על New project (פרויקט חדש).
  2. נותנים שם לפרויקט Apps Script:

    1. לוחצים על פרויקט בלי שם.

    2. בשדה Project title, כותבים Contact Manager - Google Chat app.

    3. לוחצים על Rename.

  3. מחליפים את התוכן של Code.gs בקוד לדוגמה Code.gs שמופיע למעלה.

  4. לוחצים על Project Settings (הגדרות הפרויקט) הסמל של הגדרות הפרויקט ובוחרים באפשרות Show "appsscript.json" manifest file in editor (הצגת קובץ המניפסט appsscript.json בכלי העריכה).

  5. חוזרים אל העורך ומחליפים את התוכן של appsscript.json בקוד המניפסט appsscript.json שלמעלה, ואז שומרים את הפרויקט.

בעתיד, אם תרצו להשתמש בממשקי Google API מסוימים או לפרסם את האפליקציה, תצטרכו לשייך את פרויקט בענן לפרויקט Apps Script. במדריך הזה לא צריך לעשות את זה. מידע נוסף זמין במדריך לפרויקטים ב-Google Cloud.

יצירת פריסה של Apps Script

אחרי שכל הקוד במקום, פורסים את פרויקט Apps Script. משתמשים במזהה הפריסה כשמגדירים את אפליקציית Chat ב-Google Cloud.

  1. ב-Apps Script, פותחים את הפרויקט של אפליקציית Chat.

    מעבר אל Apps Script

  2. לוחצים על פריסה > פריסה חדשה.

  3. אם האפשרות תוסף עדיין לא נבחרה, לוחצים על סוגי הפריסה הסמל של הגדרות הפרויקט לצד בחירת סוג ובוחרים באפשרות תוסף.

  4. בשדה תיאור, מזינים תיאור לגרסה הזו, כמו Test of Contact Manager.

  5. לוחצים על פריסה. ‫Apps Script מדווח על פריסה מוצלחת ומספק מזהה פריסה.

  6. לוחצים על העתקה כדי להעתיק את מזהה הפריסה ואז לוחצים על סיום.

הגדרת אפליקציית Chat ב-Google API Console

בקטע הזה מוסבר איך להגדיר את Google Chat API ב-Google API Console עם מידע על אפליקציית Chat, כולל מזהה הפריסה שיצרתם זה עתה מפרויקט Apps Script.

  1. ב-Google API Console, לוחצים על תפריט > APIs & Services > Enabled APIs & Services > Google Chat API > Configuration.

    מעבר להגדרות של Chat API

  2. בשדה App name, כותבים Contact Manager.

  3. בקטע כתובת ה-URL של האווטאר, מקלידים https://developers.google.com/chat/images/contact-icon.png.

  4. בקטע תיאור, מקלידים Manage your personal and business contacts.

  5. לוחצים על המתג הפעלת תכונות אינטראקטיביות כדי להפעיל אותו.

  6. בקטע פונקציונליות, בוחרים באפשרות הצטרפות למרחבים ולשיחות קבוצתיות.

  7. בקטע הגדרות חיבור, בוחרים באפשרות Apps Script.

  8. בקטע Deployment ID (מזהה פריסה), מדביקים את מזהה הפריסה של Apps Script שהועתק בקטע הקודם כשנוצרה הפריסה של Apps Script.

  9. בקטע Triggers (טריגרים), מגדירים את הפונקציות שמגיבות לאינטראקציות של המשתמשים:

    • בטריגר Message, מזינים onMessage.
    • בטריגר App command (פקודת אפליקציה), מזינים onAppCommand.
  10. בקטע Commands (פקודות), מגדירים את הפקודות דרך שורת הפקודות /about ו-/addContact:

    1. לוחצים על הוספת פקודה כדי להגדיר את הפקודה הראשונה דרך שורת הפקודות.
    2. בשדה Command ID (מזהה הפקודה), כותבים 1.
    3. בקטע תיאור, מקלידים את Learn how to use this Chat app to manage your contacts.
    4. בקטע סוג הפקודה, בוחרים באפשרות Slash command.
    5. בשדה Slash command name, כותבים /about.
    6. לוחצים על סיום.
    7. כדי להגדיר עוד פקודה דרך שורת הפקודות, לוחצים על הוספת פקודה.
    8. בשדה Command ID (מזהה הפקודה), כותבים 2.
    9. בקטע תיאור, מקלידים את Submit information about a contact.
    10. בקטע סוג הפקודה, בוחרים באפשרות Slash command.
    11. בשדה Slash command name, כותבים /addContact.
    12. בוחרים באפשרות הקישור פותח תיבת דו-שיח.
    13. לוחצים על סיום.
  11. בקטע חשיפה, מסמנים את התיבה האפליקציה הזו ב-Chat תהיה זמינה לאנשים ולקבוצות ספציפיים ב-YOUR DOMAIN ומזינים את כתובת האימייל.

  12. בקטע יומנים, בוחרים באפשרות רישום שגיאות ביומן.

  13. לוחצים על שמירה. מופיעה הודעה שההגדרה נשמרה.

אפשר להתקין את האפליקציה של Chat ולבדוק אותה ב-Chat.

בדיקת אפליקציית Chat

כדי לבדוק את אפליקציית Chat, פותחים מרחב לצ'אט ישיר עם אפליקציית Chat ושולחים הודעה:

  1. פותחים את Google Chat באמצעות חשבון Google Workspace שציינתם כשנרשמתם כבודקים מהימנים.

    מעבר אל Google Chat

  2. לוחצים על צ'אט חדש.
  3. בשדה Add 1 or more people (הוספת אדם אחד או יותר), מקלידים את השם של אפליקציית Chat.
  4. בוחרים את אפליקציית Chat מתוך התוצאות. ייפתח צ'אט ישיר.

  1. בצ'אט הישיר החדש עם אפליקציית Chat, כותבים /addContact ולוחצים על Enter.

  2. בתיבת הדו-שיח שנפתחת, מזינים את הפרטים ליצירת קשר:

    1. בתיבת הטקסט First and last name, מזינים שם.
    2. בחלונית לבחירת תאריך של תאריך הלידה, בוחרים תאריך.
    3. בקטע סוג איש הקשר, בוחרים בלחצן הבחירה עבודה או אישי.
  3. לוחצים על בדיקה ושליחה.

  4. בתיבת הדו-שיח לאישור, בודקים את המידע ששלחתם ולוחצים על שליחה. אפליקציית Chat תשלח תשובה בהודעת טקסט עם הכיתוב ✅ CONTACT NAME has been added to your contacts..

  5. אפשר גם לבדוק ולשלוח את טופס יצירת הקשר בדרכים הבאות:

    • משתמשים בפקודה דרך שורת הפקודות /about. אפליקציית הצ'אט משיבה בהודעת SMS ובווידג'ט של אביזר עם הכיתוב Add a contact. אפשר ללחוץ על הכפתור כדי לפתוח תיבת דו-שיח עם הטופס ליצירת קשר.
    • שולחים לאפליקציית Chat הודעה בצ'אט ישיר בלי להשתמש בפקודה דרך שורת הפקודות, כמו Hello. אפליקציית Chat משיבה עם טקסט וכרטיס שמכילים את טופס יצירת הקשר.

הסרת המשאבים

כדי להימנע מחיובים בחשבון Google Cloud בגלל השימוש במשאבים שנעשה במסגרת המדריך הזה, מומלץ למחוק את פרויקט בענן.

  1. במסוף Google API, עוברים לדף Manage resources. לוחצים על תפריט > IAM & Admin > Manage Resources.

    כניסה ל-Resource Manager

  2. ברשימת הפרויקטים, בוחרים את הפרויקט שרוצים למחוק ולוחצים על מחיקה .
  3. כדי למחוק את הפרויקט, כותבים את מזהה הפרויקט בתיבת הדו-שיח ולוחצים על Shut down.

אפליקציות ל-Chat שהן לא תוספים: ניהול אנשי קשר מ-Google Chat

ההוראות ודוגמאות הקוד הבאות רלוונטיות לאפליקציית Chat שהיא לא תוסף ל-Google Workspace (אפשר לראות ב-GitHub).

קובצי Apps Script

main.gs

מטפל בכל הלוגיקה של האפליקציה, כולל אירועי אינטראקציה שקשורים למקרים שבהם משתמשים שולחים הודעות לאפליקציית Chat, לוחצים על לחצנים בהודעה מאפליקציית Chat או פותחים וסוגרים תיבות דו-שיח.

apps-script/contact-form-app/main.gs
/**
 * Copyright 2024 Google Inc.
 *
 * Licensed under the Apache License, Version 2.0 (the "License");
 * you may not use this file except in compliance with the License.
 * You may obtain a copy of the License at
 *
 * http://www.apache.org/licenses/LICENSE-2.0
 *
 * Unless required by applicable law or agreed to in writing, software
 * distributed under the License is distributed on an "AS IS" BASIS,
 * WITHOUT WARRANTIES OR CONDITIONS OF ANY KIND, either express or implied.
 * See the License for the specific language governing permissions and
 * limitations under the License.
 */

/**
 * Responds to a MESSAGE interaction event in Google Chat.
 *
 * @param {Object} event the MESSAGE interaction event from Chat API.
 * @return {Object} message response that opens a dialog or sends private
 *                          message with text and card.
 */
function onMessage(event) {
  if (event.message.slashCommand) {
    switch (event.message.slashCommand.commandId) {
      case 1:
        // If the slash command is "/about", responds with a text message and button
        // that opens a dialog.
        return {
          text: "Manage your personal and business contacts 📇. To add a " +
                  "contact, use the slash command `/addContact`.",
          accessoryWidgets: [{
            buttonList: { buttons: [{
              text: "Add Contact",
              onClick: { action: {
                function: "openInitialDialog",
                interaction: "OPEN_DIALOG"
              }}
            }]}
          }]
        }
      case 2:
        // If the slash command is "/addContact", opens a dialog.
        return openInitialDialog();
    }
  }

  // If user sends the Chat app a message without a slash command, the app responds
  // privately with a text and card to add a contact.
  return {
    privateMessageViewer: event.user,
    text: "To add a contact, try `/addContact` or complete the form below:",
    cardsV2: [{
      cardId: "addContactForm",
      card: {
        header: { title: "Add a contact" },
        sections:[{ widgets: CONTACT_FORM_WIDGETS.concat([{
          buttonList: { buttons: [{
            text: "Review and submit",
            onClick: { action: { function : "openConfirmation" }}
          }]}
        }])}]
      }
    }]
  };
}

/**
 * Responds to CARD_CLICKED interaction events in Google Chat.
 *
 * @param {Object} event the CARD_CLICKED interaction event from Google Chat.
 * @return {Object} message responses specific to the dialog handling.
 */
function onCardClick(event) {
  // Initial dialog form page
  if (event.common.invokedFunction === "openInitialDialog") {
    return openInitialDialog();
  // Confirmation dialog form page
  } else if (event.common.invokedFunction === "openConfirmation") {
    return openConfirmation(event);
  // Submission dialog form page
  } else if (event.common.invokedFunction === "submitForm") {
    return submitForm(event);
  }
}

/**
 * Opens the initial step of the dialog that lets users add contact details.
 *
 * @return {Object} a message with an action response to open a dialog.
 */
function openInitialDialog() {
  return { actionResponse: {
    type: "DIALOG",
    dialogAction: { dialog: { body: { sections: [{
      header: "Add new contact",
      widgets: CONTACT_FORM_WIDGETS.concat([{
        buttonList: { buttons: [{
          text: "Review and submit",
          onClick: { action: { function: "openConfirmation" }}
        }]}
      }])
    }]}}}
  }};
}

/**
 * Returns the second step as a dialog or card message that lets users confirm details.
 *
 * @param {Object} event the interactive event with form inputs.
 * @return {Object} returns a dialog or private card message.
 */
function openConfirmation(event) {
  const name = fetchFormValue(event, "contactName") ?? "";
  const birthdate = fetchFormValue(event, "contactBirthdate") ?? "";
  const type = fetchFormValue(event, "contactType") ?? "";
  const cardConfirmation = {
    header: "Your contact",
    widgets: [{
      textParagraph: { text: "Confirm contact information and submit:" }}, {
      textParagraph: { text: "<b>Name:</b> " + name }}, {
      textParagraph: {
        text: "<b>Birthday:</b> " + convertMillisToDateString(birthdate)
      }}, {
      textParagraph: { text: "<b>Type:</b> " + type }}, {
      buttonList: { buttons: [{
        text: "Submit",
        onClick: { action: {
          function: "submitForm",
          parameters: [{
            key: "contactName", value: name }, {
            key: "contactBirthdate", value: birthdate }, {
            key: "contactType", value: type
          }]
        }}
      }]}
    }]
  };

  // Returns a dialog with contact information that the user input.
  if (event.isDialogEvent) {
    return { action_response: {
      type: "DIALOG",
      dialogAction: { dialog: { body: { sections: [ cardConfirmation ]}}}
    }};
  }

  // Updates existing card message with contact information that the user input.
  return {
    actionResponse: { type: "UPDATE_MESSAGE" },
    privateMessageViewer: event.user,
    cardsV2: [{
      card: { sections: [cardConfirmation]}
    }]
  }
}

/**
  * Validates and submits information from a dialog or card message
  * and notifies status.
  *
  * @param {Object} event the interactive event with parameters.
  * @return {Object} a message response that opens a dialog or posts a private
  *                  message.
  */
function submitForm(event) {
  const contactName = event.common.parameters["contactName"];
  // Checks to make sure the user entered a contact name.
  // If no name value detected, returns an error message.
  const errorMessage = "Don't forget to name your new contact!";
  if (!contactName && event.dialogEventType === "SUBMIT_DIALOG") {
    return { actionResponse: {
      type: "DIALOG",
      dialogAction: { actionStatus: {
        statusCode: "INVALID_ARGUMENT",
        userFacingMessage: errorMessage
      }}
    }};
  }
  if (!contactName) {
    return {
      privateMessageViewer: event.user,
      text: errorMessage
    };
  }

  // The Chat app indicates that it received form data from the dialog or card.
  // Sends private text message that confirms submission.
  const confirmationMessage = "✅ " + contactName + " has been added to your contacts.";
  if (event.dialogEventType === "SUBMIT_DIALOG") {
    return {
      actionResponse: {
        type: "DIALOG",
        dialogAction: { actionStatus: {
          statusCode: "OK",
          userFacingMessage: "Success " + contactName
        }}
      }
    };
  }
  return {
    actionResponse: { type: "NEW_MESSAGE" },
    privateMessageViewer: event.user,
    text: confirmationMessage
  };
}

/**
 * Extracts form input value for a given widget.
 *
 * @param {Object} event the CARD_CLICKED interaction event from Google Chat.
 * @param {String} widgetName a unique ID for the widget, specified in the widget's name field.
 * @returns the value inputted by the user, null if no value can be found.
 */
function fetchFormValue(event, widgetName) {
  const formItem = event.common.formInputs[widgetName][""];
  // For widgets that receive StringInputs data, the value input by the user.
  if (formItem.hasOwnProperty("stringInputs")) {
    const stringInput = event.common.formInputs[widgetName][""].stringInputs.value[0];
    if (stringInput != null) {
      return stringInput;
    }
  // For widgets that receive dateInput data, the value input by the user.
  } else if (formItem.hasOwnProperty("dateInput")) {
    const dateInput = event.common.formInputs[widgetName][""].dateInput.msSinceEpoch;
     if (dateInput != null) {
       return dateInput;
     }
  }

  return null;
}

/**
 * Converts date in milliseconds since epoch to user-friendly string.
 *
 * @param {Object} millis the milliseconds since epoch time.
 * @return {string} Display-friend date (English US).
 */
function convertMillisToDateString(millis) {
  const date = new Date(millis);
  const options = { year: 'numeric', month: 'long', day: 'numeric' };
  return date.toLocaleDateString('en-US', options);
}
contactForm.gs

מכיל את הווידג'טים שמקבלים נתוני טופס מהמשתמשים. ווידג'טים של קלט בטופס מוצגים בכרטיסים שמופיעים בהודעות ובתיבות דו-שיח.

apps-script/contact-form-app/contactForm.gs
/**
 * Copyright 2024 Google Inc.
 *
 * Licensed under the Apache License, Version 2.0 (the "License");
 * you may not use this file except in compliance with the License.
 * You may obtain a copy of the License at
 *
 * http://www.apache.org/licenses/LICENSE-2.0
 *
 * Unless required by applicable law or agreed to in writing, software
 * distributed under the License is distributed on an "AS IS" BASIS,
 * WITHOUT WARRANTIES OR CONDITIONS OF ANY KIND, either express or implied.
 * See the License for the specific language governing permissions and
 * limitations under the License.
 */

/**
 * The section of the contact card that contains the form input widgets. Used in a dialog and card message.
 * To add and preview widgets, use the Card Builder: https://addons.gsuite.google.com/uikit/builder
 */
const CONTACT_FORM_WIDGETS = [
  {
    "textInput": {
      "name": "contactName",
      "label": "First and last name",
      "type": "SINGLE_LINE"
    }
  },
  {
    "dateTimePicker": {
      "name": "contactBirthdate",
      "label": "Birthdate",
      "type": "DATE_ONLY"
    }
  },
  {
    "selectionInput": {
      "name": "contactType",
      "label": "Contact type",
      "type": "RADIO_BUTTON",
      "items": [
        {
          "text": "Work",
          "value": "Work",
          "selected": false
        },
        {
          "text": "Personal",
          "value": "Personal",
          "selected": false
        }
      ]
    }
  }
];
appsscript.json

מניפסט Apps Script שמגדיר ומגדיר את פרויקט Apps Script עבור אפליקציית Chat שאינה תוסף.

apps-script/contact-form-app/appsscript.json
{
  "timeZone": "America/Los_Angeles",
  "dependencies": {},
  "exceptionLogging": "STACKDRIVER",
  "runtimeVersion": "V8",
  "chat": {}
}

יצירה והגדרה של פרויקט Apps Script

  1. פותחים את הפרויקט של Apps Script Manage contacts in Google Chat עבור אפליקציית Chat שאינה תוסף, ויוצרים עותק.
  2. כשמגדירים את Chat API ב-Google API Console: מבטלים את הסימון של Build this Chat app as a Google Workspace add-on (בניית אפליקציית Chat כתוסף ל-Google Workspace). תיפתח תיבת דו-שיח שבה תתבקשו לאשר את הפעולה. בתיבת הדו-שיח, לוחצים על השבתה.