Google Chat에서 연락처 수집 및 관리하기

이 튜토리얼에서는 Google Chat 사용자가 개인 및 비즈니스 연락처를 관리하는 데 도움이 되는 Google Chat 앱을 빌드하는 방법을 알아봅니다. 정보를 수집하기 위해 Chat 앱은 카드 메시지와 대화상자에서 사용자에게 문의 양식을 작성하라는 메시지를 표시합니다.

Chat 앱의 작동 방식은 다음을 참고하세요.

  • 슬래시 명령어의 문의 양식
    그림 1. Chat 앱은 슬래시 명령어 /about에 문자 메시지와 문의 양식을 여는 버튼으로 응답합니다.
  • 대화상자의 문의 양식
    그림 2. Chat 앱은 사용자가 연락처에 관한 정보를 입력할 수 있는 대화상자를 엽니다.
  • 확인 및 검토 대화상자
    그림 3. 사용자가 제출하기 전에 정보를 검토하고 확인할 수 있도록 Chat 앱에서 확인 대화상자를 반환합니다.
  • 새 연락처를 확인하는 문자 메시지
    그림 4. 사용자가 양식을 제출하면 Chat 앱에서 제출을 확인하기 위해 비공개 문자 메시지를 보냅니다.
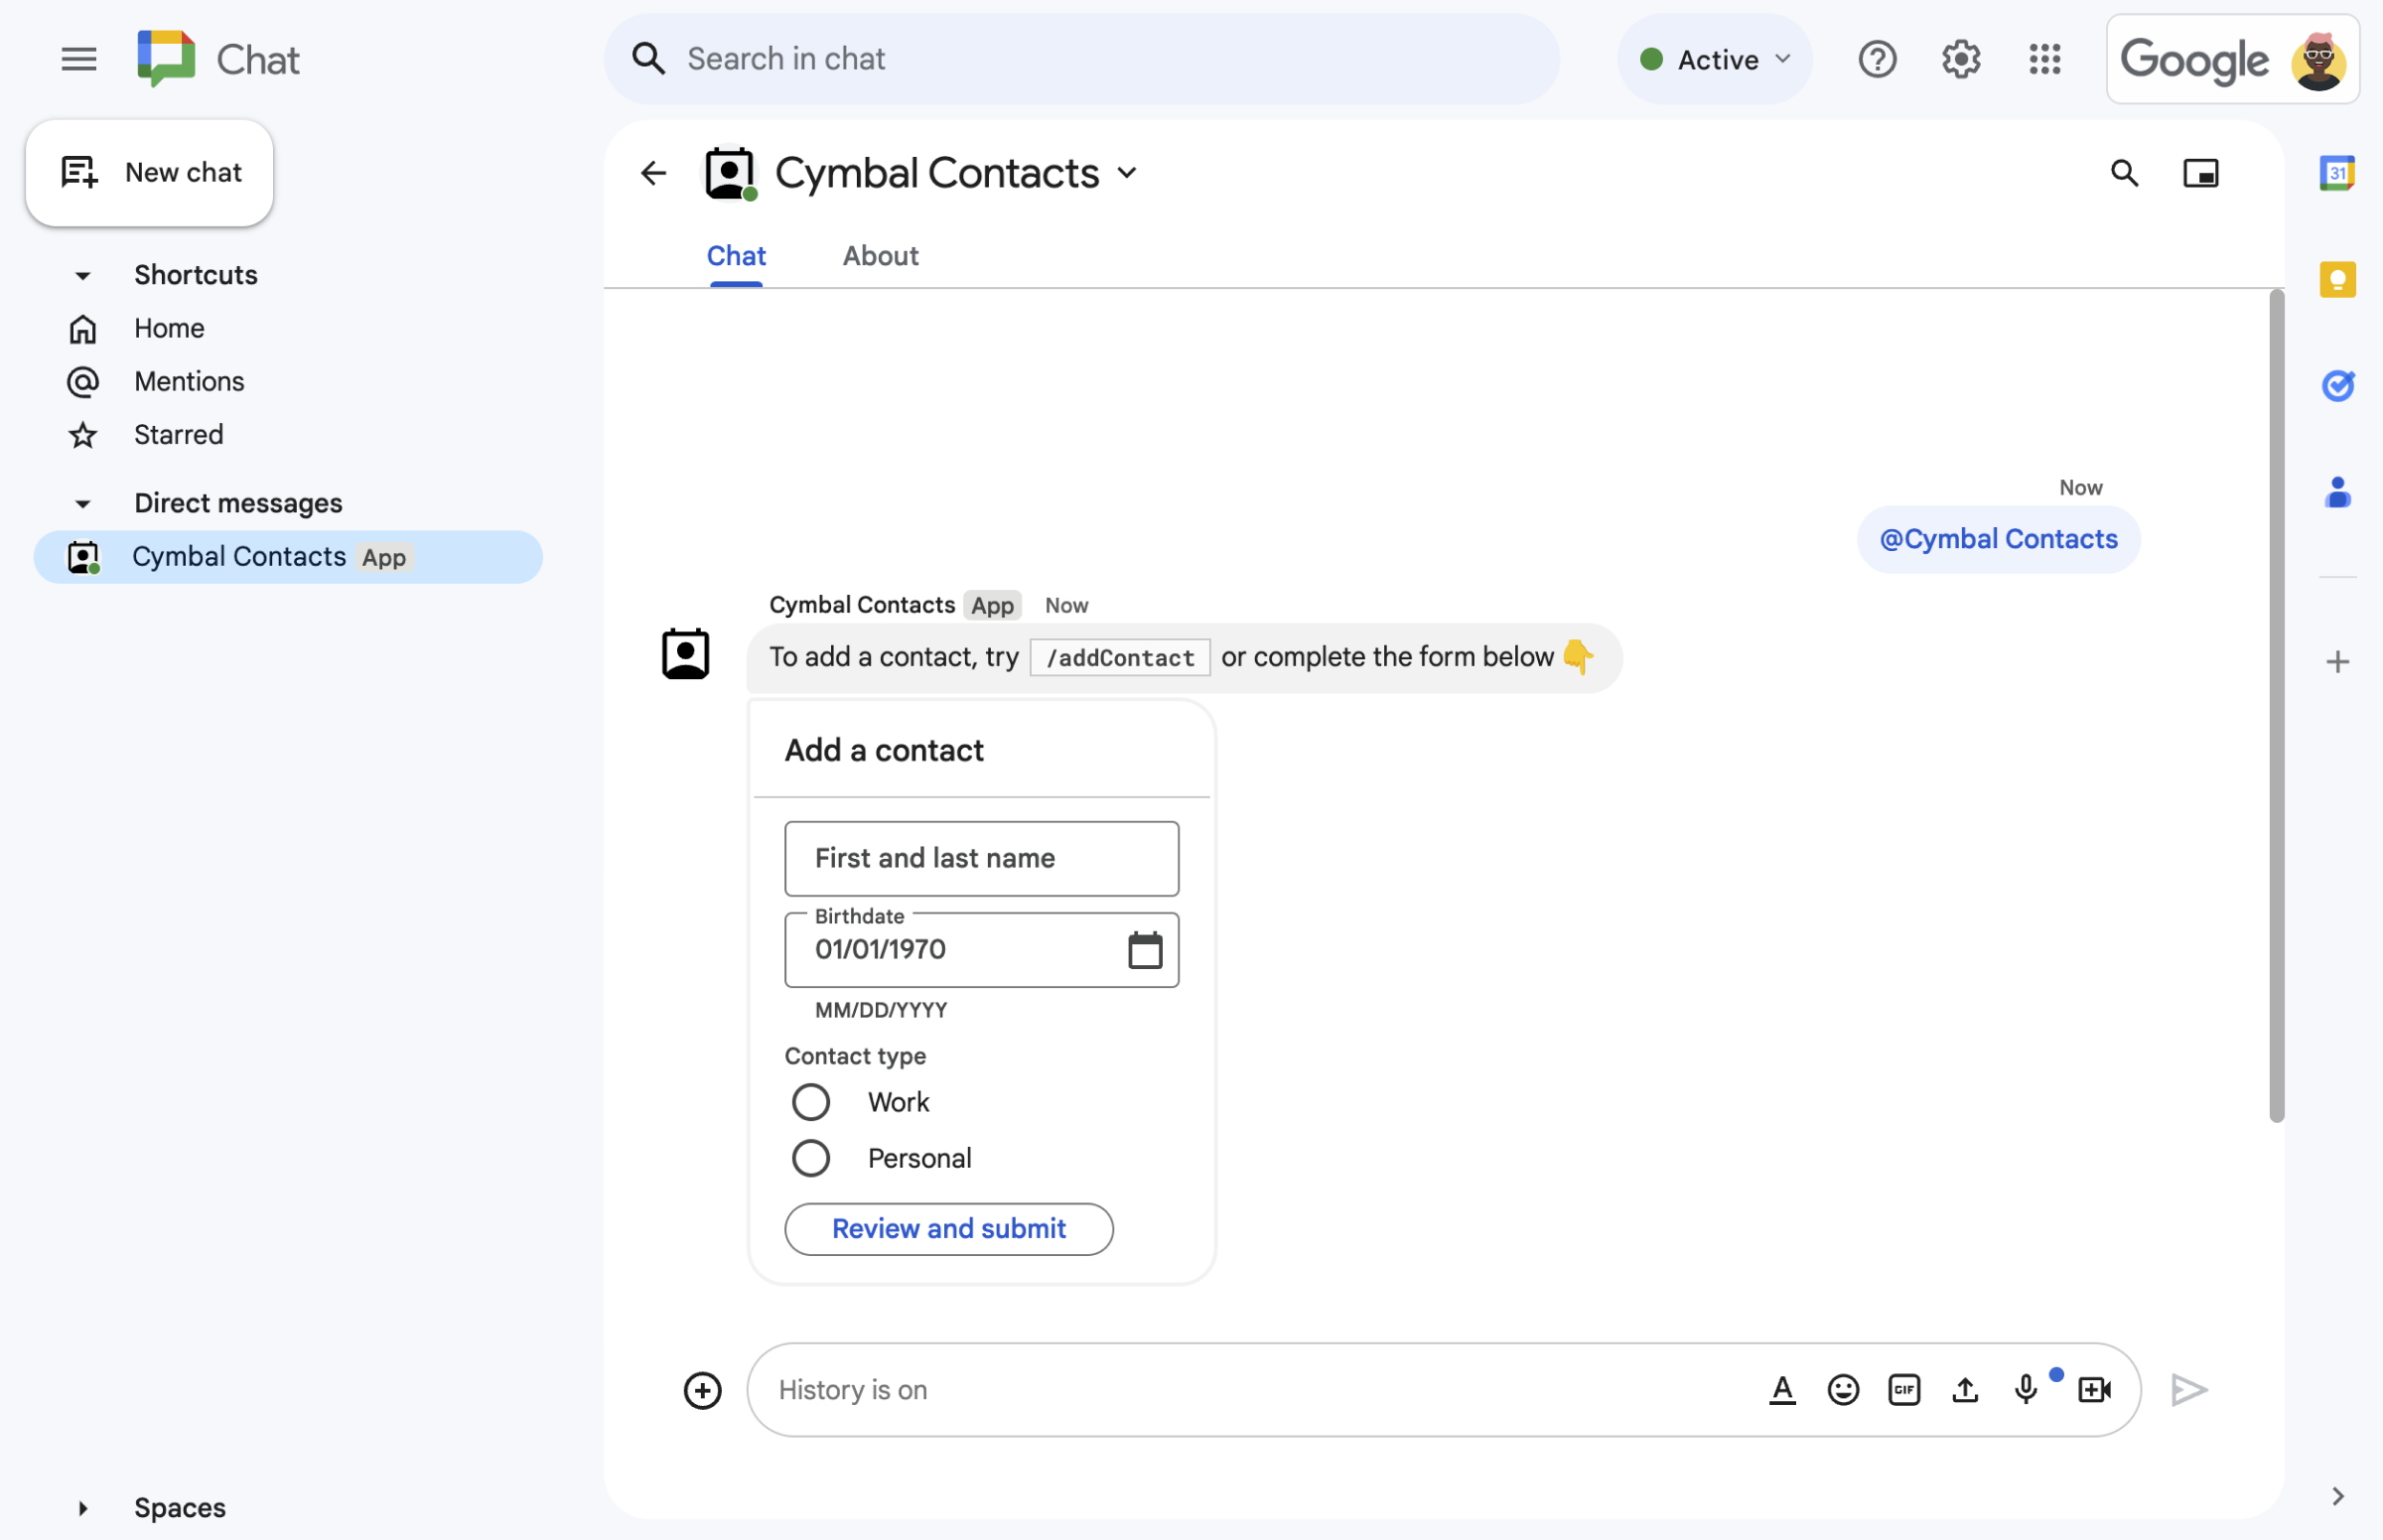
  • 카드 메시지의 문의 양식
    그림 5. 또한 채팅 앱은 사용자에게 메시지의 카드에서 연락처를 추가하라는 메시지를 표시합니다.

기본 요건

목표

아키텍처

Chat 앱은 Google Apps Script (Google Chat을 확장하는 Google Workspace 부가기능)로 빌드되며 사용자 상호작용 (onMessage, onAppCommand, openInitialDialog, openConfirmationDialog, submitForm를 호출하는 버튼 클릭)에 응답하여 Chat 사용자를 처리하고 응답합니다.

다음은 사용자가 일반적으로 채팅 앱과 상호작용하는 방식을 보여줍니다.

  1. 사용자가 Chat 앱과의 채팅 메시지를 열거나 기존 스페이스에 Chat 앱을 추가합니다.

  2. 채팅 앱은 연락처 양식을 card 객체로 빌드하고 표시하여 사용자에게 연락처를 추가하라는 메시지를 표시합니다. 문의 양식을 표시하기 위해 Chat 앱은 다음과 같은 방식으로 사용자에게 응답합니다.

    • @멘션 및 채팅 메시지 (onMessage)에 문의 양식이 포함된 카드 메시지로 응답합니다.
    • 연락처 양식이 포함된 대화상자를 열어 슬래시 명령어 /addContact (onAppCommand)에 응답합니다.
    • 사용자가 클릭하여 openInitialDialog를 호출하고 문의 양식이 있는 대화상자를 열 수 있는 연락처 추가 버튼이 있는 문자 메시지로 슬래시 명령어 /about (onAppCommand)에 응답합니다.
  3. 문의 양식이 표시되면 사용자는 다음 필드와 위젯에 연락처 정보를 입력합니다.

    • 이름 및 성: 문자열을 허용하는 textInput 위젯입니다.
    • 생일: 날짜만 허용하는 dateTimePicker 위젯입니다.
    • 문의 유형: 사용자가 단일 문자열 값 (Personal 또는 Work)을 선택하고 제출할 수 있는 라디오 버튼의 selectionInput 위젯입니다.
    • 검토 및 제출 버튼: 사용자가 입력한 값을 제출하기 위해 클릭하는 button 위젯이 있는 buttonList 배열입니다.
  4. Google Chat 앱은 openConfirmationDialog를 호출하여 사용자가 입력한 값을 처리하고 확인 카드에 값을 표시합니다.

  5. 사용자가 확인 카드를 검토하고 제출 버튼을 클릭하여 submitForm를 호출하고 연락처 정보를 완료합니다.

  6. Google Chat 앱에서 제출을 확인하는 비공개 문자 메시지를 보냅니다.

환경 준비

이 섹션에서는 Chat 앱을 위해 Google Cloud 프로젝트를 구성하는 방법을 보여줍니다.

Google API 콘솔에서 Cloud 프로젝트 열기

아직 열지 않은 경우 이 샘플에 사용할 Cloud 프로젝트를 엽니다.

  1. Google API 콘솔에서 프로젝트 선택 페이지로 이동합니다.

    Cloud 프로젝트 선택

  2. 사용할 Google Cloud 프로젝트를 선택합니다. 또는 프로젝트 만들기를 클릭하고 화면에 표시된 안내를 따릅니다. Google Cloud 프로젝트를 만드는 경우 프로젝트에 결제를 사용 설정해야 할 수 있습니다.

인증 및 승인 설정

Google Chat 앱을 사용하려면 사용자가 Google Chat을 비롯한 Google Workspace 애플리케이션에서 앱을 승인할 수 있도록 OAuth 동의 화면을 구성해야 합니다.

이 튜토리얼에서는 테스트 및 내부용으로만 사용되는 Chat 앱을 배포하므로 동의 화면에 자리표시자 정보를 사용해도 됩니다. Chat 앱을 게시하기 전에 자리표시자 정보를 실제 정보로 바꿉니다.

  1. Google API 콘솔에서 메뉴 > Google 인증 플랫폼 > 브랜딩으로 이동합니다.

    브랜딩으로 이동

  2. 이미 Google 인증 플랫폼을 구성한 경우 브랜딩, 대상, 데이터 액세스에서 다음 OAuth 동의 화면 설정을 구성할 수 있습니다. Google 인증 플랫폼이 아직 구성되지 않음이라는 메시지가 표시되면 시작하기를 클릭합니다.

    1. 앱 정보의 앱 이름에 Contact Manager를 입력합니다.
    2. 사용자 지원 이메일에서 이메일 주소 또는 적절한 Google 그룹을 선택합니다.
    3. 다음을 클릭합니다.
    4. 대상에서 내부를 선택합니다. 내부를 선택할 수 없는 경우 외부를 선택합니다.
    5. 다음을 클릭합니다.
    6. 연락처 정보에서 프로젝트 변경사항에 대한 알림을 받을 수 있는 이메일 주소를 입력합니다.
    7. 다음을 클릭합니다.
    8. 완료에서 Google API 서비스 사용자 데이터 정책을 검토하고 동의하는 경우 Google API 서비스: 사용자 데이터 정책에 동의합니다를 선택합니다.
    9. 계속을 클릭합니다.
    10. 만들기를 클릭합니다.
    11. 사용자 유형으로 외부를 선택한 경우 테스트 사용자를 추가합니다.
      1. 잠재고객을 클릭합니다.
      2. 테스트 사용자에서 사용자 추가를 클릭합니다.
      3. 이메일 주소와 기타 승인된 테스트 사용자를 입력한 후 저장을 클릭합니다.

Chat 앱 만들기 및 배포

다음 섹션에서는 채팅 앱의 애플리케이션 코드 (Code.gs 및 appsscript.json)를 사용하여 Apps Script 프로젝트를 만들고 업데이트합니다.

원하는 경우 GitHub에서 전체 프로젝트를 확인할 수 있습니다.

GitHub에서 보기

각 파일의 개요는 다음과 같습니다.

Code.gs

사용자 상호작용 (onMessage, onAppCommand, openInitialDialog, openConfirmationDialog, submitForm)과 메시지 및 대화상자의 카드에 표시되는 양식 입력 위젯을 비롯한 모든 앱 로직을 처리합니다.

Code.gs 코드 보기

apps-script/chat/contact-form-app/Code.gs
/**
 * Copyright 2025 Google LLC
 *
 * Licensed under the Apache License, Version 2.0 (the "License");
 * you may not use this file except in compliance with the License.
 * You may obtain a copy of the License at
 *
 * http://www.apache.org/licenses/LICENSE-2.0
 *
 * Unless required by applicable law or agreed to in writing, software
 * distributed under the License is distributed on an "AS IS" BASIS,
 * WITHOUT WARRANTIES OR CONDITIONS OF ANY KIND, either express or implied.
 * See the License for the specific language governing permissions and
 * limitations under the License.
 */

/**
 * Responds to a message in Google Chat.
 *
 * @param {Object} event The event object from the Google Workspace add-on.
 * @return {Object} response that handles dialogs.
 */
function onMessage(event) {
  // Reply with a message that contains a button to open the initial dialog
  return { hostAppDataAction: { chatDataAction: { createMessageAction: { message: {
    text: "To add a contact, use the `ADD CONTACT` button below.",
    accessoryWidgets: [
      { buttonList: { buttons: [{
        text: "ADD CONTACT",
        onClick: { action: {
          function: "openInitialDialog",
          interaction: "OPEN_DIALOG"
        }}
      }]}}
    ]
  }}}}};
}

/**
 * Opens the initial step of the dialog that lets users add contact details.
 *
 * @param {Object} event The event object from the Google Workspace add-on.
 * @return {Object} open the dialog.
 */
function openInitialDialog(event) {
  return { action: { navigations: [{ pushCard: { sections: [{ widgets: [
    { textInput: {
      name: "contactName",
      label: "First and last name",
      type: "SINGLE_LINE"
    }},
    { dateTimePicker: {
      name: "contactBirthdate",
      label: "Birthdate",
      type: "DATE_ONLY"
    }},
    { selectionInput: {
      name: "contactType",
      label: "Contact type",
      type: "RADIO_BUTTON",
      items: [
        { text: "Work", value: "Work", selected: false },
        { text: "Personal", value: "Personal", selected: false }
      ]
    }},
    { buttonList: { buttons: [{
      text: "NEXT",
      onClick: { action: { function : "openConfirmationDialog" }}
    }]}}
  ]}]}}]}};
}

/**
 * Opens the second step of the dialog that lets users confirm details.
 *
 * @param {Object} event The event object from the Google Workspace add-on.
 * @return {Object} update the dialog.
 */
function openConfirmationDialog(event) {
  // Retrieve the form input values
  const name = event.commonEventObject.formInputs["contactName"].stringInputs.value[0];
  const birthdate = event.commonEventObject.formInputs["contactBirthdate"].dateInput.msSinceEpoch;
  const type = event.commonEventObject.formInputs["contactType"].stringInputs.value[0];
  // Display the input values for confirmation
  return { action: { navigations: [{ pushCard: { sections: [{ widgets: [
    { textParagraph: { text: "Confirm contact information and submit:" }},
    { textParagraph: { text: "<b>Name:</b> " + name }},
    { textParagraph: { text: "<b>Birthday:</b> " + new Date(birthdate) }},
    { textParagraph: { text: "<b>Type:</b> " + type }},
    { buttonList: { buttons: [{
      text: "SUBMIT",
      onClick: { action: {
        function: "submitDialog",
        // Pass input values as parameters for last dialog step (submission)
        parameters: [
          { key: "contactName", value: name },
          { key: "contactBirthdate", value: birthdate },
          { key: "contactType", value: type }
        ]
      }}
    }]}}
  ]}]}}]}};
}

/**
 * Handles submission and closes the dialog.
 *
 * @param {Object} event The event object from the Google Workspace add-on.
 * @return {Object} close the dialog with a status in text notification or message.
 */
function submitDialog(event) {
  // Validate the parameters.
  if (!event.commonEventObject.parameters["contactName"]) {
    return { action: {
      navigations: [{ endNavigation: { action: "CLOSE_DIALOG"}}],
      notification: { text: "Failure, the contact name was missing!" }
    }};
  }

  return { hostAppDataAction: { chatDataAction: { createMessageAction: { message: {
    text: "✅ " + event.commonEventObject.parameters["contactName"] + " has been added to your contacts."
  }}}}};
}
appsscript.json

Chat 앱의 Apps Script 프로젝트를 정의하고 구성하는 Apps Script 매니페스트입니다.

appsscript.json 코드 보기

apps-script/chat/contact-form-app/appsscript.json
{
  "timeZone": "America/Los_Angeles",
  "dependencies": {},
  "exceptionLogging": "STACKDRIVER",
  "runtimeVersion": "V8",
  "addOns": {
    "common": {
      "name": "Contact Form app",
      "logoUrl": "https://developers.google.com/workspace/add-ons/images/contact-icon.png"
    },
    "chat": {}
  }
}

Apps Script 프로젝트 만들기

Code.gs 및 appsscript.json 파일에서 Apps Script 프로젝트를 만들려면 다음 단계를 따르세요.

  1. Google Apps Script로 이동하여 새 프로젝트를 클릭합니다.
  2. Apps Script 프로젝트 이름을 지정합니다.

    1. 제목 없는 프로젝트를 클릭합니다.

    2. 프로젝트 제목에 Contact Manager - Google Chat app를 입력합니다.

    3. 이름 바꾸기를 클릭합니다.

  3. Code.gs의 콘텐츠를 위의 Code.gs 샘플 코드로 바꿉니다.

  4. 프로젝트 설정 프로젝트 설정 아이콘을 클릭하고 편집기에 'appsscript.json' 매니페스트 파일 표시를 선택합니다.

  5. 편집기로 돌아가 appsscript.json의 콘텐츠를 위의 appsscript.json 매니페스트 코드로 바꾼 후 프로젝트를 저장합니다.

향후 특정 Google API를 사용하거나 앱을 게시하려면 Cloud 프로젝트를 Apps Script 프로젝트와 연결해야 합니다. 이 가이드에서는 이 작업을 수행하지 않아도 됩니다. 자세한 내용은 Google Cloud 프로젝트 가이드를 참고하세요.

Apps Script 배포 만들기

이제 모든 코드가 준비되었으므로 Apps Script 프로젝트를 배포합니다. Google Cloud에서 Chat 앱을 구성할 때 배포 ID를 사용합니다.

  1. Apps Script에서 Chat 앱의 프로젝트를 엽니다.

    Apps Script로 이동

  2. 배포 > 새 배포를 클릭합니다.

  3. 부가기능이 아직 선택되지 않은 경우 유형 선택 옆에 있는 배포 유형 프로젝트 설정 아이콘을 클릭하고 부가기능을 선택합니다.

  4. 설명에 이 버전에 대한 설명을 입력합니다(예: Test of Contact Manager).

  5. 배포를 클릭합니다. Apps Script에서 배포가 성공했다고 보고하고 배포 ID를 제공합니다.

  6. 복사를 클릭하여 배포 ID를 복사한 다음 완료를 클릭합니다.

Google API 콘솔에서 Chat 앱 구성

이 섹션에서는 Apps Script 프로젝트에서 방금 만든 배포의 ID를 비롯한 Chat 앱에 관한 정보로 Google API 콘솔에서 Google Chat API를 구성하는 방법을 보여줍니다.

  1. Google API 콘솔에서 메뉴 > API 및 서비스 > 사용 설정된 API 및 서비스 > Google Chat API > 구성을 클릭합니다.

    Chat API 구성으로 이동

  2. 앱 이름에 Contact Manager를 입력합니다.

  3. 아바타 URL에 https://developers.google.com/chat/images/contact-icon.png를 입력합니다.

  4. 설명에 Manage your personal and business contacts를 입력합니다.

  5. 대화형 기능 사용 설정 전환 버튼을 클릭하여 설정 위치로 전환합니다.

  6. 기능에서 스페이스 및 그룹 대화 참여를 선택합니다.

  7. 연결 설정에서 Apps Script를 선택합니다.

  8. 배포 ID에 Apps Script 배포를 만들 때 이전 섹션에서 복사한 Apps Script 배포 ID를 붙여넣습니다.

  9. 트리거에서 사용자 상호작용에 응답하는 함수를 구성합니다.

    • 메시지 트리거에 onMessage을 입력합니다.
    • 앱 명령어 트리거에 onAppCommand를 입력합니다.
  10. 명령어에서 슬래시 명령어 /about 및 /addContact를 설정합니다.

    1. 명령어 추가를 클릭하여 첫 번째 슬래시 명령어를 설정합니다.
    2. 명령어 ID에 1를 입력합니다.
    3. 설명에 Learn how to use this Chat app to manage your contacts를 입력합니다.
    4. 명령어 유형에서 Slash command를 선택합니다.
    5. 슬래시 명령어 이름에 /about를 입력합니다.
    6. 완료를 클릭합니다.
    7. 명령어 추가를 클릭하여 다른 슬래시 명령어를 설정합니다.
    8. 명령어 ID에 2를 입력합니다.
    9. 설명에 Submit information about a contact를 입력합니다.
    10. 명령어 유형에서 Slash command를 선택합니다.
    11. 슬래시 명령어 이름에 /addContact를 입력합니다.
    12. 대화상자 열기를 선택합니다.
    13. 완료를 클릭합니다.
  11. 공개 상태에서 YOUR DOMAIN의 특정 사용자 및 그룹에서 이 채팅 앱을 사용할 수 있도록 설정 체크박스를 선택하고 이메일 주소를 입력합니다.

  12. 로그에서 Logging에 오류 로깅을 선택합니다.

  13. 저장을 클릭합니다. '구성이 저장되었습니다'라는 메시지가 표시됩니다.

이제 Chat에서 채팅 앱을 설치하고 테스트할 수 있습니다.

채팅 앱 테스트

Chat 앱을 테스트하려면 Chat 앱과의 채팅 메시지 스페이스를 열고 메시지를 보냅니다.

  1. 신뢰할 수 있는 테스터로 자신을 추가할 때 제공한 Google Workspace 계정을 사용하여 Google Chat을 엽니다.

    Google Chat으로 이동

  2. 새 채팅을 클릭합니다.
  3. 사용자 1명 이상 추가 필드에 Chat 앱 이름을 입력합니다.
  4. 검색 결과에서 채팅 앱을 선택합니다. 채팅 메시지가 열립니다.

  1. Chat 앱과의 새 채팅 메시지에 /addContact를 입력하고 Enter를 누릅니다.

  2. 열리는 대화상자에 연락처 정보를 입력합니다.

    1. 이름 텍스트 필드에 이름을 입력합니다.
    2. 생년월일 날짜 선택 도구에서 날짜를 선택합니다.
    3. 연락처 유형에서 직장 또는 개인 라디오 버튼을 선택합니다.
  3. 검토 및 제출을 클릭합니다.

  4. 확인 대화상자에서 제출한 정보를 검토하고 제출을 클릭합니다. Chat 앱은 ✅ CONTACT NAME has been added to your contacts.라는 텍스트 메시지로 답장합니다.

  5. 원하는 경우 다음 방법으로 문의 양식을 테스트하고 제출할 수도 있습니다.

    • /about 슬래시 명령어를 사용합니다. 채팅 앱은 Add a contact라는 문자 메시지와 액세서리 위젯 버튼으로 답장합니다. 버튼을 클릭하여 문의 양식이 포함된 대화상자를 열 수 있습니다.
    • 슬래시 명령어(예: Hello) 없이 Chat 앱에 채팅 메시지를 보냅니다. Chat 앱에서 문의 양식이 포함된 텍스트와 카드로 답장합니다.

삭제

이 튜토리얼에서 사용한 리소스 비용이 Google Cloud 계정에 청구되지 않도록 하려면 Cloud 프로젝트를 삭제하는 것이 좋습니다.

  1. Google API 콘솔에서 리소스 관리 페이지로 이동합니다. 메뉴 > IAM 및 관리자 > 리소스 관리를 클릭합니다.

    Resource Manager로 이동

  2. 프로젝트 목록에서 삭제할 프로젝트를 선택한 다음 삭제 를 클릭합니다.
  3. 대화상자에서 프로젝트 ID를 입력한 후 종료를 클릭하여 프로젝트를 삭제합니다.

부가기능이 아닌 채팅 앱: Google Chat에서 연락처 관리하기

다음 안내와 코드 샘플은 Google Workspace 부가기능이 아닌 Chat 앱에 적용됩니다(GitHub에서 보기).

Apps Script 파일

main.gs

사용자가 Chat 앱에 메시지를 보내거나, Chat 앱 메시지에서 버튼을 클릭하거나, 대화상자를 열고 닫는 시점에 관한 상호작용 이벤트를 비롯한 모든 앱 로직을 처리합니다.

apps-script/contact-form-app/main.gs
/**
 * Copyright 2024 Google Inc.
 *
 * Licensed under the Apache License, Version 2.0 (the "License");
 * you may not use this file except in compliance with the License.
 * You may obtain a copy of the License at
 *
 * http://www.apache.org/licenses/LICENSE-2.0
 *
 * Unless required by applicable law or agreed to in writing, software
 * distributed under the License is distributed on an "AS IS" BASIS,
 * WITHOUT WARRANTIES OR CONDITIONS OF ANY KIND, either express or implied.
 * See the License for the specific language governing permissions and
 * limitations under the License.
 */

/**
 * Responds to a MESSAGE interaction event in Google Chat.
 *
 * @param {Object} event the MESSAGE interaction event from Chat API.
 * @return {Object} message response that opens a dialog or sends private
 *                          message with text and card.
 */
function onMessage(event) {
  if (event.message.slashCommand) {
    switch (event.message.slashCommand.commandId) {
      case 1:
        // If the slash command is "/about", responds with a text message and button
        // that opens a dialog.
        return {
          text: "Manage your personal and business contacts 📇. To add a " +
                  "contact, use the slash command `/addContact`.",
          accessoryWidgets: [{
            buttonList: { buttons: [{
              text: "Add Contact",
              onClick: { action: {
                function: "openInitialDialog",
                interaction: "OPEN_DIALOG"
              }}
            }]}
          }]
        }
      case 2:
        // If the slash command is "/addContact", opens a dialog.
        return openInitialDialog();
    }
  }

  // If user sends the Chat app a message without a slash command, the app responds
  // privately with a text and card to add a contact.
  return {
    privateMessageViewer: event.user,
    text: "To add a contact, try `/addContact` or complete the form below:",
    cardsV2: [{
      cardId: "addContactForm",
      card: {
        header: { title: "Add a contact" },
        sections:[{ widgets: CONTACT_FORM_WIDGETS.concat([{
          buttonList: { buttons: [{
            text: "Review and submit",
            onClick: { action: { function : "openConfirmation" }}
          }]}
        }])}]
      }
    }]
  };
}

/**
 * Responds to CARD_CLICKED interaction events in Google Chat.
 *
 * @param {Object} event the CARD_CLICKED interaction event from Google Chat.
 * @return {Object} message responses specific to the dialog handling.
 */
function onCardClick(event) {
  // Initial dialog form page
  if (event.common.invokedFunction === "openInitialDialog") {
    return openInitialDialog();
  // Confirmation dialog form page
  } else if (event.common.invokedFunction === "openConfirmation") {
    return openConfirmation(event);
  // Submission dialog form page
  } else if (event.common.invokedFunction === "submitForm") {
    return submitForm(event);
  }
}

/**
 * Opens the initial step of the dialog that lets users add contact details.
 *
 * @return {Object} a message with an action response to open a dialog.
 */
function openInitialDialog() {
  return { actionResponse: {
    type: "DIALOG",
    dialogAction: { dialog: { body: { sections: [{
      header: "Add new contact",
      widgets: CONTACT_FORM_WIDGETS.concat([{
        buttonList: { buttons: [{
          text: "Review and submit",
          onClick: { action: { function: "openConfirmation" }}
        }]}
      }])
    }]}}}
  }};
}

/**
 * Returns the second step as a dialog or card message that lets users confirm details.
 *
 * @param {Object} event the interactive event with form inputs.
 * @return {Object} returns a dialog or private card message.
 */
function openConfirmation(event) {
  const name = fetchFormValue(event, "contactName") ?? "";
  const birthdate = fetchFormValue(event, "contactBirthdate") ?? "";
  const type = fetchFormValue(event, "contactType") ?? "";
  const cardConfirmation = {
    header: "Your contact",
    widgets: [{
      textParagraph: { text: "Confirm contact information and submit:" }}, {
      textParagraph: { text: "<b>Name:</b> " + name }}, {
      textParagraph: {
        text: "<b>Birthday:</b> " + convertMillisToDateString(birthdate)
      }}, {
      textParagraph: { text: "<b>Type:</b> " + type }}, {
      buttonList: { buttons: [{
        text: "Submit",
        onClick: { action: {
          function: "submitForm",
          parameters: [{
            key: "contactName", value: name }, {
            key: "contactBirthdate", value: birthdate }, {
            key: "contactType", value: type
          }]
        }}
      }]}
    }]
  };

  // Returns a dialog with contact information that the user input.
  if (event.isDialogEvent) {
    return { action_response: {
      type: "DIALOG",
      dialogAction: { dialog: { body: { sections: [ cardConfirmation ]}}}
    }};
  }

  // Updates existing card message with contact information that the user input.
  return {
    actionResponse: { type: "UPDATE_MESSAGE" },
    privateMessageViewer: event.user,
    cardsV2: [{
      card: { sections: [cardConfirmation]}
    }]
  }
}

/**
  * Validates and submits information from a dialog or card message
  * and notifies status.
  *
  * @param {Object} event the interactive event with parameters.
  * @return {Object} a message response that opens a dialog or posts a private
  *                  message.
  */
function submitForm(event) {
  const contactName = event.common.parameters["contactName"];
  // Checks to make sure the user entered a contact name.
  // If no name value detected, returns an error message.
  const errorMessage = "Don't forget to name your new contact!";
  if (!contactName && event.dialogEventType === "SUBMIT_DIALOG") {
    return { actionResponse: {
      type: "DIALOG",
      dialogAction: { actionStatus: {
        statusCode: "INVALID_ARGUMENT",
        userFacingMessage: errorMessage
      }}
    }};
  }
  if (!contactName) {
    return {
      privateMessageViewer: event.user,
      text: errorMessage
    };
  }

  // The Chat app indicates that it received form data from the dialog or card.
  // Sends private text message that confirms submission.
  const confirmationMessage = "✅ " + contactName + " has been added to your contacts.";
  if (event.dialogEventType === "SUBMIT_DIALOG") {
    return {
      actionResponse: {
        type: "DIALOG",
        dialogAction: { actionStatus: {
          statusCode: "OK",
          userFacingMessage: "Success " + contactName
        }}
      }
    };
  }
  return {
    actionResponse: { type: "NEW_MESSAGE" },
    privateMessageViewer: event.user,
    text: confirmationMessage
  };
}

/**
 * Extracts form input value for a given widget.
 *
 * @param {Object} event the CARD_CLICKED interaction event from Google Chat.
 * @param {String} widgetName a unique ID for the widget, specified in the widget's name field.
 * @returns the value inputted by the user, null if no value can be found.
 */
function fetchFormValue(event, widgetName) {
  const formItem = event.common.formInputs[widgetName][""];
  // For widgets that receive StringInputs data, the value input by the user.
  if (formItem.hasOwnProperty("stringInputs")) {
    const stringInput = event.common.formInputs[widgetName][""].stringInputs.value[0];
    if (stringInput != null) {
      return stringInput;
    }
  // For widgets that receive dateInput data, the value input by the user.
  } else if (formItem.hasOwnProperty("dateInput")) {
    const dateInput = event.common.formInputs[widgetName][""].dateInput.msSinceEpoch;
     if (dateInput != null) {
       return dateInput;
     }
  }

  return null;
}

/**
 * Converts date in milliseconds since epoch to user-friendly string.
 *
 * @param {Object} millis the milliseconds since epoch time.
 * @return {string} Display-friend date (English US).
 */
function convertMillisToDateString(millis) {
  const date = new Date(millis);
  const options = { year: 'numeric', month: 'long', day: 'numeric' };
  return date.toLocaleDateString('en-US', options);
}
contactForm.gs

사용자로부터 양식 데이터를 수신하는 위젯이 포함되어 있습니다. 이러한 양식 입력 위젯은 메시지와 대화상자에 표시되는 카드에 표시됩니다.

apps-script/contact-form-app/contactForm.gs
/**
 * Copyright 2024 Google Inc.
 *
 * Licensed under the Apache License, Version 2.0 (the "License");
 * you may not use this file except in compliance with the License.
 * You may obtain a copy of the License at
 *
 * http://www.apache.org/licenses/LICENSE-2.0
 *
 * Unless required by applicable law or agreed to in writing, software
 * distributed under the License is distributed on an "AS IS" BASIS,
 * WITHOUT WARRANTIES OR CONDITIONS OF ANY KIND, either express or implied.
 * See the License for the specific language governing permissions and
 * limitations under the License.
 */

/**
 * The section of the contact card that contains the form input widgets. Used in a dialog and card message.
 * To add and preview widgets, use the Card Builder: https://addons.gsuite.google.com/uikit/builder
 */
const CONTACT_FORM_WIDGETS = [
  {
    "textInput": {
      "name": "contactName",
      "label": "First and last name",
      "type": "SINGLE_LINE"
    }
  },
  {
    "dateTimePicker": {
      "name": "contactBirthdate",
      "label": "Birthdate",
      "type": "DATE_ONLY"
    }
  },
  {
    "selectionInput": {
      "name": "contactType",
      "label": "Contact type",
      "type": "RADIO_BUTTON",
      "items": [
        {
          "text": "Work",
          "value": "Work",
          "selected": false
        },
        {
          "text": "Personal",
          "value": "Personal",
          "selected": false
        }
      ]
    }
  }
];
appsscript.json

부가기능이 아닌 채팅 앱의 Apps Script 프로젝트를 정의하고 구성하는 Apps Script 매니페스트입니다.

apps-script/contact-form-app/appsscript.json
{
  "timeZone": "America/Los_Angeles",
  "dependencies": {},
  "exceptionLogging": "STACKDRIVER",
  "runtimeVersion": "V8",
  "chat": {}
}

Apps Script 프로젝트 만들기 및 구성

  1. 부가기능이 아닌 채팅 앱의 Google Chat에서 연락처 관리 Apps Script 프로젝트를 열고 사본을 만듭니다.
  2. Google API 콘솔에서 Chat API를 구성할 때 다음을 실행하세요. 이 Chat 앱을 Google Workspace 부가기능으로 빌드를 선택 해제합니다. 확인을 요청하는 대화상자가 열립니다. 대화상자에서 사용 중지를 클릭합니다.