Поддержка интерактивных диалогов

На этой странице рассказывается, как приложение Google Chat может открывать диалоговые окна, чтобы показывать пользовательские интерфейсы и отвечать на запросы пользователей.

Диалоговые окна – это интерфейсы на основе карточек, которые открываются в окне из чат-группы или сообщения. Диалоговое окно и его содержимое видны только пользователю, который его открыл.

Приложения для Chat могут использовать диалоговые окна, чтобы запрашивать и собирать информацию у пользователей Chat, в том числе с помощью многоэтапных форм. Подробнее о том, как собирать и обрабатывать информацию от пользователей…

Требования

HTTP

Приложение Google Chat, которое получает и обрабатывает действия пользователей. Чтобы создать его, выполните краткое руководство по HTTP.

Apps Script

Приложение Google Chat, которое получает и обрабатывает действия пользователей. Чтобы создать такой скрипт, выполните инструкции по началу работы с Apps Script.

Открыть диалоговое окно
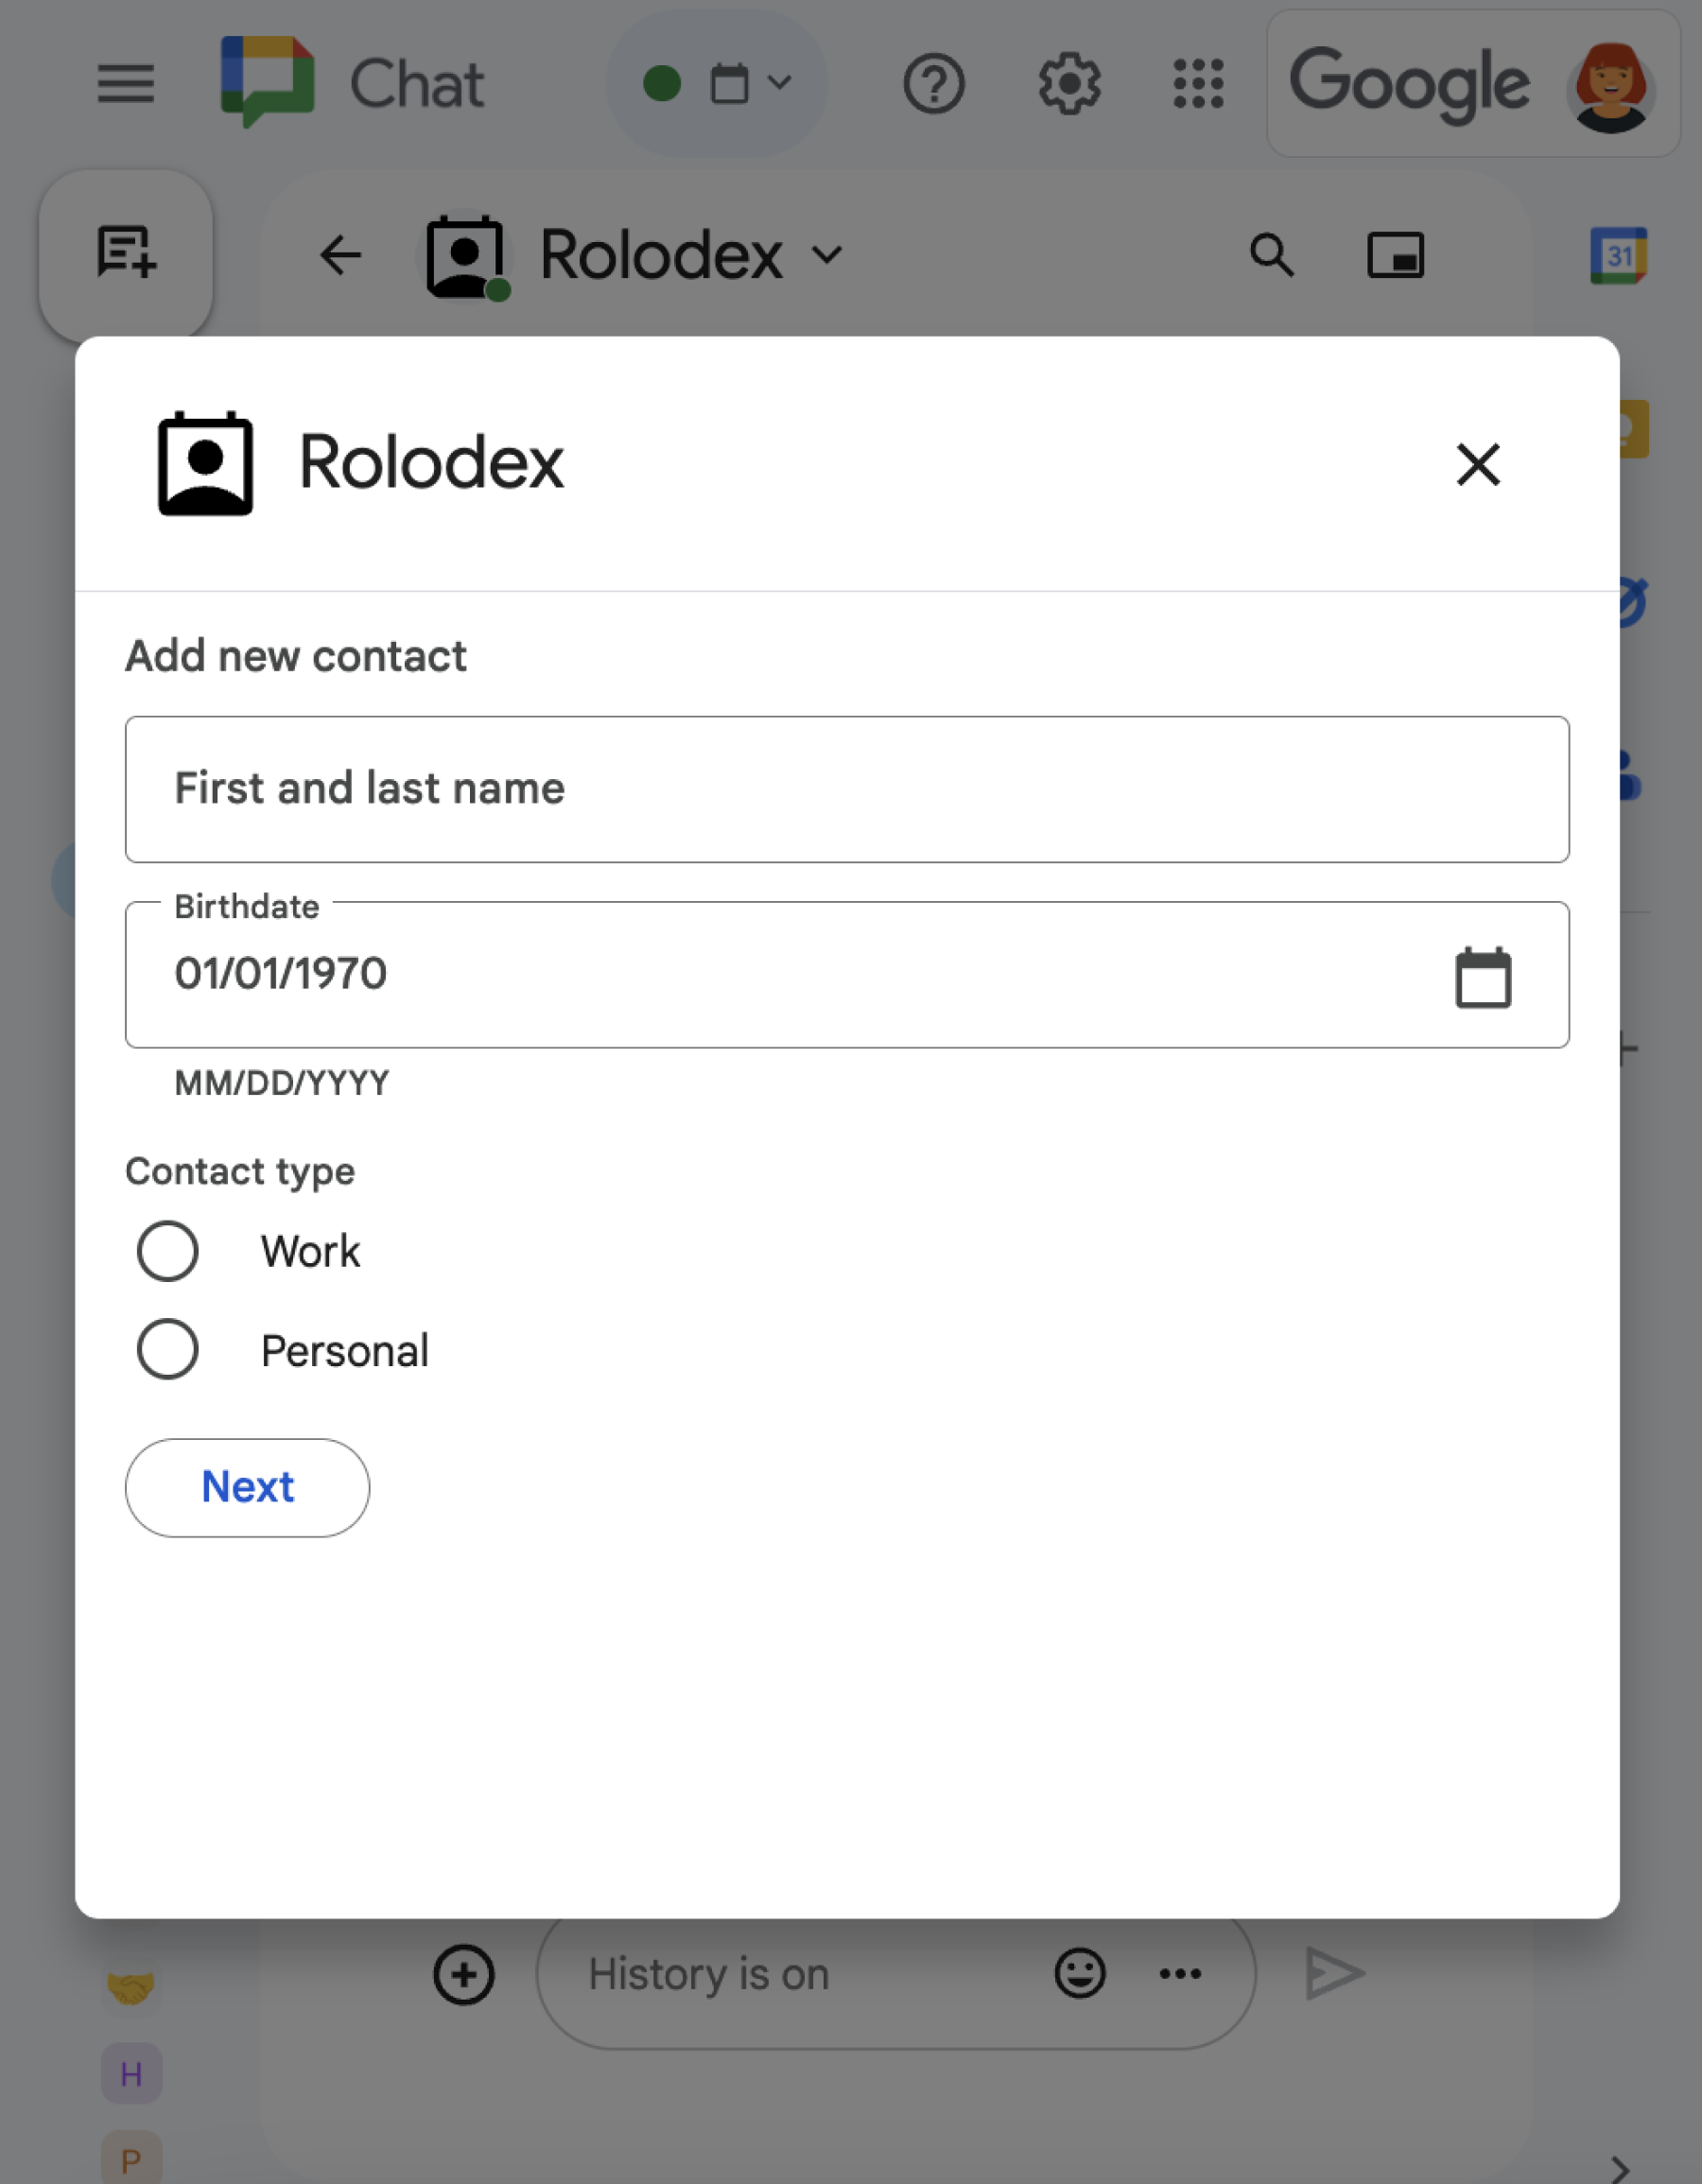
Диалоговое окно с различными виджетами.
Рисунок 1. Пример приложения Chat, которое открывает диалоговое окно для сбора контактной информации.

В этом разделе рассказывается, как отвечать на запросы и настраивать диалог, выполняя следующие действия:

  1. Запрос диалогового окна должен быть вызван действием пользователя.
  2. Обработайте запрос, вернув и открыв диалоговое окно.
  3. После того как пользователь отправит информацию, обработайте ее, закрыв диалоговое окно или открыв другое.

Как запустить запрос диалога

Приложение Chat может открывать диалоговые окна только в ответ на действия пользователя, например на команду или нажатие кнопки в сообщении на карточке.

Чтобы ответить пользователю с помощью диалогового окна, приложение Chat должно создать взаимодействие, которое запускает запрос диалогового окна, например:

  • Ответить на команду. Чтобы запрос запускался с помощью команды, при настройке команды установите флажок Открывает диалоговое окно.
  • Отвечать на нажатие кнопки в сообщении, которое может быть частью карточки или находиться внизу сообщения. Чтобы активировать запрос с помощью кнопки в сообщении, настройте действие onClick кнопки, задав для параметра interaction значение OPEN_DIALOG.
  • Как реагировать на нажатие кнопки на главной странице приложения Chat. Чтобы узнать, как открывать диалоговые окна с главной страницы, ознакомьтесь со статьей Как создать главную страницу для приложения Google Chat.
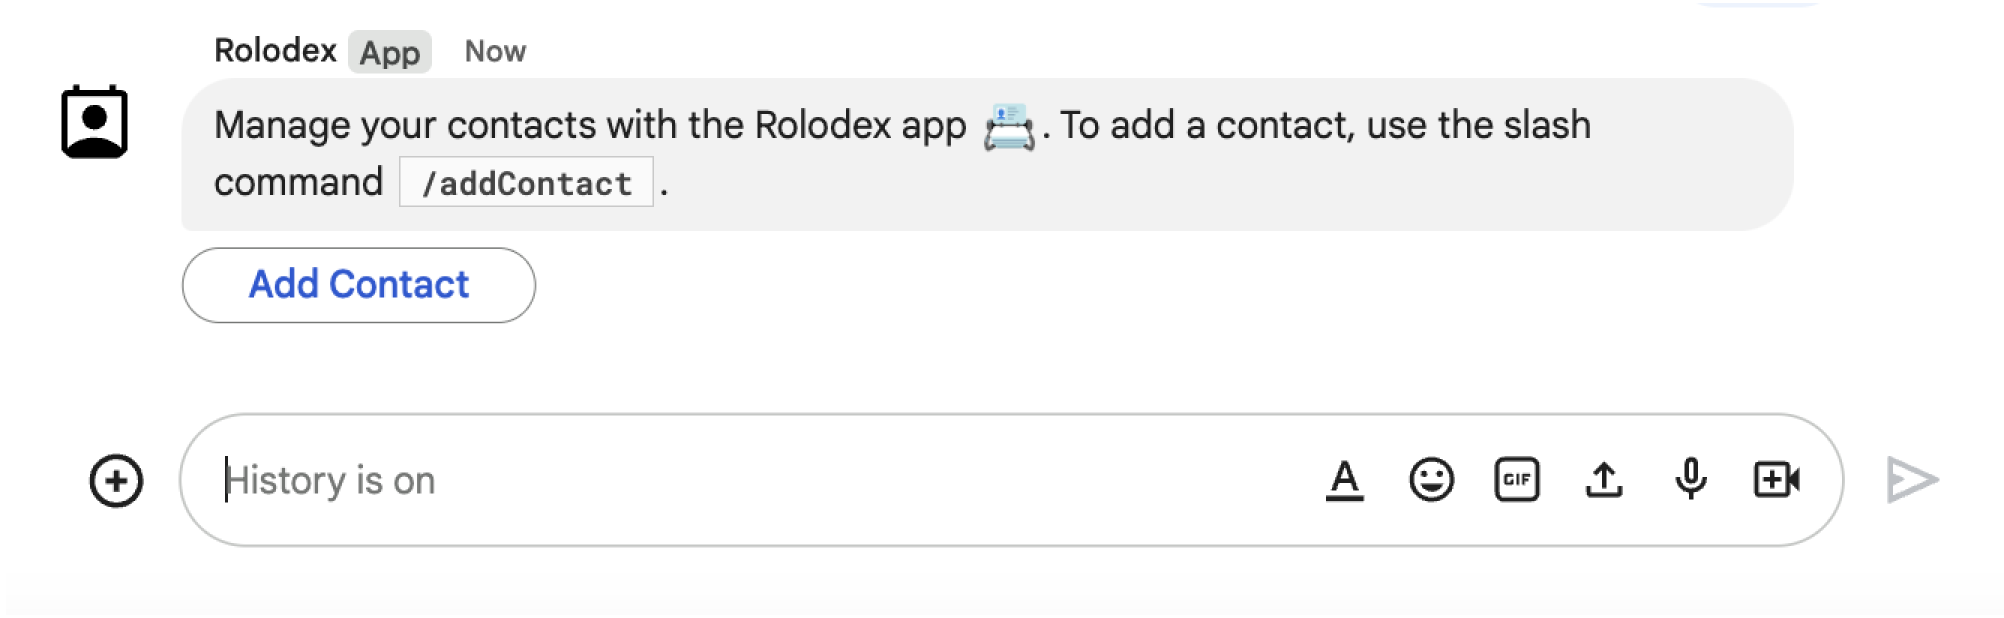
Кнопка, которая открывает диалоговое окно.
Рисунок 2. Приложение Chat отправляет сообщение с предложением использовать слеш-команду /addContact.
В сообщении также есть кнопка, нажав на которую пользователи могут запустить команду.

В приведенном ниже фрагменте кода показано, как активировать запрос диалогового окна с помощью кнопки в сообщении-карточке. Чтобы открыть диалоговое окно, задайте для поля кнопки onClick.action.interaction значение OPEN_DIALOG:

Node.js

node/chat/contact-form-app/index.js
{ buttonList: { buttons: [{
  text: "ADD CONTACT",
  onClick: { action: {
    function: FUNCTION_URL,
    interaction: "OPEN_DIALOG",
    parameters: [
      { key: "actionName", value: "openInitialDialog" }
    ]
  }}
}]}}

Замените FUNCTION_URL конечной точкой HTTP, которая обрабатывает нажатия кнопок.

Python

python/chat/contact-form-app/main.py
{ 'buttonList': { 'buttons': [{
  'text': "ADD CONTACT",
  'onClick': { 'action': {
    'function': FUNCTION_URL,
    'interaction': "OPEN_DIALOG",
    'parameters': [
      { 'key': "actionName", 'value': "openInitialDialog" }
    ]
  }}
}]}}

Замените FUNCTION_URL конечной точкой HTTP, которая обрабатывает нажатия кнопок.

Java

java/chat/contact-form-app/src/main/java/com/google/chat/contact/App.java
.setButtonList(new GoogleAppsCardV1ButtonList().setButtons(List.of(new GoogleAppsCardV1Button()
  .setText("ADD CONTACT")
  .setOnClick(new GoogleAppsCardV1OnClick().setAction(new GoogleAppsCardV1Action()
    .setFunction(FUNCTION_URL)
    .setInteraction("OPEN_DIALOG")
    .setParameters(List.of(
      new GoogleAppsCardV1ActionParameter().setKey("actionName").setValue("openInitialDialog"))))))))));

Замените FUNCTION_URL конечной точкой HTTP, которая обрабатывает нажатия кнопок.

Apps Script

В этом примере отправляется сообщение с карточкой, для чего возвращается JSON-код карточки. Вы также можете использовать сервис карточек Apps Script.

apps-script/chat/contact-form-app/Code.gs
{ buttonList: { buttons: [{
  text: "ADD CONTACT",
  onClick: { action: {
    function: "openInitialDialog",
    interaction: "OPEN_DIALOG"
  }}
}]}}

Как открыть диалоговое окно

Когда пользователь активирует запрос диалогового окна, ваше приложение Chat получает объект события с полезной нагрузкой, в которой объект dialogEventType указан как REQUEST_DIALOG.

Чтобы открыть диалоговое окно, приложение Chat может ответить на запрос, вернув объект RenderActions с навигацией pushCard для показа карточки. Карточка должна содержать любые элементы пользовательского интерфейса, в том числе один или несколько виджетов sections[]. Чтобы собирать информацию от пользователей, можно указать виджеты для ввода данных в форму и виджет кнопки. Подробнее о том, как создавать поля форм, рассказывается в статье Как собирать и обрабатывать информацию от пользователей.

В приведенном ниже фрагменте кода показано, как приложение Chat возвращает ответ, который открывает диалоговое окно:

Node.js

node/chat/contact-form-app/index.js
/**
 * Opens the initial step of the dialog that lets users add contact details.
 *
 * @return {Object} open the dialog.
 */
function openInitialDialog() {
  return { action: { navigations: [{ pushCard: { sections: [{ widgets: [
    { textInput: {
      name: "contactName",
      label: "First and last name",
      type: "SINGLE_LINE"
    }},
    { dateTimePicker: {
      name: "contactBirthdate",
      label: "Birthdate",
      type: "DATE_ONLY"
    }},
    { selectionInput: {
      name: "contactType",
      label: "Contact type",
      type: "RADIO_BUTTON",
      items: [
        { text: "Work", value: "Work", selected: false },
        { text: "Personal", value: "Personal", selected: false }
      ]
    }},
    { buttonList: { buttons: [{
      text: "NEXT",
      onClick: { action: {
        function: FUNCTION_URL,
        parameters: [
          { key: "actionName", value: "openConfirmationDialog" }
        ]
      }}
    }]}}
  ]}]}}]}};
}

Замените FUNCTION_URL конечной точкой HTTP, которая обрабатывает нажатия кнопок.

Python

python/chat/contact-form-app/main.py
def open_initial_dialog() -> Mapping[str, Any]:
  """Opens the initial step of the dialog that lets users add contact details.

  Returns:
    Mapping[str, Any]: open the dialog.
  """
  return { 'action': { 'navigations': [{ 'pushCard': { 'sections': [{ 'widgets': [
    { 'textInput': {
      'name': "contactName",
      'label': "First and last name",
      'type': "SINGLE_LINE"
    }},
    { 'dateTimePicker': {
      'name': "contactBirthdate",
      'label': "Birthdate",
      'type': "DATE_ONLY"
    }},
    { 'selectionInput': {
      'name': "contactType",
      'label': "Contact type",
      'type': "RADIO_BUTTON",
      'items': [
        { 'text': "Work", 'value': "Work", 'selected': False },
        { 'text': "Personal", 'value': "Personal", 'selected': False }
      ]
    }},
    { 'buttonList': { 'buttons': [{
      'text': "NEXT",
      'onClick': { 'action': {
        'function': FUNCTION_URL,
        'parameters': [
          { 'key': "actionName", 'value': "openConfirmationDialog" }
        ]
      }}
    }]}}
  ]}]}}]}}

Замените FUNCTION_URL конечной точкой HTTP, которая обрабатывает нажатия кнопок.

Java

java/chat/contact-form-app/src/main/java/com/google/chat/contact/App.java
/**
 * Opens the initial step of the dialog that lets users add contact details.
 *
 * @return {Object} open the dialog.
 */
GenericJson openInitialDialog() {
  GoogleAppsCardV1Card cardV2 = new GoogleAppsCardV1Card()
    .setSections(List.of(new GoogleAppsCardV1Section().setWidgets(List.of(
      new GoogleAppsCardV1Widget().setTextInput(new GoogleAppsCardV1TextInput()
        .setName("contactName")
        .setLabel("First and last name")
        .setType("SINGLE_LINE")),
      new GoogleAppsCardV1Widget().setDateTimePicker(new GoogleAppsCardV1DateTimePicker()
        .setName("contactBirthdate")
        .setLabel("Birthdate")
        .setType("DATE_ONLY")),
      new GoogleAppsCardV1Widget().setSelectionInput(new GoogleAppsCardV1SelectionInput()
        .setName("contactType")
        .setLabel("Contact type")
        .setType("RADIO_BUTTON")
        .setItems(List.of(
          new GoogleAppsCardV1SelectionItem()
            .setText("Work")
            .setValue("Work")
            .setSelected(false),
          new GoogleAppsCardV1SelectionItem()
            .setText("Personal")
            .setValue("Personal")
            .setSelected(false)))),
      new GoogleAppsCardV1Widget().setButtonList(new GoogleAppsCardV1ButtonList().setButtons(List.of(
        new GoogleAppsCardV1Button()
          .setText("NEXT")
          .setOnClick(new GoogleAppsCardV1OnClick().setAction(new GoogleAppsCardV1Action()
            .setFunction(FUNCTION_URL)
            .setParameters(List.of(
              new GoogleAppsCardV1ActionParameter().setKey("actionName").setValue("openConfirmationDialog"))))))))))));
  return new GenericJson() {{
    put("action", new GenericJson() {{
      put("navigations", List.of(new GenericJson() {{
        put("pushCard", cardV2);
      }}));
    }});
  }};
}

Замените FUNCTION_URL конечной точкой HTTP, которая обрабатывает нажатия кнопок.

Apps Script

В этом примере отправляется сообщение с карточкой, для чего возвращается JSON-код карточки. Вы также можете использовать сервис карточек Apps Script.

apps-script/chat/contact-form-app/Code.gs
/**
 * Opens the initial step of the dialog that lets users add contact details.
 *
 * @param {Object} event The event object from the Google Workspace add-on.
 * @return {Object} open the dialog.
 */
function openInitialDialog(event) {
  return { action: { navigations: [{ pushCard: { sections: [{ widgets: [
    { textInput: {
      name: "contactName",
      label: "First and last name",
      type: "SINGLE_LINE"
    }},
    { dateTimePicker: {
      name: "contactBirthdate",
      label: "Birthdate",
      type: "DATE_ONLY"
    }},
    { selectionInput: {
      name: "contactType",
      label: "Contact type",
      type: "RADIO_BUTTON",
      items: [
        { text: "Work", value: "Work", selected: false },
        { text: "Personal", value: "Personal", selected: false }
      ]
    }},
    { buttonList: { buttons: [{
      text: "NEXT",
      onClick: { action: { function : "openConfirmationDialog" }}
    }]}}
  ]}]}}]}};
}

Как обрабатывать отправку диалогового окна

Когда пользователь нажимает кнопку, отправляющую диалоговое окно, приложение Chat получает объект события с объектом buttonClickedPayload. В полезной нагрузке для параметра dialogEventType задано значение SUBMIT_DIALOG. Чтобы узнать, как собирать и обрабатывать информацию из диалогового окна, ознакомьтесь со статьей Как собирать и обрабатывать информацию от пользователей Google Chat.

Приложение Chat должно отреагировать на объект события одним из следующих способов:

Как вернуться к другому диалоговому окну (необязательно)

После того как пользователь отправит первый диалог, приложения Chat могут вернуть один или несколько дополнительных диалогов, чтобы помочь пользователям проверить информацию перед отправкой, заполнить многоэтапные формы или динамически заполнить контент формы.

Чтобы обработать данные, введенные пользователями, приложение Chat обрабатывает данные в объекте commonEventObject.formInputs события. Подробнее о том, как собирать и обрабатывать информацию от пользователей…

Чтобы отслеживать данные, которые пользователи вводят в первом диалоговом окне, необходимо добавить параметры к кнопке, открывающей следующее диалоговое окно. Подробнее о том, как перенести данные на другую карту…

В этом примере приложение Chat открывает первое диалоговое окно, а затем второе, чтобы пользователь мог подтвердить отправку:

Node.js

node/chat/contact-form-app/index.js
/**
 * Responds to a message in Google Chat.
 *
 * @return {Object} response that handles dialogs.
 */
function handleMessage() {
  return { hostAppDataAction: { chatDataAction: { createMessageAction: { message: {
    text: "To add a contact, use the `ADD CONTACT` button below.",
    accessoryWidgets: [
      { buttonList: { buttons: [{
        text: "ADD CONTACT",
        onClick: { action: {
          function: FUNCTION_URL,
          interaction: "OPEN_DIALOG",
          parameters: [
            { key: "actionName", value: "openInitialDialog" }
          ]
        }}
      }]}}
    ]
  }}}}};
}

/**
 * Responds to a button clicked in Google Chat.
 *
 * @param {Object} event The event object from the Google Workspace add-on.
 * @return {Object} response depending on the button clicked.
 */
function handleButtonClicked(event) {
  // Initial dialog form page
  if (event.commonEventObject.parameters.actionName === "openInitialDialog") {
    return openInitialDialog();
  // Confirmation dialog form page
  } else if (event.commonEventObject.parameters.actionName === "openConfirmationDialog") {
    return openConfirmationDialog(event);
  // Submission dialog form page
  } else if (event.commonEventObject.parameters.actionName === "submitDialog") {
    return submitDialog(event);
  }
}

/**
 * Opens the initial step of the dialog that lets users add contact details.
 *
 * @return {Object} open the dialog.
 */
function openInitialDialog() {
  return { action: { navigations: [{ pushCard: { sections: [{ widgets: [
    { textInput: {
      name: "contactName",
      label: "First and last name",
      type: "SINGLE_LINE"
    }},
    { dateTimePicker: {
      name: "contactBirthdate",
      label: "Birthdate",
      type: "DATE_ONLY"
    }},
    { selectionInput: {
      name: "contactType",
      label: "Contact type",
      type: "RADIO_BUTTON",
      items: [
        { text: "Work", value: "Work", selected: false },
        { text: "Personal", value: "Personal", selected: false }
      ]
    }},
    { buttonList: { buttons: [{
      text: "NEXT",
      onClick: { action: {
        function: FUNCTION_URL,
        parameters: [
          { key: "actionName", value: "openConfirmationDialog" }
        ]
      }}
    }]}}
  ]}]}}]}};
}

/**
 * Opens the second step of the dialog that lets users confirm details.
 *
 * @param {Object} event The event object from the Google Workspace add-on.
 * @return {Object} update the dialog.
 */
function openConfirmationDialog(event) {
  // Retrieve the form input values
  const name = event.commonEventObject.formInputs["contactName"].stringInputs.value[0];
  const birthdate = event.commonEventObject.formInputs["contactBirthdate"].dateInput.msSinceEpoch;
  const type = event.commonEventObject.formInputs["contactType"].stringInputs.value[0];
  // Display the input values for confirmation
  return { action: { navigations: [{ pushCard: { sections: [{ widgets: [
    { textParagraph: { text: "Confirm contact information and submit:" }},
    { textParagraph: { text: "<b>Name:</b> " + name }},
    { textParagraph: { text: "<b>Birthday:</b> " + new Date(birthdate) }},
    { textParagraph: { text: "<b>Type:</b> " + type }},
    { buttonList: { buttons: [{
      text: "SUBMIT",
      onClick: { action: {
        function: FUNCTION_URL,
        parameters: [
          { key: "actionName", value: "submitDialog" },
          // Pass input values as parameters for last dialog step (submission)
          { key: "contactName", value: name },
          { key: "contactBirthdate", value: birthdate },
          { key: "contactType", value: type }
        ]
      }}
    }]}}
  ]}]}}]}};
}

Замените FUNCTION_URL конечной точкой HTTP, которая обрабатывает нажатия кнопок.

Python

python/chat/contact-form-app/main.py
def handle_message() -> Mapping[str, Any]:
  """Responds to a message in Google Chat.

  Returns:
    Mapping[str, Any]: the response that handles dialogs.
  """
  return { 'hostAppDataAction': { 'chatDataAction': { 'createMessageAction': { 'message': {
    'text': "To add a contact, use the `ADD CONTACT` button below.",
    'accessoryWidgets': [
      { 'buttonList': { 'buttons': [{
        'text': "ADD CONTACT",
        'onClick': { 'action': {
          'function': FUNCTION_URL,
          'interaction': "OPEN_DIALOG",
          'parameters': [
            { 'key': "actionName", 'value': "openInitialDialog" }
          ]
        }}
      }]}}
    ]
  }}}}}


def handle_button_clicked(event: Mapping[str, Any]) -> Mapping[str, Any]:
  """Responds to a button clicked in Google Chat.

  Args:
    Mapping[str, Any] event: the event object from the Google Workspace add-on

  Returns:
    Mapping[str, Any]: the response depending on the button clicked.
  """
  # Initial dialog form page
  if "openInitialDialog" == event['commonEventObject']['parameters']['actionName']:
    return open_initial_dialog()
  # Confirmation dialog form page
  elif "openConfirmationDialog" == event['commonEventObject']['parameters']['actionName'] :
    return open_confirmation_dialog(event)
  # Submission dialog form page
  elif "submitDialog" == event['commonEventObject']['parameters']['actionName']:
    return submit_dialog(event)


def open_initial_dialog() -> Mapping[str, Any]:
  """Opens the initial step of the dialog that lets users add contact details.

  Returns:
    Mapping[str, Any]: open the dialog.
  """
  return { 'action': { 'navigations': [{ 'pushCard': { 'sections': [{ 'widgets': [
    { 'textInput': {
      'name': "contactName",
      'label': "First and last name",
      'type': "SINGLE_LINE"
    }},
    { 'dateTimePicker': {
      'name': "contactBirthdate",
      'label': "Birthdate",
      'type': "DATE_ONLY"
    }},
    { 'selectionInput': {
      'name': "contactType",
      'label': "Contact type",
      'type': "RADIO_BUTTON",
      'items': [
        { 'text': "Work", 'value': "Work", 'selected': False },
        { 'text': "Personal", 'value': "Personal", 'selected': False }
      ]
    }},
    { 'buttonList': { 'buttons': [{
      'text': "NEXT",
      'onClick': { 'action': {
        'function': FUNCTION_URL,
        'parameters': [
          { 'key': "actionName", 'value': "openConfirmationDialog" }
        ]
      }}
    }]}}
  ]}]}}]}}


def open_confirmation_dialog(event: Mapping[str, Any]) -> Mapping[str, Any]:
  """Opens the second step of the dialog that lets users confirm details.

  Args:
    Mapping[str, Any] event: the event object from the Google Workspace add-on

  Returns:
    Mapping[str, Any]: update the dialog.
  """
  name = event.get('commonEventObject').get('formInputs')["contactName"].get('stringInputs').get('value')[0]
  birthdateEpoch = event.get('commonEventObject').get('formInputs')["contactBirthdate"].get('dateInput').get('msSinceEpoch')
  birthdate = datetime.fromtimestamp(int(birthdateEpoch) / 1000.0).strftime("%Y-%m-%d")
  type = event.get('commonEventObject').get('formInputs')["contactType"].get('stringInputs').get('value')[0]
  # Display the input values for confirmation
  return { 'action': { 'navigations': [{ 'pushCard': { 'sections': [{ 'widgets': [
    { 'textParagraph': { 'text': "Confirm contact information and submit:" }},
    { 'textParagraph': { 'text': "<b>Name:</b> " + name }},
    { 'textParagraph': { 'text': "<b>Birthday:</b> " + birthdate }},
    { 'textParagraph': { 'text': "<b>Type:</b> " + type }},
    { 'buttonList': { 'buttons': [{
      'text': "SUBMIT",
      'onClick': { 'action': {
        'function': FUNCTION_URL,
        'parameters': [
          { 'key': "actionName", 'value': "submitDialog" },
          # Pass input values as parameters for last dialog step (submission)
          { 'key': "contactName", 'value': name },
          { 'key': "contactBirthdate", 'value': birthdate },
          { 'key': "contactType", 'value': type }
        ]
      }}
    }]}}
  ]}]}}]}}

Замените FUNCTION_URL конечной точкой HTTP, которая обрабатывает нажатия кнопок.

Java

java/chat/contact-form-app/src/main/java/com/google/chat/contact/App.java
/**
 * Responds to a message in Google Chat.
 *
 * @return response that handles dialogs.
 */
GenericJson handleMessage() {
  Message message = new Message()
    .setText("To add a contact, use the `ADD CONTACT` button below.")
    .setAccessoryWidgets(List.of(new AccessoryWidget()
      .setButtonList(new GoogleAppsCardV1ButtonList().setButtons(List.of(new GoogleAppsCardV1Button()
        .setText("ADD CONTACT")
        .setOnClick(new GoogleAppsCardV1OnClick().setAction(new GoogleAppsCardV1Action()
          .setFunction(FUNCTION_URL)
          .setInteraction("OPEN_DIALOG")
          .setParameters(List.of(
            new GoogleAppsCardV1ActionParameter().setKey("actionName").setValue("openInitialDialog"))))))))));
  return new GenericJson() {{
    put("hostAppDataAction", new GenericJson() {{
      put("chatDataAction", new GenericJson() {{
        put("createMessageAction", new GenericJson() {{
          put("message", message);
        }});
      }});
    }});
  }};
}

/**
 * Responds to a button clicked in Google Chat.
 *
 * @param event The event object from the Google Workspace add-on.
 * @return response depending on the button clicked.
 */
GenericJson handleButtonClicked(JsonNode event) {
  String actionName = event.at("/commonEventObject/parameters/actionName").asText();
  // Initial dialog form page
  if ("openInitialDialog".equals(actionName)) {
    return openInitialDialog();
  // Confirmation dialog form page
  } else if ("openConfirmationDialog".equals(actionName)) {
    return openConfirmationDialog(event);
  // Submission dialog form page
  } else if ("submitDialog".equals(actionName)) {
    return submitDialog(event);
  }
  return null; 
}

/**
 * Opens the initial step of the dialog that lets users add contact details.
 *
 * @return {Object} open the dialog.
 */
GenericJson openInitialDialog() {
  GoogleAppsCardV1Card cardV2 = new GoogleAppsCardV1Card()
    .setSections(List.of(new GoogleAppsCardV1Section().setWidgets(List.of(
      new GoogleAppsCardV1Widget().setTextInput(new GoogleAppsCardV1TextInput()
        .setName("contactName")
        .setLabel("First and last name")
        .setType("SINGLE_LINE")),
      new GoogleAppsCardV1Widget().setDateTimePicker(new GoogleAppsCardV1DateTimePicker()
        .setName("contactBirthdate")
        .setLabel("Birthdate")
        .setType("DATE_ONLY")),
      new GoogleAppsCardV1Widget().setSelectionInput(new GoogleAppsCardV1SelectionInput()
        .setName("contactType")
        .setLabel("Contact type")
        .setType("RADIO_BUTTON")
        .setItems(List.of(
          new GoogleAppsCardV1SelectionItem()
            .setText("Work")
            .setValue("Work")
            .setSelected(false),
          new GoogleAppsCardV1SelectionItem()
            .setText("Personal")
            .setValue("Personal")
            .setSelected(false)))),
      new GoogleAppsCardV1Widget().setButtonList(new GoogleAppsCardV1ButtonList().setButtons(List.of(
        new GoogleAppsCardV1Button()
          .setText("NEXT")
          .setOnClick(new GoogleAppsCardV1OnClick().setAction(new GoogleAppsCardV1Action()
            .setFunction(FUNCTION_URL)
            .setParameters(List.of(
              new GoogleAppsCardV1ActionParameter().setKey("actionName").setValue("openConfirmationDialog"))))))))))));
  return new GenericJson() {{
    put("action", new GenericJson() {{
      put("navigations", List.of(new GenericJson() {{
        put("pushCard", cardV2);
      }}));
    }});
  }};
}

/**
 * Opens the second step of the dialog that lets users confirm details.
 *
 * @param event The event object from the Google Workspace add-on.
 * @return update the dialog.
 */
GenericJson openConfirmationDialog(JsonNode event) {
  // Retrieve the form input values
  String name = event.at("/commonEventObject/formInputs/contactName/stringInputs/value").get(0).asText();
  String birthdateEpoch = event.at("/commonEventObject/formInputs/contactBirthdate/dateInput/msSinceEpoch").asText();
  String birthdate = new SimpleDateFormat("MM/dd/yyyy").format(new Date((long)Double.parseDouble(birthdateEpoch)));
  String type = event.at("/commonEventObject/formInputs/contactType/stringInputs/value").get(0).asText();
  // Display the input values for confirmation
  GoogleAppsCardV1Card cardV2 = new GoogleAppsCardV1Card()
    .setSections(List.of(new GoogleAppsCardV1Section().setWidgets(List.of(
      new GoogleAppsCardV1Widget().setTextParagraph(new GoogleAppsCardV1TextParagraph()
        .setText("Confirm contact information and submit:")),
      new GoogleAppsCardV1Widget().setTextParagraph(new GoogleAppsCardV1TextParagraph()
        .setText("<b>Name:</b> " + name)),
      new GoogleAppsCardV1Widget().setTextParagraph(new GoogleAppsCardV1TextParagraph()
        .setText("<b>Birthday:</b> " + birthdate)),
      new GoogleAppsCardV1Widget().setTextParagraph(new GoogleAppsCardV1TextParagraph()
        .setText("<b>Type:</b> " + type)),
      new GoogleAppsCardV1Widget().setButtonList(new GoogleAppsCardV1ButtonList().setButtons(List.of(
        new GoogleAppsCardV1Button()
          .setText("SUBMIT")
          .setOnClick(new GoogleAppsCardV1OnClick().setAction(new GoogleAppsCardV1Action()
            .setFunction(FUNCTION_URL)
            .setParameters(List.of(
              new GoogleAppsCardV1ActionParameter().setKey("actionName").setValue("submitDialog"),
              // Pass input values as parameters for last dialog step (submission)
              new GoogleAppsCardV1ActionParameter().setKey("contactName").setValue(name),
              new GoogleAppsCardV1ActionParameter().setKey("contactBirthdate").setValue(birthdate),
              new GoogleAppsCardV1ActionParameter().setKey("contactType").setValue(type))))))))))));
  return new GenericJson() {{
    put("action", new GenericJson() {{
      put("navigations", List.of(new GenericJson() {{
        put("pushCard", cardV2);
      }}));
    }});
  }};
}

Замените FUNCTION_URL конечной точкой HTTP, которая обрабатывает нажатия кнопок.

Apps Script

В этом примере отправляется сообщение с карточкой, для чего возвращается JSON-код карточки. Вы также можете использовать сервис карточек Apps Script.

apps-script/chat/contact-form-app/Code.gs
/**
 * Responds to a message in Google Chat.
 *
 * @param {Object} event The event object from the Google Workspace add-on.
 * @return {Object} response that handles dialogs.
 */
function onMessage(event) {
  // Reply with a message that contains a button to open the initial dialog
  return { hostAppDataAction: { chatDataAction: { createMessageAction: { message: {
    text: "To add a contact, use the `ADD CONTACT` button below.",
    accessoryWidgets: [
      { buttonList: { buttons: [{
        text: "ADD CONTACT",
        onClick: { action: {
          function: "openInitialDialog",
          interaction: "OPEN_DIALOG"
        }}
      }]}}
    ]
  }}}}};
}

/**
 * Opens the initial step of the dialog that lets users add contact details.
 *
 * @param {Object} event The event object from the Google Workspace add-on.
 * @return {Object} open the dialog.
 */
function openInitialDialog(event) {
  return { action: { navigations: [{ pushCard: { sections: [{ widgets: [
    { textInput: {
      name: "contactName",
      label: "First and last name",
      type: "SINGLE_LINE"
    }},
    { dateTimePicker: {
      name: "contactBirthdate",
      label: "Birthdate",
      type: "DATE_ONLY"
    }},
    { selectionInput: {
      name: "contactType",
      label: "Contact type",
      type: "RADIO_BUTTON",
      items: [
        { text: "Work", value: "Work", selected: false },
        { text: "Personal", value: "Personal", selected: false }
      ]
    }},
    { buttonList: { buttons: [{
      text: "NEXT",
      onClick: { action: { function : "openConfirmationDialog" }}
    }]}}
  ]}]}}]}};
}

/**
 * Opens the second step of the dialog that lets users confirm details.
 *
 * @param {Object} event The event object from the Google Workspace add-on.
 * @return {Object} update the dialog.
 */
function openConfirmationDialog(event) {
  // Retrieve the form input values
  const name = event.commonEventObject.formInputs["contactName"].stringInputs.value[0];
  const birthdate = event.commonEventObject.formInputs["contactBirthdate"].dateInput.msSinceEpoch;
  const type = event.commonEventObject.formInputs["contactType"].stringInputs.value[0];
  // Display the input values for confirmation
  return { action: { navigations: [{ pushCard: { sections: [{ widgets: [
    { textParagraph: { text: "Confirm contact information and submit:" }},
    { textParagraph: { text: "<b>Name:</b> " + name }},
    { textParagraph: { text: "<b>Birthday:</b> " + new Date(birthdate) }},
    { textParagraph: { text: "<b>Type:</b> " + type }},
    { buttonList: { buttons: [{
      text: "SUBMIT",
      onClick: { action: {
        function: "submitDialog",
        // Pass input values as parameters for last dialog step (submission)
        parameters: [
          { key: "contactName", value: name },
          { key: "contactBirthdate", value: birthdate },
          { key: "contactType", value: type }
        ]
      }}
    }]}}
  ]}]}}]}};
}

Закрыть диалоговое окно

Когда пользователь нажимает кнопку отправки в диалоговом окне, приложение Chat выполняет связанное с ней действие и предоставляет объект события со значением buttonClickedPayload, заданным следующим образом:

  • isDialogEvent: true.
  • dialogEventType: SUBMIT_DIALOG.

Приложение Chat должно вернуть объект RenderActions с параметром endNavigation, для которого задано значение CLOSE_DIALOG (endNavigation: "CLOSE_DIALOG").

Как показывать временные уведомления (необязательно)

После закрытия диалогового окна можно также показать пользователю, взаимодействующему с приложением, временное текстовое уведомление.

Чтобы показать уведомление, верните объект RenderActions с заданным полем notification.

В примере ниже показано, как закрыть диалоговое окно с текстовым уведомлением.

Node.js

node/chat/contact-form-app/index.js
// Validate the parameters.
if (!event.commonEventObject.parameters["contactName"]) {
  return { action: {
    navigations: [{ endNavigation: { action: "CLOSE_DIALOG"}}],
    notification: { text: "Failure, the contact name was missing!" }
  }};
}

Python

python/chat/contact-form-app/main.py
# Validate the parameters.
if event.get('commonEventObject').get('parameters')["contactName"] == "":
  return { 'action': {
    'navigations': [{ 'endNavigation': { 'action': "CLOSE_DIALOG"}}],
    'notification': { 'text': "Failure, the contact name was missing!" }
  }}

Java

java/chat/contact-form-app/src/main/java/com/google/chat/contact/App.java
    // Validate the parameters.
    if (event.at("/commonEventObject/parameters/contactName").asText().isEmpty()) {
      return new GenericJson() {{
        put("action", new GenericJson() {{
          put("navigations", List.of(new GenericJson() {{
            put("endNavigation", new GenericJson() {{
              put("action", "CLOSE_DIALOG");
            }});
          }}));
          put("notification", new GenericJson() {{
            put("text", "Failure, the contact name was missing!");
          }});
        }});
      }};
    }

    return new GenericJson() {{
      put("hostAppDataAction", new GenericJson() {{
        put("chatDataAction", new GenericJson() {{
          put("createMessageAction", new GenericJson() {{
            put("message", new Message()
              .setText( "✅ " + event.at("/commonEventObject/parameters/contactName").asText() +
                        " has been added to your contacts."));
          }});
        }});
      }});
    }};
  }
}

Apps Script

В этом примере отправляется сообщение с карточкой, для чего возвращается JSON-код карточки. Вы также можете использовать сервис карточек Apps Script.

apps-script/chat/contact-form-app/Code.gs
// Validate the parameters.
if (!event.commonEventObject.parameters["contactName"]) {
  return { action: {
    navigations: [{ endNavigation: { action: "CLOSE_DIALOG"}}],
    notification: { text: "Failure, the contact name was missing!" }
  }};
}

Подробнее о том, как передавать данные на другую карточку…

Как отправить подтверждающее сообщение в чате (необязательно)

После закрытия диалогового окна вы также можете отправить новое сообщение Chat или изменить существующее.

Чтобы отправить новое сообщение, верните объект DataActions с полем CreateMessageAction, в котором указано новое сообщение. В примере ниже диалоговое окно закрывается путем отправки нового сообщения:

Node.js

node/chat/contact-form-app/index.js
return { hostAppDataAction: { chatDataAction: { createMessageAction: { message: {
  text: "✅ " + event.commonEventObject.parameters["contactName"] + " has been added to your contacts."
}}}}};

Python

python/chat/contact-form-app/main.py
return { 'hostAppDataAction': { 'chatDataAction': { 'createMessageAction': { 'message': {
  'text': "✅ " + event.get('commonEventObject').get('parameters')["contactName"] + " has been added to your contacts."
}}}}}

Java

java/chat/contact-form-app/src/main/java/com/google/chat/contact/App.java
return new GenericJson() {{
  put("hostAppDataAction", new GenericJson() {{
    put("chatDataAction", new GenericJson() {{
      put("createMessageAction", new GenericJson() {{
        put("message", new Message()
          .setText( "✅ " + event.at("/commonEventObject/parameters/contactName").asText() +
                    " has been added to your contacts."));
      }});
    }});
  }});
}};

Apps Script

В этом примере отправляется сообщение с карточкой, для чего возвращается JSON-код карточки. Вы также можете использовать сервис карточек Apps Script.

apps-script/chat/contact-form-app/Code.gs
return { hostAppDataAction: { chatDataAction: { createMessageAction: { message: {
  text: "✅ " + event.commonEventObject.parameters["contactName"] + " has been added to your contacts."
}}}}};

Чтобы обновить сообщение после того, как пользователь отправит диалоговое окно, верните объект DataActions, содержащий одно из следующих действий:

Устранение неполадок

Если приложение Google Chat или карточка возвращает ошибку, в интерфейсе Chat появляется сообщение "Что-то пошло не так". или "Не удалось обработать запрос". Иногда в интерфейсе Chat не показывается сообщение об ошибке, но приложение Chat или карточка выдает неожиданный результат, например не появляется сообщение на карточке.

Хотя в интерфейсе Chat может не показываться сообщение об ошибке, при включенном ведении журнала ошибок для приложений Chat вам будут доступны подробные сообщения об ошибках и данные журнала, которые помогут устранить неполадки. Чтобы узнать, как просматривать, отлаживать и исправлять ошибки, ознакомьтесь с разделом Устранение неполадок в Google Chat.

Приложения для чата, не являющиеся дополнениями: открытие интерактивных диалоговых окон

Ниже приведена документация по приложениям Chat, которые не являются дополнениями Google Workspace. Чтобы перенести приложение Chat, которое не является дополнением, ознакомьтесь со статьей Как преобразовать приложение Google Chat в дополнение Google Workspace.

Как запустить запрос диалога

В приведенном ниже фрагменте кода показано, как приложение Chat, не являющееся дополнением, активирует запрос диалогового окна с помощью кнопки в сообщении-карточке. Чтобы открыть диалоговое окно, в поле button.interaction должно быть указано значение OPEN_DIALOG:

Node.js

node/contact-form-app/index.js
buttonList: { buttons: [{
  text: "Add Contact",
  onClick: { action: {
    function: "openInitialDialog",
    interaction: "OPEN_DIALOG"
  }}
}]}

Python

python/contact-form-app/main.py
'buttonList': { 'buttons': [{
  'text': "Add Contact",
  'onClick': { 'action': {
    'function': "openInitialDialog",
    'interaction': "OPEN_DIALOG"
  }}
}]}

Java

java/contact-form-app/src/main/java/com/google/chat/contact/App.java
.setButtonList(new GoogleAppsCardV1ButtonList().setButtons(List.of(new GoogleAppsCardV1Button()
  .setText("Add Contact")
  .setOnClick(new GoogleAppsCardV1OnClick().setAction(new GoogleAppsCardV1Action()
    .setFunction("openInitialDialog")
    .setInteraction("OPEN_DIALOG"))))))));

Apps Script

В этом примере отправляется сообщение с карточкой, для чего возвращается JSON-код карточки. Вы также можете использовать сервис карточек Apps Script.

apps-script/contact-form-app/main.gs
buttonList: { buttons: [{
  text: "Add Contact",
  onClick: { action: {
    function: "openInitialDialog",
    interaction: "OPEN_DIALOG"
  }}
}]}

Как открыть диалоговое окно

Когда пользователь запрашивает диалоговое окно, приложение Chat, которое не является дополнением, получает событие взаимодействия, представленное в Chat API как тип event. Если взаимодействие вызывает запрос диалогового окна, в поле dialogEventType события устанавливается значение REQUEST_DIALOG.

Чтобы открыть диалоговое окно, приложение Chat, не являющееся дополнением, может ответить на запрос, вернув объект actionResponse с type: "DIALOG" и объектом Message. Чтобы задать содержимое диалогового окна, добавьте следующие объекты:

  • Объект actionResponse, для свойства type которого задано значение DIALOG.
  • Объект dialogAction. Поле body содержит элементы пользовательского интерфейса, которые будут отображаться на карточке, в том числе один или несколько виджетов sections. Чтобы собирать информацию от пользователей, можно указать виджеты для ввода данных в форму и виджет кнопки.

В приведенном ниже фрагменте кода показано, как приложение Chat, которое не является дополнением, возвращает ответ, открывающий диалоговое окно:

Node.js

node/contact-form-app/index.js
/**
 * Opens the initial step of the dialog that lets users add contact details.
 *
 * @return {Object} a message with an action response to open a dialog.
 */
function openInitialDialog() {
  return { actionResponse: {
    type: "DIALOG",
    dialogAction: { dialog: { body: { sections: [{
      header: "Add new contact",
      widgets: CONTACT_FORM_WIDGETS.concat([{
        buttonList: { buttons: [{
          text: "Review and submit",
          onClick: { action: { function: "openConfirmation" }}
        }]}
      }])
    }]}}}
  }};
}

Python

python/contact-form-app/main.py
def open_initial_dialog() -> dict:
  """Opens the initial step of the dialog that lets users add contact details."""
  return { 'actionResponse': {
    'type': "DIALOG",
    'dialogAction': { 'dialog': { 'body': { 'sections': [{
      'header': "Add new contact",
      'widgets': CONTACT_FORM_WIDGETS + [{
        'buttonList': { 'buttons': [{
          'text': "Review and submit",
          'onClick': { 'action': { 'function': "openConfirmation" }}
        }]}
      }]
    }]}}}
  }}

Java

java/contact-form-app/src/main/java/com/google/chat/contact/App.java
// Opens the initial step of the dialog that lets users add contact details.
Message openInitialDialog() {
  return new Message().setActionResponse(new ActionResponse()
    .setType("DIALOG")
    .setDialogAction(new DialogAction().setDialog(new Dialog().setBody(new GoogleAppsCardV1Card()
      .setSections(List.of(new GoogleAppsCardV1Section()
        .setHeader("Add new contact")
        .setWidgets(Stream.concat(
          CONTACT_FORM_WIDGETS.stream(),
          List.of(new GoogleAppsCardV1Widget()
            .setButtonList(new GoogleAppsCardV1ButtonList().setButtons(List.of(new GoogleAppsCardV1Button()
            .setText("Review and submit")
            .setOnClick(new GoogleAppsCardV1OnClick().setAction(new GoogleAppsCardV1Action()
              .setFunction("openConfirmation"))))))).stream()).collect(Collectors.toList()))))))));
}

Apps Script

В этом примере отправляется сообщение с карточкой, для чего возвращается JSON-код карточки. Вы также можете использовать сервис карточек Apps Script.

apps-script/contact-form-app/main.gs
/**
 * Opens the initial step of the dialog that lets users add contact details.
 *
 * @return {Object} a message with an action response to open a dialog.
 */
function openInitialDialog() {
  return { actionResponse: {
    type: "DIALOG",
    dialogAction: { dialog: { body: { sections: [{
      header: "Add new contact",
      widgets: CONTACT_FORM_WIDGETS.concat([{
        buttonList: { buttons: [{
          text: "Review and submit",
          onClick: { action: { function: "openConfirmation" }}
        }]}
      }])
    }]}}}
  }};
}

Как обрабатывать отправку диалогового окна

Когда пользователь нажимает кнопку, отправляющую диалоговое окно, приложение Chat, не являющееся дополнением, получает событие взаимодействия CARD_CLICKED, в котором dialogEventType имеет значение SUBMIT_DIALOG.

Как вернуться к другому диалоговому окну (необязательно)

Чтобы обработать данные, которые пользователи вводят в приложении Chat, не являющемся дополнением, приложение Chat использует объект event.common.formInputs.

В этом примере приложение Chat, которое не является дополнением, открывает диалоговое окно, а затем ещё одно, чтобы пользователь мог подтвердить отправку:

Node.js

node/contact-form-app/index.js
/**
 * Responds to CARD_CLICKED interaction events in Google Chat.
 *
 * @param {Object} event the CARD_CLICKED interaction event from Google Chat.
 * @return {Object} message responses specific to the dialog handling.
 */
function onCardClick(event) {
  // Initial dialog form page
  if (event.common.invokedFunction === "openInitialDialog") {
    return openInitialDialog();
  // Confirmation dialog form page
  } else if (event.common.invokedFunction === "openConfirmation") {
    return openConfirmation(event);
  // Submission dialog form page
  } else if (event.common.invokedFunction === "submitForm") {
    return submitForm(event);
  }
}

/**
 * Opens the initial step of the dialog that lets users add contact details.
 *
 * @return {Object} a message with an action response to open a dialog.
 */
function openInitialDialog() {
  return { actionResponse: {
    type: "DIALOG",
    dialogAction: { dialog: { body: { sections: [{
      header: "Add new contact",
      widgets: CONTACT_FORM_WIDGETS.concat([{
        buttonList: { buttons: [{
          text: "Review and submit",
          onClick: { action: { function: "openConfirmation" }}
        }]}
      }])
    }]}}}
  }};
}

/**
 * Returns the second step as a dialog or card message that lets users confirm details.
 *
 * @param {Object} event the interactive event with form inputs.
 * @return {Object} returns a dialog or private card message.
 */
function openConfirmation(event) {
  const name = fetchFormValue(event, "contactName") ?? "";
  const birthdate = fetchFormValue(event, "contactBirthdate") ?? "";
  const type = fetchFormValue(event, "contactType") ?? "";
  const cardConfirmation = {
    header: "Your contact",
    widgets: [{
      textParagraph: { text: "Confirm contact information and submit:" }}, {
      textParagraph: { text: "<b>Name:</b> " + name }}, {
      textParagraph: {
        text: "<b>Birthday:</b> " + convertMillisToDateString(birthdate)
      }}, {
      textParagraph: { text: "<b>Type:</b> " + type }}, {
      buttonList: { buttons: [{
        text: "Submit",
        onClick: { action: {
          function: "submitForm",
          parameters: [{
            key: "contactName", value: name }, {
            key: "contactBirthdate", value: birthdate }, {
            key: "contactType", value: type
          }]
        }}
      }]}
    }]
  };

  // Returns a dialog with contact information that the user input.
  if (event.isDialogEvent) {
    return { action_response: {
      type: "DIALOG",
      dialogAction: { dialog: { body: { sections: [ cardConfirmation ]}}}
    }};
  }

  // Updates existing card message with contact information that the user input.
  return {
    actionResponse: { type: "UPDATE_MESSAGE" },
    privateMessageViewer: event.user,
    cardsV2: [{
      card: { sections: [cardConfirmation]}
    }]
  }
}

Python

python/contact-form-app/main.py
def on_card_click(event: dict) -> dict:
  """Responds to CARD_CLICKED interaction events in Google Chat."""
  # Initial dialog form page
  if "openInitialDialog" == event.get('common').get('invokedFunction'):
    return open_initial_dialog()
  # Confirmation dialog form page
  elif "openConfirmation" == event.get('common').get('invokedFunction'):
    return open_confirmation(event)
  # Submission dialog form page
  elif "submitForm" == event.get('common').get('invokedFunction'):
    return submit_form(event)


def open_initial_dialog() -> dict:
  """Opens the initial step of the dialog that lets users add contact details."""
  return { 'actionResponse': {
    'type': "DIALOG",
    'dialogAction': { 'dialog': { 'body': { 'sections': [{
      'header': "Add new contact",
      'widgets': CONTACT_FORM_WIDGETS + [{
        'buttonList': { 'buttons': [{
          'text': "Review and submit",
          'onClick': { 'action': { 'function': "openConfirmation" }}
        }]}
      }]
    }]}}}
  }}


def open_confirmation(event: dict) -> dict:
  """Returns the second step as a dialog or card message that lets users confirm details."""
  name = fetch_form_value(event, "contactName") or ""
  birthdate = fetch_form_value(event, "contactBirthdate") or ""
  type = fetch_form_value(event, "contactType") or ""
  card_confirmation = {
    'header': "Your contact",
    'widgets': [{
      'textParagraph': { 'text': "Confirm contact information and submit:" }}, {
      'textParagraph': { 'text': "<b>Name:</b> " + name }}, {
      'textParagraph': {
        'text': "<b>Birthday:</b> " + convert_millis_to_date_string(birthdate)
      }}, {
      'textParagraph': { 'text': "<b>Type:</b> " + type }}, {
      'buttonList': { 'buttons': [{
        'text': "Submit",
        'onClick': { 'action': {
          'function': "submitForm",
          'parameters': [{
            'key': "contactName", 'value': name }, {
            'key': "contactBirthdate", 'value': birthdate }, {
            'key': "contactType", 'value': type
          }]
        }}
      }]}
    }]
  }

  # Returns a dialog with contact information that the user input.
  if event.get('isDialogEvent'): 
    return { 'action_response': {
      'type': "DIALOG",
      'dialogAction': { 'dialog': { 'body': { 'sections': [card_confirmation] }}}
    }}

  # Updates existing card message with contact information that the user input.
  return {
    'actionResponse': { 'type': "UPDATE_MESSAGE" },
    'privateMessageViewer': event.get('user'),
    'cardsV2': [{
      'card': { 'sections': [card_confirmation] }
    }]
  }

Java

java/contact-form-app/src/main/java/com/google/chat/contact/App.java
// Responds to CARD_CLICKED interaction events in Google Chat.
Message onCardClick(JsonNode event) {
  String invokedFunction = event.at("/common/invokedFunction").asText();
  // Initial dialog form page
  if ("openInitialDialog".equals(invokedFunction)) {
    return openInitialDialog();
  // Confirmation dialog form page
  } else if ("openConfirmation".equals(invokedFunction)) {
    return openConfirmation(event);
  // Submission dialog form page
  } else if ("submitForm".equals(invokedFunction)) {
    return submitForm(event);
  }
  return null; 
}

// Opens the initial step of the dialog that lets users add contact details.
Message openInitialDialog() {
  return new Message().setActionResponse(new ActionResponse()
    .setType("DIALOG")
    .setDialogAction(new DialogAction().setDialog(new Dialog().setBody(new GoogleAppsCardV1Card()
      .setSections(List.of(new GoogleAppsCardV1Section()
        .setHeader("Add new contact")
        .setWidgets(Stream.concat(
          CONTACT_FORM_WIDGETS.stream(),
          List.of(new GoogleAppsCardV1Widget()
            .setButtonList(new GoogleAppsCardV1ButtonList().setButtons(List.of(new GoogleAppsCardV1Button()
            .setText("Review and submit")
            .setOnClick(new GoogleAppsCardV1OnClick().setAction(new GoogleAppsCardV1Action()
              .setFunction("openConfirmation"))))))).stream()).collect(Collectors.toList()))))))));
}

// Returns the second step as a dialog or card message that lets users confirm details.
Message openConfirmation(JsonNode event) {
  String name = fetchFormValue(event, "contactName") != null ?
    fetchFormValue(event, "contactName") : "";
  String birthdate = fetchFormValue(event, "contactBirthdate") != null ?
    fetchFormValue(event, "contactBirthdate") : "";
  String type = fetchFormValue(event, "contactType") != null ?
    fetchFormValue(event, "contactType") : "";
  GoogleAppsCardV1Section cardConfirmationSection = new GoogleAppsCardV1Section()
    .setHeader("Your contact")
    .setWidgets(List.of(
      new GoogleAppsCardV1Widget().setTextParagraph(new GoogleAppsCardV1TextParagraph()
        .setText("Confirm contact information and submit:")),
      new GoogleAppsCardV1Widget().setTextParagraph(new GoogleAppsCardV1TextParagraph()
        .setText("<b>Name:</b> " + name)),
      new GoogleAppsCardV1Widget().setTextParagraph(new GoogleAppsCardV1TextParagraph()
        .setText("<b>Birthday:</b> " + convertMillisToDateString(birthdate))),
      new GoogleAppsCardV1Widget().setTextParagraph(new GoogleAppsCardV1TextParagraph()
        .setText("<b>Type:</b> " + type)),
      new GoogleAppsCardV1Widget().setButtonList(new GoogleAppsCardV1ButtonList().setButtons(List.of(new GoogleAppsCardV1Button()
        .setText("Submit")
        .setOnClick(new GoogleAppsCardV1OnClick().setAction(new GoogleAppsCardV1Action()
          .setFunction("submitForm")
          .setParameters(List.of(
            new GoogleAppsCardV1ActionParameter().setKey("contactName").setValue(name),
            new GoogleAppsCardV1ActionParameter().setKey("contactBirthdate").setValue(birthdate),
            new GoogleAppsCardV1ActionParameter().setKey("contactType").setValue(type))))))))));

  // Returns a dialog with contact information that the user input.
  if (event.at("/isDialogEvent") != null && event.at("/isDialogEvent").asBoolean()) {
    return new Message().setActionResponse(new ActionResponse()
      .setType("DIALOG")
      .setDialogAction(new DialogAction().setDialog(new Dialog().setBody(new GoogleAppsCardV1Card()
        .setSections(List.of(cardConfirmationSection))))));
  }

  // Updates existing card message with contact information that the user input.
  return new Message()
    .setActionResponse(new ActionResponse()
      .setType("UPDATE_MESSAGE"))
    .setPrivateMessageViewer(new User().setName(event.at("/user/name").asText()))
    .setCardsV2(List.of(new CardWithId().setCard(new GoogleAppsCardV1Card()
      .setSections(List.of(cardConfirmationSection)))));
}

Apps Script

В этом примере отправляется сообщение с карточкой, для чего возвращается JSON-код карточки. Вы также можете использовать сервис карточек Apps Script.

apps-script/contact-form-app/main.gs
/**
 * Responds to CARD_CLICKED interaction events in Google Chat.
 *
 * @param {Object} event the CARD_CLICKED interaction event from Google Chat.
 * @return {Object} message responses specific to the dialog handling.
 */
function onCardClick(event) {
  // Initial dialog form page
  if (event.common.invokedFunction === "openInitialDialog") {
    return openInitialDialog();
  // Confirmation dialog form page
  } else if (event.common.invokedFunction === "openConfirmation") {
    return openConfirmation(event);
  // Submission dialog form page
  } else if (event.common.invokedFunction === "submitForm") {
    return submitForm(event);
  }
}

/**
 * Opens the initial step of the dialog that lets users add contact details.
 *
 * @return {Object} a message with an action response to open a dialog.
 */
function openInitialDialog() {
  return { actionResponse: {
    type: "DIALOG",
    dialogAction: { dialog: { body: { sections: [{
      header: "Add new contact",
      widgets: CONTACT_FORM_WIDGETS.concat([{
        buttonList: { buttons: [{
          text: "Review and submit",
          onClick: { action: { function: "openConfirmation" }}
        }]}
      }])
    }]}}}
  }};
}

/**
 * Returns the second step as a dialog or card message that lets users confirm details.
 *
 * @param {Object} event the interactive event with form inputs.
 * @return {Object} returns a dialog or private card message.
 */
function openConfirmation(event) {
  const name = fetchFormValue(event, "contactName") ?? "";
  const birthdate = fetchFormValue(event, "contactBirthdate") ?? "";
  const type = fetchFormValue(event, "contactType") ?? "";
  const cardConfirmation = {
    header: "Your contact",
    widgets: [{
      textParagraph: { text: "Confirm contact information and submit:" }}, {
      textParagraph: { text: "<b>Name:</b> " + name }}, {
      textParagraph: {
        text: "<b>Birthday:</b> " + convertMillisToDateString(birthdate)
      }}, {
      textParagraph: { text: "<b>Type:</b> " + type }}, {
      buttonList: { buttons: [{
        text: "Submit",
        onClick: { action: {
          function: "submitForm",
          parameters: [{
            key: "contactName", value: name }, {
            key: "contactBirthdate", value: birthdate }, {
            key: "contactType", value: type
          }]
        }}
      }]}
    }]
  };

  // Returns a dialog with contact information that the user input.
  if (event.isDialogEvent) {
    return { action_response: {
      type: "DIALOG",
      dialogAction: { dialog: { body: { sections: [ cardConfirmation ]}}}
    }};
  }

  // Updates existing card message with contact information that the user input.
  return {
    actionResponse: { type: "UPDATE_MESSAGE" },
    privateMessageViewer: event.user,
    cardsV2: [{
      card: { sections: [cardConfirmation]}
    }]
  }
}

Закрыть диалоговое окно

Когда пользователь нажимает кнопку в диалоговом окне, приложение Chat, не являющееся дополнением, выполняет связанное с ней действие и предоставляет объект события со следующей информацией:

Приложение Chat, которое не является дополнением, должно возвращать объект ActionResponse, в котором для параметра type задано значение DIALOG, а параметр dialogAction заполнен. Если действие не завершилось ошибкой, то параметр dialogAction.actionStatus должен иметь значение OK, как в следующем примере:

Node.js

node/contact-form-app/index.js
// The Chat app indicates that it received form data from the dialog or card.
// Sends private text message that confirms submission.
const confirmationMessage = "✅ " + contactName + " has been added to your contacts.";
if (event.dialogEventType === "SUBMIT_DIALOG") {
  return {
    actionResponse: {
      type: "DIALOG",
      dialogAction: { actionStatus: {
        statusCode: "OK",
        userFacingMessage: "Success " + contactName
      }}
    }
  };
}

Python

python/contact-form-app/main.py
# The Chat app indicates that it received form data from the dialog or card.
# Sends private text message that confirms submission.
confirmation_message = "✅ " + contact_name + " has been added to your contacts.";
if "SUBMIT_DIALOG" == event.get('dialogEventType'):
  return {
    'actionResponse': {
      'type': "DIALOG",
      'dialogAction': { 'actionStatus': {
        'statusCode': "OK",
        'userFacingMessage': "Success " + contact_name
      }}
    }
  }

Java

java/contact-form-app/src/main/java/com/google/chat/contact/App.java
// The Chat app indicates that it received form data from the dialog or card.
// Sends private text message that confirms submission.
String confirmationMessage = "✅ " + contactName + " has been added to your contacts.";
if (event.at("/dialogEventType") != null && "SUBMIT_DIALOG".equals(event.at("/dialogEventType").asText())) {
  return new Message().setActionResponse(new ActionResponse()
    .setType("DIALOG")
    .setDialogAction(new DialogAction().setActionStatus(new ActionStatus()
      .setStatusCode("OK")
      .setUserFacingMessage("Success " + contactName))));
}

Apps Script

В этом примере отправляется сообщение с карточкой, для чего возвращается JSON-код карточки. Вы также можете использовать сервис карточек Apps Script.

apps-script/contact-form-app/main.gs
// The Chat app indicates that it received form data from the dialog or card.
// Sends private text message that confirms submission.
const confirmationMessage = "✅ " + contactName + " has been added to your contacts.";
if (event.dialogEventType === "SUBMIT_DIALOG") {
  return {
    actionResponse: {
      type: "DIALOG",
      dialogAction: { actionStatus: {
        statusCode: "OK",
        userFacingMessage: "Success " + contactName
      }}
    }
  };
}
Как показывать временные уведомления (необязательно)

Приложение Chat, которое не является дополнением, может отправить уведомление об успешном выполнении или ошибке, вернув объект ActionResponse с заданным значением actionStatus.

В примере ниже проверяется, действительны ли параметры, и закрывается диалоговое окно с текстовым уведомлением, если они недействительны:

Node.js

node/contact-form-app/index.js
const contactName = event.common.parameters["contactName"];
// Checks to make sure the user entered a contact name.
// If no name value detected, returns an error message.
const errorMessage = "Don't forget to name your new contact!";
if (!contactName && event.dialogEventType === "SUBMIT_DIALOG") {
  return { actionResponse: {
    type: "DIALOG",
    dialogAction: { actionStatus: {
      statusCode: "INVALID_ARGUMENT",
      userFacingMessage: errorMessage
    }}
  }};
}

Python

python/contact-form-app/main.py
contact_name = event.get('common').get('parameters')["contactName"]
# Checks to make sure the user entered a contact name.
# If no name value detected, returns an error message.
error_message = "Don't forget to name your new contact!"
if contact_name == "" and "SUBMIT_DIALOG" == event.get('dialogEventType'):
  return { 'actionResponse': {
    'type': "DIALOG",
    'dialogAction': { 'actionStatus': {
      'statusCode': "INVALID_ARGUMENT",
      'userFacingMessage': error_message
    }}
  }}

Java

java/contact-form-app/src/main/java/com/google/chat/contact/App.java
String contactName = event.at("/common/parameters/contactName").asText();
// Checks to make sure the user entered a contact name.
// If no name value detected, returns an error message.
String errorMessage = "Don't forget to name your new contact!";
if (contactName.isEmpty() && event.at("/dialogEventType") != null && "SUBMIT_DIALOG".equals(event.at("/dialogEventType").asText())) {
  return new Message().setActionResponse(new ActionResponse()
    .setType("DIALOG")
    .setDialogAction(new DialogAction().setActionStatus(new ActionStatus()
      .setStatusCode("INVALID_ARGUMENT")
      .setUserFacingMessage(errorMessage))));
}

Apps Script

В этом примере отправляется сообщение с карточкой, для чего возвращается JSON-код карточки. Вы также можете использовать сервис карточек Apps Script.

apps-script/contact-form-app/main.gs
const contactName = event.common.parameters["contactName"];
// Checks to make sure the user entered a contact name.
// If no name value detected, returns an error message.
const errorMessage = "Don't forget to name your new contact!";
if (!contactName && event.dialogEventType === "SUBMIT_DIALOG") {
  return { actionResponse: {
    type: "DIALOG",
    dialogAction: { actionStatus: {
      statusCode: "INVALID_ARGUMENT",
      userFacingMessage: errorMessage
    }}
  }};
}
Как отправить подтверждающее сообщение в чате (необязательно)

Чтобы отправить новое сообщение при закрытии диалогового окна в приложении Chat, которое не является дополнением, верните объект ActionResponse с type: "NEW_MESSAGE". В следующем примере диалоговое окно закрывается с помощью текстового сообщения с подтверждением:

Node.js

node/contact-form-app/index.js
return {
  actionResponse: { type: "NEW_MESSAGE" },
  privateMessageViewer: event.user,
  text: confirmationMessage
};

Python

python/contact-form-app/main.py
return {
  'actionResponse': { 'type': "NEW_MESSAGE" },
  'privateMessageViewer': event.get('user'),
  'text': confirmation_message
}

Java

java/contact-form-app/src/main/java/com/google/chat/contact/App.java
return new Message()
  .setActionResponse(new ActionResponse().setType("NEW_MESSAGE"))
  .setPrivateMessageViewer(new User().setName(event.at("/user/name").asText()))
  .setText(confirmationMessage);

Apps Script

В этом примере отправляется сообщение с карточкой, для чего возвращается JSON-код карточки. Вы также можете использовать сервис карточек Apps Script.

apps-script/contact-form-app/main.gs
return {
  actionResponse: { type: "NEW_MESSAGE" },
  privateMessageViewer: event.user,
  text: confirmationMessage
};

Чтобы обновить сообщение, верните объект actionResponse, содержащий обновленное сообщение, и задайте для параметра type одно из следующих значений: