
In dieser Kurzanleitung erfahren Sie, wie Sie mit Google Apps Script einen benutzerdefinierten Schritt für Workspace-Abläufe erstellen. Der benutzerdefinierte Schritt nimmt zwei Zahlen und eine Rechenoperation als Eingabe entgegen, führt die Berechnung durch und gibt das Ergebnis aus.
Ziele
- Mit Google Apps Script ein benutzerdefiniertes Modul für Workspace Flows erstellen
- Stellen Sie den benutzerdefinierten Schritt in Ihrer eigenen Google Workspace-Organisation bereit.
- Testen Sie den benutzerdefinierten Flow-Schritt in Workspace Flows.
Vorbereitung
- Ein Google-Konto mit Zugriff auf Workspace Flows über das Gemini Alpha-Programm.
Script einrichten
Erstellen Sie zum Einrichten des Skripts ein neues Apps Script-Projekt und verbinden Sie es dann mit Ihrem Cloud-Projekt.
Klicken Sie auf die folgende Schaltfläche, um das Apps Script-Projekt Flows calculator quickstart zu öffnen.
Klicken Sie auf Übersicht.
Klicken Sie auf der Übersichtsseite auf
 Kopie erstellen.
Geben Sie Ihrer Kopie des Apps Script-Projekts einen Namen:
Klicken Sie auf Kopie des Schnellstarts für den Flows-Rechner.
Geben Sie unter Projekttitel
Flows calculator quickstartein.Klicken Sie auf Umbenennen.
Optional: Kurzanleitungscode ansehen
Im vorherigen Abschnitt haben Sie ein ganzes Apps Script-Projekt kopiert, das den gesamten erforderlichen Anwendungscode für den benutzerdefinierten Schritt Ihres Ablaufs enthält. Sie müssen also nicht jede Datei einzeln kopieren und einfügen.
Optional können Sie sich hier jede Datei ansehen, die Sie im vorherigen Abschnitt kopiert haben:
appsscript.jsonDie Manifestdatei. Eine spezielle JSON-Datei, in der grundlegende Projektinformationen angegeben sind, die Apps Script zum Ausführen des Skripts benötigt.
appsscript.json-Code ansehen{ "timeZone": "America/Los_Angeles", "exceptionLogging": "STACKDRIVER", "runtimeVersion": "V8", "addOns": { "common": { "name": "Calculator", "logoUrl": "https://www.gstatic.com/images/branding/productlogos/calculator_search/v1/web-24dp/logo_calculator_search_color_1x_web_24dp.png", "useLocaleFromApp": true }, "flows": { "workflowElements": [ { "id": "actionElement", "state": "ACTIVE", "name": "Calculate", "description": "Asks the user for two values and a math operation, then performs the math operation on the values and outputs the result.", "workflowAction": { "inputs": [ { "id": "value1", "description": "value1", "cardinality": "SINGLE", "dataType": { "basicType": "INTEGER" } }, { "id": "value2", "description": "value2", "cardinality": "SINGLE", "dataType": { "basicType": "INTEGER" } }, { "id": "operation", "description": "operation", "cardinality": "SINGLE", "dataType": { "basicType": "STRING" } } ], "outputs": [ { "id": "result", "description": "Calculated result", "cardinality": "SINGLE", "dataType": { "basicType": "INTEGER" } }, { "id": "log", "description": "Logged result of flow event.", "cardinality": "SINGLE", "dataType": { "basicType": "STRING" } } ], "onConfigFunction": "onConfigCalculateFunction", "onExecuteFunction": "onExecuteCalculateFunction" } } ] } } }
Calculator.gsDefiniert einen benutzerdefinierten Schritt für Google Workspace Flows. Der Schritt mit dem Namen „Berechnen“ nimmt zwei Zahlen und eine Operation als Eingabe entgegen und gibt das Ergebnis der Berechnung zurück.
Calculator.gs-Code ansehen/** * This script defines a custom step for Google Workspace Flows. * The step, named "Calculate", takes two numbers and an operation as input * and returns the result of the calculation. * * The script includes functions to: * * 1. Define the configuration UI for the step using Card objects: * * - `onConfigCalculateFunction()`: Generates the main configuration card. * - Helper functions like `pushCard()`, `saveButton()` to build card components. * * 2. Handle the execution of the step. * * - `onExecuteCalculateFunction()`: Retrieves inputs, performs the calculation, * and returns outputs. * * To learn more, see the following quickstart guide: * https://developers.google.com/workspace/add-ons/workflows/quickstart */ /** * Creates an action response to push a new card onto the card stack. * * This function generates an action object that, when returned, causes the * provided card to be pushed onto the card stack, making it the currently * displayed card in the configuration UI. * @param {Object} card The Card object to push. * @return {Object} The action response object. */ function pushCard(card) { return { "action": { "navigations": [{ "push_card": card } ] } }; } /** * Creates an action response to update the currently displayed card. * * This function generates an action object that, when returned, causes the * currently displayed card to be replaced with the provided card in the * configuration UI. * @param {Object} card The Card object to update. * @return {Object} The render actions object. */ function updateCard(card) { return { "render_actions": { "action": { "navigations": [{ "update_card": card } ] } } }; } /** * Creates a button configuration object for saving the workflow. * * This function generates a button definition that, when clicked, triggers * a save action for the current workflow configuration. * @return {Object} The button widget object. */ function saveButton() { return { "text": "Save", "onClick": { "hostAppAction" : { "workflowAction" : { "saveWorkflowAction" : {} } } }, }; } /** * Creates a button configuration object for a refresh action. * * This function generates a button definition that, when clicked, triggers * a function to refresh the current card. * @param {string} functionName The name of the Apps Script function to call on click. * @return {Object} The button widget object. */ function refreshButton(functionName) { return { "text": "Refresh", "onClick": { "action" : { "function" : functionName } }, }; } /** * Generates and displays a configuration card for the sample calculation action. * * This function creates a card with input fields for two values and a dropdown * for selecting an arithmetic operation. The card also includes a "Save" * button to save the action configuration for the workflow. * * The input fields are configured to let the user select outputs from previous * workflow steps as input values using the `hostAppDataSource` property. * This function is called when the user adds or edits the "Calculate" step in the Flows UI. * @return {Object} The action response object containing the card to display. */ function onConfigCalculateFunction() { var card = { "sections": [ { "header": "Action sample: Calculate", "widgets": [ { "textInput": { "name": "value1", "label": "First value", "hostAppDataSource" : { "workflowDataSource" : { "includeVariables" : true } } } }, { "selectionInput": { "name": "operation", "label": "Operation", "type": "DROPDOWN", "items": [ { "text": "+", "value": "+", }, { "text": "-", "value": "-", }, { "text": "x", "value": "x", }, { "text": "/", "value": "/", } ] } }, { "textInput": { "name": "value2", "label": "Second value", "hostAppDataSource" : { "workflowDataSource" : { "includeVariables" : true } } } } ] } ] }; return pushCard(card); } /** * Gets an integer value from variable data, handling both string and integer formats. * * This function attempts to extract an integer value from the provided variable data. * It checks if the data contains string values and, if so, parses the first string * as an integer. If integer values are present, it returns the first integer. * @param {Object} variableData The variable data object from the event. * @return {number} The extracted integer value. */ function getIntValue(variableData) { if (variableData.stringValues) { return parseInt(variableData.stringValues[0]); } return variableData.integerValues[0]; } /** * Executes the calculation action based on the inputs from a workflow event. * * This function retrieves input values ("value1", "value2") and the "operation" * from the workflow event, performs the calculation, and returns the "result" and * "log" as output variables. * This function is called when the workflow execution reaches this custom step. * @param {Object} event The event object passed by the Flows runtime. * @return {Object} The output variables object. */ function onExecuteCalculateFunction(event) { console.log("output: " + JSON.stringify(event)); var calculatedValue = 0; var value1 = getIntValue(event.workflow.actionInvocation.inputs["value1"]); var value2 = getIntValue(event.workflow.actionInvocation.inputs["value2"]); var operation = event.workflow.actionInvocation.inputs["operation"].stringValues[0]; if (operation == "+") { calculatedValue = value1 + value2; } else if (operation == "-") { calculatedValue = value1 - value2; } else if (operation == "x") { calculatedValue = value1 * value2; } else if (operation == "/") { calculatedValue = value1 / value2; } var renderAction = { "hostAppAction" : { "workflowAction" : { "returnOutputVariablesAction" : { "variableValues" : [ { "variableId": "result", "integerValues": [ calculatedValue ] } ] } } } }; }
Schritt bereitstellen und testen
Um den Schritt zu testen, richten Sie ein Test-Deployment für Ihr Add-on ein, fügen Sie den Schritt einem Ablauf hinzu und führen Sie den Ablauf dann aus.
Testbereitstellung für Ihr Add‑on einrichten:
- Öffnen Sie das Skriptprojekt im Apps Script-Editor.
- Klicken Sie auf Bereitstellen > Bereitstellungen testen.
- Klicken Sie auf Installieren.
- Klicken Sie unten auf Fertig.
Sie können anderen Nutzern erlauben, das Add-on zu testen, indem Sie das Apps Script-Projekt für ihr Konto freigeben (Bearbeitungszugriff ist erforderlich). Fordern Sie die Nutzer dann auf, die vorherigen Schritte auszuführen.
Nach der Installation ist das Add-on sofort in Flows verfügbar. Möglicherweise müssen Sie Flows aktualisieren, bevor das Add-on angezeigt wird. Sie müssen das Add-on auch autorisieren, bevor Sie es verwenden können.
Weitere Informationen zu Testbereitstellungen finden Sie unter Nicht veröffentlichtes Add-on installieren.
Öffnen Sie Flows.
Erstellen Sie einen Ablauf, der Ihren Schritt enthält:
- Klicken Sie auf Neuer Flow.
- Wählen Sie aus, wie der Ablauf gestartet werden soll. Wählen Sie beim Testen eines Schritts einen Starter aus, den Sie selbst auslösen können, z. B. indem Sie sich selbst eine E-Mail senden. Wenn für Ihren Schritt eine Eingabevariable erforderlich ist, konfigurieren Sie die Eingabevariable als Teil der Ausgabe des Starters.
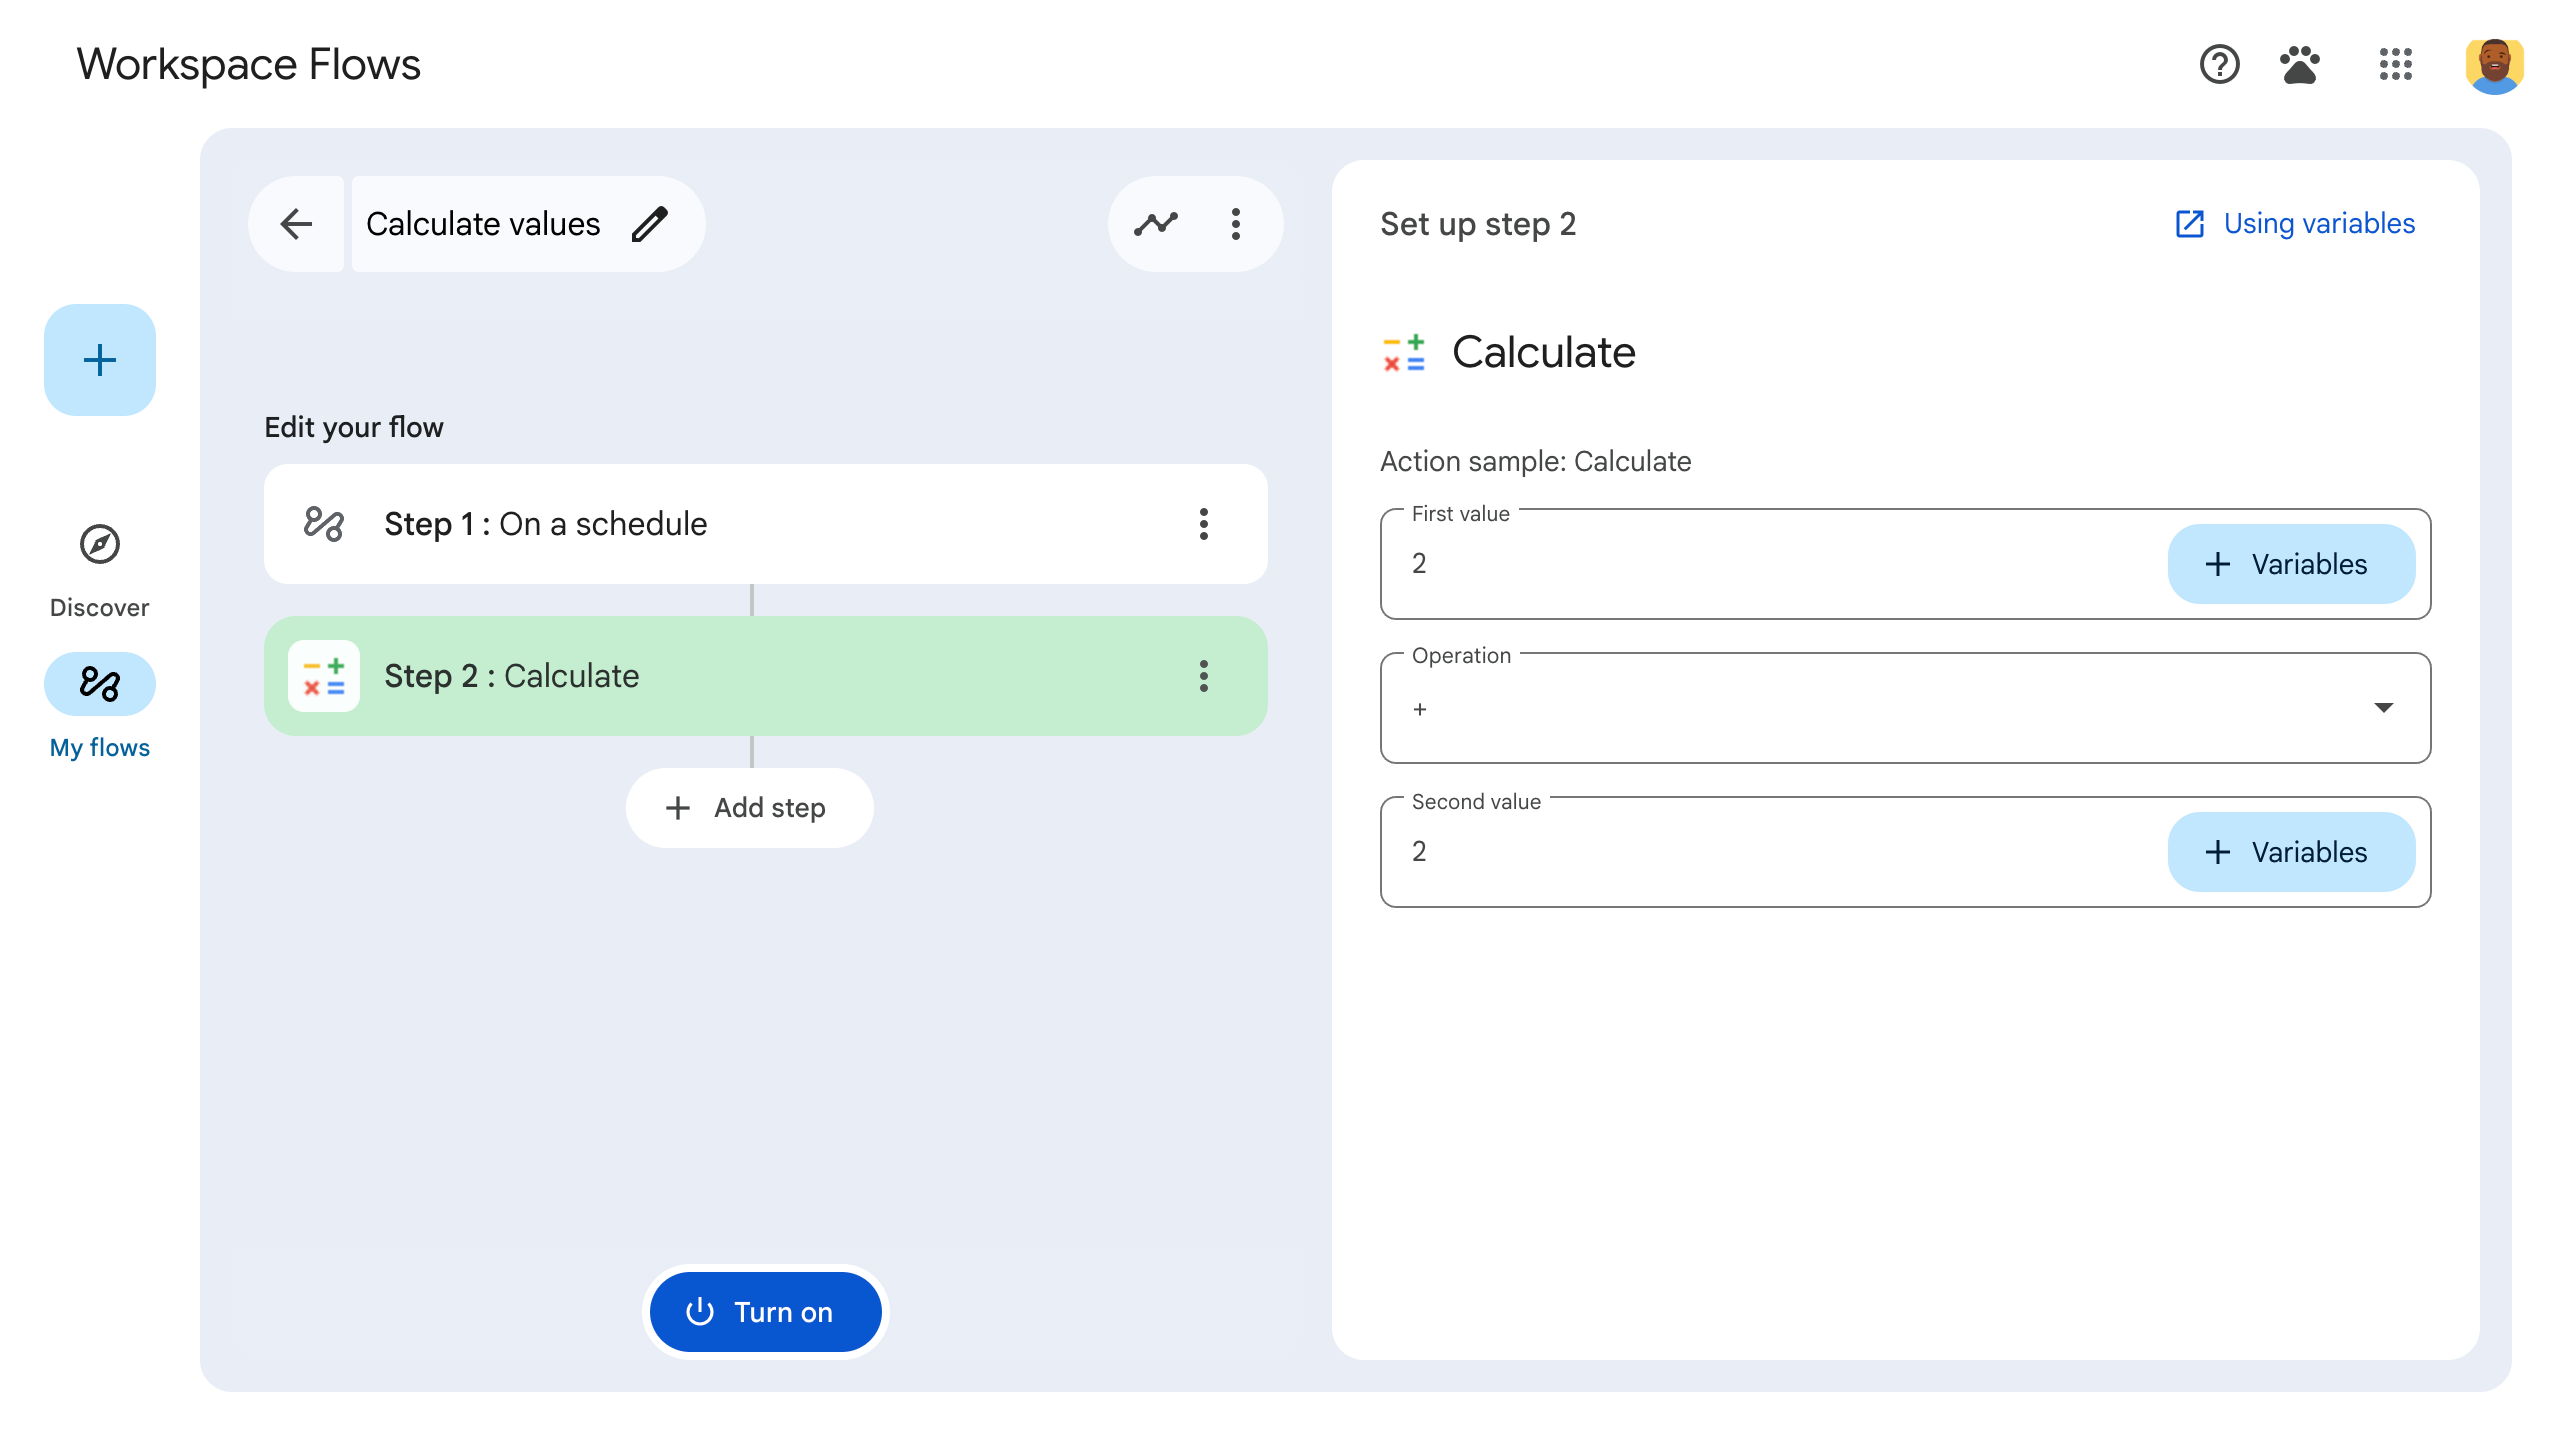
- Klicken Sie auf Schritt hinzufügen. Wählen Sie den Schritt aus, den Sie erstellt oder aktualisiert haben, mit dem Namen Calculate (Berechnen).
- Konfigurieren Sie den Schritt. Wählen Sie für den Berechnungsschritt zwei Werte und eine mathematische Operation aus. Der Schritt wird automatisch gespeichert.
- Wenn Sie die Ausgabe Ihres Schritts testen möchten, fügen Sie einen weiteren Schritt hinzu. Wenn Sie beispielsweise einer E-Mail-Nachricht eine Ausgabe hinzufügen möchten, können Sie den Gmail-Schritt Nachricht senden hinzufügen. Klicken Sie unter Nachricht auf Variablen und wählen Sie die Ausgabe des Schritts aus. Wählen Sie für den Berechnungsschritt Variablen > Schritt 2: Berechnetes Ergebnis > Berechnetes Ergebnis aus. Die Variable wird als Chip im Feld Nachricht angezeigt.
- Klicke auf Aktivieren. Der Flow kann jetzt ausgeführt werden.
Führen Sie den Ablauf aus, indem Sie den Auslöser des Ablaufs aktivieren. Wenn Ihr Flow beispielsweise beim Empfang einer E‑Mail gestartet wird, senden Sie sich selbst eine E‑Mail.
Prüfen Sie, ob der Ablauf wie erwartet ausgeführt wird. Sie können die Logs auf dem Tab Aktivität des Flow-Builders aufrufen. Informationen zum Erstellen benutzerdefinierter Logs auf dem Tab „Aktivität“ finden Sie unter Aktivitätslogs.
Nächste Schritte
Sie haben erfolgreich einen benutzerdefinierten Ablaufschritt für Workspace-Abläufe erstellt und getestet. Du hast nun folgende Möglichkeiten:
Sie können den Schritt weiter anpassen, indem Sie Gemini auffordern, Ihnen bei der Implementierung komplexerer Logik zu helfen.
Konfigurationskarte erstellen, um die Schrittkonfiguration anzupassen.
Aktivitäten und Fehler protokollieren, um Ihre Schrittläufe aufzuzeichnen und Fehler zu beheben.
Flow-Ereignisobjekte ansehen, um die JSON-Nutzlast zu prüfen, die von Flows gesendet und empfangen wird, wenn sie ausgeführt werden.