
В этом кратком руководстве вы узнаете, как создать пользовательский шаг для Workspace Studio с помощью Google Apps Script. Пользовательский шаг принимает на вход два числа и арифметическую операцию, выполняет вычисление и выводит результат.
Цели
- Создайте пользовательский шаг для Workspace Studio с помощью Google Apps Script.
- Разверните пользовательский шаг в своей организации Google Workspace.
- Протестируйте пользовательский шаг в Workspace Studio.
Предварительные требования
- Учетная запись Google с доступом к Workspace Studio.
Настройте скрипт
Для настройки скрипта создайте новый проект Apps Script, а затем подключите его к своему облачному проекту.
Нажмите следующую кнопку, чтобы открыть проект быстрого запуска приложения «Калькулятор» на Apps Script.
Нажмите на Overview .
На странице обзора нажмите
 Сделайте копию .
Назовите свою копию проекта Apps Script:
Нажмите «Копировать краткое руководство по использованию калькулятора» .
В поле «Название проекта» введите
Calculator quickstart.Нажмите «Переименовать» .
Необязательно: ознакомьтесь с кодом для быстрого запуска.
В предыдущем разделе вы скопировали весь проект Apps Script, содержащий весь необходимый код приложения для пользовательского шага вашего потока, поэтому нет необходимости копировать и вставлять каждый файл по отдельности.
При желании вы можете просмотреть каждый файл, скопированный в предыдущем разделе, здесь:
-
appsscript.json Файл манифеста. Специальный JSON-файл, содержащий основную информацию о проекте, необходимую Apps Script для запуска скрипта.
Просмотреть код
appsscript.json{ "timeZone": "America/Los_Angeles", "exceptionLogging": "STACKDRIVER", "runtimeVersion": "V8", "addOns": { "common": { "name": "Calculator", "logoUrl": "https://www.gstatic.com/images/branding/productlogos/calculator_search/v1/web-24dp/logo_calculator_search_color_1x_web_24dp.png", "useLocaleFromApp": true }, "flows": { "workflowElements": [ { "id": "actionElement", "state": "ACTIVE", "name": "Calculate", "description": "Asks the user for two values and a math operation, then performs the math operation on the values and outputs the result.", "workflowAction": { "inputs": [ { "id": "value1", "description": "value1", "cardinality": "SINGLE", "dataType": { "basicType": "INTEGER" } }, { "id": "value2", "description": "value2", "cardinality": "SINGLE", "dataType": { "basicType": "INTEGER" } }, { "id": "operation", "description": "operation", "cardinality": "SINGLE", "dataType": { "basicType": "STRING" } } ], "outputs": [ { "id": "result", "description": "Calculated result", "cardinality": "SINGLE", "dataType": { "basicType": "INTEGER" } } ], "onConfigFunction": "onConfigCalculateFunction", "onExecuteFunction": "onExecuteCalculateFunction" } } ] } } }
-
Calculator.gs Определяет пользовательский шаг для Google Workspace Studio. Шаг с именем "Вычислить" принимает в качестве входных данных два числа и операцию и возвращает результат вычисления.
Просмотреть код
Calculator.gs/** * This script defines a custom step for Google Workspace Studio. * The step, named "Calculate", takes two numbers and an operation as input * and returns the result of the calculation. * * The script includes functions to: * * 1. Define the configuration UI for the step using Card objects: * * - `onConfigCalculateFunction()`: Generates the main configuration card. * - Helper functions like `pushCard()`, `saveButton()` to build card components. * * 2. Handle the execution of the step. * * - `onExecuteCalculateFunction()`: Retrieves inputs, performs the calculation, * and returns outputs. * * To learn more, see the following quickstart guide: * https://developers.google.com/workspace/add-ons/studio/quickstart */ /** * Creates an action response to push a new card onto the card stack. * * This function generates an action object that, when returned, causes the * provided card to be pushed onto the card stack, making it the currently * displayed card in the configuration UI. * @param {Object} card The Card object to push. * @return {Object} The action response object. */ function pushCard(card) { return { "action": { "navigations": [{ "push_card": card } ] } }; } /** * Creates an action response to update the currently displayed card. * * This function generates an action object that, when returned, causes the * currently displayed card to be replaced with the provided card in the * configuration UI. * @param {Object} card The Card object to update. * @return {Object} The render actions object. */ function updateCard(card) { return { "render_actions": { "action": { "navigations": [{ "update_card": card } ] } } }; } /** * Creates a button configuration object for saving the step. * * This function generates a button definition that, when clicked, triggers * a save action for the current step configuration. * @return {Object} The button widget object. */ function saveButton() { return { "text": "Save", "onClick": { "hostAppAction" : { "workflowAction" : { "saveWorkflowAction" : {} } } }, }; } /** * Creates a button configuration object for a refresh action. * * This function generates a button definition that, when clicked, triggers * a function to refresh the current card. * @param {string} functionName The name of the Apps Script function to call on click. * @return {Object} The button widget object. */ function refreshButton(functionName) { return { "text": "Refresh", "onClick": { "action" : { "function" : functionName } }, }; } /** * Generates and displays a configuration card for the sample calculation action. * * This function creates a card with input fields for two values and a dropdown * for selecting an arithmetic operation. The card also includes a "Save" * button to save the action configuration for the step. * * The input fields are configured to let the user select outputs from previous * steps as input values using the `hostAppDataSource` property. * This function is called when the user adds or edits the "Calculate" step in the UI. * @return {Object} The action response object containing the card to display. */ function onConfigCalculateFunction() { var card = { "sections": [ { "header": "Action sample: Calculate", "widgets": [ { "textInput": { "name": "value1", "label": "First value", "hostAppDataSource" : { "workflowDataSource" : { "includeVariables" : true } } } }, { "selectionInput": { "name": "operation", "label": "Operation", "type": "DROPDOWN", "items": [ { "text": "+", "value": "+", }, { "text": "-", "value": "-", }, { "text": "x", "value": "x", }, { "text": "/", "value": "/", } ] } }, { "textInput": { "name": "value2", "label": "Second value", "hostAppDataSource" : { "workflowDataSource" : { "includeVariables" : true } } } } ] } ] }; return pushCard(card); } /** * Gets an integer value from variable data, handling both string and integer formats. * * This function attempts to extract an integer value from the provided variable data. * It checks if the data contains string values and, if so, parses the first string * as an integer. If integer values are present, it returns the first integer. * @param {Object} variableData The variable data object from the event. * @return {number} The extracted integer value. */ function getIntValue(variableData) { if (variableData.stringValues) { return parseInt(variableData.stringValues[0]); } return variableData.integerValues[0]; } /** * Returns output variables from a step. * * This function constructs an object that, when returned, sends the * provided variable values as output from the current step. * The variable values are logged to the console for debugging purposes. */ function outputVariables(variableDataMap) { const workflowAction = AddOnsResponseService.newReturnOutputVariablesAction() .setVariableDataMap(variableDataMap); const hostAppAction = AddOnsResponseService.newHostAppAction() .setWorkflowAction(workflowAction); const renderAction = AddOnsResponseService.newRenderActionBuilder() .setHostAppAction(hostAppAction) .build(); return renderAction; } /** * Executes the calculation action based on the inputs from an event. * * This function retrieves input values ("value1", "value2") and the "operation" * from the event, performs the calculation, and returns the "result" and * "log" as output variables. * This function is called when the flow reaches this custom step. * @param {Object} event The event object passed by the runtime. * @return {Object} The output variables object. */ function onExecuteCalculateFunction(event) { console.log("output: " + JSON.stringify(event)); var calculatedValue = 0; var value1 = event.workflow.actionInvocation.inputs["value1"].integerValues[0]; var value2 = event.workflow.actionInvocation.inputs["value2"].integerValues[0]; var operation = event.workflow.actionInvocation.inputs["operation"].stringValues[0]; if (operation == "+") { calculatedValue = value1 + value2; } else if (operation == "-") { calculatedValue = value1 - value2; } else if (operation == "x") { calculatedValue = value1 * value2; } else if (operation == "/") { calculatedValue = value1 / value2; } const variableDataMap = { "result": AddOnsResponseService.newVariableData().addIntegerValue(calculatedValue) }; return outputVariables(variableDataMap); }
Разверните и протестируйте свой шаг.
Чтобы протестировать этот шаг, настройте тестовое развертывание для вашего дополнения, добавьте этот шаг в поток, а затем запустите поток.
Настройте тестовое развертывание для вашего дополнения:
- Откройте проект скрипта в редакторе Apps Script.
- Нажмите «Развернуть» > «Проверить развертывания» .
- Нажмите «Установить» .
- Внизу нажмите «Готово» .
Вы можете разрешить другим пользователям протестировать дополнение, предоставив им доступ к проекту Apps Script (требуется доступ на редактирование). Затем предложите пользователям выполнить описанные выше шаги.
После установки дополнение сразу же становится доступно в Flows. Возможно, потребуется обновить страницу Flows, прежде чем дополнение появится. Также необходимо авторизовать дополнение перед его использованием.
Чтобы узнать больше о развертывании тестовых файлов, см. раздел «Установка неопубликованного дополнения» .
Открытые потоки.
Создайте алгоритм, включающий ваш шаг:
- Нажмите новый поток» .
- Выберите способ запуска процесса. Если ваш шаг требует входной переменной, настройте эту переменную как часть выходных данных запускаемого шага.
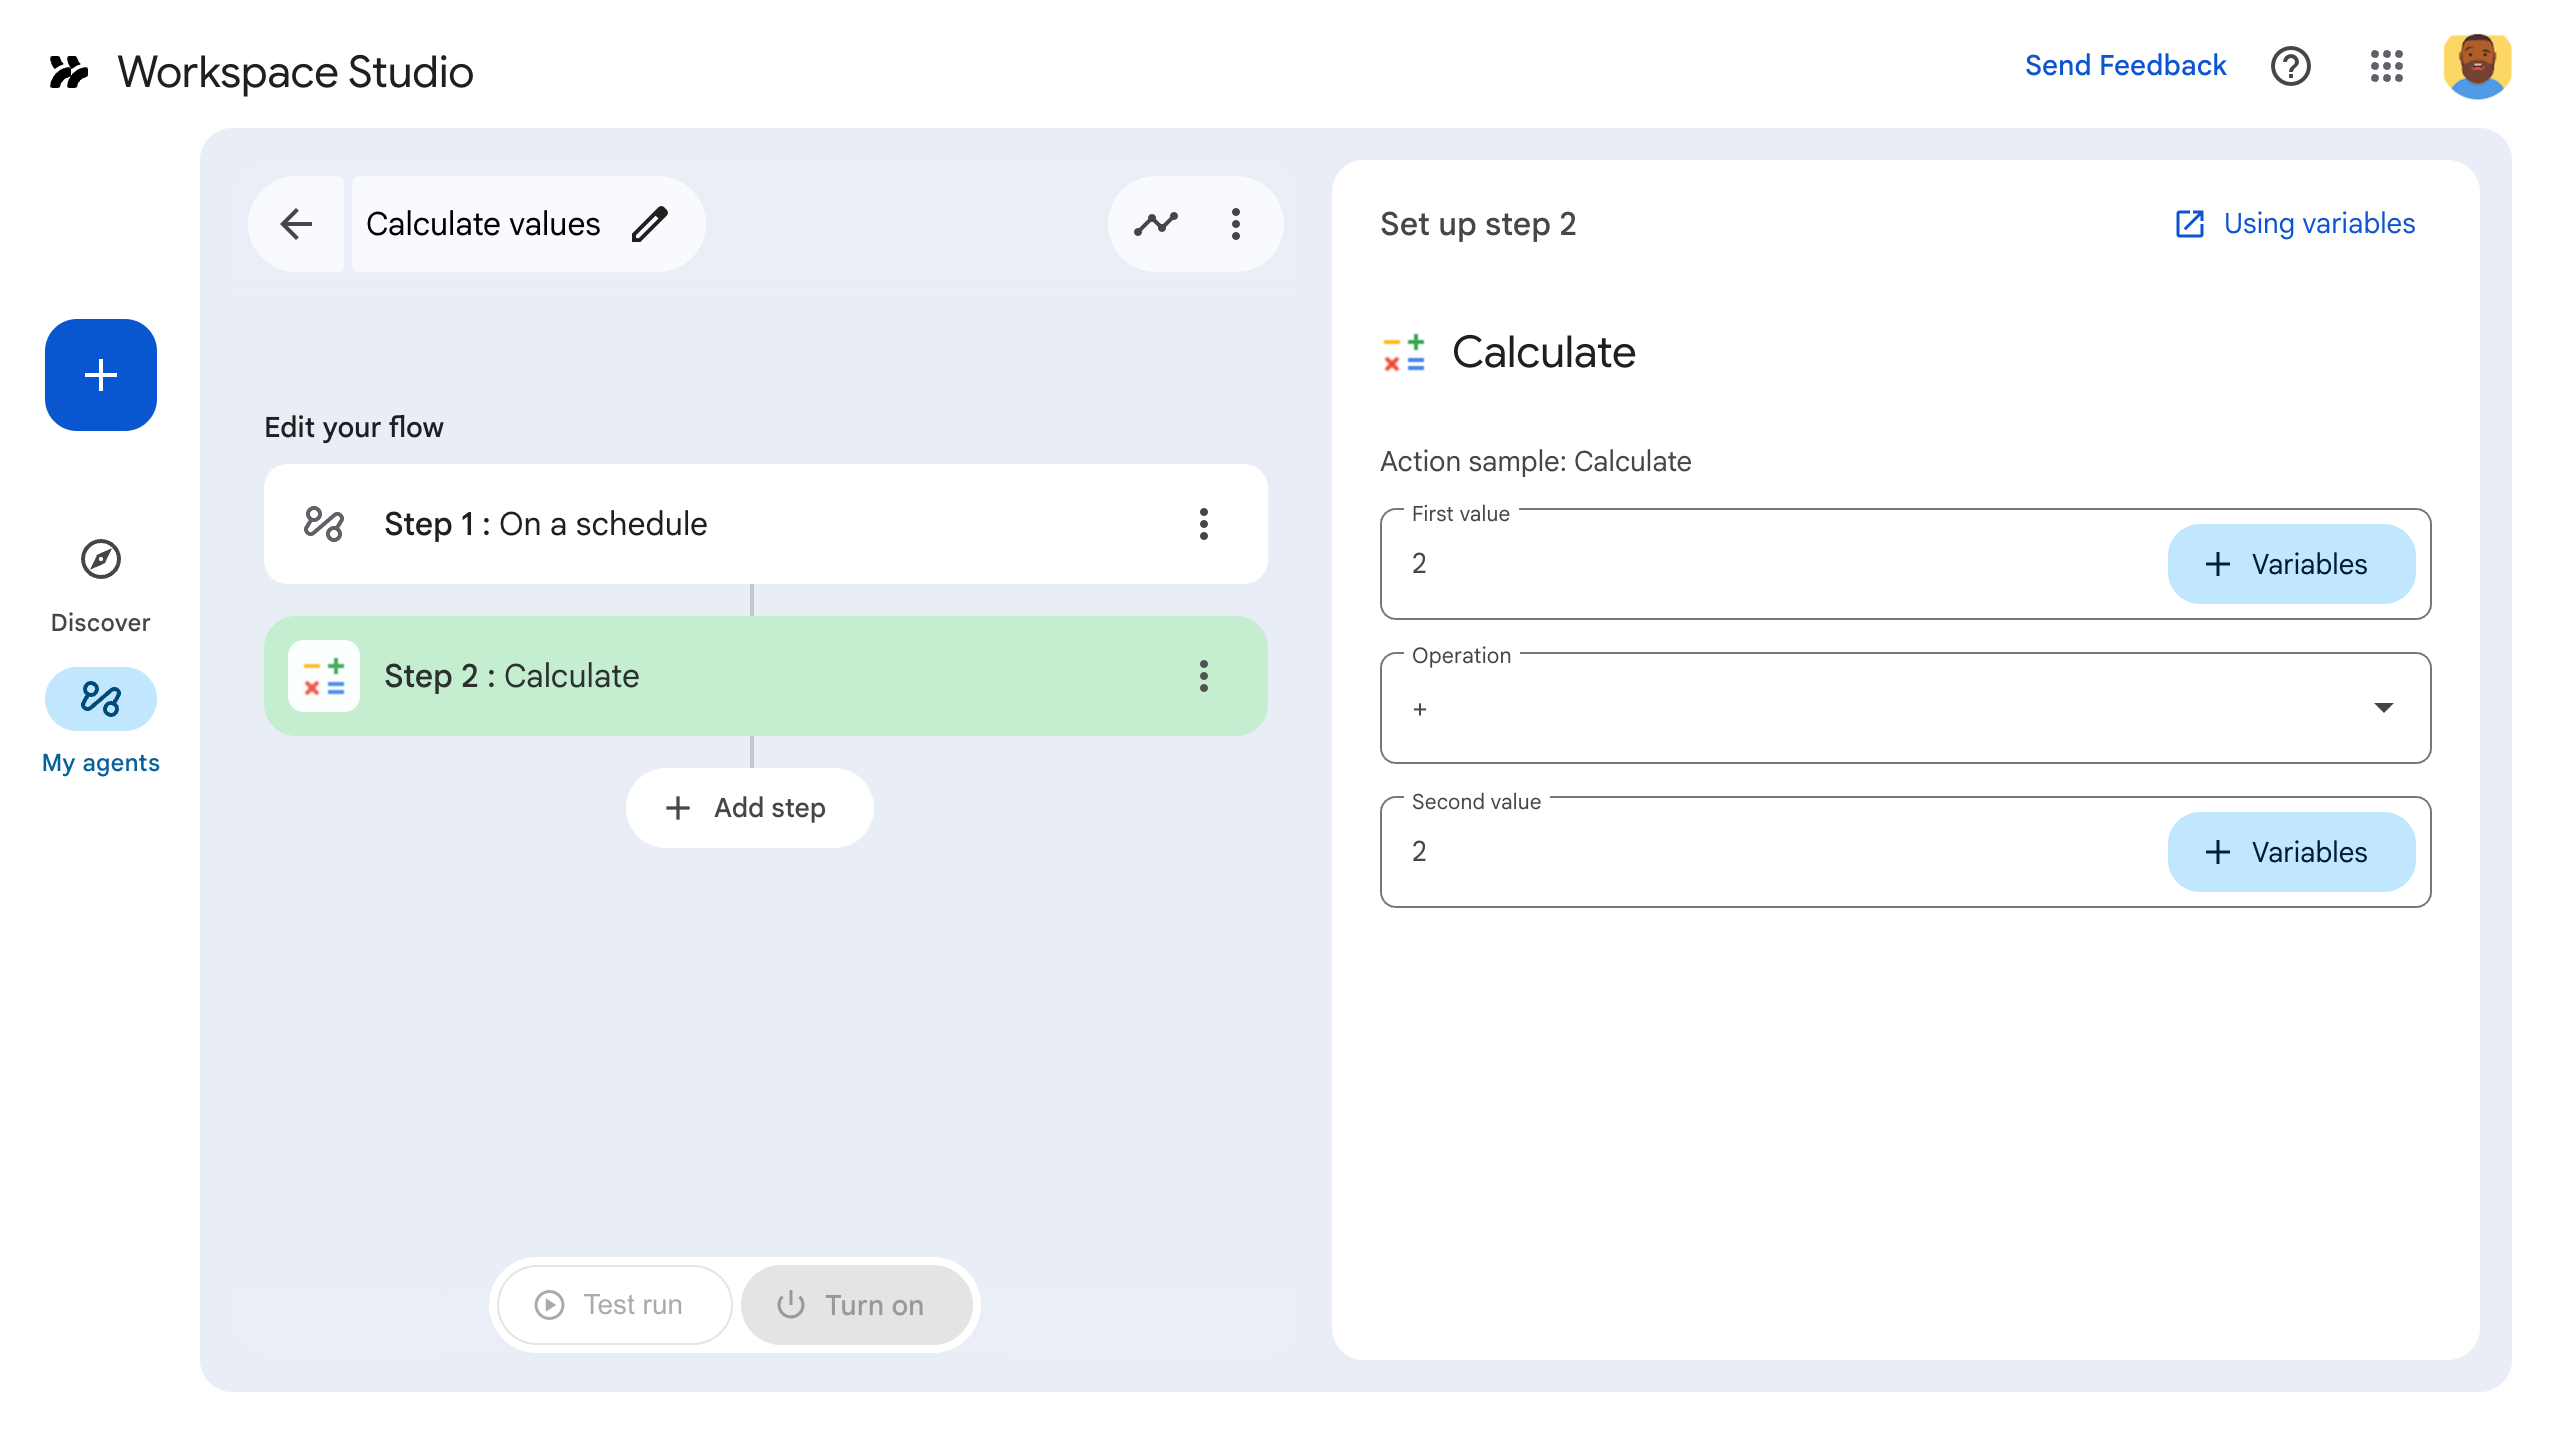
- Нажмите шаг» . Выберите шаг, который вы создали или обновили, под названием «Вычислить» .
- Настройте шаг. Для шага вычисления выберите два значения и математическую операцию. Шаг сохраняется автоматически.
- Чтобы проверить результат выполнения шага, добавьте еще один шаг. Например, чтобы добавить результат в сообщение Google Chat, добавьте шаг « Уведомить меня в чате» . В поле «Сообщение» нажмите переменные» и выберите результат выполнения шага. Для шага «Вычисление» выберите переменные» > «Шаг 2: Вычисление» > «Результат вычисления» . Переменная отобразится в виде значка в поле «Сообщение» .
- Нажмите «Включить» . Ваш процесс готов к запуску.
Запустите поток, указав его в качестве стартового параметра. Например, если ваш поток запускается по расписанию, он будет выполнен в указанную дату и время.
Убедитесь, что процесс выполняется должным образом. Проверьте журналы, перейдя на вкладку «Действия» в конструкторе процессов. Чтобы узнать, как создавать пользовательские журналы на вкладке «Действия», см. раздел «Журналы действий» .
Следующие шаги
Вы успешно создали и протестировали пользовательский шаг для Workspace Studio. Теперь вы можете:
Продолжите настройку шага, предложив Gemini помочь вам реализовать более сложную логику.
Создайте карточку конфигурации для настройки параметров шага.
Регистрируйте действия и ошибки для записи и устранения неполадок во время выполнения шагов.
Просмотрите объекты событий , чтобы изучить полезную нагрузку JSON, которую потоки отправляют и получают по мере выполнения шагов.