Menganalisis dan memberi label pada pesan Gmail dengan Gemini dan Vertex AI

Solusi ini menggunakan Vertex AI dan Gemini untuk menganalisis pesan Gmail dan melabelinya berdasarkan sentimennya.

Tingkat coding: Menengah
Durasi: 30 menit
Jenis project: Add-on Google Workspace

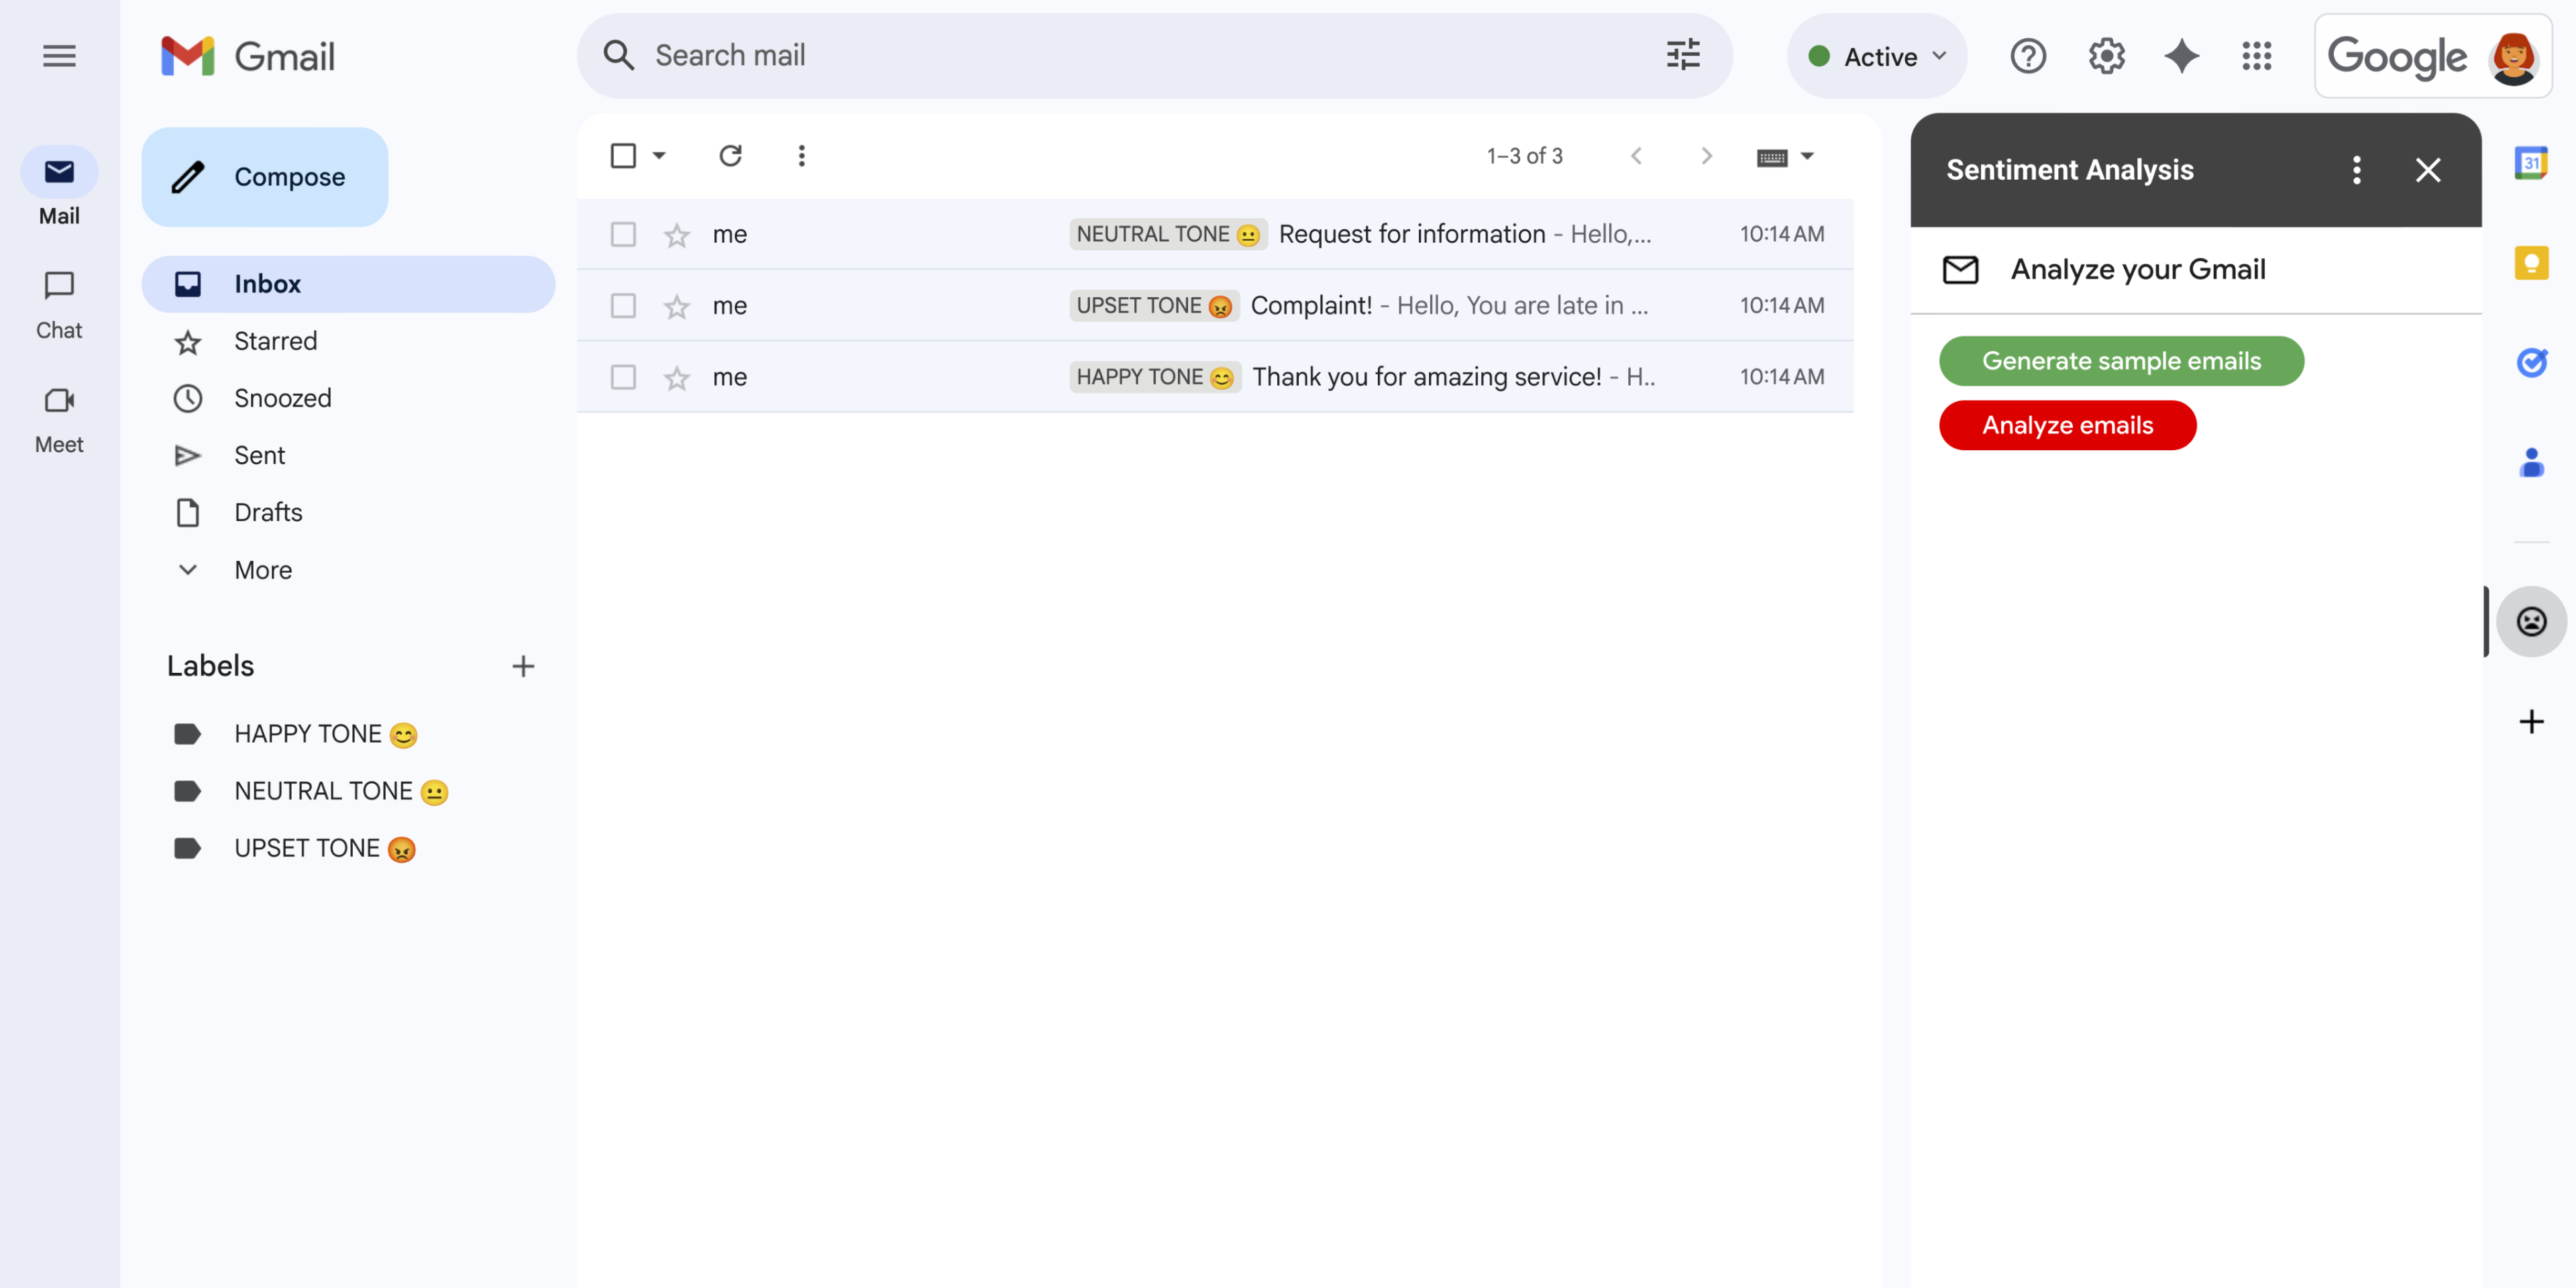
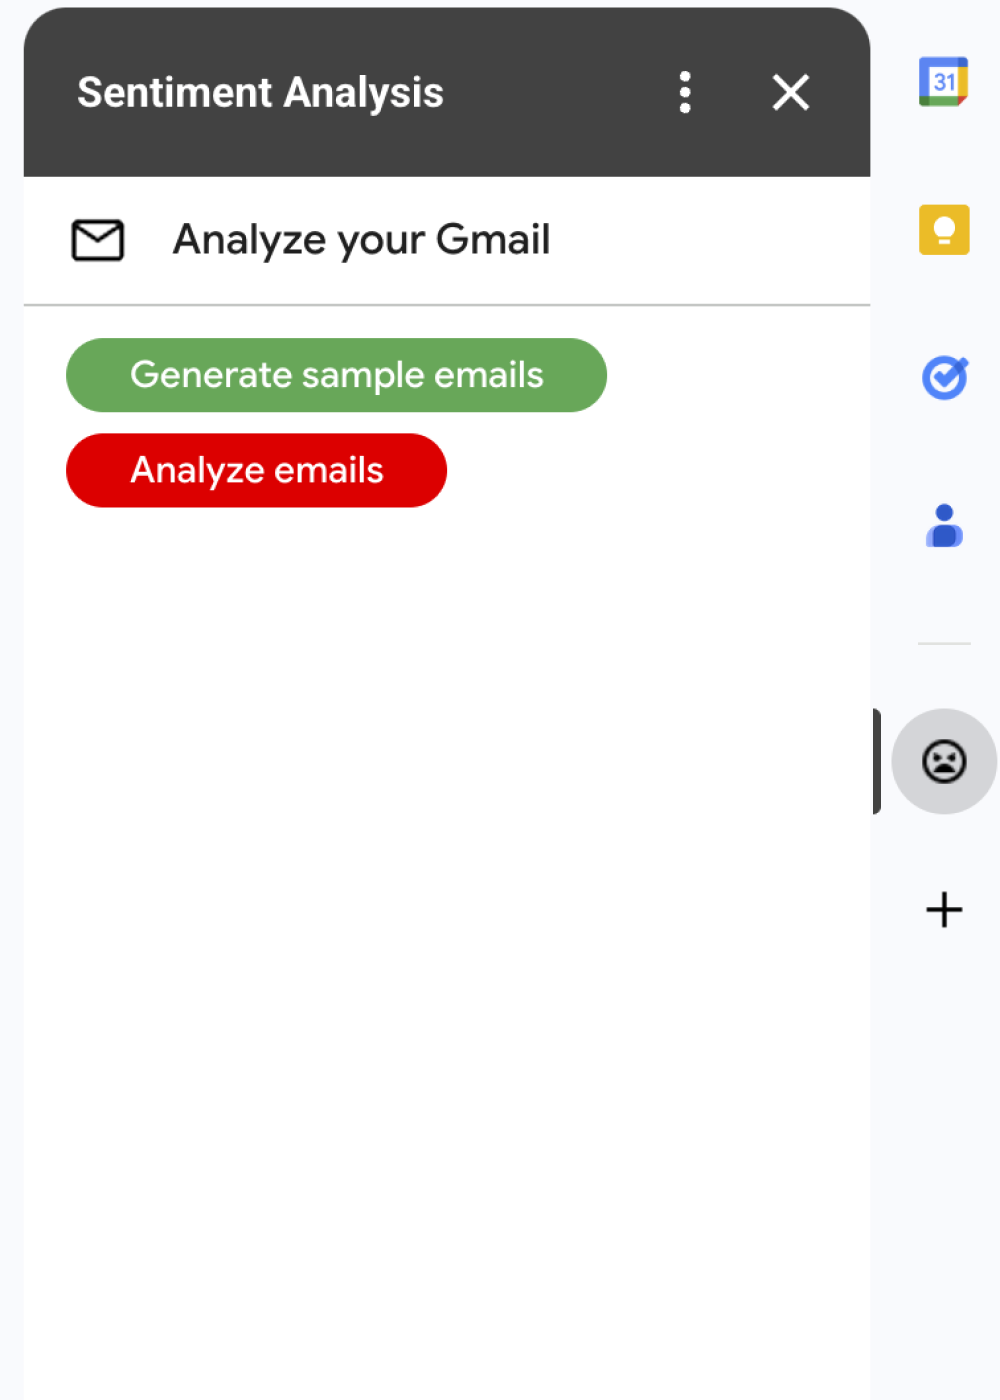
  • Add-on Google Workspace yang memperluas fungsi Gmail di sidebar.
    Gambar 1: Add-on Analisis Sentimen menampilkan sidebar di Gmail tempat pengguna dapat meminta Gemini untuk menganalisis dan menerapkan label ke pesan berdasarkan sentimen.
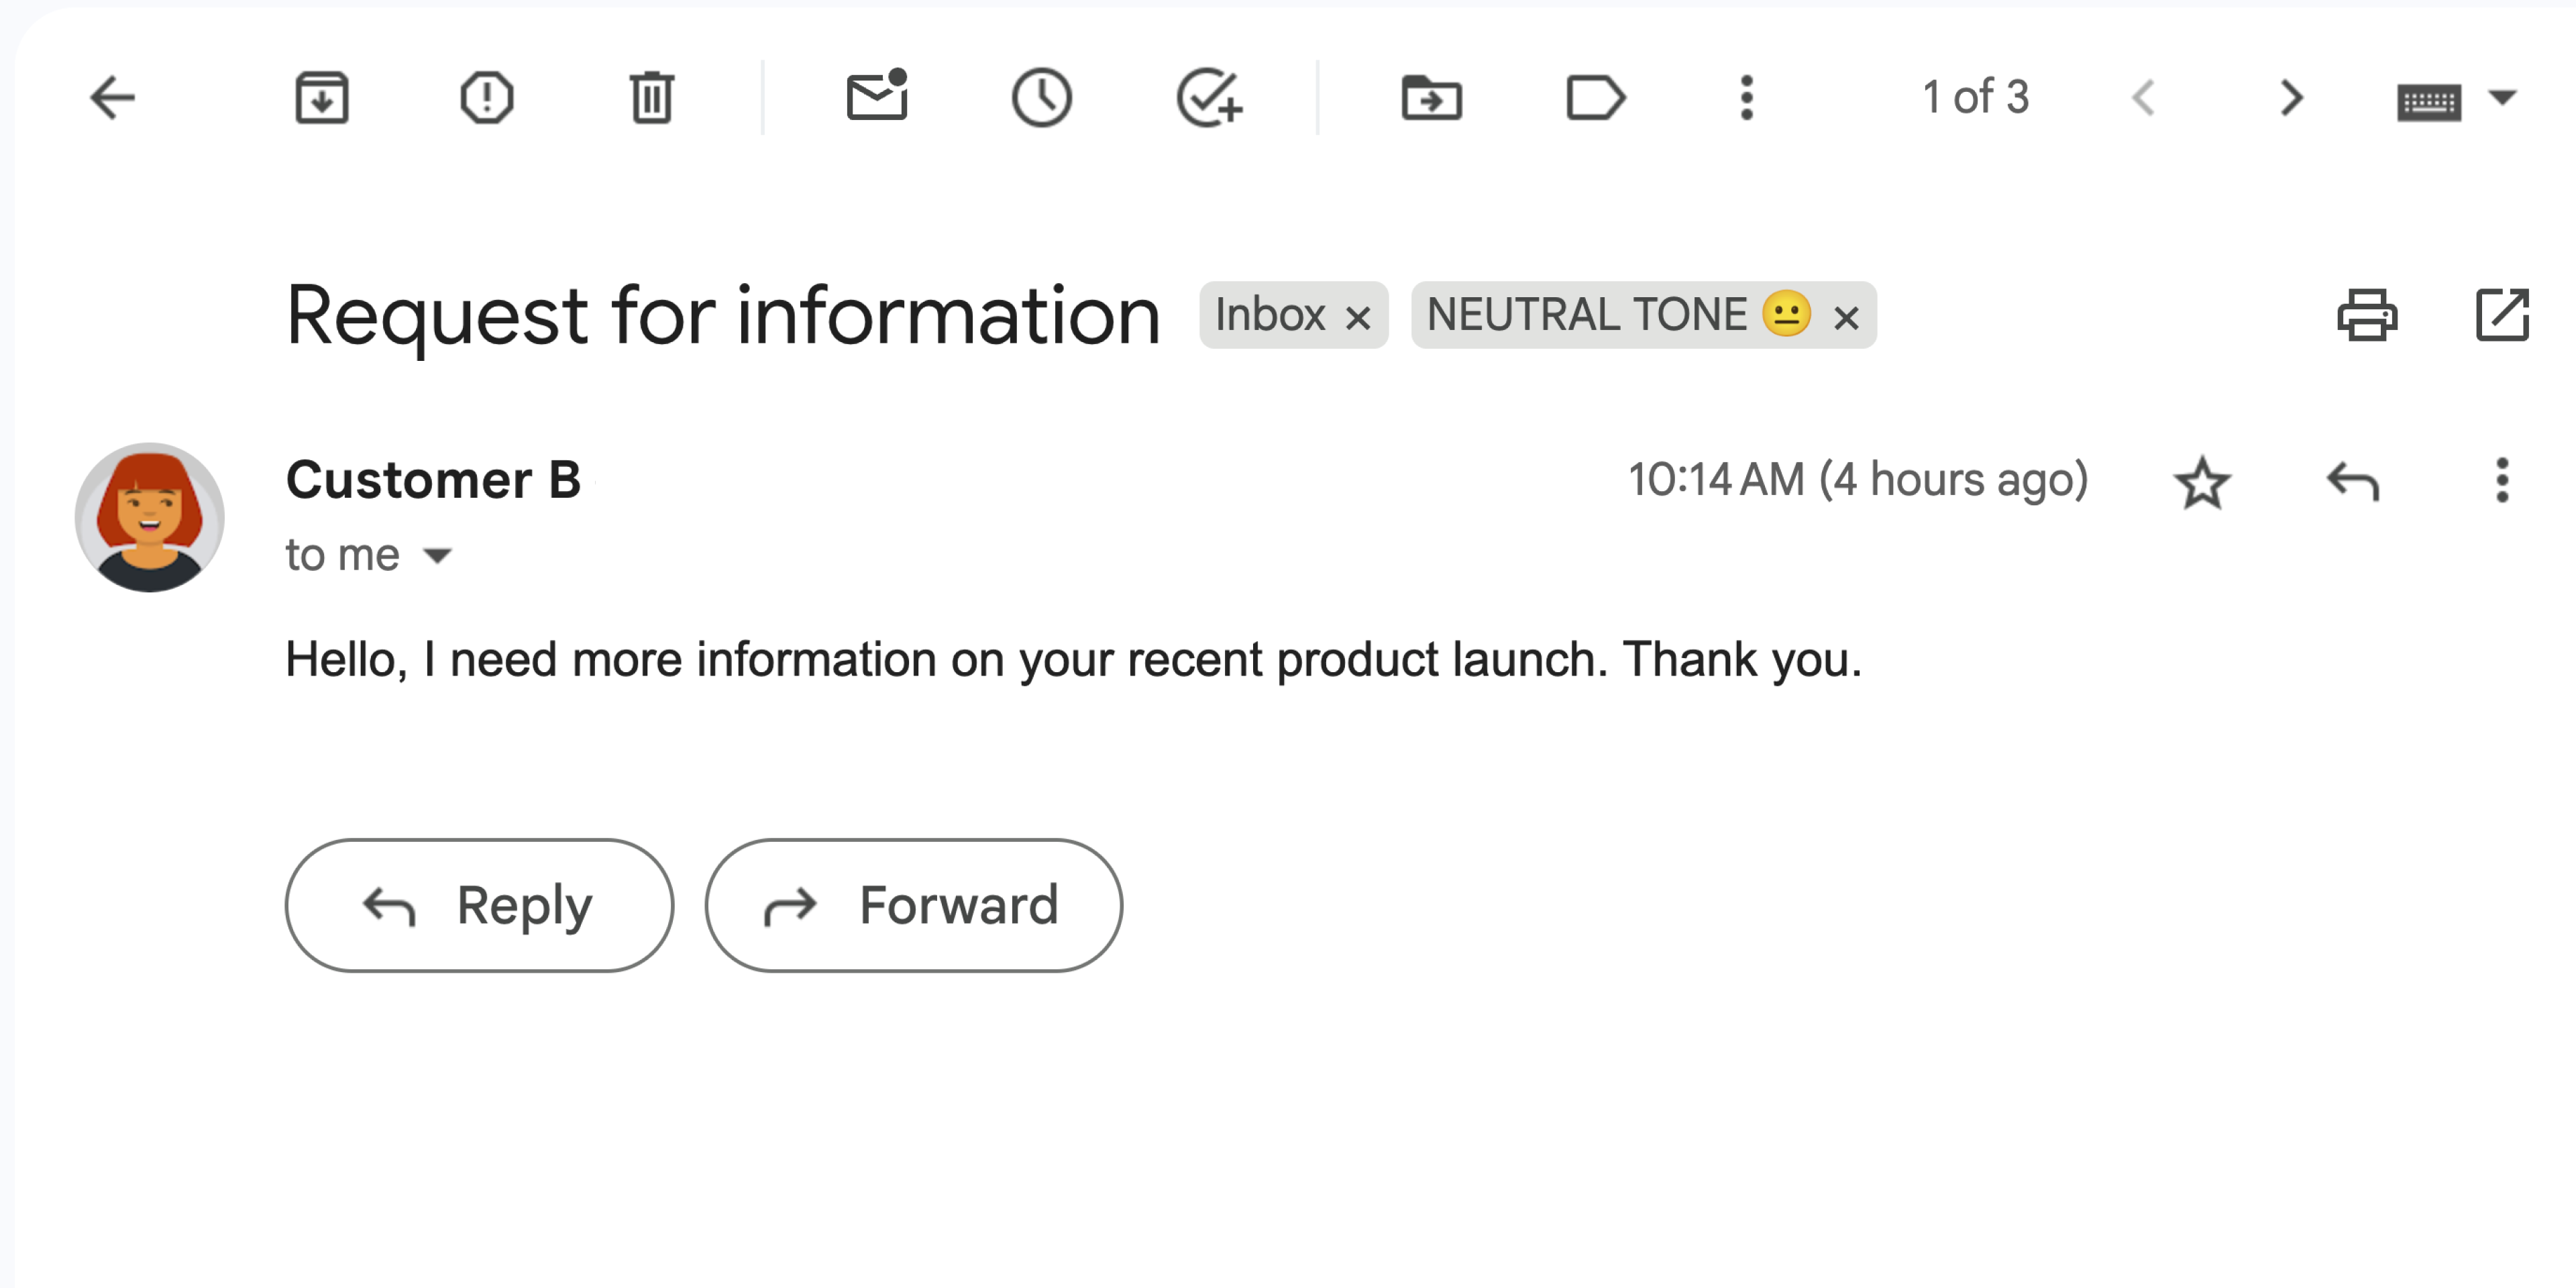
  • Pesan Gmail dengan sentimen netral.
    Gambar 2: Add-on melabeli pesan Gmail dengan label NEUTRAL TONE 😐.
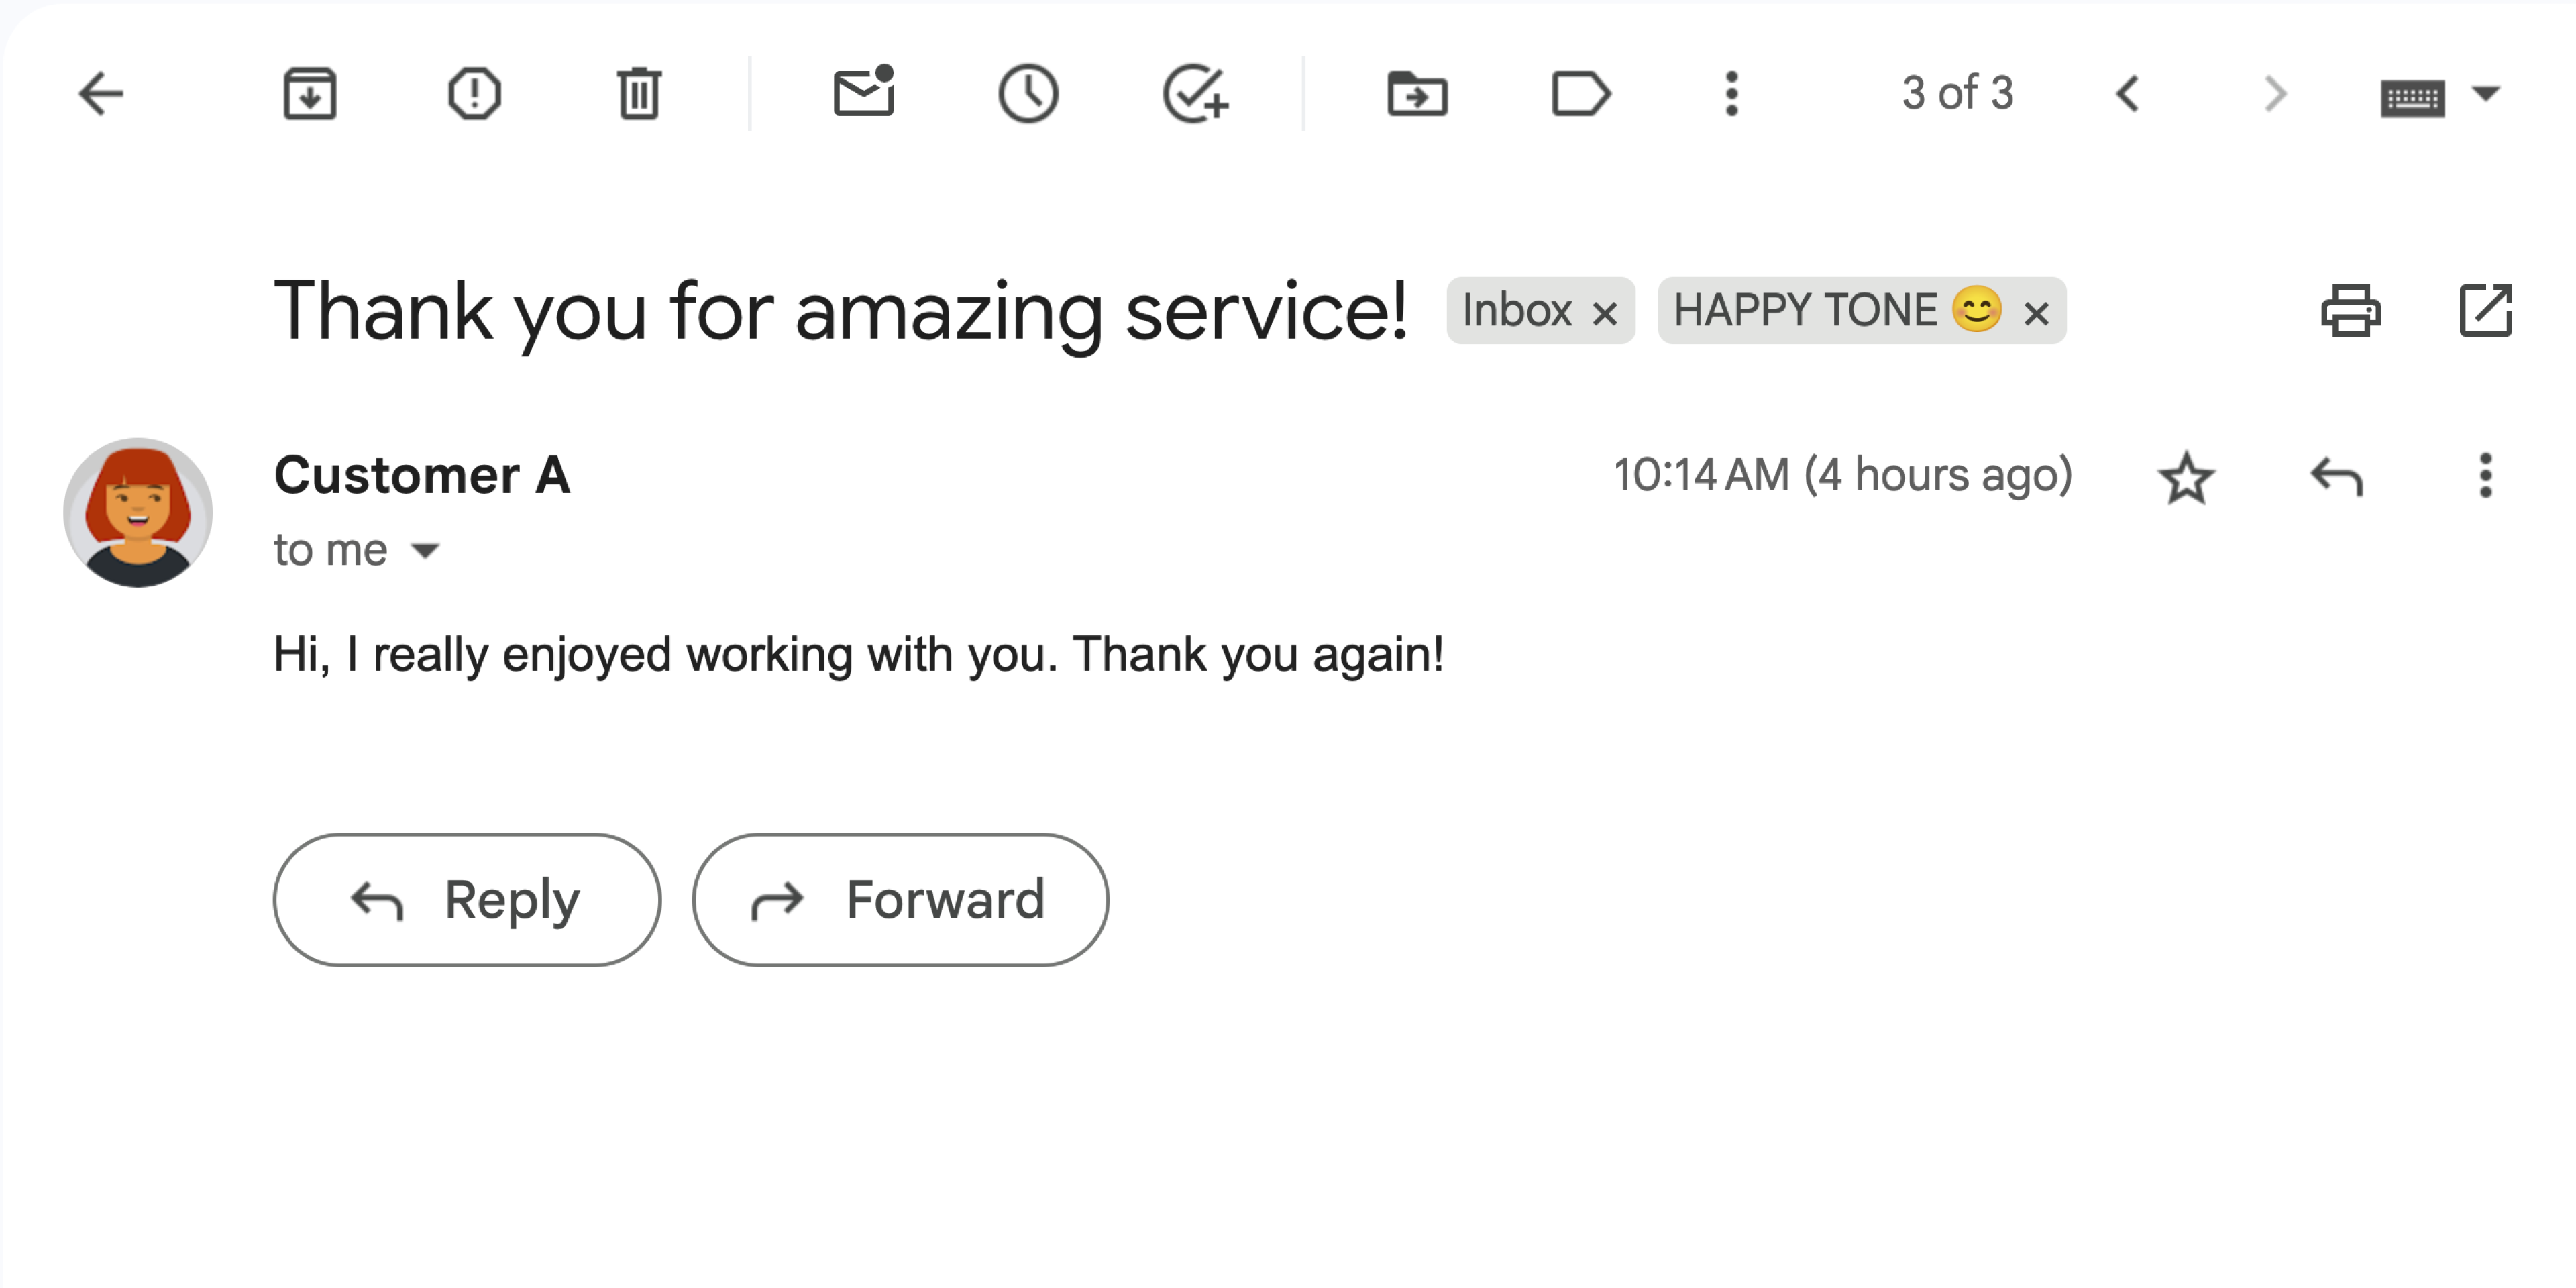
  • Pesan Gmail dengan sentimen positif.
    Gambar 3: Add-on melabeli pesan Gmail dengan label HAPPY TONE 😊.
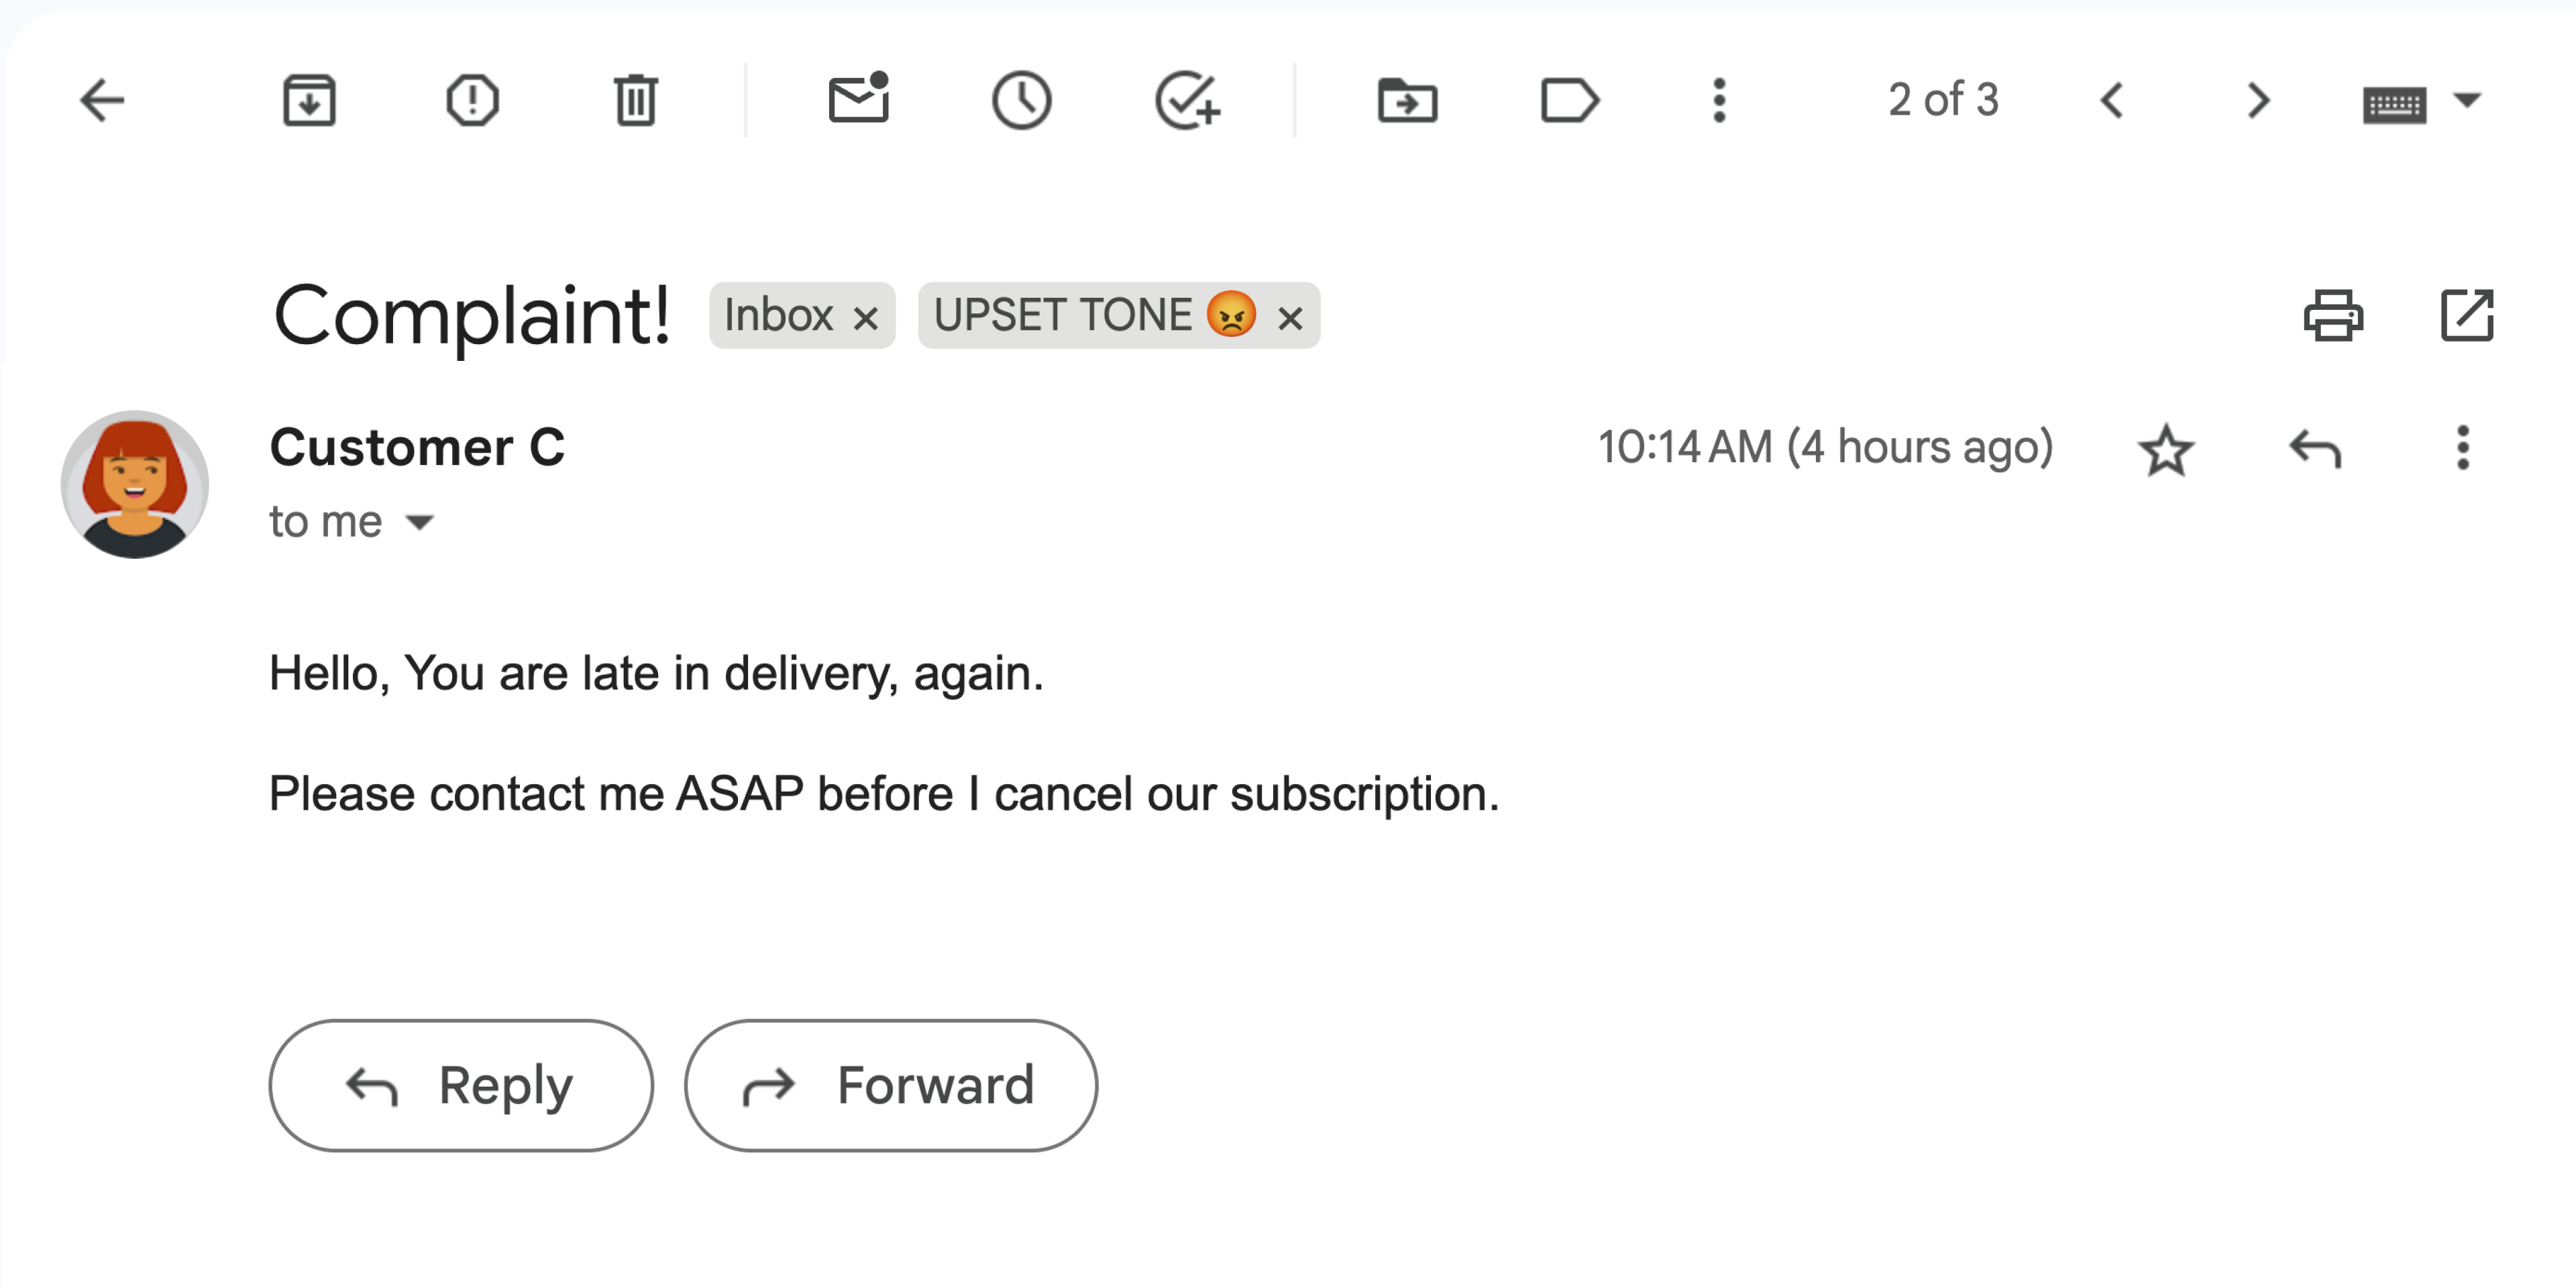
  • Pesan Gmail dengan sentimen negatif.
    Gambar 4: Add-on melabeli pesan Gmail dengan label UPSET TONE 😡.

Tujuan

  • Memahami fungsi solusi.
  • Memahami fungsi layanan Google dalam solusi.
  • Menyiapkan lingkungan.
  • Menyiapkan project Google Apps Script.
  • Menjalankan skrip.

Tentang solusi ini

Add-on Google Workspace Analisis Sentimen

Add-on Google Workspace Analisis Sentimen

Solusi ini adalah add-on Google Workspace yang menerapkan label berdasarkan sentimen pesan Gmail. Untuk menganalisis konten pesan, add-on menggunakan Vertex AI untuk meminta model Gemini 2.5 Flash dan menampilkan salah satu sentimen berikut:

  • Positif
  • Negatif
  • Netral

Dengan respons dari Gemini, add-on akan menerapkan label Gmail yang sesuai ke pesan.

Untuk membatasi permintaan ke Vertex AI API, add-on ini hanya menganalisis dan menerapkan label ke 10 pesan terbaru di kotak masuk pengguna Gmail. Untuk mempelajari kuota dan batas lebih lanjut, lihat dokumentasi Vertex AI.

Cara kerjanya

Solusi ini dibuat di Google Apps Script dan menggunakan layanan serta produk Google berikut:

  • Vertex AI API–Meminta model Gemini 2.5 Flash untuk menganalisis konten pesan Gmail dan mengidentifikasi sentimen.
  • Layanan Apps Script:

    • Layanan Gmail–Mengambil dan menerapkan label ke pesan Gmail. Secara opsional, membuat contoh pesan untuk menguji add-on.
    • Layanan kartu–Membuat antarmuka pengguna add-on yang muncul sebagai sidebar di Gmail.
    • Layanan URL Fetch–Menghubungkan ke Vertex AI API untuk analisis sentimen.
    • Layanan skrip–Untuk memanggil Vertex AI API, mendapatkan token akses OAuth 2.0 untuk add-on menggunakan metode getOAuthToken.

Prasyarat

Menyiapkan lingkungan Anda

Bagian ini menjelaskan cara mengonfigurasi dan menyiapkan lingkungan Anda di konsol Google Cloud dan Apps Script.

Mengonfigurasi project Cloud Anda di konsol Google Cloud

Bagian ini menunjukkan cara mengaktifkan Vertex AI API dan mengonfigurasi layar izin OAuth di project Cloud Anda.

Mengaktifkan Vertex AI API

  1. Di konsol Google Cloud, buka project Google Cloud Anda dan aktifkan Vertex AI API:

    Mengaktifkan API

  2. Pastikan Anda mengaktifkan API di project Cloud yang benar, lalu klik Next.

  3. Pastikan Anda mengaktifkan API yang benar, lalu klik Enable.

Mengonfigurasi layar izin OAuth

Add-on Google Workspace memerlukan konfigurasi layar izin. Mengonfigurasi layar izin OAuth add-on Anda menentukan konten yang ditampilkan Google kepada pengguna.

  1. Di Konsol Google API, buka Menu > Google Auth platform > Branding.

    Buka Branding

  2. Jika sudah mengonfigurasi platform Google Auth, Anda dapat mengonfigurasi setelan Layar Izin OAuth berikut di Branding, Audiens, dan Akses Data. Jika Anda melihat pesan yang menyatakan Google Auth platform not configured yet, klik Get Started:
    1. Di bagian App Information, di App name, masukkan nama untuk aplikasi.
    2. Di User support email, pilih alamat email dukungan tempat pengguna dapat menghubungi Anda jika mereka memiliki pertanyaan tentang izin mereka.
    3. Klik Next.
    4. Di bagian Audience, pilih Internal.
    5. Klik Next.
    6. Di bagian Contact Information, masukkan Email address tempat Anda dapat menerima notifikasi tentang perubahan apa pun pada project Anda.
    7. Klik Next.
    8. Di bagian Finish, tinjau Kebijakan Data Pengguna Layanan Google API dan jika Anda setuju, pilih I agree to the Google API Services: User Data Policy.
    9. Klik Continue.
    10. Klik Create.
  3. Untuk saat ini, Anda dapat melewati penambahan cakupan. Pada masa mendatang, saat membuat aplikasi untuk digunakan di luar organisasi Google Workspace Anda, Anda harus mengubah User type menjadi External. Kemudian, tambahkan cakupan otorisasi yang diperlukan aplikasi Anda. Untuk mempelajari lebih lanjut, lihat panduan lengkap Mengonfigurasi izin OAuth guide.

Membuat dan menyiapkan project Apps Script Anda

Untuk membuat dan menyiapkan project Apps Script Anda untuk add-on, selesaikan langkah-langkah berikut:

  1. Klik tombol berikut untuk membuka project Apps Script Gmail Sentiment Analysis with Gemini and Vertex AI.
    Buka project Apps Script

  2. Klik Overview .

  3. Di halaman ringkasan, klik Buat salinan Ikon untuk membuat salinan.

  4. Dapatkan nomor project Cloud Anda:

    1. Di Konsol Google API, buka Menu > IAM & Admin > Settings.

      Buka Setelan IAM &Admin

    2. Di kolom Project number, salin nilainya.
  5. Hubungkan project Cloud Anda dengan project Apps Script Anda:

    1. Di project Apps Script yang Anda salin, klik Project Settings Ikon untuk setelan project.
    2. Di bagian Google Cloud Platform (GCP) Project, klik Change project.
    3. Di GCP project number, tempel nomor project Cloud.
    4. Klik Set project.

Menguji add-on

Untuk mencoba add-on, instal deployment pengujian, lalu buka add-on di Gmail:

  1. Buat dan instal deployment pengujian Apps Script:
    1. Di project Apps Script yang Anda salin, klik Editor .
    2. Buka file Code.gs, lalu klik Run. Saat diminta, izinkan skrip.
    3. Klik Deploy > Test deployments.
    4. Klik Install > Done.
  2. Buka Gmail.

    Buka Gmail

  3. Di sidebar kanan, buka add-on Analisis Sentimen.

  4. Jika diminta, izinkan add-on.

  5. Opsional: Untuk membuat pesan guna menguji add-on Anda, klik Generate sample emails. Tiga pesan akan muncul di kotak masuk Anda. Jika Anda tidak melihatnya, muat ulang halaman.

  6. Untuk menambahkan label, klik Analyze emails.

Add-on akan meninjau 10 pesan terbaru di kotak masuk Anda, lalu menerapkan salah satu label berikut berdasarkan konten pesan:

  • HAPPY TONE 😊
  • NEUTRAL TONE 😐
  • UPSET TONE 😡

Meninjau kode

Tinjau kode Apps Script untuk solusi ini:

Melihat kode sumber

Code.gs

gmail-sentiment-analysis/Code.gs
/*
Copyright 2024 Google LLC

Licensed under the Apache License, Version 2.0 (the "License");
you may not use this file except in compliance with the License.
You may obtain a copy of the License at

    https://www.apache.org/licenses/LICENSE-2.0

Unless required by applicable law or agreed to in writing, software
distributed under the License is distributed on an "AS IS" BASIS,
WITHOUT WARRANTIES OR CONDITIONS OF ANY KIND, either express or implied.
See the License for the specific language governing permissions and
limitations under the License.
*/

/**
 * Triggered when the add-on is opened from the Gmail homepage.
 *
 * @param {Object} e - The event object.
 * @returns {Card} - The homepage card.
 */
function onHomepageTrigger(e) {
  return buildHomepageCard();
}

Cards.gs

gmail-sentiment-analysis/Cards.gs
/*
Copyright 2024-2025 Google LLC

Licensed under the Apache License, Version 2.0 (the "License");
you may not use this file except in compliance with the License.
You may obtain a copy of the License at

    https://www.apache.org/licenses/LICENSE-2.0

Unless required by applicable law or agreed to in writing, software
distributed under the License is distributed on an "AS IS" BASIS,
WITHOUT WARRANTIES OR CONDITIONS OF ANY KIND, either express or implied.
See the License for the specific language governing permissions and
limitations under the License.
*/

/**
 * Builds the main card displayed on the Gmail homepage.
 *
 * @returns {Card} - The homepage card.
 */
function buildHomepageCard() {
  // Create a new card builder
  const cardBuilder = CardService.newCardBuilder();

  // Create a card header
  const cardHeader = CardService.newCardHeader();
  cardHeader.setImageUrl(
    "https://fonts.gstatic.com/s/i/googlematerialicons/mail/v6/black-24dp/1x/gm_mail_black_24dp.png",
  );
  cardHeader.setImageStyle(CardService.ImageStyle.CIRCLE);
  cardHeader.setTitle("Analyze your Gmail");

  // Add the header to the card
  cardBuilder.setHeader(cardHeader);

  // Create a card section
  const cardSection = CardService.newCardSection();

  // Create buttons for generating sample emails and analyzing sentiment
  const buttonSet = CardService.newButtonSet();

  // Create "Generate sample emails" button
  const generateButton = createFilledButton(
    "Generate sample emails",
    "generateSampleEmails",
    "#34A853",
  );
  buttonSet.addButton(generateButton);

  // Create "Analyze emails" button
  const analyzeButton = createFilledButton(
    "Analyze emails",
    "analyzeSentiment",
    "#FF0000",
  );
  buttonSet.addButton(analyzeButton);

  // Add the button set to the section
  cardSection.addWidget(buttonSet);

  // Add the section to the card
  cardBuilder.addSection(cardSection);

  // Build and return the card
  return cardBuilder.build();
}

/**
 * Creates a filled text button with the specified text, function, and color.
 *
 * @param {string} text - The text to display on the button.
 * @param {string} functionName - The name of the function to call when the button is clicked.
 * @param {string} color - The background color of the button.
 * @returns {TextButton} - The created text button.
 */
function createFilledButton(text, functionName, color) {
  // Create a new text button
  const textButton = CardService.newTextButton();

  // Set the button text
  textButton.setText(text);

  // Set the action to perform when the button is clicked
  const action = CardService.newAction();
  action.setFunctionName(functionName);
  textButton.setOnClickAction(action);

  // Set the button style to filled
  textButton.setTextButtonStyle(CardService.TextButtonStyle.FILLED);

  // Set the background color
  textButton.setBackgroundColor(color);

  return textButton;
}

/**
 * Creates a notification response with the specified text.
 *
 * @param {string} notificationText - The text to display in the notification.
 * @returns {ActionResponse} - The created action response.
 */
function buildNotificationResponse(notificationText) {
  // Create a new notification
  const notification = CardService.newNotification();
  notification.setText(notificationText);

  // Create a new action response builder
  const actionResponseBuilder = CardService.newActionResponseBuilder();

  // Set the notification for the action response
  actionResponseBuilder.setNotification(notification);

  // Build and return the action response
  return actionResponseBuilder.build();
}

Gmail.gs

gmail-sentiment-analysis/Gmail.gs
/*
Copyright 2024-2025 Google LLC

Licensed under the Apache License, Version 2.0 (the "License");
you may not use this file except in compliance with the License.
You may obtain a copy of the License at

    https://www.apache.org/licenses/LICENSE-2.0

Unless required by applicable law or agreed to in writing, software
distributed under the License is distributed on an "AS IS" BASIS,
WITHOUT WARRANTIES OR CONDITIONS OF ANY KIND, either express or implied.
See the License for the specific language governing permissions and
limitations under the License.
*/

/**
 * Analyzes the sentiment of the first 10 threads in the inbox
 * and labels them accordingly.
 *
 * @returns {ActionResponse} - A notification confirming completion.
 */
function analyzeSentiment() {
  // Analyze and label emails
  analyzeAndLabelEmailSentiment();

  // Return a notification
  return buildNotificationResponse("Successfully completed sentiment analysis");
}

/**
 * Analyzes the sentiment of emails and applies appropriate labels.
 */
function analyzeAndLabelEmailSentiment() {
  // Define label names
  const labelNames = ["HAPPY TONE 😊", "NEUTRAL TONE 😐", "UPSET TONE 😡"];

  // Get or create labels for each sentiment
  const positiveLabel =
    GmailApp.getUserLabelByName(labelNames[0]) ||
    GmailApp.createLabel(labelNames[0]);
  const neutralLabel =
    GmailApp.getUserLabelByName(labelNames[1]) ||
    GmailApp.createLabel(labelNames[1]);
  const negativeLabel =
    GmailApp.getUserLabelByName(labelNames[2]) ||
    GmailApp.createLabel(labelNames[2]);

  // Get the first 10 threads in the inbox
  const threads = GmailApp.getInboxThreads(0, 10);

  // Iterate through each thread
  for (const thread of threads) {
    // Iterate through each message in the thread
    const messages = thread.getMessages();
    for (const message of messages) {
      // Get the plain text body of the message
      const emailBody = message.getPlainBody();

      // Analyze the sentiment of the email body
      const sentiment = processSentiment(emailBody);

      // Apply the appropriate label based on the sentiment
      if (sentiment === "positive") {
        thread.addLabel(positiveLabel);
      } else if (sentiment === "neutral") {
        thread.addLabel(neutralLabel);
      } else if (sentiment === "negative") {
        thread.addLabel(negativeLabel);
      }
    }
  }
}

/**
 * Generates sample emails for testing the sentiment analysis.
 *
 * @returns {ActionResponse} - A notification confirming email generation.
 */
function generateSampleEmails() {
  // Get the current user's email address
  const userEmail = Session.getActiveUser().getEmail();

  // Define sample emails
  const sampleEmails = [
    {
      subject: "Thank you for amazing service!",
      body: "Hi, I really enjoyed working with you. Thank you again!",
      name: "Customer A",
    },
    {
      subject: "Request for information",
      body: "Hello, I need more information on your recent product launch. Thank you.",
      name: "Customer B",
    },
    {
      subject: "Complaint!",
      body: "",
      htmlBody: `<p>Hello, You are late in delivery, again.</p>
<p>Please contact me ASAP before I cancel our subscription.</p>`,
      name: "Customer C",
    },
  ];

  // Send each sample email
  for (const email of sampleEmails) {
    GmailApp.sendEmail(userEmail, email.subject, email.body, {
      name: email.name,
      htmlBody: email.htmlBody,
    });
  }

  // Return a notification
  return buildNotificationResponse("Successfully generated sample emails");
}

Vertex.gs

gmail-sentiment-analysis/Vertex.gs
/*
Copyright 2024-2025 Google LLC

Licensed under the Apache License, Version 2.0 (the "License");
you may not use this file except in compliance with the License.
You may obtain a copy of the License at

    https://www.apache.org/licenses/LICENSE-2.0

Unless required by applicable law or agreed to in writing, software
distributed under the License is distributed on an "AS IS" BASIS,
WITHOUT WARRANTIES OR CONDITIONS OF ANY KIND, either express or implied.
See the License for the specific language governing permissions and
limitations under the License.
*/

// Replace with your project ID
const PROJECT_ID = "[ADD YOUR GCP PROJECT ID HERE]";

// Location for your Vertex AI model
const VERTEX_AI_LOCATION = "us-central1";

// Model ID to use for sentiment analysis
const MODEL_ID = "gemini-2.5-flash";

/**
 * Sends the email text to Vertex AI for sentiment analysis.
 *
 * @param {string} emailText - The text of the email to analyze.
 * @returns {string} - The sentiment of the email ('positive', 'negative', or 'neutral').
 */
function processSentiment(emailText) {
  // Construct the API endpoint URL
  const apiUrl = `https://${VERTEX_AI_LOCATION}-aiplatform.googleapis.com/v1/projects/${PROJECT_ID}/locations/${VERTEX_AI_LOCATION}/publishers/google/models/${MODEL_ID}:generateContent`;

  // Prepare the request payload
  const payload = {
    contents: [
      {
        role: "user",
        parts: [
          {
            text: `Analyze the sentiment of the following message: ${emailText}`,
          },
        ],
      },
    ],
    generationConfig: {
      temperature: 0.9,
      maxOutputTokens: 1024,
      responseMimeType: "application/json",
      // Expected response format for simpler parsing.
      responseSchema: {
        type: "object",
        properties: {
          response: {
            type: "string",
            enum: ["positive", "negative", "neutral"],
          },
        },
      },
    },
  };

  // Prepare the request options
  const options = {
    method: "POST",
    headers: {
      Authorization: `Bearer ${ScriptApp.getOAuthToken()}`,
    },
    contentType: "application/json",
    muteHttpExceptions: true, // Set to true to inspect the error response
    payload: JSON.stringify(payload),
  };

  // Make the API request
  const response = UrlFetchApp.fetch(apiUrl, options);

  // Parse the response. There are two levels of JSON responses to parse.
  const parsedResponse = JSON.parse(response.getContentText());
  const sentimentResponse = JSON.parse(
    parsedResponse.candidates[0].content.parts[0].text,
  ).response;

  // Return the sentiment
  return sentimentResponse;
}

appsscript.json

gmail-sentiment-analysis/appsscript.json
{
  "timeZone": "America/Toronto",
  "oauthScopes": [
    "https://www.googleapis.com/auth/cloud-platform",
    "https://www.googleapis.com/auth/gmail.addons.execute",
    "https://www.googleapis.com/auth/gmail.labels",
    "https://www.googleapis.com/auth/gmail.modify",
    "https://www.googleapis.com/auth/script.external_request",
    "https://www.googleapis.com/auth/userinfo.email"
  ],
  "addOns": {
    "common": {
      "name": "Sentiment Analysis",
      "logoUrl": "https://fonts.gstatic.com/s/i/googlematerialicons/sentiment_extremely_dissatisfied/v6/black-24dp/1x/gm_sentiment_extremely_dissatisfied_black_24dp.png"
    },
    "gmail": {
      "homepageTrigger": {
        "runFunction": "onHomepageTrigger",
        "enabled": true
      }
    }
  },
  "exceptionLogging": "STACKDRIVER",
  "runtimeVersion": "V8"
}

Pembersihan

Agar tidak menimbulkan biaya pada akun Google Cloud Anda untuk resource yang digunakan dalam tutorial ini, sebaiknya hapus project Cloud.

  1. Di Konsol Google API, buka halaman Manage resources. Klik Menu > IAM & Admin > Manage Resources.

    Buka Resource Manager

  2. Pada daftar project, pilih project yang ingin Anda hapus, lalu klik Delete .
  3. Pada dialog, ketik project ID, lalu klik Shut down untuk menghapus the project.

Langkah berikutnya