This document is for users who want to deploy the Google tag gateway for advertisers. We recommend Google tag gateway for advertisers for the most durable tag configuration.
Overview
Google tag gateway for advertisers lets you deploy a Google tag using your own first-party infrastructure, hosted on your website's domain. This infrastructure sits between your website and Google's services. The setup in this documentation will help you better measure your website. You can set it up using your existing content delivery network (CDN), load balancer, or web server.
In standard Google tag setups, your web page requests a Google tag from a Google domain. When the tag fires, it sends measurement requests directly to the Google product. With Google tag gateway for advertisers, your website loads the Google tag from your first-party domain. When the tag fires, some measurement requests will be sent to Google using your first-party domain.
This diagram represents the information flow in Google tag gateway for advertisers:

Before you begin
This guide assumes that your website is already configured with:
- A Google tag or Tag Manager container.
- A content delivery network (CDN) or load balancer that can forward requests to external endpoints.
To get started, pick your setup type.
1. Choose the measurement paths
You must reserve a unique measurement path on your website domain for serving each tag or Google Tag Manager container.
Measurement Path Requirements:
- Paths must not already be in use on your domain.
- Each path must not be the root path /.
- Each path must not exceed 100 characters.
Google Tag Manager:
If you are using Google Tag Manager, you only need to provide your Container ID (e.g. GTM-XXXXXX). This single setup is sufficient for all tags (like Google Analytics, Google Ads, etc.) that are already added to that container.
For each unique container or standalone tag, you will need a unique serving path and its corresponding ID.
To set up Google tag gateway for advertisers, choose any path that isn't already in use on your site. To reduce the likelihood of conflicting with a path already on the site, you could choose any combination of letters and numbers, or if you want a more readable path, you could choose to use a word such as /gtm, /metrics, /analytics, or any other word you want.
For example:
| Use Case | ID | Tag serving path | Origin endpoint |
|---|---|---|---|
| Standalone Tag 1 | G-12345 |
/abjfo/ |
g-12345.fps.goog/abjfo/ |
| Standalone Tag 2 | G-67890 |
/fjdso/ |
g-67890.fps.goog/fjdso/ |
| GTM Container | GTM-ABCDEF |
/cvfjk/ |
gtm-abcdef.fps.goog/cvfjk/ |
Fill in the following to populate the examples throughout this document.
Your domain: example.com
Google tag ID: G-12345
Tag serving path: /metrics
How to handle multiple tags or containers:
If your tags are in the same GTM container you don't need to repeat this setup. Just add the single Google Tag Manager container, and all the tags inside it will be handled.
If your tags are in separate GTM containers OR are unlinked... You must repeat this setup for each instance. This applies if you are running:
- Multiple, separate Google Tag Manager containers.
- Individual tags (e.g., G-XXXXXX) that are not inside a container.
When you do this, you must assign a unique tag serving path to every container or tag.
2. Route traffic
This section assumes that your website is already using a CDN or load balancer that supports routing traffic by paths.
Google Cloud
You need to set up a new backend that looks up the approximate geographic location of the site visitor and create routing rules in your existing External Application Load Balancer.
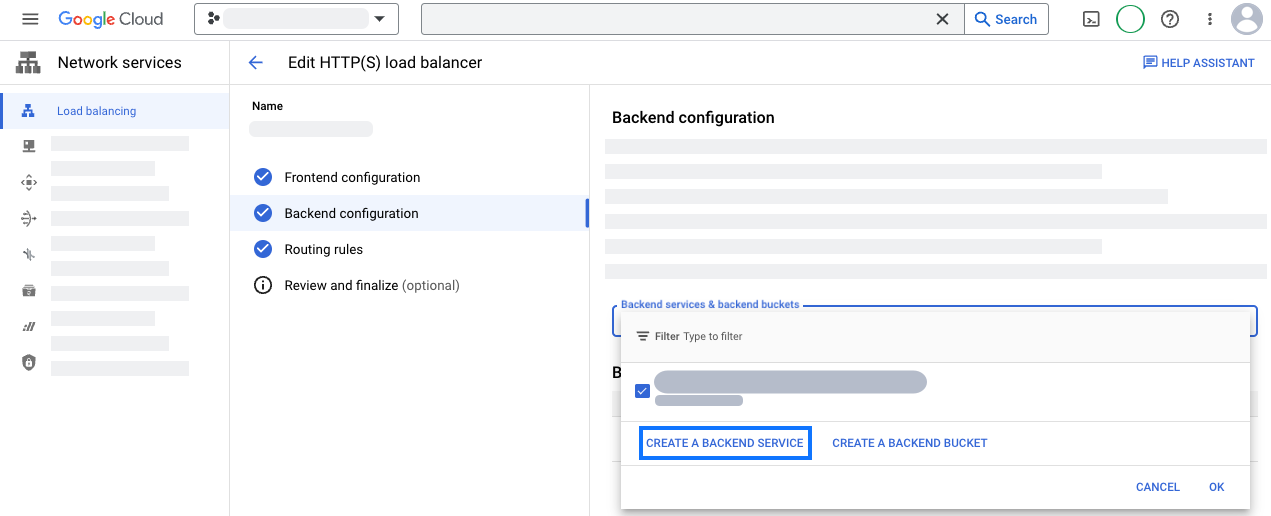
Create the new backend
In your load balancer, open the Backend configuration section. Create a new backend service.
Configure your new backend service with geolocation information:
- Specify a name, such as
measurement-be-svc. - Set Backend type to Internet network endpoint group.
- Set Protocol to HTTPS and leave Timeout as the prefilled value.
- Under Backends, click the Internet network endpoint group
drop-down and create a new internet network endpoint group:
- Set Network endpoint group type to Internet NEG (Global, Regional).
- Set Scope to Global.
- Set Add through to Fully qualified domain name and port.
- Set Fully qualified domain name to
G-12345.fps.goog. - Click CREATE to create the endpoint.
- Close the Network endpoint group tab to return to the New backend service tab.
- Search the name of the new network endpoint group and select it.
- Open the Advanced configurations section. Add the following
custom request headers.
Header name Header Value HostG-12345.fps.googX-Forwarded-CountryRegion{client_region_subdivision}X-Forwarded-Geolocationlatlong={client_city_lat_long};city={client_city} - Review the other settings. Neither Cloud CDN nor Cloud Armor are required for this integration, so you may safely disable both.
- Save the new backend service.
- Specify a name, such as
Configure routing rules
In your load balancer, open the Routing rules section.
Add the following host and path rules:
Host Path Backend */metrics/*measurement-be-svcUpdate the load balancer configuration.
In a browser, verify the set up by navigating to:
https://example.com/metrics/healthy. The page should have the textok. Verify that geographical information is being included by navigating to:https://example.com/metrics/?validate_geo=healthy. The page should have the textok.
Cloudflare
To serve your tag in Google tag gateway for advertisers, you will create a CNAME entry for a new subdomain, create an Origin Rule to forward requests, and create a Transform Rule to include geolocation information. To complete this setup, you will need to have a Cloudflare Enterprise plan. If you don't have an Enterprise plan, consider using the Cloudflare in-UI setup instead.
Create CNAME entry
Choose a subdomain to reserve for the CNAME entry. Fill in the following to populate the examples throughout this document. This CNAME is never exposed outside your Cloudflare configuration, so the name is arbitrary.
CNAME subdomain: fps
- In the DNS tab, open the Records section.
- Add a new record with the following configuration:
- Set Type to CNAME.
- Set Name to
fps. - Set Target to
G-12345.fps.goog.
- Save the CNAME record.
Create the Origin Rule
- In the Rules tab, open Origin Rules and create rule.
- Enter a rule name, such as
Route measurement. - Match incoming requests based on a Custom filter expression and click Edit expression.
- Paste the following expression in the builder:
(http.host eq "example.com" and starts_with(http.request.uri.path, "/metrics")) - Update the Host Header to Rewrite to...
G-12345.fps.goog. - Update the DNS Record to Override to...
fps.example.com. - Save the Origin Rule.
- If there are other Origin Rules, increase the newly created Rule's position so that it will run after any other wildcard paths.
- In a browser, verify the setup by navigating to:
https://example.com/metrics/healthy. The page should readok.
Include geolocation information
- In the Rules tab, open Settings
- Enable the Add visitor location headers option.
- Wait a few minutes for the rule to propagate. In a browser, verify the
set up by navigating to:
https://example.com/metrics/?validate_geo=healthy. The page should readok.
Akamai
To serve your tag in Google tag gateway for advertisers, you will need to add a new rule in your property to forward requests and add geolocation information.
Create the redirect rule
- Create a new version of your delivery configuration in property manager
- Under the Property Configuration Settings section add a new
Rule- Enter a name, such as
Route measurement
- Enter a name, such as
- Add a new Match
- Set the match dropdowns to Path and is one of
- Set the match value to
/metrics/*
- Add a new Behavior
- Select Standard Property Behavior and choose the Origin Server behavior
- Set Origin Server Hostname to
G-12345.fps.goog - Set Forward Host Header to Origin Hostname
- Save the new rule and deploy your changes
- Make sure to test the new redirect rule in your staging environment before rolling out to production
- Tip: make sure you don't have any rules that modify or remove the
outgoing response headers. This may cause Google scripts to fail if
the
Content-Typeresponse header is missing.
Include geolocation information
Choose your Redirect rule (created above) under the Property Configuration Settings
Add a new Behavior
- Select Standard Property Behavior and choose the Content Targeting (EdgeScape) behavior
- Set Enable to
true
Save the new behavior and deploy your changes.
- Make sure to test the new redirect rule in your staging environment before rolling out to production
In a browser, verify the set up by navigating to:
https://example.com/metrics/healthy. The page should have the textok. Verify that geographical information is being included by navigating to:https://example.com/metrics/?validate_geo=healthy. The page should have the textok.
Amazon CloudFront
To serve your tag with Google tag gateway for advertisers, you will need to configure the behavior of your distribution to forward requests and add geolocation information.
Add a new Origin
- Go to the CloudFront page in Amazon Web Services (AWS)
- Choose your CloudFront Distribution
- In the Origins tab create an origin with the following settings:
- Set Origin domain to
G-12345.fps.goog - Set Protocol to HTTPS Only
- Set Origin domain to
Create the redirect behavior
- Go to the CloudFront page in AWS
- Choose your CloudFront Distribution
- On the Behaviors tab, create a new Behavior with the following
settings:
- Set Path pattern to
/metrics/* - Set Origin and origin groups to
G-12345.fps.goog - Set Compress objects automatically to No
- Set Viewer protocol policy to HTTPS only
- Set Allowed HTTP Methods to GET, HEAD, OPTIONS, PUT, POST, PATCH, DELETE
- Under Cache key and origin requests choose
Cache policy and origin request policy
- Set Cache policy to CachingDisabled
- Set Origin request policy to AllViewerExceptHostHeader
- Set Path pattern to
- In the Behavior list verify the
Precedenceof the new behavior is higher than all other behaviors- To change the
Precedenceselect your behavior and select the Move up button until it is higher than all other behaviors.
- To change the
- In a browser, verify the setup by navigating to:
https://example.com/metrics/healthy. The page should readok.
Include geolocation information
- To forward the necessary geolocation information, set Headers to
AllViewerExceptHostHeader in your redirect behavior.
- A full list of the CloudFront viewer location headers are detailed in this article
- Wait a few minutes for your distribution to deploy. In a browser,
verify the set up by navigating to:
https://example.com/metrics/?validate_geo=healthy. The page should readok.
Fastly
To serve your tag in Google tag gateway for advertisers, you will need to configure your Fastly CDN service to forward requests and add geolocation information. This process involves creating one Condition, one Host, and two VCL snippets.
Create the Condition and Host
First, you will set up a condition to identify requests for the gateway and a host to route them to Google.
Create a new Condition with the following setting:
- Type:
Request - Name:
Google Tag Gateway Path(or a name you prefer) - Apply if…:
req.url.path ~ "^/metrics"
- Type:
Create a new Host with the following settings:
- Host name/Address:
fps.goog
- Host name/Address:
Configure the new Host with these additional settings:
- Click Attach a condition and select the condition you created in step 1.
- Set Override host to
fps.goog. - Leave other settings as default.
- Click Update to save the host.
Add Google tag ID and Geolocation Headers
Next, you will add VCL (Varnish Configuration Language) snippets to attach your Google Tag ID and the client's geolocation data. You must create two separate snippets—one for
vcl_miss and one for vcl_pass—using the exact same code.
In your service, go to VCL Snippets and create a Snippet with the following fields:
- Name:
Geo_MISS(or a name you prefer) - Placement:
Within Subroutine - Subroutine:
vcl_miss VCL:
if (req.url.path ~ "^/metrics") {
  set bereq.http.X-Gtg-Tag-Id = "G-12345";
  set bereq.http.X-Forwarded-Country = client.geo.country_code;
  set bereq.http.X-Forwarded-Region = client.geo.region;
  set bereq.http.X-Forwarded-Geolocation = "latlong=" +
    client.geo.latitude + "," + client.geo.longitude + ";city=" +
    client.geo.city;
}
- Name:
Create another snippet with the following fields:
- Name:
Geo_PASS(or a name you prefer) - Type:
vcl_pass VCL:
if (req.url.path ~ "^/metrics") {
  set bereq.http.X-Gtg-Tag-Id = "G-12345";
  set bereq.http.X-Forwarded-Country = client.geo.country_code;
  set bereq.http.X-Forwarded-Region = client.geo.region;
  set bereq.http.X-Forwarded-Geolocation = "latlong=" +
    client.geo.latitude + "," + client.geo.longitude + ";city=" +
    client.geo.city;
}
You should now have two new, separate snippets. This ensures that the geolocation headers are added to any request that needs to be fetched from your host, whether it's a "cache miss" (
vcl_miss) or a "cache pass" (vcl_pass).- Name:
Activate and Verify Full Configuration
With the host, condition, and VCL snippets all created, you can now activate and test the complete setup.
- Click Activate to deploy all your new changes.
Verify the configuration by running both tests in your browser:
- Test 1 (Tag & Routing): Navigate to
https://example.com/metrics/healthy - Test 2 (Geolocation): Navigate to
https://example.com/metrics/?validate_geo=healthy
Both pages should read
ok- Test 1 (Tag & Routing): Navigate to
Other
To serve your tag in Google tag gateway for advertisers, you need to configure your CDN or load balancer to route requests to the Google tag gateway for advertisers endpoint.
- Add an origin or backend that points to
G-12345.fps.goog. - Override the Host header to be equal to
G-12345.fps.goog. Allow all cookies and query strings to be forwarded. - Pass the visitor's geolocation information by including either
of the following headers:
X-Forwarded-CountryRegion- The user's country and region in a single ISO 3166-2 code (for example:US-CA).X-Forwarded-CountryandX-Forwarded-Region:X-Forwarded-Country- The user's country as an ISO 3166-1 alpha-2 code (for example:US).X-Forwarded-Region- The user's region subdivision code (for example:CA).
- If both sets of headers are included,
X-Forwarded-CountryRegionwill be used.
- Add a path rule for
/metrics/*to route traffic to Google tag gateway for advertisers. - Configure the reserved path to have higher priority than the default rule.
- In a browser, verify the set up by navigating to:
https://example.com/metrics/healthy. The page should readok. Verify that geographical information is being included by navigating to:https://example.com/metrics/?validate_geo=healthy. The page should readok.
Step 3: Update the scripts on the website to use the Measurement Path
Replace the scripts on each page of the website with one of the following:
gtag.js
At the top of the <head> section, find the two lines of script with your
Google tag ID:
<!-- Google tag (gtag.js) -->
<script async src="https://www.googletagmanager.com/gtag/js?id=G-12345"></script>
and replace them with the measurement path instead:
<!-- Google tag (gtag.js) -->
<script async src="/metrics/"></script>
gtm.js
At the top of the <head> section, replace the Tag Manager snippet with the
following:
<!-- Google Tag Manager -->
<script>(function(w,d,s,l,i){w[l]=w[l]||[];w[l].push({'gtm.start':
new Date().getTime(),event:'gtm.js'});var f=d.getElementsByTagName(s)[0],
j=d.createElement(s),dl=l!='dataLayer'?'&l='+l:'';j.async=true;j.src=
'/metrics/?id='+i+dl;f.parentNode.insertBefore(j,f);
})(window,document,'script','dataLayer','');</script>
<!-- End Google Tag Manager -->
Test the measurement setup
To test the measurement setup, configure your container to have at least one tag that fires.
- Go to Tag Assistant and preview your container.
- Navigate through your website to trigger events.
In the Summary > Output > Hits Sent tab, verify that the hits are routed to
/metrics.