

iOS-এর জন্য নেভিগেশন SDK ব্যবহার করে, আপনি আপনার ম্যাপের ইউজার এক্সপেরিয়েন্স পরিবর্তন করতে পারেন। এর জন্য আপনি নির্ধারণ করতে পারবেন যে কোন বিল্ট-ইন UI কন্ট্রোল ও এলিমেন্টগুলো ম্যাপে প্রদর্শিত হবে এবং কোন জেসচারগুলো ব্যবহারের অনুমতি দেওয়া হবে। এছাড়াও আপনি নেভিগেশন UI-এর ভিজ্যুয়াল চেহারা পরিবর্তন করতে পারেন। নেভিগেশন UI-তে গ্রহণযোগ্য পরিবর্তনগুলো সম্পর্কে নির্দেশনার জন্য পলিসি পেজটি দেখুন।
মানচিত্র UI নিয়ন্ত্রণ
নেভিগেশন এসডিকে-তে কিছু বিল্ট-ইন ইউআই কন্ট্রোল রয়েছে, যা আইওএস অ্যাপ্লিকেশনের জন্য গুগল ম্যাপস-এর কন্ট্রোলগুলোর অনুরূপ। আপনি GMSUISettings ক্লাসটি ব্যবহার করে এই কন্ট্রোলগুলোর দৃশ্যমানতা পরিবর্তন করতে পারেন। এই ক্লাসে করা পরিবর্তনগুলো ম্যাপে তাৎক্ষণিকভাবে প্রতিফলিত হয়।
কম্পাস
নেভিগেশন এসডিকে একটি কম্পাস গ্রাফিক প্রদান করে, যা নির্দিষ্ট পরিস্থিতিতে এবং শুধুমাত্র সক্রিয় করা হলেই ম্যাপের উপরের ডান কোণায় প্রদর্শিত হয়। যখন ব্যবহারকারী কম্পাসটিতে ক্লিক করেন, তখন ক্যামেরাটি অ্যানিমেট করে শূন্য বেয়ারিং-এর একটি অবস্থানে (ডিফল্ট ওরিয়েন্টেশন) ফিরে আসে এবং এর কিছুক্ষণ পরেই কম্পাসটি মিলিয়ে যায়।
If navigation is enabled and the camera mode is set to "following," the compass remains visible and tapping the compass toggles between tilted and overview camera perspectives.
চালকের মনোযোগে ব্যাঘাত এড়ানোর জন্য, যদি হেডারটি (পোর্ট্রেট মোডে) প্রসারিত হয় এবং কম্পাসের ডিফল্ট অবস্থানের সাথে সাংঘর্ষিক হয়, তাহলেও কম্পাসটি একই অবস্থানে থাকে। যদি আপনি একটি সেকেন্ডারি হেডার কাস্টম কন্ট্রোল বা হেডার অ্যাকসেসরি ভিউ যোগ করেন, তাহলে UI দ্বন্দ্ব এড়ানোর জন্য কম্পাসটি লুকানো থাকে।
কম্পাসটি দিন ও রাতের মোডের পাশাপাশি ডার্ক মোডও সমর্থন করে।
ভার্সন 11.0.0 এবং এর পরবর্তী ভার্সনগুলোতে কম্পাসটি ডিফল্টরূপে সক্রিয় থাকে। আপনি GMSUISettings এর compassButton প্রপার্টির মান false সেট করে কম্পাসটি নিষ্ক্রিয় করতে পারেন।
সুইফট
mapView.settings.compassButton = false
উদ্দেশ্য-সি
mapView.settings.compassButton = NO;
আমার অবস্থান বোতাম
'আমার অবস্থান' বাটনটি স্ক্রিনের নিচের ডান কোণায় তখনই দেখা যায়, যখন এটি সক্রিয় করা থাকে। যখন কোনো ব্যবহারকারী বাটনটিতে ক্লিক করেন, তখন ব্যবহারকারীর অবস্থান জানা থাকলে ক্যামেরাটি অ্যানিমেট করে তার বর্তমান অবস্থানে ফোকাস করে। আপনি GMSUISettings এর myLocationButton প্রপার্টিকে true সেট করে বাটনটি সক্রিয় করতে পারেন।
সুইফট
mapView.settings.myLocationButton = true
উদ্দেশ্য-সি
mapView.settings.myLocationButton = YES;
রিসেন্টার বোতাম
যখন নেভিগেশন সক্রিয় থাকে, তখন ব্যবহারকারী ম্যাপ ভিউ স্ক্রোল করলে রিসেন্টার বাটনটি দেখা যায় এবং ম্যাপটিকে পুনরায় কেন্দ্রে আনতে ট্যাপ করলে তা অদৃশ্য হয়ে যায়। রিসেন্টার বাটনটি দেখানোর জন্য, GMSUISettings এর recenterButtonEnabled প্রপার্টিটি true তে সেট করুন। রিসেন্টার বাটনটি দেখানো বন্ধ করতে, recenterButtonEnabled কে false এ সেট করুন।
সুইফট
mapView.settings.isRecenterButtonEnabled = true
উদ্দেশ্য-সি
mapView.settings.recenterButtonEnabled = YES;
মানচিত্র UI আনুষাঙ্গিক
নেভিগেশন এসডিকে এমন UI অ্যাক্সেসরিজ প্রদান করে যা নেভিগেশনের সময় প্রদর্শিত হয়, যা iOS অ্যাপ্লিকেশনের জন্য Google Maps-এ পাওয়া অ্যাক্সেসরিজগুলোর অনুরূপ। এই বিভাগে বর্ণিত পদ্ধতি অনুযায়ী আপনি এই কন্ট্রোলগুলোর দৃশ্যমানতা বা বাহ্যিক রূপ সামঞ্জস্য করতে পারেন। এখানে আপনার করা পরিবর্তনগুলো ব্যবহারকারীর পরবর্তী যাত্রায় প্রতিফলিত হবে।
নেভিগেশন হেডার এবং ফুটার

নেভিগেশনের সময়, স্ক্রিনের উপরে নেভিগেশন হেডার এবং নীচে নেভিগেশন ফুটার দেখা যায়। নেভিগেশন হেডারে রাস্তার নাম এবং রুটের পরবর্তী মোড়ের দিকনির্দেশনা, সেইসাথে তার পরের মোড়ের দিকনির্দেশনা দেখানো হয়। নেভিগেশন ফুটারে গন্তব্যে পৌঁছানোর আনুমানিক সময় ও দূরত্ব, সেইসাথে পৌঁছানোর আনুমানিক সময় দেখানো হয়।
নিম্নলিখিত প্রোপার্টিগুলো ব্যবহার করে আপনি প্রোগ্রাম্যাটিকভাবে নেভিগেশন হেডার ও ফুটারের দৃশ্যমানতা পরিবর্তন করতে এবং এর রং নির্ধারণ করতে পারেন:
-
navigationHeaderEnabled— নেভিগেশন হেডারটি দৃশ্যমান হবে কিনা তা নিয়ন্ত্রণ করে (ডিফল্ট হলোtrue)। -
navigationFooterEnabled— controls whether the navigation footer is visible (default istrue). -
navigationHeaderPrimaryBackgroundColor— নেভিগেশন হেডারের প্রাথমিক ব্যাকগ্রাউন্ড কালার নির্ধারণ করে। -
navigationHeaderSecondaryBackgroundColor— নেভিগেশন হেডারের জন্য দ্বিতীয় ব্যাকগ্রাউন্ড কালার নির্ধারণ করে।
নিম্নলিখিত কোড উদাহরণটিতে হেডার ও ফুটারের ভিজিবিলিটি চালু করা, তারপর navigationHeaderPrimaryBackgroundColor কে নীল এবং navigationHeaderSecondaryBackgroundColor কে লাল রঙে সেট করা দেখানো হয়েছে।
সুইফট
mapView.settings.isNavigationHeaderEnabled = true
mapView.settings.isNavigationFooterEnabled = true
mapView.settings.navigationHeaderPrimaryBackgroundColor = .blue
mapView.settings.navigationHeaderSecondaryBackgroundColor = .red
উদ্দেশ্য-সি
mapView.settings.navigationHeaderEnabled = YES;
mapView.settings.navigationFooterEnabled = YES;
mapView.settings.navigationHeaderPrimaryBackgroundColor = [UIColor blueColor];
mapView.settings.navigationHeaderSecondaryBackgroundColor = [UIColor redColor];
নেভিগেশন অ্যাকসেসরি হেডার ভিউ
আপনি সেকেন্ডারি নেভিগেশন হেডার ভিউকে আপনার নিজস্ব কাস্টমাইজড অ্যাক্সেসরি ভিউ দিয়ে প্রতিস্থাপন করে আপনার অ্যাপটিকে কাস্টমাইজ করতে পারেন। এটি করার জন্য আপনাকে GMSNavigationAccessoryView প্রোটোকলটি ইমপ্লিমেন্ট করে এমন একটি ভিউ তৈরি করতে হবে। এই প্রোটোকলটির একটি আবশ্যিক মেথড রয়েছে: -heightForAccessoryViewConstrainedToSize:onMapView: আপনাকে প্রদত্ত ম্যাপভিউতে আপনার ভিউয়ের জন্য উপলব্ধ সর্বোচ্চ সাইজটি দেওয়া হবে এবং আপনার ভিউয়ের জন্য প্রয়োজনীয় উচ্চতা অবশ্যই প্রদান করতে হবে।
এরপর আপনি setHeaderAccessoryView: mapView বর্তমান ভিউগুলোকে অ্যানিমেট করে সরিয়ে দেয় এবং তারপর আপনার কাস্টম ভিউটিকে অ্যানিমেট করে নিয়ে আসে। নেভিগেশন হেডারটি অবশ্যই দৃশ্যমান থাকতে হবে, যাতে আপনার কাস্টম ভিউটি প্রদর্শিত হতে পারে।
To remove the custom header accessory view, pass nil to setHeaderAccessoryView: .
If your view must change size at any time, then you can call invalidateLayoutForAccessoryView: , passing in the view that needs to change size.
উদাহরণ
The following code example demonstrates a custom view that implements the GMSNavigationAccessoryView protocol. This custom view is then used to set a custom navigation header accessory view.
সুইফট
class MyCustomView: UIView, GMSNavigationAccessoryView {
…
  func heightForAccessoryViewConstrained(to size: CGSize, on mapView: GMSMapView) -> CGFloat {
    // viewHeight gets calculated as the height your view needs.
    return viewHeight
  }
…
}

let customView = MyCustomView(...)
mapView.setHeaderAccessory(customView)

// At some later point customView changes size.
mapView.invalidateLayout(forAccessoryView: customView)

// Remove the custom header accessory view.
mapView.setHeaderAccessory(nil)
উদ্দেশ্য-সি
@interface MyCustomView : UIView <GMSNavigationAccessoryView>
…
@end

@implementation MyCustomView
…
- (CGFloat)heightForAccessoryViewConstrainedToSize:(CGSize)size onMapView:(GMSMapView *)mapView {
  // viewHeight gets calculated as the height your view needs.
  return viewHeight;
}
…
@end

MyCustomView *customView = [[MyCustomView alloc] init…];
[_mapView setHeaderAccessoryView:customView];

// At some later point customView changes size.
[_mapView invalidateLayoutForAccessoryView:customView];

// Remove the custom header accessory view.
[_mapView setHeaderAccessoryView:nil];
সাধারণ এবং কম আলোর মোড
GMSNavigatorListener.didChangeSuggestedLightingMode লিসেনার মেথডটি আনুমানিক আলোর অবস্থা আপডেট হলে ট্রিগার হয়। উদাহরণস্বরূপ, যখন ডিভাইসটির বর্তমান অবস্থানে রাত হয়। আপনি নিম্নলিখিত উপায়ে প্রোগ্রাম্যাটিকভাবে লো-লাইট মোডের আচরণ পরিবর্তন করতে পারেন:
-
GMSNavigationLightingModeenum ব্যবহার করে সাধারণ এবং স্বল্প-আলোর মোড কখন ব্যবহৃত হবে তা নির্বাচন করুন। -
navigationHeaderPrimaryBackgroundColorNightModeএবংnavigationHeaderSecondaryBackgroundColorNightModeপ্রপার্টিগুলোর মান নির্ধারণ করে লো-লাইট মোডের প্রাথমিক এবং মাধ্যমিক ব্যাকগ্রাউন্ড রঙ নির্বাচন করুন।
দিকনির্দেশনা তালিকা
You can provide step-by-step directions in your app. The following example shows one possible way to do this. These steps may vary depending on your own implementation.
-
GMSNavigator(নেভিগেটর)-এsetDestinationsসফলভাবে সম্পন্ন হওয়ার পর এবং নেভিগেটরেguidanceActiveসক্রিয় হয়ে গেলে একটি এন্ট্রি পয়েন্ট বাটন সক্রিয় করুন। - ব্যবহারকারী এন্ট্রি পয়েন্ট বোতামে ট্যাপ করলে,
GMSMapView(mapView)-এর সাথে যুক্ত নেভিগেটরসহ একটিGMSNavigationDirectionsListController(কন্ট্রোলার) তৈরি করুন। -
UIViewController(ভিউ কন্ট্রোলার)-এর একটি ইনস্ট্যান্সে কন্ট্রোলারটি যোগ করুন এবংdirectionsListViewকে ভিউ কন্ট্রোলারটির একটি সাবভিউ হিসেবে যুক্ত করুন। কন্ট্রোলারেরreloadDataএবংinvalidateLayoutমেথডগুলোUICollectionViewএর মতোই কল করতে হবে। - অ্যাপের ভিউ কন্ট্রোলার হায়ারার্কিতে ভিউ কন্ট্রোলারটি যুক্ত করুন।
The following code example shows adding a DirectionsListViewController .
সুইফট
override func viewDidLoad() {
  super.viewDidLoad()
  // Add the directionsListView to the host view controller's view.
  let directionsListView = directionsListController.directionsListView
  directionsListView.frame = self.view.frame
  self.view.addSubview(directionsListView)
  directionsListView.translatesAutoresizingMaskIntoConstraints = false
  directionsListView.topAnchor.constraint(equalTo: self.view.topAnchor).isActive = true
  directionsListView.leadingAnchor.constraint(equalTo: self.view.leadingAnchor).isActive = true
  directionsListView.trailingAnchor.constraint(equalTo: self.view.trailingAnchor).isActive = true
  directionsListView.bottomAnchor.constraint(equalTo: self.view.bottomAnchor).isActive = true
  ...
}

override func viewWillAppear(_ animated: Bool) {
  super.viewWillAppear(animated)
  // Make sure data is fresh when the view appears.
  directionsListController.reloadData()
  ...
}

override func willTransition(to newCollection: UITraitCollection, with coordinator: UIViewControllerTransitionCoordinator) {
  super.willTransition(to: newCollection, with: coordinator)
  // Invalidate the layout during rotation.
  coordinator.animate(alongsideTransition: {_ in
    self.directionsListController.invalidateLayout()
  })
  ...
}
উদ্দেশ্য-সি
- (void)viewDidLoad {
  [super viewDidLoad];
  // Add the directionsListView to the host view controller's view.
  UIView *directionsListView = _directionsListController.directionsListView;
  directionsListView.frame = self.view.bounds;
  [self.view addSubview:directionsListView];
  directionsListView.translatesAutoresizingMaskIntoConstraints = NO;
  [directionsListView.topAnchor constraintEqualToAnchor:self.view.topAnchor].active = YES;
  [directionsListView.leadingAnchor constraintEqualToAnchor:self.view.leadingAnchor].active = YES;
  [directionsListView.trailingAnchor constraintEqualToAnchor:self.view.trailingAnchor].active = YES;
  [directionsListView.bottomAnchor constraintEqualToAnchor:self.view.bottomAnchor].active = YES;
  ...
}

- (void)viewWillAppear:(BOOL)animated {
  [super viewWillAppear:animated];
  // Make sure data is fresh when the view appears.
  [_directionsListController reloadData];
  ...
}

- (void)willTransitionToTraitCollection:(UITraitCollection *)newCollection
              withTransitionCoordinator:(id<UIViewControllerTransitionCoordinator>)coordinator {
  [super willTransitionToTraitCollection:newCollection withTransitionCoordinator:coordinator];
  void(^animationBlock)(id <UIViewControllerTransitionCoordinatorContext>context) =
      ^void(id <UIViewControllerTransitionCoordinatorContext>context) {
    [_directionsListController invalidateLayout];
  };
  // Invalidate the layout during rotation.
  [coordinator animateAlongsideTransition:animationBlock
                               completion:nil];
  ...
}

...
ভ্রমণের অগ্রগতি বার

ট্রিপ প্রোগ্রেস বার হলো একটি উল্লম্ব বার যা নেভিগেশন শুরু হলে ম্যাপের শুরুর দিকে প্রদর্শিত হয়। এটি সক্রিয় করা হলে, ব্যবহারকারীর গন্তব্য এবং বর্তমান অবস্থানের সাথে সম্পূর্ণ ট্রিপের একটি সার্বিক চিত্র প্রদর্শন করে।
এটি ব্যবহারকারীদের জুম ইন না করেই ট্র্যাফিকের মতো যেকোনো আসন্ন সমস্যা দ্রুত অনুমান করার ক্ষমতা দেয়। এরপর প্রয়োজনে তারা যাত্রাপথ পরিবর্তন করতে পারেন। যদি ব্যবহারকারী যাত্রাপথ পরিবর্তন করেন, তাহলে প্রোগ্রেস বারটি এমনভাবে রিসেট হয়ে যায় যেন সেই বিন্দু থেকে একটি নতুন যাত্রা শুরু হয়েছে।
The trip progress bar displays the following status indicators:
Traffic status —the status of upcoming traffic.
Current location —the driver's current location in the trip.
Route elapsed —the elapsed portion of the trip.
GMSUISettings এ navigationTripProgressBarEnabled প্রপার্টি সেট করে ট্রিপ প্রোগ্রেস বার সক্রিয় করুন।
সুইফট
mapView.settings.isNavigationTripProgressBarEnabled = true
উদ্দেশ্য-সি
mapView.settings.navigationTripProgressBarEnabled = YES;
ট্রিপ অগ্রগতি বার অবস্থান
- The left side of the bar roughly aligns with the left of the speedometer, Google logo, and Re-center button (when visible). The width is 12 pt.
- ট্রিপ প্রোগ্রেস বারটি স্ক্রিনের উল্লম্ব স্থানের সাথে গতিশীলভাবে সাড়া দেয়। বারটির নিচের অংশ স্ক্রিনের নিচ থেকে ২১০ পিটি উপরে অবস্থিত। ট্রিপ প্রোগ্রেস বারের উপরের অংশ স্ক্রিনের উপর থেকে কমপক্ষে ১৭০ পিটি উপরে থাকে এবং বারটির সর্বোচ্চ উচ্চতা হলো ৪০০ পিটি।
- If the trip progress bar overlaps with the navigation header or other Navigation UI elements, it appears under those other elements.
প্রম্পট ভিজিবিলিটি এপিআই (পরীক্ষামূলক)
প্রম্পট ভিজিবিলিটি এপিআই আপনাকে নেভিগেশন এসডিকে দ্বারা তৈরি UI এলিমেন্ট এবং আপনার নিজস্ব কাস্টম UI এলিমেন্টের মধ্যেকার দ্বন্দ্ব এড়াতে সাহায্য করে। এটি একটি লিসেনার যোগ করার মাধ্যমে কাজ করে, যা নেভিগেশন এসডিকে-র কোনো UI এলিমেন্ট প্রদর্শিত হওয়ার ঠিক আগে এবং এলিমেন্টটি অপসারিত হওয়ার সাথে সাথেই একটি কলব্যাক গ্রহণ করে। কোড স্যাম্পলসহ আরও তথ্যের জন্য, ‘Configure real-time-disruptions ’ পেজের ‘Prompt Visibility API’ সেকশনটি দেখুন।
স্পিডোমিটার নিয়ন্ত্রণ
যখন নেভিগেশন চালু থাকে এবং ভ্রমণ মোড ড্রাইভিং-এ সেট করা থাকে, তখন iOS-এর জন্য নেভিগেশন SDK ম্যাপের নিচের কোণায় একটি গতিসীমা নিয়ন্ত্রক প্রদর্শন করে, যা বর্তমান গতিসীমা দেখায়। যখন চালক গতিসীমা অতিক্রম করেন, তখন নিয়ন্ত্রকটি প্রসারিত হয়ে চালকের বর্তমান গতিসহ একটি দ্বিতীয় স্পিডোমিটার প্রদর্শন করে।
চালক যখন গতিসীমা একটি নির্দিষ্ট পরিমাণে অতিক্রম করেন, তখন স্পিডোমিটার ডিসপ্লের ফরম্যাটিং পরিবর্তন করার জন্য আপনি অ্যালার্ট লেভেল সেট করতে পারেন। উদাহরণস্বরূপ, আপনি নির্দিষ্ট করতে পারেন যে চালক গতিসীমা ৫ মাইল প্রতি ঘণ্টা (mph) অতিক্রম করলে বর্তমান গতি লাল রঙের টেক্সটে প্রদর্শিত হবে এবং গতিসীমা ১০ মাইল প্রতি ঘণ্টা (mph) অতিক্রম করলে লাল ব্যাকগ্রাউন্ডে প্রদর্শিত হবে।
গতিসীমা নিয়ন্ত্রণ প্রদর্শন করতে, GMSUISettings এর shouldDisplaySpeedometer প্রপার্টিটি true তে সেট করুন। গতিসীমা নিয়ন্ত্রণের প্রদর্শন বন্ধ করতে, shouldDisplaySpeedometer false তে সেট করুন।
সুইফট
mapView.settings.shouldDisplaySpeedometer = true
উদ্দেশ্য-সি
mapView.settings.shouldDisplaySpeedometer = YES;
For more information on setting alerts for the speedometer, see Configure speedometer alerts .
গন্তব্য চিহ্নিতকারী
আপনি GMSUISettings এর showsDestinationMarkers প্রপার্টি সেট করে একটি নির্দিষ্ট রুটের জন্য গন্তব্য চিহ্নিতকারীগুলো দেখাতে বা লুকাতে পারেন। নিচের উদাহরণটিতে গন্তব্য চিহ্নিতকারীগুলো বন্ধ করা দেখানো হয়েছে।
সুইফট
mapView.settings.showsDestinationMarkers = false
উদ্দেশ্য-সি
mapView.settings.showsDestinationMarkers = NO;
মানচিত্র অভিজ্ঞতার বৈশিষ্ট্য
নেভিগেশন এসডিকে আপনাকে আপনার ব্যবহারকারীদের জন্য নেভিগেশন অভিজ্ঞতায় আরও কাস্টমাইজেশন করার সুযোগ দেয়। আপনার ইনস্ট্যান্সে করা পরিবর্তনগুলো ব্যবহারকারীর পরবর্তী অ্যাপ আপডেটের সময় প্রতিফলিত হয়।
গন্তব্যস্থলের বিশেষ আকর্ষণ এবং প্রবেশপথ

যখন একটি placeID দিয়ে কোনো গন্তব্য তৈরি করা হয়, তখন গন্তব্য ভবনটি হাইলাইট করা হবে এবং সম্ভব হলে একটি প্রবেশ আইকন দেখানো হবে। এই দৃশ্যমান সংকেতগুলো ব্যবহারকারীদের তাদের উদ্দিষ্ট গন্তব্য শনাক্ত করতে এবং সেখানে পৌঁছাতে সাহায্য করে।
placeID সহ একটি গন্তব্য তৈরি করতে, GMSNavigationWaypoint ইনিশিয়ালাইজারগুলোর মধ্যে এমন একটি ব্যবহার করুন যা placeID গ্রহণ করে। উদাহরণস্বরূপ, 'Navigate a route' টিউটোরিয়ালে তৈরি করা গন্তব্যগুলোতে, উপলব্ধ থাকলে, গন্তব্য হাইলাইটিং এবং প্রবেশপথের লেবেল অন্তর্ভুক্ত থাকে।
নেভিগেশনের সময় 3D বিল্ডিং প্রদর্শন
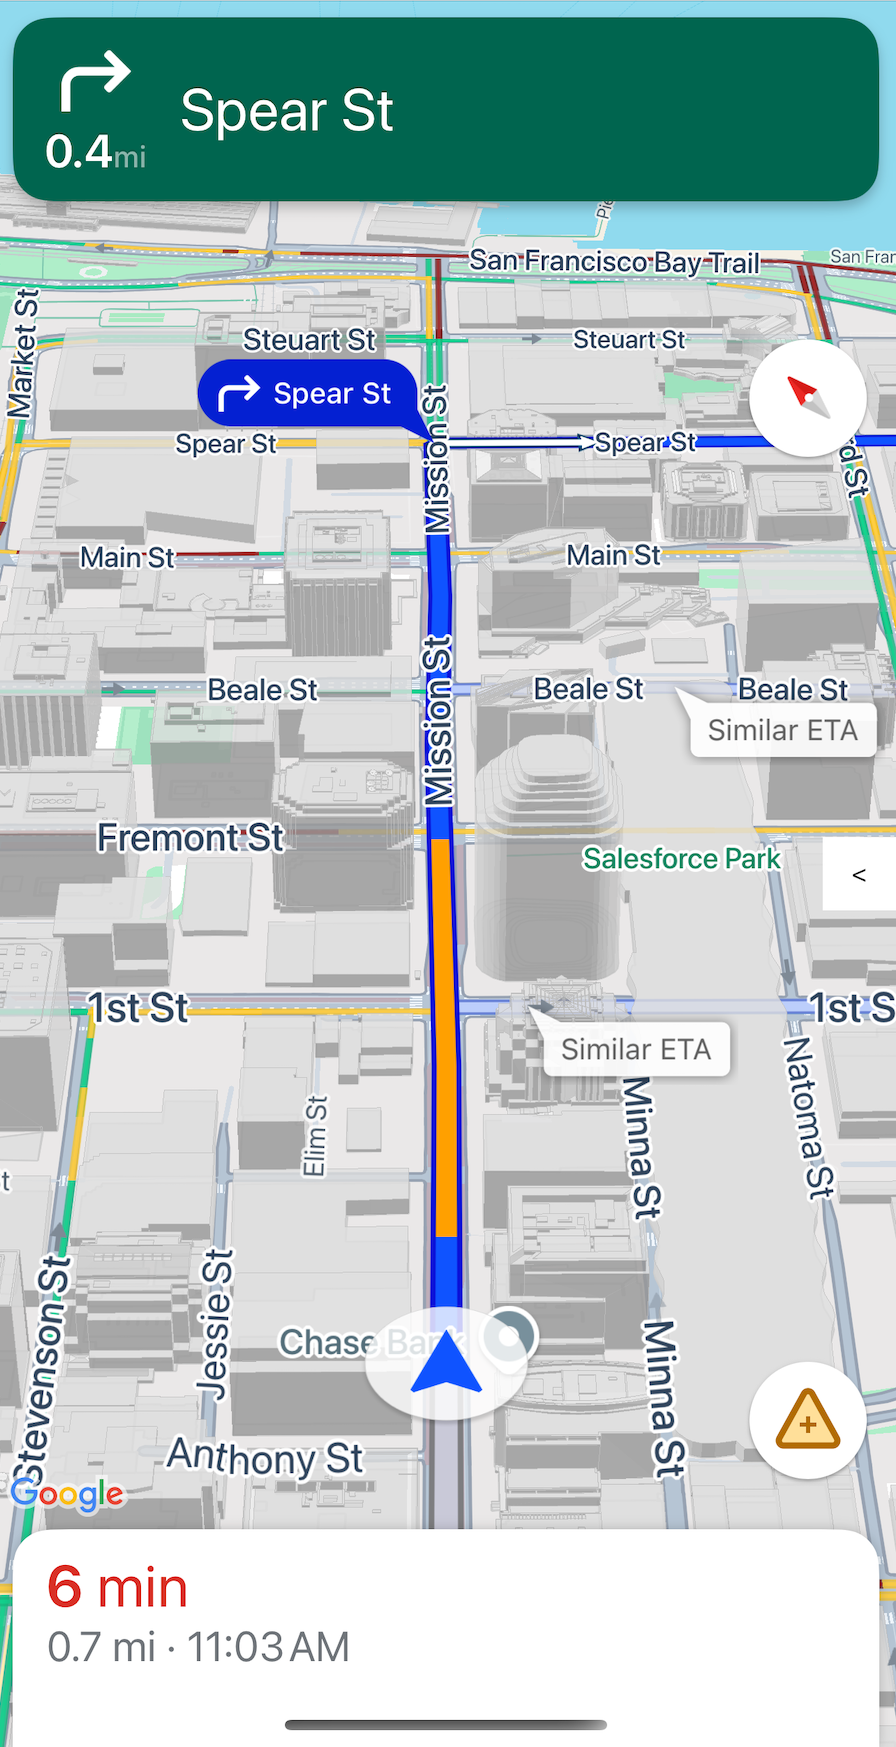
3D buildings are displayed during navigation by default. To disable this feature, set buildingsEnabled to false (Swift) or NO (Objective-C).
ডিফল্ট ম্যাপ অঙ্গভঙ্গি নিষ্ক্রিয় করুন
আপনি GMSUISettings ক্লাসের প্রোপার্টিগুলো সেট করার মাধ্যমে ম্যাপের ডিফল্ট জেসচারগুলো নিষ্ক্রিয় করতে পারেন, যা GMSMapView এর একটি প্রোপার্টি হিসেবে উপলব্ধ। নিম্নলিখিত জেসচারগুলো প্রোগ্রাম্যাটিকভাবে সক্রিয় এবং নিষ্ক্রিয় করা যায়। মনে রাখবেন যে, জেসচার নিষ্ক্রিয় করলে ক্যামেরা সেটিংসে প্রোগ্রাম্যাটিক অ্যাক্সেস সীমিত হবে না।
-
scrollGestures— controls whether scroll gestures are enabled or disabled. If enabled, users may swipe to pan the camera. -
zoomGestures— জুম জেসচার চালু বা বন্ধ থাকবে কিনা তা নিয়ন্ত্রণ করে। এটি চালু থাকলে, ব্যবহারকারীরা ক্যামেরা জুম করার জন্য ডাবল ট্যাপ, দুই আঙুলের ট্যাপ বা পিঞ্চ করতে পারবেন। উল্লেখ্য যে,scrollGesturesচালু থাকা অবস্থায় ডাবল ট্যাপ বা পিঞ্চ করলে ক্যামেরাটি নির্দিষ্ট পয়েন্টে প্যান হতে পারে। -
tiltGestures— controls whether tilt gestures are enabled or disabled. If enabled, users may use a two-finger vertical down or up swipe to tilt the camera. -
rotateGestures— controls whether rotate gestures are enabled or disabled. If enabled, users may use a two-finger rotate gesture to rotate the camera.
In this example, both pan and zoom gestures have been disabled.
সুইফট
mapView.settings.scrollGestures = false
mapView.settings.zoomGestures = false
উদ্দেশ্য-সি
mapView.settings.scrollGestures = NO;
mapView.settings.zoomGestures = NO;
অবস্থান নিয়ন্ত্রণ এবং UI উপাদান
You can position controls and other UI elements relative to the position of the navigation header and footer, by using the following properties:
-
navigationHeaderLayoutGuide -
navigationFooterLayoutGuide -
bottomTrailingButtonsLayoutGuide
The following code example shows using the layout guides to position a pair of labels in the map view:
সুইফট
/* Add a label to the top left, positioned below the header. */
let topLabel = UILabel()
topLabel.text = "Top Left"
mapView.addSubview(topLabel)
topLabel.translatesAutoresizingMaskIntoConstraints = false
topLabel.topAnchor.constraint(equalTo: mapView.navigationHeaderLayoutGuide.bottomAnchor).isActive = true
topLabel.leadingAnchor.constraint(equalTo: mapView.leadingAnchor).isActive = true

/* Add a label to the bottom right, positioned above the footer. */
let bottomLabel = UILabel()
bottomLabel.text = "Bottom Right"
mapView.addSubview(bottomLabel)
bottomLabel.translatesAutoresizingMaskIntoConstraints = false
bottomLabel.bottomAnchor.constraint(equalTo: mapView.navigationFooterLayoutGuide.topAnchor).isActive = true
bottomLabel.trailingAnchor.constraint(equalTo: mapView.trailingAnchor).isActive = true
উদ্দেশ্য-সি
/* Add a label to the top left, positioned below the header. */
UILabel *topLabel = [[UILabel alloc] init];
topLabel.text = @"Top Left";
[view addSubview:topLabel];
topLabel.translatesAutoresizingMaskIntoConstraints = NO;
[topLabel.topAnchor
    constraintEqualToAnchor:mapView.navigationHeaderLayoutGuide.bottomAnchor].active = YES;
[topLabel.leadingAnchor constraintEqualToAnchor:mapView.leadingAnchor].active = YES;

/* Add a label to the bottom right, positioned above the footer. */
UILabel *bottomLabel = [[UILabel alloc] init];
bottomLabel.text = @"Bottom Right";
[view addSubview:bottomLabel];
bottomLabel.translatesAutoresizingMaskIntoConstraints = NO;
[bottomLabel.bottomAnchor
    constraintEqualToAnchor:mapView.navigationFooterLayoutGuide.topAnchor].active = YES;
[bottomLabel.trailingAnchor constraintEqualToAnchor:mapView.trailingAnchor].active = YES;
For an example of how to use a bottomTrailingButtonsLayoutGuide , to position the real-time disruptions reporting button, see Configure real-time disruptions .
বিকল্প পথ লুকান
যখন ইউজার ইন্টারফেস অতিরিক্ত তথ্যে ভারাক্রান্ত হয়ে পড়ে, তখন আপনি ডিফল্ট (দুটি) বিকল্প রুটের চেয়ে কম রুট প্রদর্শন করে, অথবা একেবারেই কোনো বিকল্প রুট প্রদর্শন না করে এই ভারাক্রান্ততা কমাতে পারেন। রুটগুলো ফেচ করার আগে, আপনি GMSNavigationRoutingOptions কনফিগার করে এবং alternateRoutesStrategy নিম্নলিখিত এনুমারেশন ভ্যালুগুলোর মধ্যে একটি দিয়ে সেট করে এই অপশনটি কনফিগার করতে পারেন:
| গণনার মান | বর্ণনা |
|---|---|
| জিএমএসনেভিগেশনবিকল্পরুটকৌশলসব | ডিফল্ট। সর্বোচ্চ দুটি বিকল্প পথ প্রদর্শন করে। |
| জিএমএসন্যাভিগেশনঅল্টারনেটরুটসস্ট্র্যাটেজিওয়ান | Displays one alternate route (if one is available). |
| জিএমএসনেভিগেশনবিকল্পরুটকৌশলকোনটিই নয় | বিকল্প পথ গোপন করে। |
উদাহরণ
The following code example demonstrates how to hide alternate routes altogether.
সুইফট
let routingOptions = GMSNavigationRoutingOptions(alternateRoutesStrategy: .none)
navigator?.setDestinations(destinations,
                           routingOptions: routingOptions) { routeStatus in
  ...
}
উদ্দেশ্য-সি
GMSNavigationRoutingOptions *routingOptions = [[GMSNavigationRoutingOptions alloc] initWithAlternateRoutesStrategy:GMSNavigationAlternateRoutesStrategyNone];
[navigator setDestinations:destinations
            routingOptions:routingOptions
                  callback:^(GMSRouteStatus routeStatus){...}];