

এই বিভাগে বর্ণনা করা হয়েছে যে কীভাবে আপনি Apple CarPlay লাইব্রেরির সাথে Navigation SDK ব্যবহার করে ড্যাশে থাকা হেড ইউনিটে আপনার অ্যাপের নেভিগেশন অভিজ্ঞতা দেখাতে পারবেন। কোনও ড্রাইভারের ড্যাশ-বোর্ড সিস্টেম CarPlay-এর সাথে মানানসই হলে, ড্রাইভাররা ইউনিটটির সাথে ফোন কানেক্ট করে সরাসরি তাদের গাড়ির ডিসপ্লেতে আপনার অ্যাপ ব্যবহার করতে পারবেন। এছাড়াও, ভয়েস নির্দেশিকা গাড়ির স্পিকারে চলে।
Apple-এর দেওয়া UI টেমপ্লেটের সেট থেকে আপনি CarPlay অ্যাপ তৈরি করেন। আপনার অ্যাপের দায়িত্ব হল দেখানোর জন্য টেমপ্লেট বেছে নেওয়া এবং সেটির মধ্যে ডেটা প্রদান করা।
ড্যাশবোর্ডে থাকা সিস্টেম, নিরাপত্তা সংক্রান্ত অনুমোদন প্রাপ্ত ইন্ট্যার্যাক্টিভ এলিমেন্ট দেখায় যাতে ড্রাইভার অযথা মনোযোগ বিভ্রান্ত না হয়ে নিরাপদে গন্তব্যে পৌঁছাতে পারেন। এছাড়াও, আপনি অ্যাপটিকে এমনভাবে প্রোগ্রাম করতে পারেন যাতে ড্রাইভার আপনার অ্যাপ-নির্দিষ্ট ফিচারের সাথে ইন্টার্যাক্ট করতে পারেন, যেমন অর্ডার গ্রহণ বা বাতিল করা অথবা ম্যাপে গ্রাহকের লোকেশন দেখা। অর্ডারের স্ট্যাটাস সংক্রান্ত আপডেটও ইন-ড্যাশবোর্ড ইউনিটে দেখানোর জন্য প্রোগ্রাম করা যেতে পারে।
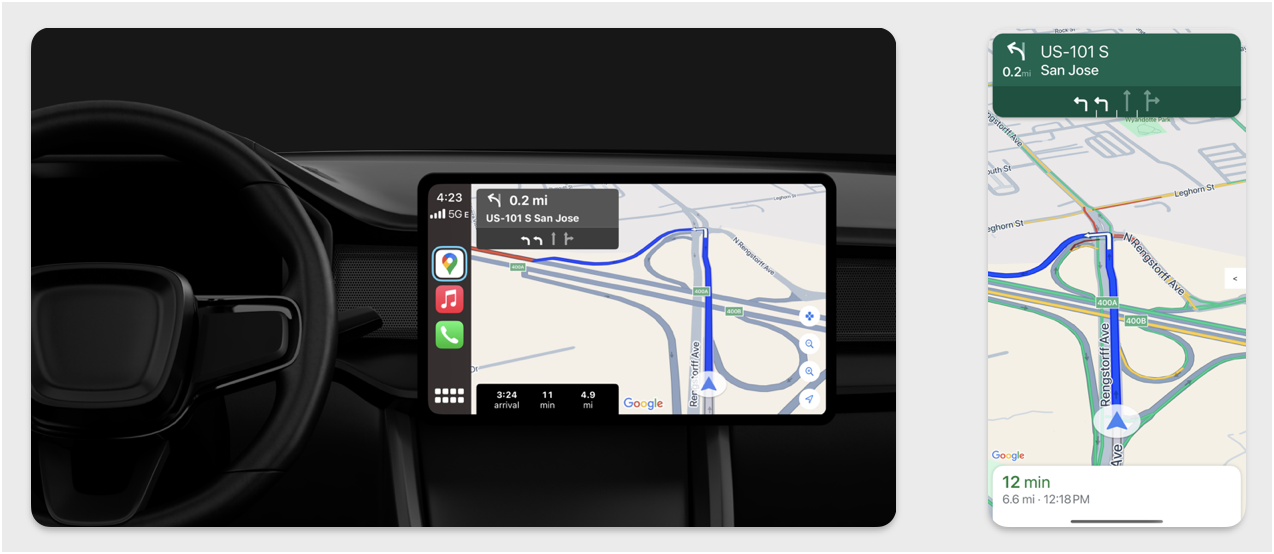
সেট-আপ করুন
CarPlay-এর মাধ্যমে শুরু করা
প্রথমে, Apple ডকুমেন্টেশন সম্পর্কে ভালোভাবে জেনে নিন:
Navigation SDK সেট-আপ করা
- Apple ডকুমেন্টেশন পড়া হয়ে গেলে, আপনি Navigation SDK-এর সাথে কাজ করার জন্য প্রস্তুত।
- আপনি যদি আগে থেকেই নিজের অ্যাপে Navigation SDK ইন্টিগ্রেট না করে থাকেন, তাহলে আপনার প্রোজেক্ট সেট-আপ করুন।
- আপনার অ্যাপের জন্য TurnByTurn নির্দেশাবলী ফিড চালু করুন।
- ঐচ্ছিক। Navigation SDK থেকে জেনারেট করা আইকন ব্যবহার করুন।
GMSMapViewUIView ক্লাসে দেওয়া ক্লাস ব্যবহার করে ম্যাপ আঁকুন। আরও তথ্যের জন্য কোনও রুটে নেভিগেট করা দেখুন। TurnByTurn লাইব্রেরি থেকে পাওয়া ডেটা দিয়েCPNavigationSessionপূরণ করুন।
ম্যাপ ও নেভিগেশন UI ড্র করা
GMSMapView
ক্লাস ম্যাপ রেন্ডার করে এবং
CPMapTemplate
CarPlay স্ক্রিনে UI রেন্ডার করে। এটি ফোনের জন্য GMSMapView-এর মতো একই ধরনের অনেক ফাংশনালিটি প্রদান করে, তবে সীমিত ইন্ট্যার্যাক্টিভিটি সহ।
Swift
init(window: CPWindow) {
    super.init(nibName: nil, bundle: nil)
    self.window = window

    // More CPMapTemplate initialization

}

override func viewDidLoad() {
    super.viewDidLoad()

    let mapViewOptions = GMSMapViewOptions()
    mapViewOptions.screen = window.screen
    mapViewOptions.frame = self.view.bounds

    mapView = GMSMapView(options: mapViewOptions)
    mapView.autoresizingMask = [.flexibleHeight, .flexibleWidth]
    mapView.settings.isNavigationHeaderEnabled = false
    mapView.settings.isNavigationFooterEnabled = false

    // Disable buttons: in CarPlay, no part of the map is clickable.
    // The app should instead place these buttons in the appropriate slots of the CarPlay template.
    mapView.settings.compassButton = false
    mapView.settings.isRecenterButtonEnabled = false
    mapView.shouldDisplaySpeedometer = false
    mapView.isMyLocationEnabled = true

    self.view.addSubview(mapView)
}
Objective-C
- (instancetype)initWithWindow:(CPWindow *)window {
  self = [super initWithNibName:nil bundle:nil];
  if (self) {
    _window = window;

  // More CPMapTemplate initialization
  }
}

- (void)viewDidLoad {
  [super viewDidLoad];
  GMSMapViewOptions *options = [[GMSMapViewOptions alloc] init];
  options.screen = _window.screen;
  options.frame = self.view.bounds;
  _mapView = [[GMSMapView alloc] initWithOptions:options];
  _mapView.autoresizingMask = UIViewAutoresizingFlexibleHeight | UIViewAutoresizingFlexibleWidth;
  _mapView.settings.navigationHeaderEnabled = NO;
  _mapView.settings.navigationFooterEnabled = NO;

  // Disable buttons: in CarPlay, no part of the map is clickable.
  // The app should instead place these buttons in the appropriate slots of the CarPlay template.
  _mapView.settings.compassButton = NO;
  _mapView.settings.recenterButtonEnabled = NO;

  _mapView.shouldDisplaySpeedometer = NO;
  _mapView.myLocationEnabled = YES;

  [self.view addSubview:_mapView];
}
ম্যাপ ইন্টার্যাকশন চালু করা
ড্রাইভারের নিরাপত্তা নিশ্চিত করতে, CarPlay স্ক্রিন সারফেস ইন্টার্যাকশনকে
CPMapTemplateDelegate
পদ্ধতির
একটি সিরিজে সীমাবদ্ধ করে। ড্যাশ-বোর্ডের স্ক্রিনে
ম্যাপের সাথে সীমিত ড্রাইভার ইন্টার্যাকশনের জন্য এইসব কলব্যাক ব্যবহার করুন।
ব্যবহারকারীর অতিরিক্ত অ্যাকশনকে সাপোর্ট করতে, CPMapButton-এর একটি অ্যারে তৈরি করুন এবং
এটি CPMapTemplate.mapButtons-এ অ্যাসাইন করুন।
নিচের কোডটি প্যান করার ইন্টার্যাকশন এবং প্যান, জুম ইন ও জুম আউট করার বোতাম তৈরি করে এবং ব্যবহারকারীর লোকেশন প্রদান করে।
প্যানিং ইন্টার্যাকশন
Swift
// MARK: CPMapTemplateDelegate
func mapTemplate(_ mapTemplate: CPMapTemplate, panBeganWith direction: CPMapTemplate.PanDirection) {

}

func mapTemplate(_ mapTemplate: CPMapTemplate, panWith direction: CPMapTemplate.PanDirection) {
    let scrollAmount = scrollAmount(for: direction)
    let scroll = GMSCameraUpdate.scrollBy(x: scrollAmount.x, y: scrollAmount.y)
    mapView.animate(with: scroll)
}

func mapTemplate(_ mapTemplate: CPMapTemplate, panEndedWith direction: CPMapTemplate.PanDirection) {
}

func scrollAmount(for panDirection: CPMapTemplate.PanDirection) -> CGPoint {
    let scrollDistance = 80.0
    var scrollAmount = CGPoint(x: 0, y: 0)
    switch panDirection {
        case .left:
            scrollAmount.x -= scrollDistance
            break;
        case .right:
            scrollAmount.x += scrollDistance
            break;
        case .up:
            scrollAmount.y += scrollDistance
            break;
        case .down:
            scrollAmount.y -= scrollDistance
            break;
        default:
            break;
    }
    if scrollAmount.x != 0 && scrollAmount.y != 0 {
        // Adjust length if scrolling diagonally.
        scrollAmount = CGPointMake(scrollAmount.x * sqrt(1.0/2.0), scrollAmount.y * sqrt(1.0/2.0))
    }
    return scrollAmount
}
Objective-C
#pragma mark - CPMapTemplateDelegate

- (void)mapTemplate:(CPMapTemplate *)mapTemplate panBeganWithDirection:(CPPanDirection)direction {
}

- (void)mapTemplate:(CPMapTemplate *)mapTemplate panWithDirection:(CPPanDirection)direction {
CGPoint scrollAmount = [self scrollAmountForPanDirection:direction];
GMSCameraUpdate *scroll = [GMSCameraUpdate scrollByX:scrollAmount.x Y:scrollAmount.y];
[_mapView animateWithCameraUpdate:scroll];
}

- (void)mapTemplate:(CPMapTemplate *)mapTemplate panEndedWithDirection:(CPPanDirection)direction {
}
- (CGPoint)scrollAmountForPanDirection:(CPPanDirection)direction {
  static const CGFloat scrollDistance = 80.;
  CGPoint scrollAmount = {0., 0.};
  if (direction & CPPanDirectionLeft) {
    scrollAmount.x = -scrollDistance;
  }
  if (direction & CPPanDirectionRight) {
    scrollAmount.x = scrollDistance;
  }
  if (direction & CPPanDirectionUp) {
    scrollAmount.y = -scrollDistance;
  }
  if (direction & CPPanDirectionDown) {
    scrollAmount.y = scrollDistance;
  }
  if (scrollAmount.x != 0 && scrollAmount.y != 0) {
  // Adjust length if scrolling diagonally.
  scrollAmount =
    CGPointMake(scrollAmount.x * (CGFloat)M_SQRT1_2, scrollAmount.y * (CGFloat)M_SQRT1_2);
  }
  return scrollAmount;
}
বোতামের সাধারণ ব্যবহার
Swift
// MARK: Create Buttons

func createMapButtons() -> [CPMapButton] {
    let panButton = mapButton(systemImageName: "dpad.fill") { [weak self] in
        self?.didTapPanButton()
    }

    let zoomOutButton = mapButton(systemImageName: "minus.magnifyingglass") { [weak self] in
        self?.didTapZoomOutButton()
    }

    let zoomInButton = mapButton(systemImageName: "plus.magnifyingglass") { [weak self] in
        self?.didTapZoomInButton()
    }

    let myLocationButton = mapButton(systemImageName: "location") { [weak self] in
        self?.didTapMyLocationButton()
    }

    let mapButtons = [panButton, zoomOutButton, zoomInButton, myLocationButton]
    return mapButtons
}

func mapButton(systemImageName: String, handler: @escaping () -> Void) -> CPMapButton {

}


// MARK: Button callbacks

@objc func didTapPanButton() {
    mapTemplate?.showPanningInterface(animated: true)
}

@objc func didTapZoomOutButton() {
    mapView.animate(with: GMSCameraUpdate.zoomOut())
}

@objc func didTapZoomInButton() {
    mapView.animate(with: GMSCameraUpdate.zoomIn())
}

@objc func didTapMyLocationButton() {
    if let lastLocation = lastLocation {
        let cameraPosition = GMSCameraPosition(target: lastLocation.coordinate, zoom: 15)
        mapView.animate(to: cameraPosition)
    }
}
Objective-C
#pragma mark - Create Buttons

- (NSArray<CPMapButton *>*)createMapButtons {
    NSMutableArray<CPMapButton *> *mapButtons = [NSMutableArray<CPMapButton *> array];

    __weak __typeof__(self) weakSelf = self;
    CPMapButton *panButton = [self mapButtonWithSystemImageNamed:@"dpad.fill"
                                                        handler:^(CPMapButton *_) {
                                                        [weakSelf didTapPanButton];
                                                        }];
    [mapButtons addObject:panButton];

    CPMapButton *zoomOutButton =
        [self mapButtonWithSystemImageNamed:@"minus.magnifyingglass"
                                    handler:^(CPMapButton *_Nonnull mapButon) {
                                    [weakSelf didTapZoomOutButton];
                                    }];
    [mapButtons addObject:zoomOutButton];

    CPMapButton *zoomInButton =
        [self mapButtonWithSystemImageNamed:@"plus.magnifyingglass"
                                    handler:^(CPMapButton *_Nonnull mapButon) {
                                    [weakSelf didTapZoomInButton];
                                    }];
    [mapButtons addObject:zoomInButton];

    CPMapButton *myLocationButton =
        [self mapButtonWithSystemImageNamed:@"location"
                                    handler:^(CPMapButton *_Nonnull mapButton) {
                                    [weakSelf didTapMyLocationButton];
                                    }];
    [mapButtons addObject:myLocationButton];
    return mapButtons;
}

#pragma mark - Button Callbacks

- (void)didTapZoomOutButton {
[_mapView animateWithCameraUpdate:[GMSCameraUpdate zoomOut]];
}

- (void)didTapZoomInButton {
[_mapView animateWithCameraUpdate:[GMSCameraUpdate zoomIn]];
}

- (void)didTapMyLocationButton {
CLLocation *location = self.lastLocation;
if (location) {
    GMSCameraPosition *position =
        [[GMSCameraPosition alloc] initWithTarget:self.lastLocation.coordinate zoom:15.];
    [_mapView animateToCameraPosition:position];
}
}

- (void)didTapPanButton {
[_mapTemplate showPanningInterfaceAnimated:YES];
_isPanningInterfaceEnabled = YES;
}

- (void)didTapStopPanningButton {
[_mapTemplate dismissPanningInterfaceAnimated:YES];
_isPanningInterfaceEnabled = NO;
}
মনে রাখবেন: CarPlay স্ক্রিনে বিকল্প রুট বেছে নেওয়া যায় না। CarPlay শুরু হওয়ার আগে ফোন থেকে এগুলি বেছে নিতে হবে।
নেভিগেশন সংক্রান্ত দিকনির্দেশ দেখানো
এই বিভাগে ডেটা ফিডের জন্য কীভাবে লিসনার সেট-আপ করতে হয় এবং কীভাবে নির্দেশাবলী ও ট্রিপ এস্টিমেট প্যানেলে নেভিগেশন সংক্রান্ত দিকনির্দেশ পূরণ করতে হয় তা বলা আছে। আরও তথ্যের জন্য "CarPlay নেভিগেশন অ্যাপ তৈরি করুন" CarPlay অ্যাপ প্রোগ্রামিং গাইড বিভাগ দেখুন।
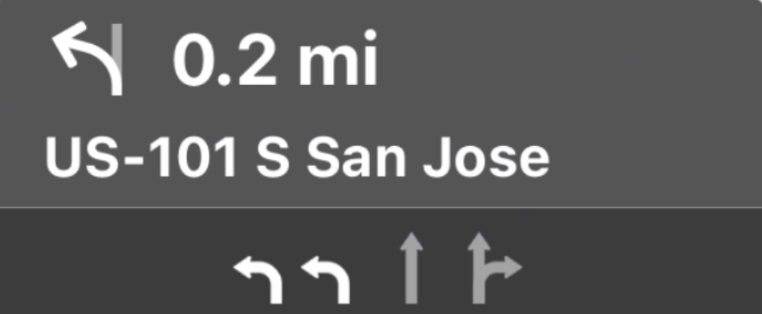
নির্দেশাবলী ও ট্রিপের আনুমানিক সময় প্যানেলে একটি নেভিগেশন কার্ড থাকে, যা বর্তমান ট্রিপ সম্পর্কিত নেভিগেশন তথ্য দেখায়। Navigation SDK-তে TurnByTurn লাইব্রেরি এই তথ্যের কিছু অংশ প্রদান করতে সাহায্য করতে পারে, যেমন চিহ্ন, টেক্সট এবং বাকি সময়।
লিসেনার সেট-আপ করুন
এক এক করে ডেটা ফিড সম্পর্কে বিবরণ-এ ইভেন্ট লিসেনার সেট-আপ করার জন্য নির্দেশাবলী অনুসরণ করুন।
নেভিগেশন সংক্রান্ত তথ্য পূরণ করা
নিচের কোড স্যাম্পেলের প্রথম অংশে দেখানো হয়েছে যে কীভাবে
GMSNavigationNavInfo.timeToCurrentStepSeconds থেকে CPTravelEstimate-এ অনুবাদ করে CarPlay
ভ্রমণ সংক্রান্ত অনুমান তৈরি করা যায়। আপনি
এক এক করে ডেটা ফিড সম্পর্কে বিস্তারিত তথ্য থেকে এই এবং অন্যান্য ডিসপ্লে এলিমেন্ট সম্পর্কে আরও পড়তে পারেন।
স্যাম্পেলের দ্বিতীয় অংশে দেখানো হয়েছে কীভাবে কোনও অবজেক্ট তৈরি করে তা
userInfo ফিল্ডে CPManuevers স্টোর করতে হয়। এটি CPManeuverDisplayStyle নির্ধারণ করে,
যা লেন নির্দেশিকা সংক্রান্ত তথ্যের জন্যও ব্যবহার করা হয়। আরও তথ্যের জন্য Apple-এর CarPlay অ্যাপ
প্রোগ্রামিং
গাইড
দেখুন।
Swift
// Get a CPTravelEstimate from GMSNavigationNavInfo
func getTravelEstimates(from navInfo:GMSNavigationNavInfo) -> CPTravelEstimates {
    let distanceRemaining = navInfo.roundedDistance(navInfo.distanceToCurrentStepMeters)
    let timeRemaining = navInfo.roundedTime(navInfo.timeToCurrentStepSeconds)
    let travelEstimates = CPTravelEstimates(distanceRemaining: distanceRemaining, timeRemaining: timeRemaining)
    return travelEstimates
}

//  Create an object to be stored in the userInfo field of CPManeuver to determine the CPManeuverDisplayStyle.

/** An object to be stored in the userInfo field of a CPManeuver. */

struct ManeuverUserInfo {
    var stepInfo: GMSNavigationStepInfo
    var isLaneGuidance: Bool
}

func mapTemplate(_ mapTemplate: CPMapTemplate, displayStyleFor maneuver: CPManeuver) -> CPManeuverDisplayStyle {
    let userInfo = maneuver.userInfo
    if let maneuverUserInfo = userInfo as? ManeuverUserInfo {
        return maneuverUserInfo.isLaneGuidance ? .symbolOnly : .leadingSymbol
    }
    return .leadingSymbol
}

// Get a CPManeuver with instructionVariants and symbolImage from GMSNavigationStepInfo
func getManeuver(for stepInfo: GMSNavigationStepInfo) -> CPManeuver {
    let maneuver = CPManeuver()
    maneuver.userInfo = ManeuverUserInfo(stepInfo: stepInfo, isLaneGuidance: false)
    switch stepInfo.maneuver {
        case .destination:
            maneuver.instructionVariants = ["Your destination is ahead."]
            break
        case .destinationLeft:
            maneuver.instructionVariants = ["Your destination is ahead on your left."]
            break
        case .destinationRight:
            maneuver.instructionVariants = ["Your destination is ahead on your right."]
            break
        default:
            maneuver.attributedInstructionVariants = currentNavInfo?.instructions(forStep: stepInfo, options: instructionOptions)
            break
    }
    maneuver.symbolImage = stepInfo.maneuverImage(with: instructionOptions.imageOptions)
    return maneuver
}

// Get the lane image for a CPManeuver from GMSNavigationStepInfo
func laneGuidanceManeuver(for stepInfo: GMSNavigationStepInfo) -> CPManeuver? {
    let maneuver = CPManeuver()
    maneuver.userInfo = ManeuverUserInfo(stepInfo: stepInfo, isLaneGuidance: true)
    let lanesImage = stepInfo.lanesImage(with: imageOptions)
    guard let lanesImage = lanesImage else { return nil }
    maneuver.symbolImage = lanesImage
    return maneuver
}
Objective-C
// Get a CPTravelEstimate from GMSNavigationNavInfo
- (nonull CPTravelEstimates *)travelEstimates:(GMSNavigationNavInfo *_Nonnull navInfo) {
NSMeasurement<NSUnitLength *> *distanceRemaining = [navInfo roundedDistance:navInfo.distanceToCurrentStepMeters];
NSTimeInterval timeRemaining = [navInfo roundedTime:navInfo.timeToCurrentStepSeconds];
CPTravelEstimate* travelEstimate = [[CPTravelEstimates alloc] initWithDistanceRemaining:distanceRemaining
                                                timeRemaining:timeRemaining];
}
//  Create an object to be stored in the userInfo field of CPManeuver to determine the CPManeuverDisplayStyle.

/** An object to be stored in the userInfo field of a CPManeuver. */
@interface ManeuverUserInfo : NSObject

@property(nonatomic, readonly, nonnull) GMSNavigationStepInfo *stepInfo;
@property(nonatomic, readonly, getter=isLaneGuidance) BOOL laneGuidance;

- (nonnull instancetype)initWithStepInfo:(GMSNavigationStepInfo *)stepInfo
                        isLaneGuidance:(BOOL)isLaneGuidance NS_DESIGNATED_INITIALIZER;

- (instancetype)init NS_UNAVAILABLE;

@end

- (CPManeuverDisplayStyle)mapTemplate:(CPMapTemplate *)mapTemplate
            displayStyleForManeuver:(nonnull CPManeuver *)maneuver {
ManeuverUserInfo *userInfo = maneuver.userInfo;
return userInfo.laneGuidance ? CPManeuverDisplayStyleSymbolOnly : CPManeuverDisplayStyleDefault;
}
// Get a CPManeuver with instructionVariants and symbolImage from GMSNavigationStepInfo
- (nonnull CPManeuver *)maneuverForStep:(nonnull GMSNavigationStepInfo *)stepInfo {
CPManeuver *maneuver = [[CPManeuver alloc] init];
maneuver.userInfo = [[ManeuverUserInfo alloc] initWithStepInfo:stepInfo isLaneGuidance:NO];
switch (stepInfo.maneuver) {
    case GMSNavigationManeuverDestination:
    maneuver.instructionVariants = @[ @"Your destination is ahead." ];
    break;
    case GMSNavigationManeuverDestinationLeft:
    maneuver.instructionVariants = @[ @"Your destination is ahead on your left." ];
    break;
    case GMSNavigationManeuverDestinationRight:
    maneuver.instructionVariants = @[ @"Your destination is ahead on your right." ];
    break;
    default: {
    maneuver.attributedInstructionVariants =
        [_currentNavInfo instructionsForStep:stepInfo options:_instructionOptions];
    break;
    }
}
maneuver.symbolImage = [stepInfo maneuverImageWithOptions:_instructionOptions.imageOptions];
return maneuver;
}
// Get the lane image for a CPManeuver from GMSNavigationStepInfo
- (nullable CPManeuver *)laneGuidanceManeuverForStep:(nonnull GMSNavigationStepInfo *)stepInfo {
CPManeuver *maneuver = [[CPManeuver alloc] init];
maneuver.userInfo = [[ManeuverUserInfo alloc] initWithStepInfo:stepInfo isLaneGuidance:YES];
UIImage *lanesImage = [stepInfo lanesImageWithOptions:_imageOptions];
if (!lanesImage) {
    return nil;
}
maneuver.symbolImage = lanesImage;
return maneuver;
}
কৌশল
এক এক করে নির্দেশিকা প্রদান করতে
CarPlay CPManeuver
ক্লাস ব্যবহার করে। ম্যানুভার ও লেন গাইডেন্স সম্পর্কে আরও তথ্য পেতে, এক এক করে ডেটা
ফিড সংক্রান্ত বিবরণ দেখুন।
সম্পর্কিত ডকুমেন্টেশন
- https://developer.apple.com/carplay/
- https://developer.apple.com/carplay/documentation/CarPlay-App-Programming-Guide.pdf
- https://developer.apple.com/design/human-interface-guidelines/carplay
- এক এক করে ডেটা ফিড সম্পর্কে বিবরণ
- কোনও রুটে নেভিগেট করা