
В этом примере показано, как добавить карту Google в приложение для Android, а также как использовать ломаные линии и многоугольники, чтобы обозначать на карте маршруты и области.
Следуйте руководству по созданию приложения для Android с помощью Maps SDK для Android. Рекомендуемая среда разработки – Android Studio.
Как получить код
Клонируйте или скачайте репозиторий с примерами Google Maps Android API версии 2 с сайта GitHub.
Версия на языке Java:
    // Copyright 2020 Google LLC
//
// Licensed under the Apache License, Version 2.0 (the "License");
// you may not use this file except in compliance with the License.
// You may obtain a copy of the License at
//
//      http://www.apache.org/licenses/LICENSE-2.0
//
// Unless required by applicable law or agreed to in writing, software
// distributed under the License is distributed on an "AS IS" BASIS,
// WITHOUT WARRANTIES OR CONDITIONS OF ANY KIND, either express or implied.
// See the License for the specific language governing permissions and
// limitations under the License.

package com.example.polygons;

import android.os.Bundle;
import android.widget.Toast;
import androidx.appcompat.app.AppCompatActivity;
import com.google.android.gms.maps.CameraUpdateFactory;
import com.google.android.gms.maps.GoogleMap;
import com.google.android.gms.maps.OnMapReadyCallback;
import com.google.android.gms.maps.SupportMapFragment;
import com.google.android.gms.maps.model.BitmapDescriptorFactory;
import com.google.android.gms.maps.model.CustomCap;
import com.google.android.gms.maps.model.Dash;
import com.google.android.gms.maps.model.Dot;
import com.google.android.gms.maps.model.Gap;
import com.google.android.gms.maps.model.JointType;
import com.google.android.gms.maps.model.LatLng;
import com.google.android.gms.maps.model.PatternItem;
import com.google.android.gms.maps.model.Polygon;
import com.google.android.gms.maps.model.PolygonOptions;
import com.google.android.gms.maps.model.Polyline;
import com.google.android.gms.maps.model.PolylineOptions;
import com.google.android.gms.maps.model.RoundCap;
import java.util.Arrays;
import java.util.List;


/**
 * An activity that displays a Google map with polylines to represent paths or routes,
 * and polygons to represent areas.
 */
public class PolyActivity extends AppCompatActivity
        implements
                OnMapReadyCallback,
                GoogleMap.OnPolylineClickListener,
                GoogleMap.OnPolygonClickListener {

    @Override
    protected void onCreate(Bundle savedInstanceState) {
        super.onCreate(savedInstanceState);

        // Retrieve the content view that renders the map.
        setContentView(R.layout.activity_maps);

        // Get the SupportMapFragment and request notification when the map is ready to be used.
        SupportMapFragment mapFragment = (SupportMapFragment) getSupportFragmentManager()
                .findFragmentById(R.id.map);
        mapFragment.getMapAsync(this);
    }

    /**
     * Manipulates the map when it's available.
     * The API invokes this callback when the map is ready to be used.
     * This is where we can add markers or lines, add listeners or move the camera.
     * In this tutorial, we add polylines and polygons to represent routes and areas on the map.
     */
    @Override
    public void onMapReady(GoogleMap googleMap) {

        // Add polylines to the map.
        // Polylines are useful to show a route or some other connection between points.
        Polyline polyline1 = googleMap.addPolyline(new PolylineOptions()
                .clickable(true)
                .add(
                        new LatLng(-35.016, 143.321),
                        new LatLng(-34.747, 145.592),
                        new LatLng(-34.364, 147.891),
                        new LatLng(-33.501, 150.217),
                        new LatLng(-32.306, 149.248),
                        new LatLng(-32.491, 147.309)));
        // Store a data object with the polyline, used here to indicate an arbitrary type.
        polyline1.setTag("A");
        // Style the polyline.
        stylePolyline(polyline1);

        Polyline polyline2 = googleMap.addPolyline(new PolylineOptions()
                .clickable(true)
                .add(
                        new LatLng(-29.501, 119.700),
                        new LatLng(-27.456, 119.672),
                        new LatLng(-25.971, 124.187),
                        new LatLng(-28.081, 126.555),
                        new LatLng(-28.848, 124.229),
                        new LatLng(-28.215, 123.938)));
        polyline2.setTag("B");
        stylePolyline(polyline2);

        // Add polygons to indicate areas on the map.
        Polygon polygon1 = googleMap.addPolygon(new PolygonOptions()
                .clickable(true)
                .add(
                        new LatLng(-27.457, 153.040),
                        new LatLng(-33.852, 151.211),
                        new LatLng(-37.813, 144.962),
                        new LatLng(-34.928, 138.599)));
        // Store a data object with the polygon, used here to indicate an arbitrary type.
        polygon1.setTag("alpha");
        // Style the polygon.
        stylePolygon(polygon1);

        Polygon polygon2 = googleMap.addPolygon(new PolygonOptions()
                .clickable(true)
                .add(
                        new LatLng(-31.673, 128.892),
                        new LatLng(-31.952, 115.857),
                        new LatLng(-17.785, 122.258),
                        new LatLng(-12.4258, 130.7932)));
        polygon2.setTag("beta");
        stylePolygon(polygon2);

        // Position the map's camera near Alice Springs in the center of Australia,
        // and set the zoom factor so most of Australia shows on the screen.
        googleMap.moveCamera(CameraUpdateFactory.newLatLngZoom(new LatLng(-23.684, 133.903), 4));

        // Set listeners for click events.
        googleMap.setOnPolylineClickListener(this);
        googleMap.setOnPolygonClickListener(this);
    }

    private static final int COLOR_BLACK_ARGB = 0xff000000;
    private static final int POLYLINE_STROKE_WIDTH_PX = 12;

    /**
     * Styles the polyline, based on type.
     * @param polyline The polyline object that needs styling.
     */
    private void stylePolyline(Polyline polyline) {
        String type = "";
        // Get the data object stored with the polyline.
        if (polyline.getTag() != null) {
            type = polyline.getTag().toString();
        }

        switch (type) {
            // If no type is given, allow the API to use the default.
            case "A":
                // Use a custom bitmap as the cap at the start of the line.
                polyline.setStartCap(
                        new CustomCap(
                                BitmapDescriptorFactory.fromResource(R.drawable.ic_arrow), 10));
                break;
            case "B":
                // Use a round cap at the start of the line.
                polyline.setStartCap(new RoundCap());
                break;
        }

        polyline.setEndCap(new RoundCap());
        polyline.setWidth(POLYLINE_STROKE_WIDTH_PX);
        polyline.setColor(COLOR_BLACK_ARGB);
        polyline.setJointType(JointType.ROUND);
    }

    private static final int PATTERN_GAP_LENGTH_PX = 20;
    private static final PatternItem DOT = new Dot();
    private static final PatternItem GAP = new Gap(PATTERN_GAP_LENGTH_PX);

    // Create a stroke pattern of a gap followed by a dot.
    private static final List<PatternItem> PATTERN_POLYLINE_DOTTED = Arrays.asList(GAP, DOT);

    /**
     * Listens for clicks on a polyline.
     * @param polyline The polyline object that the user has clicked.
     */
    @Override
    public void onPolylineClick(Polyline polyline) {
        // Flip from solid stroke to dotted stroke pattern.
        if ((polyline.getPattern() == null) || (!polyline.getPattern().contains(DOT))) {
            polyline.setPattern(PATTERN_POLYLINE_DOTTED);
        } else {
            // The default pattern is a solid stroke.
            polyline.setPattern(null);
        }

        Toast.makeText(this, "Route type " + polyline.getTag().toString(),
                Toast.LENGTH_SHORT).show();
    }

    /**
     * Listens for clicks on a polygon.
     * @param polygon The polygon object that the user has clicked.
     */
    @Override
    public void onPolygonClick(Polygon polygon) {
        // Flip the values of the red, green, and blue components of the polygon's color.
        int color = polygon.getStrokeColor() ^ 0x00ffffff;
        polygon.setStrokeColor(color);
        color = polygon.getFillColor() ^ 0x00ffffff;
        polygon.setFillColor(color);

        Toast.makeText(this, "Area type " + polygon.getTag().toString(), Toast.LENGTH_SHORT).show();
    }

    private static final int COLOR_WHITE_ARGB = 0xffffffff;
    private static final int COLOR_DARK_GREEN_ARGB = 0xff388E3C;
    private static final int COLOR_LIGHT_GREEN_ARGB = 0xff81C784;
    private static final int COLOR_DARK_ORANGE_ARGB = 0xffF57F17;
    private static final int COLOR_LIGHT_ORANGE_ARGB = 0xffF9A825;

    private static final int POLYGON_STROKE_WIDTH_PX = 8;
    private static final int PATTERN_DASH_LENGTH_PX = 20;
    private static final PatternItem DASH = new Dash(PATTERN_DASH_LENGTH_PX);

    // Create a stroke pattern of a gap followed by a dash.
    private static final List<PatternItem> PATTERN_POLYGON_ALPHA = Arrays.asList(GAP, DASH);

    // Create a stroke pattern of a dot followed by a gap, a dash, and another gap.
    private static final List<PatternItem> PATTERN_POLYGON_BETA =
        Arrays.asList(DOT, GAP, DASH, GAP);

    /**
     * Styles the polygon, based on type.
     * @param polygon The polygon object that needs styling.
     */
    private void stylePolygon(Polygon polygon) {
        String type = "";
        // Get the data object stored with the polygon.
        if (polygon.getTag() != null) {
            type = polygon.getTag().toString();
        }

        List<PatternItem> pattern = null;
        int strokeColor = COLOR_BLACK_ARGB;
        int fillColor = COLOR_WHITE_ARGB;

        switch (type) {
            // If no type is given, allow the API to use the default.
            case "alpha":
                // Apply a stroke pattern to render a dashed line, and define colors.
                pattern = PATTERN_POLYGON_ALPHA;
                strokeColor = COLOR_DARK_GREEN_ARGB;
                fillColor = COLOR_LIGHT_GREEN_ARGB;
                break;
            case "beta":
                // Apply a stroke pattern to render a line of dots and dashes, and define colors.
                pattern = PATTERN_POLYGON_BETA;
                strokeColor = COLOR_DARK_ORANGE_ARGB;
                fillColor = COLOR_LIGHT_ORANGE_ARGB;
                break;
        }

        polygon.setStrokePattern(pattern);
        polygon.setStrokeWidth(POLYGON_STROKE_WIDTH_PX);
        polygon.setStrokeColor(strokeColor);
        polygon.setFillColor(fillColor);
    }
}
Версия на языке Kotlin:
    // Copyright 2020 Google LLC
//
// Licensed under the Apache License, Version 2.0 (the "License");
// you may not use this file except in compliance with the License.
// You may obtain a copy of the License at
//
//      http://www.apache.org/licenses/LICENSE-2.0
//
// Unless required by applicable law or agreed to in writing, software
// distributed under the License is distributed on an "AS IS" BASIS,
// WITHOUT WARRANTIES OR CONDITIONS OF ANY KIND, either express or implied.
// See the License for the specific language governing permissions and
// limitations under the License.
package com.example.polygons

import android.os.Bundle
import android.widget.Toast
import androidx.appcompat.app.AppCompatActivity
import com.google.android.gms.maps.CameraUpdateFactory
import com.google.android.gms.maps.GoogleMap
import com.google.android.gms.maps.GoogleMap.OnPolygonClickListener
import com.google.android.gms.maps.GoogleMap.OnPolylineClickListener
import com.google.android.gms.maps.OnMapReadyCallback
import com.google.android.gms.maps.SupportMapFragment
import com.google.android.gms.maps.model.BitmapDescriptorFactory
import com.google.android.gms.maps.model.CustomCap
import com.google.android.gms.maps.model.Dash
import com.google.android.gms.maps.model.Dot
import com.google.android.gms.maps.model.Gap
import com.google.android.gms.maps.model.JointType
import com.google.android.gms.maps.model.LatLng
import com.google.android.gms.maps.model.PatternItem
import com.google.android.gms.maps.model.Polygon
import com.google.android.gms.maps.model.PolygonOptions
import com.google.android.gms.maps.model.Polyline
import com.google.android.gms.maps.model.PolylineOptions
import com.google.android.gms.maps.model.RoundCap

/**
 * An activity that displays a Google map with polylines to represent paths or routes,
 * and polygons to represent areas.
 */
class PolyActivity : AppCompatActivity(), OnMapReadyCallback, OnPolylineClickListener, OnPolygonClickListener {

    override fun onCreate(savedInstanceState: Bundle?) {
        super.onCreate(savedInstanceState)

        // Retrieve the content view that renders the map.
        setContentView(R.layout.activity_maps)

        // Get the SupportMapFragment and request notification when the map is ready to be used.
        val mapFragment = supportFragmentManager
            .findFragmentById(R.id.map) as SupportMapFragment?
        mapFragment?.getMapAsync(this)
    }

    /**
     * Manipulates the map when it's available.
     * The API invokes this callback when the map is ready to be used.
     * This is where we can add markers or lines, add listeners or move the camera.
     * In this tutorial, we add polylines and polygons to represent routes and areas on the map.
     */
    override fun onMapReady(googleMap: GoogleMap) {

        // Add polylines to the map.
        // Polylines are useful to show a route or some other connection between points.
        val polyline1 = googleMap.addPolyline(PolylineOptions()
            .clickable(true)
            .add(
                LatLng(-35.016, 143.321),
                LatLng(-34.747, 145.592),
                LatLng(-34.364, 147.891),
                LatLng(-33.501, 150.217),
                LatLng(-32.306, 149.248),
                LatLng(-32.491, 147.309)))
        // Store a data object with the polyline, used here to indicate an arbitrary type.
        polyline1.tag = "A"
        // Style the polyline.
        stylePolyline(polyline1)

        val polyline2 = googleMap.addPolyline(PolylineOptions()
            .clickable(true)
            .add(
                LatLng(-29.501, 119.700),
                LatLng(-27.456, 119.672),
                LatLng(-25.971, 124.187),
                LatLng(-28.081, 126.555),
                LatLng(-28.848, 124.229),
                LatLng(-28.215, 123.938)))
        polyline2.tag = "B"
        stylePolyline(polyline2)

        // Add polygons to indicate areas on the map.
        val polygon1 = googleMap.addPolygon(PolygonOptions()
            .clickable(true)
            .add(
                LatLng(-27.457, 153.040),
                LatLng(-33.852, 151.211),
                LatLng(-37.813, 144.962),
                LatLng(-34.928, 138.599)))
        // Store a data object with the polygon, used here to indicate an arbitrary type.
        polygon1.tag = "alpha"
        // Style the polygon.
        stylePolygon(polygon1)

        val polygon2 = googleMap.addPolygon(PolygonOptions()
            .clickable(true)
            .add(
                LatLng(-31.673, 128.892),
                LatLng(-31.952, 115.857),
                LatLng(-17.785, 122.258),
                LatLng(-12.4258, 130.7932)))
        polygon2.tag = "beta"
        stylePolygon(polygon2)

        // Position the map's camera near Alice Springs in the center of Australia,
        // and set the zoom factor so most of Australia shows on the screen.
        googleMap.moveCamera(CameraUpdateFactory.newLatLngZoom(LatLng(-23.684, 133.903), 4f))

        // Set listeners for click events.
        googleMap.setOnPolylineClickListener(this)
        googleMap.setOnPolygonClickListener(this)
    }

    private val COLOR_BLACK_ARGB = -0x1000000
    private val POLYLINE_STROKE_WIDTH_PX = 12

    /**
     * Styles the polyline, based on type.
     * @param polyline The polyline object that needs styling.
     */
    private fun stylePolyline(polyline: Polyline) {
        // Get the data object stored with the polyline.
        val type = polyline.tag?.toString() ?: ""
        when (type) {
            "A" -> {
                // Use a custom bitmap as the cap at the start of the line.
                polyline.startCap = CustomCap(
                    BitmapDescriptorFactory.fromResource(R.drawable.ic_arrow), 10f)
            }
            "B" -> {
               // Use a round cap at the start of the line.
                polyline.startCap = RoundCap()
            }
        }
        polyline.endCap = RoundCap()
        polyline.width = POLYLINE_STROKE_WIDTH_PX.toFloat()
        polyline.color = COLOR_BLACK_ARGB
        polyline.jointType = JointType.ROUND
    }

    private val PATTERN_GAP_LENGTH_PX = 20
    private val DOT: PatternItem = Dot()
    private val GAP: PatternItem = Gap(PATTERN_GAP_LENGTH_PX.toFloat())

    // Create a stroke pattern of a gap followed by a dot.
    private val PATTERN_POLYLINE_DOTTED = listOf(GAP, DOT)

    /**
     * Listens for clicks on a polyline.
     * @param polyline The polyline object that the user has clicked.
     */
    override fun onPolylineClick(polyline: Polyline) {
        // Flip from solid stroke to dotted stroke pattern.
        if (polyline.pattern == null || !polyline.pattern!!.contains(DOT)) {
            polyline.pattern = PATTERN_POLYLINE_DOTTED
        } else {
            // The default pattern is a solid stroke.
            polyline.pattern = null
        }
        Toast.makeText(this, "Route type " + polyline.tag.toString(),
            Toast.LENGTH_SHORT).show()
    }

    /**
     * Listens for clicks on a polygon.
     * @param polygon The polygon object that the user has clicked.
     */
    override fun onPolygonClick(polygon: Polygon) {
        // Flip the values of the red, green, and blue components of the polygon's color.
        var color = polygon.strokeColor xor 0x00ffffff
        polygon.strokeColor = color
        color = polygon.fillColor xor 0x00ffffff
        polygon.fillColor = color
        Toast.makeText(this, "Area type ${polygon.tag?.toString()}", Toast.LENGTH_SHORT).show()
    }

    private val COLOR_WHITE_ARGB = -0x1
    private val COLOR_DARK_GREEN_ARGB = -0xc771c4
    private val COLOR_LIGHT_GREEN_ARGB = -0x7e387c
    private val COLOR_DARK_ORANGE_ARGB = -0xa80e9
    private val COLOR_LIGHT_ORANGE_ARGB = -0x657db
    private val POLYGON_STROKE_WIDTH_PX = 8
    private val PATTERN_DASH_LENGTH_PX = 20

    private val DASH: PatternItem = Dash(PATTERN_DASH_LENGTH_PX.toFloat())

    // Create a stroke pattern of a gap followed by a dash.
    private val PATTERN_POLYGON_ALPHA = listOf(GAP, DASH)

    // Create a stroke pattern of a dot followed by a gap, a dash, and another gap.
    private val PATTERN_POLYGON_BETA = listOf(DOT, GAP, DASH, GAP)

    /**
     * Styles the polygon, based on type.
     * @param polygon The polygon object that needs styling.
     */
    private fun stylePolygon(polygon: Polygon) {
        // Get the data object stored with the polygon.
        val type = polygon.tag?.toString() ?: ""
        var pattern: List<PatternItem>? = null
        var strokeColor = COLOR_BLACK_ARGB
        var fillColor = COLOR_WHITE_ARGB
        when (type) {
            "alpha" -> {
                // Apply a stroke pattern to render a dashed line, and define colors.
                pattern = PATTERN_POLYGON_ALPHA
                strokeColor = COLOR_DARK_GREEN_ARGB
                fillColor = COLOR_LIGHT_GREEN_ARGB
            }
            "beta" -> {
                // Apply a stroke pattern to render a line of dots and dashes, and define colors.
                pattern = PATTERN_POLYGON_BETA
                strokeColor = COLOR_DARK_ORANGE_ARGB
                fillColor = COLOR_LIGHT_ORANGE_ARGB
            }
        }
        polygon.strokePattern = pattern
        polygon.strokeWidth = POLYGON_STROKE_WIDTH_PX.toFloat()
        polygon.strokeColor = strokeColor
        polygon.fillColor = fillColor
    }
}
Как настроить проект
Чтобы создать проект в Android Studio, выполните следующие действия:
- Скачайте и установите Android Studio.
- Добавьте пакет сервисов Google Play в Android Studio.
- Клонируйте или скачайте репозиторий с примерами Google Maps Android API версии 2 с сайта GitHub, если вы ещё не сделали этого.
Импортируйте учебный проект:
- В Android Studio выберите File > New > Import Project (Файл > Создать > Импортировать проект).
- Перейдите в каталог, где вы сохранили репозиторий с примерами Google Maps Android API версии 2 после его скачивания.
- Найдите проект Polygons. Он расположен в следующем каталоге:
PATH-TO-SAVED-REPO/android-samples/tutorials/java/Polygons(Java)
PATH-TO-SAVED-REPO/android-samples/tutorials/kotlin/Polygons(Kotlin) - Выберите каталог проекта и нажмите Open (Открыть). Теперь Android Studio создаст ваш проект с использованием инструмента сборки Gradle.
Как включить нужные API и получить ключ API
Для этого учебного проекта вам понадобится проект Google Cloud, в котором включены все необходимые API, и ключ API, авторизованный для работы с Maps SDK для Android. Подробная информация приведена в следующих статьях:
Как добавить в приложение ключ API
- Откройте файл
local.propertiesпроекта. Добавьте приведенную ниже строку и укажите вместо
YOUR_API_KEYваш ключ API.MAPS_API_KEY=YOUR_API_KEYПлагин Secrets Gradle копирует ключ API во время сборки приложения и делает его доступным в виде переменной сборки в манифесте Android, как объясняется ниже.
Как создать сборку и запустить приложение
Чтобы собрать и запустить приложение, выполните следующие действия:
Подключите устройство Android к компьютеру. Выполните инструкции по активации параметров для разработчиков на устройстве Android и настройте систему для обнаружения этого устройства.
Если вам нужно настроить виртуальное устройство, воспользуйтесь Менеджером виртуального устройства Android (AVD). Выбирая эмулятор, убедитесь, что вы используете образ, который содержит интерфейсы Google API. Подробнее о том, как настроить проект Android Studio…
В Android Studio выберите пункт меню Run (Запустить) или нажмите на значок воспроизведения, чтобы запустить свое приложение. В открывшемся окне выберите устройство.
Android Studio вызовет Gradle для сборки приложения, а затем запустит его на устройстве или в эмуляторе.
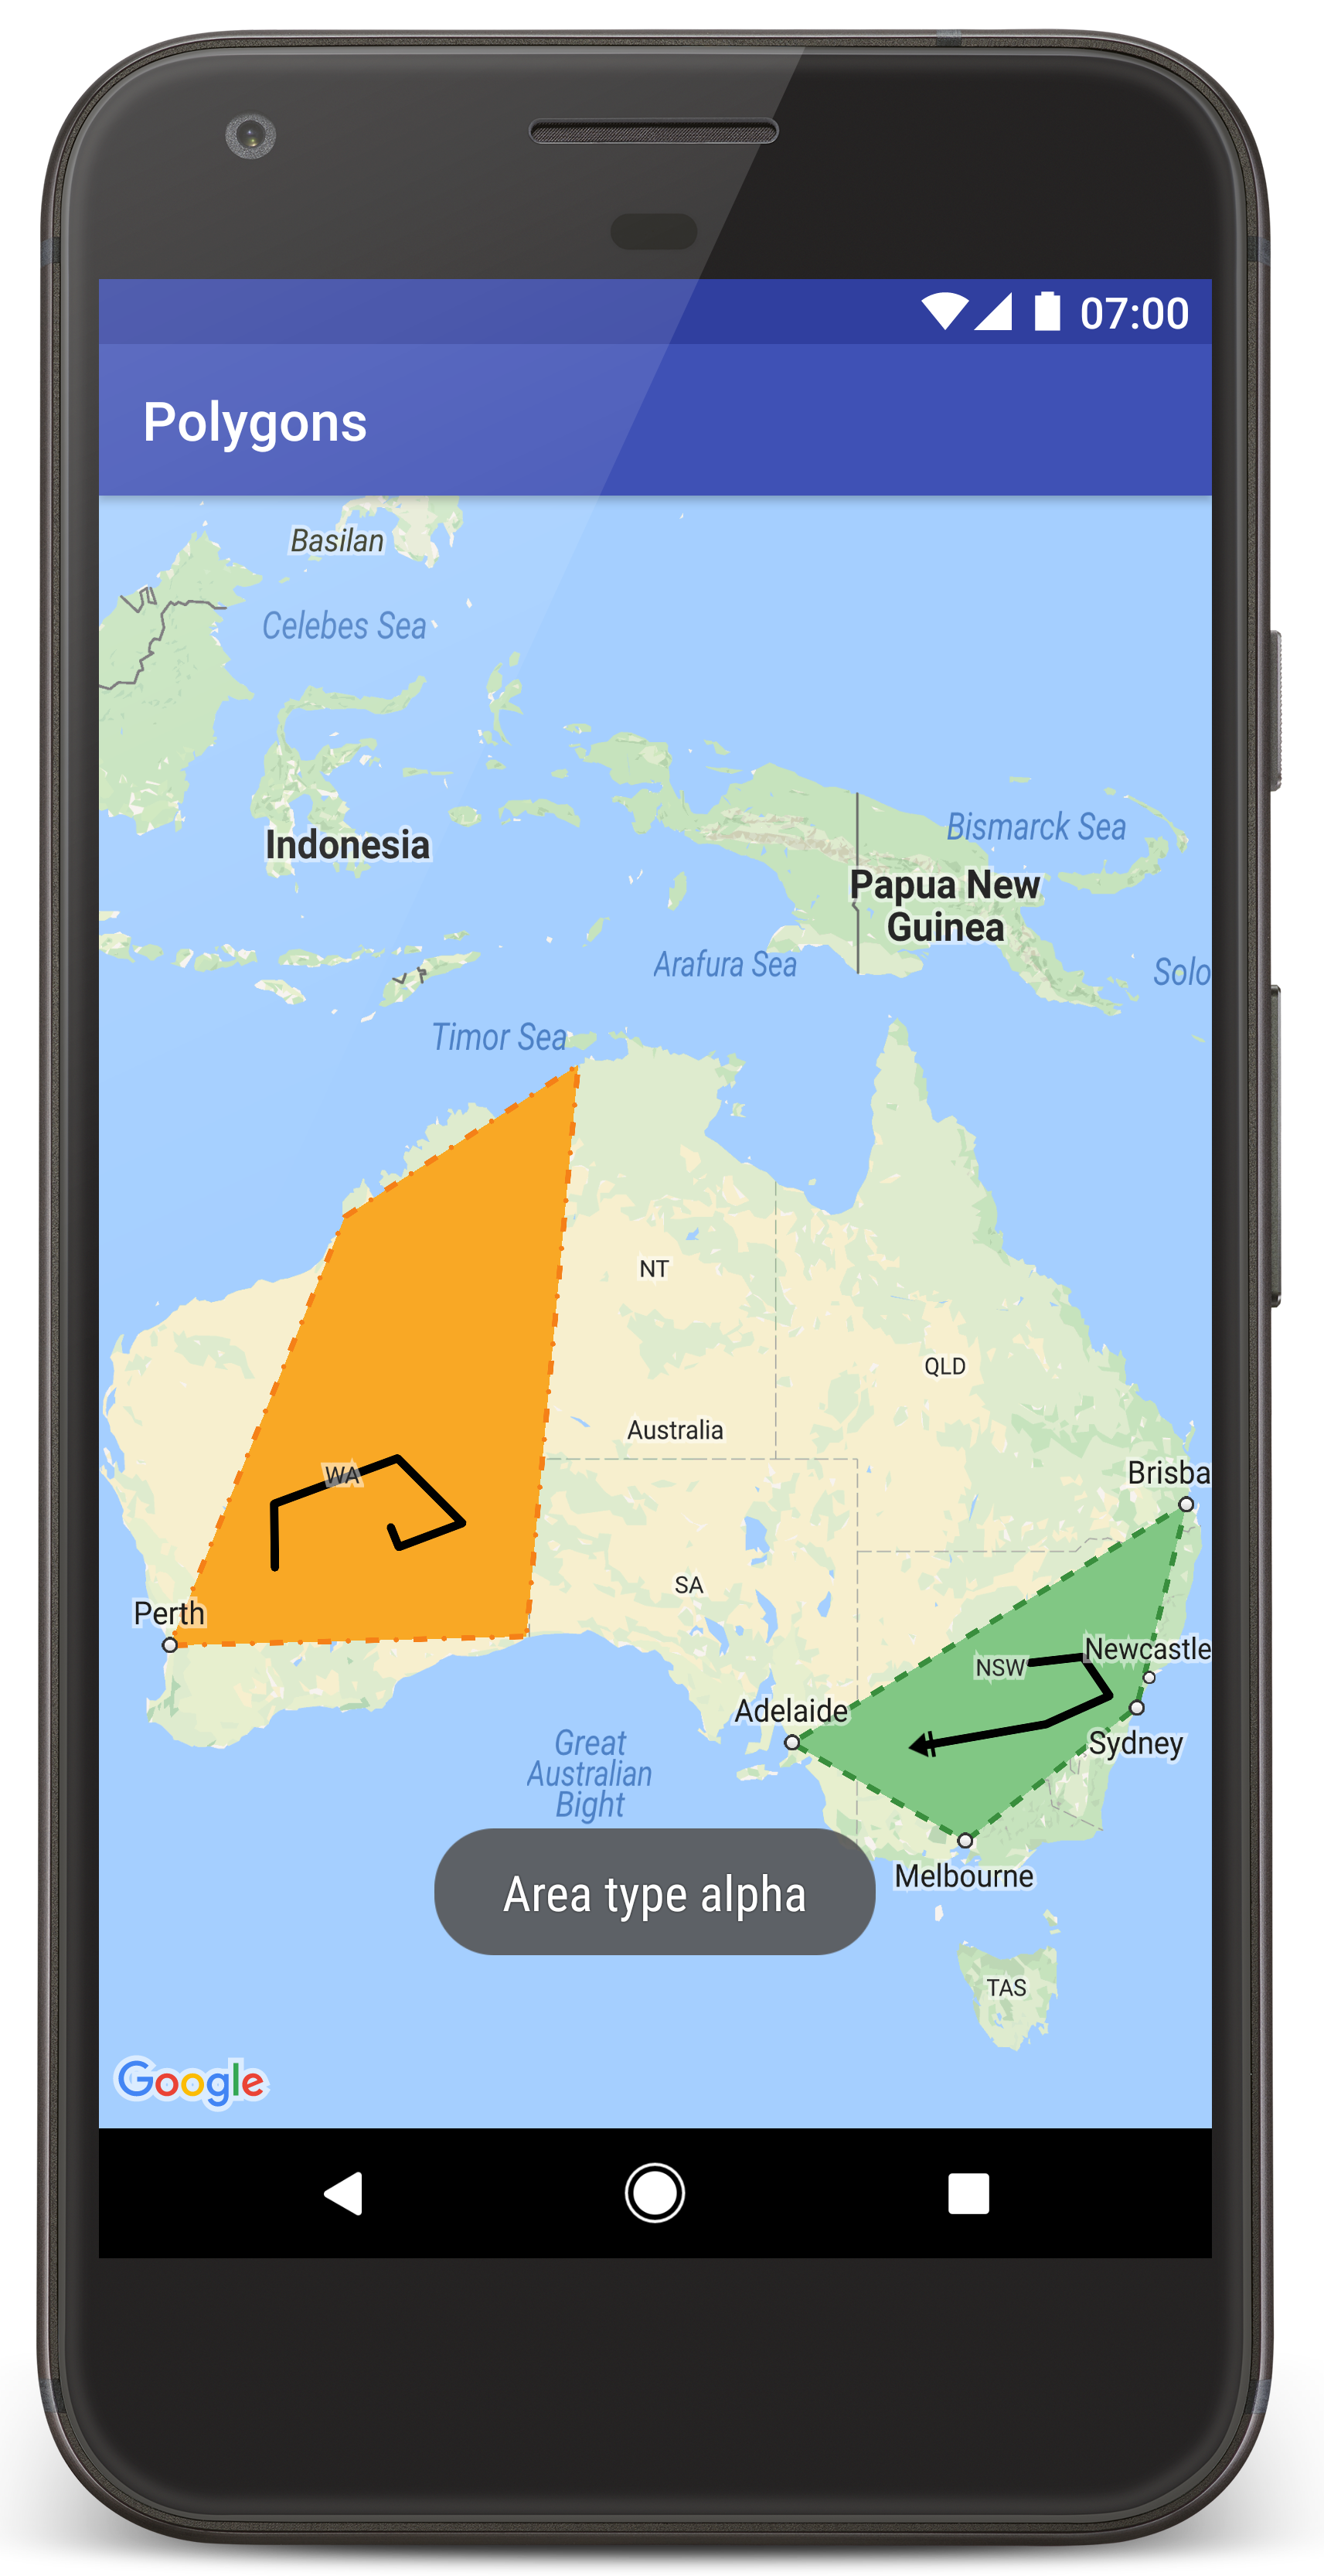
Вы должны увидеть карту с двумя многоугольниками, наложенными на карту Австралии, как показано на этой странице.
Устранение неполадок
- Если карта не показывается, проверьте, получен ли ключ API и добавлен ли он в приложение, как описано выше. Проверьте журнал Android Monitor в Android Studio на наличие сообщений об ошибках, касающихся ключа API.
- Для просмотра журналов и отладки приложения используйте средства отладки Android Studio.
Как работает код
В этой части руководства рассказывается о наиболее важных компонентах приложения Polygons, чтобы вам было проще понять принципы создания таких приложений.
Проверка манифеста Android
Обратите внимание на перечисленные ниже элементы в файле AndroidManifest.xml своего приложения.
Добавьте элемент
meta-data, чтобы указать версию сервисов Google Play, с которой было скомпилировано приложение.<meta-data android:name="com.google.android.gms.version" android:value="@integer/google_play_services_version" />Добавьте элемент
meta-dataс указанием своего ключа API. В примере, приведенном в этом руководстве, значение ключа API сопоставляется с определенной ранее переменной сборки (MAPS_API_KEY). Во время сборки приложения плагин Secrets Gradle для Android делает ключи в вашем файлеlocal.propertiesдоступными, используя переменные манифеста.<meta-data android:name="com.google.android.geo.API_KEY" android:value="${MAPS_API_KEY}" />В файле
build.gradleприведенная ниже строка осуществляет передачу ключа API в манифест Android.id 'com.google.android.libraries.mapsplatform.secrets-gradle-plugin'
Ниже приведен пример манифеста полностью:
<?xml version="1.0" encoding="utf-8"?>
<!--
Copyright 2020 Google LLC
Licensed under the Apache License, Version 2.0 (the "License");
you may not use this file except in compliance with the License.
You may obtain a copy of the License at
http://www.apache.org/licenses/LICENSE-2.0
Unless required by applicable law or agreed to in writing, software
distributed under the License is distributed on an "AS IS" BASIS,
WITHOUT WARRANTIES OR CONDITIONS OF ANY KIND, either express or implied.
See the License for the specific language governing permissions and
limitations under the License.
-->
<manifest xmlns:android="http://schemas.android.com/apk/res/android">
<application
android:allowBackup="true"
android:icon="@mipmap/ic_launcher"
android:label="@string/app_name"
android:supportsRtl="true"
android:theme="@style/AppTheme">
<meta-data
    android:name="com.google.android.gms.version"
    android:value="@integer/google_play_services_version" />
<!--
The API key for Google Maps-based APIs.
-->
<meta-data
  android:name="com.google.android.geo.API_KEY"
  android:value="${MAPS_API_KEY}" />
<activity
android:name="com.example.polygons.PolyActivity"
android:exported="true"
android:label="@string/title_activity_maps">
<intent-filter>
<action android:name="android.intent.action.MAIN" />
<category android:name="android.intent.category.LAUNCHER" />
</intent-filter>
</activity>
</application>
</manifest>
Добавление карты
Отобразите карту, используя Maps SDK для Android.
Добавьте элемент
<fragment>в файл макета для объекта activity (activity_maps.xml). Этот элемент указывает, что фрагментSupportMapFragmentдолжен выступать в роли контейнера для карты и предоставить доступ к объектуGoogleMap. В учебном проекте используется версия библиотеки поддержки Android для фрагмента карты. Это обеспечивает обратную совместимость с более ранними версиями фреймворка Android.<!-- Copyright 2020 Google LLC Licensed under the Apache License, Version 2.0 (the "License"); you may not use this file except in compliance with the License. You may obtain a copy of the License at http://www.apache.org/licenses/LICENSE-2.0 Unless required by applicable law or agreed to in writing, software distributed under the License is distributed on an "AS IS" BASIS, WITHOUT WARRANTIES OR CONDITIONS OF ANY KIND, either express or implied. See the License for the specific language governing permissions and limitations under the License. --> <fragment xmlns:android="http://schemas.android.com/apk/res/android" xmlns:tools="http://schemas.android.com/tools" android:id="@+id/map" android:name="com.google.android.gms.maps.SupportMapFragment" android:layout_width="match_parent" android:layout_height="match_parent" tools:context="com.example.polygons.PolyActivity" />В методе
onCreate()своего объекта activity установите файл макета как представление контента. Получите дескриптор для фрагмента карты, вызвав методFragmentManager.findFragmentById(). Затем используйте методgetMapAsync(), чтобы зарегистрировать обратный вызов карты:Java
@Override protected void onCreate(Bundle savedInstanceState) { super.onCreate(savedInstanceState); // Retrieve the content view that renders the map. setContentView(R.layout.activity_maps); // Get the SupportMapFragment and request notification when the map is ready to be used. SupportMapFragment mapFragment = (SupportMapFragment) getSupportFragmentManager() .findFragmentById(R.id.map); mapFragment.getMapAsync(this); }Kotlin
override fun onCreate(savedInstanceState: Bundle?) { super.onCreate(savedInstanceState) // Retrieve the content view that renders the map. setContentView(R.layout.activity_maps) // Get the SupportMapFragment and request notification when the map is ready to be used. val mapFragment = supportFragmentManager .findFragmentById(R.id.map) as SupportMapFragment? mapFragment?.getMapAsync(this) }Реализуйте интерфейс
OnMapReadyCallbackи переопределите методonMapReady(). API выполняет этот обратный вызов, когда объектGoogleMapдоступен (это позволяет вам добавлять объекты на карту и настраивать их в своем приложении).Java
public class PolyActivity extends AppCompatActivity implements OnMapReadyCallback, GoogleMap.OnPolylineClickListener, GoogleMap.OnPolygonClickListener { @Override protected void onCreate(Bundle savedInstanceState) { super.onCreate(savedInstanceState); // Retrieve the content view that renders the map. setContentView(R.layout.activity_maps); // Get the SupportMapFragment and request notification when the map is ready to be used. SupportMapFragment mapFragment = (SupportMapFragment) getSupportFragmentManager() .findFragmentById(R.id.map); mapFragment.getMapAsync(this); } /** * Manipulates the map when it's available. * The API invokes this callback when the map is ready to be used. * This is where we can add markers or lines, add listeners or move the camera. * In this tutorial, we add polylines and polygons to represent routes and areas on the map. */ @Override public void onMapReady(GoogleMap googleMap) { // Add polylines to the map. // Polylines are useful to show a route or some other connection between points. Polyline polyline1 = googleMap.addPolyline(new PolylineOptions() .clickable(true) .add( new LatLng(-35.016, 143.321), new LatLng(-34.747, 145.592), new LatLng(-34.364, 147.891), new LatLng(-33.501, 150.217), new LatLng(-32.306, 149.248), new LatLng(-32.491, 147.309))); // Position the map's camera near Alice Springs in the center of Australia, // and set the zoom factor so most of Australia shows on the screen. googleMap.moveCamera(CameraUpdateFactory.newLatLngZoom(new LatLng(-23.684, 133.903), 4)); // Set listeners for click events. googleMap.setOnPolylineClickListener(this); googleMap.setOnPolygonClickListener(this); }Kotlin
class PolyActivity : AppCompatActivity(), OnMapReadyCallback, OnPolylineClickListener, OnPolygonClickListener { override fun onCreate(savedInstanceState: Bundle?) { super.onCreate(savedInstanceState) // Retrieve the content view that renders the map. setContentView(R.layout.activity_maps) // Get the SupportMapFragment and request notification when the map is ready to be used. val mapFragment = supportFragmentManager .findFragmentById(R.id.map) as SupportMapFragment? mapFragment?.getMapAsync(this) } /** * Manipulates the map when it's available. * The API invokes this callback when the map is ready to be used. * This is where we can add markers or lines, add listeners or move the camera. * In this tutorial, we add polylines and polygons to represent routes and areas on the map. */ override fun onMapReady(googleMap: GoogleMap) { // Add polylines to the map. // Polylines are useful to show a route or some other connection between points. val polyline1 = googleMap.addPolyline(PolylineOptions() .clickable(true) .add( LatLng(-35.016, 143.321), LatLng(-34.747, 145.592), LatLng(-34.364, 147.891), LatLng(-33.501, 150.217), LatLng(-32.306, 149.248), LatLng(-32.491, 147.309))) // Position the map's camera near Alice Springs in the center of Australia, // and set the zoom factor so most of Australia shows on the screen. googleMap.moveCamera(CameraUpdateFactory.newLatLngZoom(LatLng(-23.684, 133.903), 4f)) // Set listeners for click events. googleMap.setOnPolylineClickListener(this) googleMap.setOnPolygonClickListener(this) }
Добавление ломаной линии на карту
Ломаная линия (объект Polyline) – это последовательность отрезков прямых, с помощью которых можно нарисовать любую фигуру. Как правило, ломаные линии используются для нанесения на карту маршрутов.
Создайте объект
PolylineOptionsи добавьте к нему точки. Каждая точка соответствует местоположению на карте, которое вы определяете с помощью объектаLatLngс указанием широты и долготы. Ниже приведен пример кода для ломаной линии с шестью точками.Чтобы добавить ломаную линию на карту, вызовите метод
GoogleMap.addPolyline().Java
Polyline polyline1 = googleMap.addPolyline(new PolylineOptions() .clickable(true) .add( new LatLng(-35.016, 143.321), new LatLng(-34.747, 145.592), new LatLng(-34.364, 147.891), new LatLng(-33.501, 150.217), new LatLng(-32.306, 149.248), new LatLng(-32.491, 147.309)));Kotlin
val polyline1 = googleMap.addPolyline(PolylineOptions() .clickable(true) .add( LatLng(-35.016, 143.321), LatLng(-34.747, 145.592), LatLng(-34.364, 147.891), LatLng(-33.501, 150.217), LatLng(-32.306, 149.248), LatLng(-32.491, 147.309)))
Задайте для параметра clickable значение true, если вы хотите, чтобы для ломаной линии обрабатывались события кликов. Дополнительная информация об обработке событий будет приведена далее в этом руководстве.
Сохранение произвольных данных с помощью ломаной линии
Вы можете сохранять объекты с произвольными данными с помощью ломаных линий и других геометрических фигур.
Чтобы сохранить объект данных с помощью ломаной линии, вызовите метод
Polyline.setTag(). Код ниже определяет произвольный тег (A), который указывает тип ломаной линии.Java
Polyline polyline1 = googleMap.addPolyline(new PolylineOptions()
    .clickable(true)
    .add(
            new LatLng(-35.016, 143.321),
            new LatLng(-34.747, 145.592),
            new LatLng(-34.364, 147.891),
            new LatLng(-33.501, 150.217),
            new LatLng(-32.306, 149.248),
            new LatLng(-32.491, 147.309)));
// Store a data object with the polyline, used here to indicate an arbitrary type.
polyline1.setTag("A");
Kotlin
val polyline1 = googleMap.addPolyline(PolylineOptions()
.clickable(true)
.add(
    LatLng(-35.016, 143.321),
    LatLng(-34.747, 145.592),
    LatLng(-34.364, 147.891),
    LatLng(-33.501, 150.217),
    LatLng(-32.306, 149.248),
    LatLng(-32.491, 147.309)))
// Store a data object with the polyline, used here to indicate an arbitrary type.
polyline1.tag = "A
Извлеките данные с помощью метода
Polyline.getTag(), как показано в следующем разделе.
Собственный стиль ломаной линии
В объекте PolylineOptions вы можете задавать различные свойства стиля, например цвет линии, ее толщину и начертание, тип соединения, вид начальной и конечной точек. Если какое-либо свойство не определено, API будет использовать вариант по умолчанию.
Приведенный ниже код задает круглый элемент для конца линии, а также другой элемент для ее начала, выбранный в зависимости от типа линии. Тип представляет собой произвольное свойство в объекте данных для нее. В этом примере также заданы толщина линии, ее цвет и тип соединений.
Java
private static final int COLOR_BLACK_ARGB = 0xff000000;
private static final int POLYLINE_STROKE_WIDTH_PX = 12;
/**
* Styles the polyline, based on type.
* @param polyline The polyline object that needs styling.
*/
private void stylePolyline(Polyline polyline) {
String type = "";
// Get the data object stored with the polyline.
if (polyline.getTag() != null) {
type = polyline.getTag().toString();
}
switch (type) {
// If no type is given, allow the API to use the default.
case "A":
// Use a custom bitmap as the cap at the start of the line.
polyline.setStartCap(
new CustomCap(
BitmapDescriptorFactory.fromResource(R.drawable.ic_arrow), 10));
break;
case "B":
// Use a round cap at the start of the line.
polyline.setStartCap(new RoundCap());
break;
}
polyline.setEndCap(new RoundCap());
polyline.setWidth(POLYLINE_STROKE_WIDTH_PX);
polyline.setColor(COLOR_BLACK_ARGB);
polyline.setJointType(JointType.ROUND);
}
Kotlin
private val COLOR_BLACK_ARGB = -0x1000000
private val POLYLINE_STROKE_WIDTH_PX = 12
/**
* Styles the polyline, based on type.
* @param polyline The polyline object that needs styling.
*/
private fun stylePolyline(polyline: Polyline) {
// Get the data object stored with the polyline.
val type = polyline.tag?.toString() ?: ""
when (type) {
"A" -> {
// Use a custom bitmap as the cap at the start of the line.
polyline.startCap = CustomCap(
BitmapDescriptorFactory.fromResource(R.drawable.ic_arrow), 10f)
}
"B" -> {
// Use a round cap at the start of the line.
polyline.startCap = RoundCap()
}
}
polyline.endCap = RoundCap()
polyline.width = POLYLINE_STROKE_WIDTH_PX.toFloat()
polyline.color = COLOR_BLACK_ARGB
polyline.jointType = JointType.ROUND
}
Приведенный выше код задает пользовательскую битовую карту для начала ломаной линии типа А, а также ориентировочную толщину линии, равную 10 пикселям. API масштабирует битовую карту с учетом ориентировочной толщины линии. Укажите толщину линии, которую вы использовали при создании битовой карты в исходном размере изображения. Чтобы указать толщину линии с учетом размера изображения, откройте битовую карту в графическом редакторе в масштабе 100 %.
Подробнее о начальных и конечных точках, а также других вариантах персонализации фигур…
Обработка событий кликов для ломаной линии
Чтобы сделать ломаную линию кликабельной, вызовите метод
Polyline.setClickable(). По умолчанию ломаные линии не интерактивны, а приложение не получает уведомления, если пользователь нажимает на линию.Реализуйте интерфейс
OnPolylineClickListenerи вызовите методGoogleMap.setOnPolylineClickListener(), чтобы добавить прослушиватель на карту:Java
public class PolyActivity extends AppCompatActivity implements OnMapReadyCallback, GoogleMap.OnPolylineClickListener, GoogleMap.OnPolygonClickListener { @Override protected void onCreate(Bundle savedInstanceState) { super.onCreate(savedInstanceState); // Retrieve the content view that renders the map. setContentView(R.layout.activity_maps); // Get the SupportMapFragment and request notification when the map is ready to be used. SupportMapFragment mapFragment = (SupportMapFragment) getSupportFragmentManager() .findFragmentById(R.id.map); mapFragment.getMapAsync(this); } /** * Manipulates the map when it's available. * The API invokes this callback when the map is ready to be used. * This is where we can add markers or lines, add listeners or move the camera. * In this tutorial, we add polylines and polygons to represent routes and areas on the map. */ @Override public void onMapReady(GoogleMap googleMap) { // Add polylines to the map. // Polylines are useful to show a route or some other connection between points. Polyline polyline1 = googleMap.addPolyline(new PolylineOptions() .clickable(true) .add( new LatLng(-35.016, 143.321), new LatLng(-34.747, 145.592), new LatLng(-34.364, 147.891), new LatLng(-33.501, 150.217), new LatLng(-32.306, 149.248), new LatLng(-32.491, 147.309))); // Position the map's camera near Alice Springs in the center of Australia, // and set the zoom factor so most of Australia shows on the screen. googleMap.moveCamera(CameraUpdateFactory.newLatLngZoom(new LatLng(-23.684, 133.903), 4)); // Set listeners for click events. googleMap.setOnPolylineClickListener(this); googleMap.setOnPolygonClickListener(this); }Kotlin
class PolyActivity : AppCompatActivity(), OnMapReadyCallback, OnPolylineClickListener, OnPolygonClickListener { override fun onCreate(savedInstanceState: Bundle?) { super.onCreate(savedInstanceState) // Retrieve the content view that renders the map. setContentView(R.layout.activity_maps) // Get the SupportMapFragment and request notification when the map is ready to be used. val mapFragment = supportFragmentManager .findFragmentById(R.id.map) as SupportMapFragment? mapFragment?.getMapAsync(this) } /** * Manipulates the map when it's available. * The API invokes this callback when the map is ready to be used. * This is where we can add markers or lines, add listeners or move the camera. * In this tutorial, we add polylines and polygons to represent routes and areas on the map. */ override fun onMapReady(googleMap: GoogleMap) { // Add polylines to the map. // Polylines are useful to show a route or some other connection between points. val polyline1 = googleMap.addPolyline(PolylineOptions() .clickable(true) .add( LatLng(-35.016, 143.321), LatLng(-34.747, 145.592), LatLng(-34.364, 147.891), LatLng(-33.501, 150.217), LatLng(-32.306, 149.248), LatLng(-32.491, 147.309))) // Position the map's camera near Alice Springs in the center of Australia, // and set the zoom factor so most of Australia shows on the screen. googleMap.moveCamera(CameraUpdateFactory.newLatLngZoom(LatLng(-23.684, 133.903), 4f)) // Set listeners for click events. googleMap.setOnPolylineClickListener(this) googleMap.setOnPolygonClickListener(this) }Переопределите метод обратного вызова
onPolylineClick(). Пример кода, где вид ломаной линии меняется со сплошного на пунктирный или обратно каждый раз, когда пользователь нажимает на нее:Java
private static final int PATTERN_GAP_LENGTH_PX = 20; private static final PatternItem DOT = new Dot(); private static final PatternItem GAP = new Gap(PATTERN_GAP_LENGTH_PX); // Create a stroke pattern of a gap followed by a dot. private static final List<PatternItem> PATTERN_POLYLINE_DOTTED = Arrays.asList(GAP, DOT); /** * Listens for clicks on a polyline. * @param polyline The polyline object that the user has clicked. */ @Override public void onPolylineClick(Polyline polyline) { // Flip from solid stroke to dotted stroke pattern. if ((polyline.getPattern() == null) || (!polyline.getPattern().contains(DOT))) { polyline.setPattern(PATTERN_POLYLINE_DOTTED); } else { // The default pattern is a solid stroke. polyline.setPattern(null); } Toast.makeText(this, "Route type " + polyline.getTag().toString(), Toast.LENGTH_SHORT).show(); }Kotlin
private val PATTERN_GAP_LENGTH_PX = 20 private val DOT: PatternItem = Dot() private val GAP: PatternItem = Gap(PATTERN_GAP_LENGTH_PX.toFloat()) // Create a stroke pattern of a gap followed by a dot. private val PATTERN_POLYLINE_DOTTED = listOf(GAP, DOT) /** * Listens for clicks on a polyline. * @param polyline The polyline object that the user has clicked. */ override fun onPolylineClick(polyline: Polyline) { // Flip from solid stroke to dotted stroke pattern. if (polyline.pattern == null || !polyline.pattern!!.contains(DOT)) { polyline.pattern = PATTERN_POLYLINE_DOTTED } else { // The default pattern is a solid stroke. polyline.pattern = null } Toast.makeText(this, "Route type " + polyline.tag.toString(), Toast.LENGTH_SHORT).show() }
Представление областей на карте с помощью многоугольников
Многоугольник (Polygon) – это фигура, состоящая из упорядоченной последовательности координат, как и ломаная линия (Polyline). Разница только в том, что многоугольник – закрытая фигура, которую можно заполнить заливкой.
Создайте объект
PolygonOptionsи добавьте к нему точки. Каждая точка соответствует местоположению на карте, которое вы определяете с помощью объектаLatLngс указанием широты и долготы. Ниже приведен пример кода для многоугольника из четырех точек.Чтобы сделать многоугольник кликабельным, вызовите метод
Polygon.setClickable(). По умолчанию многоугольники не интерактивны, а приложение не получает уведомления, если пользователь нажимает на фигуру. События кликов для многоугольников обрабатываются так же, как и для ломаных линий. См. выше.Чтобы добавить многоугольник на карту, вызовите
GoogleMap.addPolygon().Чтобы сохранить объект данных для многоугольника, вызовите метод
Polygon.setTag(). Приведенный ниже код определяет произвольный тип (alpha) для многоугольника.Java
// Add polygons to indicate areas on the map. Polygon polygon1 = googleMap.addPolygon(new PolygonOptions() .clickable(true) .add( new LatLng(-27.457, 153.040), new LatLng(-33.852, 151.211), new LatLng(-37.813, 144.962), new LatLng(-34.928, 138.599))); // Store a data object with the polygon, used here to indicate an arbitrary type. polygon1.setTag("alpha");Kotlin
// Add polygons to indicate areas on the map. val polygon1 = googleMap.addPolygon(PolygonOptions() .clickable(true) .add( LatLng(-27.457, 153.040), LatLng(-33.852, 151.211), LatLng(-37.813, 144.962), LatLng(-34.928, 138.599))) // Store a data object with the polygon, used here to indicate an arbitrary type. polygon1.tag = "alpha" // Style the polygon.
Собственный стиль многоугольника
В объекте PolygonOptions вы можете задавать различные свойства стиля, например цвет линии, ее толщину и начертание, тип соединения и цвет заливки. Если какое-либо свойство не определено, API будет использовать вариант по умолчанию.
Приведенный ниже код задает определенные цвета и начертание линий в зависимости от типа многоугольника – произвольного свойства в объекте данных для фигуры.
Java
private static final int COLOR_WHITE_ARGB = 0xffffffff;
private static final int COLOR_DARK_GREEN_ARGB = 0xff388E3C;
private static final int COLOR_LIGHT_GREEN_ARGB = 0xff81C784;
private static final int COLOR_DARK_ORANGE_ARGB = 0xffF57F17;
private static final int COLOR_LIGHT_ORANGE_ARGB = 0xffF9A825;
private static final int POLYGON_STROKE_WIDTH_PX = 8;
private static final int PATTERN_DASH_LENGTH_PX = 20;
private static final PatternItem DASH = new Dash(PATTERN_DASH_LENGTH_PX);
// Create a stroke pattern of a gap followed by a dash.
private static final List<PatternItem> PATTERN_POLYGON_ALPHA = Arrays.asList(GAP, DASH);
// Create a stroke pattern of a dot followed by a gap, a dash, and another gap.
private static final List<PatternItem> PATTERN_POLYGON_BETA =
Arrays.asList(DOT, GAP, DASH, GAP);
/**
* Styles the polygon, based on type.
* @param polygon The polygon object that needs styling.
*/
private void stylePolygon(Polygon polygon) {
String type = "";
// Get the data object stored with the polygon.
if (polygon.getTag() != null) {
type = polygon.getTag().toString();
}
List<PatternItem> pattern = null;
int strokeColor = COLOR_BLACK_ARGB;
int fillColor = COLOR_WHITE_ARGB;
switch (type) {
// If no type is given, allow the API to use the default.
case "alpha":
// Apply a stroke pattern to render a dashed line, and define colors.
pattern = PATTERN_POLYGON_ALPHA;
strokeColor = COLOR_DARK_GREEN_ARGB;
fillColor = COLOR_LIGHT_GREEN_ARGB;
break;
case "beta":
// Apply a stroke pattern to render a line of dots and dashes, and define colors.
pattern = PATTERN_POLYGON_BETA;
strokeColor = COLOR_DARK_ORANGE_ARGB;
fillColor = COLOR_LIGHT_ORANGE_ARGB;
break;
}
polygon.setStrokePattern(pattern);
polygon.setStrokeWidth(POLYGON_STROKE_WIDTH_PX);
polygon.setStrokeColor(strokeColor);
polygon.setFillColor(fillColor);
}
Kotlin
private val COLOR_WHITE_ARGB = -0x1
private val COLOR_DARK_GREEN_ARGB = -0xc771c4
private val COLOR_LIGHT_GREEN_ARGB = -0x7e387c
private val COLOR_DARK_ORANGE_ARGB = -0xa80e9
private val COLOR_LIGHT_ORANGE_ARGB = -0x657db
private val POLYGON_STROKE_WIDTH_PX = 8
private val PATTERN_DASH_LENGTH_PX = 20
private val DASH: PatternItem = Dash(PATTERN_DASH_LENGTH_PX.toFloat())
// Create a stroke pattern of a gap followed by a dash.
private val PATTERN_POLYGON_ALPHA = listOf(GAP, DASH)
// Create a stroke pattern of a dot followed by a gap, a dash, and another gap.
private val PATTERN_POLYGON_BETA = listOf(DOT, GAP, DASH, GAP)
/**
* Styles the polygon, based on type.
* @param polygon The polygon object that needs styling.
*/
private fun stylePolygon(polygon: Polygon) {
// Get the data object stored with the polygon.
val type = polygon.tag?.toString() ?: ""
var pattern: List<PatternItem>? = null
var strokeColor = COLOR_BLACK_ARGB
var fillColor = COLOR_WHITE_ARGB
when (type) {
"alpha" -> {
// Apply a stroke pattern to render a dashed line, and define colors.
pattern = PATTERN_POLYGON_ALPHA
strokeColor = COLOR_DARK_GREEN_ARGB
fillColor = COLOR_LIGHT_GREEN_ARGB
}
"beta" -> {
// Apply a stroke pattern to render a line of dots and dashes, and define colors.
pattern = PATTERN_POLYGON_BETA
strokeColor = COLOR_DARK_ORANGE_ARGB
fillColor = COLOR_LIGHT_ORANGE_ARGB
}
}
polygon.strokePattern = pattern
polygon.strokeWidth = POLYGON_STROKE_WIDTH_PX.toFloat()
polygon.strokeColor = strokeColor
polygon.fillColor = fillColor
}
Подробнее о начертании, а также других вариантах настройки внешнего вида фигур…
Дальнейшие действия
Прочитайте статью об объекте круг. Он похож на многоугольник, но у него есть свойства, определяющие форму круга.