

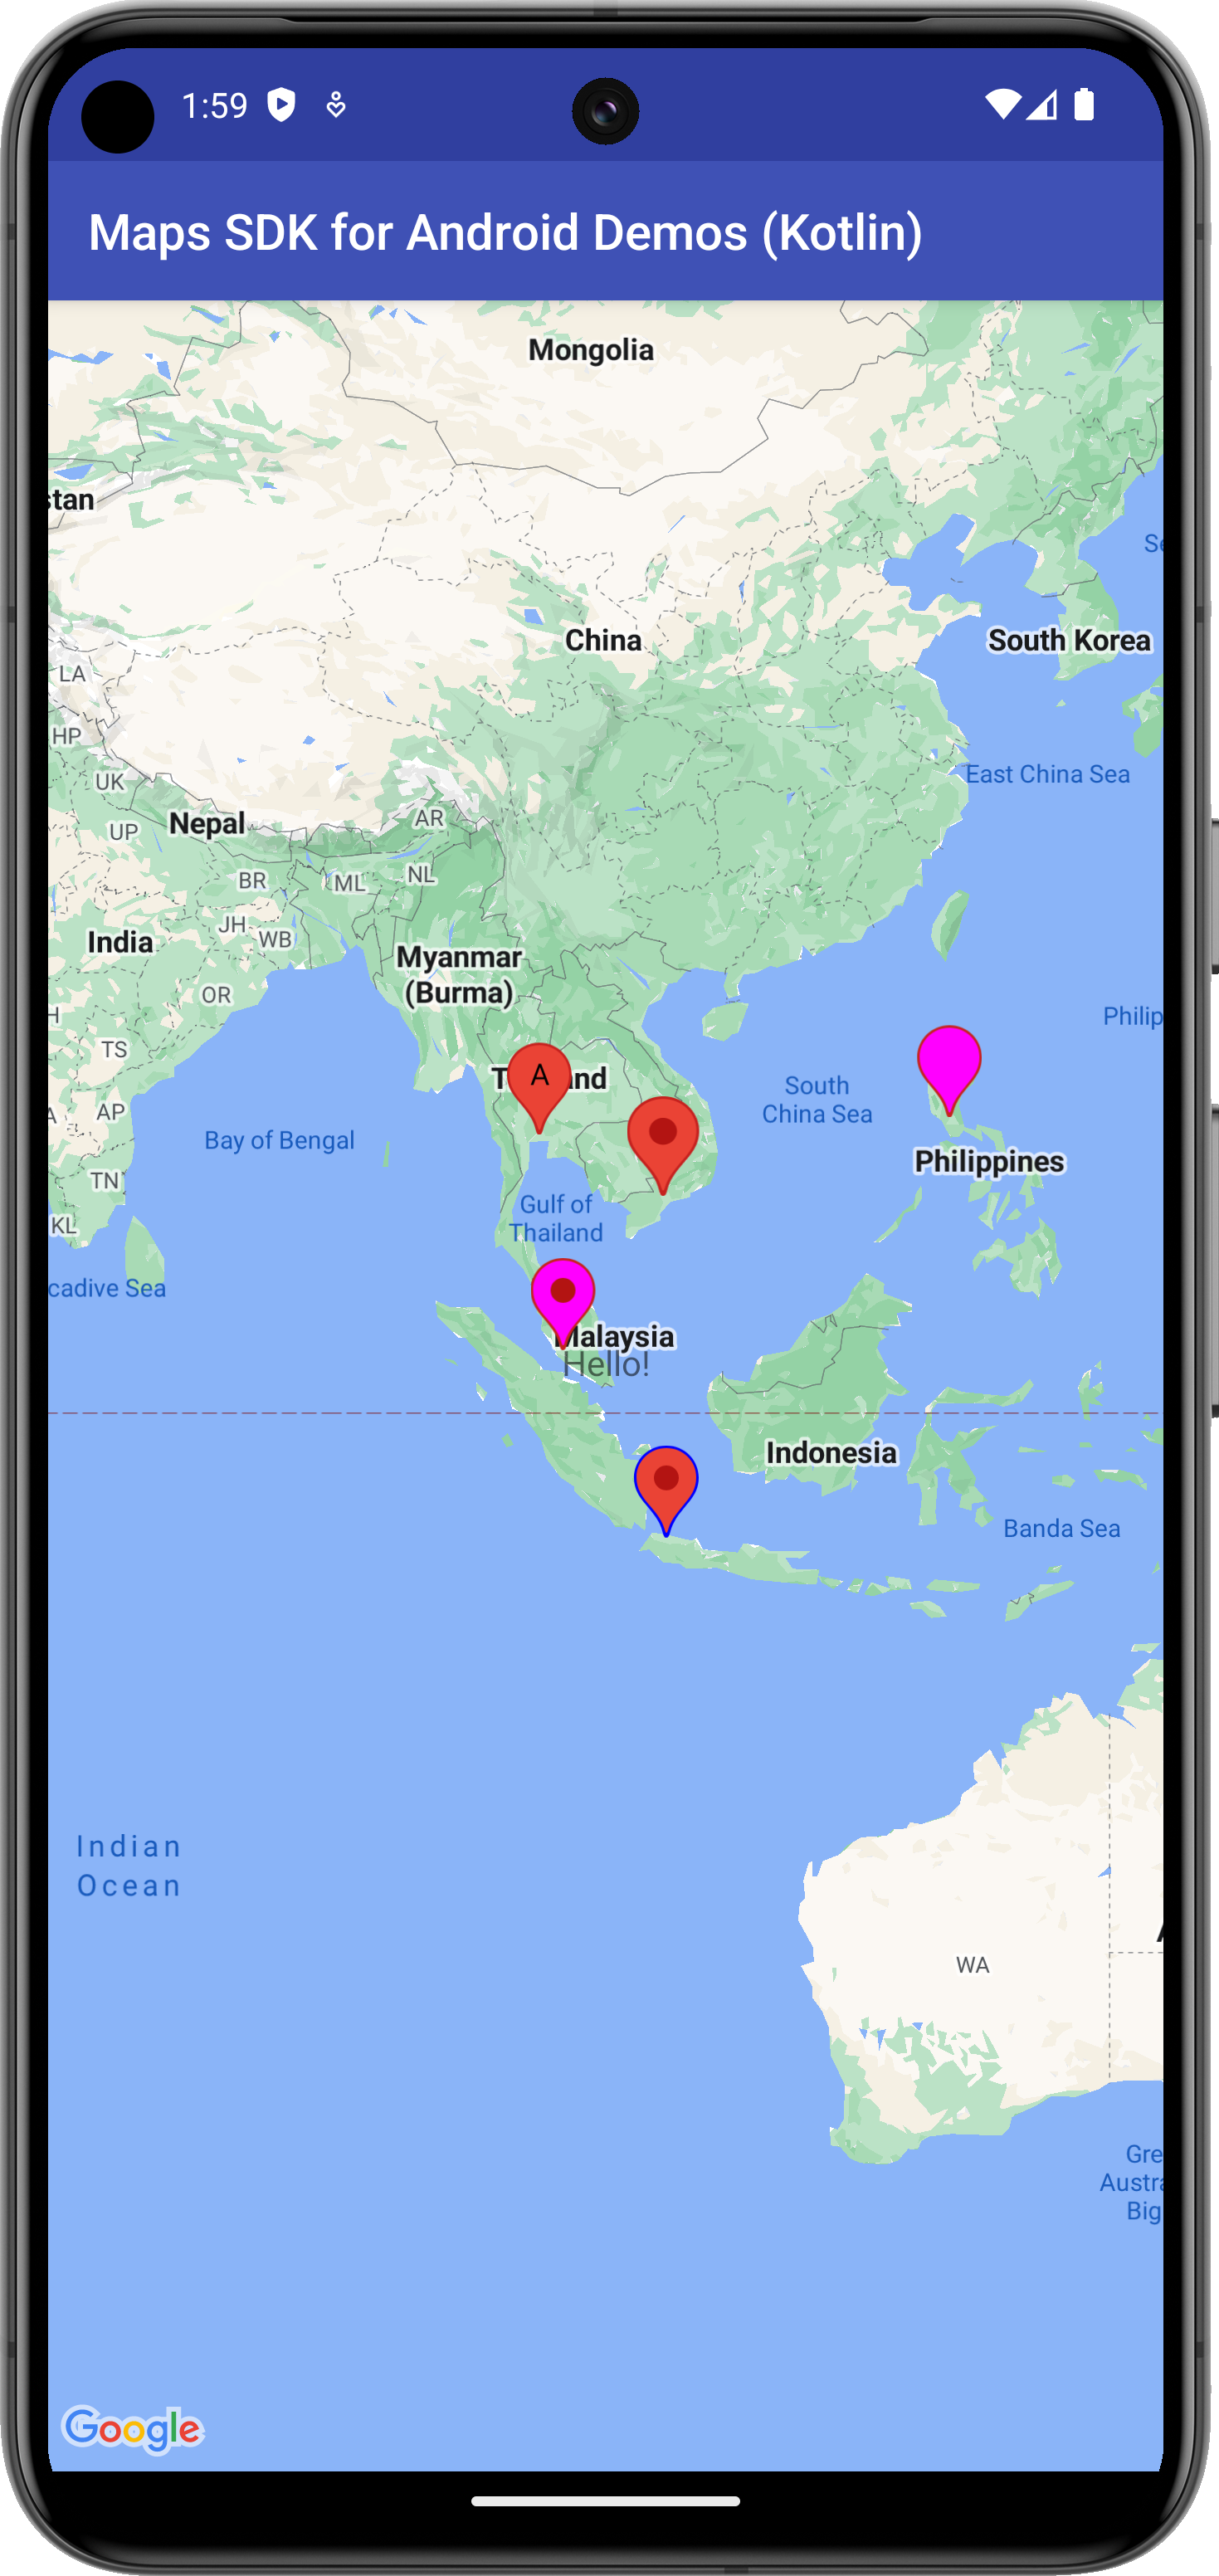
این مثال مکانی را روی نقشه با نشانگر پیشرفته شناسایی میکند و برخیاز قابلیتهای نشانگرهای پیشرفته را نشان میدهد.
برای اطلاعات بیشتر، به مستندات مراجعه کنید.
شروع کنید
قبلاز اینکه بتوانید کد نمونه را امتحان کنید، باید محیط توسعهتان را پیکربندی کنید. برای اطلاعات بیشتر، نمونههای کد کیت توسعه نرمافزار Google Maps برای Android را ببینید.
مشاهده کد
Kotlin
class AdvancedMarkersDemoActivity : SamplesBaseActivity(), OnMapReadyCallback { /** * This method is called when the activity is first created. * * It sets up the activity's layout and then initializes the map. * * The key logic here is to check if the developer has provided a Map ID in the * `strings.xml` file. * * If the `R.string.map_id` value is not the default "DEMO_MAP_ID", it means a * custom Map ID has been provided. In this case, we can rely on the simpler setup * where the `SupportMapFragment` is inflated directly from the XML layout, and it * will automatically use the Map ID from the string resource. * * However, if the `R.string.map_id` is still the default value, we fall back to a * programmatic setup. This involves: * 1. Retrieving the Map ID from the `secrets.properties` file, which is managed by the * `ApiDemoApplication` class. * 2. Creating a `GoogleMapOptions` object. * 3. Explicitly setting the retrieved `mapId` on the `GoogleMapOptions`. This step is * **critical** because Advanced Markers will not work without a valid Map ID. * 4. Creating a new `SupportMapFragment` instance with these options and replacing the * placeholder fragment in the layout. * * This dual approach ensures that the demo can run seamlessly while also providing a * clear path for developers to use their own Map IDs, which is a requirement for using * Advanced Markers. */ /** * This method is called when the activity is first created. * * It sets up the activity's layout and then initializes the map. * * The key logic here is to check if the developer has provided a Map ID in the * `strings.xml` file. * * If the `R.string.map_id` value is not the default "DEMO_MAP_ID", it means a * custom Map ID has been provided. In this case, we can rely on the simpler setup * where the `SupportMapFragment` is inflated directly from the XML layout, and it * will automatically use the Map ID from the string resource. * * However, if the `R.string.map_id` is still the default value, we fall back to a * programmatic setup. This involves: * 1. Retrieving the Map ID from the `secrets.properties` file, via the * `ApiDemoApplication.mapId` property. * 2. Creating a `GoogleMapOptions` object. * 3. Explicitly setting the retrieved `mapId` on the `GoogleMapOptions`. This step is * **critical** because Advanced Markers will not work without a valid Map ID. * 4. Creating a new `SupportMapFragment` instance with these options and replacing the * placeholder fragment in the layout. * * This dual approach ensures that the demo can run seamlessly while also providing a * clear path for developers to use their own Map IDs, which is a requirement for using * Advanced Markers. */ override fun onCreate(savedInstanceState: Bundle?) { super.onCreate(savedInstanceState) setContentView(R.layout.advanced_markers_demo) if (getString(R.string.map_id) != "DEMO_MAP_ID") { val mapFragment = supportFragmentManager.findFragmentById(R.id.map) as SupportMapFragment? mapFragment?.getMapAsync(this) } else { val mapId = (application as ApiDemoApplication).mapId // --- Map ID Check --- if (mapId == null) { finish() return // Exit early if no valid Map ID } // --- Programmatically create and add the map fragment --- val mapOptions = GoogleMapOptions().apply { mapId(mapId) } val mapFragment = SupportMapFragment.newInstance(mapOptions) supportFragmentManager.beginTransaction() .replace(R.id.map, mapFragment) // Use the container ID .commit() mapFragment.getMapAsync(this) } applyInsets(findViewById(R.id.map_container)) } override fun onMapReady(map: GoogleMap) { val bounds = LatLngBounds.builder() .include(SINGAPORE) .include(KUALA_LUMPUR) .include(JAKARTA) .include(BANGKOK) .include(MANILA) .include(HO_CHI_MINH_CITY) .build() map.moveCamera(CameraUpdateFactory.newLatLngBounds(bounds, 120)) val capabilities: MapCapabilities = map.mapCapabilities Log.d(TAG, "are advanced marker enabled?" + capabilities.isAdvancedMarkersAvailable) // 1. Custom View as iconView (Framed circular badge with Android logo) val iconImageView = android.widget.ImageView(this).apply { setImageResource(R.drawable.ic_android) setColorFilter("#3DDC84".toColorInt()) // Android Green setBackgroundResource(R.drawable.bg_marker_badge) val padding = (8 * resources.displayMetrics.density).toInt() setPadding(padding, padding, padding, padding) layoutParams = android.view.ViewGroup.LayoutParams( (44 * resources.displayMetrics.density).toInt(), (44 * resources.displayMetrics.density).toInt() ) } map.addMarker( AdvancedMarkerOptions() .position(SINGAPORE) .iconView(iconImageView) .title("Singapore (Custom Framed Badge)") .zIndex(1f) ) // 2. PinConfig with custom background color val pinConfigMagenta = PinConfig.builder() .setBackgroundColor(Color.MAGENTA) .build() val klMarker = map.addMarker( AdvancedMarkerOptions() .icon(BitmapDescriptorFactory.fromPinConfig(pinConfigMagenta)) .position(KUALA_LUMPUR) .title("Kuala Lumpur (Magenta Pin)") ) klMarker?.showInfoWindow() // 3. PinConfig with custom border color val pinConfigBorder = PinConfig.builder() .setBorderColor(Color.BLUE) .build() map.addMarker( AdvancedMarkerOptions() .icon(BitmapDescriptorFactory.fromPinConfig(pinConfigBorder)) .position(JAKARTA) .title("Jakarta (Blue Border)") ) // 4. PinConfig with text glyph ("A") val pinConfigTextGlyph = PinConfig.builder() .setGlyph(PinConfig.Glyph("A")) .build() map.addMarker( AdvancedMarkerOptions() .icon(BitmapDescriptorFactory.fromPinConfig(pinConfigTextGlyph)) .position(BANGKOK) .title("Bangkok (Text Glyph 'A')") ) // 5. PinConfig with transparent glyph (cutout / donut pin) val pinConfigHole = PinConfig.builder() .setBackgroundColor(Color.MAGENTA) .setGlyph(PinConfig.Glyph(Color.TRANSPARENT)) .build() map.addMarker( AdvancedMarkerOptions() .icon(BitmapDescriptorFactory.fromPinConfig(pinConfigHole)) .position(MANILA) .title("Manila (Transparent Cutout Glyph)") ) // 6. Collision behavior val collisionBehavior = AdvancedMarkerOptions.CollisionBehavior.REQUIRED_AND_HIDES_OPTIONAL map.addMarker( AdvancedMarkerOptions() .position(HO_CHI_MINH_CITY) .collisionBehavior(collisionBehavior) .title("Ho Chi Minh City (Collision Behavior)") ) } }
جاوا
public class AdvancedMarkersDemoActivity extends SamplesBaseActivity implements OnMapReadyCallback { private static final LatLng SINGAPORE = new LatLng(1.3521, 103.8198); private static final LatLng KUALA_LUMPUR = new LatLng(3.1390, 101.6869); private static final LatLng JAKARTA = new LatLng(-6.2088, 106.8456); private static final LatLng BANGKOK = new LatLng(13.7563, 100.5018); private static final LatLng MANILA = new LatLng(14.5995, 120.9842); private static final LatLng HO_CHI_MINH_CITY = new LatLng(10.7769, 106.7009); private static final float ZOOM_LEVEL = 3.5f; private static final String TAG = AdvancedMarkersDemoActivity.class.getName(); /** * This method is called when the activity is first created. * * It sets up the activity's layout and then initializes the map. * * The key logic here is to check if the developer has provided a Map ID in the * `strings.xml` file. * * If the `R.string.map_id` value is not the default "DEMO_MAP_ID", it means a * custom Map ID has been provided. In this case, we can rely on the simpler setup * where the `SupportMapFragment` is inflated directly from the XML layout, and it * will automatically use the Map ID from the string resource. * * However, if the `R.string.map_id` is still the default value, we fall back to a * programmatic setup. This involves: * 1. Retrieving the Map ID from the `secrets.properties` file, which is managed by the * `ApiDemoApplication` class. * 2. Creating a `GoogleMapOptions` object. * 3. Explicitly setting the retrieved `mapId` on the `GoogleMapOptions`. This step is * **critical** because Advanced Markers will not work without a valid Map ID. * 4. Creating a new `SupportMapFragment` instance with these options and replacing the * placeholder fragment in the layout. * * This dual approach ensures that the demo can run seamlessly while also providing a * clear path for developers to use their own Map IDs, which is a requirement for using * Advanced Markers. */ @Override protected void onCreate(Bundle savedInstanceState) { super.onCreate(savedInstanceState); setContentView(com.example.common_ui.R.layout.advanced_markers_demo); if (!getString(com.example.common_ui.R.string.map_id).equals("DEMO_MAP_ID")) { SupportMapFragment mapFragment = (SupportMapFragment) getSupportFragmentManager().findFragmentById(com.example.common_ui.R.id.map); if (mapFragment != null) { mapFragment.getMapAsync(this); } } else { String mapId = ((ApiDemoApplication) getApplication()).getMapId(); if (mapId == null) { finish(); return; } GoogleMapOptions mapOptions = new GoogleMapOptions().mapId(mapId); SupportMapFragment mapFragment = SupportMapFragment.newInstance(mapOptions); getSupportFragmentManager().beginTransaction() .replace(com.example.common_ui.R.id.map, mapFragment) .commit(); mapFragment.getMapAsync(this); } applyInsets(findViewById(com.example.common_ui.R.id.map_container)); } @Override public void onMapReady(GoogleMap map) { LatLngBounds bounds = new LatLngBounds.Builder() .include(SINGAPORE) .include(KUALA_LUMPUR) .include(JAKARTA) .include(BANGKOK) .include(MANILA) .include(HO_CHI_MINH_CITY) .build(); map.moveCamera(CameraUpdateFactory.newLatLngBounds(bounds, 120)); MapCapabilities capabilities = map.getMapCapabilities(); Log.d(TAG, "Are advanced markers enabled? " + capabilities.isAdvancedMarkersAvailable()); // 1. Custom View as iconView (Framed circular badge with Android logo) ImageView iconImageView = new ImageView(this); iconImageView.setImageResource(R.drawable.ic_android); iconImageView.setColorFilter(Color.parseColor("#3DDC84")); // Android Green iconImageView.setBackgroundResource(R.drawable.bg_marker_badge); int padding = (int) (8 * getResources().getDisplayMetrics().density); iconImageView.setPadding(padding, padding, padding, padding); int size = (int) (44 * getResources().getDisplayMetrics().density); iconImageView.setLayoutParams(new ViewGroup.LayoutParams(size, size)); map.addMarker(new AdvancedMarkerOptions() .position(SINGAPORE) .iconView(iconImageView) .title("Singapore (Custom Framed Badge)") .zIndex(1f)); // This uses PinConfig.Builder to create an instance of PinConfig. PinConfig.Builder pinConfigBuilder = PinConfig.builder(); pinConfigBuilder.setBackgroundColor(Color.MAGENTA); PinConfig pinConfig = pinConfigBuilder.build(); // Use the PinConfig instance to set the icon for AdvancedMarkerOptions. AdvancedMarkerOptions advancedMarkerOptions = new AdvancedMarkerOptions() .icon(BitmapDescriptorFactory.fromPinConfig(pinConfig)) .position(KUALA_LUMPUR) .title("Kuala Lumpur (Magenta Pin)"); // Pass the AdvancedMarkerOptions instance to addMarker(). Marker marker = map.addMarker(advancedMarkerOptions); if (marker != null) { marker.showInfoWindow(); } // This sample changes the border color of the advanced marker PinConfig.Builder pinConfigBuilder2 = PinConfig.builder(); pinConfigBuilder2.setBorderColor(Color.BLUE); PinConfig pinConfig2 = pinConfigBuilder2.build(); AdvancedMarkerOptions advancedMarkerOptions2 = new AdvancedMarkerOptions() .icon(BitmapDescriptorFactory.fromPinConfig(pinConfig2)) .position(JAKARTA) .title("Jakarta (Blue Border)"); Marker marker2 = map.addMarker(advancedMarkerOptions2); // Set the glyph text. PinConfig.Builder pinConfigBuilder3 = PinConfig.builder(); PinConfig.Glyph glyphText = new PinConfig.Glyph("A"); // Alternatively, you can set the text color: // Glyph glyphText = new Glyph("A", Color.GREEN); pinConfigBuilder3.setGlyph(glyphText); PinConfig pinConfig3 = pinConfigBuilder3.build(); AdvancedMarkerOptions advancedMarkerOptions3 = new AdvancedMarkerOptions() .icon(BitmapDescriptorFactory.fromPinConfig(pinConfig3)) .position(BANGKOK) .title("Bangkok (Text Glyph 'A')"); Marker marker3 = map.addMarker(advancedMarkerOptions3); // Create a transparent glyph. PinConfig.Builder pinConfigBuilder4 = PinConfig.builder(); pinConfigBuilder4.setBackgroundColor(Color.MAGENTA); pinConfigBuilder4.setGlyph(new PinConfig.Glyph(Color.TRANSPARENT)); PinConfig pinConfig4 = pinConfigBuilder4.build(); AdvancedMarkerOptions advancedMarkerOptions4 = new AdvancedMarkerOptions() .icon(BitmapDescriptorFactory.fromPinConfig(pinConfig4)) .position(MANILA) .title("Manila (Transparent Cutout Glyph)"); Marker marker4 = map.addMarker(advancedMarkerOptions4); // Collision behavior can only be changed in the AdvancedMarkerOptions object. // Changes to collision behavior after a marker has been created are not possible int collisionBehavior = AdvancedMarkerOptions.CollisionBehavior.REQUIRED_AND_HIDES_OPTIONAL; AdvancedMarkerOptions advancedMarkerOptions5 = new AdvancedMarkerOptions() .position(HO_CHI_MINH_CITY) .collisionBehavior(collisionBehavior) .title("Ho Chi Minh City (Collision Behavior)"); Marker marker5 = map.addMarker(advancedMarkerOptions5); } }
نمونهها را کلون و اجرا کنید
برای اجرای این نمونه بهصورت محلی، Git لازم است. فرمان زیر مخزن برنامه نمونه را شبیهسازی میکند.
git clone git@github.com:googlemaps-samples/android-samples.git
پروژه نمونه را به «استودیو Android» وارد کنید:
- در Android Studio، فایل > جدید > وارد کردن پروژه را انتخاب کنید.
به مکانی که مخزن را ذخیره کردهاید بروید و دایرکتوری پروژه را برای Kotlin یا Java انتخاب کنید:
- Kotlin:
PATH-REPO/android-samples/ApiDemos/kotlin - جاوا:
PATH-REPO/android-samples/ApiDemos/java
- Kotlin:
- باز کردن را انتخاب کنید. «استودیو Android» بااستفاده از ابزار ساخت Gradle پروژه شما را میسازد.
- فایل
secrets.propertiesخالی در همان پوشه فایلlocal.propertiesپروژهتان ایجاد کنید. برای کسب اطلاعات بیشتر درباره این فایل، به افزودن کلید API به پروژه مراجعه کنید. - کلید میانای برنامهسازی کاربردی را از پروژهتان با کیت توسعه نرمافزار Google Maps برای Android فعالشده دریافت کنید.
رشته زیر را به
secrets.propertiesاضافه کنید و YOUR_API_KEY را با مقدار کلید میانای برنامهسازی کاربردی خود جایگزین کنید:MAPS_API_KEY=YOUR_API_KEY- برنامه را اجرا کنید.