Page Summary
-
KML 2.2 introduced
<Camera>as a way to specify the observer's viewpoint, similar to<LookAt>but defining the view based on the viewer's position and orientation. -
<Camera>offers full six-degrees-of-freedom control, allowing for tilting and rotating the view around x, y, and z axes. -
<LookAt>is simpler for view directions intersecting the planet, specifying the point of interest, distance, and view angle. -
<Camera>enables positioning the eyepoint anywhere in space and rotating the view in any direction, using<longitude>,<latitude>,<altitude>,<heading>,<tilt>, and<roll>. -
Time information can be included in both
<Camera>and<LookAt>using<gx:TimeSpan>and<gx:TimeStamp>to affect historical imagery, sunlight, and time-tagged objects.
Updated February 2009: added mention of <gx:altitudeMode>, <gx:TimeStamp>, and <gx:TimeSpan>.
Introduced with KML 2.2, <Camera> provides an additional way to specify the observer's viewpoint and associated view parameters. <Camera> is similar to <LookAt>, since both elements define the placement and orientation of a virtual camera that is viewing the Earth. The difference is that LookAt specifies the view in terms of the point of interest that is being viewed. Camera, in contrast, specifies the view in terms of the viewer's position and orientation.
Both <LookAt> and <Camera> are extended from the <AbstractView> element, which is a base abstract type. <Camera> and <LookAt> are identical in how they are used in a KML file—namely, as a child of any element derived from <Feature> (Placemark, ScreenOverlay, GroundOverlay, PhotoOverlay, Folder, Document, NetworkLink) or as a child of <NetworkLinkControl>. You can use either a <Camera> or a <LookAt> within a Feature, but not both at the same time (that is, only one virtual camera can specify the current viewpoint).
Differences between <Camera> and <LookAt>
The new <Camera> element provides additional flexibility in how you specify the view. Most importantly, you can tilt the camera view so that you're looking above the horizon into the sky. <Camera> provides full six-degrees-of-freedom control over the view, so you can position the Camera in space and then rotate it around the x, y, and z axes. If no rotations are specified, the two elements are equivalent:
<Camera>
  <longitude>-121</longitude>
  <latitude>37</latitude>
  <altitude>2000</altitude>
  <altitudeMode>clampToGround</altitudeMode>
</Camera>
<LookAt>
<longitude>-121</longitude>
<latitude>37</latitude>
<altitude>2000</altitude>
<altitudeMode>clampToGround</altitudeMode>
</LookAt>The following section offers a brief review of the <LookAt> element so that you can contrast its use with that of the new <Camera> element.
Review of <LookAt>
The <LookAt> element specifies the point on the Earth that is being viewed, the distance of the viewpoint from the point of interest, and the angle of the view. Here is the syntax for this element:
<LookAt id="ID">
  <longitude></longitude>                       <!-- kml:angle180 -->
  <latitude></latitude>                         <!-- kml:angle90 -->
  <altitude>0</altitude>                        <!-- double -->
  <range></range>                               <!-- double -->
  <tilt>0</tilt>                                <!-- float -->
  <heading>0</heading>                          <!-- float -->
  <altitudeMode>clampToGround</altitudeMode>
           <!--kml:altitudeModeEnum:clampToGround, relativeToGround, absolute -->
           <!-- or, gx:altitudeMode can be substituted: clampToSeaFloor, relativeToSeaFloor -->
</LookAt>
The following diagram illustrates how the <LookAt> viewpoint is constructed:
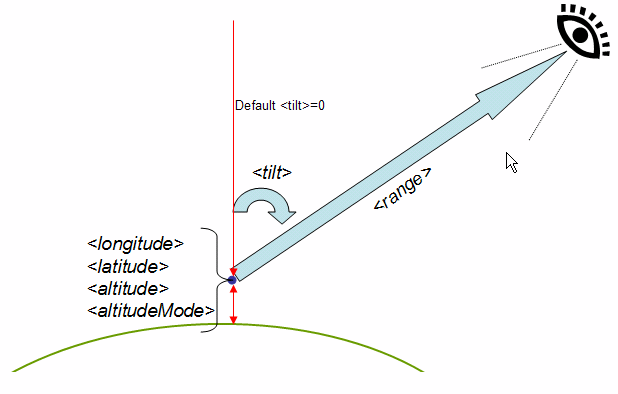
The <LookAt> element specifies answers to the following questions:
Question |
Specification in <LookAt> |
| What point am I looking at? | <longitude>, <latitude>,<altitude>, <altitudeMode> |
| How far away is the viewpoint from the point of interest? | <range> |
| Is the view oriented so that due North is at the top of the view? | If Yes, use default <heading> value of 0. If No, specify a <heading> rotation from >0 to 360° |
| Is the view looking straight down at the Earth? | If Yes, use default<tilt> value. If No, camera is tilted upwards toward the horizon; specify a <tilt> rotation ≤ 90°. 90° is looking straight along the horizon. (You may not see the surface of the Earth at all if you're far away and <tilt> equals 90°.) |
Example
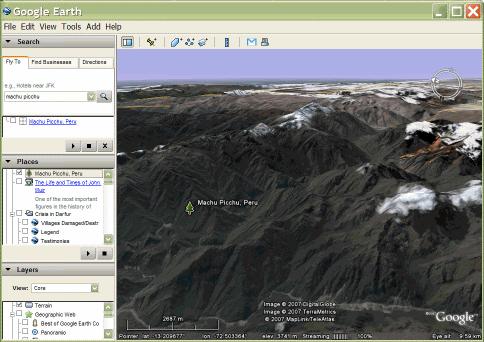
Here is a sample <Placemark> containing a <LookAt> element:
<Placemark>
  <name>Machu Picchu, Peru</name>
  <LookAt>
    <longitude>-72.503364</longitude>
    <latitude>-13.209676</latitude>
    <altitude>0</altitude>
    <range>14794.882995</range>
    <tilt>66.768762</tilt>
    <heading>71.131493</heading>
  </LookAt>
  <styleUrl>#msn_icon12</styleUrl>
  <Point>
    <coordinates>-72.516244,-13.162806,0</coordinates>
  </Point>
</Placemark>
And here is the Placemark shown in Google Earth:
If your view direction intersects the planet, use a <LookAt> element, since it's slightly easier to specify than <Camera>.
Child Elements of <Camera>
The <Camera> element offers the ability to position the eyepoint anywhere in space and rotate the view in any direction. Here is the syntax for this element:
<Camera id="ID">
  <longitude>0</longitude>          <!-- kml:angle180 -->
  <latitude>0</latitude>            <!-- kml:angle90 -->
  <altitude>0</altitude>            <!-- double -->
  <heading>0</heading>              <!-- kml:angle360 -->
  <tilt>0</tilt>                    <!-- kml:anglepos180 -->
  <roll>0</roll>                    <!-- kml:angle180 -->
  <altitudeMode>clampToGround</altitudeMode>
       <!-- kml:altitudeModeEnum: relativeToGround, clampToGround, or absolute -->
       <!-- or, gx:altitudeMode can be substituted: clampToSeaFloor, relativeToSeaFloor -->
</Camera>
The <Camera> element specifies answers to the following questions:
Question |
Specification in <Camera> |
| Where is the camera located in space? | Position the camera at the point specified by <longitude>, <latitude>, <altitude>, and <altitudeMode>. In general, it is a poor choice to put a camera on the ground. |
| Is the camera oriented so that North is at the top of the view? | If Yes, use the default <heading> value of 0. If No, rotate the camera from >0 to 360°, according to points of the compass. |
| Is the camera looking straight down at the Earth? | If Yes, use the default <tilt> value of 0. If No, rotate the camera from 0 to 180° to specify the angle of rotation around the X axis. (Negative values for <tilt> are allowed, but these result in a view that is upside down.) |
| Is the camera level as it views the scene? | If Yes, use the default <roll> value of 0. Note: the value for <roll> when it is used as a child of <Camera> is usually 0. You can specify a value between −180 and +180°, but this usage is rare. |
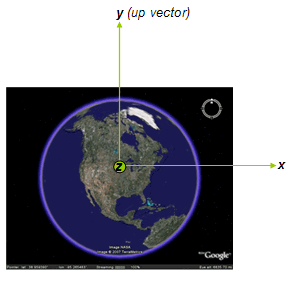
The following diagram shows the X, Y, and Z axes, which are attached to the virtual camera.
- The X axis points toward the right of the camera and is called the right vector.
- The Y axis defines the "up" direction relative to the screen and is called the up vector.
- The Z axis points from the center of the screen toward the eye point. The camera looks down the −Z axis, which is called the view vector.
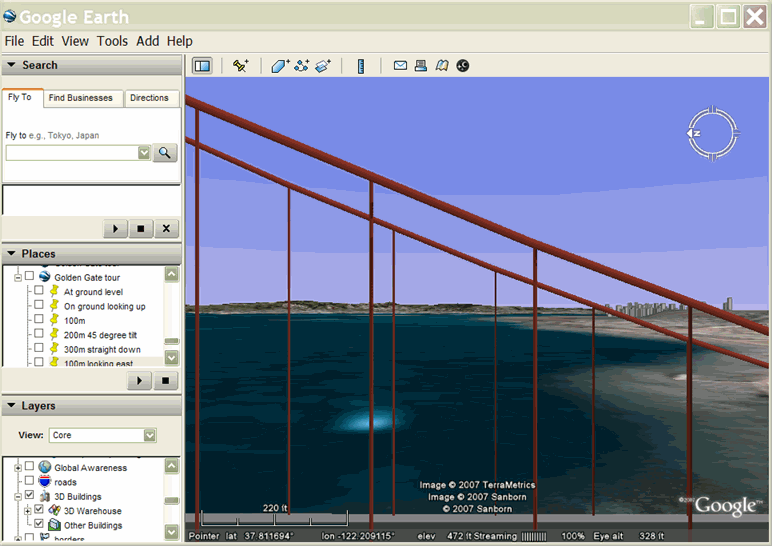
Here is an example of setting up a <Camera> as the starting viewpoint within a <Document>:
<kml xmlns="http://www.opengis.net/kml/2.2">
  <Document>
    <name>Golden Gate tour</name>
    <open>1</open>
    <Camera>
      <longitude>-122.4790</longitude>
      <latitude>37.8110</latitude>
      <altitude>127</altitude>
      <heading>18.0</heading>
      <tilt>85</tilt>
      <altitudeMode>absolute</altitudeMode>
    </Camera>
  </Document>
</kml>
Here is what this viewpoint shows in Google Earth:

Time in AbstractViews
<Camera> and <LookAt> can both contain time information, which affects the historical imagery, sunlight, and any time-tagged objects. <gx:TimeSpan> and <gx:TimeStamp> are used within AbstractViews, and are contained within the Google extension namespace. For more information, please refer to the Time with AbstractViews section of the Time and Animation chapter.
Examples
The following examples illustrate different <Camera> rotations.
Heading
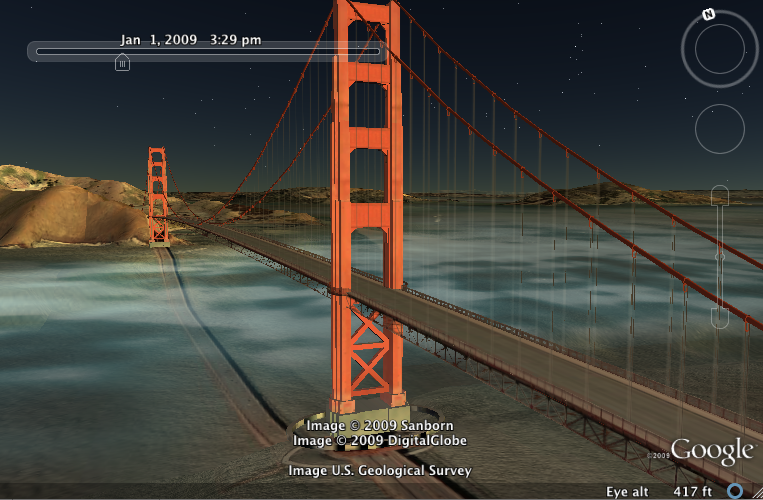
This example shows a <Camera> with a heading of 90 degrees (East) and a tilt of 90 degrees (looking toward the horizon). The Camera is placed at an altitude of 100 meters.
<kml xmlns="http://www.opengis.net/kml/2.2">
<Document>
  <Placemark>
    <name>100m looking east</name>
    <Camera>
      <longitude>-122.4783</longitude>
      <latitude>37.8120</latitude>
      <altitude>100</altitude>
      <heading>90</heading>
      <!-- east -->
      <tilt>90</tilt>
      <!-- level -->
      <altitudeMode>absolute</altitudeMode>
    </Camera>
  </Placemark>
</Document>
</kml>
Here is the result in Google Earth:
Tilt
The following example uses a <Camera> with a tilt equal to 90 degrees, which is looking toward the horizon. It uses default values for <heading>, <altitude>, <altitudeMode>, and <roll>.
The <Camera> does contain a <gx:TimeStamp> value; this affects historical imagery and sunlight, as well as the display of any time-tagged objects. In the image below, sunlight has been turned on and the <Camera> is viewing the location at 3:29pm, UTC on January 1st, 2009 (7:30am, local time).
<kml xmlns="http://www.opengis.net/kml/2.2"
 xmlns:gx="http://www.google.com/kml/ext/2.2">
  <Document>
    <Placemark>
      <name>At ground level</name>
      <Camera>
        <gx:TimeStamp><
          when>2009-01-01T15:29:27Z</when>
        </gx:TimeStamp>
        <longitude>-122.4783</longitude>
        <latitude>37.8120</latitude>
        <!-- altitude default is 0 (default altitudeMode is clampToGround) -->
        <!-- heading default is 0 (north) -->
        <tilt>90</tilt>
        <!-- level -->
        <!-- roll default is 0 -->
        <!-- altitudeMode default is clampToGround -->
      </Camera>
    </Placemark>
  </Document>
</kml>
Here is what this viewpoint shows in Google Earth:
Roll
This example includes a <roll> element with a value of 45 degrees, which causes the camera to roll to the left.
<kml xmlns="http://www.opengis.net/kml/2.2"
 xmlns:gx="http://www.google.com/kml/ext/2.2">
  <Document>
    <Placemark>
      <name>Roll left</name>
      <Camera>
        <gx:TimeStamp><
          when>2009-01-01T15:29:27Z</when>
        </gx:TimeStamp>
        <longitude>-122.4783</longitude>
        <latitude>37.8120</latitude>
        <altitude>100</altitude>
        <heading>90</heading>
        <!-- east -->
        <tilt>90</tilt>
        <!-- level -->
        <roll>45</roll>
        <altitudeMode>absolute</altitudeMode>
      </Camera>
    </Placemark>
  </Document>
</kml>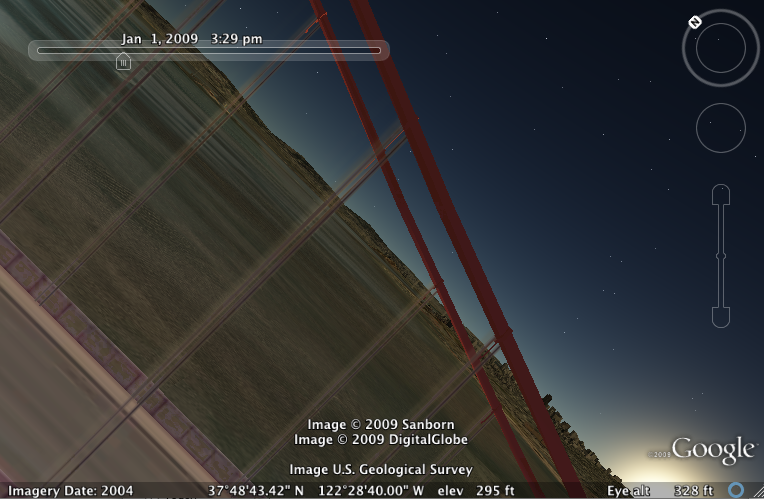
Order of Transformations
The order of rotation is important. By default, the camera is looking straight down the −Z axis toward the Earth. Before rotations are performed, the camera is translated along the Z axis to <altitude>. The order of transformations is as follows:
- <altitude> - translate along the Z axis to <altitude>
- <heading> - rotate around the Z axis.
- <tilt> - rotate around the X axis.
- <roll> - rotate around the Z axis (again).
Note that each time a rotation is applied, two of the camera axes change their orientation.