Page Summary
-
Google Sites provides a free and easy platform to share your KML files with the world.
-
The process involves creating a Google account, uploading KML/KMZ files to your Google Site, and optionally creating a Network Link for automatic connection.
-
You can enhance your site by adding descriptions, updating files dynamically, and collaborating with others.
-
By following these steps, your geographic data gains wider visibility and becomes accessible to everyone.
June 2010
Introduction
This is a re-write of an article that orginally appeared when Google Pages was still an active product. As Pages has now become Sites, this has been updated for Google Sites
Ever wonder how to put KML files on the Web and share them with people? Do you know how to edit a KML file but not a web page? You're in luck. Google Sites allows you to easily create and edit web pages. With this free service, you can also upload any type of file and make it available on the Internet. Couple that with the ease and power of creating KML files, and you have an easy, free platform for sharing your geographic data with the world.
This article walks you through the process of creating a Google Sites account, uploading your KML files to it, and making the KML available to the Internet-at-large through the use of a Network Link file. Once you've completed the simple steps outlined here, you will have a public, personalized web presence for your KML files.
Step 1: Create a Google account
Google Sites accounts are linked to Google accounts. If you have a Google account, log in at http://pages.google.com. If not, go to http://mail.google.com/mail/signup and sign up for one. Then go to http://sites.google.com and create a site.
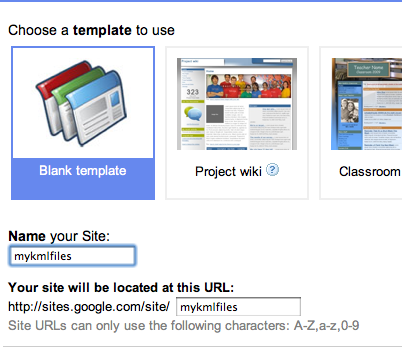
Figure 1: Creating a site
Step 2: Create some KML
Create some KML files. If you have all your KML in one big file, it will be easier to link to all your content at once. Alternatively, you can group your KML into smaller files that are more logically grouped. It is also easiest to package all your files up into a KMZ file.
Step 3: Upload your KML
When you create a Site, your browser will open the site at your home page. If you chose a blank template, it'll be a blank page. In the upper right, you'll see a button that says Create a Page. Click that button. You'll be asked to choose what time of page it is, and to name your page. Choose Web Page for the page type. You could name it something simple like KML Files, or anything you want.
Once you create the page, you'll be redirected to that page, in edit mode. Click on Attachments at the bottom of the page and then click on the button labeled Choose File. Choose the KML or KMZ file you're going to upload. If you have more files to upload, keep attaching files. Otherwise, click the Save button in the upper right corner.
That's it, you've now published KML on the web. Anyone can go to the page http://sites.google.com/site/yoursitename/yourpagename and download your files
The remaining steps are optional
Optional Step 4: Create a NetworkLink file
Now you need to create a way for people to connect to that file automatically. In KML, this is done with a Network Link file. Open your favorite text editor, such as Notepad, Textmate or vi, and create a new file. Type the following:
<?xml version="1.0" encoding="UTF-8"?>
<kml xmlns="http://www.opengis.net/kml/2.2">
  <NetworkLink>
    <Link>
      <href>http://sites.google.com/site/yoursitename/yourpagename/yourkmlfilename.kmz</href>
    </Link>
  </NetworkLink>
</kml>
Save the file. Make sure the file extension is .kml:
mykmlfile.kml.
Optional Step 5: Upload your Network Link
Upload your Network Link file just as you uploaded your KML file in Step 3.
For a more dynamic experience, see the next step.
Optional Step 6: Create a home page
Google Sites allows you to customize your website. You should at minimum put some descriptive text on the page containing the KML files. Check out this Overview of Google Sites for more info on gettings started.
Optional Step 7: Update your files
A Network Link file is interesting, but to get the best results, continue to update your files. For instance, if you create more related KML, add it to the appropriate KML file. Then upload your changed file, as you did in Step 3. The new file automatically overwrites the old, so the next time a Network Link is refreshed, new content will be displayed.
Optional Step 8: Collaborate
Google Sites has built in collaboration tools. While editing a Site, click on the More actions button in the top right, and select Manage this Site. This allows you a variety of options for collaborating with other people, including limiting access to the site, or allowing others to contribute files and edit pages. If you have friends or colleagues you want to be able to upload content to the site, invite them to be collaborators on the site.
Conclusion
If you've followed the steps outlined in this article, you now have a web presence for your geographic data, giving your KML files wider visibility. In short, your files are now available to the world.