2010 年 12 月
目標
本教學課程將介紹 Google 地球 6.0 推出的幾項新 KML 元素,以及如何使用這些元素為 LineStyle 建立複雜的製圖。您將瞭解的元素包括 <gx:physicalWidth>、<gx:outerColor>、<gx:outerWidth> 和 <gx:drawOrder>。
簡介
在 Google 地球 6.0 版發布前,您只能為 LineString 定義複雜的製圖樣式。舉例來說,如果您想為道路建立樣式,讓 LineString 的中心與邊緣顏色不同,就必須繪製兩個寬度不同的 LineString,但即使這樣,也無法保證繪製順序。
下列範例將逐步說明如何建立道路。首先,道路會採用簡單樣式。接著新增人行道。最後,您要新增高速公路天橋。
基本道路
第一個感興趣的元素是 <gx:physicalWidth>,可讓您以公尺為單位設定 LineString 的寬度,而非像素。以道路為例,這表示無論使用者從哪個高度查看道路,您都可以設定道路寬度,使其與底層圖像相符。隨著高度增加,道路的像素會減少,因此只有在近距離縮放時,才能看到 LineString。如果您不想從遠處強調顯示小型道路,或是想確保地圖繪製內容一律與衛星影像相符,這項功能就非常實用。
<?xml version="1.0" encoding="UTF-8"?>
<kml xmlns="http://www.opengis.net/kml/2.2" xmlns:gx="http://www.google.com/kml/ext/2.2" xmlns:kml="http://www.opengis.net/kml/2.2" xmlns:atom="http://www.w3.org/2005/Atom">
<Document>
  <name>Road Styling</name>
  <Style id="street">
    <LineStyle>
      <color>ff235523</color>
      <gx:physicalWidth>12</gx:physicalWidth>
    </LineStyle>
  </Style>
  <Placemark>
    <styleUrl>#street</styleUrl>
    <LineString>
      <coordinates>
      -122.2442883478408,37.4347536724074,0
      -122.2417741446485,37.43594997501623,0
      -122.2414951359056,37.43611878445952,0
      </coordinates>
    </LineString>
  </Placemark>
</Document>
</kml>
 在 Google 地球中變更攝影機高度時,請注意攝影機高度如何隨時與基礎圖像的寬度緊密相符。
新增人行道
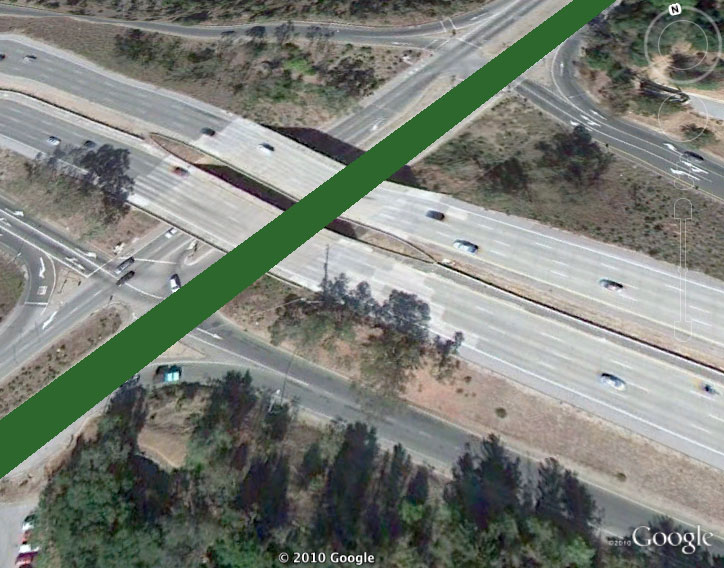
現在,您可以在道路邊緣新增淺綠色,表示人行道,藉此加入 <gx:outerColor> 和 <gx:outerWidth> 元素。將道路總像素的 25% 設為淺灰色。
<?xml version="1.0" encoding="UTF-8"?>
<kml xmlns="http://www.opengis.net/kml/2.2" xmlns:gx="http://www.google.com/kml/ext/2.2" xmlns:kml="http://www.opengis.net/kml/2.2" xmlns:atom="http://www.w3.org/2005/Atom">
<Document>
  <name>Road Styling</name>
  <Style id="street_sidewalk">
    <LineStyle>
      <color>ff235523</color>
      <gx:physicalWidth>12</gx:physicalWidth>
      <gx:outerColor>ff55ff55</gx:outerColor>
      <gx:outerWidth>0.25</gx:outerWidth>
    </LineStyle>
  </Style>
  <Placemark>
    <styleUrl>#street_sidewalk</styleUrl>
    <LineString>
      <coordinates>
      -122.2442883478408,37.4347536724074,0
      -122.2417741446485,37.43594997501623,0
      -122.2414951359056,37.43611878445952,0
      </coordinates>
    </LineString>
  </Placemark>
</Document>
</kml>
 由於道路寬度設為 12 公尺,因此 outerWidth 的值為 .25 時,表示寬度中的 3 公尺會設為淺綠色 (道路兩側各約 1.5 公尺)。
高速公路高架橋
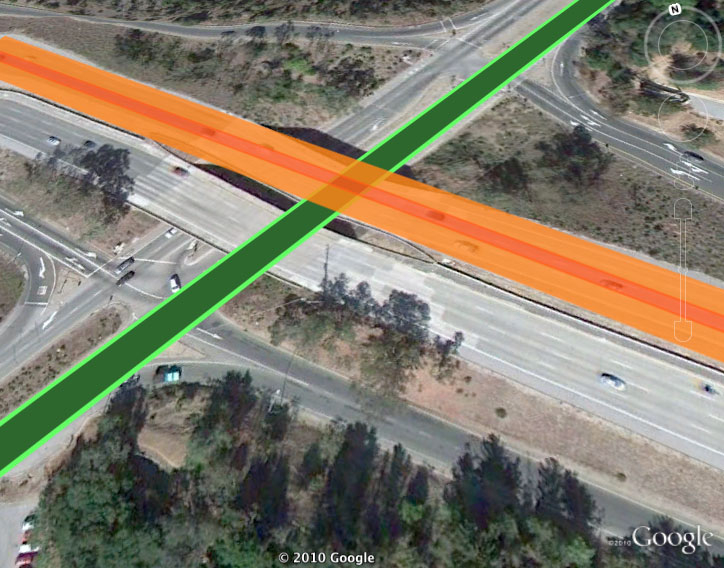
現在您已具備基本道路,接下來要處理高速公路天橋。這個會以淺橘色著色,並以深橘色中線標示。這裡的重點是,在 <LineSring> 中加入 <gx:drawOrder> 值 1 (預設為 0),確保系統會在道路上方算繪高速公路。如果您要建構更複雜的高速公路交流道 (或任何需要兩個以上重疊 LineString 的製圖),只要為要顯示在頂端的 LineString 加上較高的 <gx:drawOrder> 值即可。
<?xml version="1.0" encoding="UTF-8"?>
<kml xmlns="http://www.opengis.net/kml/2.2" xmlns:gx="http://www.google.com/kml/ext/2.2" xmlns:kml="http://www.opengis.net/kml/2.2" xmlns:atom="http://www.w3.org/2005/Atom">
<Document>
  <name>Road Styling</name>
  <Style id="street_sidewalk">
    <LineStyle>
      <color>ff235523</color>
      <gx:physicalWidth>10</gx:physicalWidth>
      <gx:outerColor>ff55ff55</gx:outerColor>
      <gx:outerWidth>0.25</gx:outerWidth>
    </LineStyle>
  </Style>
  <Style id="highway">
    <LineStyle>
      <color>cc1447ff</color>
      <gx:physicalWidth>20</gx:physicalWidth>
      <gx:outerColor>cc1473ff</gx:outerColor>
      <gx:outerWidth>0.75</gx:outerWidth>
    </LineStyle>
  </Style>
  <Placemark>
    <styleUrl>#street_sidewalk</styleUrl>
    <LineString>
      <coordinates>
     -122.2442883478408,37.4347536724074,0
     -122.2417741446485,37.43594997501623,0
     -122.2414951359056,37.43611878445952,0
      </coordinates>
    </LineString>
  </Placemark>
  <Placemark>
    <styleUrl>#highway</styleUrl>
    <LineString>
    <gx:drawOrder>1</gx:drawOrder>
    <coordinates>
      -122.2442692500139,37.43634904345254,0
      -122.2415928723012,37.43416417520744,0
    </coordinates>
    </LineString>
  </Placemark>
</Document>
</kml>
後續步驟
您現在可以描述具有多種顏色的單一 LineString,並控制算繪順序,製作先前無法建立的複雜線條製圖。無論是建造高速公路天橋,還是抽象藝術專案,都能運用這些樣式規則,盡情享受樂趣!