
Возможно, вам захочется связать встроенные HTML-рекламные блоки с видеорекламой или наложенными рекламными блоками. Такая взаимосвязь между связанными рекламными блоками называется отношением «главный-дополнительный» .
Помимо запроса видео и наложенных рекламных блоков, вы можете использовать SDK IMA для отображения сопутствующих HTML-рекламных объявлений. Эти объявления отображаются в HTML-среде.
Используйте сопутствующую рекламу
Для использования сопутствующей рекламы выполните следующие действия:
1. Забронируйте рекламу с участием компаньона.
You must first book the companion ads that you want to display with your master ads. Companion ads can be trafficked in Ad Manager . You can serve up to six companion ads per master ad. This technique, when a single buyer controls all ads on the page, is also known as roadblocking .
2. Запросите сопутствующую рекламу.
По умолчанию сопутствующая реклама включается для каждого запроса на показ рекламы.
3. Отображение сопутствующей рекламы
Существует два способа отображения сопутствующей рекламы:
Автоматическое использование тега Google Publisher Tag (GPT) .
If you're using GPT to implement your companion ads, they are displayed automatically as long as there are companion ad slots declared on the HTML page and these ads are registered with the API (that is, the div ID in the JavaScript and HTML must match). Some benefits of using GPT are:
- Осведомленность о слотах для компаньонов.
- Если в ответе VAST содержится меньше сопутствующих объявлений, чем задано мест на HTML-странице, может потребоваться заполнение данных из сети издателя.
- Функция автозаполнения, если видеореклама отсутствует.
- Предварительно загруженные рекламные блоки для видеоплееров с функцией воспроизведения по клику.
- Автоматизированная отрисовка сопутствующих элементов, включая
HTMLResourceиiFrameResource.
Использование Ad API вручную .
Используйте сопутствующие объявления с помощью тега Google Publisher Tag.
The Google Publisher Tag (GPT) automates the display of HTML companion ads on your site. We recommend that most publishers use the GPT. The HTML5 SDK recognizes GPT slots if GPT is loaded on the main web page (not in an IFrame). You can find more detailed information on using GPT with the IMA SDK in the GPT docs .
Если вы размещаете HTML5 SDK внутри IFrame
Если вы соответствуете обоим следующим критериям, вам необходимо добавить дополнительный прокси-скрипт, чтобы ваши GPT-компаньоны отображались корректно:
- Загрузите HTML5 SDK в IFrame.
- Загрузите GPT на главную веб-страницу (вне IFrame).
Чтобы ваши компаньоны отображались в этом сценарии, необходимо загрузить скрипт прокси GPT до загрузки SDK:
<script src="https://imasdk.googleapis.com/js/sdkloader/gpt_proxy.js"></script>
Важные моменты, которые следует учитывать:
- Внутри IFrame, загружающего SDK, не должно быть загружено GPT.
- GPT должен загружаться в верхней части страницы, а не в другом Iframe.
- Прокси-скрипт должен загружаться в том же фрейме, что и GPT (то есть на главной странице).
Объявление рекламных мест-компаньонов в HTML
This section explains how to declare companion ads in HTML using GPT and provides sample code for different scenarios. For the HTML5 SDK, you need to add some JavaScript to your HTML page and declare the companion ad slots.
- Пример 1: Базовая реализация рекламного блока
- Пример 2: Реализация динамического рекламного блока
- Пример 3: Предварительно загруженные рекламные блоки
Пример 1: Базовая реализация рекламного блока
The following sample code shows how to include the gpt.js file in your HTML page and declare an ad slot. The declared ad slot is 728x90px. GPT attempts to fill the slot with any companion ads returned in the VAST response that match this size. After the ad slots have been declared, the googletag.display() function can render them wherever it is called on the page. Because the slots are companion slots, ads are not displayed immediately. Instead they appear alongside the master video ad.
Вот пример реализации:
<html>
  <head>
    <!-- Uncomment the line below for the HTML5 SDK caveat proxy -->
    <!--<script src="https://imasdk.googleapis.com/js/sdkloader/gpt_proxy.js"></script>-->
    <!-- HEAD part -->
    <!-- Initialize the tagging library -->
    <script async src="https://securepubads.g.doubleclick.net/tag/js/gpt.js"></script>

    <!-- Register your companion slots -->
    <script>
       window.googletag = window.googletag || { cmd: [] };

       googletag.cmd.push(function() {
         // Supply YOUR_NETWORK and YOUR_UNIT_PATH.
         googletag.defineSlot('/YOUR_NETWORK/YOUR_UNIT_PATH', [728, 90], 'companionDiv')
             .addService(googletag.companionAds())
             .addService(googletag.pubads());
         googletag.companionAds().setRefreshUnfilledSlots(true);
         googletag.pubads().enableVideoAds();
         googletag.enableServices();
       });
    </script>
  </head>

  <body>
    <!-- BODY part -->
    <!-- Declare a div where you want the companion to appear. Use
          googletag.display() to make sure the ad is displayed. -->
    <div id="companionDiv" style="width:728px; height:90px;">
      <script>
         // Using the command queue to enable asynchronous loading.
         // The unit does not actually display now - it displays when
         // the video player is displaying the ads.
         googletag.cmd.push(function() { googletag.display('companionDiv'); });
      </script>
    </div>
  <body>
</html>
Попробуйте!
Рабочий пример можно посмотреть на следующем Codepen.
Пример 2: Реализация динамического рекламного блока
Sometimes you might not know how many ad slots you have on a page until the page content is rendered. The following sample code shows how to define ad slots while the page renders. This example is identical to Example 1 except that it registers the ad slots where they are actually displayed.
<html>
  <head>
    <!-- Uncomment the line below for the HTML5 SDK caveat proxy -->
    <!-- <script src="https://imasdk.googleapis.com/js/sdkloader/gpt_proxy.js"></script> -->
    <script async src="https://securepubads.g.doubleclick.net/tag/js/gpt.js"></script>
    <!-- HEAD part -->
    <!-- Initialize the tagging library -->
    <script>
      window.googletag = window.googletag || { cmd: [] };

      googletag.cmd.push(function() {
        googletag.companionAds().setRefreshUnfilledSlots(true);
        googletag.pubads().enableVideoAds();
        googletag.enableServices();
      });
    </script>
  </head>

  <body>
    <!-- BODY part -->
    <!-- Declare a div where you want the companion to appear. Use
        googletag.display() to make sure the ad is displayed. -->
    <div id="companionDiv" style="width:728px; height:90px;">
      <script>
        // Using the command queue to enable asynchronous loading.
        // The unit does not actually display now - it displays when
        // the video player is displaying the ads.
        googletag.cmd.push(function() {
          // Supply YOUR_NETWORK and YOUR_UNIT_PATH.
          googletag.defineSlot('/YOUR_NETWORK/YOUR_UNIT_PATH', [728, 90], 'companionDiv')
              .addService(googletag.companionAds())
              .addService(googletag.pubads());
          googletag.display('companionDiv');
        });
      </script>
    </div>
  <body>
</html>
Попробуйте!
Ниже представлен рабочий пример кода.
Пример 3: Предварительно загруженные рекламные блоки
In certain cases, you may need to display something in the ad slot before the companion ad is requested. Companion ads are usually requested along with a video ad. This request could occur after the page loads. For example, a companion ad may load only after the user clicks a click-to-play video. In such a case, you need the ability to request a regular ad to fill the ad slot before the companion ad is requested. To support this use case, you can display standard web ads in the companion slot. Ensure the web ads are targeted to the companion slots. You can target the companion slots in the same way as you would target standard web ad slots.
Вот пример только что описанной реализации:
<html>
  <head>
    ...
    <!-- Register your companion slots -->
    <script>
      window.googletag = window.googletag || { cmd: [] };

      googletag.cmd.push(function() {
        // Supply YOUR_PRELOAD_NETWORK and YOUR_PRELOAD_UNIT_PATH.
        googletag.defineSlot('/YOUR_PRELOAD_NETWORK/YOUR_PRELOAD_UNIT_PATH', [728, 90], 'companionDiv')
            .addService(googletag.companionAds())
            .addService(googletag.pubads());
        googletag.companionAds().setRefreshUnfilledSlots(true);
        googletag.pubads().enableVideoAds();
        googletag.enableServices();
      });
    </script>
  </head>
  ...
</html>
Попробуйте!
Ниже вы можете посмотреть работающую реализацию на CodePen.
Используйте сопутствующие объявления с помощью Ad API.
В этом разделе описывается, как отображать сопутствующие объявления с помощью Ad API.
Показать сопутствующие объявления
To display companion ads, first get a reference to an Ad object through any of the AdEvent events dispatched from the AdsManager . We recommend using the AdEvent.STARTED event, as displaying companion ads should coincide with displaying the master ad.
Next, use this Ad object to call getCompanionAds() to get an array of CompanionAd objects. Here you have the option of specifying CompanionAdSelectionSettings , which lets you set filters on the companion ads for creative type, near fit percentage, resource type, and size criteria. For more information on these settings, see the IMA CompanionAdSelectionSettings API documentation .
Теперь объекты CompanionAd , возвращаемые функцией getCompanionAds можно использовать для отображения сопутствующих объявлений на странице, следуя этим рекомендациям:
- Создайте на странице рекламный блок
<div>необходимого размера. - В обработчике события
STARTEDполучите объектAd, вызвав методgetAd(). - Use
getCompanionAds()to get a list of companion ads that match both the companion ad slot size andCompanionAdSelectionSettingsand have the same sequence number as the master creative. Creatives with a missing sequence attribute are treated as having sequence number 0. - Получите контент из экземпляра
CompanionAdи установите его в качестве внутреннего HTML-кода для элемента<div>этого рекламного блока.
Пример кода
<!--Set a companion ad div in html page. -->
<div id="companion-ad-300-250" width="300" height="250"></div>

<script>

  // Listen to the STARTED event.
  adsManager.addEventListener(
    google.ima.AdEvent.Type.STARTED,
    onAdEvent);

  function onAdEvent(adEvent) {
    switch (adEvent.type) {
      case google.ima.AdEvent.Type.STARTED:
        // Get the ad from the event.
        var ad = adEvent.getAd();
        var selectionCriteria = new google.ima.CompanionAdSelectionSettings();
        selectionCriteria.resourceType = google.ima.CompanionAdSelectionSettings.ResourceType.STATIC;
        selectionCriteria.creativeType = google.ima.CompanionAdSelectionSettings.CreativeType.IMAGE;
        selectionCriteria.sizeCriteria = google.ima.CompanionAdSelectionSettings.SizeCriteria.IGNORE;
        // Get a list of companion ads for an ad slot size and CompanionAdSelectionSettings
        var companionAds = ad.getCompanionAds(300, 250, selectionCriteria);
        var companionAd = companionAds[0];
        // Get HTML content from the companion ad.
        var content = companionAd.getContent();
        // Write the content to the companion ad slot.
        var div = document.getElementById('companion-ad-300-250');
        div.innerHTML = content;
        break;
    }
  }
</script>
Отображение сопутствующих рекламных объявлений
IMA now supports fluid companion ads. These companions ads can resize to match the size of the ad slot. They fill 100% of the width of parent div, then resize their height to fit the companion's content. They're set by using the Fluid companion size in Ad Manager. See the following image for where to set this value.
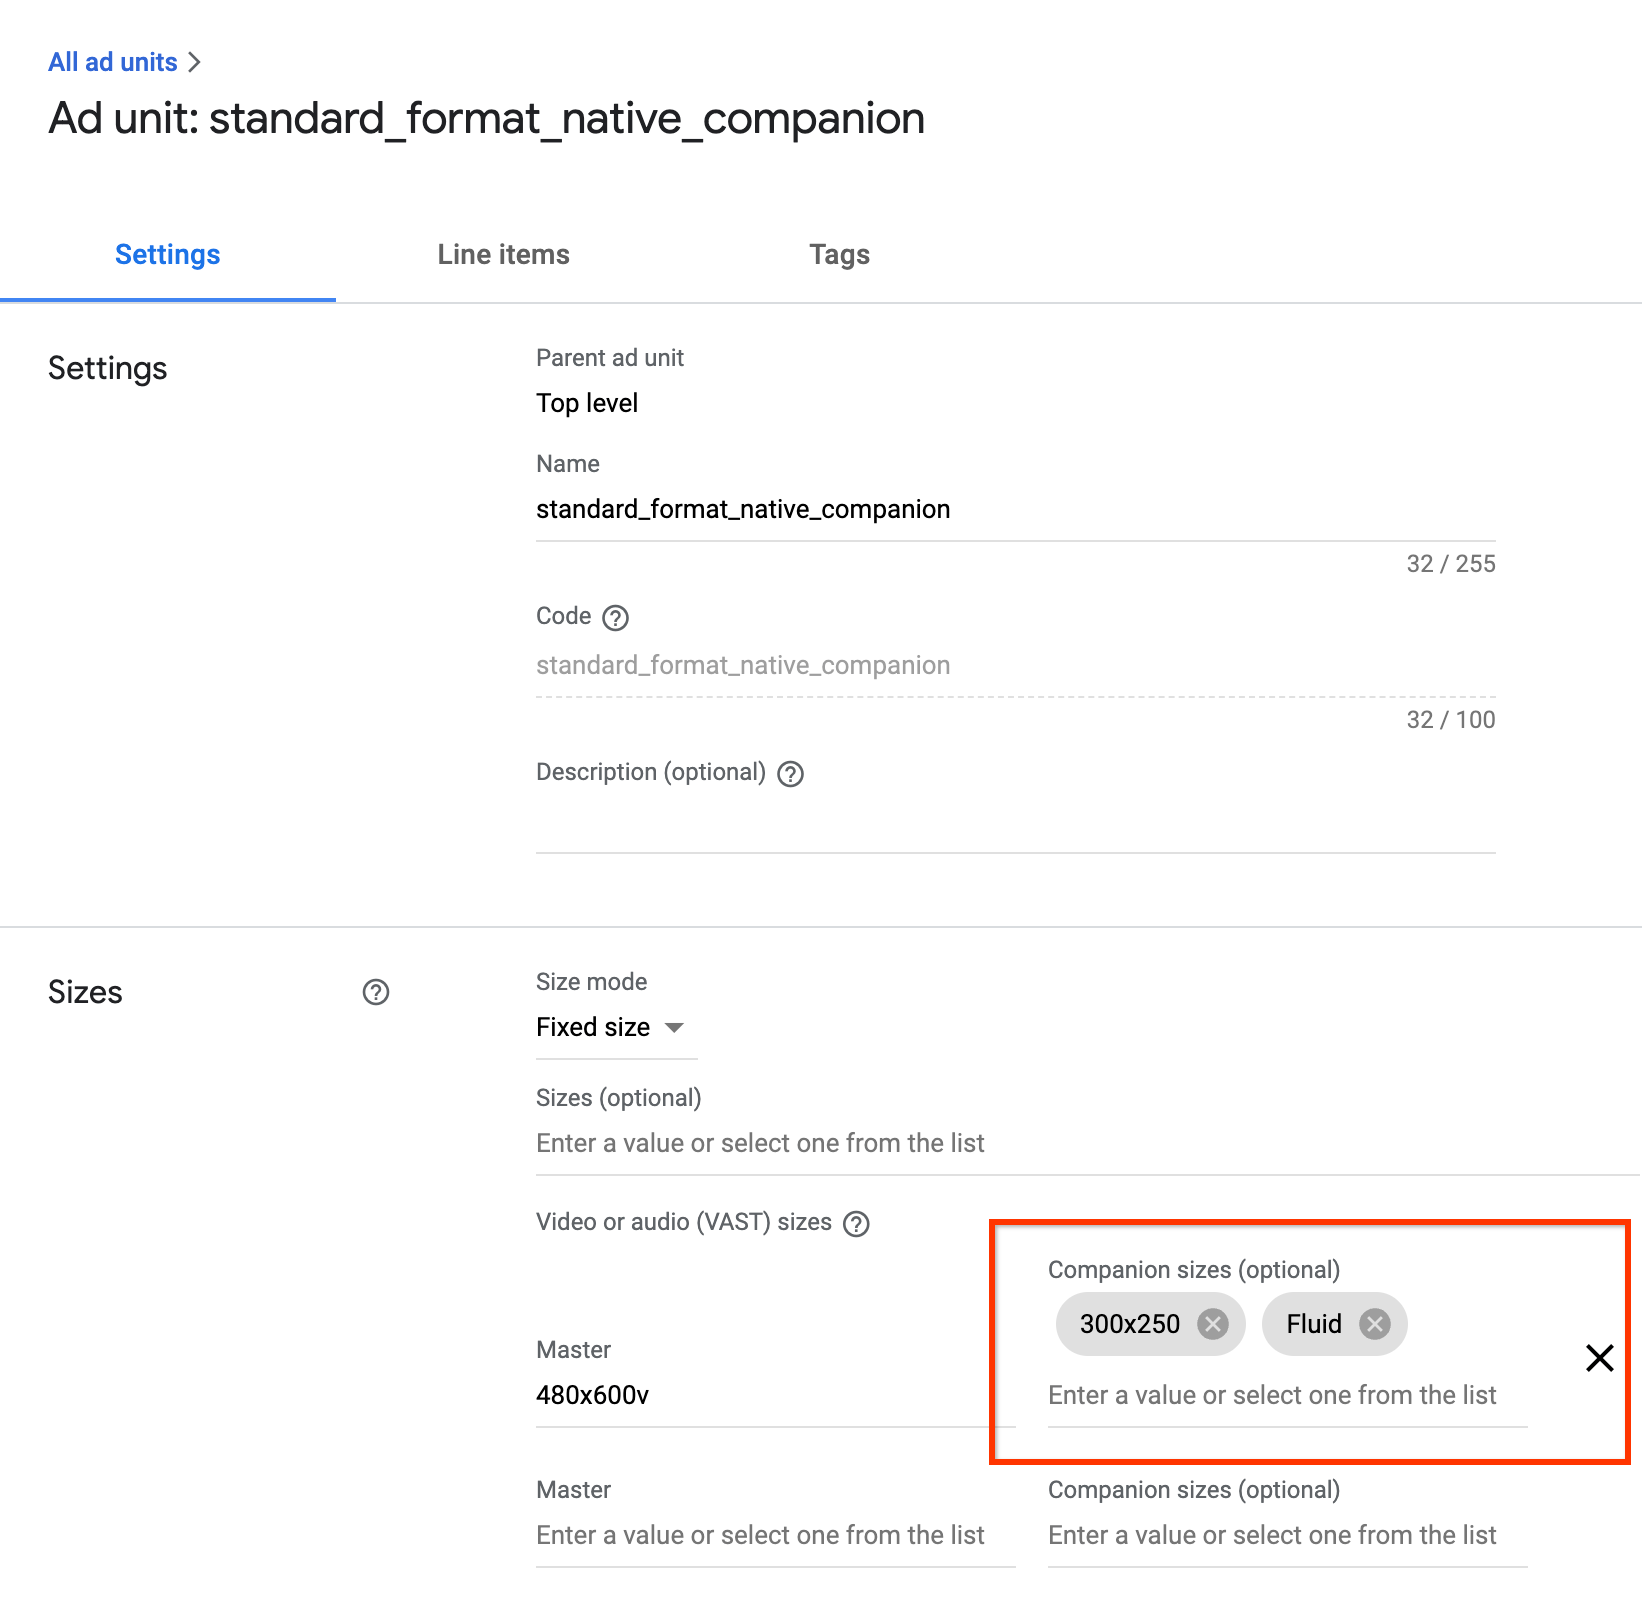
Жидкостные компаньоны ГПТ
При использовании компаньонов GPT вы можете объявить слот для компаньона, изменяя второй параметр метода defineSlot() .
<!-- Register your companion slots -->
<script>
  googletag.cmd.push(function() {
    // Supply YOUR_NETWORK and YOUR_UNIT_PATH.
    googletag.defineSlot('/YOUR_NETWORK/YOUR_UNIT_PATH', ['fluid'], 'companionDiv')
        .addService(googletag.companionAds())
        .addService(googletag.pubads());
    googletag.companionAds().setRefreshUnfilledSlots(true);
    googletag.pubads().enableVideoAds();
    googletag.enableServices();
  });
</script>
Ad API жидкие компаньоны
При использовании Ad API для сопутствующих объявлений вы можете объявить гибкий слот для сопутствующих объявлений, обновив значение SELECT_FLUID в параметре google.ima.CompanionAdSelectionSettings.SizeCriteria .
<script>

  ...
    // Get the ad from the event.
    var ad = adEvent.getAd();
    var selectionCriteria = new google.ima.CompanionAdSelectionSettings();
    selectionCriteria.resourceType = google.ima.CompanionAdSelectionSettings.ResourceType.STATIC;
    selectionCriteria.creativeType = google.ima.CompanionAdSelectionSettings.CreativeType.IMAGE;
    selectionCriteria.sizeCriteria = google.ima.CompanionAdSelectionSettings.SizeCriteria.SELECT_FLUID;
    // Get a list of companion ads for an ad slot size and CompanionAdSelectionSettings
    // Note: Companion width and height are irrelevant when fluid size is used.
    var companionAds = ad.getCompanionAds(0, 0, selectionCriteria);
    var companionAd = companionAds[0];
  ...
    }
  }
</script>