การลิงก์กับ OAuth และ Google Sign-In ที่มีประสิทธิภาพยิ่งขึ้น

ภาพรวม

การลิงก์ Google Sign-In ที่ใช้ OAuth ได้รับการปรับปรุงให้มีประสิทธิภาพมากขึ้นจะเพิ่ม Google Sign-In ไว้เหนือการลิงก์ OAuth ซึ่งจะช่วยให้ผู้ใช้ Google ลิงก์บัญชีได้อย่างราบรื่น ทั้งยังเปิดใช้การสร้างบัญชี ซึ่งช่วยให้ผู้ใช้สร้างบัญชีใหม่ในบริการของคุณโดยใช้บัญชี Google ได้

หากต้องการลิงก์บัญชีด้วย OAuth และ Google Sign-In ให้ทําตามขั้นตอนทั่วไปต่อไปนี้

  1. ก่อนอื่น ให้ขอให้ผู้ใช้ให้ความยินยอมในการเข้าถึงโปรไฟล์ Google
  2. ใช้ข้อมูลในโปรไฟล์เพื่อตรวจสอบว่าบัญชีผู้ใช้มีอยู่หรือไม่
  3. สำหรับผู้ใช้เดิม ให้ลิงก์บัญชี
  4. หากไม่พบผู้ใช้ Google ที่ตรงกันในระบบการตรวจสอบสิทธิ์ ให้ตรวจสอบโทเค็นระบุตัวตนที่ได้รับจาก Google จากนั้นคุณจะสร้างผู้ใช้โดยอิงตามข้อมูลโปรไฟล์ที่อยู่ในโทเค็นระบุตัวตนได้
รูปภาพนี้แสดงขั้นตอนที่ผู้ใช้ต้องดำเนินการเพื่อลิงก์บัญชี Google โดยใช้ขั้นตอนการลิงก์ที่มีประสิทธิภาพมากขึ้น ภาพหน้าจอแรกแสดงวิธีที่ผู้ใช้เลือกแอปของคุณเพื่อลิงก์ ภาพหน้าจอที่ 2 ช่วยให้ผู้ใช้ยืนยันได้ว่าตนมีบัญชีในบริการของคุณอยู่แล้วหรือไม่ ภาพหน้าจอที่ 3 แสดงให้ผู้ใช้เลือกบัญชี Google ที่ต้องการลิงก์ ภาพหน้าจอที่ 4 แสดงการยืนยันการลิงก์บัญชี Google กับแอปของคุณ ภาพหน้าจอที่ 5 แสดงบัญชีผู้ใช้ที่ลิงก์เรียบร้อยแล้วในแอป Google

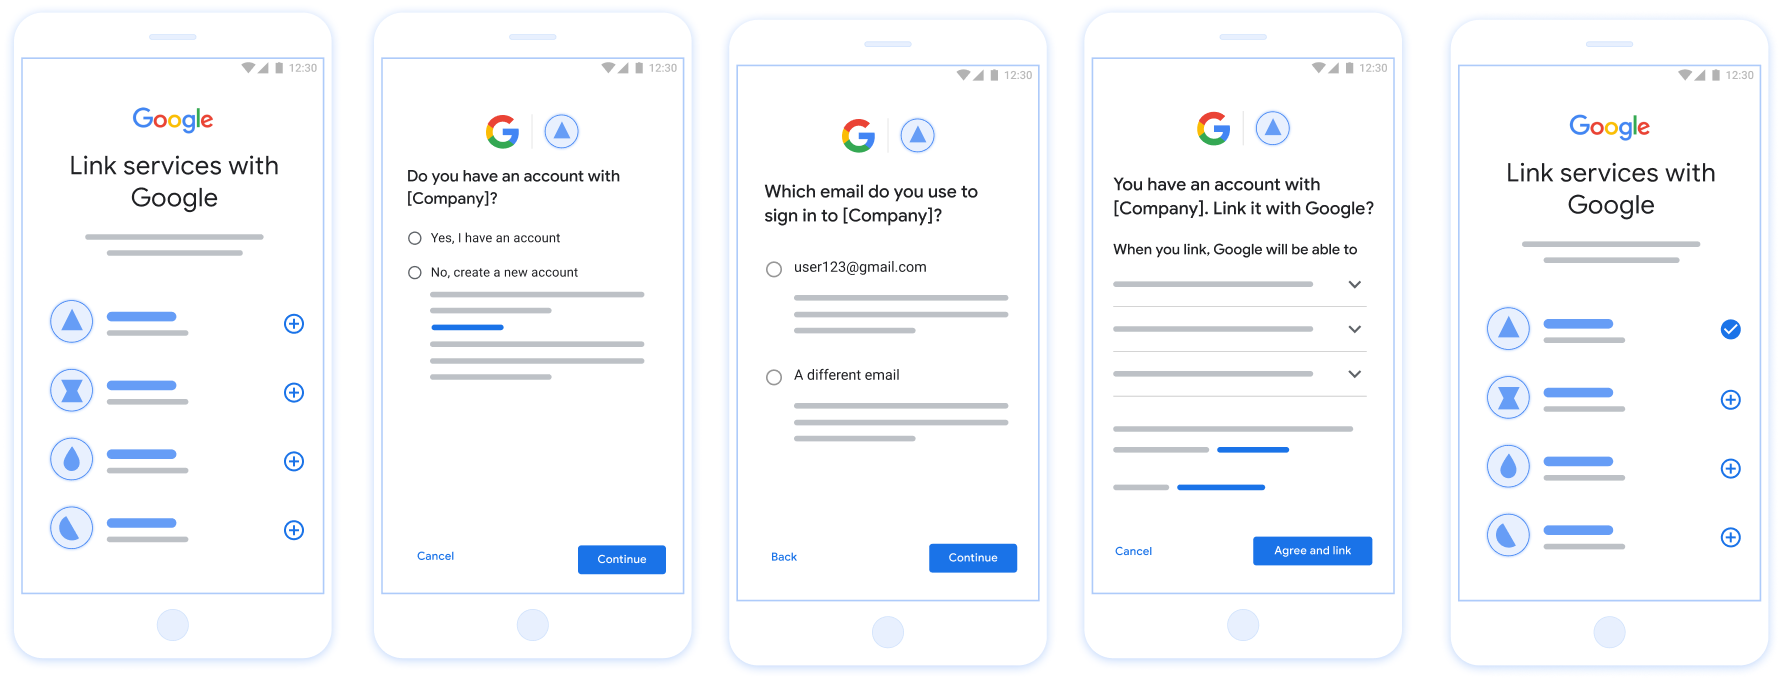
รูปที่ 1 การลิงก์บัญชีในโทรศัพท์ของผู้ใช้ด้วยการลิงก์แบบมีประสิทธิภาพ

ข้อกำหนดสำหรับการลิงก์แบบมีประสิทธิภาพ

  • ใช้โฟลว์การลิงก์ OAuth พื้นฐานบนเว็บ บริการของคุณต้องรองรับปลายทางการให้สิทธิ์และการเปลี่ยนโทเค็นที่เป็นไปตามข้อกำหนด OAuth 2.0
  • ปลายทางการแลกเปลี่ยนโทเค็นต้องรองรับการยืนยัน JSON Web Token (JWT) และใช้ Intent check, create และ get

ใช้เซิร์ฟเวอร์ OAuth

ปลายทางการแลกเปลี่ยนโทเค็นต้องรองรับ Intent check, create, get ด้านล่างแสดงขั้นตอนที่เสร็จสมบูรณ์ผ่านขั้นตอนการลิงก์บัญชี และระบุเวลาที่เรียกใช้ Intent ต่างๆ

  1. ผู้ใช้มีบัญชีในระบบการตรวจสอบสิทธิ์หรือไม่ (ผู้ใช้ตัดสินใจโดยเลือก "ใช่" หรือ "ไม่")
    1. ใช่ : ผู้ใช้ใช้อีเมลที่เชื่อมโยงกับบัญชี Google เพื่อลงชื่อเข้าใช้แพลตฟอร์มของคุณหรือไม่ (ผู้ใช้ตัดสินใจโดยเลือก "ใช่" หรือ "ไม่")
      1. ใช่ : ผู้ใช้มีบัญชีที่ตรงกันในระบบการตรวจสอบสิทธิ์หรือไม่ (โทรหา check intent เพื่อยืนยัน)
        1. ใช่ : มีการเรียกใช้ get intent และระบบจะลิงก์บัญชีหาก get intent แสดงผลสําเร็จ
        2. ไม่ : สร้างบัญชีใหม่ (ผู้ใช้ตัดสินใจโดยเลือก "ใช่" หรือ "ไม่")
          1. ใช่ : มีการเรียกใช้ create intent และลิงก์บัญชีหากสร้าง Intent สำเร็จ
          2. ไม่ : ระบบจะเรียกใช้ขั้นตอนการลงชื่อเข้าใช้ด้วย OAuth บนเว็บ ระบบจะนําผู้ใช้ไปยังเบราว์เซอร์ และผู้ใช้จะมีตัวเลือกให้ลิงก์กับอีเมลอื่น
      2. ไม่ : ระบบจะเรียกใช้ขั้นตอนการลงชื่อเข้าใช้ด้วย OAuth บนเว็บ ระบบจะนําผู้ใช้ไปยังเบราว์เซอร์ และผู้ใช้จะมีตัวเลือกให้ลิงก์กับอีเมลอื่น
    2. ไม่ : ผู้ใช้มีบัญชีที่ตรงกันในระบบการตรวจสอบสิทธิ์หรือไม่ (โทรหา check intent เพื่อยืนยัน)
      1. ใช่ : มีการเรียกใช้ get intent และระบบจะลิงก์บัญชีหาก get intent แสดงผลสําเร็จ
      2. ไม่ : มีการเรียกใช้ create intent และระบบจะลิงก์บัญชีหาก createIntent แสดงผลสำเร็จ

Check for an existing user account (check intent)

After the user gives consent to access their Google profile, Google sends a request that contains a signed assertion of the Google user's identity. The assertion contains information that includes the user's Google Account ID, name, and email address. The token exchange endpoint configured for your project handles that request.

If the corresponding Google account is already present in your authentication system, your token exchange endpoint responds with account_found=true. If the Google account doesn't match an existing user, your token exchange endpoint returns an HTTP 404 Not Found error with account_found=false.

The request has the following form:

POST /token HTTP/1.1
Host: oauth2.example.com
Content-Type: application/x-www-form-urlencoded

grant_type=urn:ietf:params:oauth:grant-type:jwt-bearer&intent=check&assertion=JWT&scope=SCOPES&client_id=GOOGLE_CLIENT_ID&client_secret=GOOGLE_CLIENT_SECRET

Your token exchange endpoint must be able to handle the following parameters:

Token endpoint parameters
intent For these requests, the value of this parameter is check.
grant_type The type of token being exchanged. For these requests, this parameter has the value urn:ietf:params:oauth:grant-type:jwt-bearer.
assertion A JSON Web Token (JWT) that provides a signed assertion of the Google user's identity. The JWT contains information that includes the user's Google Account ID, name, and email address.
client_id The client ID you assigned to Google.
client_secret The client secret you assigned to Google.

To respond to the check intent requests, your token exchange endpoint must perform the following steps:

  • Validate and decode the JWT assertion.
  • Check if the Google account is already present in your authentication system.
ตรวจสอบและถอดรหัสการยืนยัน JWT

คุณสามารถตรวจสอบและถอดรหัสการยืนยัน JWT ได้โดยใช้ ไลบรารีการถอดรหัส JWT สำหรับภาษาของคุณ ใช้ คีย์สาธารณะของ Google มีอยู่ใน JWK หรือ PEM เพื่อยืนยัน ลายเซ็นของโทเค็น

เมื่อถอดรหัสแล้ว การยืนยัน JWT จะมีลักษณะดังตัวอย่างต่อไปนี้

{
  "sub": "1234567890",      // The unique ID of the user's Google Account
  "iss": "https://accounts.google.com",        // The assertion's issuer
  "aud": "123-abc.apps.googleusercontent.com", // Your server's client ID
  "iat": 233366400,         // Unix timestamp of the assertion's creation time
  "exp": 233370000,         // Unix timestamp of the assertion's expiration time
  "name": "Jan Jansen",
  "given_name": "Jan",
  "family_name": "Jansen",
  "email": "jan@gmail.com", // If present, the user's email address
  "email_verified": true,   // true, if Google has verified the email address
  "hd": "example.com",      // If present, the host domain of the user's GSuite email address
                            // If present, a URL to user's profile picture
  "picture": "https://lh3.googleusercontent.com/a-/AOh14GjlTnZKHAeb94A-FmEbwZv7uJD986VOF1mJGb2YYQ",
  "locale": "en_US"         // User's locale, from browser or phone settings
}

นอกจากการยืนยันลายเซ็นของโทเค็นแล้ว ให้ตรวจสอบว่าการยืนยัน ผู้ออกใบรับรอง (ช่อง iss) คือ https://accounts.google.com ซึ่งกลุ่มเป้าหมาย (ช่อง aud) คือรหัสไคลเอ็นต์ที่กําหนด และโทเค็นยังไม่หมดอายุ (ช่อง exp)

เมื่อใช้ช่อง email, email_verified และ hd คุณจะทราบได้ว่า Google โฮสต์และมีสิทธิ์สำหรับอีเมล ในกรณีที่ Google เชื่อถือได้ ซึ่งผู้ใช้ปัจจุบันเป็นเจ้าของบัญชีที่ถูกต้อง และคุณก็สามารถข้ามการใช้รหัสผ่านหรือวิธีการพิสูจน์อื่นๆ ได้ มิเช่นนั้น วิธีการเหล่านี้ สามารถใช้ยืนยันบัญชีก่อนลิงก์ได้

กรณีที่ Google เชื่อถือได้

  • email มีส่วนต่อท้าย @gmail.com นี่คือบัญชี Gmail
  • email_verified เป็นจริงและตั้งค่า hd แล้ว นี่คือบัญชี G Suite

ผู้ใช้อาจลงทะเบียนบัญชี Google โดยไม่ใช้ Gmail หรือ G Suite ได้ วันและเวลา email ไม่มีคำต่อท้าย @gmail.com และ hd ไม่มี Google ไม่มี แนะนำให้ใช้รหัสผ่านหรือวิธีการอื่นๆ ในการพิสูจน์ยืนยัน ผู้ใช้รายนั้น email_verified ก็อาจเป็นจริงได้ เนื่องจาก Google ได้ยืนยัน ผู้ใช้เมื่อมีการสร้างบัญชี Google แต่การเป็นเจ้าของของบุคคลที่สาม บัญชีอีเมลของคุณอาจมีการเปลี่ยนแปลง

Check if the Google account is already present in your authentication system

Check whether either of the following conditions are true:

  • The Google Account ID, found in the assertion's sub field, is in your user database.
  • The email address in the assertion matches a user in your user database.

If either condition is true, the user has already signed up. In that case, return a response like the following:

HTTP/1.1 200 Success
Content-Type: application/json;charset=UTF-8

{
  "account_found":"true",
}

If neither the Google Account ID nor the email address specified in the assertion matches a user in your database, the user hasn't signed up yet. In this case, your token exchange endpoint needs to reply with a HTTP 404 error that specifies "account_found": "false", as in the following example:

HTTP/1.1 404 Not found
Content-Type: application/json;charset=UTF-8

{
  "account_found":"false",
}

จัดการการลิงก์อัตโนมัติ (รับ Intent)

หลังจากที่ผู้ใช้ให้ความยินยอมในการเข้าถึงโปรไฟล์ Google แล้ว Google จะส่ง คำขอที่มีการยืนยันข้อมูลประจำตัวของผู้ใช้ Google ที่ลงชื่อ การยืนยันจะมีข้อมูลที่มีรหัสบัญชี Google ของผู้ใช้ ชื่อ และที่อยู่อีเมล ปลายทางการแลกเปลี่ยนโทเค็นที่กำหนดค่าไว้สำหรับ โปรเจ็กต์จะจัดการคำขอนั้น

หากมีบัญชี Google ที่เกี่ยวข้องอยู่ในการตรวจสอบสิทธิ์อยู่แล้ว ปลายทางการแลกเปลี่ยนโทเค็นจะส่งคืนโทเค็นสำหรับผู้ใช้ หาก บัญชี Google ไม่ตรงกับผู้ใช้ที่มีอยู่, ปลายทางการแลกเปลี่ยนโทเค็น แสดงผลข้อผิดพลาด linking_error และเลือก login_hint หรือไม่ก็ได้

คำขอมีแบบฟอร์มต่อไปนี้

POST /token HTTP/1.1
Host: oauth2.example.com
Content-Type: application/x-www-form-urlencoded

grant_type=urn:ietf:params:oauth:grant-type:jwt-bearer&intent=get&assertion=JWT&scope=SCOPES&client_id=GOOGLE_CLIENT_ID&client_secret=GOOGLE_CLIENT_SECRET

ปลายทางการแลกเปลี่ยนโทเค็นต้องจัดการพารามิเตอร์ต่อไปนี้ได้

พารามิเตอร์ปลายทางของโทเค็น
intent สำหรับคำขอเหล่านี้ ค่าของพารามิเตอร์นี้คือ get
grant_type ประเภทของโทเค็นที่แลกเปลี่ยน สำหรับคำขอเหล่านี้ พารามิเตอร์นี้ มีค่า urn:ietf:params:oauth:grant-type:jwt-bearer
assertion JSON Web Token (JWT) ที่แสดงการยืนยันของ Google ข้อมูลประจำตัวของผู้ใช้ JWT มีข้อมูลที่ประกอบด้วย รหัส ชื่อ และอีเมลของบัญชี Google
scope ไม่บังคับ: ขอบเขตที่คุณกำหนดค่าให้ Google ส่งคำขอ ผู้ใช้
client_id รหัสไคลเอ็นต์ที่คุณกำหนดให้กับ Google
client_secret รหัสลับไคลเอ็นต์ที่คุณกำหนดให้กับ Google

หากต้องการตอบกลับคำขอ Intent get ปลายทางการแลกเปลี่ยนโทเค็นต้องทำตามขั้นตอนต่อไปนี้

  • ตรวจสอบและถอดรหัสการยืนยัน JWT
  • ตรวจสอบว่ามีบัญชี Google อยู่ในระบบการตรวจสอบสิทธิ์ของคุณแล้วหรือยัง
ตรวจสอบและถอดรหัสการยืนยัน JWT

คุณสามารถตรวจสอบและถอดรหัสการยืนยัน JWT ได้โดยใช้ ไลบรารีการถอดรหัส JWT สำหรับภาษาของคุณ ใช้ คีย์สาธารณะของ Google มีอยู่ใน JWK หรือ PEM เพื่อยืนยัน ลายเซ็นของโทเค็น

เมื่อถอดรหัสแล้ว การยืนยัน JWT จะมีลักษณะดังตัวอย่างต่อไปนี้

{
  "sub": "1234567890",      // The unique ID of the user's Google Account
  "iss": "https://accounts.google.com",        // The assertion's issuer
  "aud": "123-abc.apps.googleusercontent.com", // Your server's client ID
  "iat": 233366400,         // Unix timestamp of the assertion's creation time
  "exp": 233370000,         // Unix timestamp of the assertion's expiration time
  "name": "Jan Jansen",
  "given_name": "Jan",
  "family_name": "Jansen",
  "email": "jan@gmail.com", // If present, the user's email address
  "email_verified": true,   // true, if Google has verified the email address
  "hd": "example.com",      // If present, the host domain of the user's GSuite email address
                            // If present, a URL to user's profile picture
  "picture": "https://lh3.googleusercontent.com/a-/AOh14GjlTnZKHAeb94A-FmEbwZv7uJD986VOF1mJGb2YYQ",
  "locale": "en_US"         // User's locale, from browser or phone settings
}

นอกจากการยืนยันลายเซ็นของโทเค็นแล้ว ให้ตรวจสอบว่าการยืนยัน ผู้ออกใบรับรอง (ช่อง iss) คือ https://accounts.google.com ซึ่งกลุ่มเป้าหมาย (ช่อง aud) คือรหัสไคลเอ็นต์ที่กําหนด และโทเค็นยังไม่หมดอายุ (ช่อง exp)

เมื่อใช้ช่อง email, email_verified และ hd คุณจะทราบได้ว่า Google โฮสต์และมีสิทธิ์สำหรับอีเมล ในกรณีที่ Google เชื่อถือได้ ซึ่งผู้ใช้ปัจจุบันเป็นเจ้าของบัญชีที่ถูกต้อง และคุณก็สามารถข้ามการใช้รหัสผ่านหรือวิธีการพิสูจน์อื่นๆ ได้ มิเช่นนั้น วิธีการเหล่านี้ สามารถใช้ยืนยันบัญชีก่อนลิงก์ได้

กรณีที่ Google เชื่อถือได้

  • email มีส่วนต่อท้าย @gmail.com นี่คือบัญชี Gmail
  • email_verified เป็นจริงและตั้งค่า hd แล้ว นี่คือบัญชี G Suite

ผู้ใช้อาจลงทะเบียนบัญชี Google โดยไม่ใช้ Gmail หรือ G Suite ได้ วันและเวลา email ไม่มีคำต่อท้าย @gmail.com และ hd ไม่มี Google ไม่มี แนะนำให้ใช้รหัสผ่านหรือวิธีการอื่นๆ ในการพิสูจน์ยืนยัน ผู้ใช้รายนั้น email_verified ก็อาจเป็นจริงได้ เนื่องจาก Google ได้ยืนยัน ผู้ใช้เมื่อมีการสร้างบัญชี Google แต่การเป็นเจ้าของของบุคคลที่สาม บัญชีอีเมลของคุณอาจมีการเปลี่ยนแปลง

ตรวจสอบว่ามีบัญชี Google อยู่ในระบบการตรวจสอบสิทธิ์ของคุณแล้วหรือยัง

ตรวจสอบว่าเงื่อนไขใดเงื่อนไขหนึ่งต่อไปนี้เป็นจริง

  • รหัสบัญชี Google ที่พบในช่อง sub ของการยืนยันนั้นอยู่ในผู้ใช้ของคุณ ฐานข้อมูล
  • อีเมลในการยืนยันตรงกับผู้ใช้ในฐานข้อมูลผู้ใช้

หากพบบัญชีสำหรับผู้ใช้ ให้ออกโทเค็นเพื่อการเข้าถึงและแสดงผลค่าในออบเจ็กต์ JSON ในส่วนเนื้อหาของการตอบกลับ HTTPS ดังตัวอย่างต่อไปนี้

{
  "token_type": "Bearer",
  "access_token": "ACCESS_TOKEN",

  "refresh_token": "REFRESH_TOKEN",

  "expires_in": SECONDS_TO_EXPIRATION
}

ในบางกรณี การลิงก์บัญชีตามโทเค็นรหัสอาจล้มเหลวสำหรับผู้ใช้ หาก ไม่ว่าจะด้วยเหตุผลใดก็ตาม ปลายทางการแลกเปลี่ยนโทเค็นของคุณต้องตอบกลับด้วย HTTP ข้อผิดพลาด 401 ที่ระบุ error=linking_error ตามตัวอย่างต่อไปนี้

HTTP/1.1 401 Unauthorized
Content-Type: application/json;charset=UTF-8

{
  "error":"linking_error",
  "login_hint":"foo@bar.com"
}

เมื่อ Google ได้รับการตอบกลับข้อผิดพลาด 401 ด้วย linking_error ทาง Google จะส่ง ผู้ใช้ไปยังปลายทางการให้สิทธิ์โดยมี login_hint เป็นพารามิเตอร์ ผู้ใช้ลิงก์บัญชีให้เสร็จสมบูรณ์โดยใช้ขั้นตอนการลิงก์ OAuth ในเบราว์เซอร์

Handle account creation via Google Sign-In (create intent)

When a user needs to create an account on your service, Google makes a request to your token exchange endpoint that specifies intent=create.

The request has the following form:

POST /token HTTP/1.1
Host: oauth2.example.com
Content-Type: application/x-www-form-urlencoded

response_type=token&grant_type=urn:ietf:params:oauth:grant-type:jwt-bearer&scope=SCOPES&intent=create&assertion=JWT&client_id=GOOGLE_CLIENT_ID&client_secret=GOOGLE_CLIENT_SECRET

Your token exchange endpoint must able to handle the following parameters:

Token endpoint parameters
intent For these requests, the value of this parameter is create.
grant_type The type of token being exchanged. For these requests, this parameter has the value urn:ietf:params:oauth:grant-type:jwt-bearer.
assertion A JSON Web Token (JWT) that provides a signed assertion of the Google user's identity. The JWT contains information that includes the user's Google Account ID, name, and email address.
client_id The client ID you assigned to Google.
client_secret The client secret you assigned to Google.

The JWT within the assertion parameter contains the user's Google Account ID, name, and email address, which you can use to create a new account on your service.

To respond to the create intent requests, your token exchange endpoint must perform the following steps:

  • Validate and decode the JWT assertion.
  • Validate user information and create new account.
ตรวจสอบและถอดรหัสการยืนยัน JWT

คุณสามารถตรวจสอบและถอดรหัสการยืนยัน JWT ได้โดยใช้ ไลบรารีการถอดรหัส JWT สำหรับภาษาของคุณ ใช้ คีย์สาธารณะของ Google มีอยู่ใน JWK หรือ PEM เพื่อยืนยัน ลายเซ็นของโทเค็น

เมื่อถอดรหัสแล้ว การยืนยัน JWT จะมีลักษณะดังตัวอย่างต่อไปนี้

{
  "sub": "1234567890",      // The unique ID of the user's Google Account
  "iss": "https://accounts.google.com",        // The assertion's issuer
  "aud": "123-abc.apps.googleusercontent.com", // Your server's client ID
  "iat": 233366400,         // Unix timestamp of the assertion's creation time
  "exp": 233370000,         // Unix timestamp of the assertion's expiration time
  "name": "Jan Jansen",
  "given_name": "Jan",
  "family_name": "Jansen",
  "email": "jan@gmail.com", // If present, the user's email address
  "email_verified": true,   // true, if Google has verified the email address
  "hd": "example.com",      // If present, the host domain of the user's GSuite email address
                            // If present, a URL to user's profile picture
  "picture": "https://lh3.googleusercontent.com/a-/AOh14GjlTnZKHAeb94A-FmEbwZv7uJD986VOF1mJGb2YYQ",
  "locale": "en_US"         // User's locale, from browser or phone settings
}

นอกจากการยืนยันลายเซ็นของโทเค็นแล้ว ให้ตรวจสอบว่าการยืนยัน ผู้ออกใบรับรอง (ช่อง iss) คือ https://accounts.google.com ซึ่งกลุ่มเป้าหมาย (ช่อง aud) คือรหัสไคลเอ็นต์ที่กําหนด และโทเค็นยังไม่หมดอายุ (ช่อง exp)

เมื่อใช้ช่อง email, email_verified และ hd คุณจะทราบได้ว่า Google โฮสต์และมีสิทธิ์สำหรับอีเมล ในกรณีที่ Google เชื่อถือได้ ซึ่งผู้ใช้ปัจจุบันเป็นเจ้าของบัญชีที่ถูกต้อง และคุณก็สามารถข้ามการใช้รหัสผ่านหรือวิธีการพิสูจน์อื่นๆ ได้ มิเช่นนั้น วิธีการเหล่านี้ สามารถใช้ยืนยันบัญชีก่อนลิงก์ได้

กรณีที่ Google เชื่อถือได้

  • email มีส่วนต่อท้าย @gmail.com นี่คือบัญชี Gmail
  • email_verified เป็นจริงและตั้งค่า hd แล้ว นี่คือบัญชี G Suite

ผู้ใช้อาจลงทะเบียนบัญชี Google โดยไม่ใช้ Gmail หรือ G Suite ได้ วันและเวลา email ไม่มีคำต่อท้าย @gmail.com และ hd ไม่มี Google ไม่มี แนะนำให้ใช้รหัสผ่านหรือวิธีการอื่นๆ ในการพิสูจน์ยืนยัน ผู้ใช้รายนั้น email_verified ก็อาจเป็นจริงได้ เนื่องจาก Google ได้ยืนยัน ผู้ใช้เมื่อมีการสร้างบัญชี Google แต่การเป็นเจ้าของของบุคคลที่สาม บัญชีอีเมลของคุณอาจมีการเปลี่ยนแปลง

Validate user information and create new account

Check whether either of the following conditions are true:

  • The Google Account ID, found in the assertion's sub field, is in your user database.
  • The email address in the assertion matches a user in your user database.

If either condition is true, prompt the user to link their existing account with their Google Account. To do so, respond to the request with an HTTP 401 error that specifies error=linking_error and gives the user's email address as the login_hint. The following is a sample response:

HTTP/1.1 401 Unauthorized
Content-Type: application/json;charset=UTF-8

{
  "error":"linking_error",
  "login_hint":"foo@bar.com"
}

When Google receives a 401 error response with linking_error, Google sends the user to your authorization endpoint with login_hint as a parameter. The user completes account linking using the OAuth linking flow in their browser.

If neither condition is true, create a new user account with the information provided in the JWT. New accounts don't typically have a password set. It's recommended that you add Google Sign-In to other platforms to enable users to log in with Google across the surfaces of your application. Alternatively, you can email the user a link that starts your password recovery flow to allow the user to set a password to sign in on other platforms.

When the creation is completed, issue an access token and refresh token and return the values in a JSON object in the body of your HTTPS response, like in the following example:

{
  "token_type": "Bearer",
  "access_token": "ACCESS_TOKEN",
  "refresh_token": "REFRESH_TOKEN",
  "expires_in": SECONDS_TO_EXPIRATION
}

รับรหัสไคลเอ็นต์ Google API

คุณจะต้องระบุรหัสไคลเอ็นต์ Google API ในระหว่างกระบวนการลงทะเบียนการลิงก์บัญชี

วิธีรับรหัสไคลเอ็นต์ API โดยใช้โปรเจ็กต์ที่คุณสร้างขึ้นขณะทำตามขั้นตอนการลิงก์ OAuth โดยทำตามขั้นตอนต่อไปนี้

  1. Go to the Credentials page.
  2. สร้างหรือเลือกโปรเจ็กต์ Google APIs

    หากโปรเจ็กต์ไม่มีรหัสไคลเอ็นต์สำหรับประเภทเว็บแอปพลิเคชัน ให้คลิกสร้างไคลเอ็นต์เพื่อสร้างรหัส อย่าลืมใส่โดเมนของเว็บไซต์ในช่องต้นทางของ JavaScript ที่ได้รับอนุญาต เมื่อทำการทดสอบหรือพัฒนาในเครื่อง คุณต้องเพิ่มทั้ง http://localhost และ http://localhost:<port_number> ลงในช่องต้นทาง JavaScript ที่อนุญาต

ตรวจสอบการติดตั้งใช้งาน

คุณตรวจสอบการติดตั้งใช้งานได้โดยใช้เครื่องมือ OAuth 2.0 Playground

ทำตามขั้นตอนต่อไปนี้ในเครื่องมือ

  1. คลิกการกําหนดค่า เพื่อเปิดหน้าต่างการกําหนดค่า OAuth 2.0
  2. ในช่องขั้นตอน OAuth ให้เลือกฝั่งไคลเอ็นต์
  3. ในช่อง OAuth Endpoints ให้เลือก Custom
  4. ระบุปลายทาง OAuth 2.0 และรหัสไคลเอ็นต์ที่คุณกำหนดให้กับ Google ในช่องที่เกี่ยวข้อง
  5. ในส่วนขั้นตอนที่ 1 ไม่ต้องเลือกขอบเขตของ Google แต่ให้เว้นช่องนี้ว่างไว้หรือพิมพ์ขอบเขตที่ใช้ได้กับเซิร์ฟเวอร์ของคุณ (หรือสตริงที่กำหนดเองหากคุณไม่ได้ใช้ขอบเขต OAuth) เมื่อดำเนินการเสร็จแล้ว ให้คลิกให้สิทธิ์ API
  6. ในส่วนขั้นตอนที่ 2 และขั้นตอนที่ 3 ให้ทำตามขั้นตอน OAuth 2.0 และตรวจสอบว่าแต่ละขั้นตอนทำงานตามที่ต้องการ

คุณสามารถตรวจสอบการติดตั้งใช้งานโดยใช้เครื่องมือการสาธิตการลิงก์บัญชี Google

ทำตามขั้นตอนต่อไปนี้ในเครื่องมือ

  1. คลิกปุ่มลงชื่อเข้าใช้ด้วย Google
  2. เลือกบัญชีที่ต้องการลิงก์
  3. ป้อนรหัสบริการ
  4. (ไม่บังคับ) ป้อนขอบเขตที่จะขอสิทธิ์เข้าถึงอย่างน้อย 1 รายการ
  5. คลิกเริ่มสาธิต
  6. เมื่อได้รับข้อความแจ้ง ให้ยืนยันว่าคุณอาจยินยอมและปฏิเสธคำขอลิงก์
  7. ยืนยันว่าระบบเปลี่ยนเส้นทางคุณไปยังแพลตฟอร์ม