
1. Introduction
The Google Health API supports gRPC for high-performance and low-latency data retrieval. Unlike REST, using gRPC requires obtaining the API's Protocol Buffers (protobuf) definitions and generating client-side stub code before making requests.
In this codelab, you will learn how to set up a Python development environment, retrieve the public API proto definitions, compile them using protocol buffers compiler libraries, and make your first gRPC call to retrieve health data.
What you'll learn
- How to set up a client ID within the Google Cloud console.
- How to set up a Python virtual environment and install gRPC dependencies.
- How to obtain the Google Health API Protocol Buffers definitions.
- How to compile proto files to generate client code.
- How to go through Google OAuth 2.0 authorization flow to get an access token and refresh token.
- How to make gRPC calls to Google Health API endpoints using Python.
What you'll need
- Google Health mobile app
- Python 3.8+ installed on your system
- VS Code or another text editor and terminal of your choice
To set up the Google Health mobile app:
- In either the Apple App Store or the Google Play Store, search for the Google Health mobile app and download it.
- Select the app icon.
- Click Sign in with Google
- Select your Google Account and press the Continue button.
2. Setup Google Cloud project
You will use the Google Cloud console to create a client ID and enable use of the Google Health API.
- Sign in into the Google Cloud console.
- To create a new project:
- Click Select a project from the project picker.
- In the upper right corner, select New Project.
- Enter your Project name.
- Enter your Location (for example, "No organization").
- Click the Create button.
- Select your project.
Enable the Google Health API
- In the upper lefthand corner, click the menu icon:

- Select APIs & Services > Library.
- Search for "Google Health API" and enable it.
Setup your OAuth credentials
If you are not in the Google Cloud console, go to Google Cloud console.
- In the upper lefthand corner, click the menu icon:
- Select APIs & Services > Credentials.
- At the top center, select + Create Credentials > OAuth client ID.
- Click the Configure consent screen button. If the message "Google Auth Platform not configured yet" appears, click the Get Started button.
- In section 1:
- Enter the App name.
- Enter the User support email.
- Click the Next button.
- In section 2:
- Select External.
- Click the Next button.
- In section 3:
- Enter your email address in the Contact Information field.
- Click the Next button.
- In section 4:
- Click the checkbox to agree to Google's API Services User Data Policy.
- Click the Create button.
- Navigate back to APIs & Services > Credentials and select + Create Credentials > OAuth client ID.
- Choose the application type Desktop Application.
- Enter the client ID Name (for example, "Google Health API gRPC Codelab").
- Click the Create button.
- The Google Console will show a message that your client ID is created. Click the Download JSON link to download the client ID and client secret file. Since the browser will download it with a default name that includes your client ID (such as
client_secret_), you must rename this file to.json client_secret.json. We will place this file in our codebase later. - Click OK. You will return to the "OAuth 2.0 Client IDs" page.
Add test users
- On the left pane, select Audience. You should see the Publishing status set to Testing, and the User type set to External.
- Under the Test users section, click the + Add users button. Enter the email address for the Google Account you signed in with on your Google Health mobile app.
- Click the Save button.
Add scopes to the client ID
- On the left pane, select Data Access.
- Click the button Add or remove scopes.
- In the API column, search for "Google Health API". For this codelab we are using the scope
https://www.googleapis.com/auth/googlehealth.activity_and_fitness.readonly - After selecting the scope, press the Update button to return to the Data Access page.
- Click the Save button.
You have finished setting up your client ID.
3. Add data to the Google Health mobile app
For new users to the Google Health API, you might not have data in your Google Health account to query. We're going to manually add an exercise log which we can query through one of the endpoints. To manually record an exercise, follow these steps:
- Open the Google Health mobile app on your device. Sign into your Google Health account if needed.
- In the bottom right-hand corner of the screen, tap the + button.
- In the Manually log section, tap Activity.
- Search for the exercise type Walk and select it.
- Enter a Start time for today.
- Change the Duration to 15 minutes.
- Leave the Distance as 1.0 mi.
- Tap Add.
- Sync the mobile app to the Google Health servers by long pressing on the screen and sliding it down. When you release your finger, you should see the mobile app sync.
- In the Activity section, you should see your manually logged Walk entry.
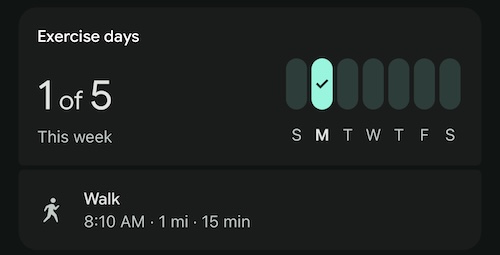
4. Set up Python project and dependencies
We will set up a local workspace directory and establish a Python virtual environment to manage dependencies for this codelab.
- Open your terminal.
- Run the setup command for your operating system:
- On macOS/Linux:
mkdir health-grpc-codelab && cd health-grpc-codelab && python3 -m venv venv && source venv/bin/activate && pip install grpcio grpcio-tools google-auth google-auth-oauthlib googleapis-common-protos - On Windows (Command Prompt):
mkdir health-grpc-codelab && cd health-grpc-codelab && python3 -m venv venv && venv\Scripts\activate.bat && pip install grpcio grpcio-tools google-auth google-auth-oauthlib googleapis-common-protos - On Windows (PowerShell):
mkdir health-grpc-codelab; cd health-grpc-codelab; python3 -m venv venv; venv\Scripts\Activate.ps1; pip install grpcio grpcio-tools google-auth google-auth-oauthlib googleapis-common-protos grpcio: The core gRPC library.grpcio-tools: The protobuf compiler toolchain for Python.google-auth/google-auth-oauthlib: Safe mechanisms to handle credentials and OAuth authorization.googleapis-common-protos: Package containing the helper modules (likegoogle.api.annotations_pb2) imported by the generated stub files.
- On macOS/Linux:
- Move the renamed
client_secret.jsoncredentials file you downloaded in the previous section into this parenthealth-grpc-codelabfolder.
5. Obtain protos and generate stubs
Before requesting data over gRPC, we must compile the protocol buffer (.proto) definitions matching the Google Health API into client stubs.
Because the schemas depend on various shared Google API files (such as annotations, operations, and field behaviors), the easiest way is to clone the official, public Google APIs repository.
- Clone the
googleapisGitHub repository, compile the required client schemas, and return to your parent workspace folder in one step:git clone --depth 1 https://github.com/googleapis/googleapis.git && \ cd googleapis && \ python3 -m grpc_tools.protoc \ --proto_path=. \ --python_out=. \ --grpc_python_out=. \ google/devicesandservices/health/v4/data_points.proto \ google/devicesandservices/health/v4/data_model.proto \ google/devicesandservices/health/v4/data_source.proto \ google/devicesandservices/health/v4/data_coordinates.proto \ google/devicesandservices/health/v4/medical_device_info.proto && \ cd ...pystub files directly in thegoogleapis/google/devicesandservices/health/v4/subdirectory.
6. Implement gRPC client code in Python
To authenticate and request data, we will write a script.
- Create a file named
client.pyin the root of thehealth-grpc-codelabdirectory. - Populate
client.pywith the following code:
import sys
# Add the 'googleapis' directory to sys.path so files in it can be imported
sys.path.insert(0, 'googleapis')

import os
import json
import grpc

import google.auth
from google.auth.transport.grpc import secure_authorized_channel
from google.auth.transport.requests import Request
from google.oauth2.credentials import Credentials
from google_auth_oauthlib.flow import InstalledAppFlow

# Import compiled gRPC stubs & message modules
from google.devicesandservices.health.v4 import data_points_pb2
from google.devicesandservices.health.v4 import data_points_pb2_grpc
from google.devicesandservices.health.v4 import data_source_pb2
from google.devicesandservices.health.v4 import data_model_pb2

# --- CONFIGURATION ---
CLIENT_SECRETS_FILE = 'client_secret.json'
SCOPES = ['https://www.googleapis.com/auth/googlehealth.activity_and_fitness.readonly']
TOKEN_FILE = 'token.json'
GRPC_ENDPOINT = 'health.googleapis.com'

def get_credentials():
    """Gets or creates OAuth 2.0 credentials."""
    creds = None
    # Load token from disk if it was already authorized
    if os.path.exists(TOKEN_FILE):
        with open(TOKEN_FILE, 'r') as token:
            creds = Credentials.from_authorized_user_info(json.load(token), SCOPES)
    # Refresh token if expired
    if creds and creds.expired and creds.refresh_token:
        try:
            creds.refresh(Request())
        except Exception as e:
            creds = None  # Force re-authentication if refresh fails
    # Run user consent flow if not authorized yet
    if not creds or not creds.valid:
        flow = InstalledAppFlow.from_client_secrets_file(
            CLIENT_SECRETS_FILE, SCOPES
        )
        # Using desktop app loopback mechanism (opens local browser)
        creds = flow.run_local_server(port=0)
        with open(TOKEN_FILE, 'w') as token:
            token.write(creds.to_json())
    return creds

def fetch_health_data_grpc(creds):
    """Fetches health data using gRPC."""
    try:
        # 1. Establish secure, authorized channel using OAuth 2.0 Credentials
        channel = secure_authorized_channel(creds, Request(), f'{GRPC_ENDPOINT}:443')

        # 2. Instantiate the service stub client
        stub = data_points_pb2_grpc.DataPointsServiceStub(channel)

        # 3. Request data points for data type "exercise"
        print("Sending ListDataPoints RPC...")
        request = data_points_pb2.ListDataPointsRequest(parent='users/me/dataTypes/exercise')
        response = stub.ListDataPoints(request)

        # 4. Display result
        print('--- Success ---')
        for dp in response.data_points:
            platform_str = data_source_pb2.DataSource.Platform.Name(dp.data_source.platform)
            exercise_str = data_model_pb2.Exercise.ExerciseType.Name(dp.exercise.exercise_type)

            print(f"Data Point ID: {dp.name}")
            print(f"Platform: {platform_str}")
            print(f"Exercise type: {exercise_str}")
            print(f"Display Name: {dp.exercise.display_name}")
            print(f"Start Time: {dp.exercise.interval.start_time.ToJsonString()}")
            print(f"Calories (kcal): {int(dp.exercise.metrics_summary.calories_kcal)}")
            print(f"Steps: {dp.exercise.metrics_summary.steps}")
            print('----------------')
    except grpc.RpcError as e:
        print(f'gRPC Error: {e.code()} - {e.details()}')
    except Exception as e:
        print(f'General error: {e}')

if __name__ == '__main__':
    try:
        print("Retrieving OAuth 2.0 credentials...")
        creds = get_credentials()
        print("Making gRPC requests...")
        fetch_health_data_grpc(creds)
    except Exception as e:
        print(f"An error occurred: {e}")
Code explanation
Here is a breakdown of how the client script uses gRPC to interact with the Google Health API:
- Importing Generated Stubs (Lines 243–261): First, the script adds the directory containing the compiled protobuf schemas (
googleapis/) to the system import path. It then imports the generated Python modules:data_points_pb2_grpc: Contains the client stub (DataPointsServiceStub) representing the API service.data_points_pb2& other_pb2modules: Contain the message classes (likeListDataPointsRequest) and data schemas utilized by the request and response.
- Establishing a Secure Channel (Lines 296–297):
channel = secure_authorized_channel(creds, Request(), f'{GRPC_ENDPOINT}:443')secure_authorized_channelfrom thegoogle-authlibrary to establish a secure TLS connection on port 443 that automatically appends OAuth 2.0 authorization credentials to all call metadata. - Instantiating the Client Stub (Line 300):
stub = data_points_pb2_grpc.DataPointsServiceStub(channel)DataPointsServiceservice definitions. You invoke all remote procedures directly through this stub. - Executing the RPC Call (Lines 304–305):
request = data_points_pb2.ListDataPointsRequest(parent='users/me/dataTypes/exercise') response = stub.ListDataPoints(request)ListDataPointsRequestspecifying the target user and data type path. You then call theListDataPointsRPC on your stub, passing the request object. The gRPC library serializes the message to binary, transmits it over HTTP/2, and returns a strongly-typed response message. - Accessing Data & Enum Mapping (Lines 309–319): Protobuf messages utilize efficient types. For enum values, you use generated descriptor helpers (like
DataSource.Platform.Name()andExercise.ExerciseType.Name()) to convert raw numeric enum values returned by the API into user-friendly names (For example,WALKINGorFITBIT).
7. Run the script and verify responses
Execute the client script and authorize access.
- In your terminal (still in active virtual environment, in the root
health-grpc-codelabdirectory), run:python3 client.py - The script will output:
Retrieving OAuth 2.0 credentials... Please visit this URL to authorize this application: https://accounts.google.com/o/oauth2/v2/auth... - Sign in using the test user email address registered to your Google Cloud Console project.
- On the consent screen, click Continue to approve permissions.
- Upon success, you will see the browser show
The authentication flow has completed. You may close this window. - Return to your terminal. The script will print the exercise data we manually logged on the mobile app:
Making gRPC requests...
Sending ListDataPoints RPC...
--- Success ---
Data Point ID: users/123456789/dataTypes/exercise/dataPoints/8896720705097069096
Platform: FITBIT
Exercise type: WALKING
Display Name: Walk
Start Time: 2026-02-23T13:10:00Z
Calories (kcal): 16
Steps: 2038
----------------
8. Fetch a different data type
To retrieve data for a different type (such as daily steps), you need to modify the request path in the Python script. If the new data type requires different permissions, you must also update the OAuth scopes.
Ensure that you are running the following steps and terminal commands from the root of your health-grpc-codelab directory, and that your Python virtual environment is still active.
Update scopes in the Google Cloud console
If the new data type is not covered by your existing permissions:
- In the Google Cloud console, go to APIs & Services > OAuth consent screen (or Data Access for Google Health API settings).
- Add the required scope corresponding to the new data type.
- Save the configuration.
Update client.py
Modify the configuration and the query path inside client.py as follows:
- Update the
SCOPESlist at the top of the file to match the new permission scopes added in the Google Cloud console. - Locate the following code block inside your
fetch_health_data_grpcfunction:# 3. Request data points for data type "exercise" print("Sending ListDataPoints RPC...") request = data_points_pb2.ListDataPointsRequest(parent='users/me/dataTypes/exercise') response = stub.ListDataPoints(request) - Change the parent query path from
'users/me/dataTypes/exercise'to'users/me/dataTypes/steps'(or to another data type path). - Adjust the console output formatting to match the structure of the new data type response. For example:
# 3. Request data points for data type "steps"
print("Sending ListDataPoints RPC for steps...")
request = data_points_pb2.ListDataPointsRequest(parent='users/me/dataTypes/steps')
response = stub.ListDataPoints(request)

# 4. Display result
print('--- Success ---')
for dp in response.data_points:
    print(f"Data Point ID: {dp.name}")
    # Steps data structures contain interval and count values
    print(f"Start Time: {dp.steps.interval.start_time.ToJsonString()}")
    print(f"Count: {dp.steps.count}")
    print('----------------')
Clear the local token cache
The OAuth access token is cached locally. To force the authentication flow to request the new scopes, delete the local token.json file:
rm token.json
Rerun the script
Execute your updated client script to complete the authorization flow again with the updated scopes and print the fetched data:
python3 client.py
9. Congratulations
Congratulations!
You have successfully set up a Google Cloud desktop client ID, configured a Python environment, retrieved and compiled the Google Health API proto schemas, and performed an end-to-end authenticated gRPC request to fetch health and fitness data.
Feel free to customize your client.py script to fetch other data types (such as steps or sleep), filter queries using intervals, or write data points using standard gRPC endpoints.
For more information:
- Review other service stubs in the RPC reference guide.
- Learn more about oauth scopes and access tokens in Set up Google Cloud and OAuth guide.