1. Before you begin
In this codelab, you'll explore how to build an app that handles the core Computer Vision use case, detecting the primary contents of an image. This is generally called Image Classification or Image Labelling.
Prerequisites
This codelab is part of the Get started with image classification pathway. It has been written for experienced developers new to machine learning.
What you'll build
- An Android app capable of classifying an image of a flower
- (Optional) An iOS app capable of classifying an image of a flower
What you'll need
- Android Studio, available at https://developer.android.com/studio for the Android portion of the Codelab
- Xcode, available in the Apple App Store, for the iOS portion of the Codelab
2. Get started
Computer Vision is a field in the larger discipline of machine learning, that works to find new ways for machines to process and extract information from the contents of an image. Where before a computer only stored the actual data of images, such as the values of the pixels that make up the image, Computer Vision allows a computer to parse the contents of the image and get information about what's in it.
For example, within the field of Computer Vision, an image of a cat could be labelled as containing a cat, in addition to the pixels that make up that image. There are other fields of computer vision that go into more detail than this, such as Object Detection, where the computer can locate multiple items in an image and derive bounding boxes for them.
In this codelab, you'll explore how to build an app that handles the core use case, detecting the primary contents of the image. This is generally called Image Classification or Image Labelling.
To keep the app as simple as possible, it will use images that are bundled with it as resources and show you a classification from them. Future extensions could be to use an Image Picker or pull images directly from the camera.
You'll start by going through the process of building the app on Android using Android Studio. (Jump to step 7 to do the equivalent on iOS.)
- Open Android Studio, go to the File menu and select Create a New Project.
- You'll be asked to pick a project template. Select Empty Activity.
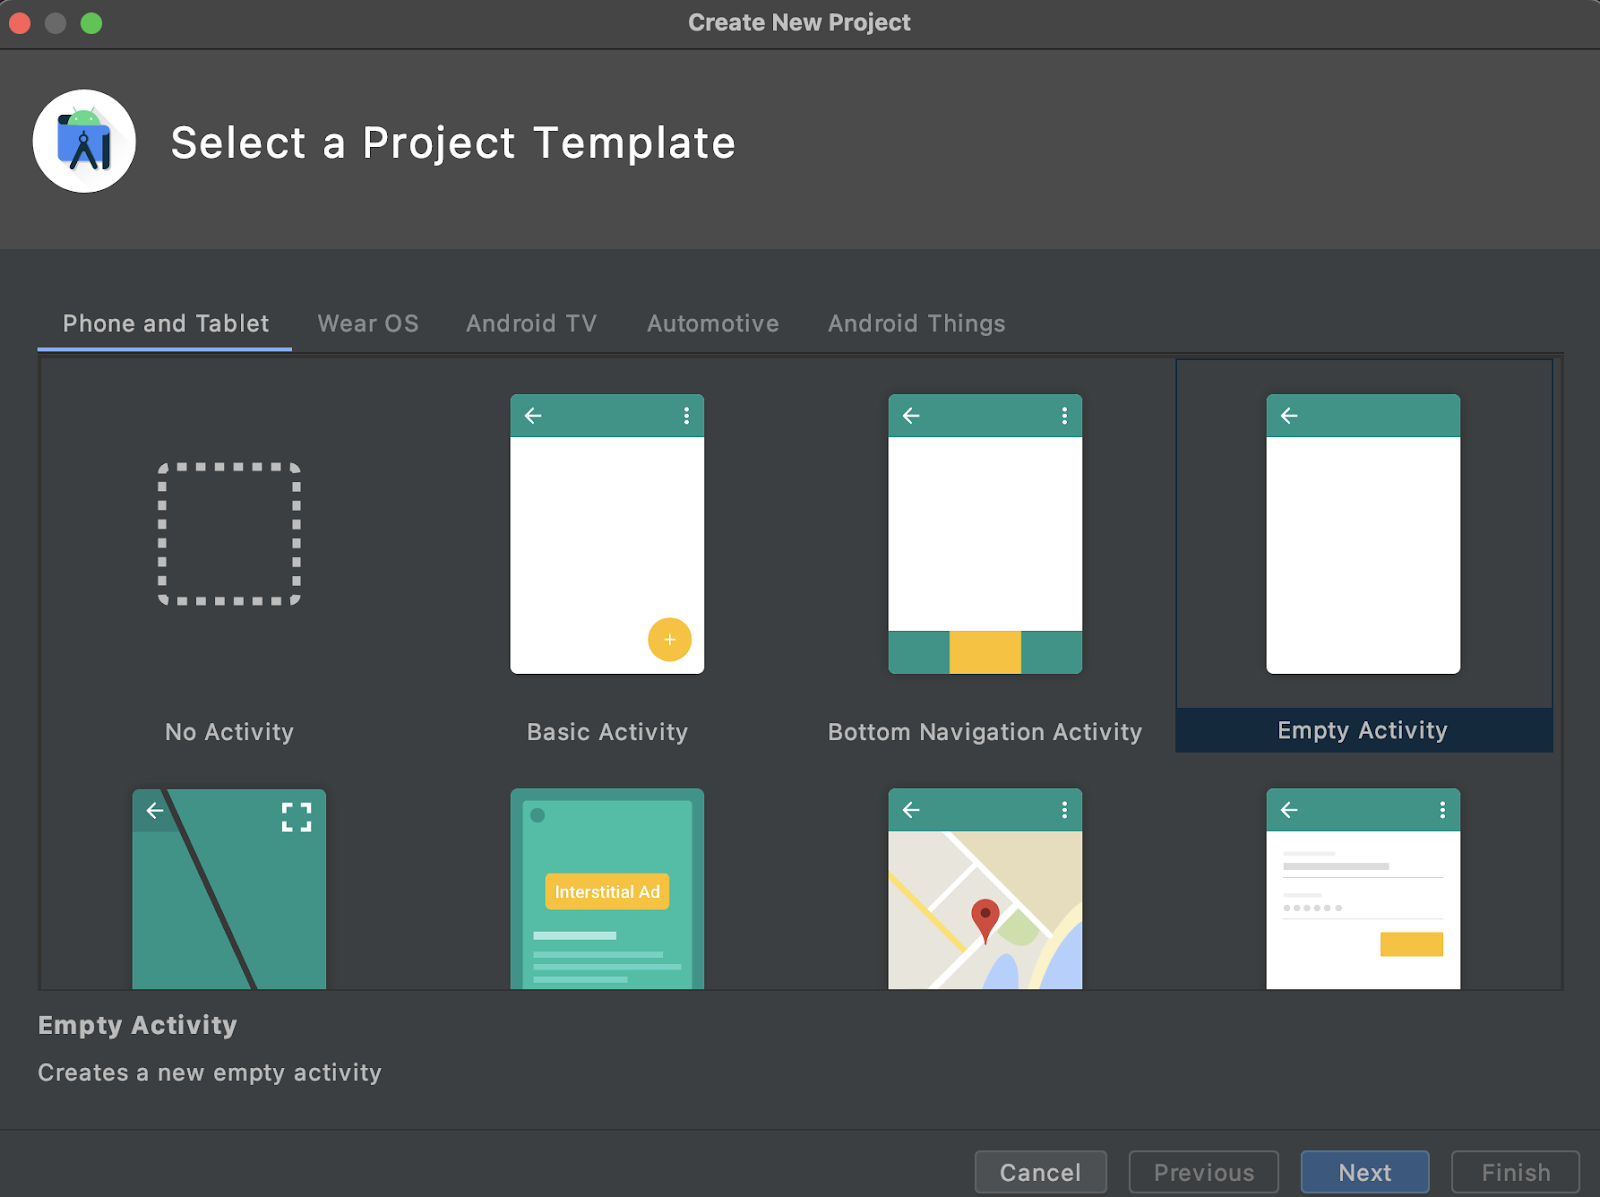
- Click Next. You'll be asked to Configure Your Project. Give it any name and package name you want, but the sample code in this codelab uses the project name ImageClassifierStep1 and the package name com.google.imageclassifierstep1.
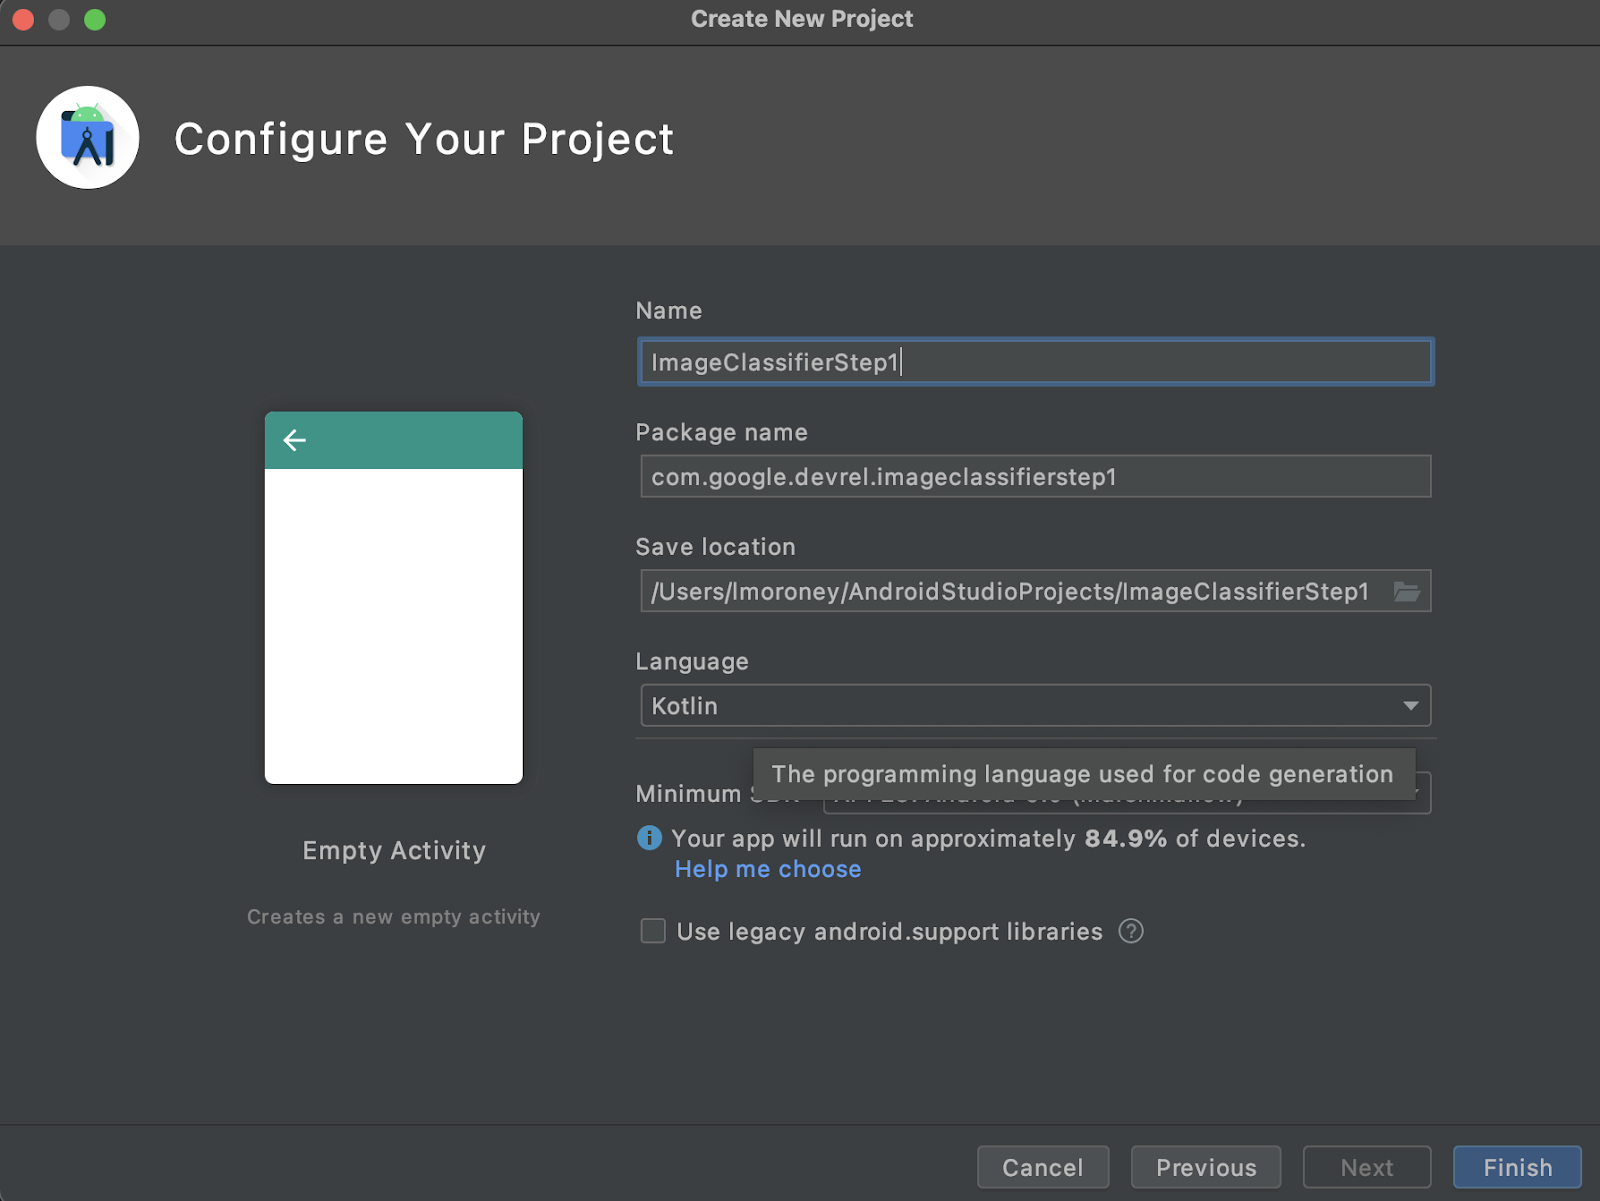
- Choose your preferred language, either Kotlin or Java. This lab uses Kotlin, so if you want to follow along exactly, you'll probably want to choose Kotlin.
- When ready, click Finish. Android Studio will create the app for you. It might take a few moments to set everything up.
3. Import ML Kit's Image Labelling Library
ML Kit (https://developers.google.com/ml-kit) offers a number of solutions for developers, meeting common scenarios in Machine Learning and making them easy to implement and work cross-platform. ML Kit provides a turnkey library that you can use in this app called Image Labelling. This library includes a model that is pre-trained to recognize over 600 classes of images. As such, it's perfect to get started with.
Note that ML Kit also allows you to use custom models using the same API, so, when you're ready, you can move beyond "getting started" and start building your personalized image labelling app that uses a model trained for your scenario.
In this scenario, you'll build a flower recognizer. When you create your first app and show it a picture of a flower, it will recognize it as a flower. (Later, when you build your own flower detector model, you'll be able to drop it into your app with minimal changes thanks to ML Kit, and have the new model tell you which type of flower it is, such as tulip or a rose.)
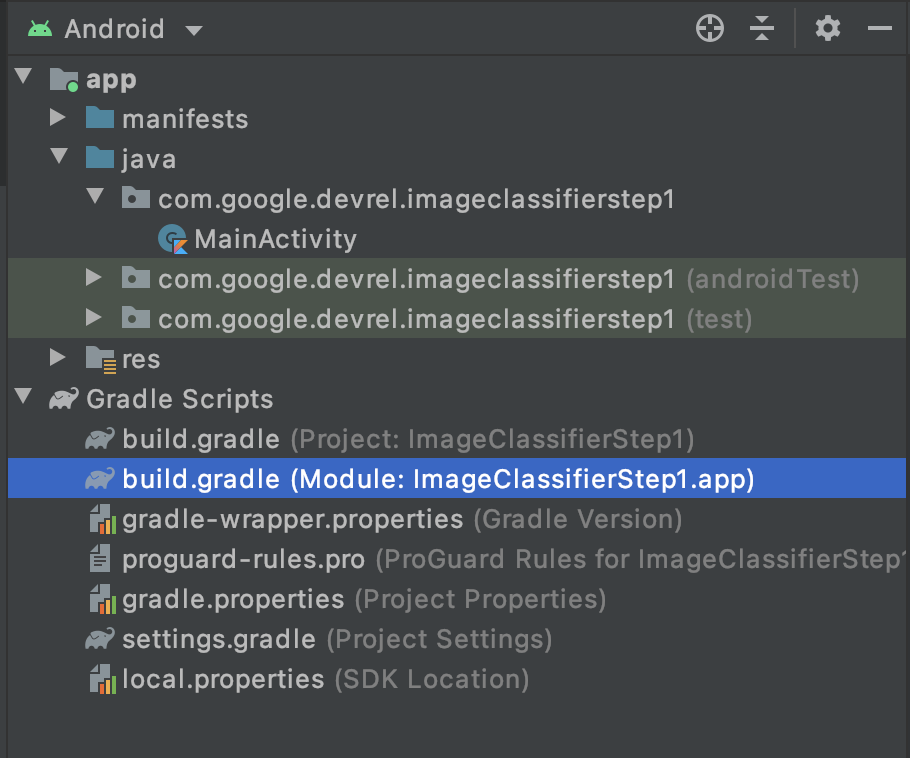
- In Android Studio, using the project explorer, make sure Android is selected at the top.
- Open the Gradle Scripts folder, and select the
build.gradlefile for the app. There may be 2 or more, so ensure you are using the app level one as shown here:
- At the bottom of the file you'll see a section called dependencies where a list of
implementation,testImplementation, andandroidImplementationsettings are stored. Add a new one to the file with this code:
implementation 'com.google.mlkit:image-labeling:17.0.3'
(Make sure that this is inside the dependencies { })
- You'll see a bar appear at the top of the window flagging that the
build.gradlehas changed, and you need to resync. Go ahead and do this. If you don't see it, look for the little elephant icon in the toolbar at the top right, and click that.

You've now imported ML Kit, and you're ready to start image labelling.
Next, you'll create a simple user interface to render an image, and give you a button that when your user presses it, ML Kit invokes the image labeler model to parse the contents of the image.
4. Build the User Interface
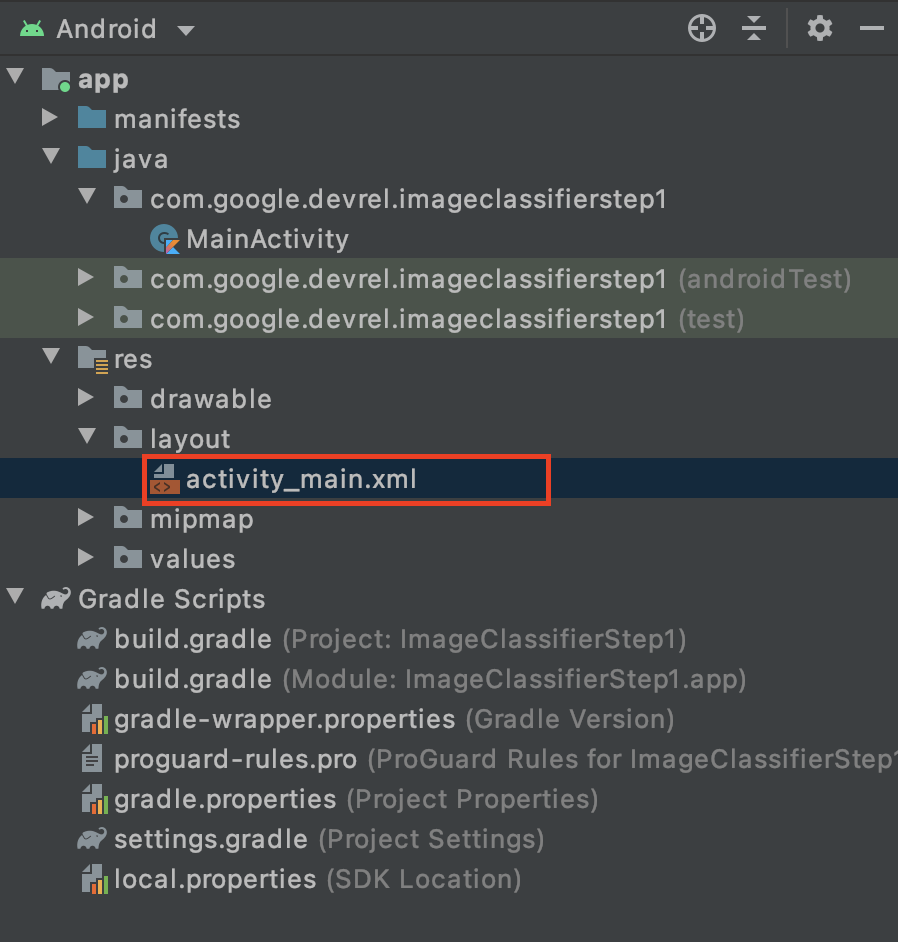
In Android Studio, you edit the user interface for each screen (or Activity) by using an xml-based layout file. The basic app you created has a single activity (whose code is in MainActivity, and you'll see that shortly), and the user interface declaration is in activity_main.xml.
You can find this in the res > layout folder in Android's project explorer – like this:
This will open a full editor that allows you to design your Activity user interface. There's a lot there, and it's not the intent of this lab to teach you how to use it. To learn more about the layout editor check out: https://developer.android.com/studio/write/layout-editor
For the purposes of this lab, select the Code tool at the upper right corner of the editor.

You'll now see just XML code in the main part of the window. Change the code to this:
<?xml version="1.0" encoding="utf-8"?>
<androidx.constraintlayout.widget.ConstraintLayout xmlns:android="http://schemas.android.com/apk/res/android"
    xmlns:app="http://schemas.android.com/apk/res-auto"
    xmlns:tools="http://schemas.android.com/tools"
    android:layout_width="match_parent"
    android:layout_height="match_parent"
    tools:context=".MainActivity">

    <LinearLayout
        android:layout_width="match_parent"
        android:layout_height="wrap_content"
        android:orientation="vertical"
        app:layout_constraintStart_toStartOf="parent"
        app:layout_constraintTop_toTopOf="parent">

        <ImageView
            android:id="@+id/imageToLabel"
            android:layout_width="match_parent"
            android:layout_height="match_parent" />
        <Button
            android:id="@+id/btnTest"
            android:layout_width="wrap_content"
            android:layout_height="wrap_content"
            android:text="Label Image"
            android:layout_gravity="center"/>
        <TextView
            android:id="@+id/txtOutput"
            android:layout_width="match_parent"
            android:layout_height="wrap_content"
            android:ems="10"
            android:gravity="start|top" />
    </LinearLayout>
</androidx.constraintlayout.widget.ConstraintLayout>
This will give you a super simple layout containing an ImageView (to render the image), a Button (for the user to press) and a TextView where the labels will be displayed.
You now have your user interface defined. Before getting to coding, add some images as assets, and the app will do inference on these images.
5. Bundle Images with the App
One way to bundle extra files with an Android app is to add them as assets that get compiled into the app. To keep this app simple, we'll do this to add an image of some flowers. Later, you could extend this app to use CameraX or other libraries to take a photo and use that. But for simplicity, we'll just bundle the image for now.
- In the project explorer, on app at the top, right click and select New Directory.
- On the dialog that appears with a listing different directories, select src/main/assets.

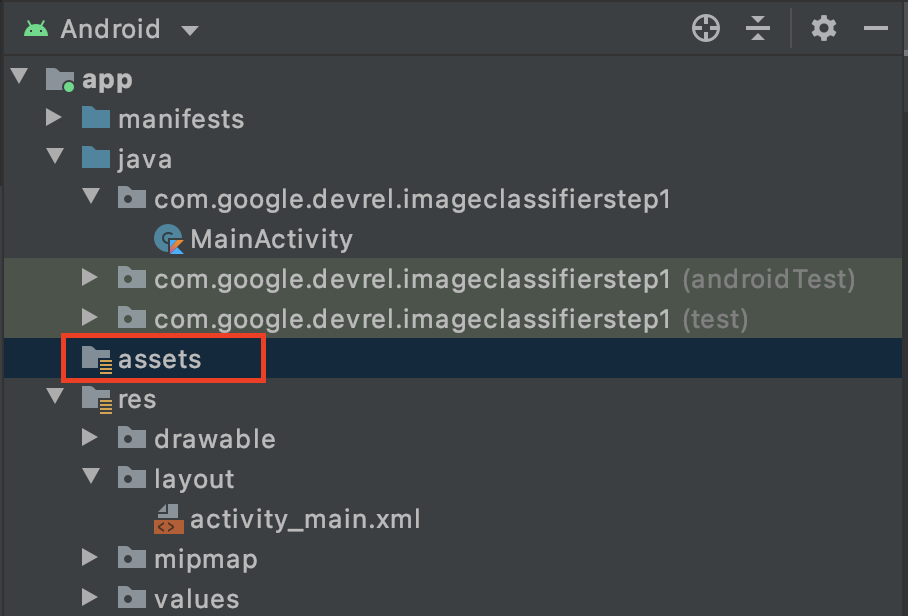
Once you've done this, you'll see a new assets folder appear in the project explorer:
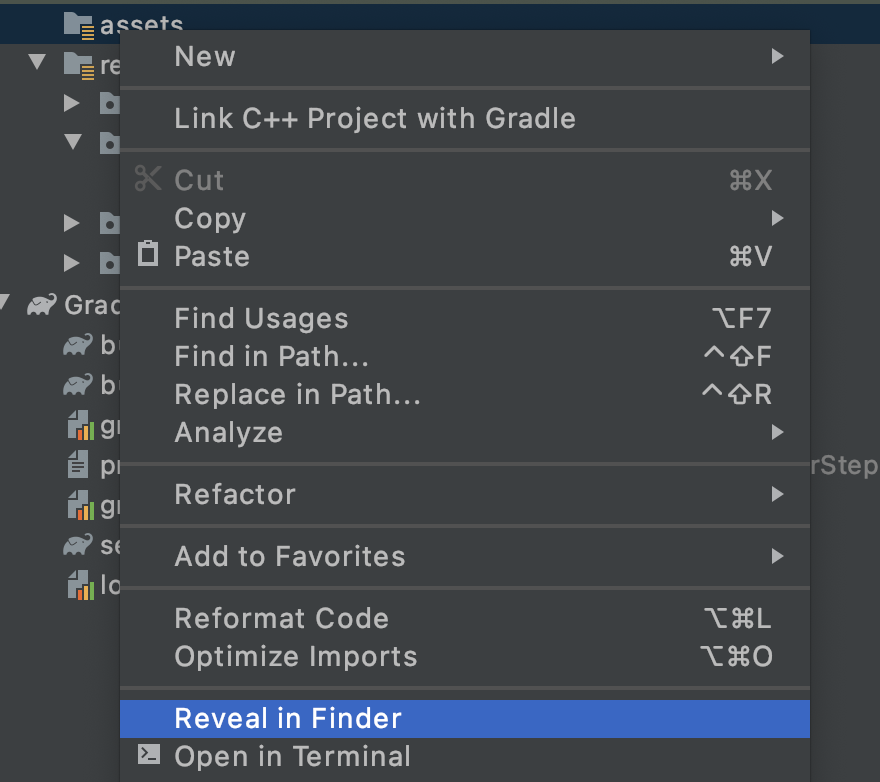
- Right click this folder, and you'll see a popup with a list of options. One of these will be to open the folder in your file system. Find the appropriate one for your operating system and select it. (On a Mac this will be Reveal in Finder, on Windows it will be Open in Explorer, and on Ubuntu it will be Show in Files.)
- Copy a file into it. You can download images from sites like Pixabay. Renaming the image into something simple is recommended. In this case, the image has been renamed
flower1.jpg.
Once you've done this, go back to Android Studio, and you should see your file within the assets folder.

You're now ready to label this image!
6. Write the Classification Code to Label the Image
(And now the part we've all been waiting for, doing Computer Vision on Android!)
- You'll write your code in the
MainActivityfile, so find that in the project folder under com.google.devrel.imageclassifierstep1 (or whatever your equivalent namespace is if you chose a different one). Note that there are generally 3 namespace folders set up in an Android Studio project, one for the app, one for Android Test, and one for test. You'll find yourMainActivityin the one that doesn't have a description after it in brackets.

If you chose to use Kotlin, you might be wondering why the parent folder is called Java. It's an historic artifact, from when Android Studio was Java only. Future versions may fix this, but don't worry if you want to use Kotlin, it's still fine. It's just the folder name for the source code.
- Open the
MainActivityfile, and you'll see a class file called MainActivity in the code editor. It should look like this:
class MainActivity : AppCompatActivity() {
    override fun onCreate(savedInstanceState: Bundle?) {
        super.onCreate(savedInstanceState)
        setContentView(R.layout.activity_main)
    }
}
Beneath the closing curly brace, you can add extension code that isn't part of the class, but is usable by the class. You'll need an extension to read a file from the assets as a bitmap. This will be used to load the image you copied into the assets folder earlier.
- Add this code:
// extension function to get bitmap from assets
fun Context.assetsToBitmap(fileName: String): Bitmap?{
    return try {
        with(assets.open(fileName)){
            BitmapFactory.decodeStream(this)
        }
    } catch (e: IOException) { null }
}
Android Studio will probably complain at this point, and highlight some of the code in red, like Context, Bitmap and IOException:
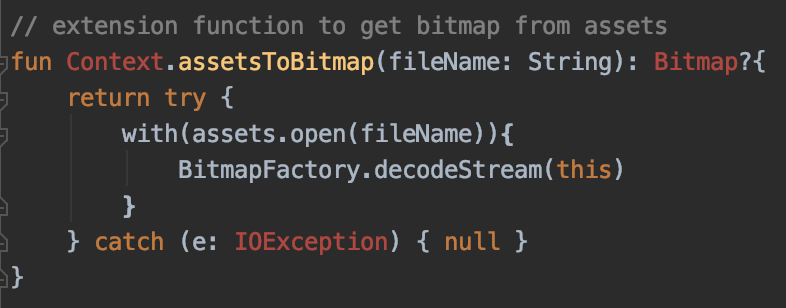
Don't worry! This is because you haven't imported the libraries that contain them yet. Android Studio offers a handy shortcut.
- Drag your cursor over the word, and press ALT + Enter (Option + Enter on a Mac) and the import will be generated for you.
- Next you can load the bitmap from the assets and put it in the ImageView. Back in the
onCreateFunctionof MainActivity, add this code right beneath thesetContentViewline:
val img: ImageView = findViewById(R.id.imageToLabel)
// assets folder image file name with extension
val fileName = "flower1.jpg"
// get bitmap from assets folder
val bitmap: Bitmap? = assetsToBitmap(fileName)
bitmap?.apply {
    img.setImageBitmap(this)
}
- As before, some of the code will be highlighted in red. Put the cursor on that line, and use the Alt + Enter / Option + Enter to automatically add the imports.
- In the
layout.xmlfile you created earlier, you gave the ImageView the name imageToLabel, so the first line will create an instance of an ImageView object, called img, using that layout information. It finds the details usingfindViewById, a built-in android function. It then uses the filenameflower1.jpgto load an image from the assets folder using theassetsToBitmapfunction you created in the previous step. Finally, it uses the bitmap abstract class to load the bitmap into img. - The layout file had a TextView that will be used to render the labels that were inferred for the image. Get a code object for that next. Immediately below the previous code, add this:
val txtOutput : TextView = findViewById(R.id.txtOutput)
As earlier, this finds the layout file information for the text view using its name (check the XML where it's called txtOutput) and uses it to instantiate a TextView object called txtOutput.
Similarly, you'll create a button object to represent the button, and instantiate it with the layout file contents.
In the layout file we called the button btnTest, so we can instantiate it like this:
val btn: Button = findViewById(R.id.btnTest)
Now you have all your code and controls initialized, the next (and final) step will be to use them to get an inference on the image.
Before continuing, make sure that your onCreate code looks like this:
override fun onCreate(savedInstanceState: Bundle?) {
    super.onCreate(savedInstanceState)
    setContentView(R.layout.activity_main)
    val img: ImageView = findViewById(R.id.imageToLabel)
    // assets folder image file name with extension
    val fileName = "flower1.jpg"
    // get bitmap from assets folder
    val bitmap: Bitmap? = assetsToBitmap(fileName)
    bitmap?.apply {
        img.setImageBitmap(this)
    }
    val txtOutput : TextView = findViewById(R.id.txtOutput)
    val btn: Button = findViewById(R.id.btnTest)
}
None of the keywords should be red in color, indicating that they haven't yet been imported. If they are, please go back and do the ALT + Enter trick to generate the imports.
When using ML Kit's image labeller, the first step is usually to create an Options object to customize the behavior. You'll convert your image to an InputImage format that ML Kit can recognize. Then you create a Labeler object to perform the inference. It will give you an asynchronous call back with the results, that you can then parse.
On the button you just created, do all of that within it's onClickListener event. Here's the complete code:
btn.setOnClickListener {
  val labeler = ImageLabeling.getClient(ImageLabelerOptions.DEFAULT_OPTIONS)
  val image = InputImage.fromBitmap(bitmap!!, 0)
  var outputText = ""
  labeler.process(image)
    .addOnSuccessListener { labels ->
      // Task completed successfully
      for (label in labels) {
        val text = label.text
        val confidence = label.confidence
        outputText += "$text : $confidence\n"
      }
      txtOutput.text = outputText
  }
    .addOnFailureListener { e ->
      // Task failed with an exception
  }
}
- When the user first clicks the button, the code will instantiate a labeler using ImageLabeling.getClient, passing it ImageLabelerOptions. This comes with a DEFAULT_OPTIONS property that lets us get up and running quickly.
- Next, an InputImage will be created from the bitmap using its fromBitmap method. InputImage is ML Kit's desired format for processing images.
- Finally, labeler will process the image, and give an asynchronous callback, either on success or on failure. If the inference is successful, the callback will include a list of labels. You can then parse through this list of labels to read the text of the label and the confidence value. If it fails, it will send you back an exception which you can use to report to the user.
And that's it! You can now run the app either on an Android device or within the emulator. If you've never done it before, you can learn how here: https://developer.android.com/studio/run/emulator
Here's the app running in the emulator. At first you'll see the image and the button, and the label will be empty.
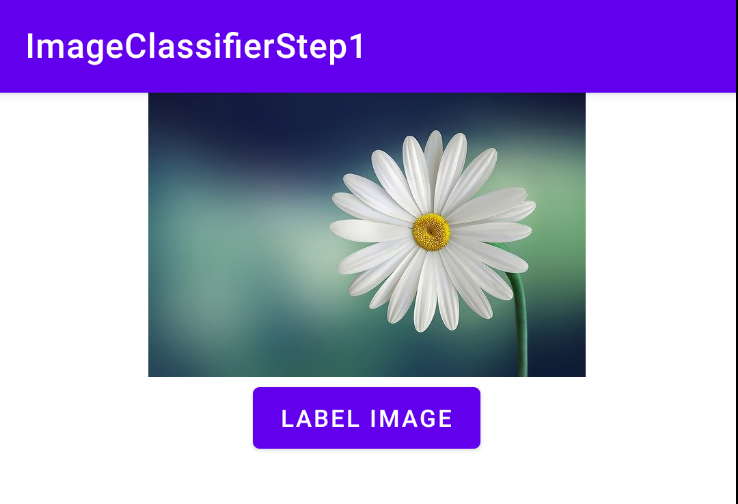
Press the button, and you'll get a set of labels for the image.
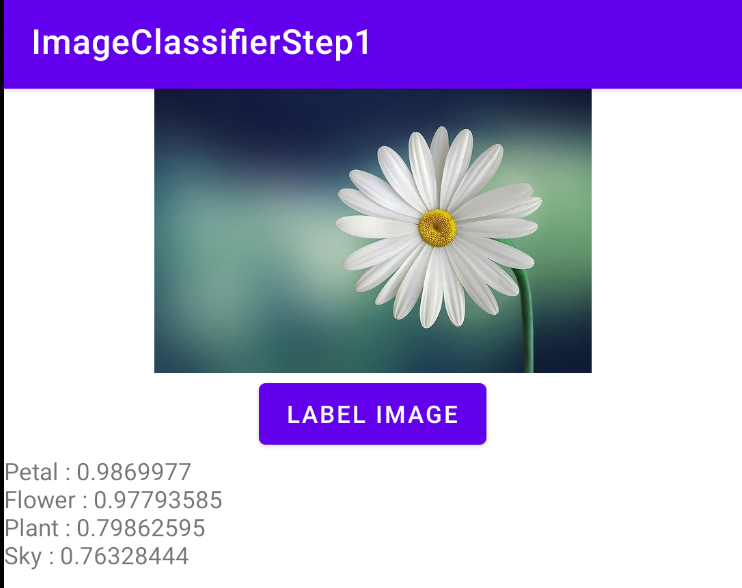
Here you can see that the labeler determined there were high probabilities that the image contained a petal, a flower, a plant, and the sky. These are all correct, and they are all demonstrating that the model is working to parse the image.
But it can't yet determine that this is a picture of a daisy. For that you'll need a custom model that is trained on specific flowers, and you'll see how to do that in the next lab.
In the following steps, you'll explore how to build this same app on iOS.
7. Create an Image Classifier on iOS - Get Started
You can create a similar app on iOS using Xcode.
- Launch Xcode, and from the file menu, select New Project. You'll see this dialog:
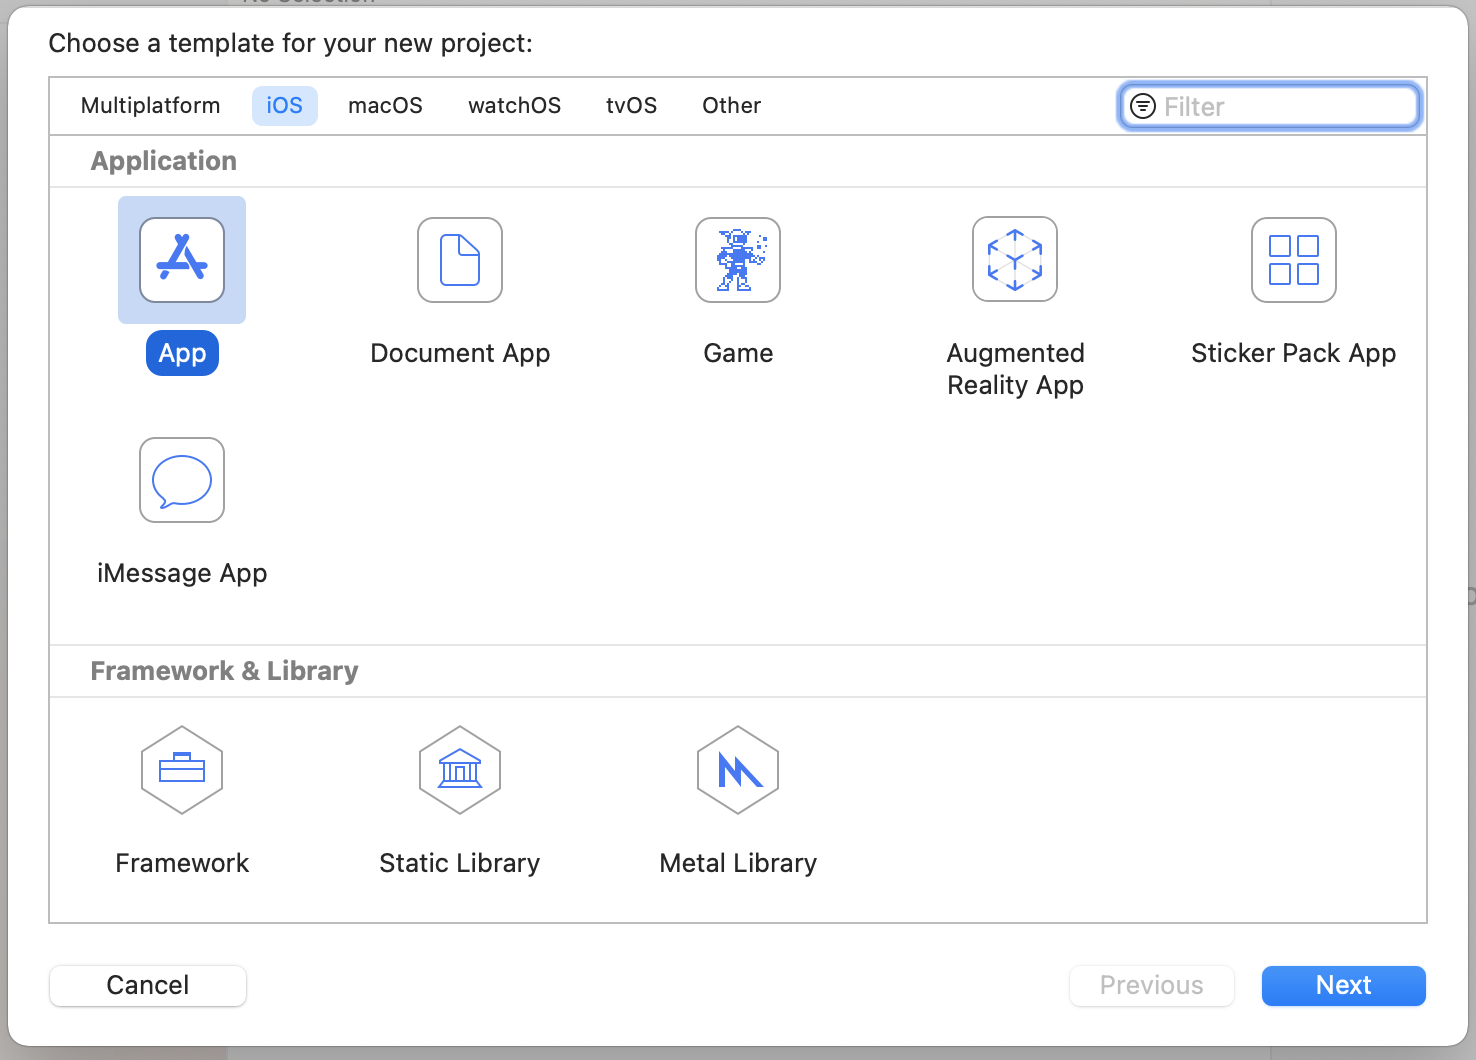
- Select App as shown, and click Next. You'll be asked to choose options for your project. Give it a name and an organization identifier as shown. Make sure that the interface type is Storyboard, and that the language is Swift as shown.
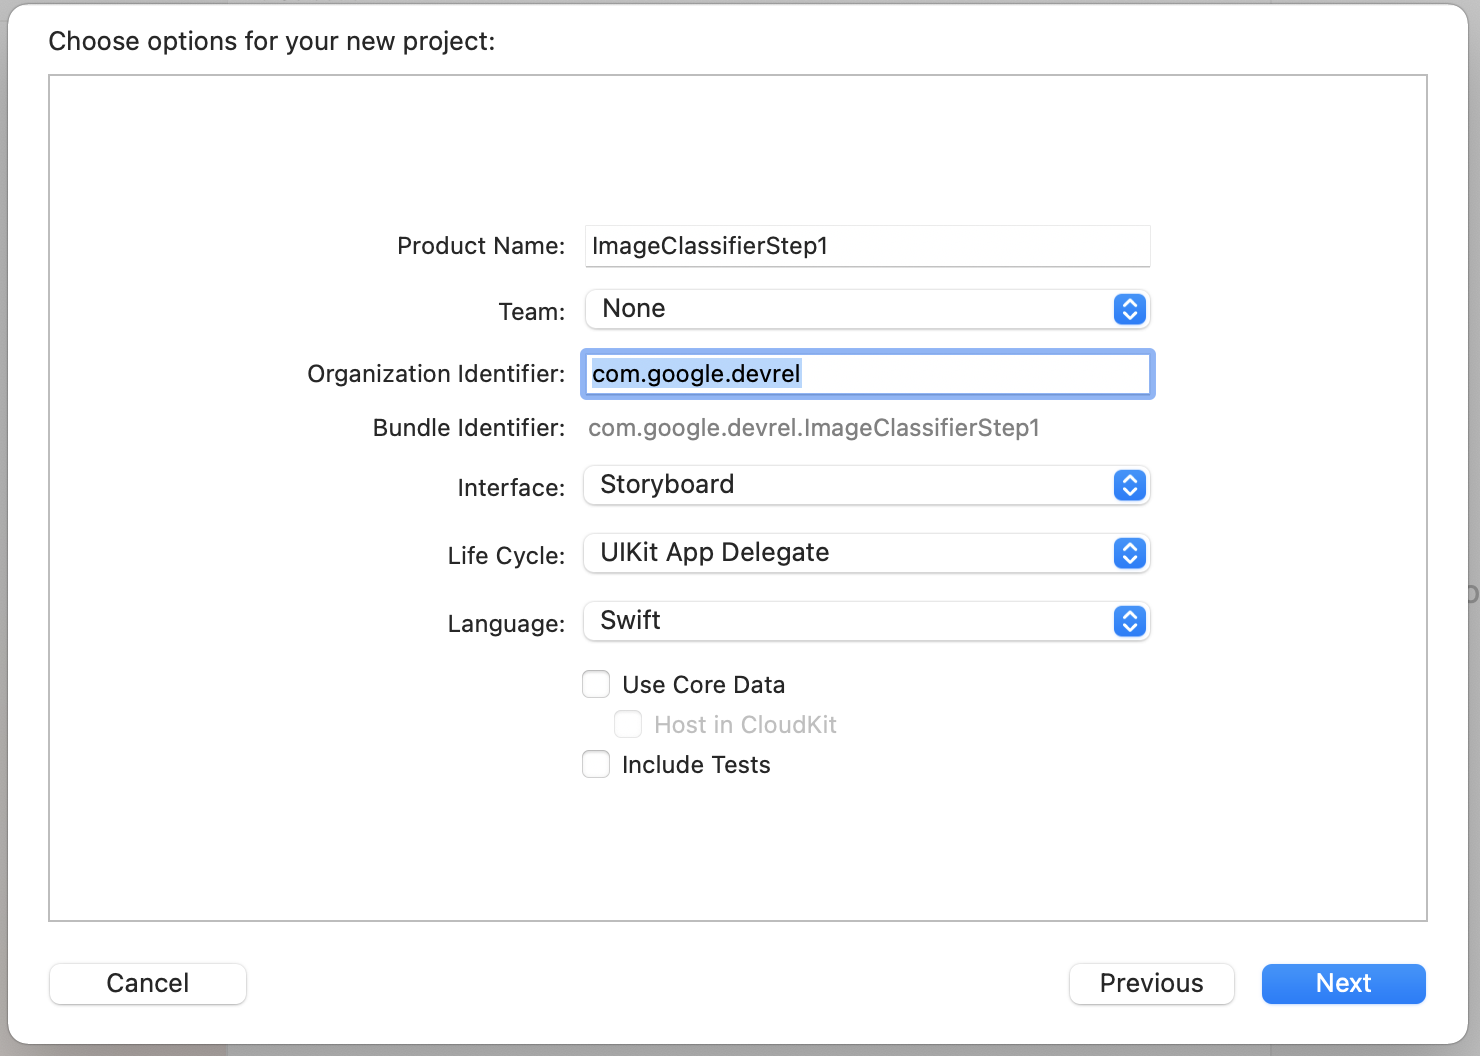
- If you want to deploy to a phone, and have a developer profile set up, you can set your team setting. If not, leave it at None and you can use the iOS simulator to run your app.
- Click Next and select a folder to store your project and its files in. Remember the location of this project, you'll need it in the next step.
- Close Xcode for now, because you'll be re-opening it using a different workspace file after the next step.
8. Integrate ML Kit using Cocoapods
As ML Kit also works on iOS, you can use it in a very similar way to build an image classifier. To integrate it you'll use CocoaPods. If you don't have this installed already, you can do so with the instructions at https://cocoapods.org/
- Open the directory where you created your project. It should contain your .xcodeproj file.
Here you can see the .xcodeproj file indicating I'm in the correct location.
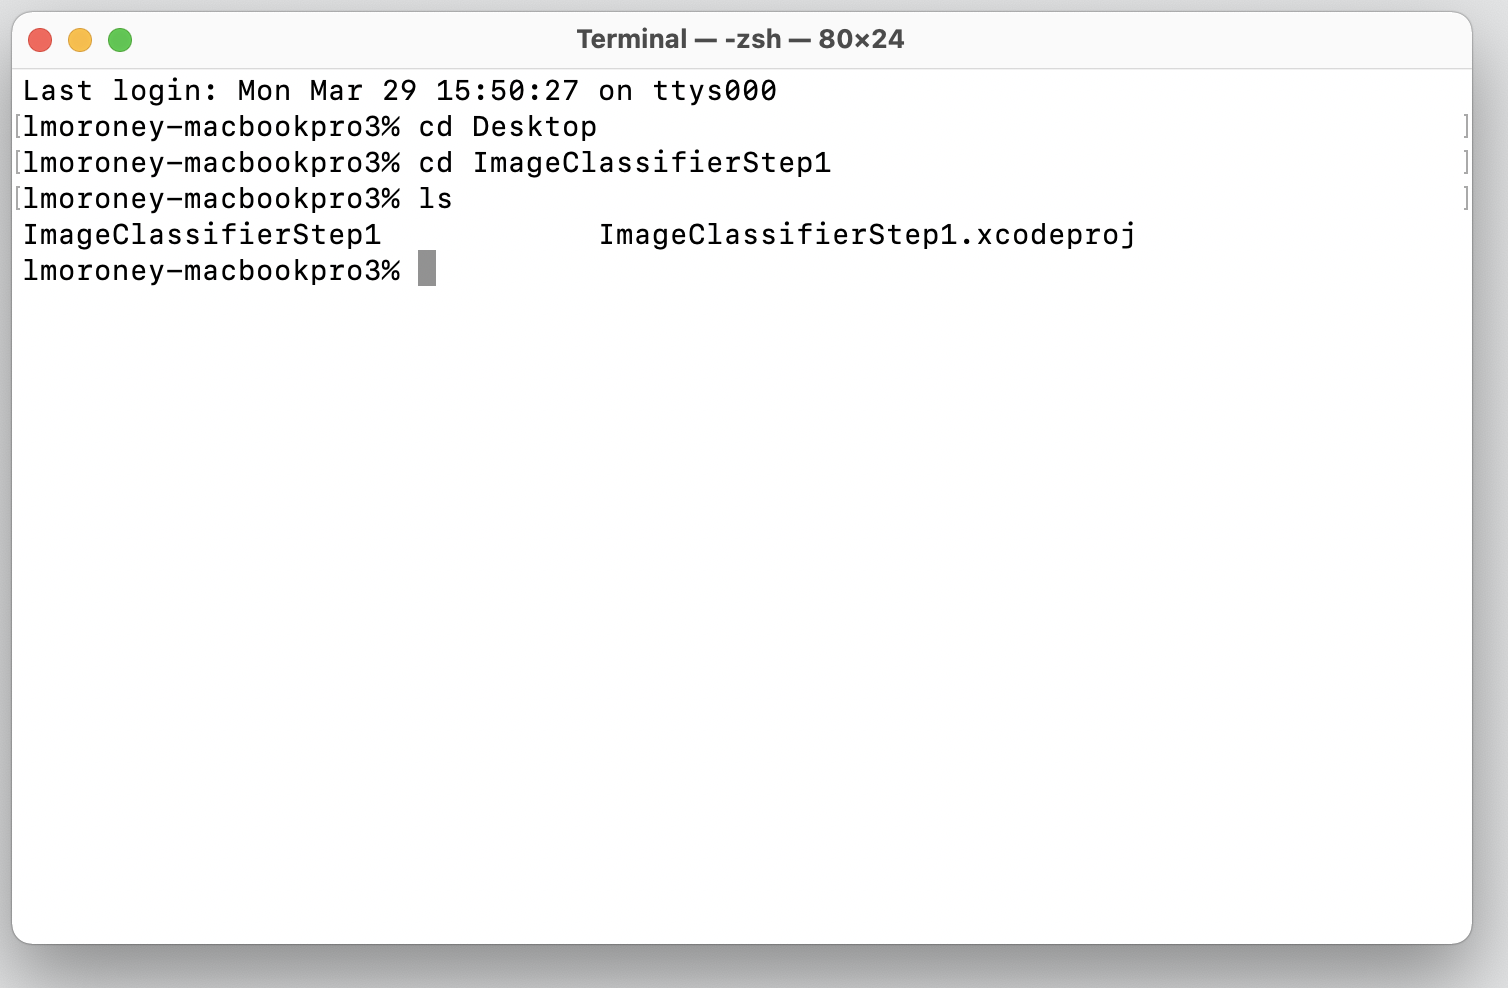
- In this folder, create a new file called Podfile. There's no extension, it's just Podfile. Within it, add the following:
platform :ios, '10.0'

target 'ImageClassifierStep1' do
        pod 'GoogleMLKit/ImageLabeling'
end
- Save it, and return to the terminal. In the same directory type
pod install. Cocoapods will download the appropriate libraries and dependencies, and create a new workspace that combines your project with its external dependencies.
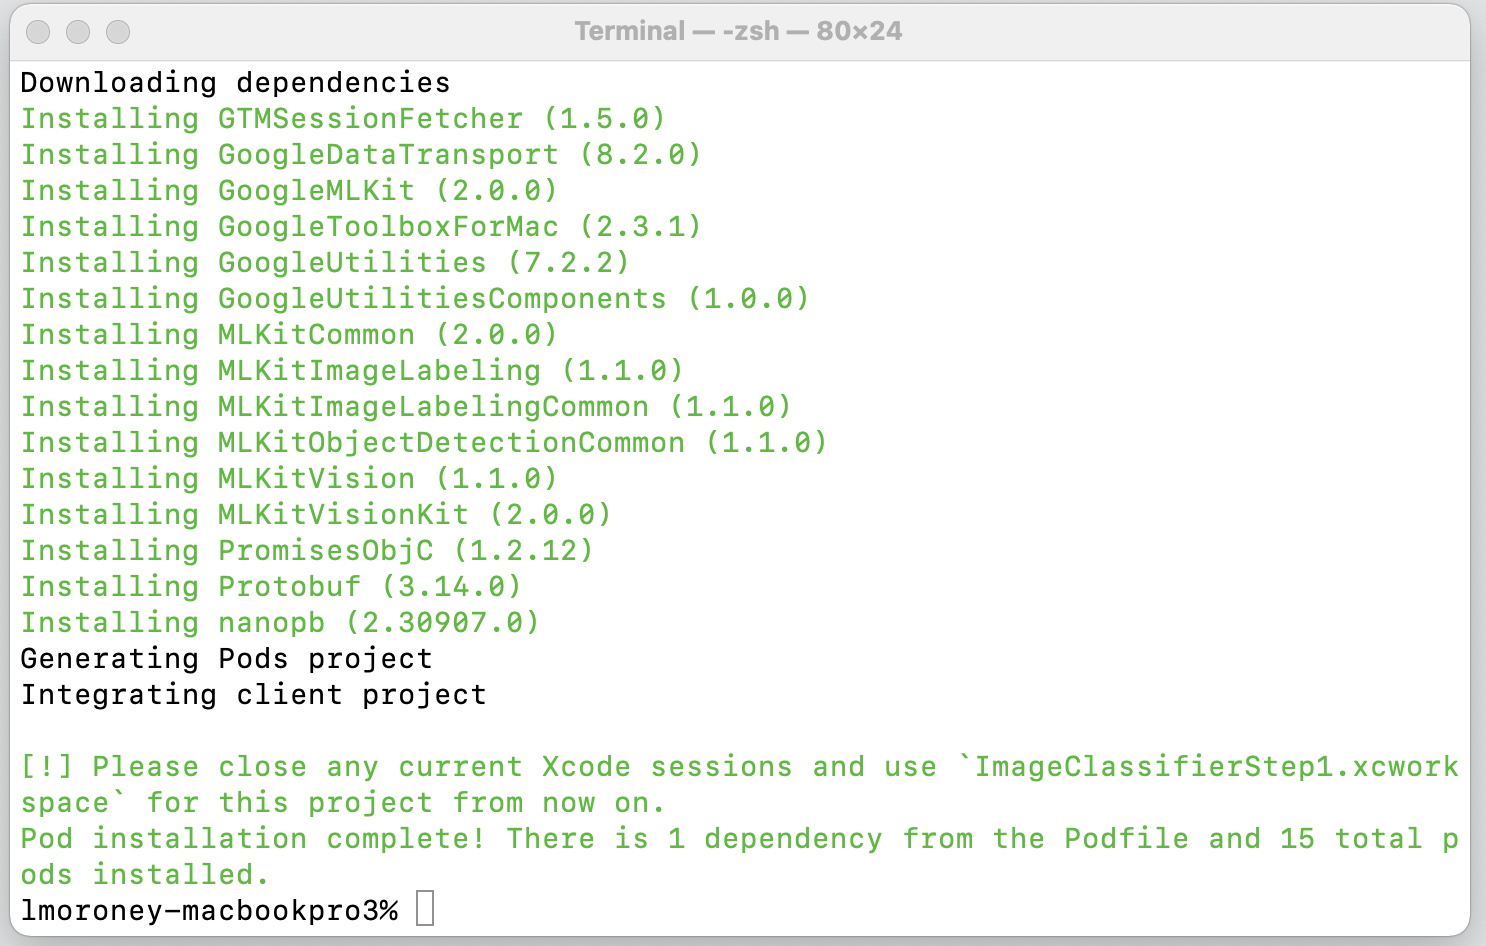
Note that at the end it asks you to close your Xcode sessions, and use the workspace file from now on. Open this file and Xcode will launch with your original project plus the external dependencies.
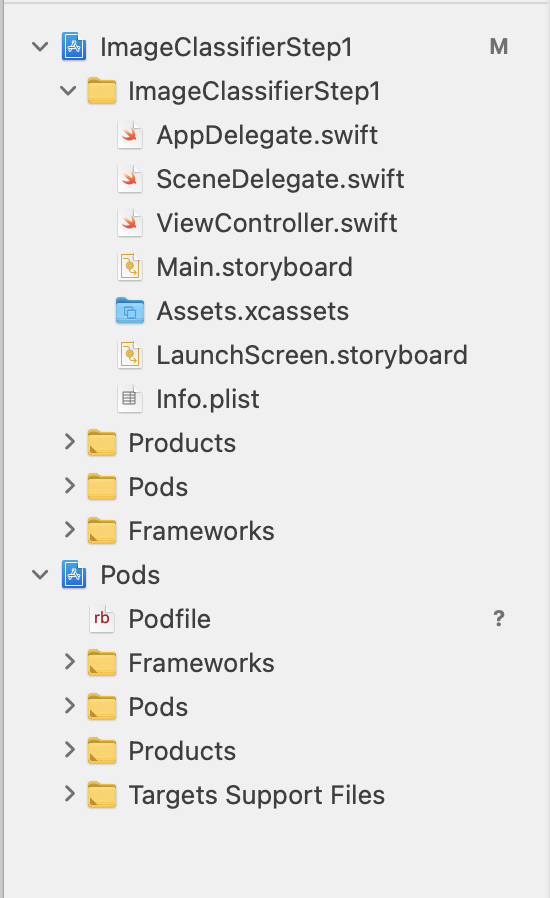
You're now ready to move to the next step and create the user interface.
9. Create the iOS UI using Storyboards
- Open the
Main.storyboardfile, and you'll see a user interface layout with a design surface for a phone. - At the top right of the screen is a + button that you can use to add controls. Click it to get the controls palette.
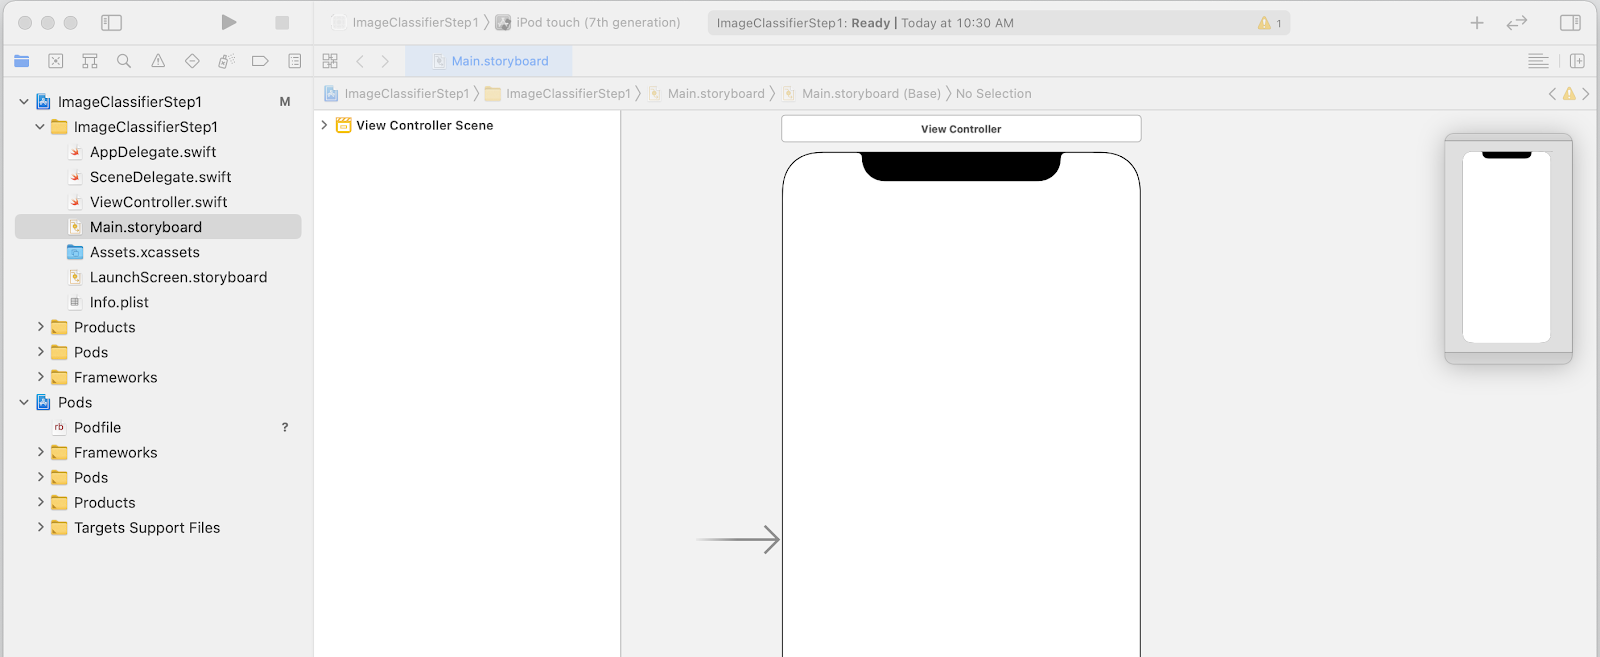
- From there, drag and drop an ImageView, a Button and a Label onto the design surface. Arrange them top to bottom as shown:
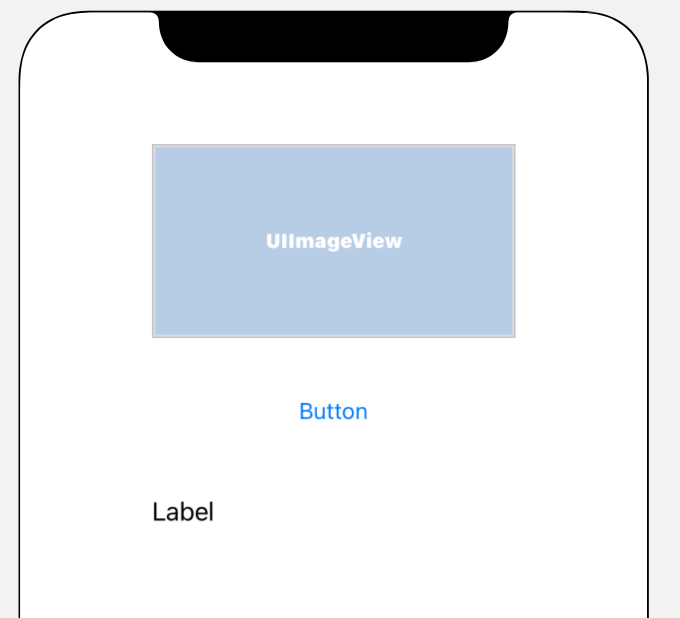
- Double click the button to edit its text from Button to Classify.
- Drag the control handles around the label to make it bigger. (Say about the same width as the UIImageView and twice the height.)
- With the label still selected, click the selectors button at the top right to show the inspectors palette.
- Once you've done this, find the Lines setting and ensure it's set to 0. This allows the label to render a dynamic number of lines.
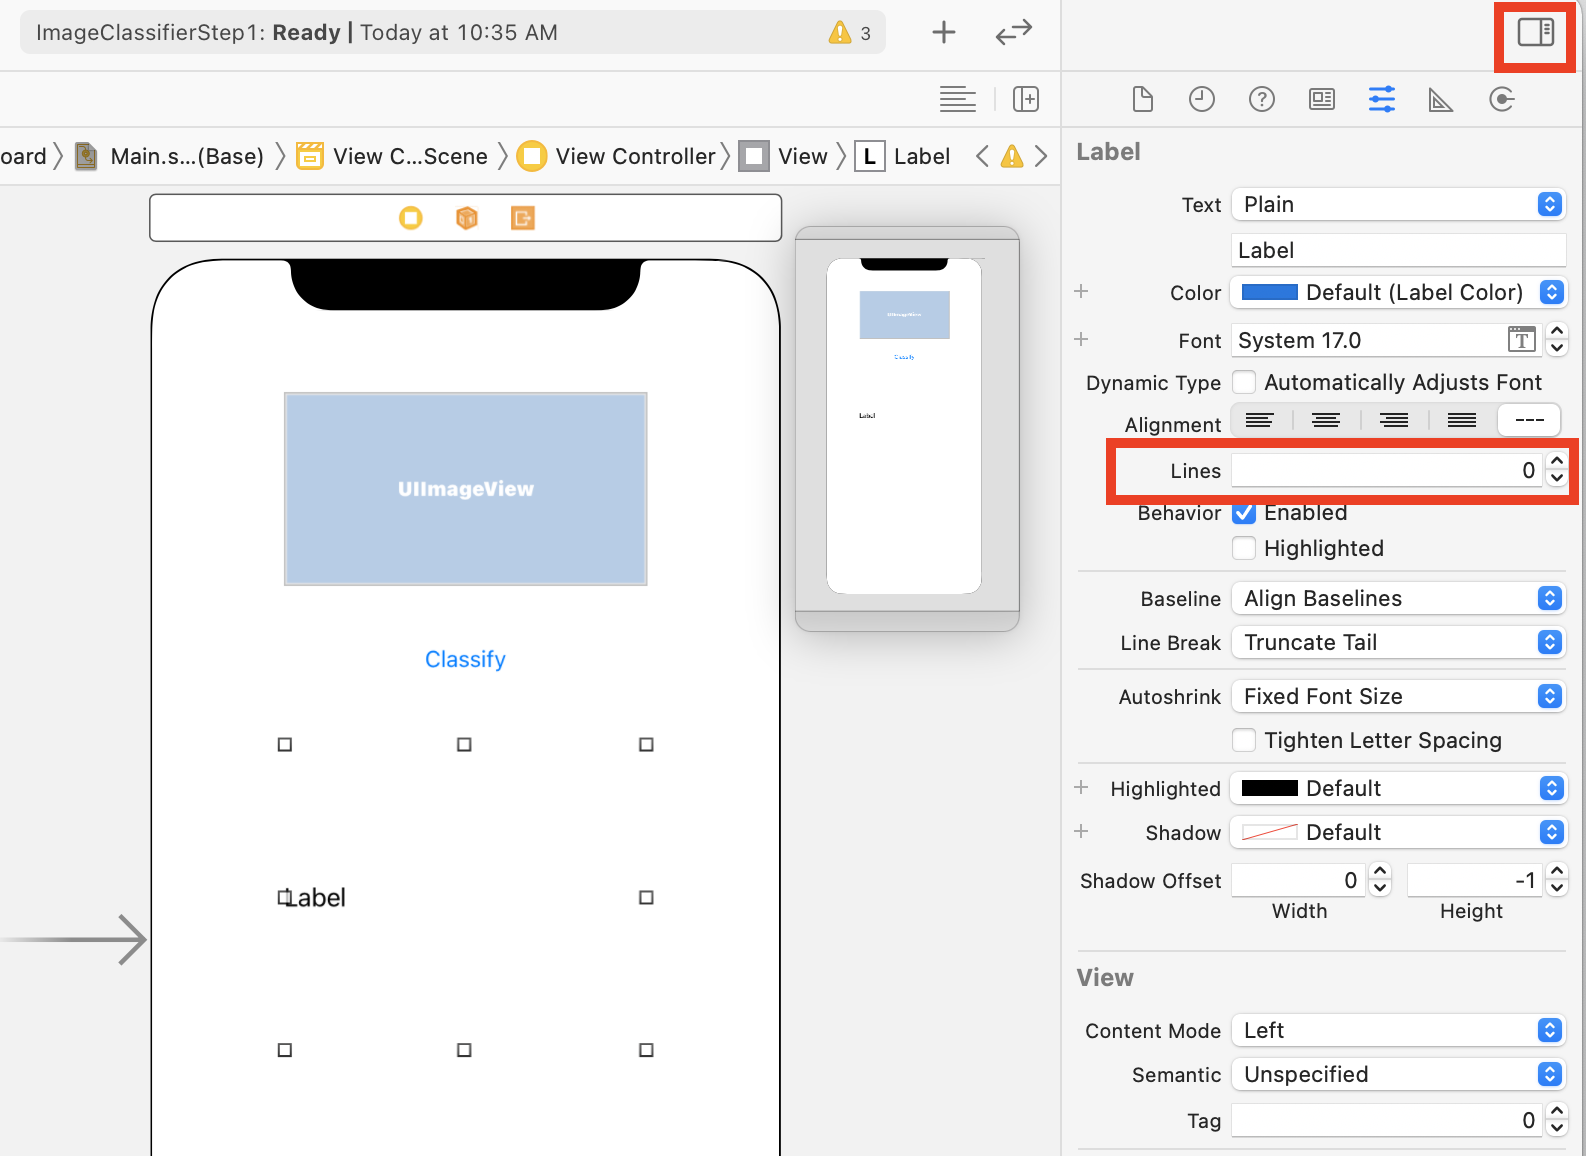
You're now ready to take the next step – wiring the UI up to code using outlets and actions.
10. Create Actions and Outlets
When doing iOS development using storyboards, you refer to the layout information for your controls using outlets, and define the code to run when the user takes an action on a control using actions.
In the next step you'll need to create outlets for the ImageView and the Label. The ImageView will be referred to in code to load the image into it. The Label will be referred to in code to set its text based on the inference that comes back from ML Kit.
- Close the inspectors palette by clicking on the control on the top right of the screen, then click the Add Editor on Right button that's immediately below it.

- You'll have a confusing screen layout where the main.storyboard is opened twice. On the left, in the project navigator, select ViewController.swift so that the view controller code opens. It might look like your design surface has vanished from the storyboard editor on the left, but don't worry, it's still there!
- To get it back, click View Controller in the View Controller Scene. Try to get your UI to look like this – with the storyboard on the left showing your design, and the code for ViewController.swift on the right.
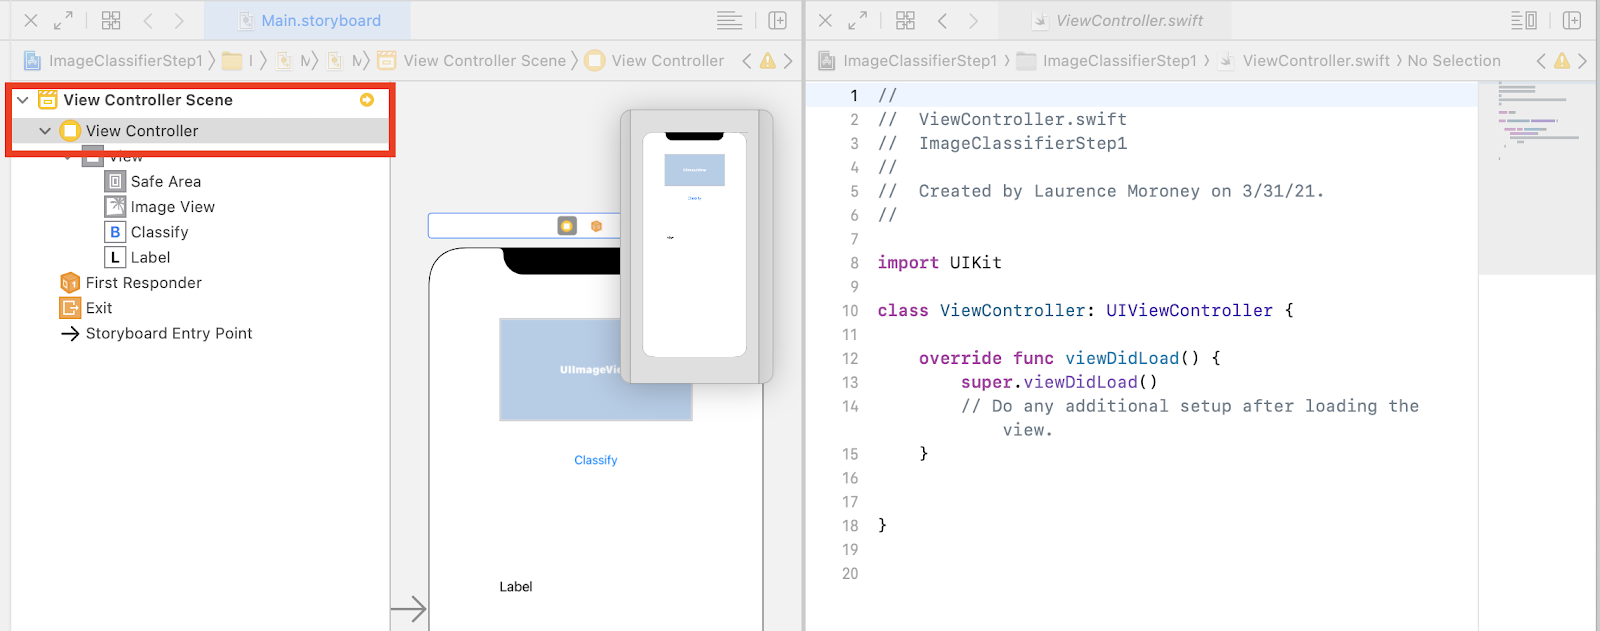
- Select the UIImageView from the design surface on the left, and while pressing the CONTROL key, drag it to the code on the right, dropping it just below the
classkeyword (at line 11 in the above screenshot).
You'll see an arrow as you drag, and when you drop you'll get a popup like this:

- Fill out the Name field as "imageView" and click Connect.
- Repeat this process with the label, and give it the name "lblOutput."
- Important: For the button, you'll do the same thing but make sure you set the connection type to Action and not Outlet!

- Give it the name "doClassification", and click Connect.
When you're done, your code should look like this: (Note that the label and image view are declared as IBOutlet (Interface Builder Outlet), and the button as IBAction (Interface Builder Action).)
import UIKit

class ViewController: UIViewController {

    @IBAction func doClassification(_ sender: Any) {
    }
    @IBOutlet weak var imageView: UIImageView!
    @IBOutlet weak var lblOutput: UILabel!
    override func viewDidLoad() {
        super.viewDidLoad()
        // Do any additional setup after loading the view.
    }

}
- Finally, bundle an image with the app so that we can do the classification easily. To do this, drag the file from your file explorer into the explorer on the left of Xcode. When you drop it, you'll get a popup like this:
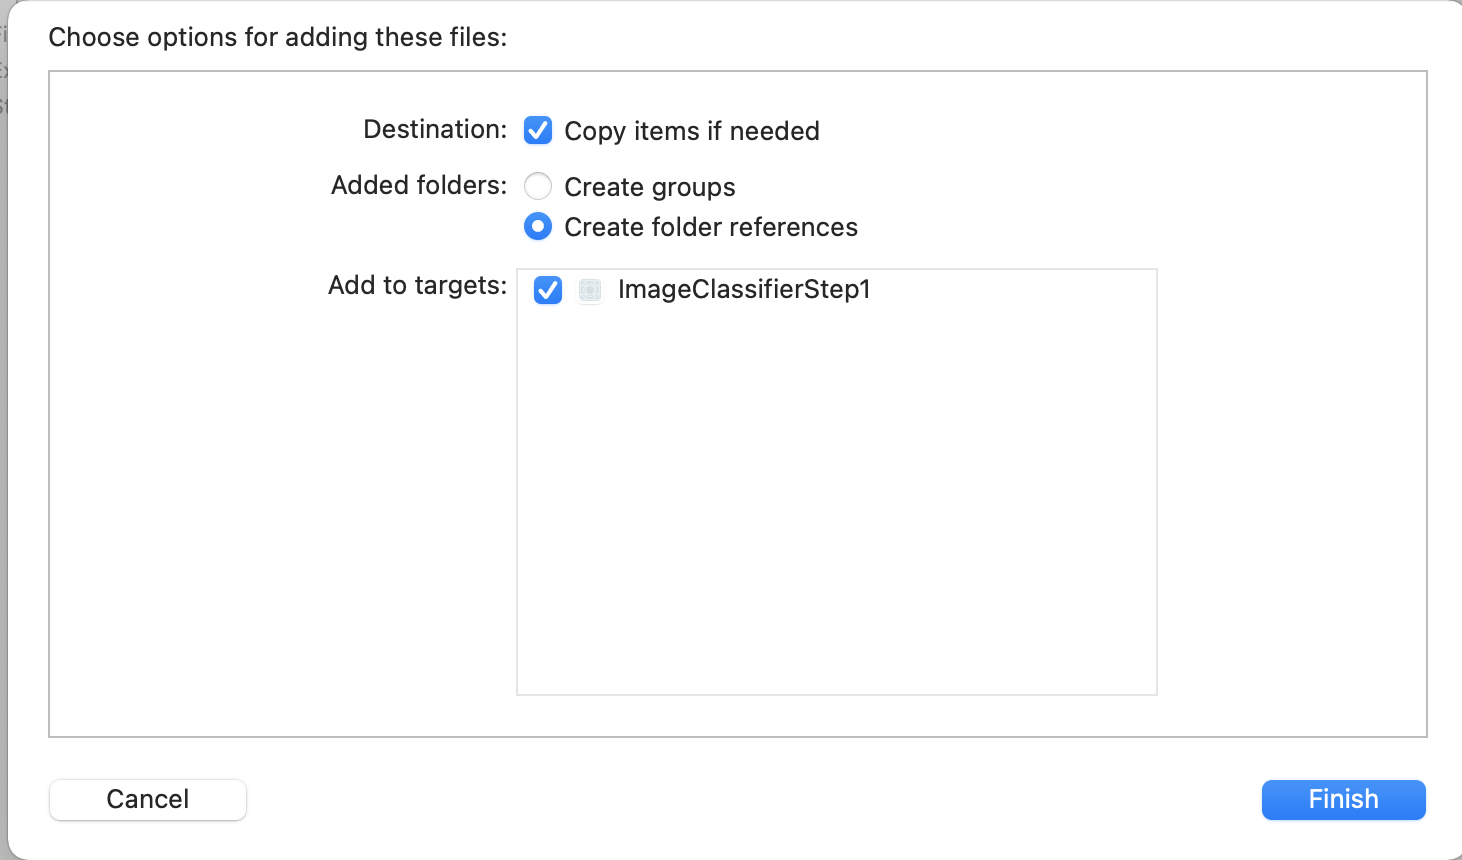
- Ensure that the checkbox in the Add to Targets section is checked as shown, then click Finish.
The file will be bundled with your app, and you can now easily classify it. You're now ready to code up the user interface to do image classification!
11. Write the Code for Image Classification
Now that everything is set up, writing the code to perform the image classification is really straightforward.
- Begin by closing the storyboard designer by clicking X in the top left corner above the design surface. This will let you focus on just your code. You'll edit ViewController.swift for the rest of this lab.
- Import the MLKitVision and MLKit ImageLabeling libraries by adding this code at the top, right under the import of UIKit:
import MLKitVision
import MLKitImageLabeling
- Then, within your
viewDidLoadfunction, initialize the ImageView using the file we bundled in the app:
override func viewDidLoad() {
    super.viewDidLoad()
    // Do any additional setup after loading the view.
    imageView.image = UIImage(named:"flower1.jpg")
}
- Create a helper function to get the labels for the image, immediately below the
viewDidLoad():
func getLabels(with image: UIImage){
- Create a VisionImage from the image. ML Kit uses this type when performing image classification. So, within the getLabels func, add this code:
let visionImage = VisionImage(image: image)
visionImage.orientation = image.imageOrientation
- Next create the options for the image labeller. It will be initialized using these options. In this case you'll just set a basic option of the
confidenceThreshold. This means that you'll only ask the labeler to return labels that have a confidence of 0.4 or above. For example, for our flower, classes like "plant" or "petal" will have a high confidence, but those like "basketball" or "car" will have a low one.
let options = ImageLabelerOptions()
options.confidenceThreshold = 0.4
- Now create the labeler using these options:
let labeler = ImageLabeler.imageLabeler(options: options)
- Once you have the labeler, you can then process it. It will give you an asynchronous callback with labels (if it succeeded) and error (if it failed), which you can then process in another function that we'll create in a moment.
labeler.process(visionImage) { labels, error in
    self.processResult(from: labels, error: error)
  }
Don't worry if Xcode complains that there is no processResult member. You just haven't implemented that yet, and you'll do that next.
For convenience, here's the full getLabels func:
// This is called when the user presses the button
func getLabels(with image: UIImage){
    // Get the image from the UI Image element and set its orientation
    let visionImage = VisionImage(image: image)
    visionImage.orientation = image.imageOrientation

    // Create Image Labeler options, and set the threshold to 0.4
    // so we will ignore all classes with a probability of 0.4 or less
    let options = ImageLabelerOptions()
    options.confidenceThreshold = 0.4

    // Initialize the labeler with these options
    let labeler = ImageLabeler.imageLabeler(options: options)

    // And then process the image, with the callback going to self.processresult
    labeler.process(visionImage) { labels, error in
        self.processResult(from: labels, error: error)
 }
}
So now you need to implement the processResult function. This is really simple now, given that we have labels and an error object returned to us. The Labels should be cast into the ImageLabel type from ML Kit.
Once that's done you can just iterate through the set of labels, pull the description and the confidence value, and add them to a var called labeltexts. Once you iterate through them all, you simply set the lblOutput.text to that value.
Here's the complete function:
// This gets called by the labeler's callback
func processResult(from labels: [ImageLabel]?, error: Error?){
    // String to hold the labels
    var labeltexts = ""
    // Check that we have valid labels first
    guard let labels = labels else{
        return
    }
  // ...and if we do we can iterate through the set to get the description and confidence
    for label in labels{
        let labelText = label.text + " : " + label.confidence.description + "\n"
        labeltexts += labelText
    }
    // And when we're done we can update the UI with the list of labels
    lblOutput.text = labeltexts
}
All that remains is to call getLabels when the user presses the button.
When you created the action everything was wired up for you, so you just need to update the IBAction called doClassificaiton that you created earlier to call getLabels.
Here's the code to just call it with the contents of imageView:
@IBAction func doClassification(_ sender: Any) {
    getLabels(with: imageView.image!)
}
Now run your app and give it a try. You can see it in action here:
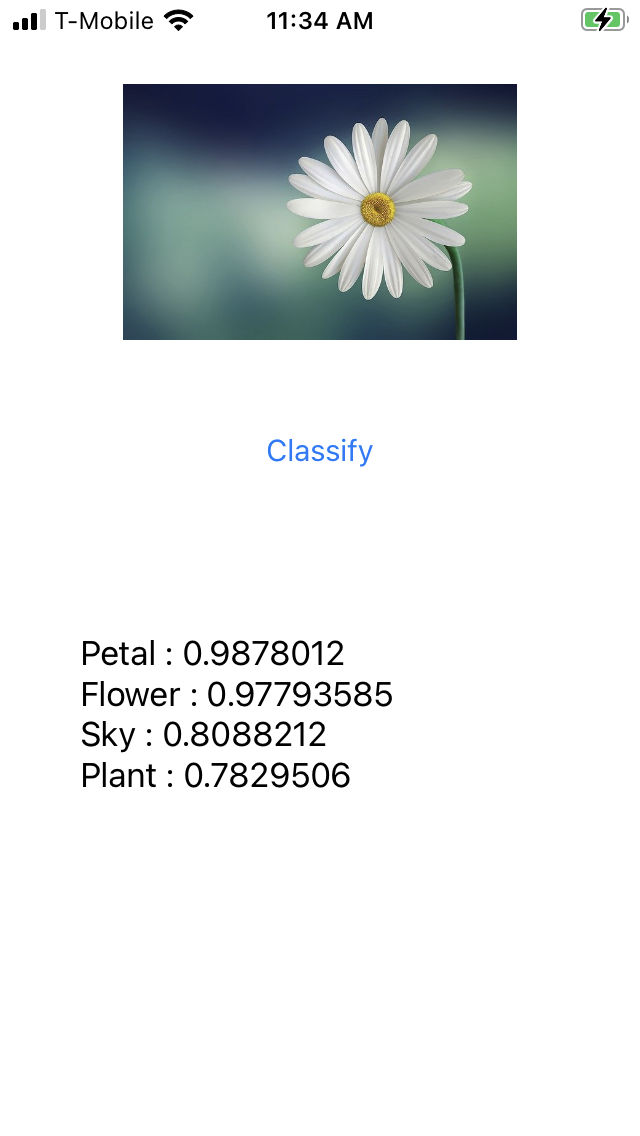
Note that your layout may look different depending on your device.
The codelab doesn't explore different layout types per device, which is a pretty complex concept in itself. If you don't see the UI properly, return to the storyboard editor, and at the bottom, you'll see a View as: section, where you can pick a particular device. Choose one to match the image or device you're testing on, and edit the UI to suit it.
As you get more into iOS development you'll learn how to use constraints to ensure that your UI is consistent across phones, but that's beyond the scope of this lab.
12. Congratulations!
You've now implemented an app on both Android and iOS that gives you basic computer vision with a generic model. You've done most of the heavy lifting already.
In the next codelab, you'll build a custom model that recognizes different types of flowers, and with just a few lines of code you'll be able to implement the custom model in this app to make it more useful!
