
1. Welcome
In this lab, you'll take an existing Progressive Web App that you have deployed and wrap it in an app for distribution in Google's Play store.
What you'll learn
- How to use Bubblewrap to package your Progressive Web App for Google's Play store
- What a Signing Key is and how to use it
- How to create a new app in Google Play's Developer Console and set up a testing release to test your app before publication
- What Digital Asset Links are and how to add them to your webapp
What you should know
- What Progressive Web Apps are
- How to use command line tools
- Basic Bash shell commands, or how to translate them into your shell of choice
What you'll need
- A Progressive Web App that's published live on the internet and you can make changes to
- The Bubblewrap Command Line Interface installed and ready to use
- A Google Play developer account
- Your existing Signing Key, if you already have apps launched in Google Play
- An Android or ChromeOS device to test on
What won't be covered
- Restricting your PWA to only Android or only ChromeOS devices
- Deploying a PWA for ChromeOS and an Android app for mobile devices under the same app.
- How to comply with Google Play's payments policy in your PWA.
2. Bubblewrapping Your PWA
Bubblewrap is a tool to make wrapping your Progressive Web App into an Android App Bundle as easy as running a a couple of CLI commands. It does this by generating an Android project that launches your PWA as a Trusted Web Activity.
To start, create a directory for your project to live in and move into it:
$ mkdir my-pwa && cd my-pwa
Then, run the Bubblewrap command line tool to generate the configuration and Android project for the Android App Bundle you'll upload to Play:
$ bubblewrap init --manifest=https://my-pwa.com/manifest.json
Here, Bubblewrap is initialized with the location of a PWA's Web App Manifest file. This will generate a default configuration from the Web App Manifest, and start an in-console wizard that will allow you to change the default configuration. Follow the wizard to change any of the values generated by the tool.
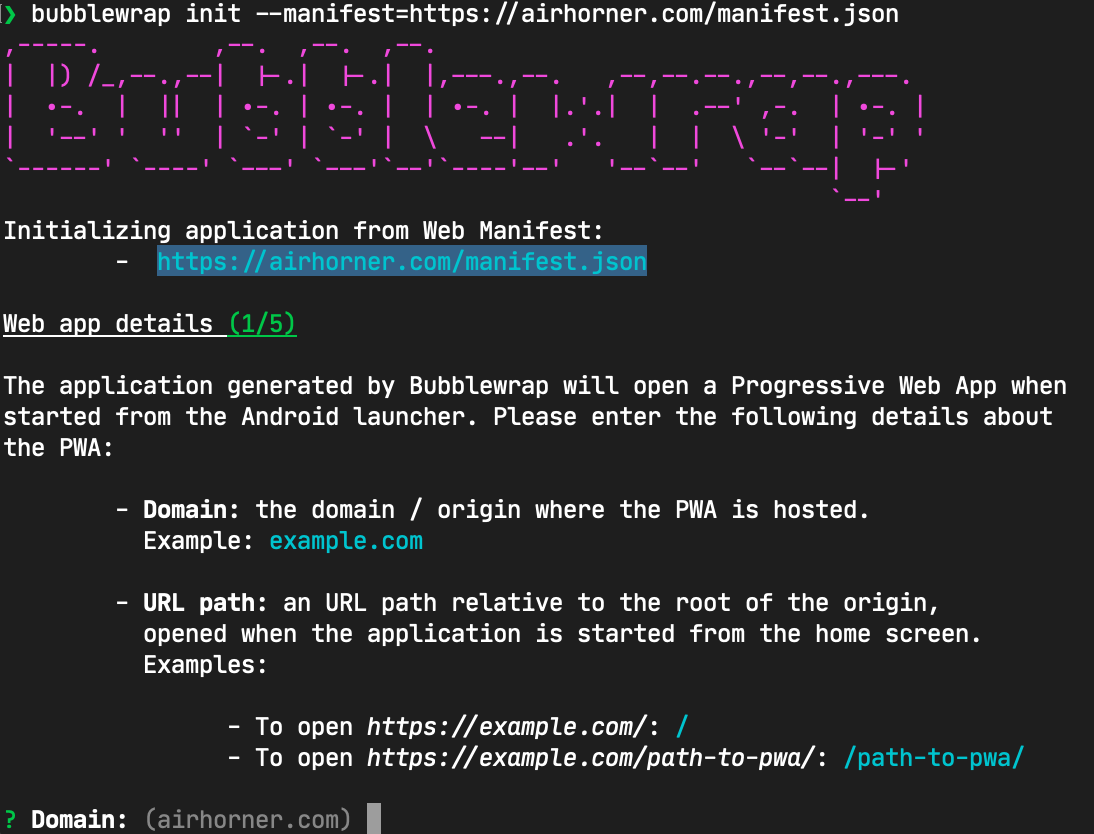
Signing Key
Google's Play Store requires application packages to be digitally signed with a certificate when uploaded, often referred to as signing key. This is a self-signed certificate and is different from the one used to serve your application over HTTPS.
Bubblewrap will ask for the path for the key when creating the application. If you are using an existing Play Store listing for your application, you will need to add the path to the same key used by that listing.
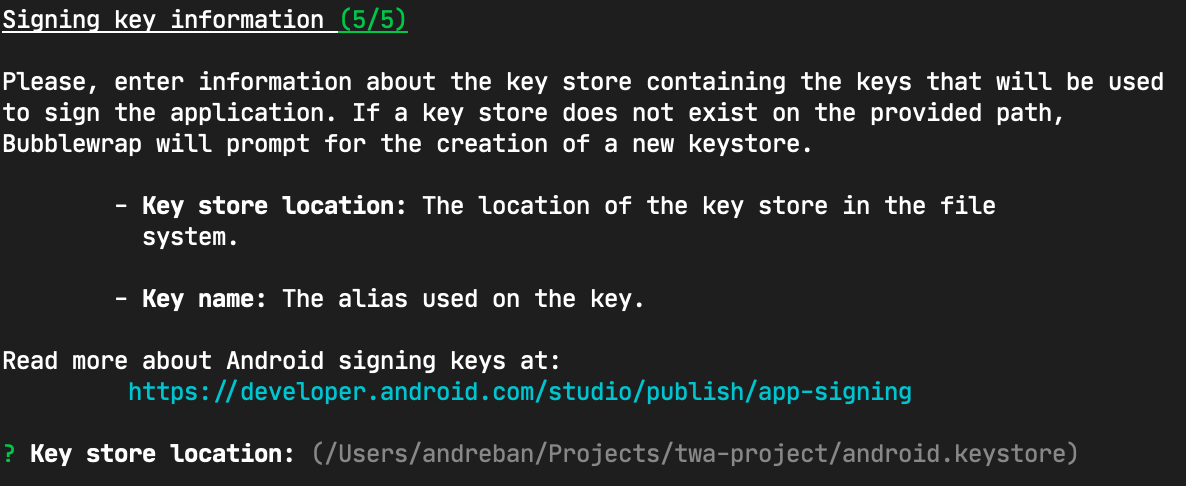
If you do not have existing signing key and are creating a new listing on the Play Store, you can use the default value provided by Bubblewrap to have it create a new key for you:

Bubblewrap Output
After initializing your Bubblewrap project and completing the wizard, the following items will have been created:
- twa-manifest.json - The project configuration, reflecting the values chosen in the Bubblewrap wizard. You will want to track this file with your version control system, as it can be used to regenerate the entire Bubblewrap project if need be.
- Android project files - The remaining files in the directory are the generated Android project. This project is the source used for the Bubblewrap build command. You can optionally track these files with your version control system, too.
- (Optionally) Signing Key - If you choose to have Bubblewrap create the signing key for you, the key will be output to the location described on the wizard. Ensure the key is kept in a safe place and limit the number of people who have access to it; it is what is used to prove apps on the Play Store come from you.
With these files, we now have everything we need to build an Android Application Bundle.
Build Your Android App Bundle
From within the same directory you ran Bubblewrap's initialization command, run the following (you'll need the passwords for your signing key):
$ bubblewrap build
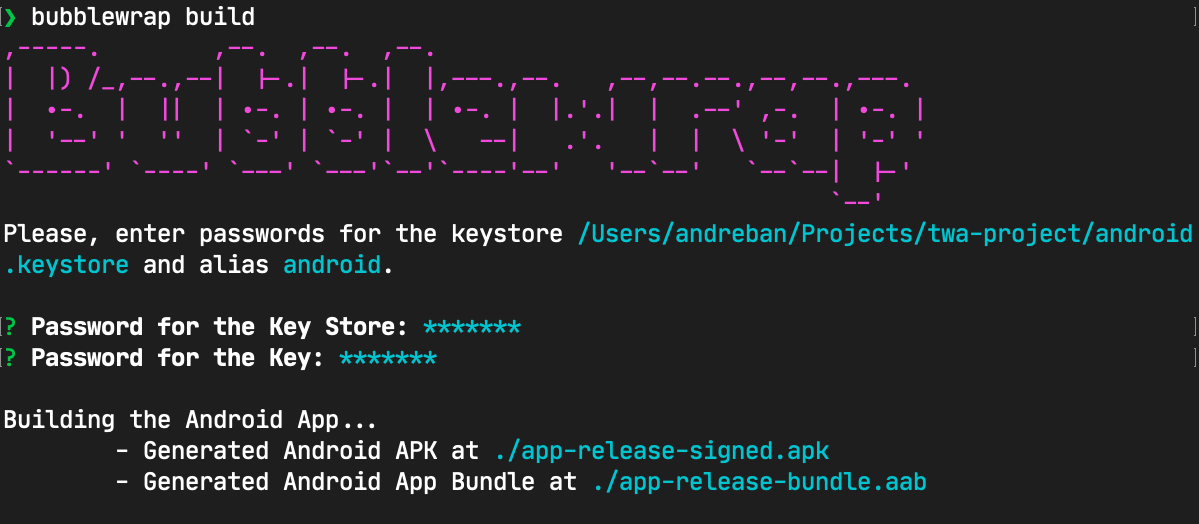
The build command will generate two important files:
- app-release-bundle.aab - Your PWA's Android App Bundle. This is the file you will upload to the Google Play Store.
- app-release-signed.apk - An Android packaging format that can be used to install the application directly to a development device using the
bubblewrap installcommand.
3. Try It Out - Bubblewrap
Now it's your turn! Using what you learned in the previous step, try and accomplish the following:
- Create a directory to hold your generated Android project.
- Initialize that directory with Bubblewrap and your PWA's Web App Manifest.
- Generate new Signing Key, or reuse your existing ones if you have them.
- Build your Android App Bundle from the generated Android project.
4. Adding Your App to Google's Play Store
Now that you have an Android App Bundle for your PWA, it's time to upload it to Google's Play Store! Once you've registered your developer account, you can go to the Play Console to log in and get started.
Create an App
Once logged in, you'll see a screen that shows all of your apps. Near the top, there is a button, Create app that, when clicked, will show the following screen to guide you through creating a new Android app listing.
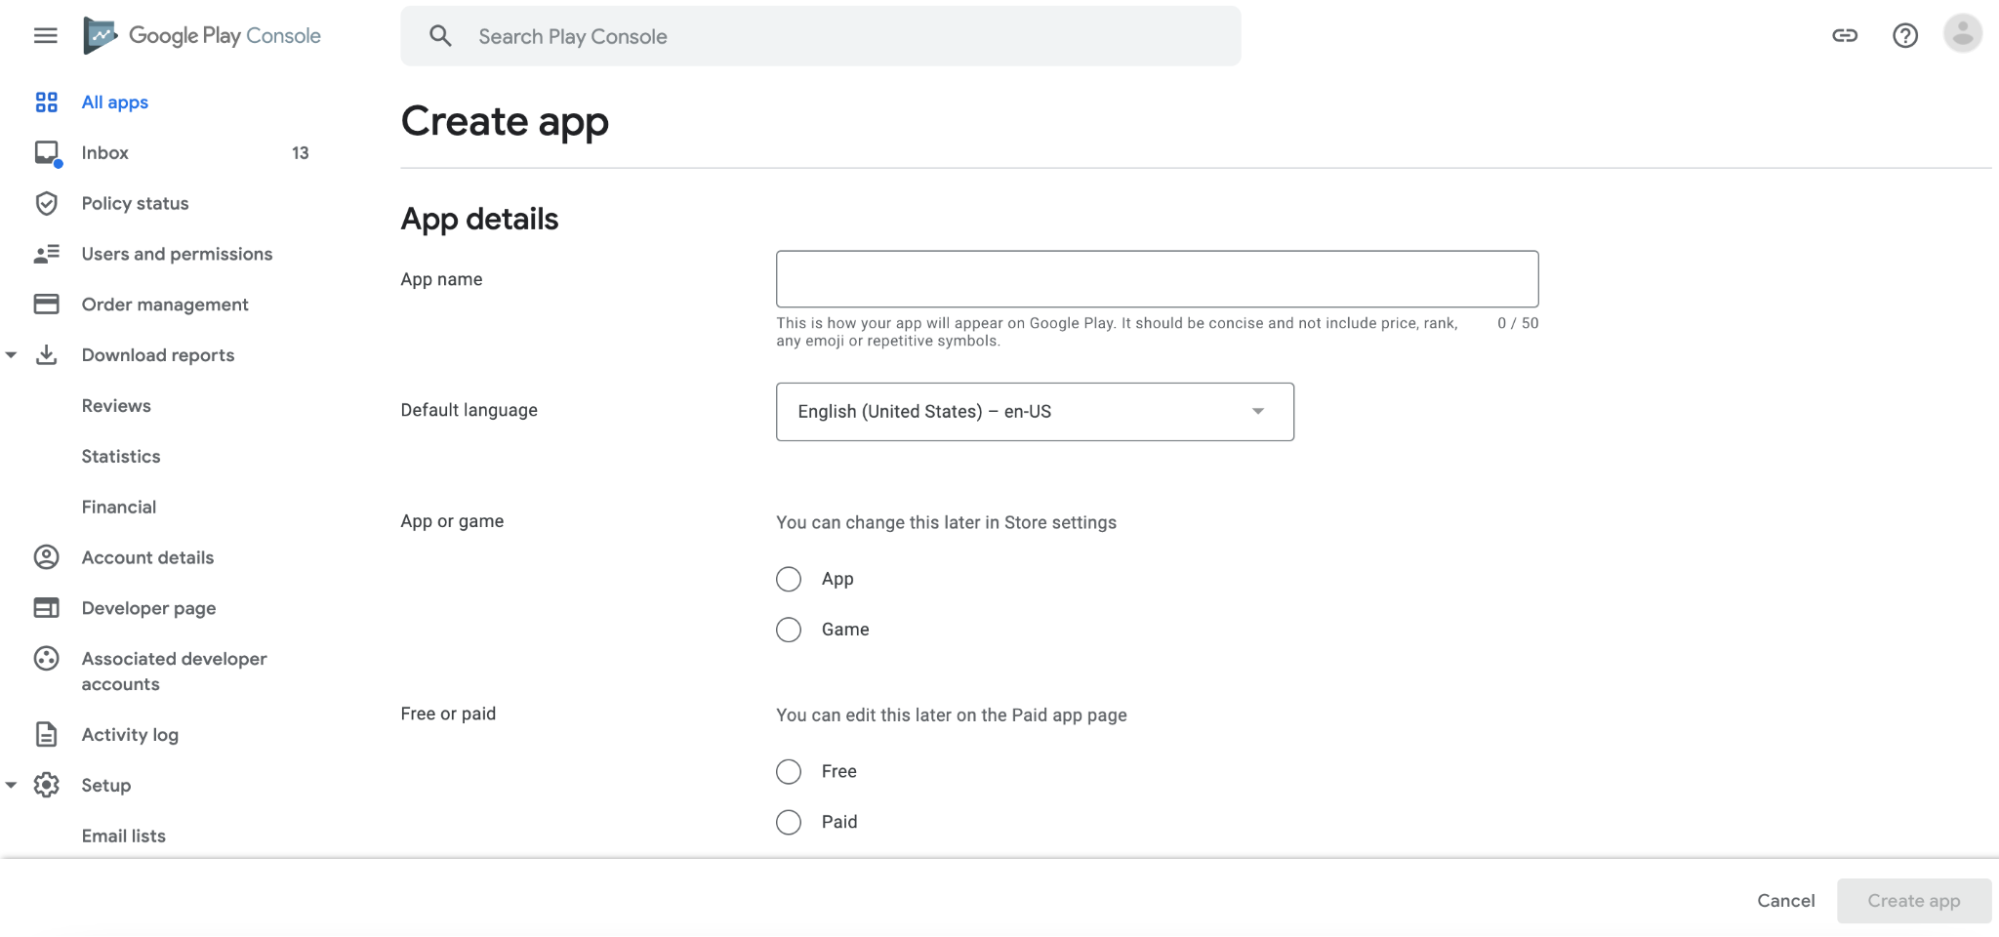
There are a number of fields here to fill out, including app name, default language, whether it's an app or a game, whether it's free or paid, and a number of declarations. You will not be able to create an app without agreeing to the declarations, so it's important that you read through them and understand them before agreeing to them.
Once you've filled out all of the information and click the Create app button at the bottom of the form, you'll be taken to the dashboard for your new app. In the dashboard, you'll see checklists of tasks that you need to complete in order to set up, start testing, and release your app.
Set Up Internal Testing
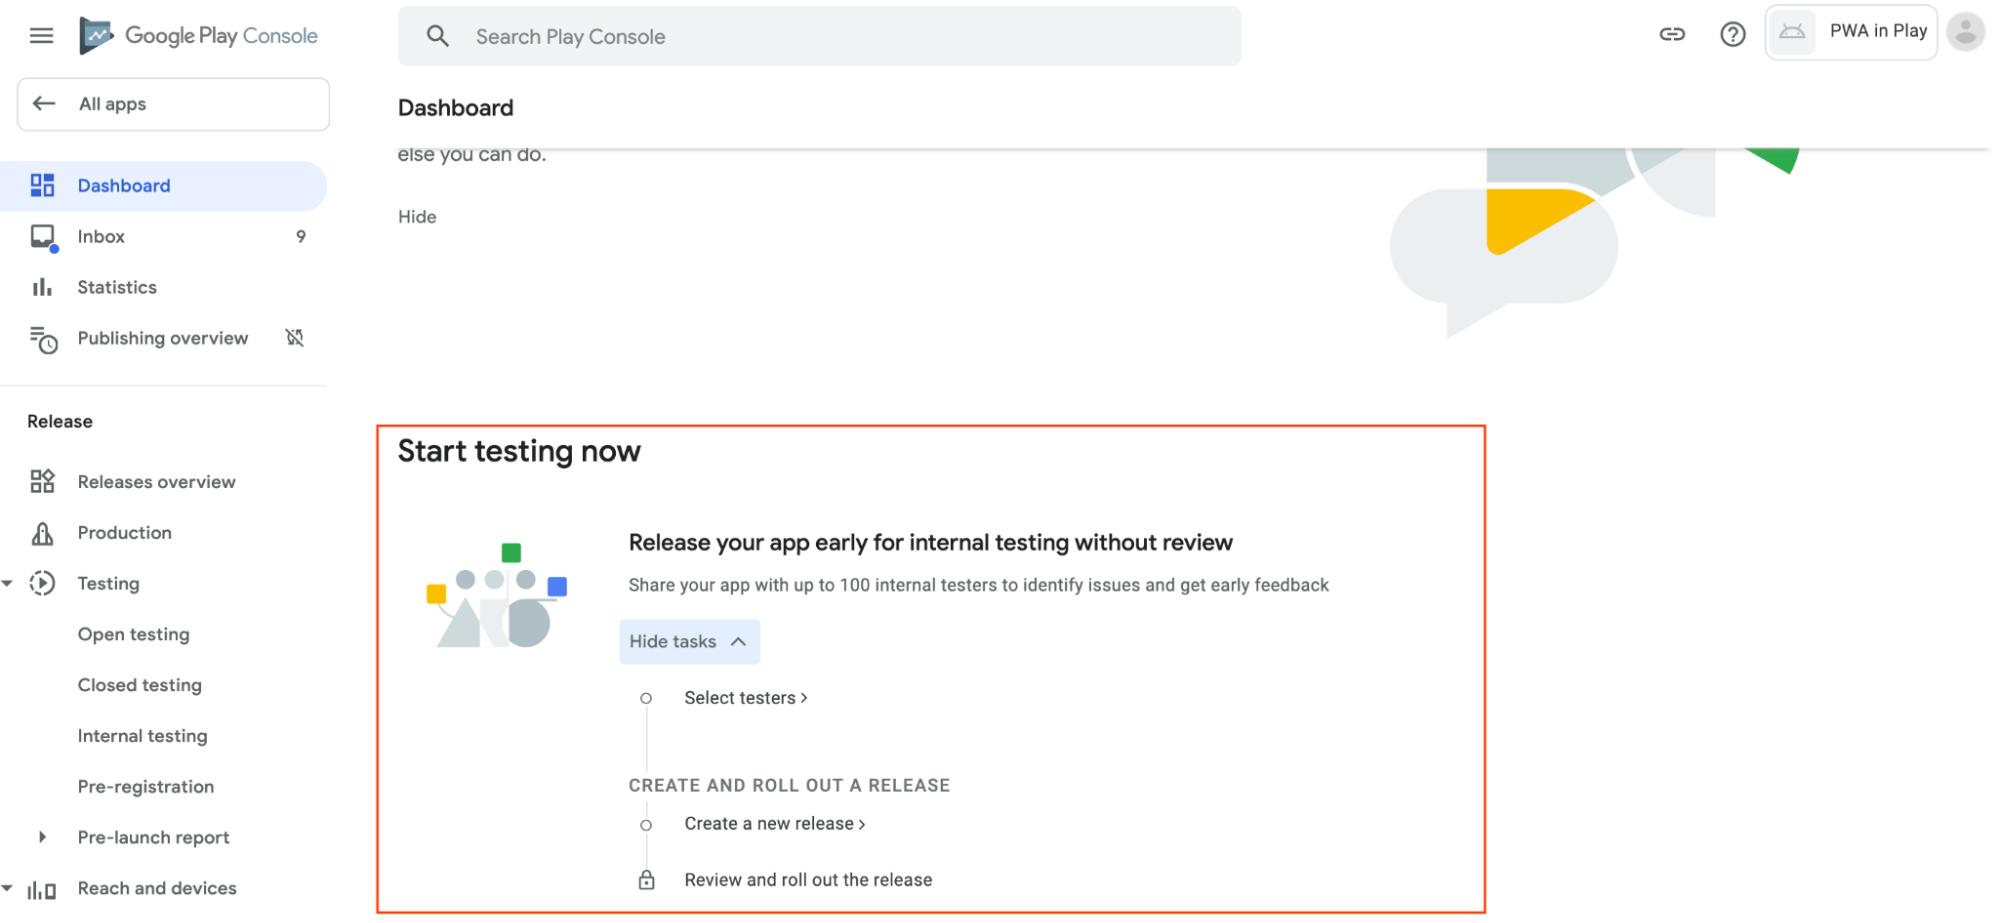
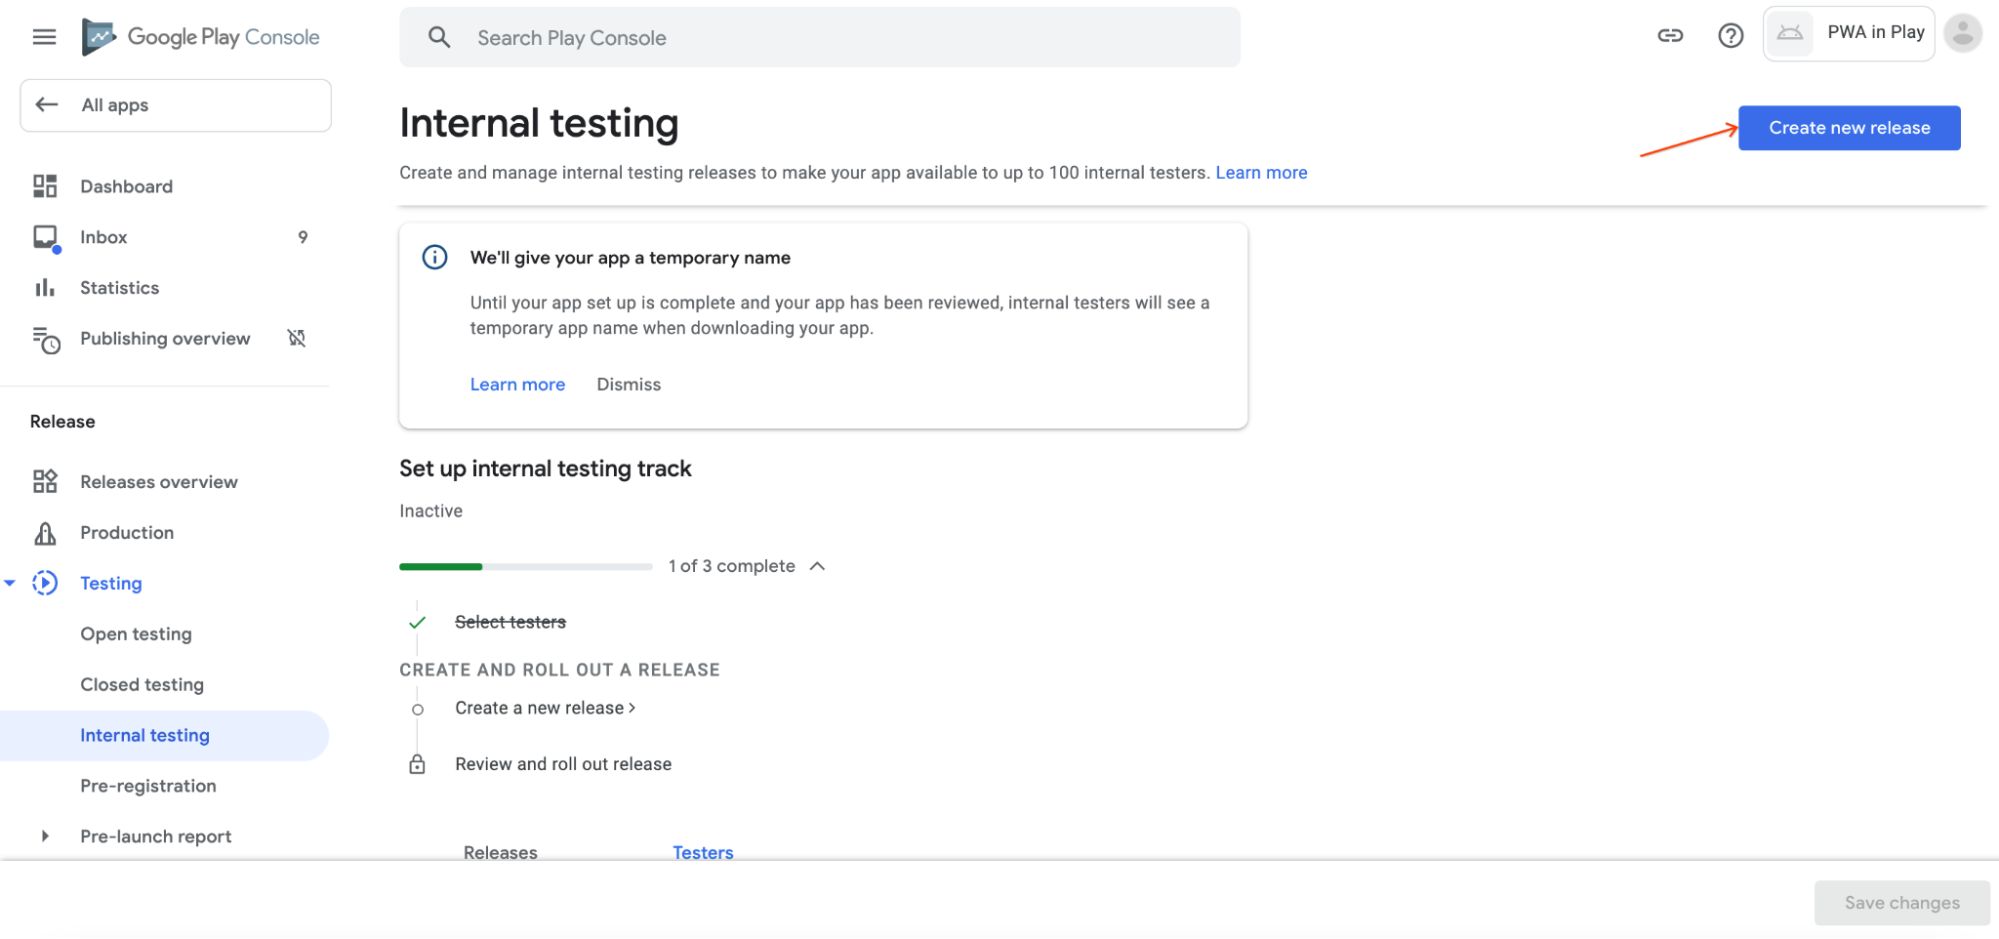
Internal testing is a great way to get your app released quickly without review to a group of trusted testers you select. View the tasks in the Start testing now checklist, and select Select testers.
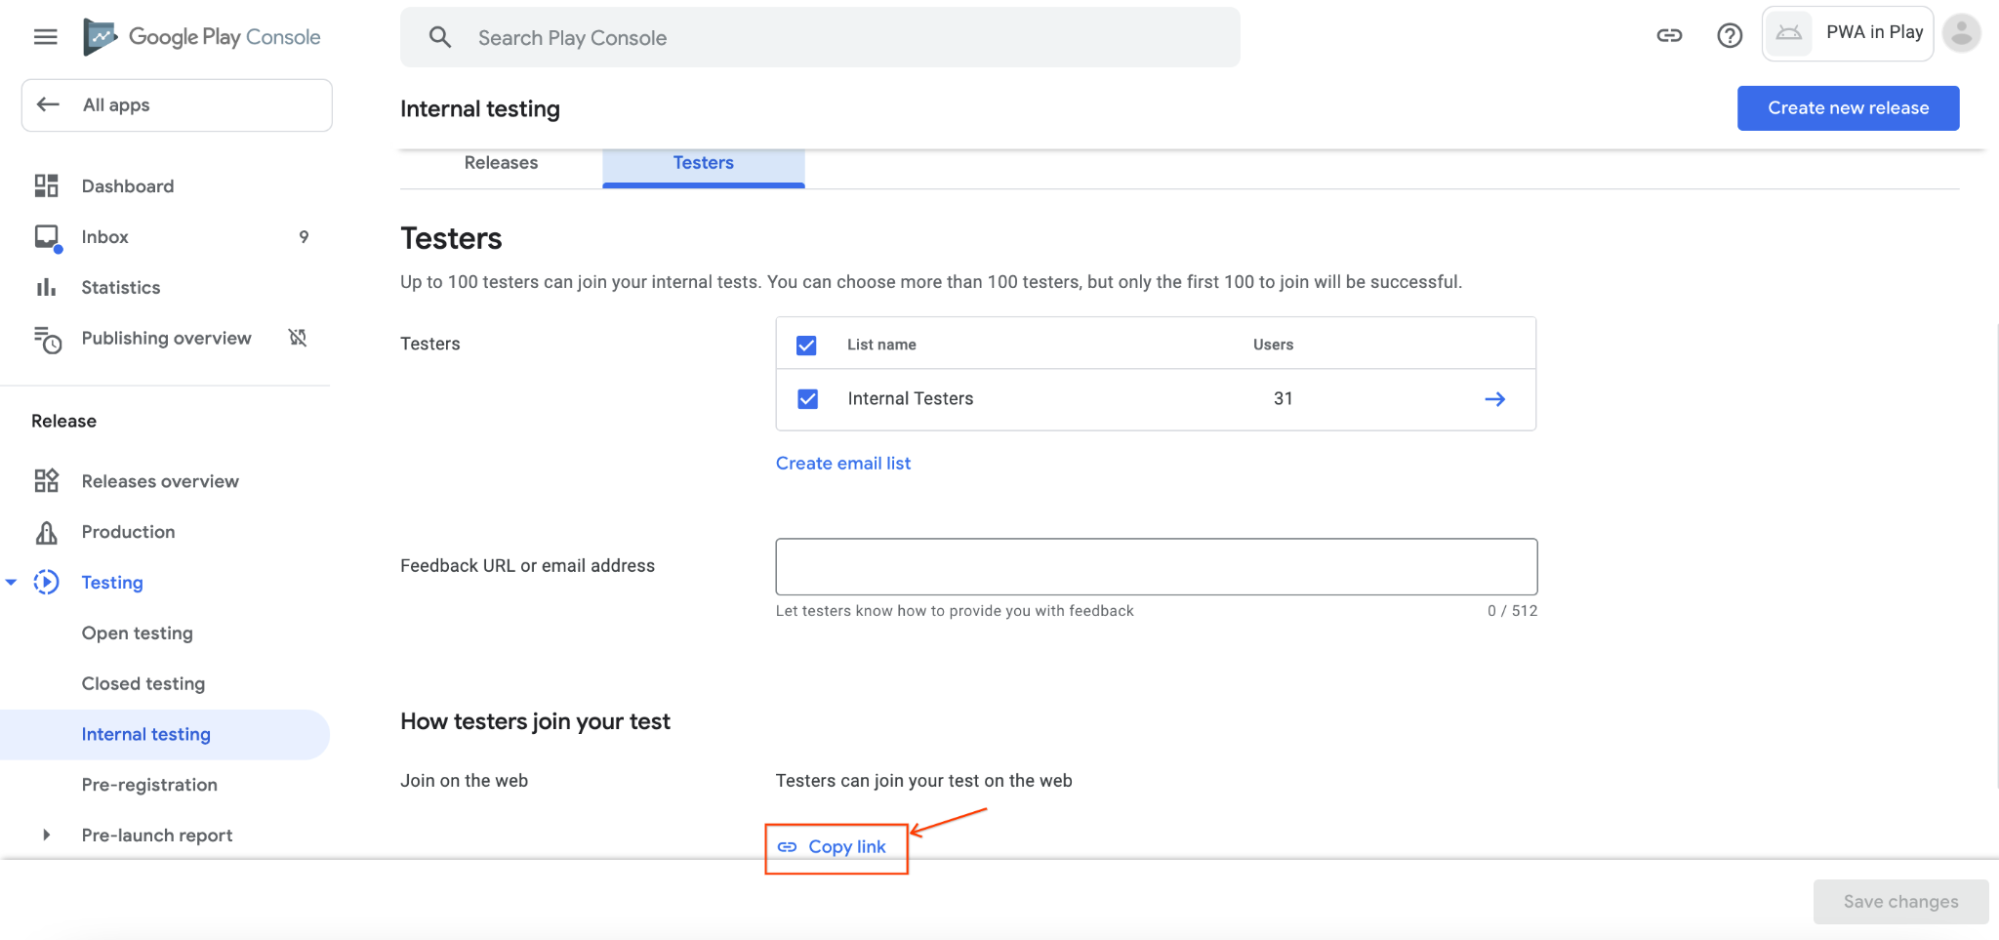
Clicking that task will bring you to the Internal Testing page. This is where you'll manage the testing setup for your app. You can navigate to it again by opening the Testing section under the Release menu in the sidebar. The first thing to do here is to create an email list of testers to test your app. To do so, click the Create email list link in the Testers section of the page. This will open up a popup to create your email list.
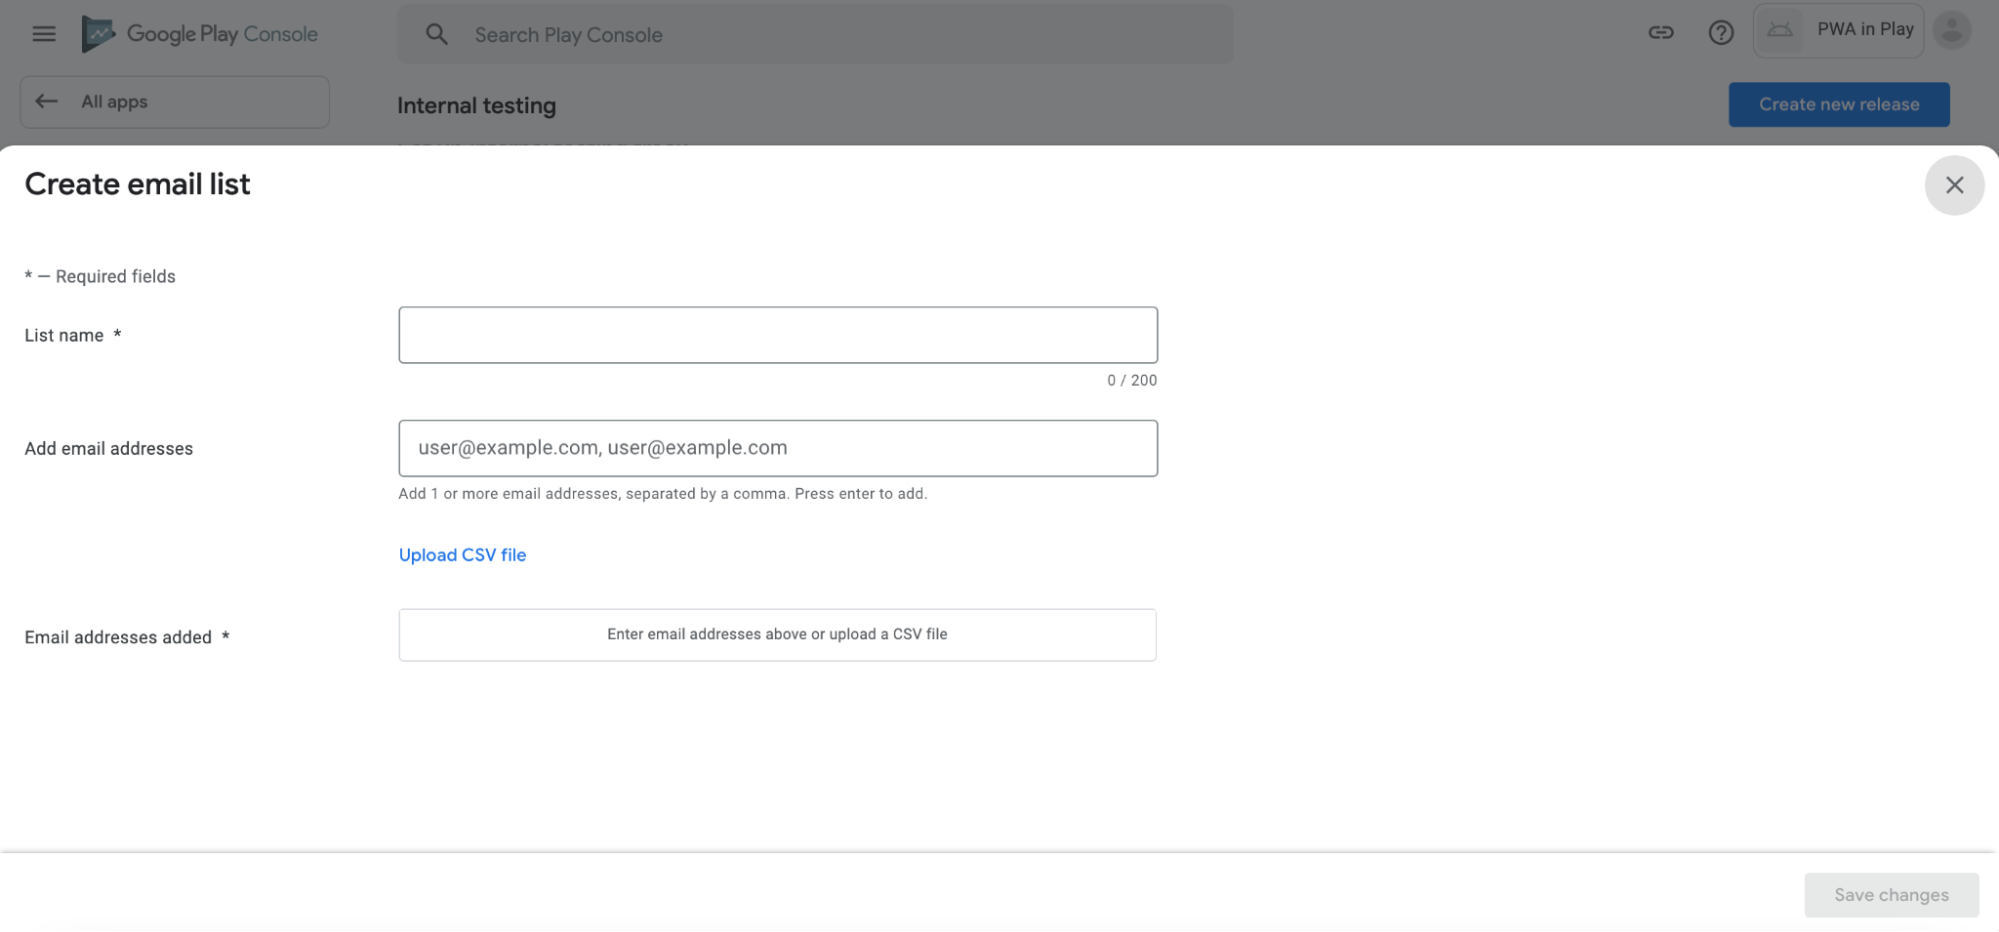
In this popup, you'll name your email list, and can either manually enter email addresses, or upload a CSV of email addresses to use. Once done, press the Save changes button. You'll be able to go back into email lists you've already created to add or remove email addresses as needed. After adding your testers, it's time to create a testing release. Click the Create new release button at the top of the page.
Create a Testing Release
After clicking on the Create new release button, you'll be prompted through a number of sections. The first, App Integrity, is where you choose how to manage your app's signing key. The default option is to let Google manage your signing key, and is the recommended option as it is both secure and keeps your app recoverable in case you lose your upload key.
Play App Signing

App Upload and Finalization
After choosing how to manage your signing key, you'll be asked to upload your app bundle to your release. To do so, drag and drop the app-release-bundle.aab file that Bubblewrap generated into the form. To finalize the release, fill in the remaining release details and click the Save, then the Review release, and finally the Start rollout to internal testing buttons to get your release started. This will make your app available to your internal testers! Back in the Testers tab of the Internal Testing page, you can copy a link to share with your testers so they can get access to your app.
5. Try It Out - Create an App
Now it's your turn! Using what you learned in the previous step, try and accomplish the following:
- Create a new app for your PWA in the Play Console.
- Set up internal testing for the app and add yourself as a tester.
- Upload your app bundle and create a testing release for your app.
- Install your app from the Play Store on your Android or ChromeOS device using the testing link!
6. Digital Asset Links
If you've gotten to test your PWA in Play, you may notice it doesn't run fullscreen. That's because you haven't verified ownership of the site yet through a Digital Asset Links file. While Bubblewrap is able to configure and build your Android application bundle, you need to finish the link by updating your web application.
Get Your App's SHA-256 Fingerprint
To configure your PWA's Digital Asset Links, you'll need the SHA-256 fingerprint for the certificate used to sign the package the user receives on their phone.
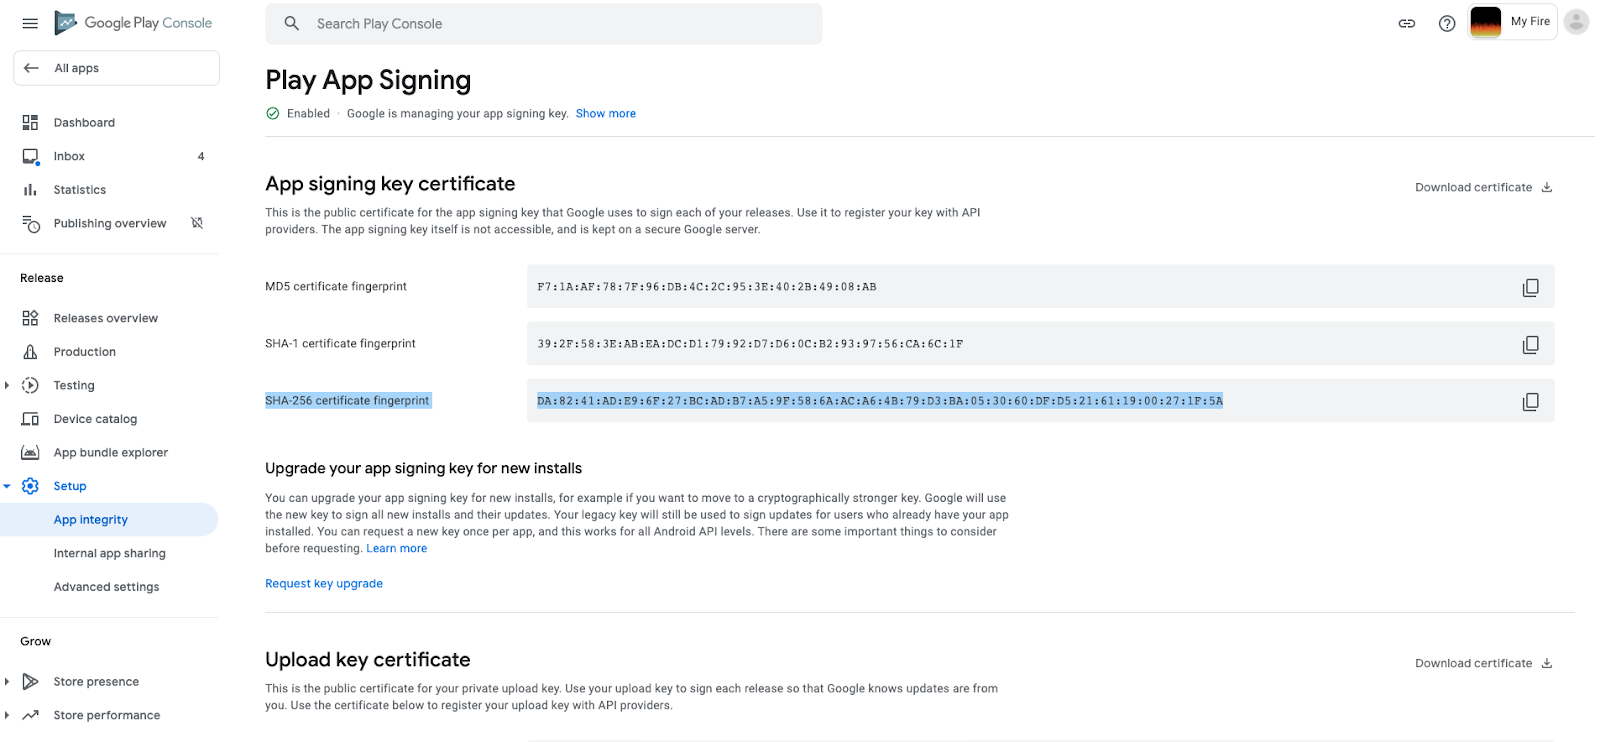
With Play App Signing
If you set up Play App Signing for your app when creating your release (which was previously recommended), the SHA-256 fingerprint can be found in the Play Console. Remember, this certificate is different than the one used to upload your application. To obtain the fingerprint, from within your application in the Play Console, go to Releases->Setup->App Integrity. There, you'll see a number of options under App signing key certificate. Copy the value of the SHA-256 certificate fingerprint.
Without Play App Signing
If you opted out of Play App Signing, the key used to sign the final application will be the same one that you use to upload the application to the Play Console. You can use Java's keytool to extract the fingerprint:
$ keytool -list -v \
    -keystore <keystore-file-path> \
    -alias <key-alias> \
    -keypass <key-password> \
    -storepass <store-password> | grep SHA256

$     SHA256: BD:92:64:B0:1A:B9:08:08:FC:FE:7F:94:B2...
To use it, you'll need to know the path to your signing key, and the relevant passwords. Copy the hexadecimal values of the SHA256 key.
Create Your Digital Asset Links File
Bubblewrap can manage the signature fingerprints you've retrieved and generate the correct Digital Asset Links file for you. To add a fingerprint with Bubblewrap, run the following command from within the same directory created during Bubblewrapping Your PWA, replacing <fingerprint> with the fingerprint copied from the previous step.
$ bubblewrap fingerprint add <fingerprint>
This command will add the fingerprint to the application's fingerprint list and generate a assetlinks.json file. Upload this file to the .well-known directory on the same origin as your PWA.
7. Try It Out - Digital Asset Links
Now it's your turn! Using what you learned in the previous step, try and accomplish the following:
- Find your app's SHA-256 fingerprint.
- Generate a Digital Asset Links file for your app.
- Upload your Digital Asset Links file to your PWA.
- Verify your Digital Asset Links file is set up correctly using the API and your testing app.
8. Test Your Knowledge
Before finishing, test your knowledge and see what you've learned by answering the following questions. Don't peek at the answers!
After generating her Android project with Bubblewrap, Sally commits the generated ______ file to her version control system so she can rebuild it whenever she needs.
Jack is looking to have his QA team test his PWA Android app. He ______ his Android App Bundle to an Internal Testing Track.
Oogie Boogie's PWA Android app isn't running fullscreen. To fix that, they get their SHA-256 certificate fingerprint for their ______ and upload it to their Digital Asset Links file located at ______ on the same origin as their PWA.
9. Test Your Knowledge - Answers
Answers to the Test Your Knowledge questions!
- After generating her Android project with Bubblewrap, Sally commits the generated ______ file to her version control system so she can rebuild it whenever she needs.
- Answer: twa-manifest.json
- Section: Bubblewrap your PWA
- Jack is looking to have his QA team test his PWA Android app. He ______ his Android App Bundle to an Internal Testing Track.
- Answer: signs and uploads
- Section: Adding Your App to Google's Play Store
- Oogie Boogie's PWA Android app isn't running fullscreen. To fix that, they get their SHA-256 certificate fingerprint for their ______ and upload it to their Digital Asset Links file located at ______ on the same origin as their PWA.
- Answer: signing key, /.well-known/assetlinks.json
- Section: Digital Asset Links
10. Congratulations!
Congratulations! You've successfully learned how to add your PWA to Google's Play Store!
When you feel ready to do so, try these next steps on your own:
- Create a production release of the app
- Dive deeper into more options for releasing your app, including ChromeOS-only releases and releases that include an Android app for mobile and a PWA for ChromeOS.
- Learn how to set up Play Billing for your app and implement it in your PWA and in your back-end.
Happy coding!