
1. Before You Begin
This codelab teaches you how to integrate the Places SDK for Android with your app and use each of the Places SDK features.
Prerequisites
- Basic knowledge of Kotlin and Android development
What you'll learn
- How to install the Places SDK for Android with Kotlin Extensions.
- How to load Place Details for a specific place.
- How to add a Place Autocomplete widget to your app.
- How to load the Current Place based on the device's currently-reported location.
What you'll need
To complete this codelab, you'll need the following accounts, services, and tools:
- A Google Account with billing enabled.
- Android Studio Bumblebee or higher.
- Google Play services installed in Android Studio.
- An Android device or an Android emulator that runs the Google APIs platform based on Android 8 or higher (see Run apps on the Android Emulator for installation steps).
2. Get set up
For the enablement step below, enable the Places API and Maps SDK for Android.
Set up Google Maps Platform
If you do not already have a Google Cloud Platform account and a project with billing enabled, please see the Getting Started with Google Maps Platform guide to create a billing account and a project.
- In the Cloud Console, click the project drop-down menu and select the project that you want to use for this codelab.

- Enable the Google Maps Platform APIs and SDKs required for this codelab in the Google Cloud Marketplace. To do so, follow the steps in this video or this documentation.
- Generate an API key in the Credentials page of Cloud Console. You can follow the steps in this video or this documentation. All requests to Google Maps Platform require an API key.
3. Quick start
To get you started as quickly as possible, download the starter code to help you follow along with this codelab. You're welcome to jump to the solution, but if you want to follow along with all the steps to build it yourself, keep reading.
- Clone the repository if you have
gitinstalled.
git clone https://github.com/googlemaps/codelab-places-101-android-kotlin.git
Alternatively, click this button to download the source code.
- After downloading the code, open the project found inside the
/starterdirectory in Android Studio. This project includes the basic file structure you'll need to complete the codelab. Everything you need to work with is located in the/starterdirectory.
If you'd like to see the full solution code running, you can view the completed code in the /solution directory.
4. Add your API key to the project
This section describes how to store your API key so that it can be securely referenced by your app. You shouldn't check your API key into your version control system, so we recommend storing it in the secrets.properties file, which will be placed in your local copy of the root directory of your project. For more information about the secrets.properties file, see Gradle properties files.
To streamline this task, we recommend that you use the Secrets Gradle Plugin for Android.
To install the Secrets Gradle Plugin for Android in your Google Maps project:
- In Android Studio, open your top-level
build.gradle.ktsorbuild.gradlefile and add the following code to thedependencieselement underbuildscript.
If using build.gradle.kts, add:
buildscript {
    dependencies {
        classpath("com.google.android.libraries.mapsplatform.secrets-gradle-plugin:secrets-gradle-plugin:2.0.1")
    }
}
If using build.gradle, add:
buildscript {
    dependencies {
        classpath "com.google.android.libraries.mapsplatform.secrets-gradle-plugin:secrets-gradle-plugin:2.0.1"
    }
}
- Open your module-level
build.gradle.ktsorbuild.gradlefile and add the following code to thepluginselement.
If using build.gradle.kts, add:
plugins {
    // ...
    id("com.google.android.libraries.mapsplatform.secrets-gradle-plugin")
}
If using build.gradle, add:
plugins {
    // ...
    id 'com.google.android.libraries.mapsplatform.secrets-gradle-plugin'
}
- In your module-level
build.gradle.ktsorbuild.gradlefile, ensure thattargetSdkandcompileSdkare set to 34. - Save the file and sync your project with Gradle.
- Open the
secrets.propertiesfile in your top-level directory, and then add the following code. ReplaceYOUR_API_KEYwith your API key. Store your key in this file becausesecrets.propertiesis excluded from being checked into a version control system.
PLACES_API_KEY=YOUR_API_KEY
- Save the file.
- Create the
local.defaults.propertiesfile in your top-level directory, the same folder as thesecrets.propertiesfile, and then add the following code.
PLACES_API_KEY=DEFAULT_API_KEY
The purpose of this file is to provide a backup location for the API key if the secrets.properties file is not found so that builds don't fail. This can happen if you clone the app from a version control system which omits secrets.properties and you have not yet created a secrets.properties file locally to provide your API key.
- Save the file.
- In Android Studio, open your module-level
build.gradle.ktsorbuild.gradlefile and edit thesecretsproperty. If thesecretsproperty does not exist, add it.
Edit the properties of the plugin to set propertiesFileName to secrets.properties, set defaultPropertiesFileName to local.defaults.properties, and set any other properties.
secrets {
    // Optionally specify a different file name containing your secrets.
    // The plugin defaults to "local.properties"
    propertiesFileName = "secrets.properties"

    // A properties file containing default secret values. This file can be
    // checked in version control.
    defaultPropertiesFileName = "local.defaults.properties"
}
5. Install the Places SDK for Android
In this section, you add the Places SDK for Android to your app's dependencies.
- Now that your API key can be accessed inside the app, add the Places SDK for Android dependency to your app's
build.gradlefile.
Modify your app-level build.gradle file to add the dependency for the Places SDK for Android:
app-level build.gradle
dependencies {
   // Dependency to include Places SDK for Android
   implementation 'com.google.android.libraries.places:places:3.4.0'
}
- Run the app.
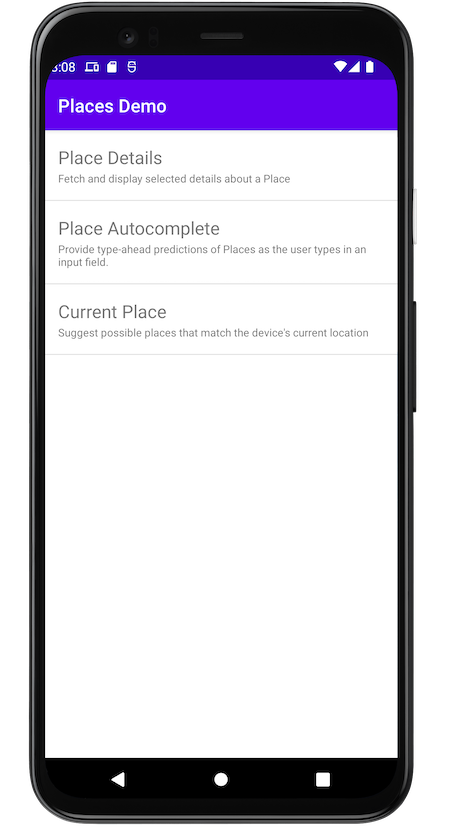
You should now see an app with an empty screen. Continue to populate this screen with three demos.
6. Install Places Android KTX
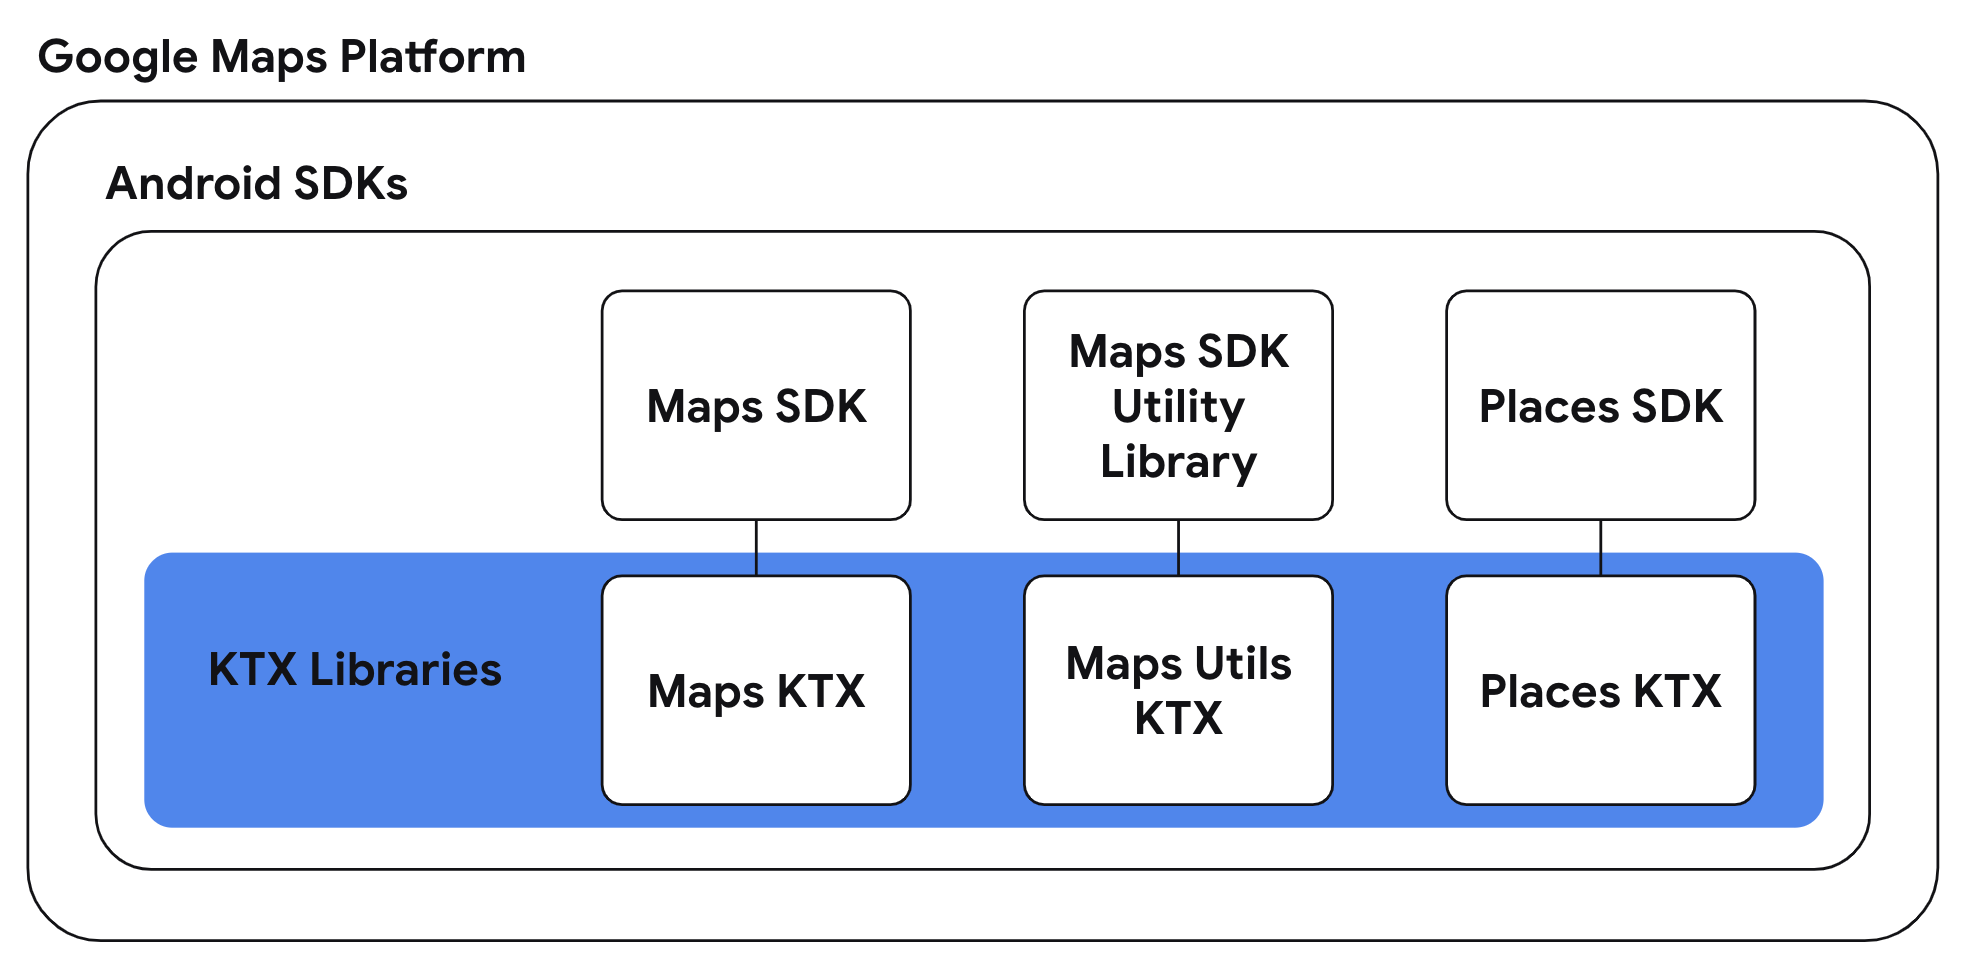
For Kotlin apps using one or more Google Maps Platform Android SDKs, Kotlin extension (KTX) libraries let you take advantage of Kotlin language features, such as coroutines, extension properties/functions, and more. Each Google Maps SDK has a corresponding KTX library as shown below:
In this task, use the Places Android KTX library to use Kotlin-specific language features in your app.
Add the Places Android KTX dependency
To take advantage of Kotlin-specific features, include the corresponding KTX library for this SDK in your app-level build.gradle file.
build.gradle
dependencies {
    // ...

    // Places SDK for Android KTX Library
    implementation 'com.google.maps.android:places-ktx:3.1.1'
}
7. Initialize the Places Client
Initialize the Places SDK for the application scope
Within the DemoApplication.kt file of the app/src/main/java/com/google/codelabs/maps/placesdemo folder, initialize the Places SDK for Android. Paste the lines below at the end of the onCreate function:
        // Initialize the SDK with the Google Maps Platform API key
        Places.initialize(this, BuildConfig.PLACES_API_KEY)
When you build your app, the Secrets Gradle Plugin for Android makes the API key in your secrets.properties file available as BuildConfig.PLACES_API_KEY.
Add the application file to the manifest
Since you have extended Application with DemoApplication, you need to update the manifest. Add the android:name property to the application element in the AndroidManifest.xml file, located in app/src/main:
    <application
        android:name=".DemoApplication"
        ...
    </application>
This code points the application manifest to the DemoApplication class in the src/main/java/com/google/codelabs/maps/placesdemo/ folder.
8. Fetch Place Details
Create a Details screen
An activity_details.xml layout with an empty LinearLayout is available in the app/src/main/res/layout/ folder. Populate the linear layout by adding the following code between the <LinearLayout> brackets.
    <com.google.android.material.textfield.TextInputLayout
        android:layout_width="match_parent"
        android:layout_height="wrap_content">

        <com.google.android.material.textfield.TextInputEditText
            android:id="@+id/details_input"
            android:layout_width="match_parent"
            android:layout_height="wrap_content"
            android:hint="@string/details_input_hint"
            android:text="@string/details_input_default" />

    </com.google.android.material.textfield.TextInputLayout>

    <Button
        android:id="@+id/details_button"
        android:layout_width="match_parent"
        android:layout_height="wrap_content"
        android:text="@string/button_details" />

    <TextView
        android:id="@+id/details_response_content"
        android:layout_width="match_parent"
        android:layout_height="wrap_content"
        android:paddingTop="16dp"
        android:textIsSelectable="true" />
This code adds a text input field where the user can enter any Place ID or use the provided default, a button to initiate the Place Details request, and a TextView to display the information from the response. Associated strings are defined for you in the src/main/res/values/strings.xml file.
Create a Details activity
- Create a
DetailsActivity.ktfile in thesrc/main/java/com/google/codelabs/maps/placesdemo/folder and associate it with the layout you just created. Paste this code into the file:
@ExperimentalCoroutinesApi
class DetailsActivity : AppCompatActivity() {
    private lateinit var placesClient: PlacesClient
    private lateinit var detailsButton: Button
    private lateinit var detailsInput: TextInputEditText
    private lateinit var responseView: TextView

    override fun onCreate(savedInstanceState: Bundle?) {
        super.onCreate(savedInstanceState)
        setContentView(R.layout.activity_details)

        // Set up view objects
        detailsInput = findViewById(R.id.details_input)
        detailsButton = findViewById(R.id.details_button)
        responseView = findViewById(R.id.details_response_content)

        val apiKey = BuildConfig.PLACES_API_KEY

        // Log an error if apiKey is not set.
        if (apiKey.isEmpty() || apiKey == "DEFAULT_API_KEY") {
            Log.e(TAG, "No api key")
            finish()
            return
        }
    }
}
- Create a Places Client for use with this activity. Paste this code after the code to check the API key in the
onCreatefunction.
        // Retrieve a PlacesClient (previously initialized - see DemoApplication)
        placesClient = Places.createClient(this)
- After the Places Client is set up, attach a click listener to the button. Paste the this code after the Places Client creation in the
onCreatefunction.
        // Upon button click, fetch and display the Place Details
        detailsButton.setOnClickListener { button ->
            button.isEnabled = false
            val placeId = detailsInput.text.toString()
            val placeFields = listOf(
                Place.Field.NAME,
                Place.Field.ID,
                Place.Field.LAT_LNG,
                Place.Field.ADDRESS
            )
            lifecycleScope.launch {
                try {
                    val response = placesClient.awaitFetchPlace(placeId, placeFields)
                    responseView.text = response.prettyPrint()
                } catch (e: Exception) {
                    e.printStackTrace()
                    responseView.text = e.message
                }
                button.isEnabled = true
            }
        }
This code retrieves the Place ID that was entered in the input field, defines which fields to request for the place, creates a FetchPlaceRequest, initiates the task, and listens for success or failure. If the request is successful, the function populates the TextView with the requested details.
Add the Details activity to the manifest
Add an <activity> element for the DetailsActivity as a child of the <application> element in the AndroidManifest.xml file, located in app/src/main:
<activity android:name=".DetailsActivity" android:label="@string/details_demo_title" />
Add the Details activity to the demo menu
An empty Demo module is provided to list the available demos on the home screen. Now that you have created a Place Details activity, add it to the Demo.kt file in the src/main/java/com/google/codelabs/maps/placesdemo/ folder with this code:
    DETAILS_FRAGMENT_DEMO(
        R.string.details_demo_title,
        R.string.details_demo_description,
        DetailsActivity::class.java
    ),
Associated strings are defined in the src/main/res/values/strings.xml file.
Inspect MainActivity.kt and observe that it creates a ListView that is populated by iterating through the contents of the Demo module. If the user taps on an item in the list, the click listener opens the associated activity.
Run the app
- Run the app. This time you should see one item in the list presenting the Place Details demo.
- Tap on the Place Details text. You should see the view you created with an input field and button.
- Tap the "GET DETAILS" button. If you used the default Place ID, you should see the place name, address, and map coordinates displayed, as shown in Figure 1.
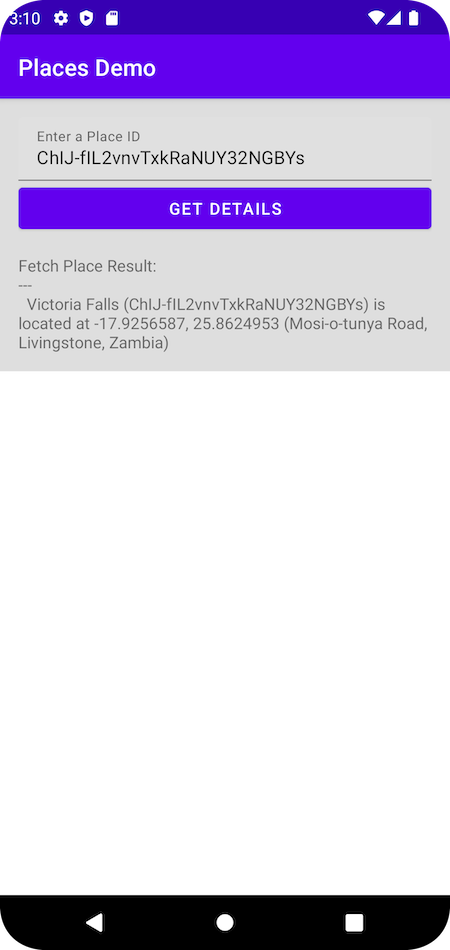
Figure 1. Place Details activity with response displayed.
9. Add Place Autocomplete
Create an Autocomplete screen
An activity_autocomplete.xml layout with an empty LinearLayout is provided in the app/src/main/res/layout/ folder. Populate the linear layout by adding this code between the <LinearLayout> brackets.
    <androidx.fragment.app.FragmentContainerView
        android:id="@+id/autocomplete_fragment"
        android:background="@android:color/white"
        android:name="com.google.android.libraries.places.widget.AutocompleteSupportFragment"
        android:layout_width="match_parent"
        android:layout_height="wrap_content" />

    <TextView
        android:id="@+id/autocomplete_response_content"
        android:layout_width="match_parent"
        android:layout_height="wrap_content"
        android:paddingTop="16dp"
        android:textIsSelectable="true" />
This code adds an AutocompleteSupportFragment widget, and a TextView to display the information from the response. Associated strings are defined in the src/main/res/values/strings.xml file.
Create an Autocomplete activity
- Create an
AutocompleteActivity.ktfile in thesrc/main/java/com/google/codelabs/maps/placesdemo/folder and define it with this code:
@ExperimentalCoroutinesApi
class AutocompleteActivity : AppCompatActivity() {
    private lateinit var responseView: TextView

    override fun onCreate(savedInstanceState: Bundle?) {
        super.onCreate(savedInstanceState)
        setContentView(R.layout.activity_autocomplete)

        // Set up view objects
        responseView = findViewById(R.id.autocomplete_response_content)
        val autocompleteFragment =
            supportFragmentManager.findFragmentById(R.id.autocomplete_fragment)
                    as AutocompleteSupportFragment
    }
}
This code associates the activity with the views and AutocompleteSupportFramgent you defined in the layout file.
- Next, define what happens when the user selects one of the predictions presented by Place Autocomplete. Add this code to the end of the
onCreatefunction:
        val placeFields: List<Place.Field> =
            listOf(Place.Field.NAME, Place.Field.ID, Place.Field.ADDRESS, Place.Field.LAT_LNG)
        autocompleteFragment.setPlaceFields(placeFields)

        // Listen to place selection events
        lifecycleScope.launchWhenCreated {
            autocompleteFragment.placeSelectionEvents().collect { event ->
                when (event) {
                    is PlaceSelectionSuccess -> {
                        val place = event.place
                        responseView.text = prettyPrintAutocompleteWidget(place, false)
                    }

                    is PlaceSelectionError -> Toast.makeText(
                        this@AutocompleteActivity,
                        "Failed to get place '${event.status.statusMessage}'",
                        Toast.LENGTH_SHORT
                    ).show()
                }
            }
        }
This code defines which fields to request for the place, listens for a place selection event, and listens for success or failure. If the request is successful, the function populates the TextView with the place details. Note that Place Autocomplete returns a Place object; there is no need to make a separate Place Details request when using the Place Autocomplete widget.
Add the Autocomplete activity to the manifest
Add an <activity> element for the AutocompleteActivity as a child of the <application> element in the AndroidManifest.xml file, located in app/src/main:
<activity android:name=".AutocompleteActivity" android:label="@string/autocomplete_fragment_demo_title" />
Add the Autocomplete activity to the demo menu
Just as before, add the Place Autocomplete demo to the home screen by appending it to the list in the Demo module. Now that you have created a Place Autocomplete activity, add it to the Demo.kt file in the src/main/java/com/google/codelabs/maps/placesdemo/ folder. Paste this code immediately after the DETAILS_FRAGMENT_DEMO item:
    AUTOCOMPLETE_FRAGMENT_DEMO(
        R.string.autocomplete_fragment_demo_title,
        R.string.autocomplete_fragment_demo_description,
        AutocompleteActivity::class.java
    ),
Associated strings are defined in the src/main/res/values/strings.xml file.
Run the app
- Run the app. This time you should see two items in the home screen list.
- Tap on the Place Autocomplete row. You should see a Place Autocomplete input pop up as shown in Figure 2.
- Begin typing the name of a place. This can be an establishment name, an address, or a geographic region. Predictions should be presented as you type.
- Select one of the predictions. The predictions should disappear and the TextView should now display the details about the selected place as shown in Figure 3.
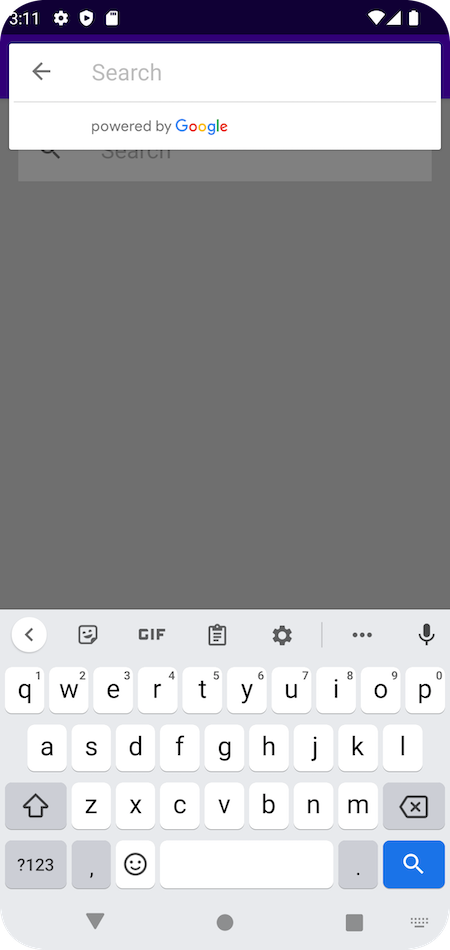
Figure 2. Autocomplete activity after user taps the input field.
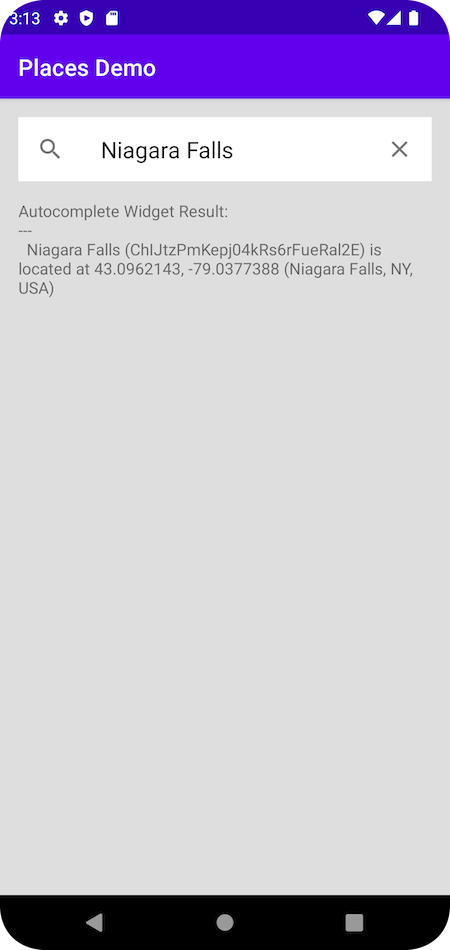
Figure 3. Autocomplete activity displaying Place Details after user has typed and selected "Niagara Falls".
10. Get the device's Current Place
Create a Current Place screen
An activity_current.xml layout with an empty LinearLayout has been provided in the app/src/main/res/layout/ folder. Populate the linear layout by adding the following code in between the <LinearLayout> brackets.
    <Button
        android:id="@+id/current_button"
        android:layout_width="match_parent"
        android:layout_height="wrap_content"
        android:text="@string/current_button" />

    <TextView
        android:id="@+id/current_response_content"
        android:layout_width="match_parent"
        android:layout_height="wrap_content"
        android:paddingTop="16dp"
        android:scrollbars = "vertical"
        android:textIsSelectable="true" />
Create a Current Place activity
- Create a
CurrentPlaceActivity.ktfile in thesrc/main/java/com/google/codelabs/maps/placesdemo/folder and define it with this code:
@ExperimentalCoroutinesApi
class CurrentPlaceActivity : AppCompatActivity(), OnMapReadyCallback {
    private lateinit var placesClient: PlacesClient
    private lateinit var currentButton: Button
    private lateinit var responseView: TextView

    override fun onCreate(savedInstanceState: Bundle?) {
        super.onCreate(savedInstanceState)
        setContentView(R.layout.activity_current)

        // Retrieve a PlacesClient (previously initialized - see DemoApplication)
        placesClient = Places.createClient(this)

        // Set view objects
        currentButton = findViewById(R.id.current_button)
        responseView = findViewById(R.id.current_response_content)

        // Set listener for initiating Current Place
        currentButton.setOnClickListener {
            checkPermissionThenFindCurrentPlace()
        }
    }
}
This code associates the activity with the views you defined in the layout file. It also adds a click listener to the button to call the function checkPermissionThenFindCurrentPlace when the button is clicked.
- Define
checkPermissionThenFindCurrentPlace()to check for fine location permission and request the permission if it has not yet been granted. Paste this code after theonCreatefunction.
    /**
     * Checks that the user has granted permission for fine or coarse location.
     * If granted, finds current Place.
     * If not yet granted, launches the permission request.
     * See https://developer.android.com/training/permissions/requesting
     */
    private fun checkPermissionThenFindCurrentPlace() {
        when {
            (ContextCompat.checkSelfPermission(
                this,
                ACCESS_FINE_LOCATION
            ) == PackageManager.PERMISSION_GRANTED || ContextCompat.checkSelfPermission(
                this,
                ACCESS_COARSE_LOCATION
            ) == PackageManager.PERMISSION_GRANTED) -> {
                // You can use the API that requires the permission.
                findCurrentPlace()
            }

            shouldShowRequestPermissionRationale(ACCESS_FINE_LOCATION)
            -> {
                Log.d(TAG, "Showing permission rationale dialog")
                // TODO: In an educational UI, explain to the user why your app requires this
                // permission for a specific feature to behave as expected. In this UI,
                // include a "cancel" or "no thanks" button that allows the user to
                // continue using your app without granting the permission.
            }

            else -> {
                // Ask for both the ACCESS_FINE_LOCATION and ACCESS_COARSE_LOCATION permissions.
                ActivityCompat.requestPermissions(
                    this,
                    arrayOf(
                        ACCESS_FINE_LOCATION,
                        ACCESS_COARSE_LOCATION
                    ),
                    PERMISSION_REQUEST_CODE
                )
            }
        }
    }

    companion object {
        private const val TAG = "CurrentPlaceActivity"
        private const val PERMISSION_REQUEST_CODE = 9
    }
- When the
elsebranch of thecheckPermissionThenFindCurrentPlacefunction callsrequestPermissions, the app will present a permission request dialog to the user. If the user is running a device running an OS lower than Android 12, the user can only grant precise (fine) location permission. If the user is using a device running Android 12 or higher, they will be given the option of providing approximate (coarse) location instead of precise (fine) location, as shown in Figure 4.
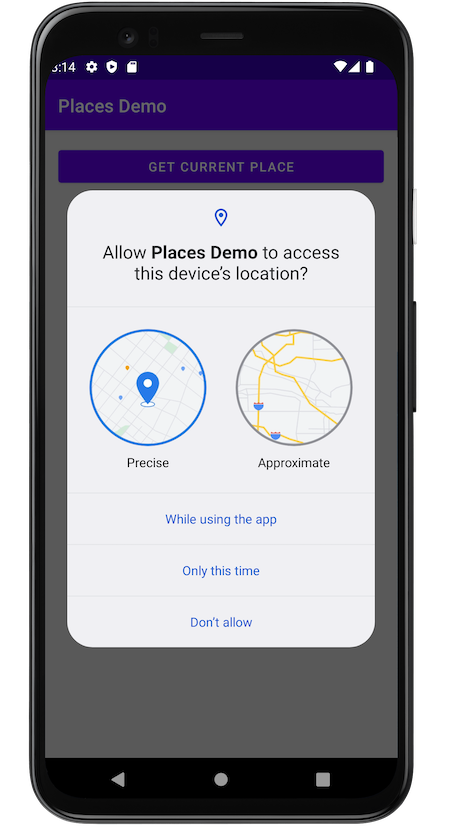
Figure 4. Requesting user permission on a device running Android 12 or higher presents the option of granting precise or approximate location.
After the user responds to the system permissions dialog, the system then invokes your app's implementation of onRequestPermissionsResult. The system passes in the user response to the permission dialog, as well as the request code that you defined. Override onRequestPermissionResult to handle the request code for the location permissions related to this Current Place activity by pasting the following code below checkPermissionThenFindCurrentPlace.
    @SuppressLint("MissingPermission")
    override fun onRequestPermissionsResult(
        requestCode: Int,
        permissions: Array<String>, grantResults: IntArray
    ) {
        if (requestCode != PERMISSION_REQUEST_CODE) {
            super.onRequestPermissionsResult(
                requestCode,
                permissions,
                grantResults
            )
            return
        } else if (
            permissions.toList().zip(grantResults.toList())
                .firstOrNull { (permission, grantResult) ->
                    grantResult == PackageManager.PERMISSION_GRANTED && (permission == ACCESS_FINE_LOCATION || permission == ACCESS_COARSE_LOCATION)
                } != null
        )
        // At least one location permission has been granted, so proceed with Find Current Place
        findCurrentPlace()
    }
- Once permission has been granted, the function
findCurrentPlacewill run. Define the function with this code after theonRequestPermissionsResultfunction.
    /**
     * Fetches a list of [PlaceLikelihood] instances that represent the Places the user is
     * most likely to be at currently.
     */
    @RequiresPermission(anyOf = [ACCESS_COARSE_LOCATION, ACCESS_FINE_LOCATION])
    private fun findCurrentPlace() {
        // Use fields to define the data types to return.
        val placeFields: List<Place.Field> =
            listOf(Place.Field.NAME, Place.Field.ID, Place.Field.ADDRESS, Place.Field.LAT_LNG)

        // Call findCurrentPlace and handle the response (first check that the user has granted permission).
        if (ContextCompat.checkSelfPermission(this, ACCESS_FINE_LOCATION) ==
            PackageManager.PERMISSION_GRANTED ||
            ContextCompat.checkSelfPermission(this, ACCESS_COARSE_LOCATION) ==
            PackageManager.PERMISSION_GRANTED
        ) {
            // Retrieve likely places based on the device's current location
            currentButton.isEnabled = false
            lifecycleScope.launch {
                val response = placesClient.awaitFindCurrentPlace(placeFields)

                responseView.text = response.prettyPrint()

                // Enable scrolling on the long list of likely places
                val movementMethod = ScrollingMovementMethod()
                responseView.movementMethod = movementMethod
            }
        } else {
            Log.d(TAG, "LOCATION permission not granted")
            checkPermissionThenFindCurrentPlace()
        }
    }
This code defines which fields to request for the likely places, creates a FindCurrentPlaceRequest, initiates the task, and populates the TextView with the requested details.
Add the Current Place activity to the manifest
Add an <activity> element for the CurrentPlaceActivity as a child of the <application> element in the AndroidManifest.xml file, located in app/src/main:
<activity android:name=".CurrentPlaceActivity" android:label="@string/current_demo_title" />
Add the Current Place activity to the demo menu
Just as before, add the Current Place demo to the home screen by appending it to the list in the Demo module. Now that you have created a Current Place activity, add it to the Demo.kt file in the src/main/java/com/google/codelabs/maps/placesdemo/ folder. Paste this code immediately after the AUTOCOMPLETE_FRAGMENT_DEMO item:
    CURRENT_FRAGMENT_DEMO(
        R.string.current_demo_title,
        R.string.current_demo_description,
        CurrentPlaceActivity::class.java
    ),
Associated strings are defined in the src/main/res/values/strings.xml file.
Run the app
- Run the app. This time you should see three items in the home screen list.
- Tap on the Current Place row. You should see a button on the screen.
- Tap the button. If you have not granted location permission to this app before, a permission request should pop up.
- Grant permission to the app to access the device's location.
- Tap the button again. This time, a list of up to 20 nearby places and their likelihoods should appear, as shown in Figure 5.
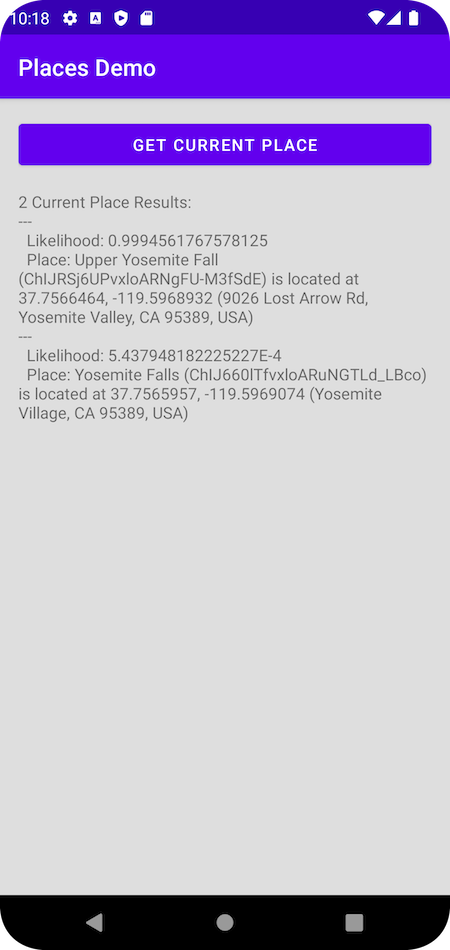
Figure 5. Presenting likely Current Place matches for the device's reported location.
11. Display the Current Place on a map
Add the Map dependency
In your module-level build.gradle file, add the Google Play services dependency for the Maps SDK for Android.
app/build.gradle
dependencies {
    // ...
    implementation 'com.google.android.gms:play-services-maps:18.2.0'
}
Update the Android manifest to account for maps
Add the following meta-data elements within the application element.
These embed the version of Google Play services that the app was compiled with and specifies your API key.
AndroidManifest.xml
        <meta-data
            android:name="com.google.android.gms.version"
            android:value="@integer/google_play_services_version" />

        <meta-data
            android:name="com.google.android.geo.API_KEY"
            android:value="${MAPS_API_KEY}" />
Add the api key to secrets.properties
Open the secrets.properties file in your top-level directory, and then add the following code. Replace YOUR_API_KEY with your API key.
MAPS_API_KEY=YOUR_API_KEY
Open local.defaults.properties file in your top-level directory, the same folder as the secrets.properties file, and then add the following code.
MAPS_API_KEY=DEFAULT_API_KEY
Check for the api key
In onCreate(), the app will check for the maps API key and to initialize the maps support fragment. getMapAsync() is used to register for the map callback.
Add the following code to do this.
CurrentPlaceActivity.kt
    override fun onCreate(savedInstanceState: Bundle?) {
        super.onCreate(savedInstanceState)
        setContentView(R.layout.activity_current)

        val apiKey = BuildConfig.MAPS_API_KEY

        // Log an error if apiKey is not set.
        if (apiKey.isEmpty() || apiKey == "DEFAULT_API_KEY") {
            Log.e("Places test", "No api key")
            finish()
            return
        }

        // Retrieve a PlacesClient (previously initialized - see DemoApplication)
        placesClient = Places.createClient(this)
        (supportFragmentManager
            .findFragmentById(R.id.map) as SupportMapFragment?)?.getMapAsync(this)

        // ...
    }
Create the map layout
- In the
app/src/main/res/layout/folder, create layout filefragment_map.xmland populate the layout with the following code.
res/layout/fragment_map.xml
<?xml version="1.0" encoding="utf-8"?>
<androidx.fragment.app.FragmentContainerView
    xmlns:android="http://schemas.android.com/apk/res/android"
    xmlns:tools="http://schemas.android.com/tools"
    android:id="@+id/map"
    android:name="com.google.android.gms.maps.SupportMapFragment"
    android:layout_width="match_parent"
    android:layout_height="wrap_content"
    tools:context="com.google.codelabs.maps.placesdemo.CurrentPlaceActivity" />
This defines a SupportMapFragment to act as a container for the map and to provide access to the GoogleMap object.
- In
activity_current.xmllayout available in theapp/src/main/res/layout/folder, add the following code to the bottom of the linear layout.
res/layout/activity_current.xml
    <TextView
        android:layout_width="match_parent"
        android:layout_height="wrap_content"
        android:paddingTop="16dp"
        android:paddingBottom="16dp"
        android:text="@string/showing_most_likely_place"
        style="@style/TextAppearance.AppCompat.Title"/>

    <include layout="@layout/fragment_map"/>
The added TextView references a new string resource that needs to be created.
- In
app/src/main/res/values/strings.xml, add the following string resource.
res/values/strings.xml
<string name="showing_most_likely_place">Showing most likely place</string>
Since additional views were added for the map, the TextView displaying the list of places needs to have its height set so these views remain visible.
- Add the
maxHeightattribute to theTextViewwith IDcurrent_response_content
res/layout/activity_current.xml
android:maxHeight="200dp"
Implement the OnMapReadyCallback
Implement the OnMapReadyCallback interface by adding it to the class declaration and override the onMapReady() method to set up the map when the GoogleMap object is available:
CurrentPlaceActivity.kt
class CurrentPlaceActivity : AppCompatActivity(), OnMapReadyCallback {
At the end of the class, add the following code:
CurrentPlaceActivity.kt
    override fun onMapReady(map: GoogleMap) {
        this.map = map
        lastKnownLocation?.let { location ->
            map.moveCamera(
                CameraUpdateFactory.newLatLngZoom(
                    location,
                    DEFAULT_ZOOM
                )
            )
        }
    }
The callback requires some class variables to work properly. Immediately after the class header, add the following:
CurrentPlaceActivity.kt
private var map: GoogleMap? = null
private var lastKnownLocation: LatLng? = null
Add the following code to the class companion object:
CurrentPlaceActivity.kt
private const val DEFAULT_ZOOM = 15f
Run the app
- Run the app.
- Tap on the Current Place row. You should see a button on the screen.
- Tap the button. If you have not granted location permission to this app before, a permission request should pop up.
- Grant permission to the app to access the device's location.
- Tap the button again. The map will be displayed.
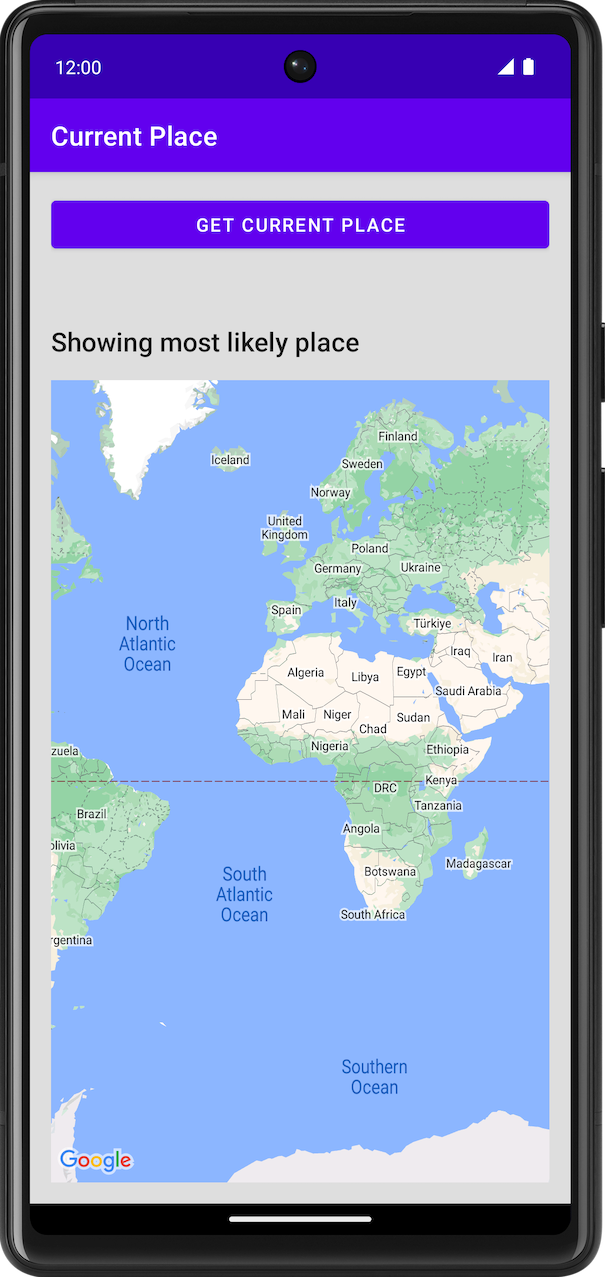
Figure 6. Current Place activity showing map.
Update the map with a place
At the end of the class, add the following code:
CurrentPlaceActivity.kt
private data class LikelyPlace(
    val name: String,
    val address: String,
    val attribution: List<String>,
    val latLng: LatLng
)

private fun PlaceLikelihood.toLikelyPlace(): LikelyPlace? {
    val name = this.place.name
    val address = this.place.address
    val latLng = this.place.latLng
    val attributions = this.place.attributions ?: emptyList()

    return if (name != null && address != null && latLng != null) {
        LikelyPlace(name, address, attributions, latLng)
    } else {
        null
    }
}
These are used to store the Place's data and format it.
At the beginning of the class, add the following code to create a variable used to store the returned Place's data.
CurrentPlaceActivity.kt
private val likelyPlaces = mutableListOf<LikelyPlace>()
In this step , the code will be changed so the user will be presented with a list of Places and they will choose one to show on the map. All the Places data is shown in a list on the screen.
In function findCurrentPlace, in the lifecycleScope.launch block before this line of code
CurrentPlaceActivity.kt
responseView.text = response.prettyPrint()
add the following code:
CurrentPlaceActivity.kt
                likelyPlaces.clear()

                likelyPlaces.addAll(
                    response.placeLikelihoods.take(M_MAX_ENTRIES).mapNotNull { placeLikelihood ->
                        placeLikelihood.toLikelyPlace()
                    }
                )

                openPlacesDialog()
This code requires a constant for the maximum number of places to show.
In the companion object, add the code for that constant.
CurrentPlaceActivity.kt
private const val M_MAX_ENTRIES = 5
Add the following code which creates the dialog allowing the user to select a place.
CurrentPlaceActivity.kt
    /**
     * Displays a form allowing the user to select a place from a list of likely places.
     */
    private fun openPlacesDialog() {
        // Ask the user to choose the place where they are now.
        val listener =
            DialogInterface.OnClickListener { _, which -> // The "which" argument contains the position of the selected item.
                val likelyPlace = likelyPlaces[which]
                lastKnownLocation = likelyPlace.latLng

                val snippet = buildString {
                    append(likelyPlace.address)
                    if (likelyPlace.attribution.isNotEmpty()) {
                        append("\n")
                        append(likelyPlace.attribution.joinToString(", "))
                    }
                }

                val place = Place.builder().apply {
                    name = likelyPlace.name
                    latLng = likelyPlace.latLng
                }.build()

                map?.clear()

                setPlaceOnMap(place, snippet)
            }

        // Display the dialog.
        AlertDialog.Builder(this)
            .setTitle(R.string.pick_place)
            .setItems(likelyPlaces.map { it.name }.toTypedArray(), listener)
            .setOnDismissListener {
                currentButton.isEnabled = true
            }
            .show()
    }
Following Android best practices, the dialog references a string resource which needs to be added to the strings.xml resource file located in app/src/main/res/values/ folder.
Add the following to strings.xml:
res/values/strings.xml
<string name="pick_place">Choose a place</string>
These functions then call function setPlaceOnMap which moves the camera and places a marker at the selected location.
Add the following code:
CurrentPlaceActivity.kt
    private fun setPlaceOnMap(place: Place?, markerSnippet: String?) {
        val latLng = place?.latLng ?: defaultLocation
        map?.moveCamera(
            CameraUpdateFactory.newLatLngZoom(
                latLng,
                DEFAULT_ZOOM
            )
        )
        map?.addMarker(
            MarkerOptions()
                .position(latLng)
                .title(place?.name)
                .snippet(markerSnippet)
        )
    }
It is also recommended to save and restore the maps state.
To save its state, override the onSaveInstanceState function and add the following code:
CurrentPlaceActivity.kt
    /**
     * Saves the state of the map when the activity is paused.
     */
    override fun onSaveInstanceState(outState: Bundle) {
        outState.putParcelable(KEY_LOCATION, lastKnownLocation)
        super.onSaveInstanceState(outState)
    }
To restore its state, in onCreate add the following code after the call to setContentView:
CurrentPlaceActivity.kt
        if (savedInstanceState != null) {
            lastKnownLocation = savedInstanceState.getParcelable(KEY_LOCATION)
        }
Saving and restoring requires a key, this is a constant from the companion object.
In the companion object block, add the following:
CurrentPlaceActivity.kt
        // Key for storing activity state.
        private const val KEY_LOCATION = "location"
Run the app
- Run the app.
- Tap on the Current Place row. You should see a button on the screen.
- Tap the button. If you have not granted location permission to this app before, a permission request should pop up.
- Grant permission to the app to access the device's location.
- Tap the button again.
- Choose a place by tapping on it. The map will be zoomed in and centered with a marker placed at the selected location.
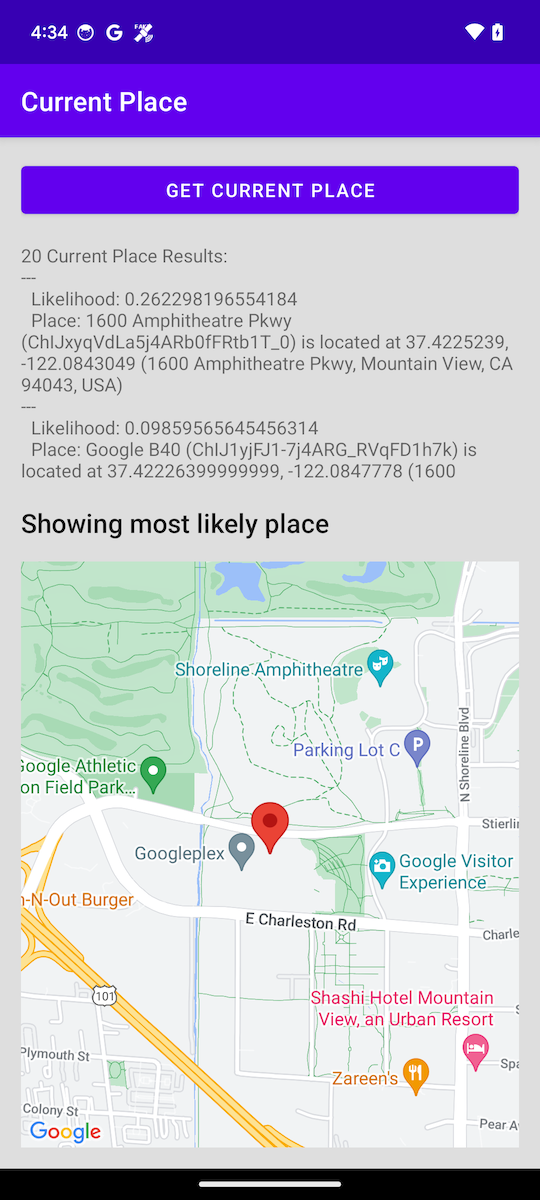
Figure 7. Map with marker at selected location.
12. Congratulations
You've successfully built an Android app with the Places SDK for Android.
What you learned
- Installing and configuring the Places SDK for Android.
- Installing Kotlin Extensions for the Places SDK for Android.
- Loading Place Details.
- Adding Place Autocomplete.
- Getting the Current Place.
What's next?
- Explore or fork the
android-places-demosGitHub repository of samples and demos for more inspiration. - Learn from more Kotlin codelabs for building Android apps with Google Maps Platform.
- Help us create the content that you would find most useful by answering the following question:
What other codelabs would you like to see?
Is the codelab you want not listed? Request it with a new issue here.