
1. 事前準備
瞭解如何使用 Google 地圖平台和 Places SDK for Android,向使用者提供地點清單,以便識別他們目前的所在位置。
必要條件
- Java 基礎技能
學習內容
- 在 Android 應用程式中加入地圖。
- 使用位置資訊權限,取得使用者的地理位置。
- 擷取使用者目前位置附近的地點。
- 向使用者顯示可能的地點,以便識別他們目前的位置。
建構項目
您將從頭建構 Android 應用程式,但可以下載範例程式碼,以便在偵錯時進行比較。從 GitHub 下載範例程式碼,或 (如果您已設定 Git 供指令列使用) 輸入下列內容:
git clone https://github.com/googlecodelabs/current-place-picker-android.git
進行本程式碼研究室時,如果你遇到任何問題 (例如程式碼錯誤、文法錯誤或用詞不明確等),請透過程式碼研究室左下角的「回報錯誤」連結回報問題。
2. 開始使用
開始本程式碼研究室前,請先完成下列設定:
Android Studio
從 https://developer.android.com/studio 下載 Android Studio。
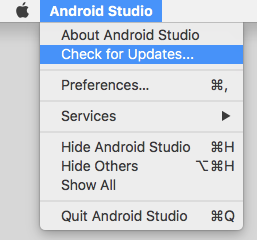
如果您已安裝 Android Studio,請依序點選「Android Studio」 >「Check for Updates...」,確認是否為最新版本。
本實驗室使用 Android Studio 3.4 編寫。
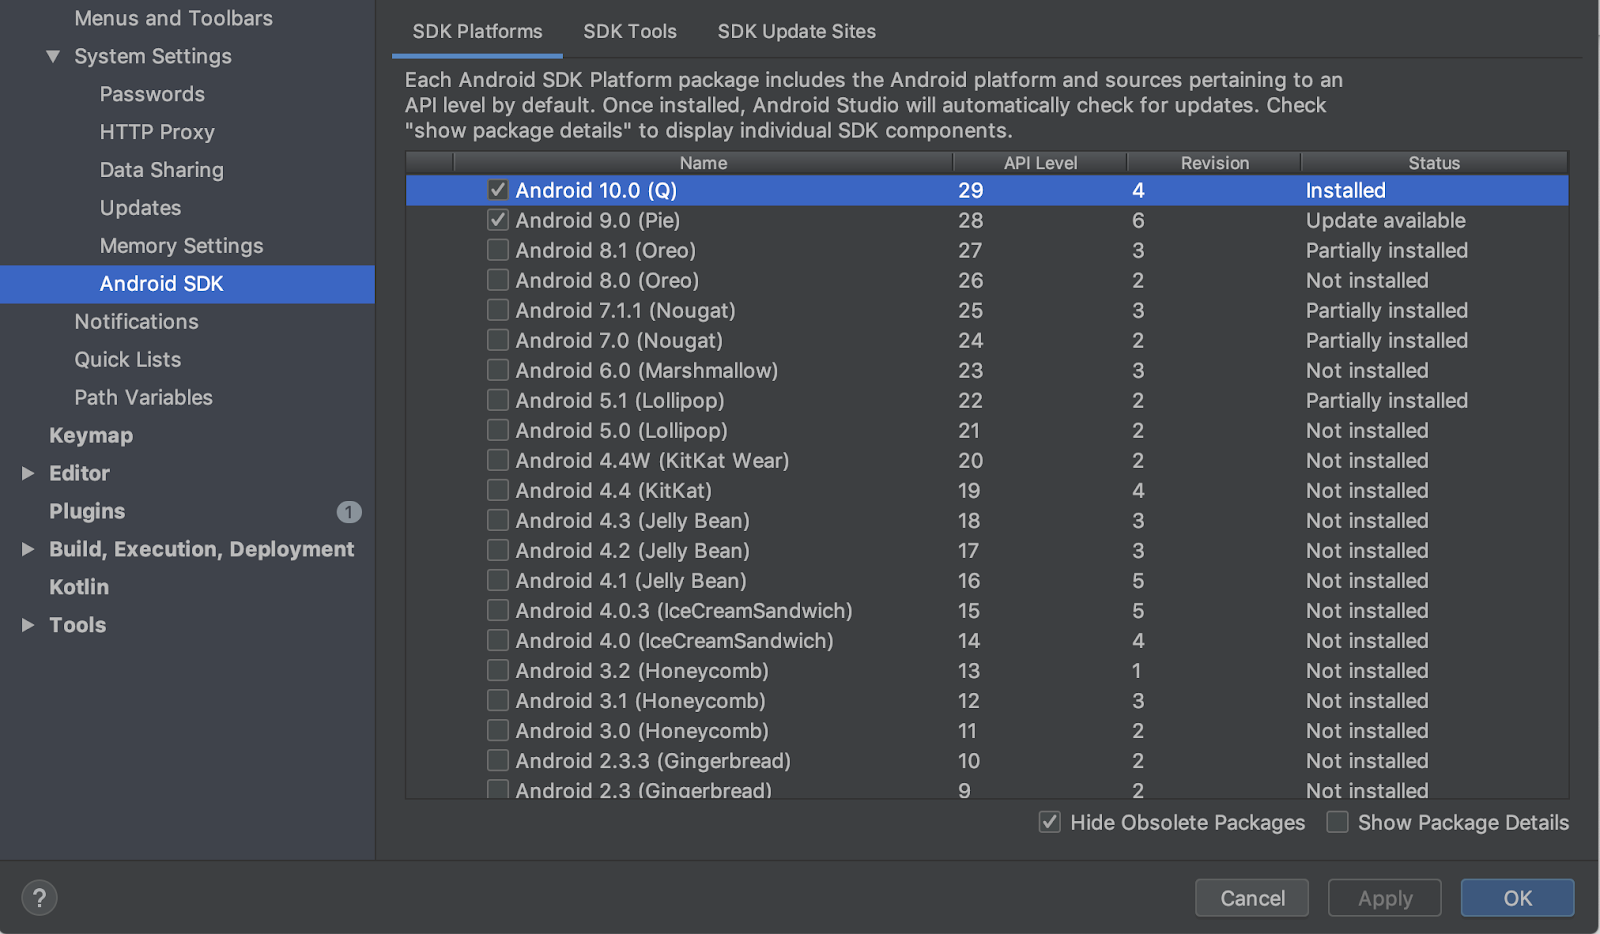
Android SDK
在 Android Studio 中,您可以使用 SDK 管理工具設定所需的 SDK。本實驗室使用 Android Q SDK。
- 在 Android Studio 歡迎畫面中,依序點選「Configure」 >「SDK Manager」。
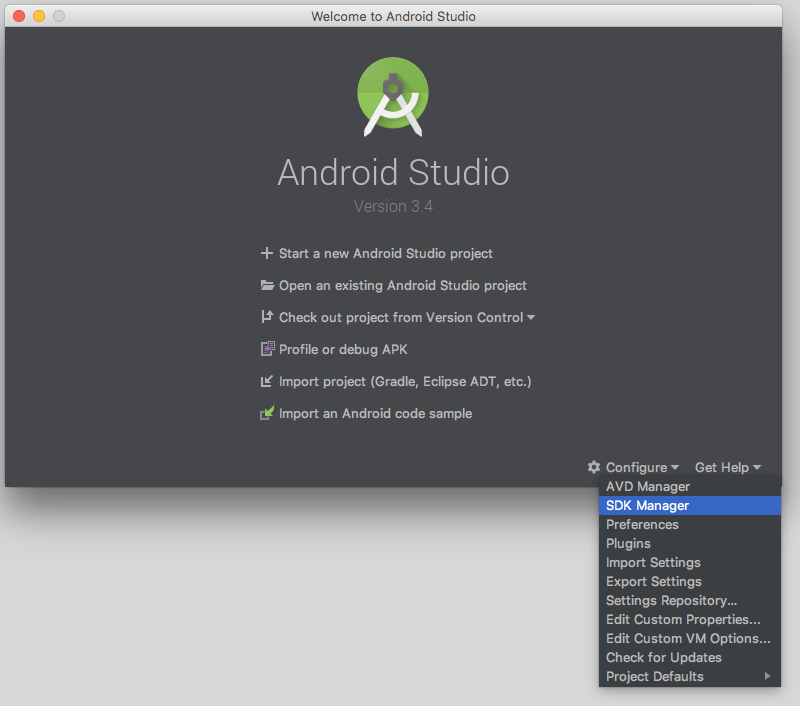
- 選取所需的 SDK 核取方塊,然後按一下「套用」。
如果您還沒有 SDK,系統會開始將 SDK 下載到您的電腦。
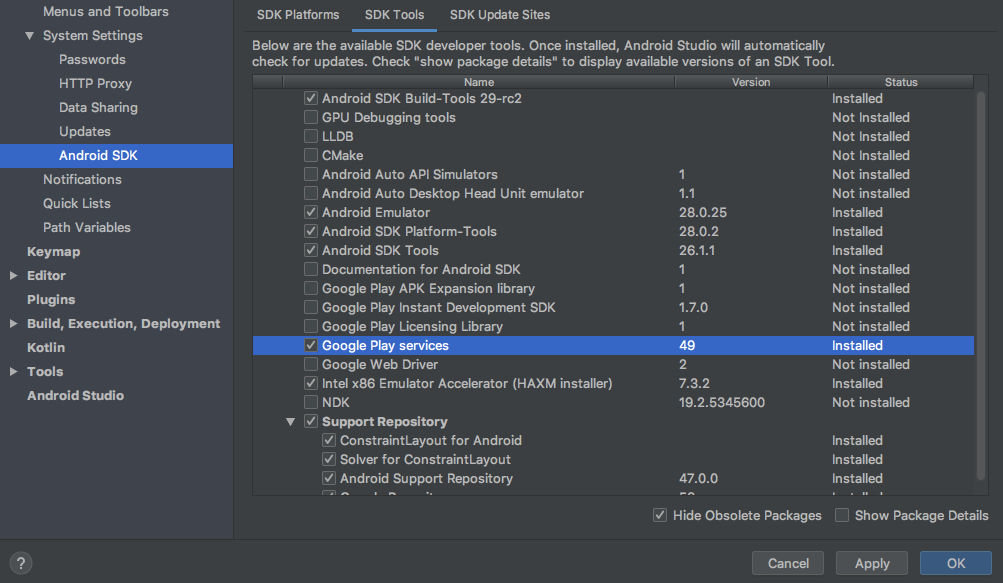
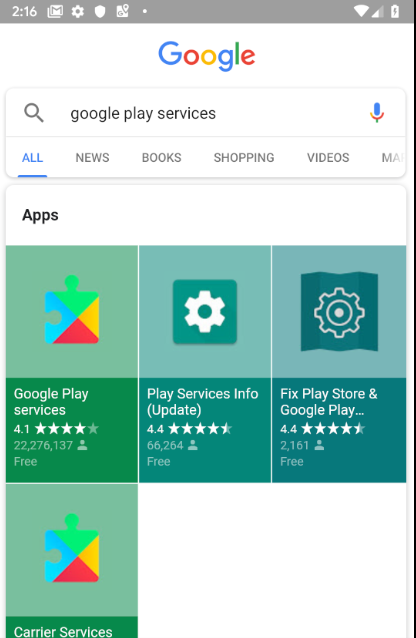
Google Play 服務
您也必須透過 SDK 管理工具安裝 Google Play 服務。
- 按一下「SDK Tools」分頁標籤,然後選取「Google Play services」核取方塊。
如果狀態顯示「有可用的更新」,請更新。
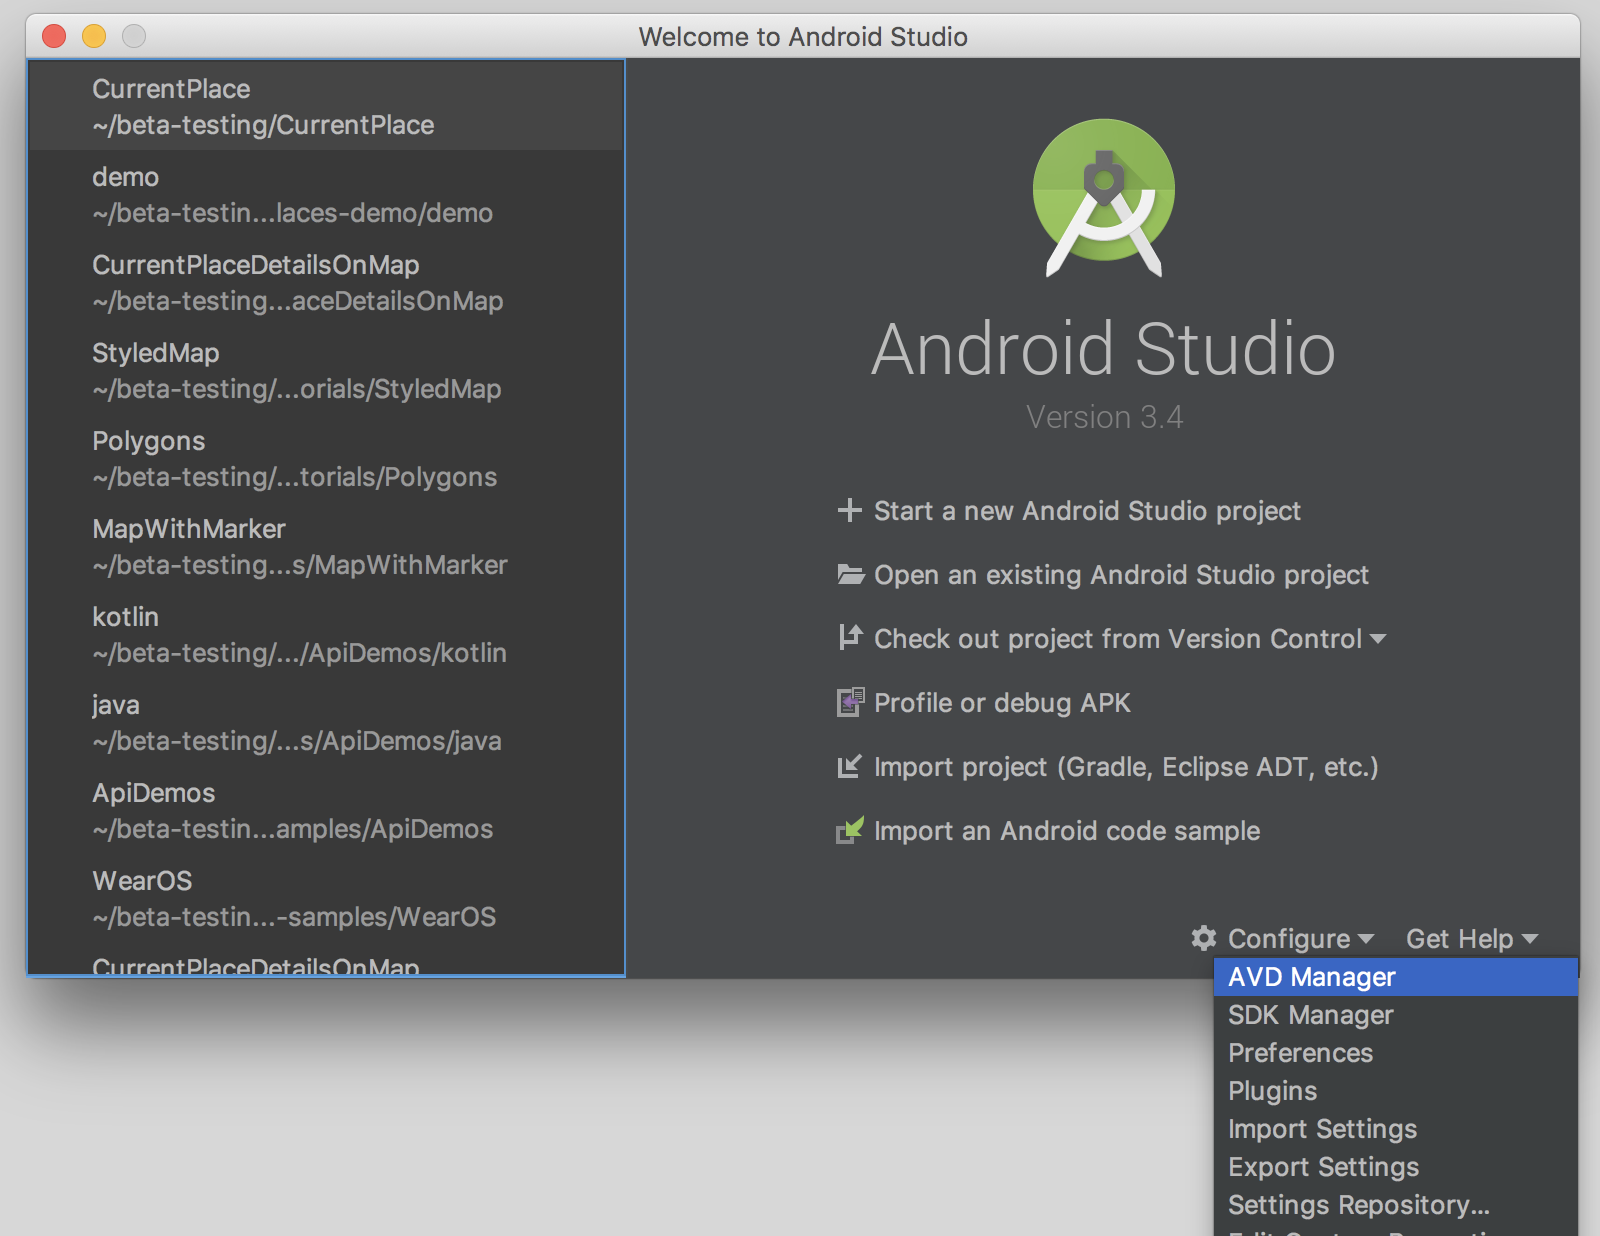
3. 準備模擬器
如要執行應用程式,您可以連結自己的裝置,或使用 Android 模擬器。
如果使用自己的裝置,請跳至本頁結尾的「實體裝置操作說明:更新 Google Play 服務」。
新增模擬器
- 在 Android Studio 歡迎畫面中,依序點選「Configure」 >「AVD Manager」。
系統會開啟「Android Virtual Device Manager」對話方塊。
- 按一下「Create Virtual Device...」(建立虛擬裝置...),開啟可供選擇的裝置清單。
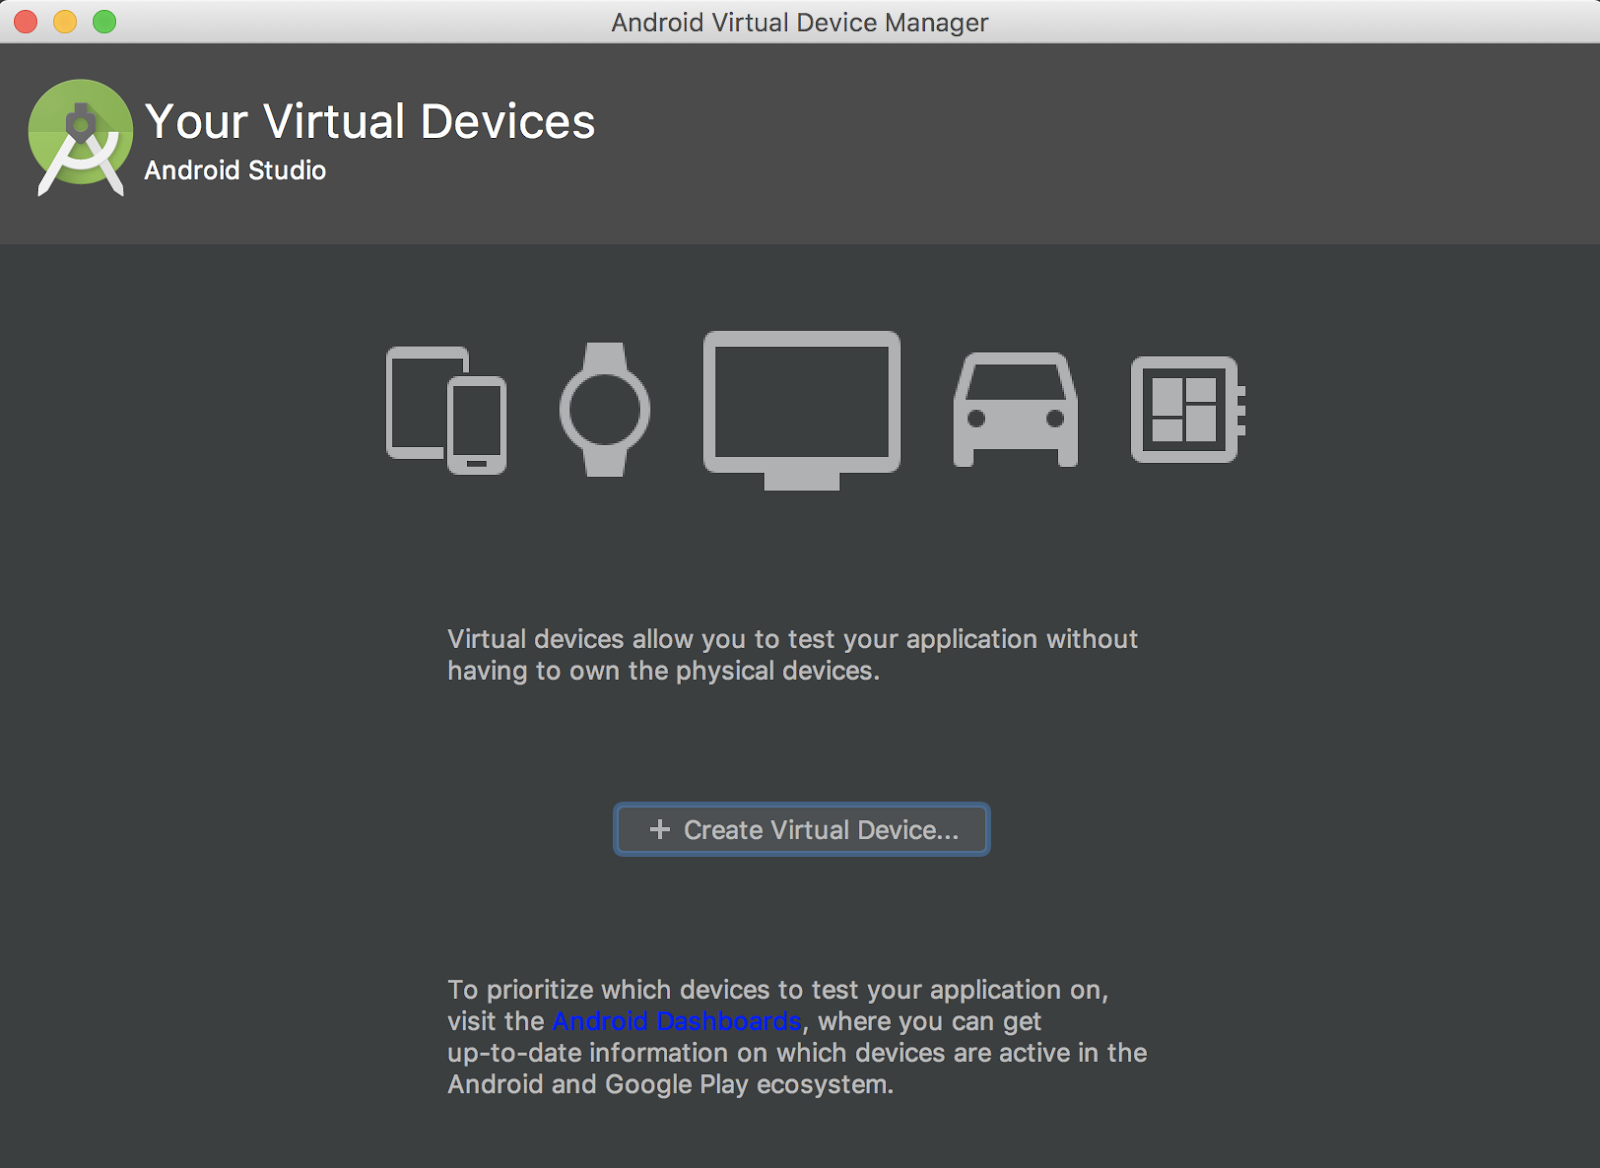
- 在「Play 商店」欄中選擇含有 Play
 圖示的裝置,然後按一下「下一步」。
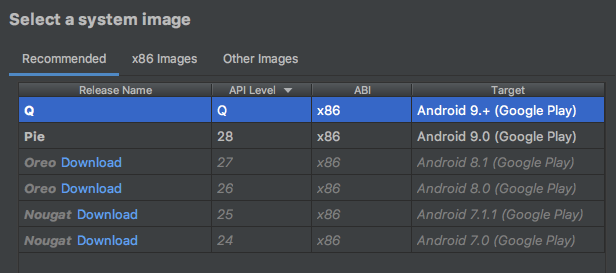
畫面上會顯示可安裝的系統映像檔。如果「Android 9 以上版本 (Google Play)」目標平台 旁邊顯示「下載」,請按一下「下載」。
- 按一下「下一步」為虛擬裝置命名,然後按一下「完成」。
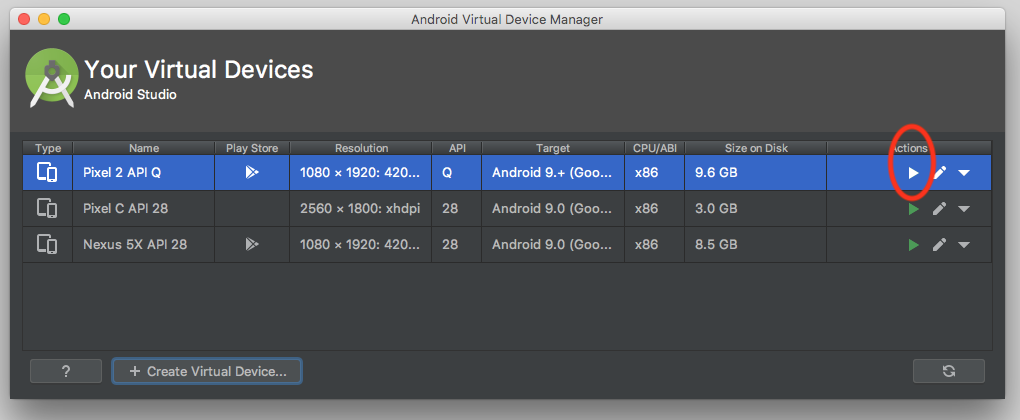
您會返回「您的虛擬裝置」清單。
- 按一下新裝置旁的「開始」圖示
 :
:
模擬器隨即開啟。
模擬器操作說明:更新 Google Play 服務
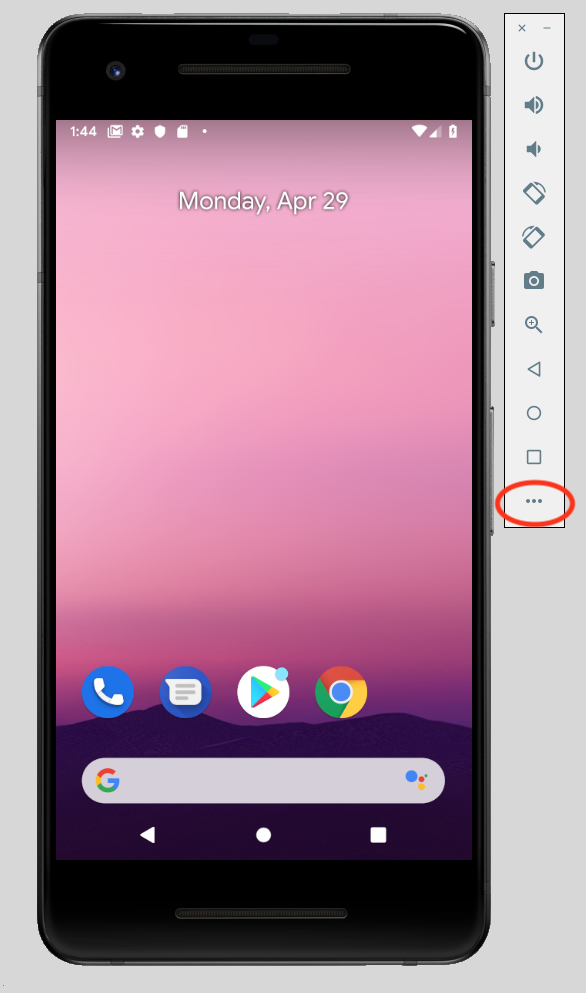
- 啟動模擬器後,按一下顯示在導覽列中的「...」**。**
系統會開啟「Extended controls」對話方塊。
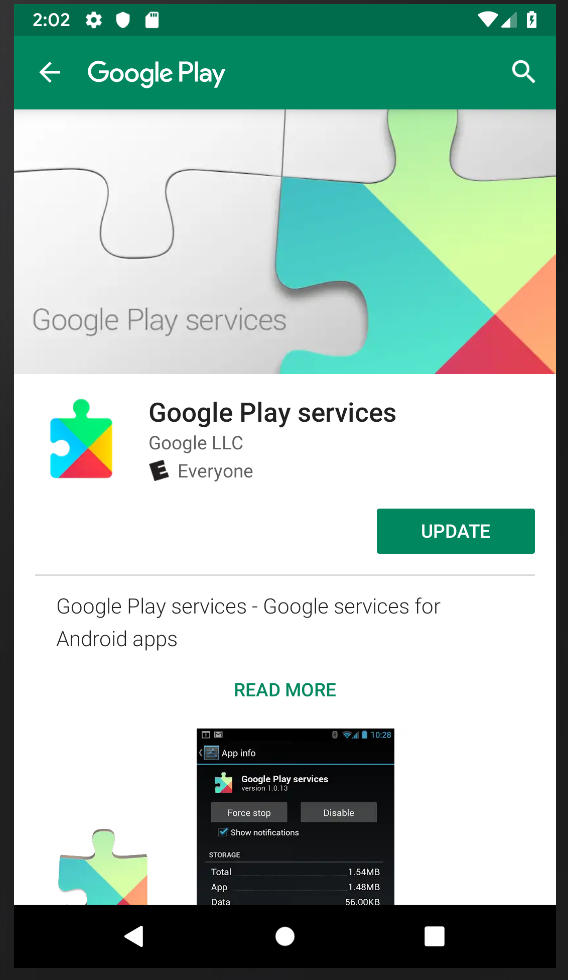
- 按一下選單中的「Google Play」。
如果有可用的更新,請按一下「更新」。

- 使用 Google 帳戶登入模擬器。
您可以免費使用自己的帳戶或建立新帳戶,將測試與個人資訊分開。
Google Play 隨即開啟 Google Play 服務。
- 按一下「更新」,即可取得最新版 Google Play 服務。
系統要求您完成帳戶設定並新增付款方式時,請按一下「略過」。
在模擬器中設定位置
- 啟動模擬器後,在主畫面搜尋列中輸入「maps」,即可叫出 Google 地圖應用程式圖示。

- 按一下圖示即可啟動。
系統會顯示預設地圖。
- 按一下地圖右下方的「你的位置」圖示
 。
。
系統會要求你授予手機使用位置資訊的權限。
- 按一下「...」開啟「擴充控制項」選單。
- 按一下「位置」分頁標籤。
- 輸入經緯度。
在這裡輸入任何內容,但請確認該區域有許多地點。
(如要重現本程式碼研究室的結果,請使用夏威夷茂宜島基黑鎮的緯度 20.7818 和經度 -156.4624)。
- 按一下「傳送」,地圖就會更新為這個位置。
您現在可以執行應用程式,並使用位置資訊進行測試。
實體裝置操作說明:更新 Google Play 服務
如果您使用的是實際 Android 裝置,請按照下列步驟操作:
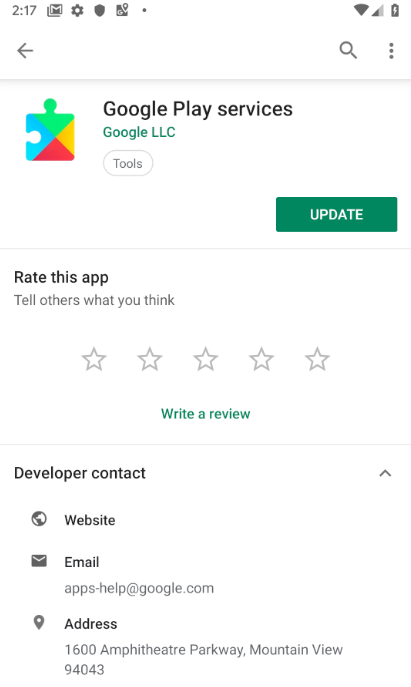
- 使用主畫面上的搜尋列搜尋並開啟 Google Play 服務。
- 按一下「更多詳細資料」。
視情況按一下「更新」。
4. 使用 Google 地圖活動建立應用程式殼層
- 在 Android Studio 歡迎畫面中,選取「Start a new Android Studio project」。
- 在「Phone and Tablet」分頁標籤中,選取「Google Maps Activity」。
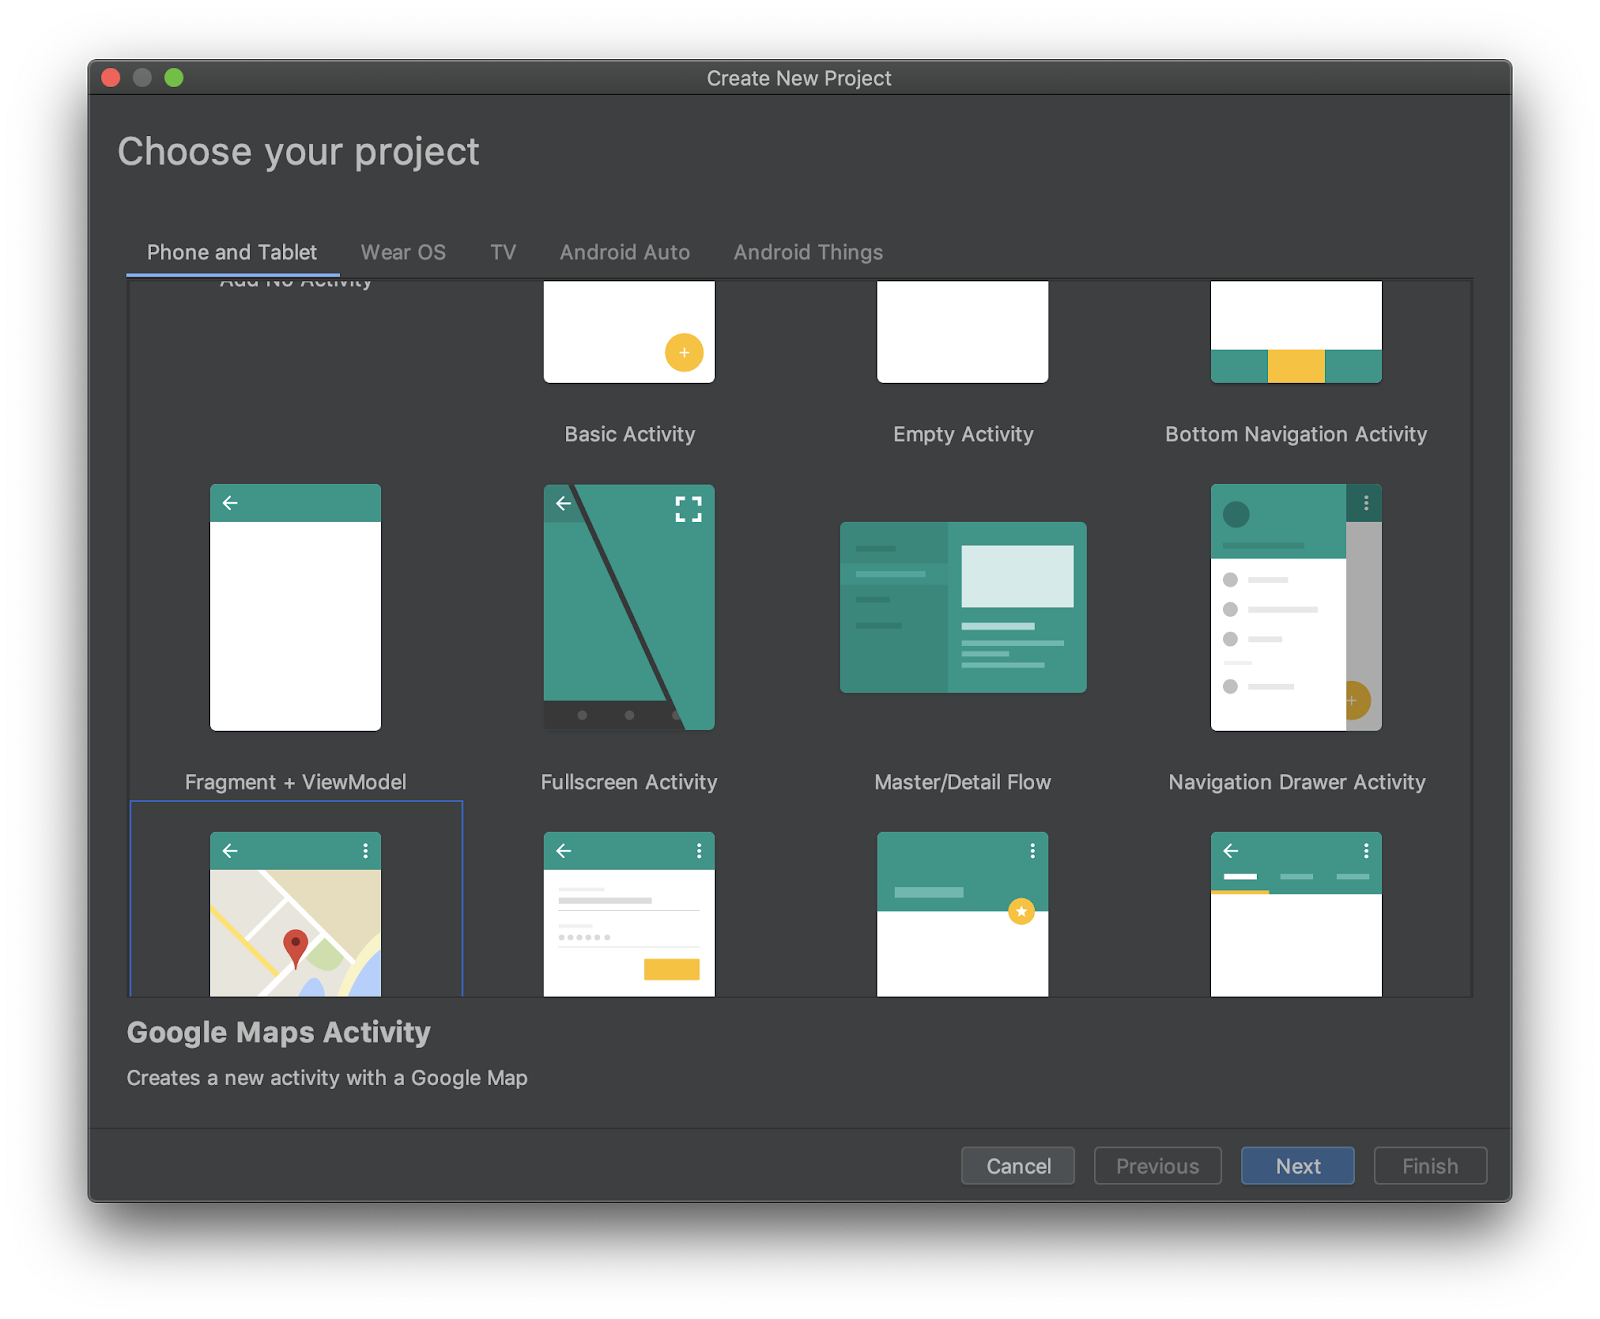
「設定專案」對話方塊隨即開啟。您可以在這裡為應用程式命名,並根據網域建立套件。
以下是名為「Current Place」的應用程式設定,對應的套件為 com.google.codelab.currentplace。
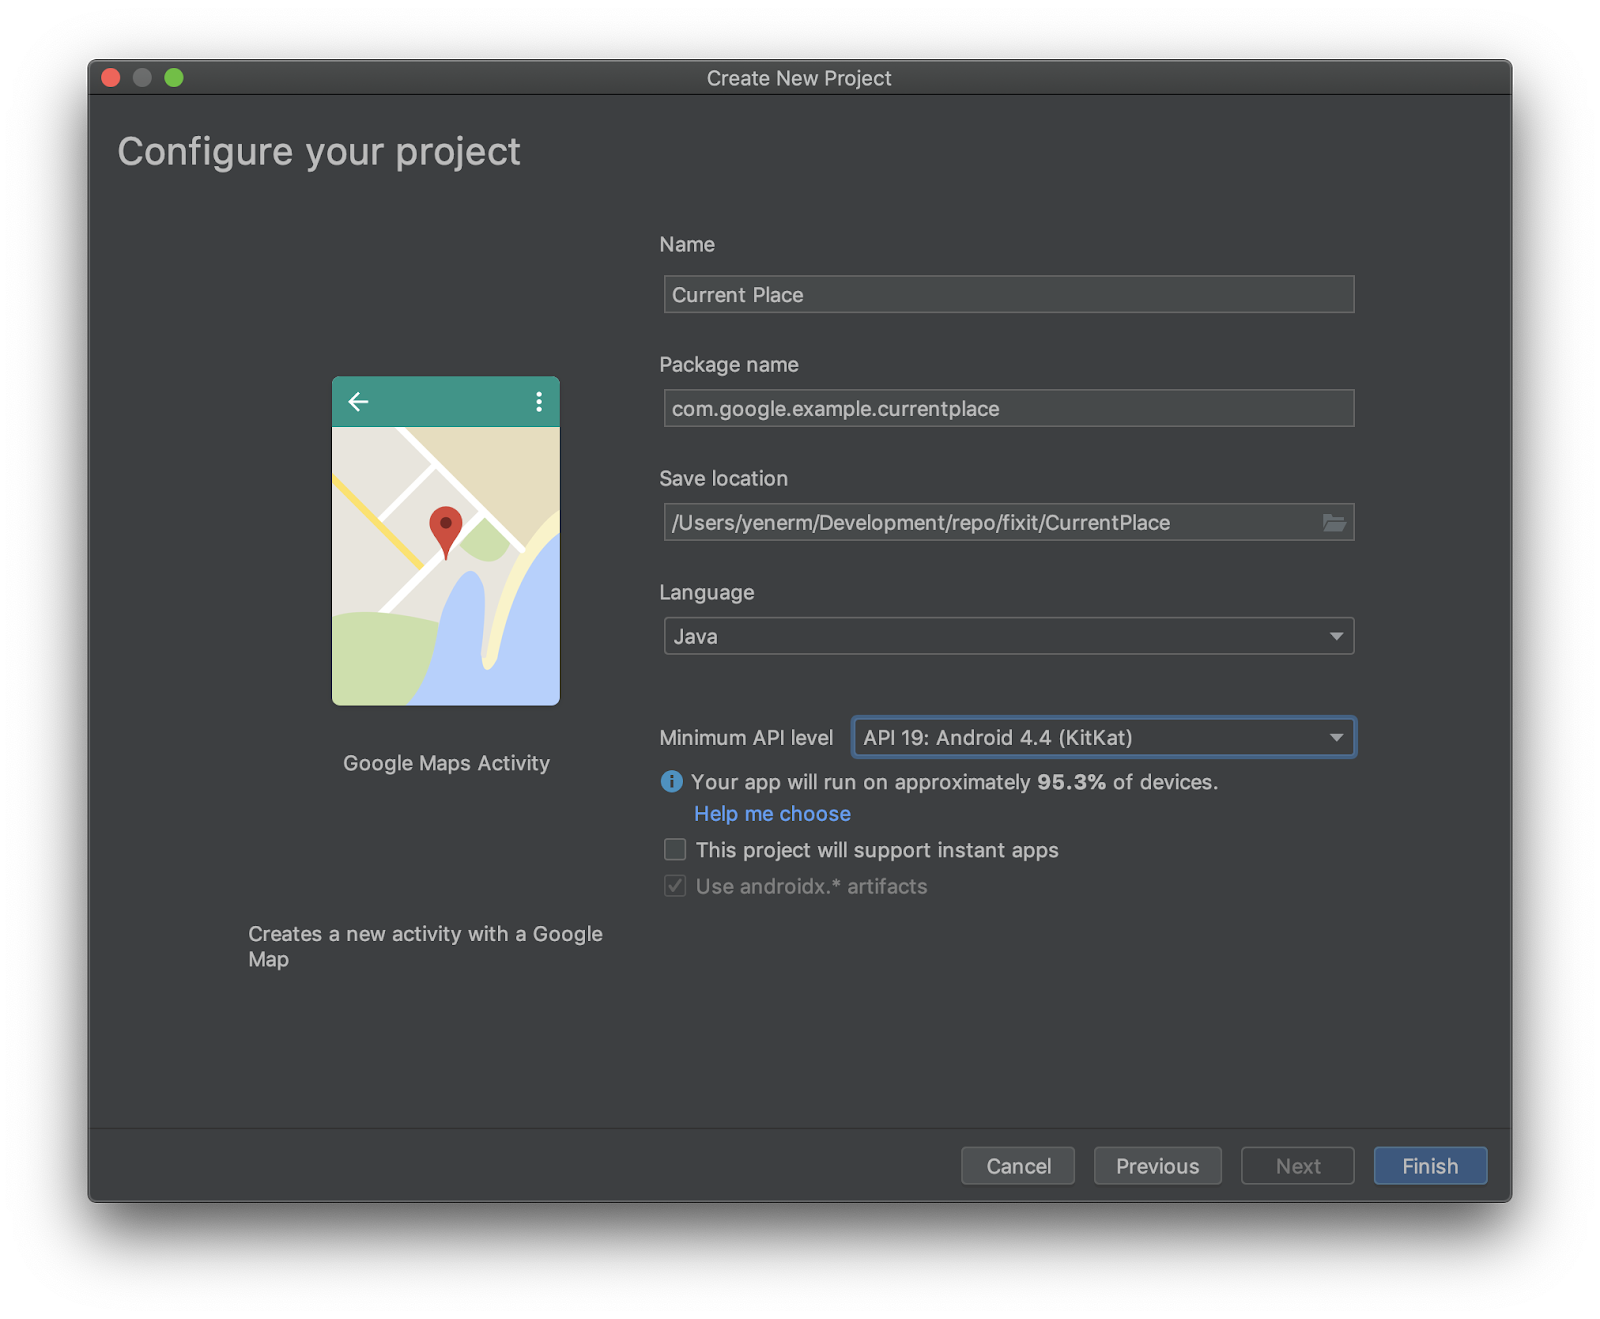
- 選擇 Java 做為語言,然後選取「Use androidx. artifacts」(使用 androidx. 構件)*。
保留其餘設定的預設值。
- 按一下「完成」。
5. 在 Gradle 建構檔案中加入 Google 服務依附元件
如要在 Android 中存取位置資訊權限,您需要 Google Play 服務的 Google Location 和 Activity Recognition API。如要進一步瞭解如何新增這項和其他 Google Play 服務 API,請參閱「設定 Google Play 服務」。
Android Studio 專案通常會有兩個 build.gradle 檔案。一個用於整體專案,另一個用於應用程式。如果 Android Studio 專案檔案總管處於「Android」Android檢視畫面,您會在 Gradle Scripts 資料夾中看到這兩個檔案。您需要編輯 build.gradle (Module: app) 檔案,才能新增 Google 服務。
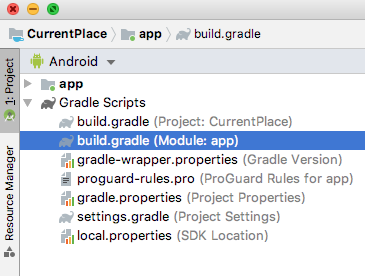
- 在
dependencies區段中新增兩行,加入位置資訊的 Google 服務和 Places API ( 相關範例程式碼)。
build.gradle (Module: app)
plugins {
  id 'com.android.application'
}

android {
    compileSdkVersion 28
    defaultConfig {
        applicationId "com.google.codelab.currentplace"
        minSdkVersion 19
        targetSdkVersion 28
        versionCode 1
        versionName "1.0"
        testInstrumentationRunner "androidx.test.runner.AndroidJUnitRunner"
    }
    buildTypes {
        release {
            minifyEnabled false
            proguardFiles getDefaultProguardFile('proguard-android-optimize.txt'), 'proguard-rules.pro'
        }
    }
}

dependencies {
    implementation fileTree(dir: 'libs', include: ['*.jar'])
    implementation 'androidx.appcompat:appcompat:1.0.2'
    implementation 'com.google.android.gms:play-services-maps:16.1.0'
    testImplementation 'junit:junit:4.12'
    androidTestImplementation 'androidx.test:runner:1.1.1'
    androidTestImplementation 'androidx.test.espresso:espresso-core:3.1.1'

    implementation 'com.google.android.gms:play-services-location:16.0.0'
    implementation 'com.google.android.libraries.places:places:1.1.0'
}
6. 啟用 Google 地圖平台 API 並取得 API 金鑰
在接下來的啟用步驟中,您需要啟用 Maps SDK for Android 和 Places API。
設定 Google 地圖平台
如果您尚未建立 Google Cloud Platform 帳戶,以及啟用計費功能的專案,請參閱「開始使用 Google 地圖平台」指南,建立帳單帳戶和專案。
- 在 Cloud 控制台中,按一下專案下拉式選單,然後選取要用於本程式碼研究室的專案。

- 在 Google Cloud Marketplace 中,啟用本程式碼研究室所需的 Google 地圖平台 API 和 SDK。如要瞭解如何操作,請觀看這部影片或參閱這份說明文件。
- 在 Cloud Console 的「憑證」頁面中產生 API 金鑰。你可以按照這部影片或這份文件中的步驟操作。所有 Google 地圖平台要求都需要 API 金鑰。
複製剛才建立的 API 金鑰。切換回 Android Studio,然後在「Android」 >「app」 >「res」 >「values」 下方找到 google_maps_api.xml 檔案。
將 YOUR_KEY_HERE 替換成您複製的 API 金鑰。

應用程式設定完成。
7. 編輯版面配置檔案
- 在專案檔案總管中,開啟 Android >
app>res>layout中的activity_maps.xml檔案。
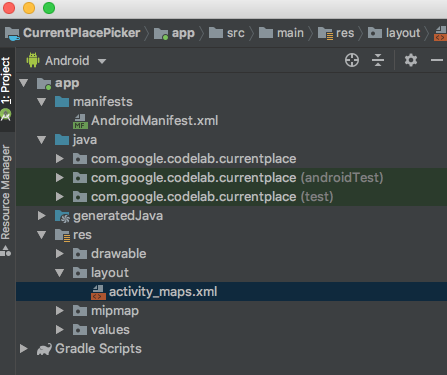
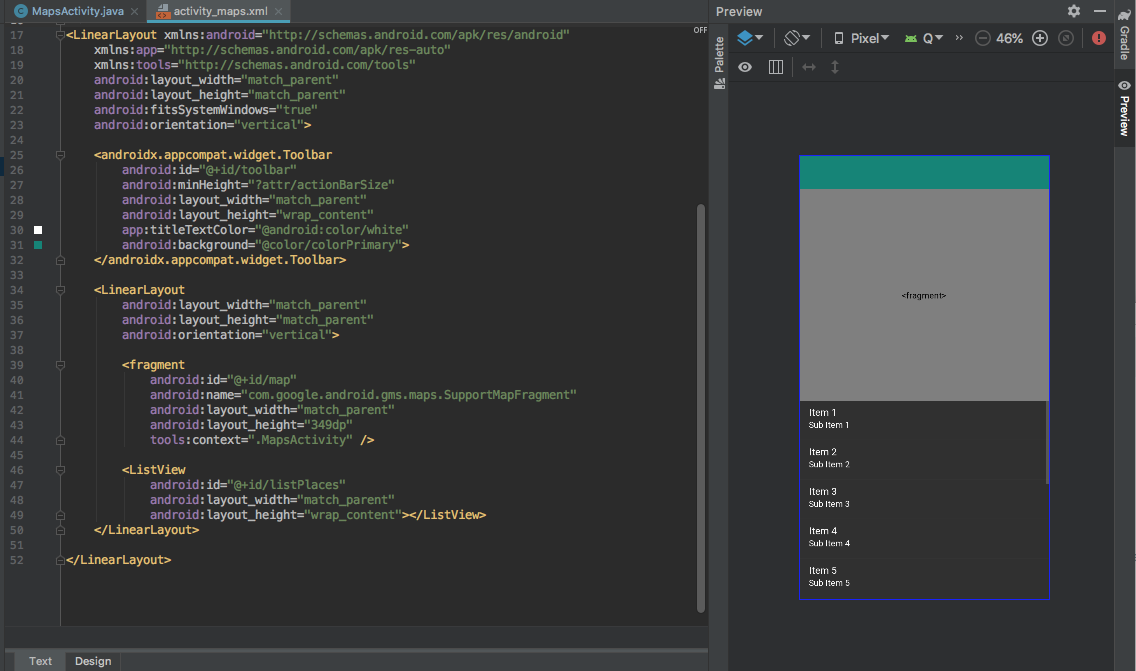
- 畫面右側會開啟基本 UI,底部的分頁則可供您選取版面配置的「設計」或「文字」編輯器。選取「Text」,然後將版面配置檔案的全部內容替換為以下內容:
activity_maps.xml
<?xml version="1.0" encoding="utf-8"?>

<LinearLayout xmlns:android="http://schemas.android.com/apk/res/android"
    xmlns:app="http://schemas.android.com/apk/res-auto"
    xmlns:tools="http://schemas.android.com/tools"
    android:layout_width="match_parent"
    android:layout_height="match_parent"
    android:fitsSystemWindows="true"
    android:orientation="vertical">

    <androidx.appcompat.widget.Toolbar
        android:id="@+id/toolbar"
        android:minHeight="?attr/actionBarSize"
        android:layout_width="match_parent"
        android:layout_height="wrap_content"
        app:titleTextColor="@android:color/white"
        android:background="@color/colorPrimary" />

    <LinearLayout
        android:layout_width="match_parent"
        android:layout_height="match_parent"
        android:orientation="vertical">

        <fragment
            android:id="@+id/map"
            android:name="com.google.android.gms.maps.SupportMapFragment"
            android:layout_width="match_parent"
            android:layout_height="349dp"
            tools:context=".MapsActivity" />

        <ListView
            android:id="@+id/listPlaces"
            android:layout_width="match_parent"
            android:layout_height="wrap_content" />
    </LinearLayout>

</LinearLayout>
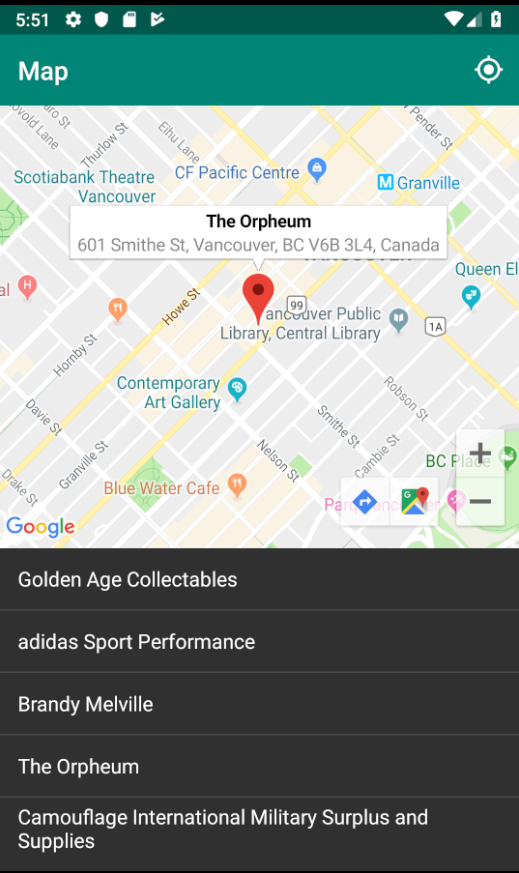
這樣一來,您就會看到如下所示的使用者介面:
8. 設定應用程式列
如要提供按鈕供使用者點選,以便選取目前地點,請新增應用程式列,並加入可尋找使用者目前地點及顯示附近可能地點的圖示。介面外觀如下:

在手機上,只會顯示圖示。如果平板電腦有更多空間,也會顯示文字。
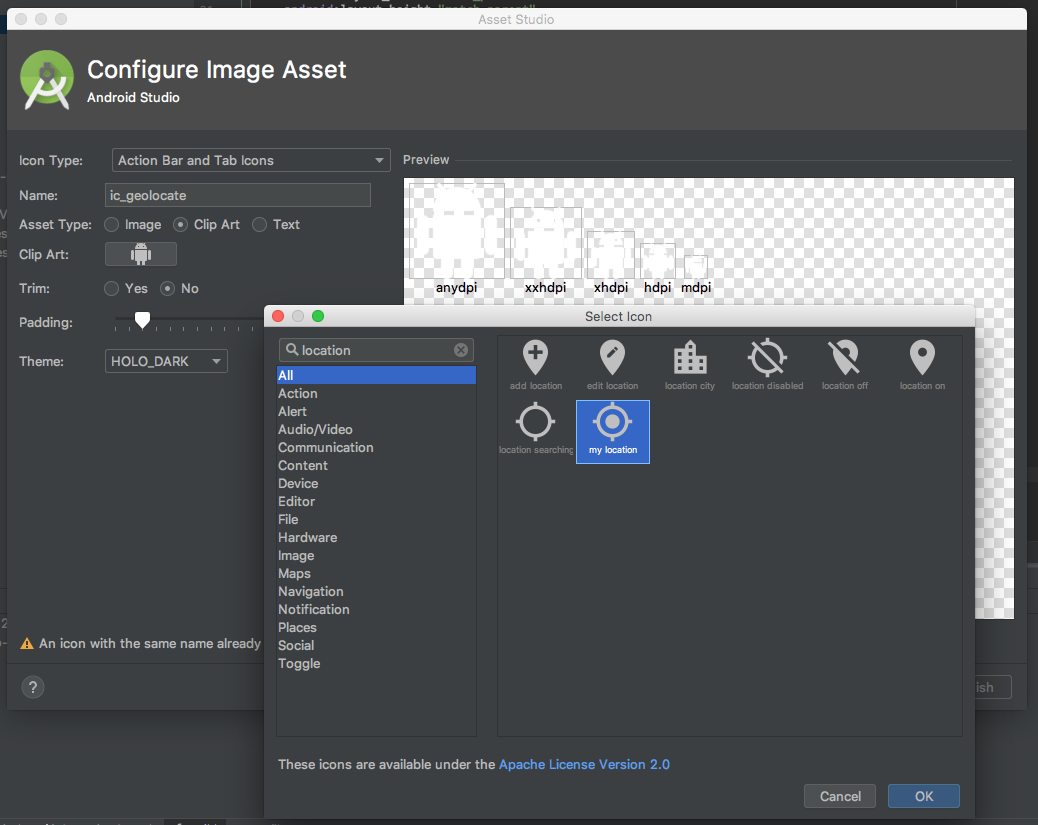
建立圖示
- 在專案檔案總管中,依序點選「Android」 >「app」,然後在「res」資料夾上按一下滑鼠右鍵,並依序選取「New」 >「Image Asset」。
「Asset Studio」隨即開啟。
- 在「Icon Type」選單中,按一下「Action Bar and Tab Icons」。
- 為資產命名
ic_geolocate。 - 選取「剪貼畫」做為資產類型。
- 按一下「插圖」旁的圖形。
「選取圖示」視窗隨即開啟。
- 選擇所需圖示。
您可以使用搜尋列,尋找與意圖相關的圖示。
- 搜尋
location並選擇與地點相關的圖示。
「我的位置」圖示與 Google 地圖應用程式中使用的圖示相同,使用者可透過這個圖示將相機對準目前位置。
- 依序點選「OK」 >「Next」 >「Finish」,確認是否出現名為
drawable的新資料夾,內含新的圖示檔案。
新增字串資源
- 在專案檔案總管中,依序點選「Android」 >「app」 >「res」 >「values」,然後開啟
strings.xml檔案。 - 在
<string name="title_activity_maps">Map</string>後方新增下列程式碼:
strings.xml
    <string name="action_geolocate">Pick Place</string>
    <string name="default_info_title">Default Location</string>
    <string name="default_info_snippet">No places found, because location permission is disabled.</string>
如果應用程式列有空間在圖示旁加入文字標籤,就會使用第一行文字。其他則用於您新增至地圖的標記。
現在檔案中的程式碼如下所示:
<resources>
    <string name="app_name">Current Place</string>
    <string name="title_activity_maps">Map</string>
    <string name="action_geolocate">Pick Place</string>
    <string name="default_info_title">Default Location</string>
    <string name="default_info_snippet">No places found, because location permission is disabled.</string>
</resources>
新增應用程式列
- 在專案檔案總管中,依序點選「Android」 >「app」,然後在
res資料夾上按一下滑鼠右鍵,依序選取「New」 >「Directory」,在app/src/main/res下方建立新的子目錄。 - 將目錄命名為
menu。 - 在
menu資料夾上按一下滑鼠右鍵,然後依序選取「New」 >「File」。 - 命名檔案
menu.xml。 - 貼上這段程式碼:
menu.xml
<?xml version="1.0" encoding="utf-8"?>
<menu xmlns:android="http://schemas.android.com/apk/res/android"
    xmlns:app="http://schemas.android.com/apk/res-auto">

    <!-- "Locate me", should appear as action button if possible -->
    <item
        android:id="@+id/action_geolocate"
        android:icon="@drawable/ic_geolocate"
        android:title="@string/action_geolocate"
        app:showAsAction="always|withText" />

</menu>
更新應用程式列樣式
- 在專案檔案總管中,依序展開「Android」Android >「
app」>「res」>「values」,然後開啟其中的styles.xml檔案。 - 在
<style>標記中,將父項屬性編輯為"Theme.AppCompat.NoActionBar"。 - 請記下
name屬性,下一個步驟會用到。
styles.xml
<style name="AppTheme" parent="Theme.AppCompat.NoActionBar">
在 AndroidManifest.xml 中更新應用程式主題
- 依序點選「Android」Android >
app>manifests,然後開啟AndroidManifest.xml檔案。 - 找出
android:theme行,並編輯或確認值為@style/AppTheme。
AndroidManifest.xml
   <application
        android:allowBackup="true"
        android:icon="@mipmap/ic_launcher"
        android:label="@string/app_name"
        android:roundIcon="@mipmap/ic_launcher_round"
        android:supportsRtl="true"
        android:theme="@style/AppTheme">
您現在可以開始寫程式了!
9. 初始化應用程式
- 在專案的檔案總管中,找出
MapsActivity.java檔案。
這個檔案位於您在步驟 1 為應用程式建立的套件對應資料夾中。
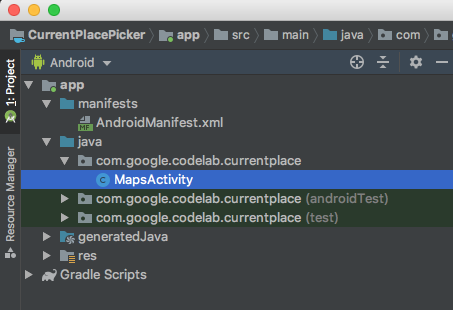
- 開啟檔案,即可進入 Java 程式碼編輯器。
匯入 Places SDK 和其他依附元件
在 MapsActivity.java 頂端新增這些行,取代現有的匯入陳述式。
包括現有的匯入項目,以及本程式碼研究室程式碼中使用的許多其他項目。
MapsActivity.java
import androidx.annotation.NonNull;
import androidx.appcompat.app.AppCompatActivity;
import androidx.appcompat.widget.Toolbar;
import androidx.core.app.ActivityCompat;
import androidx.core.content.ContextCompat;

import android.content.pm.PackageManager;
import android.location.Location;
import android.os.Bundle;
import android.text.TextUtils;
import android.util.Log;
import android.view.Menu;
import android.view.MenuItem;
import android.view.View;
import android.widget.AdapterView;
import android.widget.ArrayAdapter;
import android.widget.ListView;

import com.google.android.gms.common.api.ApiException;
import com.google.android.gms.location.FusedLocationProviderClient;
import com.google.android.gms.location.LocationServices;
import com.google.android.gms.maps.CameraUpdateFactory;
import com.google.android.gms.maps.GoogleMap;
import com.google.android.gms.maps.OnMapReadyCallback;
import com.google.android.gms.maps.SupportMapFragment;
import com.google.android.gms.maps.model.LatLng;
import com.google.android.gms.maps.model.MarkerOptions;

import com.google.android.gms.tasks.OnCompleteListener;
import com.google.android.gms.tasks.OnSuccessListener;
import com.google.android.gms.tasks.Task;
import com.google.android.libraries.places.api.Places;
import com.google.android.libraries.places.api.model.Place;
import com.google.android.libraries.places.api.model.PlaceLikelihood;
import com.google.android.libraries.places.api.net.FindCurrentPlaceRequest;
import com.google.android.libraries.places.api.net.FindCurrentPlaceResponse;
import com.google.android.libraries.places.api.net.PlacesClient;

import java.util.Arrays;
import java.util.List;
更新類別簽章
Places API 使用 AndroidX 元件提供回溯相容性支援,因此您需要定義該元件來擴充 AppCompatActivity。取代地圖活動預設定義的 FragmentActivity 擴充功能。
public class MapsActivity extends AppCompatActivity implements OnMapReadyCallback {
新增類別變數
接著,宣告不同類別方法中使用的各種類別變數。包括 UI 元素和狀態碼。這些項目應位於 GoogleMap mMap 的變數宣告下方。
    // New variables for Current Place picker
    private static final String TAG = "MapsActivity";
    ListView lstPlaces;
    private PlacesClient mPlacesClient;
    private FusedLocationProviderClient mFusedLocationProviderClient;

    // The geographical location where the device is currently located. That is, the last-known
    // location retrieved by the Fused Location Provider.
    private Location mLastKnownLocation;

    // A default location (Sydney, Australia) and default zoom to use when location permission is
    // not granted.
    private final LatLng mDefaultLocation = new LatLng(-33.8523341, 151.2106085);
    private static final int DEFAULT_ZOOM = 15;
    private static final int PERMISSIONS_REQUEST_ACCESS_FINE_LOCATION = 1;
    private boolean mLocationPermissionGranted;

    // Used for selecting the Current Place.
    private static final int M_MAX_ENTRIES = 5;
    private String[] mLikelyPlaceNames;
    private String[] mLikelyPlaceAddresses;
    private String[] mLikelyPlaceAttributions;
    private LatLng[] mLikelyPlaceLatLngs;
更新 onCreate 方法
您需要更新 onCreate 方法,處理定位服務的執行階段使用者權限、設定 UI 元素,以及建立 Places API 用戶端。
在現有 onCreate() 方法的結尾,新增下列有關動作工具列、檢視畫面設定和 Places 用戶端的程式碼行。
MapsActivity.java onCreate()
   @Override
    protected void onCreate(Bundle savedInstanceState) {
        super.onCreate(savedInstanceState);
        setContentView(R.layout.activity_maps);
        // Obtain the SupportMapFragment and get notified when the map is ready to be used.
        SupportMapFragment mapFragment = (SupportMapFragment) getSupportFragmentManager()
                .findFragmentById(R.id.map);
        mapFragment.getMapAsync(this);

        //
        // PASTE THE LINES BELOW THIS COMMENT
        //

        // Set up the action toolbar
        Toolbar toolbar = (Toolbar) findViewById(R.id.toolbar);
        setSupportActionBar(toolbar);

        // Set up the views
        lstPlaces = (ListView) findViewById(R.id.listPlaces);

        // Initialize the Places client
        String apiKey = getString(R.string.google_maps_key);
        Places.initialize(getApplicationContext(), apiKey);
        mPlacesClient = Places.createClient(this);
        mFusedLocationProviderClient = LocationServices.getFusedLocationProviderClient(this);
    }
為應用程式列選單新增程式碼
這兩種方法都會新增應用程式列選單 (內含單一項目「選擇地點」圖示),並處理使用者點選該圖示的動作。
將這兩個方法複製到 onCreate 方法之後的檔案中。
MapsActivity.java onCreateOptionsMenu() 和 onOptionsItemSelected()
    @Override
    public boolean onCreateOptionsMenu(Menu menu) {
        getMenuInflater().inflate(R.menu.menu, menu);

        return super.onCreateOptionsMenu(menu);
    }

    @Override
    public boolean onOptionsItemSelected(MenuItem item) {
        switch (item.getItemId()) {
           case R.id.action_geolocate:

                // COMMENTED OUT UNTIL WE DEFINE THE METHOD
                // Present the current place picker
                // pickCurrentPlace();
                return true;

            default:
                // If we got here, the user's action was not recognized.
                // Invoke the superclass to handle it.
                return super.onOptionsItemSelected(item);

        }
    }
測試
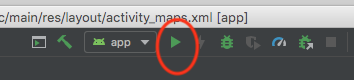
- 在 Android Studio 中,按一下「Run」或依序選取「Run」選單 >「Run ‘app'」。
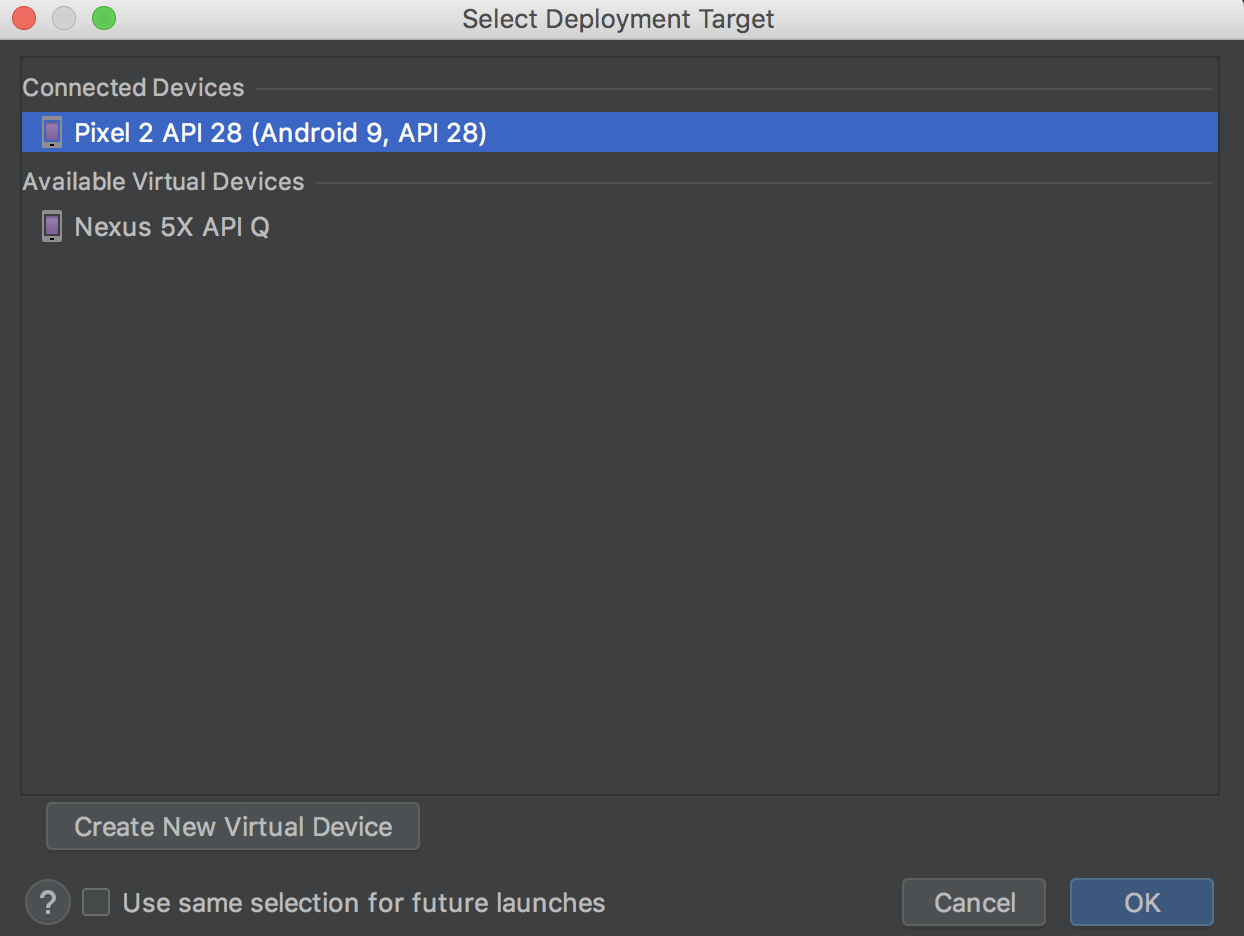
- 系統會要求您選取部署目標。這個清單中應該會顯示正在執行的模擬器。選取該裝置,Android Studio 就會將應用程式部署至模擬器。
稍待片刻,應用程式就會啟動。地圖會以澳洲雪梨為中心,並顯示單一按鈕和空白地點清單。
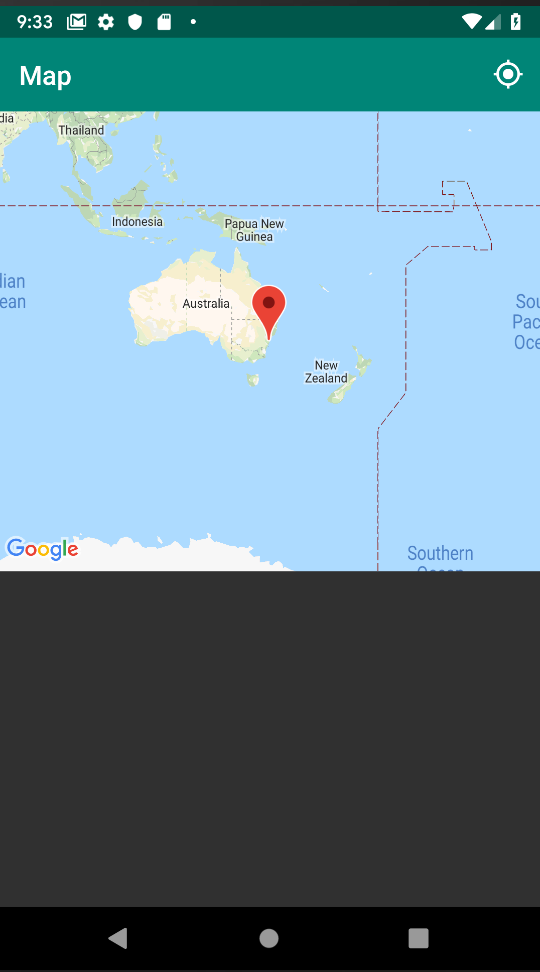
除非您要求存取裝置位置資訊的權限,否則地圖焦點不會移至使用者所在位置。
10. 要求及處理位置存取權
地圖準備就緒後,要求位置存取權
- 定義名為
getLocationPermission的方法,要求使用者權限。
將這段程式碼貼到剛才建立的 onOptionsSelected 方法下方。
MapsActivity.java getLocationPermission()
    private void getLocationPermission() {
        /*
         * Request location permission, so that we can get the location of the
         * device. The result of the permission request is handled by a callback,
         * onRequestPermissionsResult.
         */
        mLocationPermissionGranted = false;
        if (ContextCompat.checkSelfPermission(this.getApplicationContext(),
                android.Manifest.permission.ACCESS_FINE_LOCATION)
                == PackageManager.PERMISSION_GRANTED) {
            mLocationPermissionGranted = true;
        } else {
            ActivityCompat.requestPermissions(this,
                    new String[]{android.Manifest.permission.ACCESS_FINE_LOCATION},
                    PERMISSIONS_REQUEST_ACCESS_FINE_LOCATION);
        }
    }
- 在現有
onMapReady方法的結尾新增兩行,啟用縮放控制項並要求使用者授予位置資訊權限。
MapsActivity.java onMapReady()
   @Override
    public void onMapReady(GoogleMap googleMap) {
        mMap = googleMap;

        // Add a marker in Sydney and move the camera
        LatLng sydney = new LatLng(-34, 151);
        mMap.addMarker(new MarkerOptions().position(sydney).title("Marker in Sydney"));
        mMap.moveCamera(CameraUpdateFactory.newLatLng(sydney));

        //
        // PASTE THE LINES BELOW THIS COMMENT
        //

        // Enable the zoom controls for the map
        mMap.getUiSettings().setZoomControlsEnabled(true);

        // Prompt the user for permission.
        getLocationPermission();

    }
處理所要求權限的結果
使用者回應要求權限對話方塊時,Android 會呼叫這個回呼。
將這段程式碼貼到 getLocationPermission() 方法之後:
MapsActivity.java onRequestPermissionsResult()
   /**
     * Handles the result of the request for location permissions
     */
    @Override
    public void onRequestPermissionsResult(int requestCode,
                                           @NonNull String permissions[],
                                           @NonNull int[] grantResults) {
        mLocationPermissionGranted = false;
        switch (requestCode) {
            case PERMISSIONS_REQUEST_ACCESS_FINE_LOCATION: {
                // If request is cancelled, the result arrays are empty.
                if (grantResults.length > 0
                        && grantResults[0] == PackageManager.PERMISSION_GRANTED) {
                    mLocationPermissionGranted = true;
                }
            }
        }
    }
11. 取得目前位置並擷取可能的地點
使用者按一下應用程式列中的「選擇地點」時,應用程式會呼叫 pickCurrentPlace() 方法,該方法會呼叫您先前定義的 getDeviceLocation() 方法。getDeviceLocation 方法會在擷取最新的裝置位置後,呼叫另一個方法 getCurrentPlaceLikelihoods,。
呼叫 findCurrentPlace API 並處理回應
getCurrentPlaceLikelihoods 會建構 findCurrentPlaceRequest,並呼叫 Places API findCurrentPlace 工作。如果工作順利完成,會傳回內含 placeLikelihood 物件清單的 findCurrentPlaceResponse。每一個項目都具備多個屬性,包括地點的名稱和地址,以及您身處該地點的可能性機率 (從 0 到 1 的雙精度值)。這個方法會從 placeLikelihoods 建構地點詳細資料清單,藉此處理回應。
這段程式碼會逐一檢查最有可能的五個地點,並將可能性大於 0 的地點加入清單,然後顯示清單。如要顯示超過或少於五個,請編輯 M_MAX_ENTRIES 常數。
將這段程式碼貼到 onMapReady 方法之後。
MapsActivity.java getCurrentPlaceLikelihoods()
   private void getCurrentPlaceLikelihoods() {
        // Use fields to define the data types to return.
        List<Place.Field> placeFields = Arrays.asList(Place.Field.NAME, Place.Field.ADDRESS,
                Place.Field.LAT_LNG);

        // Get the likely places - that is, the businesses and other points of interest that
        // are the best match for the device's current location.
        @SuppressWarnings("MissingPermission") final FindCurrentPlaceRequest request =
                FindCurrentPlaceRequest.builder(placeFields).build();
        Task<FindCurrentPlaceResponse> placeResponse = mPlacesClient.findCurrentPlace(request);
        placeResponse.addOnCompleteListener(this,
                new OnCompleteListener<FindCurrentPlaceResponse>() {
                    @Override
                    public void onComplete(@NonNull Task<FindCurrentPlaceResponse> task) {
                        if (task.isSuccessful()) {
                            FindCurrentPlaceResponse response = task.getResult();
                            // Set the count, handling cases where less than 5 entries are returned.
                            int count;
                            if (response.getPlaceLikelihoods().size() < M_MAX_ENTRIES) {
                                count = response.getPlaceLikelihoods().size();
                            } else {
                                count = M_MAX_ENTRIES;
                            }

                            int i = 0;
                            mLikelyPlaceNames = new String[count];
                            mLikelyPlaceAddresses = new String[count];
                            mLikelyPlaceAttributions = new String[count];
                            mLikelyPlaceLatLngs = new LatLng[count];

                            for (PlaceLikelihood placeLikelihood : response.getPlaceLikelihoods()) {
                                Place currPlace = placeLikelihood.getPlace();
                                mLikelyPlaceNames[i] = currPlace.getName();
                                mLikelyPlaceAddresses[i] = currPlace.getAddress();
                                mLikelyPlaceAttributions[i] = (currPlace.getAttributions() == null) ?
                                        null : TextUtils.join(" ", currPlace.getAttributions());
                                mLikelyPlaceLatLngs[i] = currPlace.getLatLng();

                                String currLatLng = (mLikelyPlaceLatLngs[i] == null) ?
                                        "" : mLikelyPlaceLatLngs[i].toString();

                                Log.i(TAG, String.format("Place " + currPlace.getName()
                                        + " has likelihood: " + placeLikelihood.getLikelihood()
                                        + " at " + currLatLng));

                                i++;
                                if (i > (count - 1)) {
                                    break;
                                }
                            }


                            // COMMENTED OUT UNTIL WE DEFINE THE METHOD
                            // Populate the ListView
                            // fillPlacesList();
                        } else {
                            Exception exception = task.getException();
                            if (exception instanceof ApiException) {
                                ApiException apiException = (ApiException) exception;
                                Log.e(TAG, "Place not found: " + apiException.getStatusCode());
                            }
                        }
                    }
                });
    }
將地圖攝影機移至裝置目前位置
如果使用者授予權限,應用程式會擷取使用者的最新位置資訊,並將攝影機移至該位置資訊的中心。
如果使用者拒絕授權,應用程式只會將攝影機移至本頁開頭常數中定義的預設位置 (在範例程式碼中,這是澳洲雪梨)。
將這段程式碼貼到 getPlaceLikelihoods() 方法之後:
MapsActivity.java getDeviceLocation()
    private void getDeviceLocation() {
        /*
         * Get the best and most recent location of the device, which may be null in rare
         * cases when a location is not available.
         */
        try {
            if (mLocationPermissionGranted) {
                Task<Location> locationResult = mFusedLocationProviderClient.getLastLocation();
                locationResult.addOnCompleteListener(this, new OnCompleteListener<Location>() {
                    @Override
                    public void onComplete(@NonNull Task<Location> task) {
                        if (task.isSuccessful()) {
                            // Set the map's camera position to the current location of the device.
                            mLastKnownLocation = task.getResult();
                            Log.d(TAG, "Latitude: " + mLastKnownLocation.getLatitude());
                            Log.d(TAG, "Longitude: " + mLastKnownLocation.getLongitude());
                            mMap.moveCamera(CameraUpdateFactory.newLatLngZoom(
                                    new LatLng(mLastKnownLocation.getLatitude(),
                                            mLastKnownLocation.getLongitude()), DEFAULT_ZOOM));
                        } else {
                            Log.d(TAG, "Current location is null. Using defaults.");
                            Log.e(TAG, "Exception: %s", task.getException());
                            mMap.moveCamera(CameraUpdateFactory
                                    .newLatLngZoom(mDefaultLocation, DEFAULT_ZOOM));
                        }

                       getCurrentPlaceLikelihoods();
                    }
                });
            }
        } catch (SecurityException e)  {
            Log.e("Exception: %s", e.getMessage());
        }
    }
使用者點選「選擇地點」時,檢查位置存取權
使用者輕觸「選擇地點」時,這個方法會檢查位置資訊權限,並在未授予權限時提示使用者。
如果使用者已授予權限,這個方法會呼叫 getDeviceLocation,啟動取得目前可能位置的程序。
- 在
getDeviceLocation()後方新增這個方法:
MapsActivity.java pickCurrentPlace()
   private void pickCurrentPlace() {
        if (mMap == null) {
            return;
        }

        if (mLocationPermissionGranted) {
            getDeviceLocation();
        } else {
            // The user has not granted permission.
            Log.i(TAG, "The user did not grant location permission.");

            // Add a default marker, because the user hasn't selected a place.
            mMap.addMarker(new MarkerOptions()
                    .title(getString(R.string.default_info_title))
                    .position(mDefaultLocation)
                    .snippet(getString(R.string.default_info_snippet)));

            // Prompt the user for permission.
            getLocationPermission();
        }
    }
- 定義
pickCurrentPlace後,請在onOptionsItemSelected()中找出呼叫pickCurrentPlace的行,然後取消註解。
MapsActivity.java onOptionItemSelected()
           case R.id.action_geolocate:

                // COMMENTED OUT UNTIL WE DEFINE THE METHOD
                // Present the Current Place picker
                pickCurrentPlace();
                return true;
測試
現在執行應用程式並輕觸「Pick Place」,系統應該會提示您授予位置資訊權限。
- 如果允許權限,系統會儲存這項偏好設定,之後就不會再提示。如果拒絕授權,下次輕觸按鈕時,系統會再次提示您授權。
- 雖然
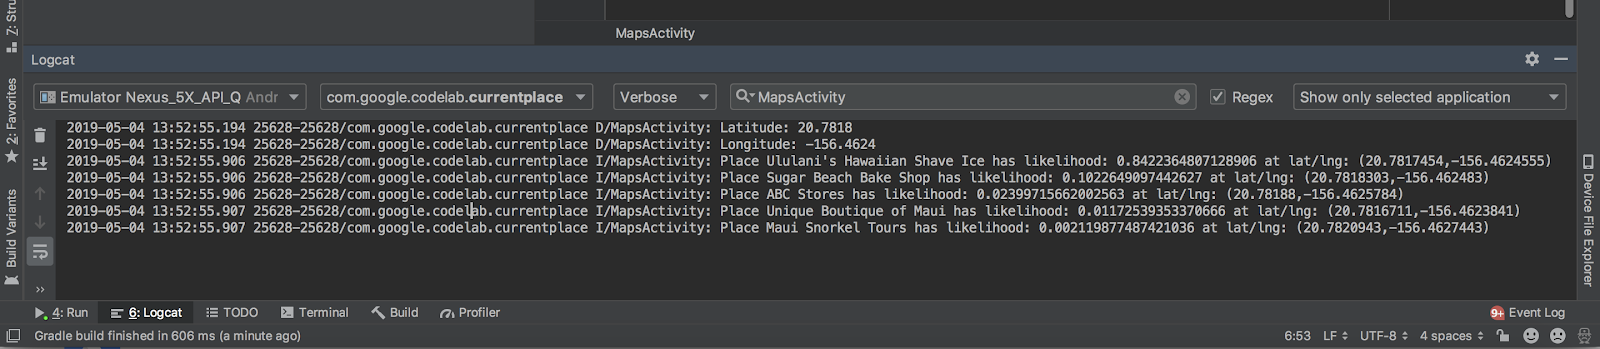
getPlaceLikelihoods已擷取可能當前位置,但ListView尚未顯示這些位置。在 Android Studio 中,您可以點選 ⌘6,在 Logcat 中查看標記為 MapsActivity 的陳述式記錄,確認新方法是否正常運作。 - 如果已授予權限,記錄會包含
Latitude:和Longitude:的陳述,顯示偵測到的裝置位置。如果您先前使用 Google 地圖和模擬器的擴充選單,為模擬器指定位置,這些陳述式就會顯示該位置。 - 如果對
findCurrentPlace的呼叫成功,記錄會包含五個陳述式,列印出最有可能的五個地點名稱和位置。
12. 填入「目前位置」挑選器
為所選地點設定處理常式
接下來,我們來思考使用者點選 ListView 中的項目時,要執行的動作。如要確認使用者目前所在位置,可以在地圖上新增該地點的標記。使用者點選該標記時,系統會彈出資訊視窗,顯示地點名稱和地址。
將這個點擊事件處理常式貼到 pickCurrentPlace 方法之後。
MapsActivity.java listClickedHandler
    private AdapterView.OnItemClickListener listClickedHandler = new AdapterView.OnItemClickListener() {
        public void onItemClick(AdapterView parent, View v, int position, long id) {
            // position will give us the index of which place was selected in the array
            LatLng markerLatLng = mLikelyPlaceLatLngs[position];
            String markerSnippet = mLikelyPlaceAddresses[position];
            if (mLikelyPlaceAttributions[position] != null) {
                markerSnippet = markerSnippet + "\n" + mLikelyPlaceAttributions[position];
            }

            // Add a marker for the selected place, with an info window
            // showing information about that place.
            mMap.addMarker(new MarkerOptions()
                    .title(mLikelyPlaceNames[position])
                    .position(markerLatLng)
                    .snippet(markerSnippet));

           // Position the map's camera at the location of the marker.
            mMap.moveCamera(CameraUpdateFactory.newLatLng(markerLatLng));
        }
    };
填入 ListView
現在您已取得使用者目前最有可能造訪的地點清單,可以在 ListView 中向使用者顯示這些選項。您也可以設定 ListView 點按事件監聽器,使用剛定義的點按事件處理常式。
將這個方法貼到點擊處理常式後方:
MapsActivity.java fillPlacesList()
    private void fillPlacesList() {
        // Set up an ArrayAdapter to convert likely places into TextViews to populate the ListView
        ArrayAdapter<String> placesAdapter =
                new ArrayAdapter<String>(this, android.R.layout.simple_list_item_1, mLikelyPlaceNames);
        lstPlaces.setAdapter(placesAdapter);
        lstPlaces.setOnItemClickListener(listClickedHandler);
    }
定義 fillPlacesList 後,請在 findPlaceLikelihoods 結尾附近找出呼叫 fillPlacesList 的行,然後取消註解。
MapsActivity.java fillPlaceLikelihoods()
               // COMMENTED OUT UNTIL WE DEFINE THE METHOD
                // Populate the ListView
                fillPlacesList();
這就是「目前所在位置」挑選器所需的所有程式碼!
13. 執行應用程式
測試挑選地點
- 再次執行應用程式。
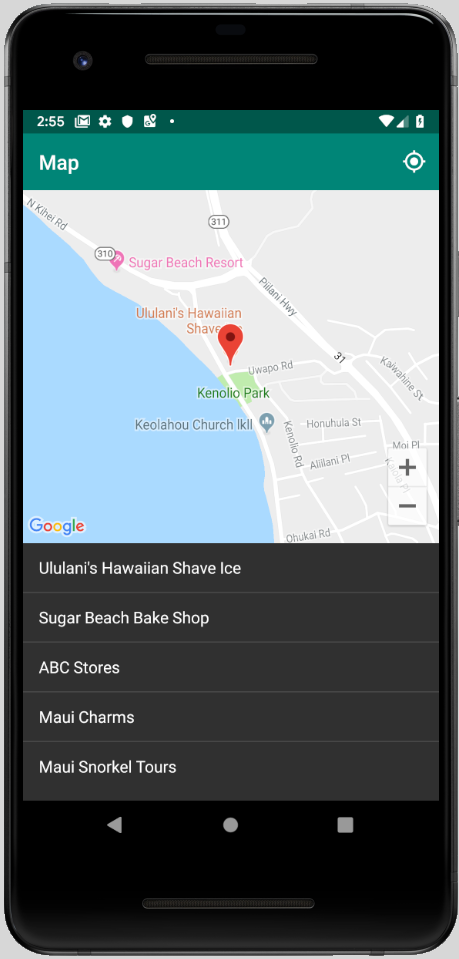
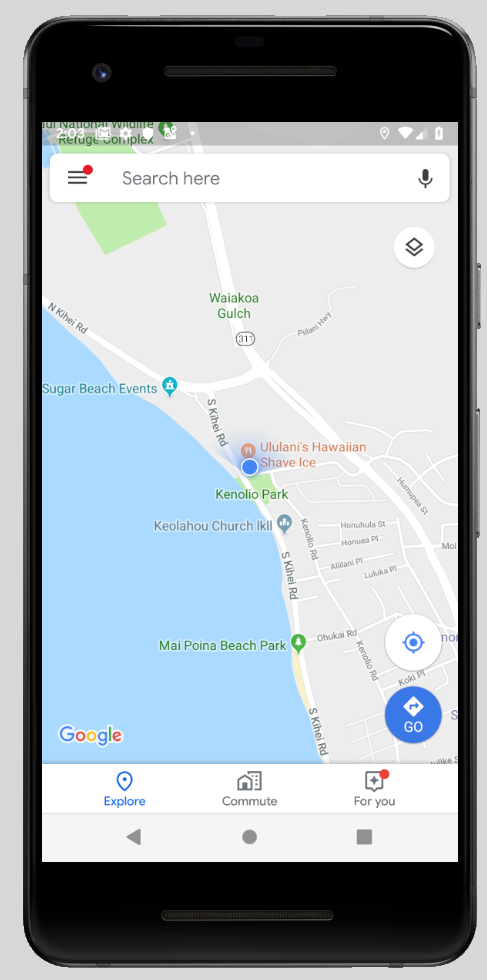
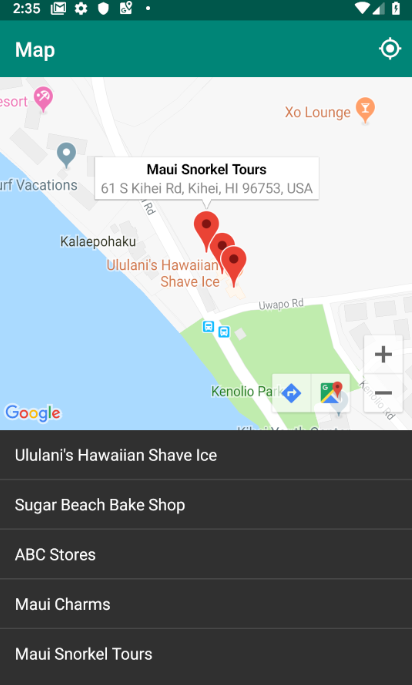
這次輕觸「選擇地點」時,應用程式會列出附近有名稱的地點。茂宜島的 Ululani's Hawaiian Shave Ice 和 Sugar Beach Bake Shop 等地點都靠近這個位置。由於這些地點與位置座標非常接近,因此這份清單列出您可能所在的地點。
- 按一下
ListView中的地點名稱。
地圖上應該會顯示新增的標記。
- 輕觸標記。
您可以查看地點詳細資料。

測試其他地點
如要變更位置,且您使用的是模擬器,當您在模擬器的擴充選單中更新位置座標時,裝置位置不會自動更新。
如要解決這個問題,請按照下列步驟使用原生 Google 地圖應用程式,強制更新模擬器的位置資訊:
- 開啟 Google 地圖。
- 依序輕觸「...」 >「位置」,將經緯度變更為新的座標,然後輕觸「傳送」。
- 舉例來說,您可以將緯度設為 49.2768,經度設為 -123.1142,將位置設為加拿大溫哥華市中心。
- 確認 Google 地圖已根據新座標重新置中。你可能需要在 Google 地圖應用程式中輕觸「我的位置」按鈕,要求重新置中。
- 返回「Current Place」應用程式,然後輕觸「Pick Place」,即可在地圖上查看新座標,以及可能的新位置清單。
這樣就完成了!您建構了一個簡單的應用程式,可檢查目前位置的地點,並提供您可能所在位置的機率。歡迎多加利用!
現在請執行應用程式,並套用您所做的修改,完成這個獎勵步驟!
14. 後續步驟
為避免 API 金鑰遭竊,請妥善保管並僅允許您的 Android 應用程式使用。如果未妥善保管金鑰,只要是擁有金鑰的使用者,都可以透過該金鑰呼叫 Google 地圖平台 API,並導致觸發計費項目。
取得 SHA-1 憑證
稍後限制 API 金鑰時,您會需要這項資訊。以下是取得偵錯憑證的一組操作說明。
如果是 Linux 或 macOS,請開啟終端機視窗並輸入以下指令:
keytool -list -v -keystore ~/.android/debug.keystore -alias androiddebugkey -storepass android -keypass android
如果是 Windows Vista 或 Windows 7,請執行下列指令:
keytool -list -v -keystore "%USERPROFILE%\.android\debug.keystore" -alias androiddebugkey -storepass android -keypass android
您應該會看到類似以下的輸出內容:
Alias name: androiddebugkey
Creation date: Jan 01, 2013
Entry type: PrivateKeyEntry
Certificate chain length: 1
Certificate[1]:
Owner: CN=Android Debug, O=Android, C=US
Issuer: CN=Android Debug, O=Android, C=US
Serial number: 4aa9b300
Valid from: Mon Jan 01 08:04:04 UTC 2013 until: Mon Jan 01 18:04:04 PST 2033
Certificate fingerprints:
     MD5:  AE:9F:95:D0:A6:86:89:BC:A8:70:BA:34:FF:6A:AC:F9
     SHA1: BB:0D:AC:74:D3:21:E1:43:07:71:9B:62:90:AF:A1:66:6E:44:5D:75
     Signature algorithm name: SHA1withRSA
     Version: 3
開頭為 SHA1 的行包含憑證的 SHA-1 指紋。指紋為一系列 20 個雙位十六進位制數碼,以冒號分隔。
準備發布應用程式時,請按照這份文件中的操作說明,擷取發布憑證。
為 API 金鑰新增限制
- 在 Cloud 控制台中,依序前往「APIs & Services」(API 和服務) >「Credentials」(憑證)。
您用於這個應用程式的金鑰應會列在「API 金鑰」下方。
- 按一下
 即可編輯金鑰設定。
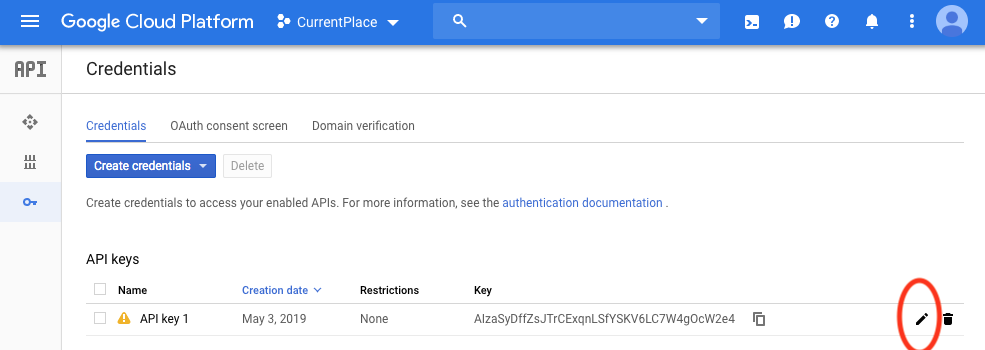
- 在 API 金鑰頁面的「金鑰限制」下方,按照下列步驟設定「應用程式限制」:
- 選取 [Android 應用程式] 並按照指示操作。
- 按一下「新增項目」。
- 輸入您的套件名稱和 SHA-1 憑證指紋 (在上一個步驟中擷取)。
例如:
com.google.codelab.currentplace
BB:0D:AC:74:D3:21:E1:43:07:71:9B:62:90:AF:A1:66:6E:44:5D:75s
- 如要進一步保護 API 金鑰,請按照下列步驟設定 API 限制。
- 在「API 限制」下方,選擇「限制金鑰」。
- 選取 Maps SDK for Android 和 Places API。
- 依序按一下「完成」和「儲存」。
15. 恭喜
您已建構簡單的應用程式,可檢查目前位置最有可能的地點,並為使用者選取的地點在地圖上新增標記。
瞭解詳情
- 如要加快開發速度,請善用 Maps SDK for Android 公用程式庫。這些公用程式可為使用 Google 地圖平台的應用程式,執行一些最熱門的作業。
- 如要查看更多程式碼範例,瞭解 Google 地圖平台 Android SDK 的大部分功能,請複製 Maps SDK for Android 範例和 Places SDK for Android 示範的存放區。
- 如要瞭解如何在 Android Q 中處理三種狀態的位置存取權,請完成「使用 Kotlin 在 Android 中接收位置資訊更新」程式碼研究室。