
1. 概览
此 Codelab 将简要介绍一些机器学习 API。您将使用:
- 使用 Cloud Vision 了解图片的内容
- 使用 Cloud Speech-to-Text 将音频转录为文字
- 使用 Cloud Translation 将任意字符串翻译成任何受支持的语言
- 使用 Cloud Natural Language 从文本中提取信息
构建内容
您将构建一个流水线,用于比较音频录制内容与图片,并确定它们之间的相关性。下面简要介绍了如何实现此目的:
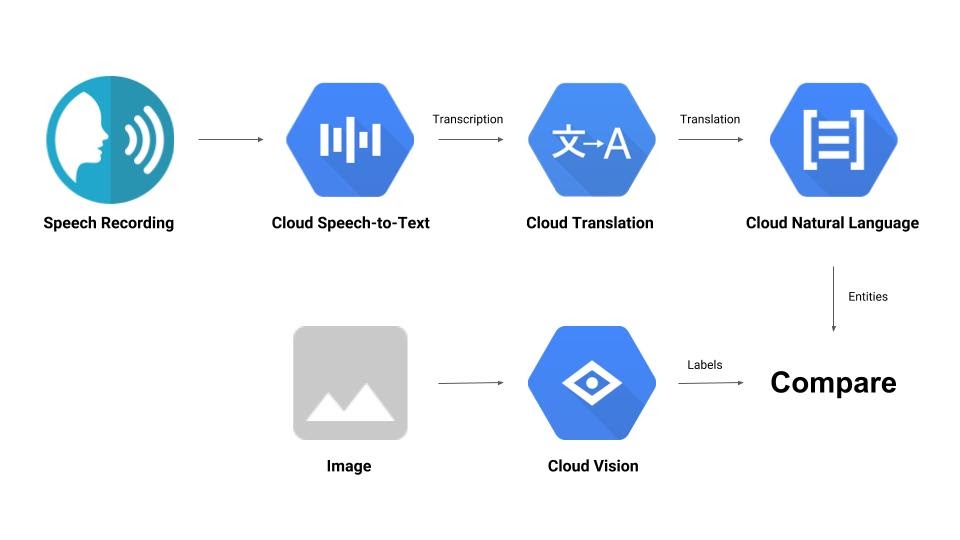
学习内容
- 如何使用 Vision、Speech-to-Text、Translation 和 Natural Language API
- 在哪里可以找到代码示例
所需条件
2. 设置和要求
自定进度的环境设置

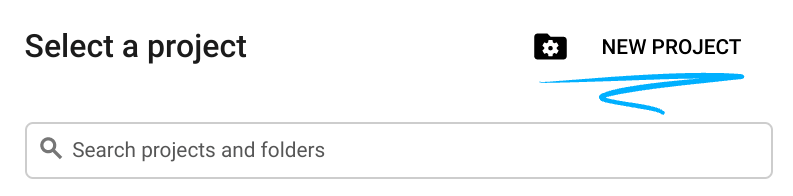
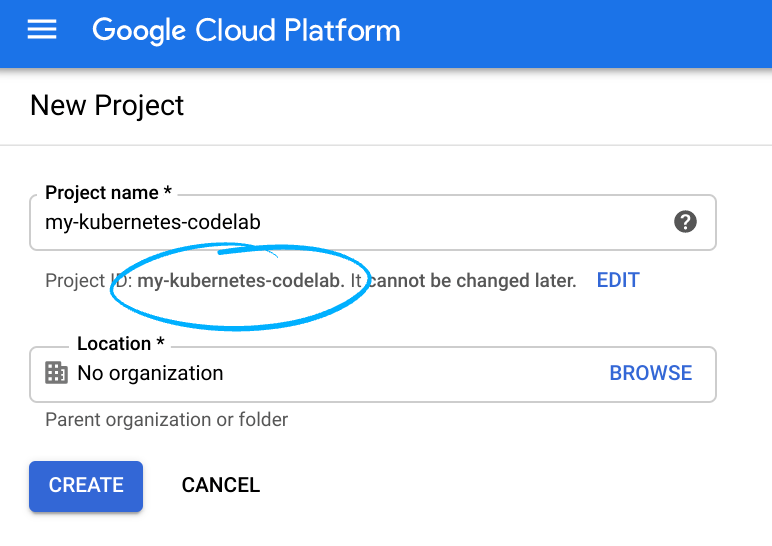
请记住项目 ID,它在所有 Google Cloud 项目中都是唯一的名称(上述名称已被占用,您无法使用,抱歉!)。它稍后将在此 Codelab 中被称为 PROJECT_ID。
- 接下来,您需要在 Cloud 控制台中启用结算功能,才能使用 Google Cloud 资源。
运行此 Codelab 应该不会产生太多的费用(如果有费用的话)。请务必按照“清理”部分中的所有说明操作,该部分介绍了如何关停资源,以免产生超出本教程范围的结算费用。Google Cloud 的新用户符合参与 $300 USD 免费试用计划的条件。
启用 API
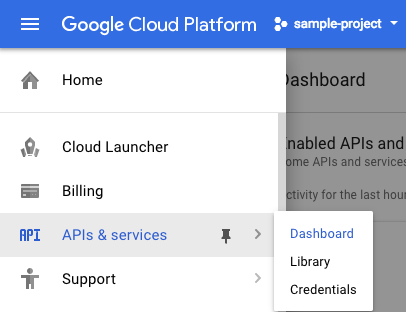
您可以点击此链接以启用所有必需的 API。完成上述操作后,您可以忽略有关设置身份验证的说明,我们稍后会进行设置。或者,您也可以单独启用每个 API。为此,请点击屏幕左上角的菜单图标。

从下拉菜单中选择 API 和服务,然后点击“信息中心”
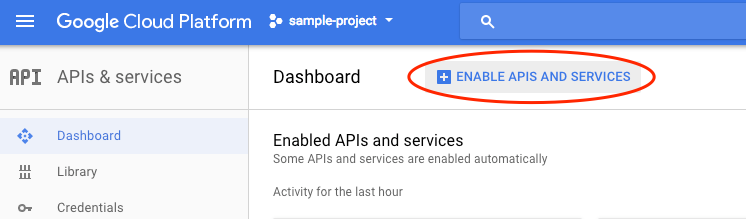
点击启用 API 和服务。
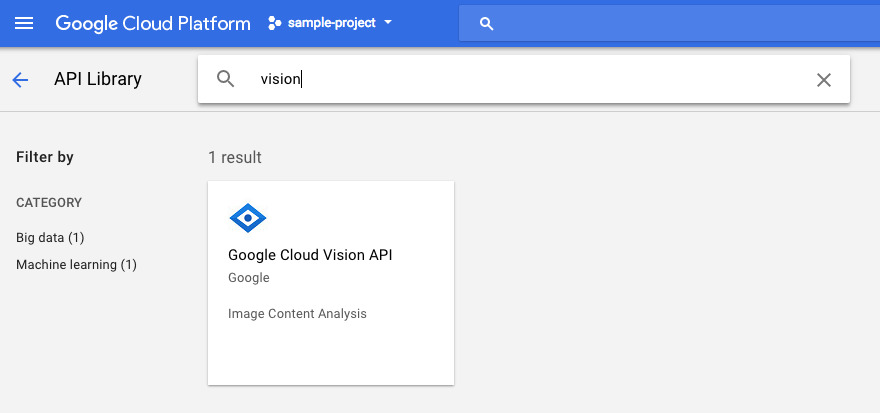
然后,在搜索框中搜索“视觉”。点击 Google Cloud Vision API:
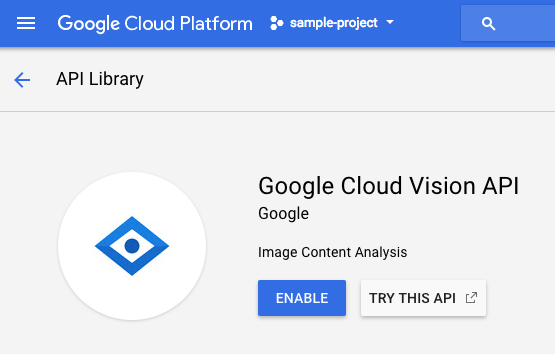
点击启用以启用 Cloud Vision API:
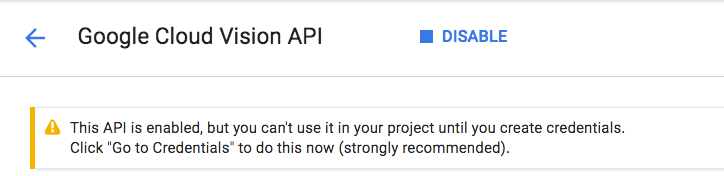
等待几秒钟,直到该功能启用。启用后,您会看到以下内容:
重复上述流程,启用 Cloud Speech、Cloud Translation 和 Cloud Natural Language API。
Cloud Shell
Google Cloud Shell 是 在云端运行的命令行环境。这个基于 Debian 的虚拟机上已加载您需要的所有开发工具(gcloud、bq、git 等),并提供永久性的 5 GB 主目录。我们将使用 Cloud Shell 来创建向机器学习 API 发出的请求。
如需开始使用 Cloud Shell,请点击标题栏右上角的“激活 Google Cloud Shell” 图标
图标

一个 Cloud Shell 会话随即会在控制台底部的新框内打开,并显示命令行提示符。等待直到出现 user@project:~$ 提示。
可选:代码编辑器
如果您对命令行比较熟悉,可以点击 Cloud Shell 栏右上角的“启动代码编辑器” 图标
图标

服务账号
您将需要一个服务账号进行身份验证。如需创建服务账号,请将 [NAME] 替换为所需的服务账号名称,然后在 Cloud Shell 中运行以下命令:
gcloud iam service-accounts create [NAME]
现在,您需要生成一个密钥才能使用该服务账号。将 [FILE_NAME] 替换为所需的密钥名称,将 [NAME] 替换为上述服务账号名称,并将 [PROJECT_ID] 替换为您的项目 ID。以下命令将创建密钥并以 [FILE_NAME].json 的形式下载:
gcloud iam service-accounts keys create [FILE_NAME].json --iam-account [NAME]@[PROJECT_ID].iam.gserviceaccount.com
如需使用服务账号,您必须将变量 GOOGLE_APPLICATION_CREDENTIALS 设置为密钥的路径。为此,请替换 [PATH_TO_FILE] 和 [FILE_NAME],然后运行以下命令:
export GOOGLE_APPLICATION_CREDENTIALS=[PATH_TO_FILE]/[FILE_NAME].json
3. Cloud Vision
Python 客户端
您需要 Cloud Vision 的 Python 客户端。如需安装,请在 Cloud Shell 中输入以下内容:
pip install --upgrade google-cloud-vision --user
试试看
我们来看看 Cloud Vision API 的代码示例。我们希望了解指定图片中的内容。detect.py 似乎对此很有用,我们来获取一下。一种方法是复制 detect.py 的内容,在 Cloud Shell 中创建一个名为 vision.py 的新文件,然后将所有代码粘贴到 vision.py 中。您可以在 Cloud Shell 代码编辑器中手动执行此操作,也可以在 Cloud Shell 中运行以下 curl 命令:
curl https://raw.githubusercontent.com/GoogleCloudPlatform/python-docs-samples/master/vision/cloud-client/detect/detect.py -o vision.py
完成上述操作后,在 Cloud Shell 中运行以下命令,以使用该 API:
python vision.py labels-uri gs://cloud-samples-data/ml-api-codelab/birds.jpg
您应该会看到有关鸟类和鸵鸟的输出,因为这是分析的图片:https://storage.googleapis.com/cloud-samples-data/ml-api-codelab/birds.jpg
这是怎么回事?
您向 vision.py 传递了 2 个实参:
- labels-uri 选择要运行的
detect_labels_uri()函数 - gs://cloud-samples-data/ml-api-codelab/birds.jpg 是 Google Cloud Storage 上某个图片的位置,并作为 uri 传递到
detect_labels_uri()
我们来详细了解一下 detect_labels_uri()。请注意已插入的附加注释。
def detect_labels_uri(uri):
    """Detects labels in the file located in Google Cloud Storage or on the
    Web."""
    # relevant import from above
    # from google.cloud import vision

    # create ImageAnnotatorClient object
    client = vision.ImageAnnotatorClient()

    # create Image object
    image = vision.types.Image()

    # specify location of image
    image.source.image_uri = uri

    # get label_detection response by passing image to client
    response = client.label_detection(image=image)

    # get label_annotations portion of response
    labels = response.label_annotations
    print('Labels:')

    for label in labels:
        # print the label descriptions
        print(label.description)
4. Cloud Speech-to-Text
Python 客户端
您需要 Cloud Speech-to-Text 的 Python 客户端。如需安装,请在 Cloud Shell 中输入以下内容:
sudo pip install --upgrade google-cloud-speech
试试看
让我们前往 Cloud Speech-to-Text 的代码示例。我们希望转写语音音频。transcribe.py 看起来是一个不错的起点,因此我们使用它。复制 transcribe.py 的内容,在 Cloud Shell 中创建一个名为 speech2text.py 的新文件,并将所有代码粘贴到 speech2text.py 中。您可以在 Cloud Shell 代码编辑器中手动执行此操作,也可以在 Cloud Shell 中运行以下 curl 命令:
curl https://raw.githubusercontent.com/GoogleCloudPlatform/python-docs-samples/master/speech/cloud-client/transcribe.py -o speech2text.py
完成上述操作后,在 Cloud Shell 中运行以下命令,以使用该 API:
python speech2text.py gs://cloud-samples-data/ml-api-codelab/tr-ostrich.wav
应该有错误报告编码和采样赫兹率错误。别担心,进入代码中的 transcribe_gcs(),从 RecognitionConfig() 中删除 encoding 和 sampe_hertz_rate 设置。同时,将语言代码更改为“tr-TR”,因为 tr-ostrich.wav 是土耳其语语音录音。
config = types.RecognitionConfig(language_code='tr-TR')
现在,再次运行 speech2text.py。输出应为一些土耳其语文本,因为这是分析的音频:https://storage.googleapis.com/cloud-samples-data/ml-api-codelab/tr-ostrich.wav
这是怎么回事?
您将 gs://cloud-samples-data/ml-api-codelab/tr-ostrich.wav(Google Cloud Storage 中音频文件的位置)传递给 speech2text.py,然后将其作为 gcs_uri 传递给 transcribe_uri()
我们来详细了解一下修改后的 transcribe_uri()。
def transcribe_gcs(gcs_uri):
    """Transcribes the audio file specified by the gcs_uri."""

    from google.cloud import speech
    # enums no longer used
    # from google.cloud.speech import enums
    from google.cloud.speech import types

    # create ImageAnnotatorClient object
    client = speech.SpeechClient()

    # specify location of speech
    audio = types.RecognitionAudio(uri=gcs_uri)

    # set language to Turkish
    # removed encoding and sample_rate_hertz
    config = types.RecognitionConfig(language_code='tr-TR')

    # get response by passing config and audio settings to client
    response = client.recognize(config, audio)

    # Each result is for a consecutive portion of the audio. Iterate through
    # them to get the transcripts for the entire audio file.
    for result in response.results:
        # The first alternative is the most likely one for this portion.
        # get the transcript of the first alternative
        print(u'Transcript: {}'.format(result.alternatives[0].transcript))
5. Cloud Translation
Python 客户端
您需要 Cloud Translation 的 Python 客户端。如需安装,请在 Cloud Shell 中输入以下内容:
sudo pip install --upgrade google-cloud-translate
试试看
现在,我们来了解一下 Cloud Translation 的代码示例。在此 Codelab 中,我们希望将文本翻译成英文。snippets.py 看起来是我们想要的。复制 snippets.py 的内容,在 Cloud Shell 中创建一个名为 translate.py 的新文件,并将所有代码粘贴到 translate.py 中。您可以在 Cloud Shell 代码编辑器中手动执行此操作,也可以在 Cloud Shell 中运行以下 curl 命令:
curl https://raw.githubusercontent.com/GoogleCloudPlatform/python-docs-samples/master/translate/cloud-client/snippets.py -o translate.py
完成上述操作后,在 Cloud Shell 中运行以下命令,以使用该 API:
python translate.py translate-text en '你有沒有帶外套'
翻译应为“Do you have a jacket?”。
这是怎么回事?
您向 translate.py 传递了 3 个实参:
- translate-text 选择要运行的
translate_text()函数 - en 作为 target 传递到
translate_text()中,用于指定要翻译成的语言 - “你有沒有帶外套”是要翻译的字符串,并作为 text 传递到
translate_text()
我们来详细了解一下 translate_text()。请注意已添加的注释。
def translate_text(target, text):
    """Translates text into the target language.

    Target must be an ISO 639-1 language code.
    See https://g.co/cloud/translate/v2/translate-reference#supported_languages
    """
    # relevant imports from above
    # from google.cloud import translate
    # import six

    # create Client object
    translate_client = translate.Client()

    # decode text if it's a binary type
    # six is a python 2 and 3 compatibility library
    if isinstance(text, six.binary_type):
        text = text.decode('utf-8')

    # get translation result by passing text and target language to client
    # Text can also be a sequence of strings, in which case this method
    # will return a sequence of results for each text.
    result = translate_client.translate(text, target_language=target)

    # print original text, translated text and detected original language
    print(u'Text: {}'.format(result['input']))
    print(u'Translation: {}'.format(result['translatedText']))
    print(u'Detected source language: {}'.format(
        result['detectedSourceLanguage']))
6. Cloud Natural Language
Python 客户端
您需要 Cloud Natural Language 的 Python 客户端。如需安装,请在 Cloud Shell 中输入以下内容:
sudo pip install --upgrade google-cloud-language
试试看
最后,我们来看看 Cloud Natural Language API 的代码示例。我们希望检测文本中的实体。snippets.py 似乎包含可实现此目的的代码。复制 snippets.py 的内容,在 Cloud Shell 中创建一个名为 natural_language.py 的新文件,并将所有代码粘贴到 natural_language.py 中。您可以在 Cloud Shell 代码编辑器中手动执行此操作,也可以在 Cloud Shell 中运行以下 curl 命令:
curl https://raw.githubusercontent.com/GoogleCloudPlatform/python-docs-samples/master/language/cloud-client/v1/snippets.py -o natural_language.py
完成上述操作后,在 Cloud Shell 中运行以下命令,以使用该 API:
python natural_language.py entities-text 'where did you leave my bike'
该 API 应将“自行车”识别为实体。实体可以是专有名词(公众人物、地标等)或普通名词(餐厅、体育场等)。
这是怎么回事?
您向 natural_language.py 传递了 2 个实参:
- entities-text 选择要运行的
entities_text()函数 - “where did you leave my bike” 是要分析实体并作为 text 传递到
entities_text()中的字符串
我们来详细了解一下 entities_text()。请注意,系统已插入新注释。
def entities_text(text):
    """Detects entities in the text."""
    # relevant imports from above
    # from google.cloud import language
    # from google.cloud.language import enums
    # from google.cloud.language import types
    # import six

    # create LanguageServiceClient object
    client = language.LanguageServiceClient()

    # decode text if it's a binary type
    # six is a python 2 and 3 compatibility library
    if isinstance(text, six.binary_type):
        text = text.decode('utf-8')

    # Instantiates a plain text document.
    document = types.Document(
        content=text,
        type=enums.Document.Type.PLAIN_TEXT)

    # Detects entities in the document. You can also analyze HTML with:
    #   document.type == enums.Document.Type.HTML
    entities = client.analyze_entities(document).entities

    # entity types from enums.Entity.Type
    entity_type = ('UNKNOWN', 'PERSON', 'LOCATION', 'ORGANIZATION',
                   'EVENT', 'WORK_OF_ART', 'CONSUMER_GOOD', 'OTHER')

    # print information for each entity found
    for entity in entities:
        print('=' * 20)
        print(u'{:<16}: {}'.format('name', entity.name))
        print(u'{:<16}: {}'.format('type', entity_type[entity.type]))
        print(u'{:<16}: {}'.format('metadata', entity.metadata))
        print(u'{:<16}: {}'.format('salience', entity.salience))
        print(u'{:<16}: {}'.format('wikipedia_url',
              entity.metadata.get('wikipedia_url', '-')))
7. 让我们将它们集成起来
我们来回顾一下您要构建的内容。
现在,我们来总结一下。创建 solution.py 文件;将上一步中的 detect_labels_uri()、transcribe_gcs()、translate_text() 和 entities_text() 复制并粘贴到 solution.py 中。
import 语句
取消注释并将 import 语句移至顶部。请注意,系统会同时导入 speech.types 和 language.types。这会造成冲突,因此我们只需移除它们,并将 transcribe_gcs() 和 entities_text() 中出现的每个 types 分别更改为 speech.types 和 language.types。您应该会看到以下内容:
from google.cloud import vision
from google.cloud import speech
from google.cloud import translate
from google.cloud import language
from google.cloud.language import enums
import six
返回结果
让函数返回结果,而不是输出结果。您应该会看到类似如下的内容:
# import statements

def detect_labels_uri(uri):
    # code

    # we only need the label descriptions
    label_descriptions = []
    for label in labels:
        label_descriptions.append(label.description)

    return label_descriptions

def transcribe_gcs(gcs_uri):
    # code

    # naive assumption that audio file is short
    return response.results[0].alternatives[0].transcript

def translate_text(target, text):
    # code

    # only interested in translated text
    return result['translatedText']

def entities_text(text):
    # code

    # we only need the entity names
    entity_names = []
    for entity in entities:
        entity_names.append(entity.name)

    return entity_names
使用函数
完成所有这些艰苦的工作后,您就可以调用这些函数了。快去试试吧!示例如下:
def compare_audio_to_image(audio, image):
    """Checks whether a speech audio is relevant to an image."""

    # speech audio -> text
    transcription = transcribe_gcs(audio)

    # text of any language -> english text
    translation = translate_text('en', transcription)

    # text -> entities
    entities = entities_text(translation)

    # image -> labels
    labels = detect_labels_uri(image)

    # naive check for whether entities intersect with labels
    has_match = False
    for entity in entities:
        if entity in labels:
            # print result for each match
            print('The audio and image both contain: {}'.format(entity))
            has_match = True

    # print if there are no matches
    if not has_match:
        print('The audio and image do not appear to be related.')
支持多种语言
我们之前将土耳其语硬编码到 transcribe_gcs() 中。我们来更改一下,以便从 compare_audio_to_image() 指定语言。必须进行以下更改:
def transcribe_gcs(language, gcs_uri):
    ...
    config = speech.types.RecognitionConfig(language_code=language)
def compare_audio_to_image(language, audio, image):
    transcription = transcribe_gcs(language, audio)
试试看
最终代码可在此 GitHub 代码库的 solution.py 中找到。以下是用于获取该信息的 curl 命令:
curl https://raw.githubusercontent.com/googlecodelabs/integrating-ml-apis/master/solution.py -O
GitHub 上的版本包含 argparse,允许从命令行执行以下操作:
python solution.py tr-TR gs://cloud-samples-data/ml-api-codelab/tr-ball.wav gs://cloud-samples-data/ml-api-codelab/football.jpg
对于找到的每个项目,代码应输出“音频和图片均包含:”。在上面的示例中,输出应为“音频和图片均包含:球”。
奖励:尝试更多
以下是您可以尝试的更多音频和图片文件位置。
8. 恭喜!
您已探索并集成了四种机器学习 API,以确定语音样本是否在描述所提供的图片。这只是一个开始,此流水线还有很多改进空间!
所学内容
- 向 Cloud Vision API 发出请求
- 向 Cloud Speech-to-Text API 发出请求
- 向 Cloud Translation API 发出请求
- 向 Cloud Natural Language API 发出请求
- 同时使用上述所有 API
后续步骤
- 如需更好地比较字词,请查看 word2vec
- 不妨查看有关 Vision API、Speech-to-Text API、Translation API 和 Natural Language API 的更深入的 Codelab
- 不妨尝试使用 Cloud Video Intelligence 代替 Cloud Vision
- 使用 Cloud Text-to-Speech API 合成语音音频
- 了解如何将对象上传到 Cloud Storage