Google Chat API を使用してメッセージを送信する

このガイドでは、Google Chat API の Message リソースで create() メソッドを使用して、次のいずれかを行う方法について説明します。

  • テキスト、カード、インタラクティブ ウィジェットを含むメッセージを送信します。
  • 特定の Chat ユーザーに非公開でメッセージを送信します。
  • メッセージ スレッドを開始または返信します。
  • 他の Chat API リクエストで指定できるように、メッセージに名前を付けます。

メッセージの最大サイズ(テキストやカードを含む)は 32,000 バイトです。このサイズを超えるメッセージを送信するには、Chat 用アプリで複数のメッセージを送信する必要があります。

Chat 用アプリは、Chat API を呼び出してメッセージを作成するだけでなく、ユーザーが Chat 用アプリをスペースに追加した後にウェルカム メッセージを投稿するなど、ユーザーの操作に返信するメッセージを作成して送信することもできます。Chat 用アプリは、インタラクションへの応答時に、インタラクティブ ダイアログやリンク プレビュー インターフェースなど、他のタイプのメッセージング機能を使用できます。ユーザーに返信する場合、Chat 用アプリは Chat API を呼び出すことなく、メッセージを同期的に返します。インタラクションに応答するメッセージの送信については、Google Chat アプリでインタラクションを受信して応答するをご覧ください。

Chat API で作成されたメッセージの Chat での表示と属性

アプリ認証ユーザー認証を使用して create() メソッドを呼び出すことができます。Chat では、使用する認証のタイプに応じてメッセージの送信者を異なる方法で特定します。

Chat 用アプリとして認証すると、Chat 用アプリがメッセージを送信します。

アプリ認証で create() メソッドを呼び出す。
図 1: アプリ認証を使用すると、Chat 用アプリがメッセージを送信します。送信者がユーザーではないことを示すため、Chat では名前の横に App が表示されます。

ユーザーとして認証すると、Chat 用アプリはユーザーに代わってメッセージを送信します。また、Chat アプリの名前を表示することで、メッセージの送信元が Chat アプリであることを示します。

ユーザー認証を使用して create() メソッドを呼び出す。
図 2: ユーザー認証では、ユーザーがメッセージを送信し、Chat にユーザー名の横に Chat 用アプリ名が表示されます。

認証タイプによって、メッセージに含めることができるメッセージ機能とインターフェースも決まります。アプリ認証を使用すると、Chat 用アプリはリッチテキスト、カードベースのインターフェース、インタラクティブなウィジェットを含むメッセージを送信できます。Chat ユーザーはメッセージでテキストのみを送信できるため、ユーザー認証を使用してメッセージを作成する場合はテキストのみを含めることができます。Chat API で使用できるメッセージ機能の詳細については、Google Chat メッセージの概要をご覧ください。

このガイドでは、いずれかの認証タイプを使用して Chat API でメッセージを送信する方法について説明します。

前提条件

Node.js

Python

Java

Apps Script

Chat 用アプリとしてメッセージを送信する

このセクションでは、アプリ認証を使用して、テキスト、カード、インタラクティブなアクセサリ ウィジェットを含むメッセージを送信する方法について説明します。

アプリ認証で送信されたメッセージ
図 4. Chat 用アプリが、テキスト、カード、アクセサリ ボタンを含むメッセージを送信します。

アプリ認証を使用して CreateMessage() メソッドを呼び出すには、リクエストで次のフィールドを指定する必要があります。

  • chat.bot 認可スコープ
  • メッセージを投稿する Space リソース。Chat 用アプリはスペースのメンバーである必要があります。
  • 作成する Message リソース。メッセージの内容を定義するには、リッチテキスト(text)、1 つ以上のカード インターフェース(cardsV2)、またはその両方を含めることができます。

必要に応じて、次のものを含めることができます。

次のコードは、テキスト、カード、メッセージの下部にあるクリック可能なボタンを含む Chat 用アプリとして投稿されたメッセージを Chat 用アプリが送信する方法の例を示しています。

Node.js

chat/client-libraries/cloud/create-message-app-cred.js
import {createClientWithAppCredentials} from './authentication-utils.js';

// This sample shows how to create message with app credential
async function main() {
  // Create a client
  const chatClient = createClientWithAppCredentials();

  // Initialize request argument(s)
  const request = {
    // Replace SPACE_NAME here.
    parent: 'spaces/SPACE_NAME',
    message: {
      text: '👋🌎 Hello world! I created this message by calling ' +
            'the Chat API\'s `messages.create()` method.',
      cardsV2 : [{ card: {
        header: {
          title: 'About this message',
          imageUrl: 'https://fonts.gstatic.com/s/i/short-term/release/googlesymbols/info/default/24px.svg'
        },
        sections: [{
          header: 'Contents',
          widgets: [{ textParagraph: {
              text: '🔡 <b>Text</b> which can include ' +
                    'hyperlinks 🔗, emojis 😄🎉, and @mentions 🗣️.'
            }}, { textParagraph: {
              text: '🖼️ A <b>card</b> to display visual elements' +
                    'and request information such as text 🔤, ' +
                    'dates and times 📅, and selections ☑️.'
            }}, { textParagraph: {
              text: '👉🔘 An <b>accessory widget</b> which adds ' +
                    'a button to the bottom of a message.'
            }}
          ]}, {
            header: "What's next",
            collapsible: true,
            widgets: [{ textParagraph: {
                text: "❤️ <a href='https://developers.google.com/workspace/chat/api/reference/rest/v1/spaces.messages.reactions/create'>Add a reaction</a>."
              }}, { textParagraph: {
                text: "🔄 <a href='https://developers.google.com/workspace/chat/api/reference/rest/v1/spaces.messages/patch'>Update</a> " +
                      "or ❌ <a href='https://developers.google.com/workspace/chat/api/reference/rest/v1/spaces.messages/delete'>delete</a> " +
                      "the message."
              }
            }]
          }
        ]
      }}],
      accessoryWidgets: [{ buttonList: { buttons: [{
        text: 'View documentation',
        icon: { materialIcon: { name: 'link' }},
        onClick: { openLink: {
          url: 'https://developers.google.com/workspace/chat/create-messages'
        }}
      }]}}]
    }
  };

  // Make the request
  const response = await chatClient.createMessage(request);

  // Handle the response
  console.log(response);
}

main().catch(console.error);

Python

chat/client-libraries/cloud/create_message_app_cred.py
from authentication_utils import create_client_with_app_credentials
from google.apps import chat_v1 as google_chat

# This sample shows how to create message with app credential
def create_message_with_app_cred():
    # Create a client
    client = create_client_with_app_credentials()

    # Initialize request argument(s)
    request = google_chat.CreateMessageRequest(
        # Replace SPACE_NAME here.
        parent = "spaces/SPACE_NAME",
        message = {
            "text": '👋🌎 Hello world! I created this message by calling ' +
                    'the Chat API\'s `messages.create()` method.',
            "cards_v2" : [{ "card": {
                "header": {
                    "title": 'About this message',
                    "image_url": 'https://fonts.gstatic.com/s/i/short-term/release/googlesymbols/info/default/24px.svg'
                },
                "sections": [{
                    "header": "Contents",
                    "widgets": [{ "text_paragraph": {
                            "text": '🔡 <b>Text</b> which can include ' +
                                    'hyperlinks 🔗, emojis 😄🎉, and @mentions 🗣️.'
                        }}, { "text_paragraph": {
                            "text": '🖼️ A <b>card</b> to display visual elements' +
                                    'and request information such as text 🔤, ' +
                                    'dates and times 📅, and selections ☑️.'
                        }}, { "text_paragraph": {
                            "text": '👉🔘 An <b>accessory widget</b> which adds ' +
                                    'a button to the bottom of a message.'
                        }}
                    ]}, {
                        "header": "What's next",
                        "collapsible": True,
                        "widgets": [{ "text_paragraph": {
                                "text": "❤️ <a href='https://developers.google.com/workspace/chat/api/reference/rest/v1/spaces.messages.reactions/create'>Add a reaction</a>."
                            }}, { "text_paragraph": {
                                "text": "🔄 <a href='https://developers.google.com/workspace/chat/api/reference/rest/v1/spaces.messages/patch'>Update</a> " +
                                        "or ❌ <a href='https://developers.google.com/workspace/chat/api/reference/rest/v1/spaces.messages/delete'>delete</a> " +
                                        "the message."
                            }
                        }]
                    }
                ]
            }}],
            "accessory_widgets": [{ "button_list": { "buttons": [{
                "text": 'View documentation',
                "icon": { "material_icon": { "name": 'link' }},
                "on_click": { "open_link": {
                    "url": 'https://developers.google.com/workspace/chat/create-messages'
                }}
            }]}}]
        }
    )

    # Make the request
    response = client.create_message(request)

    # Handle the response
    print(response)

create_message_with_app_cred()

Java

chat/client-libraries/cloud/src/main/java/com/google/workspace/api/chat/samples/CreateMessageAppCred.java
import com.google.apps.card.v1.Button;
import com.google.apps.card.v1.ButtonList;
import com.google.apps.card.v1.Card;
import com.google.apps.card.v1.Icon;
import com.google.apps.card.v1.MaterialIcon;
import com.google.apps.card.v1.OnClick;
import com.google.apps.card.v1.OpenLink;
import com.google.apps.card.v1.TextParagraph;
import com.google.apps.card.v1.Widget;
import com.google.apps.card.v1.Card.CardHeader;
import com.google.apps.card.v1.Card.Section;
import com.google.chat.v1.AccessoryWidget;
import com.google.chat.v1.CardWithId;
import com.google.chat.v1.ChatServiceClient;
import com.google.chat.v1.CreateMessageRequest;
import com.google.chat.v1.Message;

// This sample shows how to create message with app credential.
public class CreateMessageAppCred {

  public static void main(String[] args) throws Exception {
    try (ChatServiceClient chatServiceClient =
        AuthenticationUtils.createClientWithAppCredentials()) {
      CreateMessageRequest.Builder request = CreateMessageRequest.newBuilder()
        // Replace SPACE_NAME here.
        .setParent("spaces/SPACE_NAME")
        .setMessage(Message.newBuilder()
          .setText( "👋🌎 Hello world! I created this message by calling " +
                    "the Chat API\'s `messages.create()` method.")
          .addCardsV2(CardWithId.newBuilder().setCard(Card.newBuilder()
            .setHeader(CardHeader.newBuilder()
              .setTitle("About this message")
              .setImageUrl("https://fonts.gstatic.com/s/i/short-term/release/googlesymbols/info/default/24px.svg"))
            .addSections(Section.newBuilder()
              .setHeader("Contents")
              .addWidgets(Widget.newBuilder().setTextParagraph(TextParagraph.newBuilder().setText(
                "🔡 <b>Text</b> which can include " +
                "hyperlinks 🔗, emojis 😄🎉, and @mentions 🗣️.")))
              .addWidgets(Widget.newBuilder().setTextParagraph(TextParagraph.newBuilder().setText(
                "🖼️ A <b>card</b> to display visual elements " +
                "and request information such as text 🔤, " +
                "dates and times 📅, and selections ☑️.")))
              .addWidgets(Widget.newBuilder().setTextParagraph(TextParagraph.newBuilder().setText(
                "👉🔘 An <b>accessory widget</b> which adds " +
                "a button to the bottom of a message."))))
            .addSections(Section.newBuilder()
              .setHeader("What's next")
              .setCollapsible(true)
              .addWidgets(Widget.newBuilder().setTextParagraph(TextParagraph.newBuilder().setText(
                "❤️ <a href='https://developers.google.com/workspace/chat/api/reference/rest/v1/spaces.messages.reactions/create'>Add a reaction</a>.")))
              .addWidgets(Widget.newBuilder().setTextParagraph(TextParagraph.newBuilder().setText(
                "🔄 <a href='https://developers.google.com/workspace/chat/api/reference/rest/v1/spaces.messages/patch'>Update</a> " +
                "or ❌ <a href='https://developers.google.com/workspace/chat/api/reference/rest/v1/spaces.messages/delete'>delete</a> " +
                "the message."))))))
          .addAccessoryWidgets(AccessoryWidget.newBuilder()
            .setButtonList(ButtonList.newBuilder()
              .addButtons(Button.newBuilder()
                .setText("View documentation")
                .setIcon(Icon.newBuilder()
                  .setMaterialIcon(MaterialIcon.newBuilder().setName("link")))
                .setOnClick(OnClick.newBuilder()
                  .setOpenLink(OpenLink.newBuilder()
                    .setUrl("https://developers.google.com/workspace/chat/create-messages")))))));
      Message response = chatServiceClient.createMessage(request.build());

      System.out.println(JsonFormat.printer().print(response));
    }
  }
}

Apps Script

chat/advanced-service/Main.gs
/**
 * This sample shows how to create message with app credential
 * 
 * It relies on the OAuth2 scope 'https://www.googleapis.com/auth/chat.bot'
 * used by service accounts.
 */
function createMessageAppCred() {
  // Initialize request argument(s)
  // TODO(developer): Replace SPACE_NAME here.
  const parent = 'spaces/SPACE_NAME';
  const message = {
    text: '👋🌎 Hello world! I created this message by calling ' +
          'the Chat API\'s `messages.create()` method.',
    cardsV2 : [{ card: {
      header: {
        title: 'About this message',
        imageUrl: 'https://fonts.gstatic.com/s/i/short-term/release/googlesymbols/info/default/24px.svg'
      },
      sections: [{
        header: 'Contents',
        widgets: [{ textParagraph: {
            text: '🔡 <b>Text</b> which can include ' +
                  'hyperlinks 🔗, emojis 😄🎉, and @mentions 🗣️.'
          }}, { textParagraph: {
            text: '🖼️ A <b>card</b> to display visual elements' +
                  'and request information such as text 🔤, ' +
                  'dates and times 📅, and selections ☑️.'
          }}, { textParagraph: {
            text: '👉🔘 An <b>accessory widget</b> which adds ' +
                  'a button to the bottom of a message.'
          }}
        ]}, {
          header: "What's next",
          collapsible: true,
          widgets: [{ textParagraph: {
              text: "❤️ <a href='https://developers.google.com/workspace/chat/api/reference/rest/v1/spaces.messages.reactions/create'>Add a reaction</a>."
            }}, { textParagraph: {
              text: "🔄 <a href='https://developers.google.com/workspace/chat/api/reference/rest/v1/spaces.messages/patch'>Update</a> " +
                    "or ❌ <a href='https://developers.google.com/workspace/chat/api/reference/rest/v1/spaces.messages/delete'>delete</a> " +
                    "the message."
            }
          }]
        }
      ]
    }}],
    accessoryWidgets: [{ buttonList: { buttons: [{
      text: 'View documentation',
      icon: { materialIcon: { name: 'link' }},
      onClick: { openLink: {
        url: 'https://developers.google.com/workspace/chat/create-messages'
      }}
    }]}}]
  };
  const parameters = {};

  // Make the request
  const response = Chat.Spaces.Messages.create(
    message, parent, parameters, getHeaderWithAppCredentials()
  );

  // Handle the response
  console.log(response);
}

このサンプルを実行するには、SPACE_NAME をスペースの name フィールドの ID に置き換えます。ID は、ListSpaces() メソッドを呼び出すか、スペースの URL から取得できます。

メッセージの下部にインタラクティブ ウィジェットを追加する

このガイドの最初のコードサンプルでは、Chat 用アプリのメッセージの下部にクリック可能なボタン(アクセサリ ウィジェット)が表示されます。アクセサリ ウィジェットは、メッセージ内のテキストやカードの後に表示されます。これらのウィジェットを使用すると、次のようなさまざまな方法でユーザーにメッセージの操作を促すことができます。

  • メッセージの正確さや満足度を評価する。
  • メッセージ アプリまたは Chat アプリに関する問題を報告します。
  • ドキュメントなどの関連コンテンツへのリンクを開きます。
  • Chat アプリで、類似するメッセージを一定期間非表示にするか、スヌーズします。

アクセサリ ウィジェットを追加するには、リクエストの本文に accessoryWidgets[] フィールドを含め、含めるウィジェットを 1 つ以上指定します。

次の画像は、Chat 用アプリのユーザーが Chat 用アプリの利用体験を評価できるように、アクセサリ ウィジェット付きのテキスト メッセージを追加する Chat 用アプリを示しています。

アクセサリ ウィジェット。
図 5: テキストとアクセサリ ウィジェットを含むチャットアプリのメッセージ。

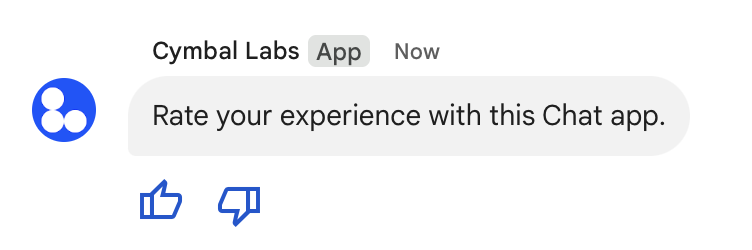
次の例は、2 つのアクセサリ ボタンを含むテキスト メッセージを作成するリクエストの本文を示しています。ユーザーがボタンをクリックすると、対応する関数(doUpvote など)がインタラクションを処理します。

{
  text: "Rate your experience with this Chat app.",
  accessoryWidgets: [{ buttonList: { buttons: [{
    icon: { material_icon: {
      name: "thumb_up"
    }},
    color: { red: 0, blue: 255, green: 0 },
    onClick: { action: {
      function: "doUpvote"
    }}
  }, {
    icon: { material_icon: {
      name: "thumb_down"
    }},
    color: { red: 0, blue: 255, green: 0 },
    onClick: { action: {
      function: "doDownvote"
    }}
  }]}}]
}

プライベート メッセージを送信する

Chat 用アプリは、スペース内の特定のユーザーにのみメッセージが表示されるように、非公開でメッセージを送信できます。Chat 用アプリが非公開メッセージを送信すると、メッセージには、そのメッセージが自分だけに表示されることをユーザーに知らせるラベルが表示されます。

Chat API を使用して非公開でメッセージを送信するには、リクエストの本文で privateMessageViewer フィールドを指定します。ユーザーを指定するには、Chat ユーザーを表す User リソースに値を設定します。次の例に示すように、User リソースの name フィールドを使用することもできます。

{
  text: "Hello private world!",
  privateMessageViewer: {
    name: "users/USER_ID"
  }
}

このサンプルを使用するには、USER_ID をユーザーの一意の ID(12345678987654321hao@cymbalgroup.com など)に置き換えます。ユーザーの指定について詳しくは、Google Chat ユーザーを特定して指定するをご覧ください。

非公開でメッセージを送信するには、リクエストで次の項目を省略する必要があります。

ユーザーの代わりにテキスト メッセージを送信する

このセクションでは、ユーザー認証を使用してユーザーに代わってメッセージを送信する方法について説明します。ユーザー認証を使用する場合、メッセージの内容はテキストのみにすることができ、カード インターフェースやインタラクティブ ウィジェットなど、Chat 用アプリでのみ使用できるメッセージ機能は省略する必要があります。

ユーザー認証で送信されたメッセージ
図 3. Chat 用アプリがユーザーに代わってテキスト メッセージを送信します。

ユーザー認証を使用して CreateMessage() メソッドを呼び出すには、リクエストで次のフィールドを指定する必要があります。

  • このメソッドのユーザー認証をサポートする認可スコープ。次のサンプルでは、chat.messages.create スコープを使用します。
  • メッセージを投稿する Space リソース。認証されたユーザーは、スペースのメンバーである必要があります。
  • 作成する Message リソース。メッセージの内容を定義するには、text フィールドを含める必要があります。

必要に応じて、次のものを含めることができます。

次のコードは、認証済みユーザーに代わって Chat 用アプリが特定のスペースにテキスト メッセージを送信する方法の例を示しています。

Node.js

chat/client-libraries/cloud/create-message-user-cred.js
import {createClientWithUserCredentials} from './authentication-utils.js';

const USER_AUTH_OAUTH_SCOPES = ['https://www.googleapis.com/auth/chat.messages.create'];

// This sample shows how to create message with user credential
async function main() {
  // Create a client
  const chatClient = await createClientWithUserCredentials(USER_AUTH_OAUTH_SCOPES);

  // Initialize request argument(s)
  const request = {
    // Replace SPACE_NAME here.
    parent: 'spaces/SPACE_NAME',
    message: {
      text: '👋🌎 Hello world!' +
            'Text messages can contain things like:\n\n' +
            '* Hyperlinks 🔗\n' +
            '* Emojis 😄🎉\n' +
            '* Mentions of other Chat users `@` \n\n' +
            'For details, see the ' +
            '<https://developers.google.com/workspace/chat/format-messages' +
            '|Chat API developer documentation>.'
    }
  };

  // Make the request
  const response = await chatClient.createMessage(request);

  // Handle the response
  console.log(response);
}

main().catch(console.error);

Python

chat/client-libraries/cloud/create_message_user_cred.py
from authentication_utils import create_client_with_user_credentials
from google.apps import chat_v1 as google_chat

SCOPES = ["https://www.googleapis.com/auth/chat.messages.create"]

def create_message_with_user_cred():
    # Create a client
    client = create_client_with_user_credentials(SCOPES)

    # Initialize request argument(s)
    request = google_chat.CreateMessageRequest(
        # Replace SPACE_NAME here.
        parent = "spaces/SPACE_NAME",
        message = {
            "text": '👋🌎 Hello world!' +
                    'Text messages can contain things like:\n\n' +
                    '* Hyperlinks 🔗\n' +
                    '* Emojis 😄🎉\n' +
                    '* Mentions of other Chat users `@` \n\n' +
                    'For details, see the ' +
                    '<https://developers.google.com/workspace/chat/format-messages' +
                    '|Chat API developer documentation>.'
        }
    )

    # Make the request
    response = client.create_message(request)

    # Handle the response
    print(response)

create_message_with_user_cred()

Java

chat/client-libraries/cloud/src/main/java/com/google/workspace/api/chat/samples/CreateMessageUserCred.java
import com.google.chat.v1.ChatServiceClient;
import com.google.chat.v1.CreateMessageRequest;
import com.google.chat.v1.Message;

// This sample shows how to create message with user credential.
public class CreateMessageUserCred {

  private static final String SCOPE =
    "https://www.googleapis.com/auth/chat.messages.create";

  public static void main(String[] args) throws Exception {
    try (ChatServiceClient chatServiceClient =
        AuthenticationUtils.createClientWithUserCredentials(
          ImmutableList.of(SCOPE))) {
      CreateMessageRequest.Builder request = CreateMessageRequest.newBuilder()
        // Replace SPACE_NAME here.
        .setParent("spaces/SPACE_NAME")
        .setMessage(Message.newBuilder()
          .setText( "👋🌎 Hello world!" +
                    "Text messages can contain things like:\n\n" +
                    "* Hyperlinks 🔗\n" +
                    "* Emojis 😄🎉\n" +
                    "* Mentions of other Chat users `@` \n\n" +
                    "For details, see the " +
                    "<https://developers.google.com/workspace/chat/format-messages" +
                    "|Chat API developer documentation>."));
      Message response = chatServiceClient.createMessage(request.build());

      System.out.println(JsonFormat.printer().print(response));
    }
  }
}

Apps Script

chat/advanced-service/Main.gs
/**
 * This sample shows how to create message with user credential
 * 
 * It relies on the OAuth2 scope 'https://www.googleapis.com/auth/chat.messages.create'
 * referenced in the manifest file (appsscript.json).
 */
function createMessageUserCred() {
  // Initialize request argument(s)
  // TODO(developer): Replace SPACE_NAME here.
  const parent = 'spaces/SPACE_NAME';
  const message = {
    text: '👋🌎 Hello world!' +
          'Text messages can contain things like:\n\n' +
          '* Hyperlinks 🔗\n' +
          '* Emojis 😄🎉\n' +
          '* Mentions of other Chat users `@` \n\n' +
          'For details, see the ' +
          '<https://developers.google.com/workspace/chat/format-messages' +
          '|Chat API developer documentation>.'
  };

  // Make the request
  const response = Chat.Spaces.Messages.create(message, parent);

  // Handle the response
  console.log(response);
}

このサンプルを実行するには、SPACE_NAME をスペースの name フィールドの ID に置き換えます。ID は、ListSpaces() メソッドを呼び出すか、スペースの URL から取得できます。

スレッドを開始する、またはスレッドに返信する

スレッドを使用するスペースでは、新しいメッセージでスレッドを開始するか、既存のスレッドに返信するかを指定できます。

デフォルトでは、Chat API を使用して作成したメッセージは新しいスレッドを開始します。スレッドを特定して後で返信できるようにするには、リクエストでスレッドキーを指定します。

  • リクエストの本文で、thread.threadKey フィールドを指定します。
  • キーがすでに存在する場合の処理を決定するには、クエリ パラメータ messageReplyOption を指定します。

既存のスレッドに返信するメッセージを作成するには:

  • リクエストの本文に、thread フィールドを含めます。設定されている場合は、作成した threadKey を指定できます。それ以外の場合は、スレッドの name を使用する必要があります。
  • クエリ パラメータ messageReplyOption を指定します。

次のコードは、認証済みユーザーに代わって、特定のスペースのキーで識別される特定のスレッドを開始または返信するテキスト メッセージを Chat 用アプリが送信する方法の例を示しています。

Node.js

chat/client-libraries/cloud/create-message-user-cred-thread-key.js
import {createClientWithUserCredentials} from './authentication-utils.js';
const {MessageReplyOption} = require('@google-apps/chat').protos.google.chat.v1.CreateMessageRequest;

const USER_AUTH_OAUTH_SCOPES = ['https://www.googleapis.com/auth/chat.messages.create'];

// This sample shows how to create message with user credential with thread key
async function main() {
  // Create a client
  const chatClient = await createClientWithUserCredentials(USER_AUTH_OAUTH_SCOPES);

  // Initialize request argument(s)
  const request = {
    // Replace SPACE_NAME here.
    parent: 'spaces/SPACE_NAME',
    // Creates the message as a reply to the thread specified by thread_key
    // If it fails, the message starts a new thread instead
    messageReplyOption: MessageReplyOption.REPLY_MESSAGE_FALLBACK_TO_NEW_THREAD,
    message: {
      text: 'Hello with user credential!',
      thread: {
        // Thread key specifies a thread and is unique to the chat app
        // that sets it
        threadKey: 'THREAD_KEY'
      }
    }
  };

  // Make the request
  const response = await chatClient.createMessage(request);

  // Handle the response
  console.log(response);
}

main().catch(console.error);

Python

chat/client-libraries/cloud/create_message_user_cred_thread_key.py
from authentication_utils import create_client_with_user_credentials
from google.apps import chat_v1 as google_chat

import google.apps.chat_v1.CreateMessageRequest.MessageReplyOption

SCOPES = ["https://www.googleapis.com/auth/chat.messages.create"]

# This sample shows how to create message with user credential with thread key
def create_message_with_user_cred_thread_key():
    # Create a client
    client = create_client_with_user_credentials(SCOPES)

    # Initialize request argument(s)
    request = google_chat.CreateMessageRequest(
        # Replace SPACE_NAME here
        parent = "spaces/SPACE_NAME",
        # Creates the message as a reply to the thread specified by thread_key.
        # If it fails, the message starts a new thread instead.
        message_reply_option = MessageReplyOption.REPLY_MESSAGE_FALLBACK_TO_NEW_THREAD,
        message = {
            "text": "Hello with user credential!",
            "thread": {
                # Thread key specifies a thread and is unique to the chat app
                # that sets it.
                "thread_key": "THREAD_KEY"
            }
        }
    )

    # Make the request
    response = client.create_message(request)

    # Handle the response
    print(response)

create_message_with_user_cred_thread_key()

Java

chat/client-libraries/cloud/src/main/java/com/google/workspace/api/chat/samples/CreateMessageUserCredThreadKey.java
import com.google.chat.v1.ChatServiceClient;
import com.google.chat.v1.CreateMessageRequest;
import com.google.chat.v1.CreateMessageRequest.MessageReplyOption;
import com.google.chat.v1.Message;
import com.google.chat.v1.Thread;

// This sample shows how to create message with a thread key with user
// credential.
public class CreateMessageUserCredThreadKey {

  private static final String SCOPE =
    "https://www.googleapis.com/auth/chat.messages.create";

  public static void main(String[] args) throws Exception {
    try (ChatServiceClient chatServiceClient =
        AuthenticationUtils.createClientWithUserCredentials(
          ImmutableList.of(SCOPE))) {
      CreateMessageRequest.Builder request = CreateMessageRequest.newBuilder()
        // Replace SPACE_NAME here.
        .setParent("spaces/SPACE_NAME")
        // Creates the message as a reply to the thread specified by thread_key.
        // If it fails, the message starts a new thread instead.
        .setMessageReplyOption(
          MessageReplyOption.REPLY_MESSAGE_FALLBACK_TO_NEW_THREAD)
        .setMessage(Message.newBuilder()
          .setText("Hello with user credentials!")
          // Thread key specifies a thread and is unique to the chat app
          // that sets it.
          .setThread(Thread.newBuilder().setThreadKey("THREAD_KEY")));
      Message response = chatServiceClient.createMessage(request.build());

      System.out.println(JsonFormat.printer().print(response));
    }
  }
}

Apps Script

chat/advanced-service/Main.gs
/**
 * This sample shows how to create message with user credential with thread key
 * 
 * It relies on the OAuth2 scope 'https://www.googleapis.com/auth/chat.messages.create'
 * referenced in the manifest file (appsscript.json).
 */
function createMessageUserCredThreadKey() {
  // Initialize request argument(s)
  // TODO(developer): Replace SPACE_NAME here.
  const parent = 'spaces/SPACE_NAME';
  // Creates the message as a reply to the thread specified by thread_key
  // If it fails, the message starts a new thread instead
  const messageReplyOption = 'REPLY_MESSAGE_FALLBACK_TO_NEW_THREAD';
  const message = {
    text: 'Hello with user credential!',
    thread: {
      // Thread key specifies a thread and is unique to the chat app
      // that sets it
      threadKey: 'THREAD_KEY'
    }
  };

  // Make the request
  const response = Chat.Spaces.Messages.create(message, parent, {
    messageReplyOption: messageReplyOption
  });

  // Handle the response
  console.log(response);
}

このサンプルを実行するには、次の値を置き換えます。

  • THREAD_KEY: スペース内の既存のスレッドキー。新しいスレッドを作成する場合は、スレッドの一意の名前。
  • SPACE_NAME: スペースの name フィールドの ID。ID は、ListSpaces() メソッドを呼び出すか、スペースの URL から取得できます。

メッセージに名前を付ける

将来の API 呼び出しでメッセージを取得または指定するには、リクエストの messageId フィールドを設定してメッセージに名前を付けます。メッセージに名前を付けると、メッセージのリソース名からシステム割り当て ID(name フィールドで表される)を保存しなくても、メッセージを指定できます。

たとえば、get() メソッドを使用してメッセージを取得するには、リソース名を使用して、取得するメッセージを指定します。リソース名は spaces/{space}/messages/{message} の形式で指定します。ここで、{message} は、メッセージの作成時に設定したシステム割り当て ID またはカスタム名を表します。

メッセージに名前を付けるには、メッセージの作成時に messageId フィールドにカスタム ID を指定します。messageId フィールドは、Message リソースの clientAssignedMessageId フィールドの値を設定します。

メッセージに名前を付けることができるのは、メッセージの作成時のみです。既存のメッセージのカスタム ID の名前を変更したり、変更したりすることはできません。カスタム ID は次の要件を満たしている必要があります。

  • client- で始まります。たとえば、client-custom-name は有効なカスタム ID ですが、custom-name は無効です。
  • 63 文字以下で、小文字、数字、ハイフンのみが含まれます。
  • スペース内で一意である。Chat 用アプリで、異なるメッセージに同じカスタム ID を使用することはできません。

次のコードは、認証済みユーザーに代わって、Chat 用アプリが ID 付きのテキスト メッセージを特定のスペースに送信する方法の例を示しています。

Node.js

chat/client-libraries/cloud/create-message-user-cred-message-id.js
import {createClientWithUserCredentials} from './authentication-utils.js';

const USER_AUTH_OAUTH_SCOPES = ['https://www.googleapis.com/auth/chat.messages.create'];

// This sample shows how to create message with user credential with message id
async function main() {
  // Create a client
  const chatClient = await createClientWithUserCredentials(USER_AUTH_OAUTH_SCOPES);

  // Initialize request argument(s)
  const request = {
    // Replace SPACE_NAME here.
    parent: 'spaces/SPACE_NAME',
    // Message id lets chat apps get, update or delete a message without needing
    // to store the system assigned ID in the message's resource name
    messageId: 'client-MESSAGE-ID',
    message: { text: 'Hello with user credential!' }
  };

  // Make the request
  const response = await chatClient.createMessage(request);

  // Handle the response
  console.log(response);
}

main().catch(console.error);

Python

chat/client-libraries/cloud/create_message_user_cred_message_id.py
from authentication_utils import create_client_with_user_credentials
from google.apps import chat_v1 as google_chat

SCOPES = ["https://www.googleapis.com/auth/chat.messages.create"]

# This sample shows how to create message with user credential with message id
def create_message_with_user_cred_message_id():
    # Create a client
    client = create_client_with_user_credentials(SCOPES)

    # Initialize request argument(s)
    request = google_chat.CreateMessageRequest(
        # Replace SPACE_NAME here
        parent = "spaces/SPACE_NAME",
        # Message id let chat apps get, update or delete a message without needing
        # to store the system assigned ID in the message's resource name.
        message_id = "client-MESSAGE-ID",
        message = {
            "text": "Hello with user credential!"
        }
    )

    # Make the request
    response = client.create_message(request)

    # Handle the response
    print(response)

create_message_with_user_cred_message_id()

Java

chat/client-libraries/cloud/src/main/java/com/google/workspace/api/chat/samples/CreateMessageUserCredMessageId.java
import com.google.chat.v1.ChatServiceClient;
import com.google.chat.v1.CreateMessageRequest;
import com.google.chat.v1.Message;

// This sample shows how to create message with message id specified with user
// credential.
public class CreateMessageUserCredMessageId {

  private static final String SCOPE =
    "https://www.googleapis.com/auth/chat.messages.create";

  public static void main(String[] args) throws Exception {
    try (ChatServiceClient chatServiceClient =
        AuthenticationUtils.createClientWithUserCredentials(
          ImmutableList.of(SCOPE))) {
      CreateMessageRequest.Builder request = CreateMessageRequest.newBuilder()
        // Replace SPACE_NAME here.
        .setParent("spaces/SPACE_NAME")
        .setMessage(Message.newBuilder()
          .setText("Hello with user credentials!"))
        // Message ID lets chat apps get, update or delete a message without
        // needing to store the system assigned ID in the message's resource
        // name.
        .setMessageId("client-MESSAGE-ID");
      Message response = chatServiceClient.createMessage(request.build());

      System.out.println(JsonFormat.printer().print(response));
    }
  }
}

Apps Script

chat/advanced-service/Main.gs
/**
 * This sample shows how to create message with user credential with message id
 * 
 * It relies on the OAuth2 scope 'https://www.googleapis.com/auth/chat.messages.create'
 * referenced in the manifest file (appsscript.json).
 */
function createMessageUserCredMessageId() {
  // Initialize request argument(s)
  // TODO(developer): Replace SPACE_NAME here.
  const parent = 'spaces/SPACE_NAME';
  // Message id lets chat apps get, update or delete a message without needing
  // to store the system assigned ID in the message's resource name
  const messageId = 'client-MESSAGE-ID';
  const message = { text: 'Hello with user credential!' };

  // Make the request
  const response = Chat.Spaces.Messages.create(message, parent, {
    messageId: messageId
  });

  // Handle the response
  console.log(response);
}

このサンプルを実行するには、次の値を置き換えます。

  • SPACE_NAME: スペースの name フィールドの ID。ID は、ListSpaces() メソッドを呼び出すか、スペースの URL から取得できます。
  • MESSAGE-ID: custom- で始まるメッセージの名前。指定されたスペースで Chat 用アプリによって作成された他のメッセージ名と重複しないようにする必要があります。

トラブルシューティング

Google Chat 用アプリまたはカードがエラーを返すと、Chat インターフェースに「エラーが発生しました」というメッセージが表示されます。または「リクエストを処理できません。」と表示されることがあります。Chat UI にエラー メッセージが表示されない場合でも、Chat 用アプリやカードで予期しない結果が生じることがあります。たとえば、カード メッセージが表示されないことがあります。

Chat UI にエラー メッセージが表示されない場合でも、Chat 用アプリのエラー ロギングが有効になっている場合は、エラーの修正に役立つ説明的なエラー メッセージとログデータを利用できます。エラーの表示、デバッグ、修正については、Google Chat のエラーのトラブルシューティングと修正をご覧ください。