सिस्टम की ओर से तय किए गए नेटिव फ़ॉर्मैट के अलावा, Ad Manager पब्लिशर के पास ऐसे नेटिव विज्ञापन फ़ॉर्मैट बनाने का विकल्प होता है जिनमें ऐसेट की कस्टम सूचियां तय की गई हों. इन्हें कस्टम नेटिव विज्ञापन फ़ॉर्मैट कहा जाता है. इनका इस्तेमाल, रिज़र्व किए गए विज्ञापनों के साथ किया जा सकता है. इससे पब्लिशर, अपने ऐप्लिकेशन को कोई भी स्ट्रक्चर्ड डेटा भेज पाते हैं. इन विज्ञापनों को NativeCustomFormatAd ऑब्जेक्ट से दिखाया जाता है.
कस्टम नेटिव विज्ञापन फ़ॉर्मैट लोड करना
इस गाइड में, कस्टम नेटिव विज्ञापन फ़ॉर्मैट को लोड करने और दिखाने का तरीका बताया गया है.
कस्टम नेटिव विज्ञापन लोड करना
कस्टम नेटिव विज्ञापन लोड करने के लिए, यह तरीका अपनाएं:
NativeAdType.CUSTOM_NATIVEकोNativeAdType.CUSTOM_NATIVEमें विज्ञापन के टाइप के तौर पर शामिल करें.NativeAdRequestकस्टम नेटिव विज्ञापन के फ़ॉर्मैट आईडी को सेट करें.
Kotlin
Java
कस्टम नेटिव विज्ञापन फ़ॉर्मैट का आईडी
कस्टम नेटिव विज्ञापन फ़ॉर्मैट की पहचान करने के लिए इस्तेमाल किया गया फ़ॉर्मैट आईडी, Ad Manager के यूज़र इंटरफ़ेस (यूआई) में जाकर देखा जा सकता है. इसके लिए, डिलिवरी ड्रॉप-डाउन में मौजूद नेटिव सेक्शन पर जाएं:
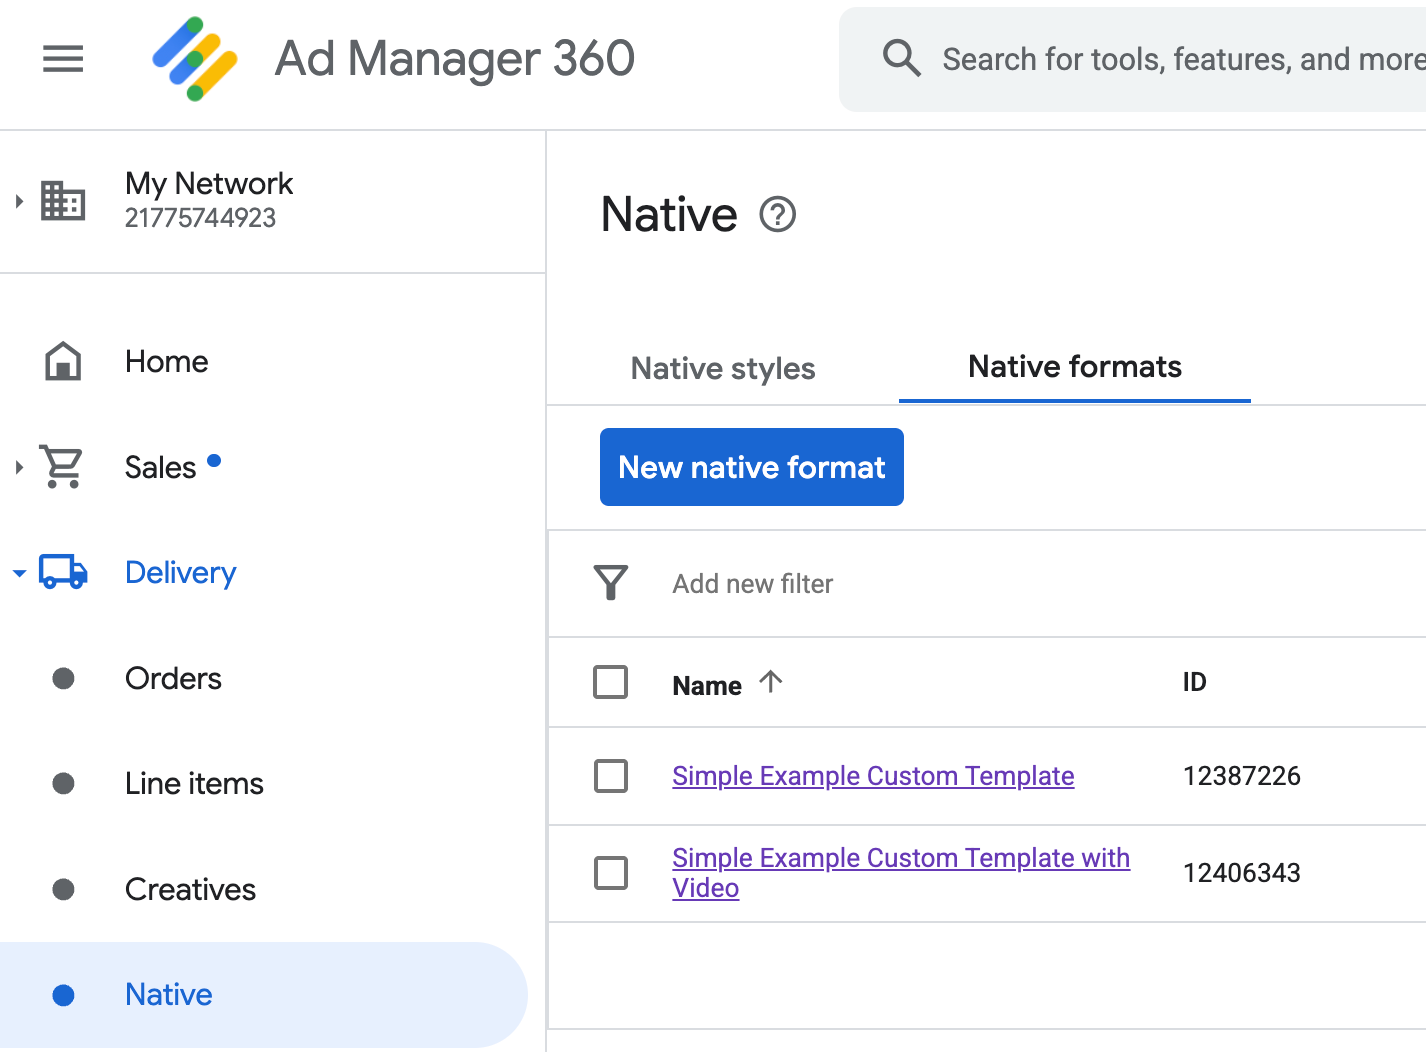
हर कस्टम नेटिव विज्ञापन फ़ॉर्मैट आईडी, उसके नाम के बगल में दिखता है. किसी नाम पर क्लिक करने से, आपको ज़्यादा जानकारी वाली स्क्रीन पर ले जाया जाएगा. इस स्क्रीन पर, फ़ॉर्मैट के फ़ील्ड के बारे में जानकारी दिखेगी:
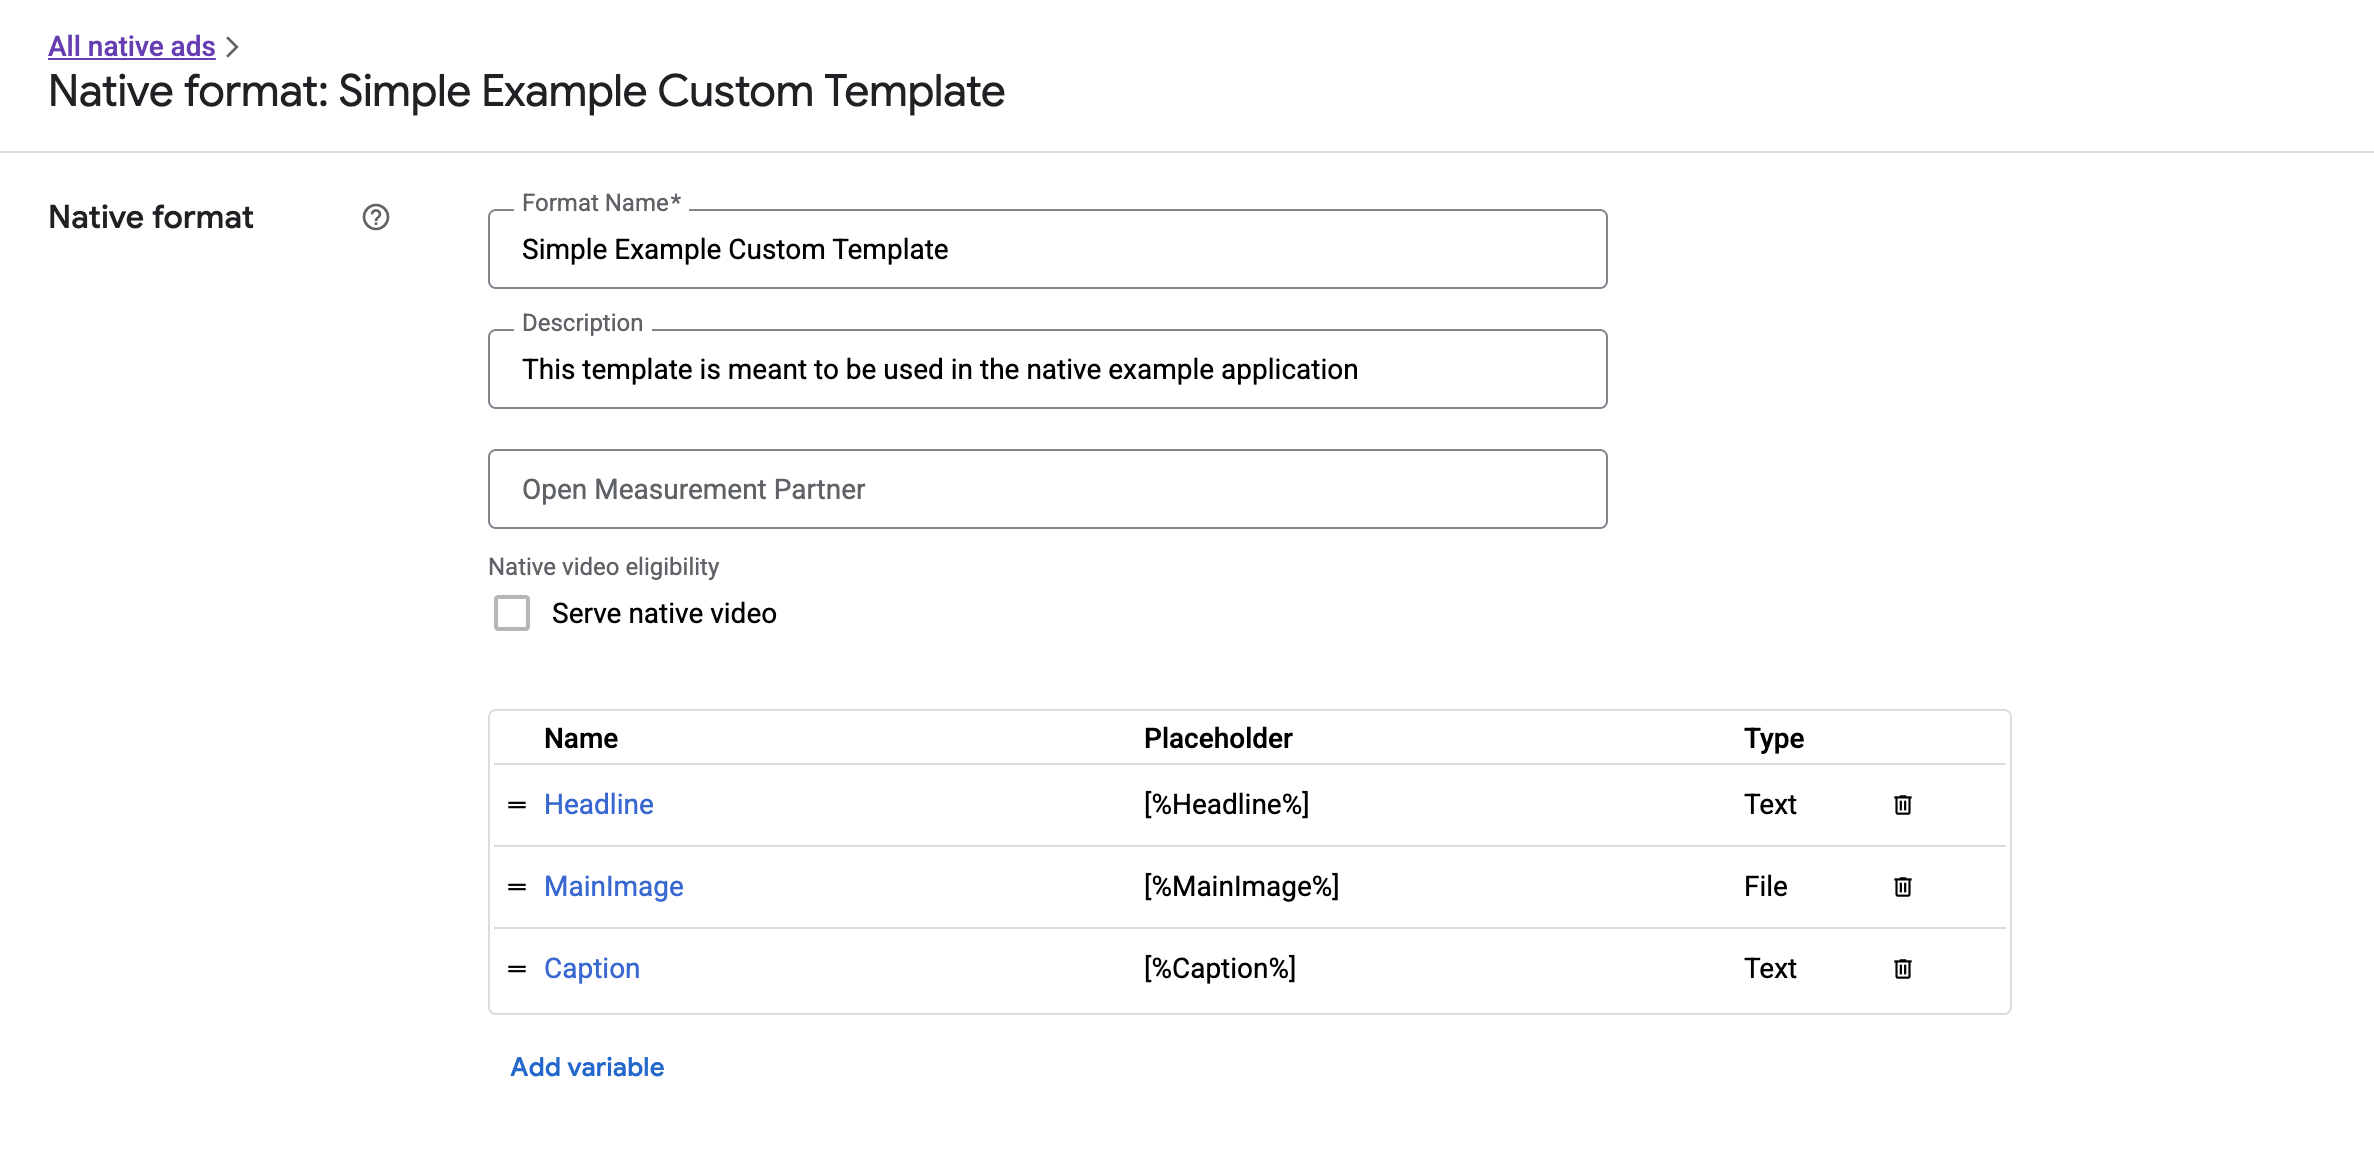
यहां से, अलग-अलग फ़ील्ड जोड़े, बदले, और हटाए जा सकते हैं. हर ऐसेट का नाम नोट करें. यह नाम, एक कुंजी है. इसका इस्तेमाल, कस्टम नेटिव विज्ञापन फ़ॉर्मैट दिखाते समय हर ऐसेट का डेटा पाने के लिए किया जाता है.
डिसप्ले कस्टम नेटिव विज्ञापन फ़ॉर्मैट
कस्टम नेटिव विज्ञापन फ़ॉर्मैट, सिस्टम की ओर से तय किए गए फ़ॉर्मैट से इस तरह अलग होते हैं कि पब्लिशर के पास, विज्ञापन बनाने वाली ऐसेट की अपनी सूची तय करने का अधिकार होता है. इसलिए, सिस्टम के तय किए गए फ़ॉर्मैट से अलग फ़ॉर्मैट में विज्ञापन दिखाने की प्रोसेस, इन मामलों में अलग होती है:
- टेक्स्ट और इमेज ऐसेट,
getText()औरgetImage()गेटर के ज़रिए उपलब्ध होती हैं. ये फ़ील्ड के नाम को पैरामीटर के तौर पर इस्तेमाल करते हैं. - Google के साथ रजिस्टर करने के लिए, कोई खास
ViewGroupक्लास नहीं है. इसलिए, आपको इंप्रेशन और क्लिक मैन्युअल तरीके से रिकॉर्ड करने होंगे. - अगर कस्टम नेटिव विज्ञापन में वीडियो ऐसेट शामिल नहीं है, तो उसमें
nullमीडिया कॉन्टेंट होता है.
इस उदाहरण में, CustomNativeAd को दिखाने का तरीका बताया गया है:
Kotlin
private fun displayCustomNativeAd(customNativeAd: CustomNativeAd, context: Context) {
  // Render the text elements.

  // The `customNativeAdBinding` is the layout binding for the ad container that
  // contains all `CustomNativeAd` assets.
  customNativeAdBinding.headline.text = customNativeAd.getText("Headline")
  customNativeAdBinding.caption.text = customNativeAd.getText("Caption")

  // If the main asset is an image, render it with an ImageView.
  val imageView = ImageView(context)
  imageView.adjustViewBounds = true
  imageView.setImageDrawable(customNativeAd.getImage("MainImage")?.drawable)
  imageView.setOnClickListener { customNativeAd.performClick("MainImage") }
  customNativeAdBinding.mediaPlaceholder.addView(imageView)

  // Render the ad choices icon.
  renderAdChoices(customNativeAd)

  // Record an impression.
  customNativeAd.recordImpression()
}
Java
private void displayCustomNativeAd(CustomNativeAd customNativeAd, Context context) {
  // Render the text elements.

  // The `customNativeAdBinding` is the layout binding for the ad container that
  // contains all `CustomNativeAd` assets.
  if (customNativeAdBinding != null) {
    customNativeAdBinding.headline.setText(customNativeAd.getText("Headline"));
    customNativeAdBinding.caption.setText(customNativeAd.getText("Caption"));

    ImageView imageView = new ImageView(context);
    imageView.setAdjustViewBounds(true);
    imageView.setImageDrawable(customNativeAd.getImage("MainImage").getDrawable());
    imageView.setOnClickListener(
        new View.OnClickListener() {
          @Override
          public void onClick(View v) {
            customNativeAd.performClick("MainImage");
          }
        });
    customNativeAdBinding.mediaPlaceholder.addView(imageView);

    // Render the ad choices icon.
    renderAdChoices(customNativeAd);

    // Record an impression.
    customNativeAd.recordImpression();
  }
}
कस्टम नेटिव विज्ञापन फ़ॉर्मैट के लिए नेटिव वीडियो
कस्टम फ़ॉर्मैट बनाते समय, आपके पास फ़ॉर्मैट को वीडियो के लिए ज़रूरी शर्तें पूरी करने वाला बनाने का विकल्प होता है.
ऐप्लिकेशन में लागू करने के लिए, मीडिया कॉन्टेंट पाने के लिए CustomNativeAd.getMediaContent() का इस्तेमाल किया जा सकता है. इसके बाद, मीडिया व्यू पर मीडिया कॉन्टेंट सेट करने के लिए, setMediaContent() पर कॉल करें.
अगर विज्ञापन में null मीडिया कॉन्टेंट है, तो वीडियो के बिना विज्ञापन दिखाने के लिए अन्य प्लान बनाएं.
यहां दिए गए उदाहरण में यह देखा जाता है कि विज्ञापन में वीडियो कॉन्टेंट है या नहीं. अगर वीडियो उपलब्ध नहीं है, तो उसकी जगह इमेज दिखाई जाती है:
Kotlin
private fun displayVideoCustomNativeAd(customNativeAd: CustomNativeAd, context: Context) {
  // Check whether the custom native ad has video content.
  val mediaContent = customNativeAd.mediaContent
  if (mediaContent != null && mediaContent.hasVideoContent) {
    // Render the media content in a MediaView.
    val mediaView = MediaView(context)
    mediaView.mediaContent = mediaContent
    customNativeAdBinding.mediaPlaceholder.addView(mediaView)
  } else {
    // Fall back to other assets defined on your custom native ad.
    val imageView = ImageView(context)
    imageView.adjustViewBounds = true
    imageView.setImageDrawable(customNativeAd.getImage("MainImage")?.drawable)
    customNativeAdBinding.mediaPlaceholder.addView(imageView)
  }

  // Record an impression.
  customNativeAd.recordImpression()
}
Java
private void displayVideoCustomNativeAd(CustomNativeAd customNativeAd, Context context) {
  // Check whether the custom native ad has video content.
  MediaContent mediaContent = customNativeAd.getMediaContent();
  if (mediaContent != null && mediaContent.getHasVideoContent()) {
    // Render the media content in a MediaView.
    MediaView mediaView = new MediaView(context);
    mediaView.setMediaContent(mediaContent);
    customNativeAdBinding.mediaPlaceholder.addView(mediaView);
  } else {
    // Fall back to other assets defined on your custom native ad.
    ImageView imageView = new ImageView(context);
    imageView.setAdjustViewBounds(true);
    imageView.setImageDrawable(customNativeAd.getImage("MainImage").getDrawable());
    customNativeAdBinding.mediaPlaceholder.addView(imageView);
  }

  // Record an impression.
  customNativeAd.recordImpression();
}
कस्टम नेटिव विज्ञापन के वीडियो अनुभव को अपनी पसंद के मुताबिक बनाने के तरीके के बारे में ज़्यादा जानने के लिए, वीडियो विज्ञापन देखें.
AdChoices आइकॉन रेंडर करना
डिजिटल सर्विसेज़ ऐक्ट (डीएसए) का पालन करने के लिए, यूरोपियन इकनॉमिक एरिया (ईईए) में रिज़र्वेशन करके दिखाए जाने वाले विज्ञापनों में AdChoices आइकॉन और Google के 'विज्ञापन के बारे में जानकारी' पेज का लिंक शामिल होना चाहिए. कस्टम नेटिव विज्ञापन लागू करते समय, AdChoices आइकॉन को रेंडर करने की ज़िम्मेदारी आपकी होती है. हमारा सुझाव है कि मुख्य विज्ञापन ऐसेट रेंडर करते समय, AdChoices आइकॉन को रेंडर करने और उसके लिए क्लिक लिसनर सेट करने के लिए ज़रूरी कार्रवाई करें.
यहां दिए गए उदाहरण में यह माना गया है कि आपने AdChoices लोगो को होल्ड करने के लिए, व्यू हैरारकी में <ImageView /> एलिमेंट तय किया है.
<LinearLayout xmlns:android="http://schemas.android.com/apk/res/android">
    <ImageView
        android:id="@+id/adChoices"
        android:layout_width="15dp"
        android:layout_height="15dp"
        android:adjustViewBounds="true"
        android:contentDescription="AdChoices icon." />
</LinearLayout>
यहां दिए गए उदाहरण में, AdChoices आइकॉन को रेंडर करने और क्लिक करने पर होने वाली कार्रवाई को कॉन्फ़िगर करने का तरीका बताया गया है.
Kotlin
private fun renderAdChoices(customNativeAd: CustomNativeAd) {
  // Render the AdChoices image.
  val adChoiceAsset = customNativeAd.getImage(NativeAdAssetNames.ASSET_ADCHOICES_CONTAINER_VIEW)
  if (adChoiceAsset != null) {
    customNativeAdBinding.adchoices.setImageDrawable(adChoiceAsset.drawable)
    customNativeAdBinding.adchoices.visibility = View.VISIBLE
    customNativeAdBinding.adchoices.setOnClickListener {
      // Handle click. See the next section for more details.
      customNativeAd.performClick(NativeAdAssetNames.ASSET_ADCHOICES_CONTAINER_VIEW)
    }
  } else {
    customNativeAdBinding.adchoices.visibility = View.GONE
  }
}
Java
private void renderAdChoices(CustomNativeAd customNativeAd) {
  // Render the AdChoices image.
  Image adChoiceAsset =
      customNativeAd.getImage(NativeAdAssetNames.ASSET_ADCHOICES_CONTAINER_VIEW);
  if (adChoiceAsset != null) {
    if (customNativeAdBinding != null) {
      customNativeAdBinding.adchoices.setImageDrawable(adChoiceAsset.getDrawable());
      customNativeAdBinding.adchoices.setVisibility(View.VISIBLE);
      customNativeAdBinding.adchoices.setOnClickListener(
          new View.OnClickListener() {
            @Override
            public void onClick(View v) {
              // Handle click.
              customNativeAd.performClick(NativeAdAssetNames.ASSET_ADCHOICES_CONTAINER_VIEW);
            }
          });
    }
  } else {
    if (customNativeAdBinding != null) {
      customNativeAdBinding.adchoices.setVisibility(View.GONE);
    }
  }
}
इंप्रेशन रिकॉर्ड करना और क्लिक की रिपोर्ट करना
आपके ऐप्लिकेशन की यह ज़िम्मेदारी है कि वह इंप्रेशन रिकॉर्ड करे और क्लिक इवेंट की जानकारी, Google Mobile Ads SDK (बीटा वर्शन) को दे.
रिकॉर्ड किए गए इंप्रेशन
कस्टम नेटिव विज्ञापन के लिए इंप्रेशन रिकॉर्ड करने के लिए, विज्ञापन के recordImpression() तरीके को कॉल करें:
Kotlin
// Record an impression.
customNativeAd.recordImpression()
Java
// Record an impression.
customNativeAd.recordImpression();
अगर आपका ऐप्लिकेशन, एक ही विज्ञापन के लिए इस तरीके को गलती से दो बार कॉल करता है, तो SDK, एक ही अनुरोध के लिए डुप्लीकेट इंप्रेशन को अपने-आप रिकॉर्ड होने से रोकता है.
रिपोर्ट पर क्लिक करें
एसडीके को यह बताने के लिए कि ऐसेट व्यू पर क्लिक किया गया है, विज्ञापन के performClick() तरीके को कॉल करें. उस ऐसेट का नाम डालें जिस पर क्लिक किया गया था. इसके लिए, उसी स्ट्रिंग का इस्तेमाल करें जिसे आपने Ad Manager के यूज़र इंटरफ़ेस (यूआई) में तय किया था.
Kotlin
imageView.setOnClickListener { customNativeAd.performClick("MainImage") }
Java
imageView.setOnClickListener(
    new View.OnClickListener() {
      @Override
      public void onClick(View v) {
        customNativeAd.performClick("MainImage");
      }
    });
ध्यान दें कि आपको अपने विज्ञापन से जुड़े हर व्यू के लिए, इस तरीके को कॉल करने की ज़रूरत नहीं है. अगर आपके पास "कैप्शन" नाम का कोई दूसरा फ़ील्ड था, जिसे दिखाया जाना था, लेकिन उपयोगकर्ता को उस पर क्लिक या टैप नहीं करना था, तो आपके ऐप्लिकेशन को उस ऐसेट के व्यू के लिए performClick को कॉल करने की ज़रूरत नहीं होगी.
कस्टम क्लिक कार्रवाइयों का जवाब देना
कस्टम फ़ॉर्मैट वाले विज्ञापन पर क्लिक करने पर, SDK टूल से तीन तरह के जवाब मिल सकते हैं. ये जवाब इस क्रम में मिलते हैं:
- अगर कोई फ़ंक्शन दिया गया है, तो
OnCustomClickListenerको कॉल करें. - विज्ञापन के हर डीप लिंक यूआरएल के लिए, कॉन्टेंट रिज़ॉल्वर का पता लगाएं और रिज़ॉल्व करने वाले पहले कॉन्टेंट रिज़ॉल्वर को शुरू करें.
- कोई ब्राउज़र खोलें और विज्ञापन के डेस्टिनेशन यूआरएल पर जाएं.
कस्टम क्लिक ऐक्शन लागू करने के लिए, OnCustomClickListener दें:
Kotlin
customNativeAd.onCustomClickListener =
  object : OnCustomClickListener {
    override fun onCustomClick(assetName: String) {
      // Perform your custom action.
    }
  }
Java
customNativeAd.setOnCustomClickListener(
    new OnCustomClickListener() {
      @Override
      public void onCustomClick(@NonNull String assetName) {
        // Perform your custom action.
      }
    });
शुरुआत में, यह अजीब लग सकता है कि कस्टम क्लिक लिसनर मौजूद हैं. आखिरकार, आपके ऐप्लिकेशन ने एसडीके को सिर्फ़ यह बताया है कि क्लिक हुआ है. इसलिए, एसडीके को ऐप्लिकेशन को यह रिपोर्ट क्यों करनी चाहिए?
जानकारी का यह फ़्लो कई वजहों से काम का है. हालांकि, सबसे अहम बात यह है कि इससे एसडीके को क्लिक के जवाब को कंट्रोल करने की अनुमति मिलती है. यह क्रिएटिव के लिए सेट किए गए तीसरे पक्ष के ट्रैकिंग यूआरएल को अपने-आप पिंग कर सकता है. उदाहरण के लिए, यह बिना किसी अतिरिक्त कोड के, बैकग्राउंड में अन्य टास्क मैनेज कर सकता है.