

このページでは、YouTube Data API にリクエストを行う簡単な iOS アプリケーションをすばやく作成する方法について説明します。このサンプルでは、GoogleDevelopers YouTube チャンネルに関するデータを取得する方法を示します。また、現在のユーザーの YouTube チャンネルに関するデータを取得するようにクエリを変更する方法を説明するコメントも含まれています。
前提条件
このクイックスタートを実行するには、次のものが必要です。
ステップ 1: YouTube Data API を有効にする
-
このウィザード を使用して、Google Developers Console でプロジェクトを作成または選択し、 API を自動的に有効にします。[**続行**]、 [**認証情報に移動**] の順にクリックします。
-
[認証情報を作成] ページで、 [キャンセル] ボタンをクリックします。
-
ページの上部で、[OAuth 同意画面] タブを選択します。 [**メールアドレス**] を選択し、[**商品名**] が設定されていない場合は入力して、[**保存**] ボタンをクリックします。
-
[認証情報] タブを選択し、[認証情報を作成] ボタンをクリックして [OAuth クライアント ID] を選択します。
- アプリケーション タイプ [iOS] を選択し、「YouTube Data API
Quickstart」という名前、バンドル ID
com.example.QuickstartAppを入力して、[作成] ボタンをクリックします。
ステップ 2: ワークスペースを準備する
- Xcode を開き、新しいプロジェクトを作成します。
- [File > New > Project] をクリックし、[iOS > Application > Single View Application] テンプレートを選択して、[Next] をクリックします。
- [Product Name] を「QuickstartApp」、[Organization Identifier]
を「com.example」、[Language] を
[Objective-C]に設定します。
組織識別子の下に、ステップ
1.bで入力した [iOS バンドル ID]
(
com.example.QuickstartApp)と一致する生成された [バンドル ID]が表示されます。 - [Next] をクリックします。
- プロジェクトの宛先ディレクトリを選択して、[Create] をクリックします。
- [File > Close Project] をクリックしてプロジェクトを閉じます。
- ターミナル ウィンドウを開き、先ほど作成した
QuickstartApp.xcodeprojファイルを含むディレクトリに移動します。 次のコマンドを実行して、Podfile を作成し、ライブラリをインストールして、作成された XCode プロジェクトを開きます。
cat << EOF > Podfile &&
platform :ios, '8.0'
target 'QuickstartApp' do
    pod 'GoogleAPIClientForREST/YouTube', '~> 1.2.1'
    pod 'Google/SignIn', '~> 3.0.3'
end
EOF
pod install &&
open QuickstartApp.xcworkspace
XCode プロジェクト ナビゲータで、プロジェクト ノード「QuickstartApp」を選択します。 [File > Add files to "QuickstartApp"] メニュー項目をクリックします。
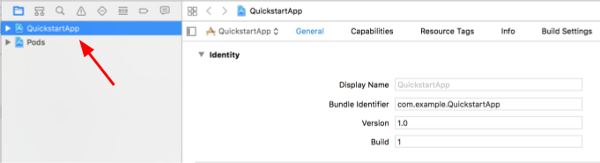
先ほどダウンロードした
GoogleService-Info.plistファイルを見つけて選択します。 [Options] ボタンをクリックします。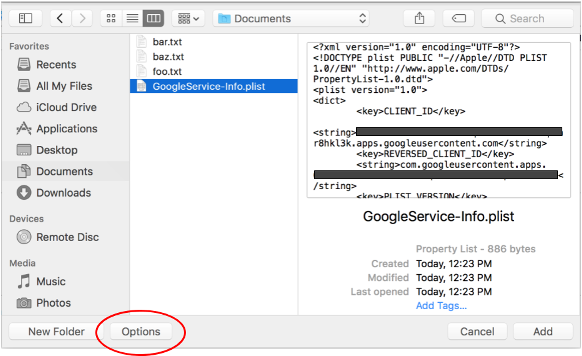
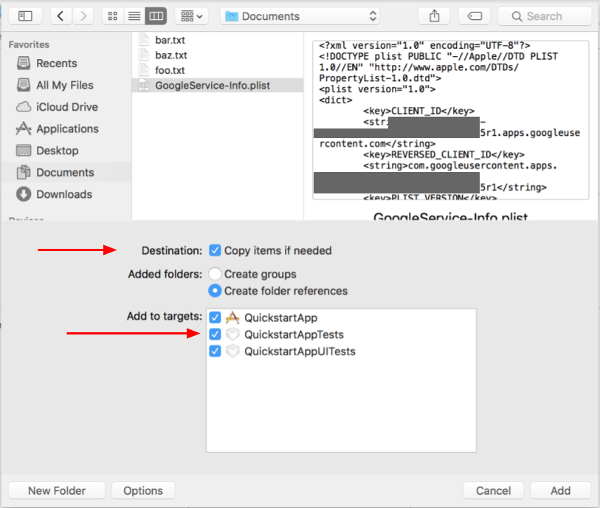
オプション ウィンドウで次の選択を行い、[Add] ボタンをクリックします。
- [Copy items if needed] チェックボックスをオンにします。
- [Add to targets] セクションに表示されているすべてのターゲットをオンにします。
プロジェクト ノードが選択された状態で、次の 2 つの画像に示すように、[TARGETS] セクションで [QuickstartApp] を選択します。
このスクリーンショットに示す領域をクリックします:
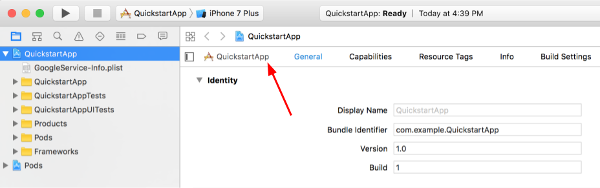
適切なターゲットを選択します。
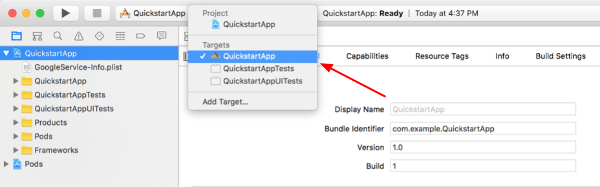
[Info] タブを選択し、[URL Types] セクションを開きます。
[+] ボタンをクリックし、反転クライアント ID の [URL スキーム] を追加します。この値を確認するには、ステップ 2.f で選択した
GoogleService-Info.plist構成ファイルを開きます。[REVERSED_CLIENT_ID] キーを探します。見つかったキーの値をコピーし、構成ページの [URL スキーム] ボックスに貼り付けます。その他の入力欄は空白にしておきます。プロジェクトを再ビルドします。
- [Product > Clean Build Folder](option キーを押しながら)をクリックします。
- [Product > Build] をクリックします。
ステップ 3: サンプルを設定する
次のファイルの内容を、提供されたコードに置き換えます。#import <UIKit/UIKit.h> @import GoogleSignIn; @interface AppDelegate : UIResponder <UIApplicationDelegate> @property (strong, nonatomic) UIWindow *window; @end
#import "AppDelegate.h"

@implementation AppDelegate

- (BOOL)application:(UIApplication *)application
didFinishLaunchingWithOptions:(NSDictionary *)launchOptions {
    // Initialize Google sign-in.
    [GIDSignIn sharedInstance].clientID = @"<YOUR_CLIENT_ID>";

    return YES;
}

- (BOOL)application:(UIApplication *)application
            openURL:(NSURL *)url
  sourceApplication:(NSString *)sourceApplication
         annotation:(id)annotation {
    return [[GIDSignIn sharedInstance] handleURL:url
                               sourceApplication:sourceApplication
                                      annotation:annotation];
}


@end
#import <UIKit/UIKit.h>
@import GoogleSignIn;
#import <GTLRYouTube.h>

@interface ViewController : UIViewController <GIDSignInDelegate, GIDSignInUIDelegate>

@property (nonatomic, strong) IBOutlet GIDSignInButton *signInButton;
@property (nonatomic, strong) UITextView *output;
@property (nonatomic, strong) GTLRYouTubeService *service;


@end
#import "ViewController.h"

@implementation ViewController

- (void)viewDidLoad {
    [super viewDidLoad];
    // Configure Google Sign-in.
    GIDSignIn* signIn = [GIDSignIn sharedInstance];
    signIn.delegate = self;
    signIn.uiDelegate = self;
    signIn.scopes = [NSArray arrayWithObjects:kGTLRAuthScopeYouTubeReadonly, nil];
    [signIn signInSilently];

    // Add the sign-in button.
    self.signInButton = [[GIDSignInButton alloc] init];
    [self.view addSubview:self.signInButton];

    // Create a UITextView to display output.
    self.output = [[UITextView alloc] initWithFrame:self.view.bounds];
    self.output.editable = false;
    self.output.contentInset = UIEdgeInsetsMake(20.0, 0.0, 20.0, 0.0);
    self.output.autoresizingMask = UIViewAutoresizingFlexibleHeight | UIViewAutoresizingFlexibleWidth;
    self.output.hidden = true;
    [self.view addSubview:self.output];

    // Initialize the service object.
    self.service = [[GTLRYouTubeService alloc] init];
}

- (void)signIn:(GIDSignIn *)signIn
didSignInForUser:(GIDGoogleUser *)user
     withError:(NSError *)error {
    if (error != nil) {
        [self showAlert:@"Authentication Error" message:error.localizedDescription];
        self.service.authorizer = nil;
    } else {
        self.signInButton.hidden = true;
        self.output.hidden = false;
        self.service.authorizer = user.authentication.fetcherAuthorizer;
        [self fetchChannelResource];
    }
}


// Construct a query and retrieve the channel resource for the GoogleDevelopers
// YouTube channel. Display the channel title, description, and view count.
- (void)fetchChannelResource {
    GTLRYouTubeQuery_ChannelsList *query =
    [GTLRYouTubeQuery_ChannelsList queryWithPart:@"snippet,statistics"];
  query.identifier = @"UC_x5XG1OV2P6uZZ5FSM9Ttw";
  // To retrieve data for the current user's channel, comment out the previous
  // line (query.identifier ...) and uncomment the next line (query.mine ...).
  // query.mine = true;

  [self.service executeQuery:query
                    delegate:self
           didFinishSelector:@selector(displayResultWithTicket:finishedWithObject:error:)];
}

// Process the response and display output
- (void)displayResultWithTicket:(GTLRServiceTicket *)ticket
             finishedWithObject:(GTLRYouTube_ChannelListResponse *)channels
                          error:(NSError *)error {
  if (error == nil) {
    NSMutableString *output = [[NSMutableString alloc] init];
    if (channels.items.count > 0) {
      [output appendString:@"Channel information:\n"];
      for (GTLRYouTube_Channel *channel in channels) {
        NSString *title = channel.snippet.title;
        NSString *description = channel.snippet.description;
        NSNumber *viewCount = channel.statistics.viewCount;
        [output appendFormat:@"Title: %@\nDescription: %@\nViewCount: %@\n", title, description, viewCount];
      }
    } else {
      [output appendString:@"Channel not found."];
    }
    self.output.text = output;
  } else {
    [self showAlert:@"Error" message:error.localizedDescription];
  }
}


// Helper for showing an alert
- (void)showAlert:(NSString *)title message:(NSString *)message {
    UIAlertController *alert =
    [UIAlertController alertControllerWithTitle:title
                                        message:message
                                 preferredStyle:UIAlertControllerStyleAlert];
    UIAlertAction *ok =
    [UIAlertAction actionWithTitle:@"OK"
                             style:UIAlertActionStyleDefault
                           handler:^(UIAlertAction * action)
     {
         [alert dismissViewControllerAnimated:YES completion:nil];
     }];
    [alert addAction:ok];
    [self presentViewController:alert animated:YES completion:nil];
}


@end
ステップ 4: サンプルを実行する
[Product > Scheme > QuickstartApp] をクリックして [QuickstartApp] スキームに切り替え、デバイス シミュレータまたは構成済みのデバイスを使用してサンプル(Cmd+R)を実行します。サンプルを初めて実行するときに、Google アカウントにログインしてアクセスを承認するよう求められます。
メモ
- 認可情報はキーチェーンに保存されるため、以降の実行では認可を求められません。