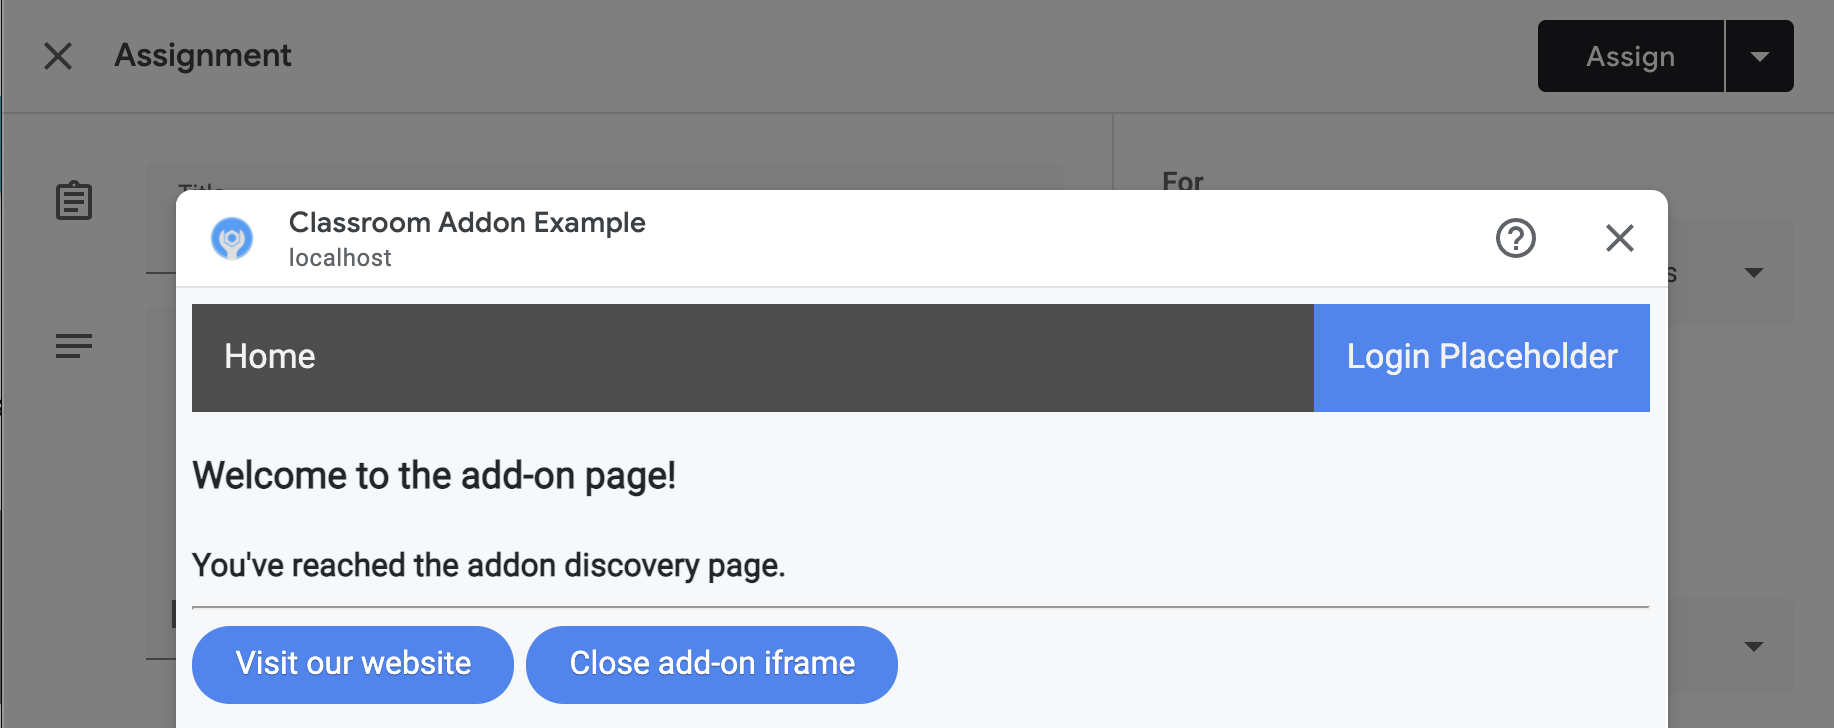
這是 Classroom 外掛程式導覽系列中的第一個導覽。
在本逐步導覽中,您將為開發網頁應用程式奠定基礎,並將其發布為 Classroom 外掛程式。日後的導覽步驟會展開這個應用程式。
在本逐步操作說明中,您將完成下列事項:
- 為外掛程式建立新的 Google Cloud 專案。
- 建立含有登入按鈕預留位置的網頁應用程式架構。
- 發布外掛程式的 Google Workspace Marketplace 商店資訊。
完成後,您就可以安裝外掛程式,並在 Classroom 外掛程式 iframe 中載入。
必要條件
選擇語言,查看適用的先決條件:
Python
我們的 Python 範例使用 Flask 架構。您可以從「總覽」頁面下載所有逐步解說的完整原始碼。您可以在 /flask/01-basic-app/ 目錄中找到這個特定逐步解說的程式碼。
如有需要,請安裝 Python 3.7 以上版本,並確認 pip 可用。
python -m ensurepip --upgrade我們也建議您設定並啟用新的 Python 虛擬環境。
python3 -m venv .classroom-addon-envsource .classroom-addon-env/bin/activate
下載範例中的每個逐步解說子目錄都包含 requirements.txt。您可以使用 pip 快速安裝必要程式庫。使用下列指令,為本逐步解說安裝必要的程式庫。
cd flask/01-basic-apppip install -r requirements.txt
Node.js
我們的 Node.js 範例使用 Express 架構。您可以從「總覽」頁面下載所有逐步解說的完整原始碼。
如有需要,請安裝 NodeJS v16.13 以上版本。
使用 npm 安裝必要的節點模組。
npm installJava
我們的 Java 範例使用 Spring Boot 架構。您可以從「總覽」頁面下載所有逐步解說的完整原始碼。
如果電腦尚未安裝 Java 11 以上版本,請先完成安裝。
Spring Boot 應用程式可以使用 Gradle 或 Maven 處理建構作業及管理依附元件。這個範例包含 Maven 包裝函式,可確保建構作業順利完成,您不必安裝 Maven 本身。
如要執行我們提供的範例,請在下載專案的目錄中執行下列指令,確保您具備執行專案的必要條件。
java --version./mvnw --version
或在 Windows 執行下列指令:
java -versionmvnw.cmd --version
設定 Google Cloud 專案
Classroom API 的存取權和必要驗證方法是由 Google Cloud 專案控管。以下操作說明會引導您完成建立及設定新專案的基本步驟,以便搭配外掛程式使用。
建立專案
前往專案建立頁面,建立新的 Google Cloud 專案。您可以為新專案提供任何名稱。點選「建立」。
建立新專案需要一些時間。完成後,請務必選取專案。您可以在畫面頂端的專案選取器下拉式選單中選擇專案,或按一下右上角通知選單中的「選取專案」。

將 Google Workspace Marketplace SDK 附加至 Google Cloud 專案
前往「API Library」(API 程式庫) 瀏覽器。搜尋 Google Workspace Marketplace SDK。結果清單中應會顯示 SDK。

選取 Google Workspace Marketplace SDK 資訊卡,然後按一下「啟用」。
設定 Google Workspace Marketplace SDK
Google Workspace Marketplace 會提供清單,供使用者和管理員安裝您的外掛程式。設定 Marketplace SDK 的「應用程式設定」和「商店資訊」,以及「OAuth 同意畫面」,然後繼續操作。
應用程式設定
前往 Marketplace SDK 的「應用程式設定」頁面。 用下列資訊作答:
將「應用程式顯示設定」設為
Public或Private。- 公開設定適用於最終會向使用者發布的應用程式。公開應用程式必須經過核准程序,才能發布給使用者,但您可以指定使用者安裝及測試草稿。這是發布前的狀態,您可以在送交審核前測試及開發外掛程式。
- 私密設定適合用於內部測試和開發。只有與專案建立者位於同一網域的使用者,才能安裝私人應用程式。因此,只有在網域已訂閱 Google Workspace for Education 服務時,才應將瀏覽權限設為「私人」,否則測試使用者將無法啟動 Classroom 外掛程式。
如要限制只有網域管理員可以安裝,請將「安裝設定」設為
Admin Only install。在「應用程式整合」下方,選取「Classroom 外掛程式」。系統會提示您輸入安全附件設定 URI。使用者開啟外掛程式時,系統會載入這個網址。在本逐步操作說明中,這個值應為
https://<your domain>/addon-discovery。「可使用的附件 URI 前置字串」會用來驗證
AddOnAttachment中設定的 URI,方法是使用courses.*.addOnAttachments.create和courses.*.addOnAttachments.patch方法。驗證是字串前置字元的比對,目前不允許使用萬用字元。至少要新增內容伺服器的根網域,例如https://localhost:5000/或https://cdn.myedtech.com/。新增與上一個步驟中 OAuth 同意畫面相同的 OAuth 範圍。
在「開發人員連結」下方,視貴機構情況填寫欄位。
商店資訊
前往 Marketplace SDK 的「商店資訊」頁面。 用下列資訊作答:
- 在「應用程式詳細資料」下方,新增語言或展開已列出語言旁的下拉式選單。提供應用程式名稱和說明,這些資訊會顯示在外掛程式的 Google Workspace Marketplace 商店資訊頁面。按一下「完成」即可儲存。
- 選擇外掛程式的類別。
- 在「圖像素材資源」下方,為必填欄位提供圖片。這些資訊稍後可以變更,目前可先使用預留位置。
- 在「支援連結」下方提供要求的網址。如果您在上一個步驟中將應用程式瀏覽權限設為「私人」,這些網址可以是預留位置。
如果您在上一個步驟中將應用程式顯示設定為「私人」,請按一下「發布」,應用程式就會立即開放安裝。如果將應用程式瀏覽權限設為「公開」,請在「草稿測試人員」區域中新增所有測試人員的電子郵件地址,然後按一下「儲存草稿」。
OAuth 同意畫面
使用者首次授權應用程式時,系統會顯示 OAuth 同意畫面,提示使用者允許應用程式存取個人和帳戶資訊,具體取決於您啟用的範圍。
- 將「使用者類型」設為「外部」。點選「建立」。
- 在下一個頁面中,填寫必要的應用程式詳細資料和聯絡資訊。 在「授權網域」下方提供代管應用程式的網域。按一下「儲存並繼續」。
新增網頁應用程式所需的任何 OAuth 範圍。如要深入瞭解範圍及其用途,請參閱 OAuth 設定指南。
您必須要求下列至少一個範圍,Google 才會傳送
login_hint查詢參數。如要進一步瞭解這項行為,請參閱 OAuth 設定指南:https://www.googleapis.com/auth/userinfo.email(已包含)https://www.googleapis.com/auth/userinfo.profile(已包含)
下列範圍是 Classroom 外掛程式專屬範圍:
https://www.googleapis.com/auth/classroom.addons.teacherhttps://www.googleapis.com/auth/classroom.addons.student
此外,請一併列出應用程式向使用者要求的其他Google API 範圍。
按一下 [儲存並繼續]。
在「測試使用者」頁面列出所有測試帳戶的電子郵件地址。 按一下「儲存並繼續」。
確認設定正確無誤,然後返回資訊主頁。
安裝外掛程式
現在只要使用 Marketplace SDK「商店資訊」頁面頂端的連結,即可安裝外掛程式。按一下頁面頂端的「在 Marketplace 中查看」,即可查看產品資訊,然後選擇「安裝」。
建構基本網頁應用程式
設定具有兩條路徑的骨架網頁應用程式。後續的逐步說明
請展開這個應用程式,因此目前只要為外掛程式建立到達網頁
/addon-discovery,以及「公司網站」的模擬索引頁面 / 即可。

實作下列兩個端點:
/:顯示歡迎訊息和按鈕,可同時關閉目前的分頁和外掛程式 iframe。/addon-discovery:顯示歡迎訊息和兩個按鈕:一個用於關閉外掛程式 iframe,另一個用於在新分頁中開啟網站。
請注意,我們新增了按鈕,用於建立及關閉視窗或 iframe。這些範例示範如何安全地將使用者帶往新分頁進行授權。
建立公用程式指令碼
建立 static/scripts 目錄。建立新檔案 addon-utils.js。新增下列兩個函式。
/**
 *   Opens a given destination route in a new window. This function uses
 *   window.open() so as to force window.opener to retain a reference to the
 *   iframe from which it was called.
 *   @param {string} destinationURL The endpoint to open, or "/" if none is
 *   provided.
 */
function openWebsiteInNewTab(destinationURL = '/') {
  window.open(destinationURL, '_blank');
}

/**
 *   Close the iframe by calling postMessage() in the host Classroom page. This
 *   function can be called directly when in a Classroom add-on iframe.
 *
 *   Alternatively, it can be used to close an add-on iframe in another window.
 *   For example, if an add-on iframe in Window 1 opens a link in a new Window 2
 *   using the openWebsiteInNewTab function, you can call
 *   window.opener.closeAddonIframe() from Window 2 to close the iframe in Window
 *   1.
 */
function closeAddonIframe() {
  window.parent.postMessage({
    type: 'Classroom',
    action: 'closeIframe',
  }, '*');
};
建立路線
實作 /addon-discovery 和 / 端點。
Python
設定應用程式目錄
為符合本範例的目的,請將應用程式邏輯建構為 Python 模組。這是我們提供的範例中的 webapp 目錄。
建立伺服器模組的目錄,例如 webapp。將 static 目錄移至模組目錄。在模組目錄中建立 template 目錄,HTML 檔案會放在這裡。
建構伺服器模組*
在模組目錄中建立 __init__.py 檔案,然後新增下列匯入項目和宣告。
from flask import Flask
import config

app = Flask(__name__)
app.config.from_object(config.Config)

# Load other module script files. This import statement refers to the
# 'routes.py' file described below.
from webapp import routes
接著,建立檔案來處理網頁應用程式的路徑。在我們提供的範例中,這是 webapp/routes.py。在這個檔案中實作這兩個路徑。
from webapp import app
import flask

@app.route("/")
def index():
    return flask.render_template("index.html",
                                message="You've reached the index page.")

@app.route("/classroom-addon")
def classroom_addon():
    return flask.render_template(
        "addon-discovery.html",
        message="You've reached the addon discovery page.")
請注意,我們的路徑都會將 message 變數傳遞至各自的 Jinja 範本。這項資訊有助於判斷使用者到達的網頁。
建立設定和啟動檔案
在應用程式的根目錄中,建立 main.py 和 config.py 檔案。在 config.py 中設定密鑰。
import os

class Config(object):
    # Note: A secret key is included in the sample so that it works.
    # If you use this code in your application, replace this with a truly secret
    # key. See https://flask.palletsprojects.com/quickstart/#sessions.
    SECRET_KEY = os.environ.get(
        'SECRET_KEY') or "REPLACE ME - this value is here as a placeholder."
在 main.py 檔案中匯入模組,並啟動 Flask 伺服器。
from webapp import app

if __name__ == "__main__":
    # Run the application over HTTPs with a locally stored certificate and key.
    # Defaults to https://localhost:5000.
    app.run(
        host="localhost",
        ssl_context=("localhost.pem", "localhost-key.pem"),
        debug=True)
Node.js
在 app.js 檔案中註冊路徑,程式碼如下:
const websiteRouter = require('./routes/index');
const addonRouter = require('./routes/classroom-addon');

app.use('/', websiteRouter);
app.use('/addon-discovery', addonRouter);
開啟 /01-basic-app/routes/index.js 並檢查程式碼。當使用者造訪公司網站時,就會抵達這個路徑。這個路徑會使用 index Handlebars 範本算繪回應,並將包含 title 和 message 變數的資料物件傳遞至範本。
router.get('/', function (req, res, next) {
  res.render('index', {
    title: 'Education Technology',
    message: 'Welcome to our website!'
  });
});
開啟第二條路徑 /01-basic-app/routes/classroom-addon.js 並檢查程式碼。使用者造訪外掛程式時,系統會抵達這條路徑。請注意,這個路徑使用 discovery Handlebars 範本,以及 addon.hbs 版面配置,以不同於公司網站的方式轉譯網頁。
router.get('/', function (req, res, next) {
  res.render('discovery', {
    layout: 'addon.hbs',
    title: 'Education Technology Classroom add-on',
    message: `Welcome.`
  });
});
Java
Java 程式碼範例會使用模組封裝循序逐步操作說明步驟。由於這是第一個逐步導覽,程式碼位於 step_01_basic_app 模組下方。我們不希望您使用模組實作專案,而是建議您在逐步導覽的每個步驟中,都以單一專案為基礎進行建構。
建立控制器類別 (在本範例專案中為 Controller.java),定義端點。在這個檔案中,從 spring-boot-starter-web 依附元件匯入 @GetMapping 註解。
import org.springframework.web.bind.annotation.GetMapping;
在類別定義上方加入 Spring 架構控制器註解,指出類別用途。
@org.springframework.stereotype.Controller
public class Controller {
然後實作這兩條路徑,以及一條用於錯誤處理的路徑。
/** Returns the index page that will be displayed when the add-on opens in a
*   new tab.
*   @param model the Model interface to pass error information that's
*   displayed on the error page.
*   @return the index page template if successful, or the onError method to
*   handle and display the error message.
*/
@GetMapping(value = {"/"})
public String index(Model model) {
  try {
    return "index";
  } catch (Exception e) {
    return onError(e.getMessage(), model);
  }
}

/** Returns the add-on discovery page that will be displayed when the iframe
*   is first opened in Classroom.
*   @param model the Model interface to pass error information that's
*   displayed on the error page.
*   @return the addon-discovery page.
*/
@GetMapping(value = {"/addon-discovery"})
public String addon_discovery(Model model) {
  try {
    return "addon-discovery";
  } catch (Exception e) {
    return onError(e.getMessage(), model);
  }
}

/** Handles application errors.
*   @param errorMessage message to be displayed on the error page.
*   @param model the Model interface to pass error information to display on
*   the error page.
*   @return the error page.
*/
@GetMapping(value = {"/error"})
public String onError(String errorMessage, Model model) {
  model.addAttribute("error", errorMessage);
  return "error";
}
測試外掛程式
啟動伺服器。然後以其中一位老師測試使用者身分登入 Google Classroom。前往「課堂作業」分頁,然後建立新的「作業」。從「外掛程式」挑選器中選取外掛程式。系統會開啟 iframe,外掛程式也會載入您在 Marketplace SDK 的「應用程式設定」頁面中指定的「附件設定 URI」。
恭喜!您已準備好進行下一個步驟:使用 Google 單一登入服務登入使用者。
