
이 가이드는 클래스룸 부가기능 가이드 시리즈의 네 번째 가이드입니다.
이 둘러보기에서는 Google 클래스룸 API와 상호작용하여 첨부파일을 만듭니다. 사용자가 첨부파일 콘텐츠를 볼 수 있는 경로를 제공합니다. 뷰는 수업에서 사용자의 역할에 따라 다릅니다. 이 둘러보기에서는 학생이 제출하지 않아도 되는 콘텐츠 유형 첨부파일을 다룹니다.
이 둘러보기에서는 다음을 완료합니다.
- 다음 부가기능 쿼리 매개변수를 검색하여 사용합니다.
addOnToken: 첨부파일 검색 뷰에 전달되는 승인 토큰입니다.itemId: 부가기능 첨부파일을 수신하는 CourseWork, CourseWorkMaterial 또는 Announcement의 고유 식별자입니다.itemType: 'courseWork', 'courseWorkMaterials' 또는 'announcement' 중 하나입니다.courseId: 과제가 생성되는 Google 클래스룸 수업의 고유 식별자입니다.attachmentId: 생성 후 Google 클래스룸에서 애드온 첨부파일에 할당한 고유 식별자입니다.
- 콘텐츠 유형 첨부파일의 영구 스토리지를 구현합니다.
- 첨부파일을 만들고 교사 보기 및 학생 보기 iframe을 제공하는 경로를 제공합니다.
- Google 클래스룸 부가기능 API에 다음 요청을 실행합니다.
- 새 첨부파일을 만듭니다.
- 로그인한 사용자가 학생인지 교사인지 식별하는 부가기능 컨텍스트를 가져옵니다.
완료되면 교사로 로그인한 상태에서 Google 클래스룸 UI를 통해 과제에 콘텐츠 유형 첨부파일을 만들 수 있습니다. 수업에 참여하는 교사와 학생도 콘텐츠를 볼 수 있습니다.
Classroom API 사용 설정
이 단계부터 클래스룸 API를 호출합니다. API를 호출하려면 먼저 Google Cloud 프로젝트에 API를 사용 설정해야 합니다. Google Classroom API 라이브러리 항목으로 이동하여 사용 설정을 선택합니다.
첨부파일 검색 보기 쿼리 매개변수 처리
앞서 설명한 대로 Google 클래스룸은 iframe에서 첨부파일 검색 뷰를 로드할 때 쿼리 매개변수를 전달합니다.
courseId: 현재 클래스룸 수업의 ID입니다.itemId: 부가기능 첨부파일을 수신하는 CourseWork, CourseWorkMaterial 또는 Announcement의 고유 식별자입니다.itemType: 'courseWork', 'courseWorkMaterials' 또는 'announcement' 중 하나입니다.addOnToken: 특정 클래스룸 부가기능 작업을 승인하는 데 사용되는 토큰입니다.login_hint: 현재 사용자의 Google ID입니다.
이 둘러보기에서는 courseId, itemId, itemType, addOnToken를 다룹니다.
Classroom API를 호출할 때 이를 유지하고 전달합니다.
이전 둘러보기 단계에서와 같이 전달된 쿼리 매개변수 값을 세션에 저장합니다. 첨부파일 검색 보기가 처음 열릴 때 이렇게 하는 것이 중요합니다. Classroom이 이러한 쿼리 매개변수를 전달할 수 있는 유일한 기회이기 때문입니다.
Python
첨부파일 검색 뷰의 경로를 제공하는 Flask 서버 파일로 이동합니다 (제공된 예시를 따르는 경우 attachment-discovery-routes.py). 제공된 예의 /classroom-addon와 같은 부가기능 방문 페이지 경로의 상단에서 courseId, itemId, itemType, addOnToken 쿼리 매개변수를 검색하고 저장합니다.
# Retrieve the itemId, courseId, and addOnToken query parameters.
if flask.request.args.get("itemId"):
    flask.session["itemId"] = flask.request.args.get("itemId")
if flask.request.args.get("itemType"):
    flask.session["itemType"] = flask.request.args.get("itemType")
if flask.request.args.get("courseId"):
    flask.session["courseId"] = flask.request.args.get("courseId")
if flask.request.args.get("addOnToken"):
    flask.session["addOnToken"] = flask.request.args.get("addOnToken")
이러한 값은 있는 경우에만 세션에 작성합니다. 사용자가 iframe을 닫지 않고 나중에 첨부파일 검색 뷰로 돌아가는 경우 다시 전달되지 않습니다.
콘텐츠 유형 첨부파일의 영구 저장소 추가
생성된 첨부파일의 로컬 기록이 필요합니다. 이를 통해 교사가 선택한 콘텐츠를 클래스룸에서 제공하는 식별자를 사용하여 조회할 수 있습니다.
Attachment의 데이터베이스 스키마를 설정합니다. Google에서 제공하는 예에서는 이미지와 설명을 보여주는 첨부파일을 보여줍니다. Attachment에는 다음 속성이 포함됩니다.
attachment_id: 첨부파일의 고유 식별자입니다. Classroom에서 할당하고 첨부파일을 생성할 때 응답으로 반환됩니다.image_filename: 표시할 이미지의 로컬 파일 이름입니다.image_caption: 이미지와 함께 표시할 설명입니다.
Python
이전 단계에서 SQLite 및 flask_sqlalchemy 구현을 확장합니다.
사용자 테이블을 정의한 파일로 이동합니다 (제공된 예시를 따르는 경우 models.py). 파일 하단의 User 클래스 아래에 다음을 추가합니다.
class Attachment(db.Model):
    # The attachmentId is the unique identifier for the attachment.
    attachment_id = db.Column(db.String(120), primary_key=True)

    # The image filename to store.
    image_filename = db.Column(db.String(120))

    # The image caption to store.
    image_caption = db.Column(db.String(120))
첨부 파일 처리 경로가 있는 서버 파일로 새 Attachment 클래스를 가져옵니다.
새 경로 설정
이 연습 단계를 시작하려면 애플리케이션에서 새 페이지를 설정하세요. 이를 통해 사용자는 Google Workspace 부가기능을 통해 콘텐츠를 만들고 볼 수 있습니다.
첨부파일 생성 경로 추가
교사가 콘텐츠를 선택하고 첨부파일 생성 요청을 발행할 수 있는 페이지가 필요합니다. 교사가 선택할 수 있는 콘텐츠 옵션을 표시하는 /attachment-options 경로를 구현합니다. 콘텐츠 선택 및 생성 확인 페이지용 템플릿도 필요합니다. Google에서 제공하는 예시에는 이러한 템플릿이 포함되어 있으며 Classroom API의 요청과 응답도 표시할 수 있습니다.
새 /attachment-options 페이지를 만드는 대신 기존 첨부파일 검색 보기 방문 페이지를 수정하여 콘텐츠 옵션을 표시할 수도 있습니다. 이 연습에서는 두 번째 연습 단계에서 구현된 SSO 동작(예: 앱 권한 취소)을 유지할 수 있도록 새 페이지를 만드는 것이 좋습니다. 이러한 도구는 부가기능을 빌드하고 테스트할 때 유용합니다.
교사는 Google에서 제공하는 예시에서 캡션이 있는 이미지의 작은 집합 중에서 선택할 수 있습니다. 파일 이름에서 캡션이 파생된 유명한 랜드마크의 이미지를 4개 제공했습니다.
Python
제공된 예시에서는 webapp/attachment_routes.py 파일에 있습니다.
@app.route("/attachment-options", methods=["GET", "POST"])
def attachment_options():
    """
    Render the attachment options page from the "attachment-options.html"
    template.

    This page displays a grid of images that the user can select using
    checkboxes.
    """

    # A list of the filenames in the static/images directory.
    image_filenames = os.listdir(os.path.join(app.static_folder, "images"))

    # The image_list_form_builder method creates a form that displays a grid
    # of images, checkboxes, and captions with a Submit button. All images
    # passed in image_filenames will be shown, and the captions will be the
    # title-cased filenames.

    # The form must be built dynamically due to limitations in WTForms. The
    # image_list_form_builder method therefore also returns a list of
    # attribute names in the form, which will be used by the HTML template
    # to properly render the form.
    form, var_names = image_list_form_builder(image_filenames)

    # If the form was submitted, validate the input and create the attachments.
    if form.validate_on_submit():

        # Build a dictionary that maps image filenames to captions.
        # There will be one dictionary entry per selected item in the form.
        filename_caption_pairs = construct_filename_caption_dictionary_list(
            form)

        # Check that the user selected at least one image, then proceed to
        # make requests to the Classroom API.
        if len(filename_caption_pairs) > 0:
            return create_attachments(filename_caption_pairs)
        else:
            return flask.render_template(
                "create-attachment.html",
                message="You didn't select any images.",
                form=form,
                var_names=var_names)

    return flask.render_template(
        "attachment-options.html",
        message=("You've reached the attachment options page. "
                "Select one or more images and click 'Create Attachment'."),
        form=form,
        var_names=var_names,
    )
그러면 다음과 유사한 '첨부파일 만들기' 페이지가 생성됩니다.
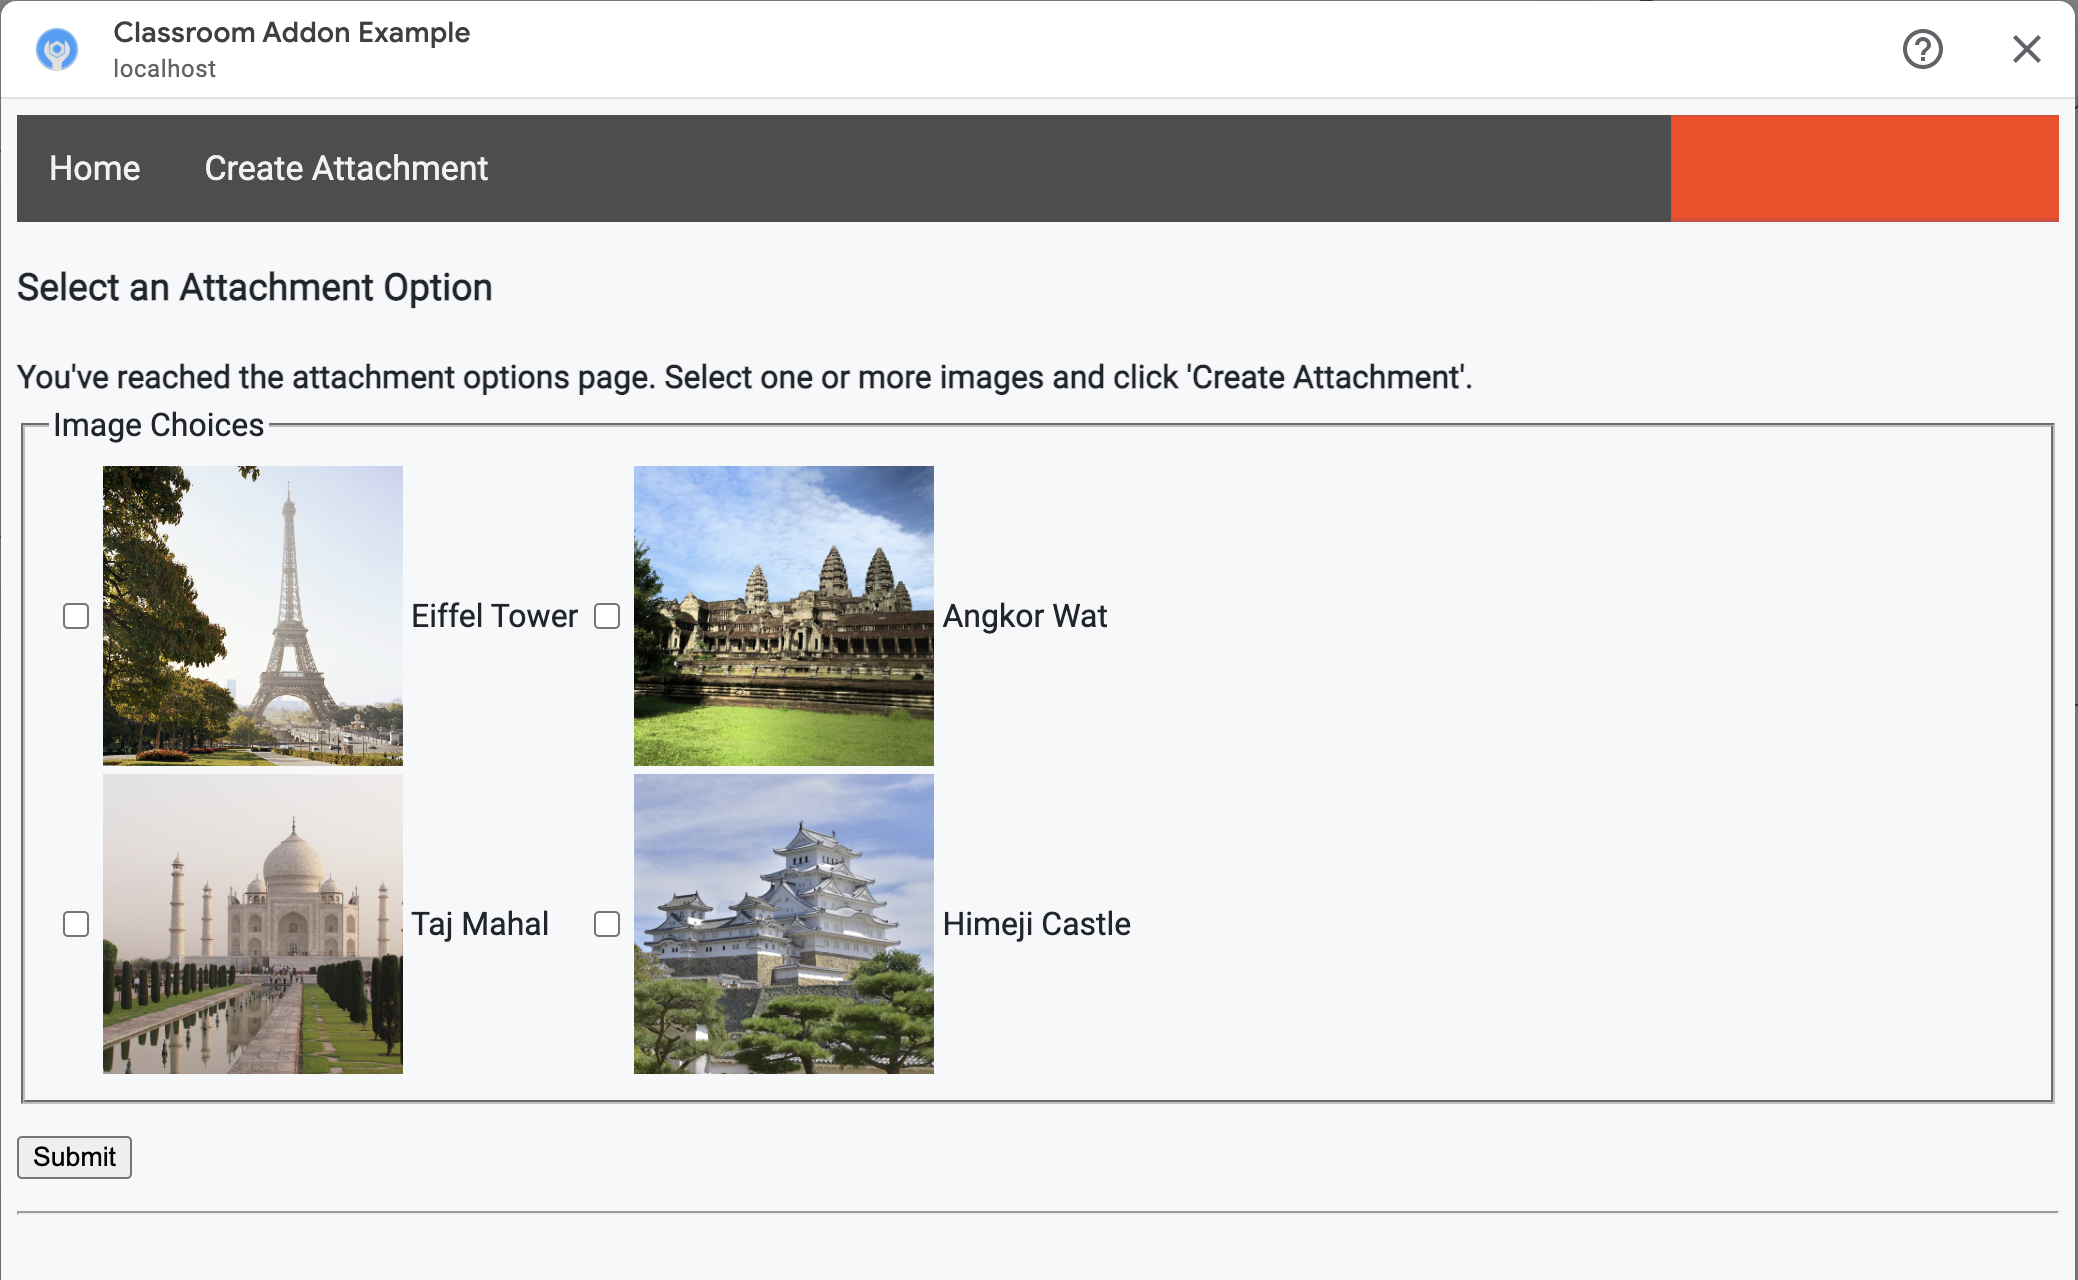
선생님은 이미지를 여러 개 선택할 수 있습니다. 교사가 create_attachments 메서드에서 선택한 각 이미지에 대해 하나의 첨부파일을 만듭니다.
문제 첨부파일 생성 요청
이제 교사가 첨부하려는 콘텐츠를 알았으므로 클래스룸 API에 요청을 발행하여 과제에 첨부파일을 만듭니다. 클래스룸 API에서 응답을 받은 후 데이터베이스에 첨부파일 세부정보를 저장합니다.
먼저 클래스룸 서비스의 인스턴스를 가져옵니다.
Python
제공된 예시에서는 webapp/attachment_routes.py 파일에 있습니다.
def create_attachments(filename_caption_pairs):
    """
    Create attachments and show an acknowledgement page.

    Args:
        filename_caption_pairs: A dictionary that maps image filenames to
            captions.
    """
    # Get the Google Classroom service.
    classroom_service = googleapiclient.discovery.build(
        serviceName="classroom",
        version="v1",
        credentials=credentials)
courses.courseWork.addOnAttachments 엔드포인트에 CREATE 요청을 실행합니다. 교사가 선택한 각 이미지에 대해 먼저 AddOnAttachment 객체를 구성합니다.
Python
제공된 예에서는 create_attachments 메서드의 연속입니다.
# Create a new attachment for each image that was selected.
attachment_count = 0
for key, value in filename_caption_pairs.items():
    attachment_count += 1

    # Create a dictionary with values for the AddOnAttachment object fields.
    attachment = {
        # Specifies the route for a teacher user.
        "teacherViewUri": {
            "uri":
                flask.url_for(
                    "load_content_attachment", _scheme='https', _external=True),
        },
        # Specifies the route for a student user.
        "studentViewUri": {
            "uri":
                flask.url_for(
                    "load_content_attachment", _scheme='https', _external=True)
        },
        # The title of the attachment.
        "title": f"Attachment {attachment_count}",
    }
각 첨부파일에 대해 teacherViewUri, studentViewUri, title 필드가 하나 이상 제공되어야 합니다. teacherViewUri 및 studentViewUri은 각 사용자 유형이 첨부파일을 열 때 로드되는 URL을 나타냅니다.
적절한 addOnAttachments 엔드포인트에 대한 요청의 본문에 AddOnAttachment 객체를 전송합니다. 각 요청에 courseId, itemId, itemType, addOnToken 식별자를 제공합니다.
Python
제공된 예에서는 create_attachments 메서드의 연속입니다.
# Use the itemType to determine which stream item type the teacher created
match flask.session["itemType"]:
    case "announcements":
        parent = classroom_service.courses().announcements()
    case "courseWorkMaterials":
        parent = classroom_service.courses().courseWorkMaterials()
    case _:
        parent = classroom_service.courses().courseWork()

# Issue a request to create the attachment.
resp = parent.addOnAttachments().create(
    courseId=flask.session["courseId"],
    itemId=flask.session["itemId"],
    addOnToken=flask.session["addOnToken"],
    body=attachment).execute()
나중에 올바른 콘텐츠를 로드할 수 있도록 로컬 데이터베이스에 이 첨부파일의 항목을 만듭니다. Classroom은 생성 요청에 대한 응답으로 고유한 id 값을 반환하므로 이를 데이터베이스의 기본 키로 사용합니다. 클래스룸은 교사 및 학생 보기를 열 때 attachmentId 쿼리 매개변수도 전달합니다.
Python
제공된 예에서는 create_attachments 메서드의 연속입니다.
# Store the value by id.
new_attachment = Attachment(
    # The new attachment's unique ID, returned in the CREATE response.
    attachment_id=resp.get("id"),
    image_filename=key,
    image_caption=value)
db.session.add(new_attachment)
db.session.commit()
이 시점에서 사용자를 확인 페이지로 라우팅하여 첨부파일을 성공적으로 만들었음을 알립니다.
부가기능의 첨부파일 허용
지금 Google Workspace Marketplace SDK의 앱 구성 페이지에 적절한 주소를 허용된 첨부파일 URI 접두사 필드에 추가하는 것이 좋습니다. 부가기능은 이 페이지에 나열된 URI 접두사 중 하나에서만 첨부파일을 만들 수 있습니다. 이는 중간자 공격의 가능성을 줄이기 위한 보안 조치입니다.
가장 간단한 방법은 이 필드에 최상위 도메인(예: https://example.com)을 제공하는 것입니다. 로컬 머신을 웹 서버로 사용하는 경우 https://localhost:<your port number>/이 작동합니다.
교사 및 학생 뷰의 경로 추가
Google 클래스룸 부가기능이 로드될 수 있는 iframe이 4개 있습니다. 지금까지는 첨부파일 검색 보기 iframe을 제공하는 경로만 빌드했습니다. 다음으로 교사 및 학생 뷰 iframe도 제공하는 경로를 추가합니다.
교사용 뷰 iframe은 학생 환경 미리보기를 표시하는 데 필요하지만, 원하는 경우 추가 정보나 수정 기능을 포함할 수 있습니다.
학생 보기는 학생이 부가기능 첨부파일을 열 때 각 학생에게 표시되는 페이지입니다.
이 실습에서는 교사 뷰와 학생 뷰를 모두 제공하는 단일 /load-content-attachment 경로를 만듭니다. 페이지가 로드될 때 클래스룸 API 메서드를 사용하여 사용자가 교사인지 학생인지 확인합니다.
Python
제공된 예시에서는 webapp/attachment_routes.py 파일에 있습니다.
@app.route("/load-content-attachment")
def load_content_attachment():
    """
    Load the attachment for the user's role."""

    # Since this is a landing page for the Teacher and Student View iframes, we
    # need to preserve the incoming query parameters.
    if flask.request.args.get("itemId"):
        flask.session["itemId"] = flask.request.args.get("itemId")
    if flask.request.args.get("itemType"):
        flask.session["itemType"] = flask.request.args.get("itemType")
    if flask.request.args.get("courseId"):
        flask.session["courseId"] = flask.request.args.get("courseId")
    if flask.request.args.get("attachmentId"):
        flask.session["attachmentId"] = flask.request.args.get("attachmentId")
이때 사용자를 인증해야 합니다. 여기에서 login_hint 쿼리 매개변수도 처리하고 필요한 경우 사용자를 승인 흐름으로 라우팅해야 합니다. 이 흐름에 관한 자세한 내용은 이전 둘러보기에서 설명한 로그인 안내 세부정보를 참고하세요.
그런 다음 항목 유형과 일치하는 getAddOnContext 엔드포인트에 요청을 보냅니다.
Python
제공된 예에서는 load_content_attachment 메서드의 연속입니다.
# Create an instance of the Classroom service.
classroom_service = googleapiclient.discovery.build(
    serviceName="classroom"
    version="v1",
    credentials=credentials)

# Use the itemType to determine which stream item type the teacher created
match flask.session["itemType"]:
    case "announcements":
        parent = classroom_service.courses().announcements()
    case "courseWorkMaterials":
        parent = classroom_service.courses().courseWorkMaterials()
    case _:
        parent = classroom_service.courses().courseWork()

addon_context_response = parent.getAddOnContext(
    courseId=flask.session["courseId"],
    itemId=flask.session["itemId"]).execute()
이 메서드는 수업에서 현재 사용자의 역할에 관한 정보를 반환합니다.
역할에 따라 사용자에게 표시되는 뷰를 변경합니다. studentContext 또는 teacherContext 필드 중 정확히 하나가 응답 객체에 채워집니다. 이를 검토하여 사용자에게 어떻게 응대할지 결정합니다.
어떤 경우든 attachmentId 쿼리 매개변수 값을 사용하여 데이터베이스에서 가져올 첨부파일을 확인합니다. 이 쿼리 매개변수는 교사 또는 학생 보기 URI를 열 때 제공됩니다.
Python
제공된 예에서는 load_content_attachment 메서드의 연속입니다.
# Determine which view we are in by testing the returned context type.
user_context = "student" if addon_context_response.get(
    "studentContext") else "teacher"

# Look up the attachment in the database.
attachment = Attachment.query.get(flask.session["attachmentId"])

# Set the text for the next page depending on the user's role.
message_str = f"I see that you're a {user_context}! "
message_str += (
    f"I've loaded the attachment with ID {attachment.attachment_id}. "
    if user_context == "teacher" else
    "Please enjoy this image of a famous landmark!")

# Show the content with the customized message text.
return flask.render_template(
    "show-content-attachment.html",
    message=message_str,
    image_filename=attachment.image_filename,
    image_caption=attachment.image_caption,
    responses=response_strings)
부가기능 테스트
첨부파일 생성을 테스트하려면 다음 단계를 완료하세요.
- 교사 테스트 사용자 중 한 명으로 [Google 클래스룸] 에 로그인합니다.
- 수업 과제 탭으로 이동하여 새 과제를 만듭니다.
- 텍스트 영역 아래에 있는 부가기능 버튼을 클릭한 다음 부가기능을 선택합니다. iframe이 열리고 부가기능이 Google Workspace Marketplace SDK의 앱 구성 페이지에서 지정한 첨부파일 설정 URI를 로드합니다.
- 과제에 첨부할 콘텐츠를 선택합니다.
- 첨부파일 생성 흐름이 완료되면 iframe을 닫습니다.
Google 클래스룸의 과제 생성 UI에 첨부파일 카드가 표시됩니다. 카드를 클릭하여 교사 보기 iframe을 열고 올바른 첨부파일이 표시되는지 확인합니다. 할당 버튼을 클릭합니다.
학생 환경을 테스트하려면 다음 단계를 완료하세요.
- 그런 다음 교사 테스트 사용자와 동일한 수업에서 학생 테스트 사용자로 클래스룸에 로그인합니다.
- '수업 과제' 탭에서 테스트 과제를 찾습니다.
- 과제를 펼치고 첨부파일 카드를 클릭하여 학생 보기 iframe을 엽니다.
학생에게 올바른 첨부파일이 표시되는지 확인합니다.
축하합니다. 이제 다음 단계인 활동 유형 첨부파일 만들기를 진행할 수 있습니다.