
यह Classroom के ऐड-ऑन के बारे में जानकारी देने वाली सीरीज़ का चौथा वॉकथ्रू है.
इस वॉकट्रू में, अटैचमेंट बनाने के लिए Google Classroom API के साथ इंटरैक्ट किया जाता है. उपयोगकर्ताओं को अटैचमेंट का कॉन्टेंट देखने के लिए, रास्ते उपलब्ध कराए जाते हैं. क्लास में उपयोगकर्ता की भूमिका के हिसाब से, व्यू अलग-अलग होते हैं. इस वॉकट्रू में कॉन्टेंट-टाइप अटैचमेंट के बारे में बताया गया है. इनके लिए छात्र-छात्राओं को कुछ भी सबमिट करने की ज़रूरत नहीं होती.
इस वॉकट्रू के दौरान, आपको ये काम करने होंगे:
- ऐड-ऑन के इन क्वेरी पैरामीटर को वापस पाएं और इनका इस्तेमाल करें:
addOnToken: यह एक अनुमति देने वाला टोकन है. इसे अटैचमेंट डिस्कवरी व्यू को पास किया जाता है.itemId: यह CourseWork, CourseWorkMaterial या Announcement के लिए यूनीक आइडेंटिफ़ायर होता है. इसमें ऐड-ऑन अटैचमेंट मिलता है.itemType: "courseWork", "courseWorkMaterials" या "announcement" में से कोई एक.courseId: यह Google Classroom में मौजूद उस कोर्स का यूनीक आइडेंटिफ़ायर होता है जिसमें असाइनमेंट बनाया जा रहा है.attachmentId: यह Google Classroom की ओर से असाइन किया गया एक यूनीक आइडेंटिफ़ायर है. इसे ऐड-ऑन अटैचमेंट बनाने के बाद असाइन किया जाता है.
- कॉन्टेंट-टाइप अटैचमेंट के लिए, स्थायी स्टोरेज लागू करें.
- अटैचमेंट बनाने के लिए रास्ते उपलब्ध कराता है. साथ ही, शिक्षक के लिए उपलब्ध व्यू और छात्र-छात्राओं के लिए उपलब्ध व्यू वाले iframe दिखाता है.
- Google Classroom के ऐड-ऑन वाले एपीआई को ये अनुरोध भेजें:
- नया अटैचमेंट बनाएं.
- ऐड-ऑन का कॉन्टेक्स्ट पाएं. इससे यह पता चलता है कि लॉग इन करने वाला उपयोगकर्ता छात्र-छात्रा है या शिक्षक.
इसके बाद, शिक्षक के तौर पर लॉगिन करके, Google Classroom के यूज़र इंटरफ़ेस (यूआई) के ज़रिए असाइनमेंट में कॉन्टेंट-टाइप अटैचमेंट बनाए जा सकते हैं. क्लास में शामिल शिक्षक और छात्र-छात्राएं भी कॉन्टेंट देख सकते हैं.
Classroom API चालू करना
इस चरण से Classroom API को कॉल करना शुरू करें. एपीआई को कॉल करने से पहले, उसे अपने Google Cloud प्रोजेक्ट के लिए चालू करना होगा. Google Classroom API की लाइब्रेरी एंट्री पर जाएं और चालू करें को चुनें.
Attachment Discovery View के क्वेरी पैरामीटर मैनेज करना
पहले बताया गया था कि Google Classroom, iframe में अटैचमेंट डिस्कवरी व्यू लोड करते समय क्वेरी पैरामीटर पास करता है:
courseId: मौजूदा Classroom कोर्स का आईडी.itemId: यह CourseWork, CourseWorkMaterial या Announcement के लिए यूनीक आइडेंटिफ़ायर होता है. इसमें ऐड-ऑन अटैचमेंट मिलता है.itemType: "courseWork", "courseWorkMaterials" या "announcement" में से कोई एक.addOnToken: इस टोकन का इस्तेमाल, Classroom ऐड-ऑन की कुछ कार्रवाइयों को अनुमति देने के लिए किया जाता है.login_hint: मौजूदा उपयोगकर्ता का Google आईडी.
इस वॉकट्रू में courseId, itemId, itemType, और addOnToken के बारे में बताया गया है.
Classroom API को कॉल करते समय, इन्हें बनाए रखें और पास करें.
पिछले वॉकट्रू चरण की तरह, पास की गई क्वेरी पैरामीटर वैल्यू को हमारे सेशन में सेव करें. जब अटैचमेंट डिस्कवरी व्यू पहली बार खोला जाता है, तब हमें ऐसा करना ज़रूरी होता है. ऐसा इसलिए, क्योंकि Classroom के पास इन क्वेरी पैरामीटर को पास करने का यही एक मौका होता है.
Python
अपनी फ़्लास्क सर्वर फ़ाइल पर जाएं. यह फ़ाइल, अटैचमेंट डिस्कवरी व्यू (attachment-discovery-routes.py अगर आपने हमारे दिए गए उदाहरण का इस्तेमाल किया है) के लिए रूट उपलब्ध कराती है. अपने ऐड-ऑन के लैंडिंग पेज के सबसे ऊपर (/classroom-addon हमारे दिए गए उदाहरण में), courseId, itemId, itemType, और addOnToken क्वेरी पैरामीटर पाएं और उन्हें सेव करें.
# Retrieve the itemId, courseId, and addOnToken query parameters.
if flask.request.args.get("itemId"):
    flask.session["itemId"] = flask.request.args.get("itemId")
if flask.request.args.get("itemType"):
    flask.session["itemType"] = flask.request.args.get("itemType")
if flask.request.args.get("courseId"):
    flask.session["courseId"] = flask.request.args.get("courseId")
if flask.request.args.get("addOnToken"):
    flask.session["addOnToken"] = flask.request.args.get("addOnToken")
इन वैल्यू को सेशन में सिर्फ़ तब लिखें, जब ये मौजूद हों. अगर उपयोगकर्ता iframe बंद किए बिना बाद में अटैचमेंट डिस्कवरी व्यू पर वापस आता है, तो इन्हें फिर से पास नहीं किया जाता.
कॉन्टेंट-टाइप अटैचमेंट के लिए परसिस्टेंट स्टोरेज की सुविधा जोड़ें
आपके पास बनाए गए किसी भी अटैचमेंट का स्थानीय रिकॉर्ड होना चाहिए. इससे आपको उस कॉन्टेंट को ढूंढने में मदद मिलती है जिसे शिक्षक ने Classroom से मिले आइडेंटिफ़ायर का इस्तेमाल करके चुना है.
Attachment के लिए डेटाबेस स्कीमा सेट अप करो. हमारे दिए गए उदाहरण में, ऐसे अटैचमेंट दिखाए गए हैं जिनमें इमेज और कैप्शन मौजूद है. Attachment में ये एट्रिब्यूट शामिल होते हैं:
attachment_id: अटैचमेंट के लिए यूनीक आइडेंटिफ़ायर. यह आईडी, Classroom असाइन करता है. अटैचमेंट बनाते समय, यह आईडी रिस्पॉन्स में दिखता है.image_filename: यह दिखाने के लिए इमेज का स्थानीय फ़ाइल नाम है.image_caption: इमेज के साथ दिखाने के लिए कैप्शन.
Python
पिछले चरणों में, SQLite और flask_sqlalchemy को लागू करने की प्रोसेस को आगे बढ़ाएं.
उस फ़ाइल पर जाएं जिसमें आपने उपयोगकर्ता टेबल को तय किया है (models.py
अगर आपको हमारा दिया गया उदाहरण देखना है). नीचे दी गई फ़ाइल में, User क्लास के नीचे यह कोड जोड़ें.
class Attachment(db.Model):
    # The attachmentId is the unique identifier for the attachment.
    attachment_id = db.Column(db.String(120), primary_key=True)

    # The image filename to store.
    image_filename = db.Column(db.String(120))

    # The image caption to store.
    image_caption = db.Column(db.String(120))
अटैचमेंट हैंडलिंग के रास्तों के साथ, सर्वर फ़ाइल में नई अटैचमेंट क्लास इंपोर्ट करें.
नए रूट सेट अप करना
इस वॉकट्रू को शुरू करने के लिए, हमारे ऐप्लिकेशन में कुछ नए पेज सेट अप करें. इन कुकी की मदद से, उपयोगकर्ता हमारे ऐड-ऑन के ज़रिए कॉन्टेंट बना और देख सकता है.
अटैचमेंट बनाने के रास्ते जोड़ना
आपको शिक्षक के लिए ऐसे पेज बनाने होंगे जिन पर वह कॉन्टेंट चुन सके और अटैचमेंट बनाने के अनुरोध कर सके. शिक्षक को कॉन्टेंट के विकल्प दिखाने के लिए, /attachment-options रूट लागू करें. आपको कॉन्टेंट चुनने और कॉन्टेंट बनाने की पुष्टि करने वाले पेजों के लिए भी टेंप्लेट की ज़रूरत होगी. हमने जो उदाहरण दिए हैं उनमें इनके लिए टेंप्लेट शामिल हैं. साथ ही, ये Classroom API से मिले अनुरोधों और जवाबों को भी दिखा सकते हैं.
ध्यान दें कि /attachment-options पेज बनाने के बजाय, कॉन्टेंट के विकल्प दिखाने के लिए अपने मौजूदा अटैचमेंट डिस्कवरी व्यू लैंडिंग पेज में बदलाव किया जा सकता है. हमारा सुझाव है कि इस अभ्यास के लिए, एक नया पेज बनाएं. इससे आपको दूसरे वॉकट्रू चरण में लागू किए गए एसएसओ के व्यवहार को बनाए रखने में मदद मिलेगी. जैसे, ऐप्लिकेशन की अनुमतियों को रद्द करना. ये आपके ऐड-ऑन को बनाने और उसकी जांच करने में मददगार साबित होंगे.
शिक्षक, हमारे दिए गए उदाहरण में कैप्शन वाली इमेज के छोटे सेट में से कोई इमेज चुन सकता है. हमने मशहूर जगहों की चार इमेज दी हैं. इनके कैप्शन, फ़ाइलों के नाम से लिए गए हैं.
Python
हमने जो उदाहरण दिया है उसमें यह webapp/attachment_routes.py फ़ाइल में है.
@app.route("/attachment-options", methods=["GET", "POST"])
def attachment_options():
    """
    Render the attachment options page from the "attachment-options.html"
    template.

    This page displays a grid of images that the user can select using
    checkboxes.
    """

    # A list of the filenames in the static/images directory.
    image_filenames = os.listdir(os.path.join(app.static_folder, "images"))

    # The image_list_form_builder method creates a form that displays a grid
    # of images, checkboxes, and captions with a Submit button. All images
    # passed in image_filenames will be shown, and the captions will be the
    # title-cased filenames.

    # The form must be built dynamically due to limitations in WTForms. The
    # image_list_form_builder method therefore also returns a list of
    # attribute names in the form, which will be used by the HTML template
    # to properly render the form.
    form, var_names = image_list_form_builder(image_filenames)

    # If the form was submitted, validate the input and create the attachments.
    if form.validate_on_submit():

        # Build a dictionary that maps image filenames to captions.
        # There will be one dictionary entry per selected item in the form.
        filename_caption_pairs = construct_filename_caption_dictionary_list(
            form)

        # Check that the user selected at least one image, then proceed to
        # make requests to the Classroom API.
        if len(filename_caption_pairs) > 0:
            return create_attachments(filename_caption_pairs)
        else:
            return flask.render_template(
                "create-attachment.html",
                message="You didn't select any images.",
                form=form,
                var_names=var_names)

    return flask.render_template(
        "attachment-options.html",
        message=("You've reached the attachment options page. "
                "Select one or more images and click 'Create Attachment'."),
        form=form,
        var_names=var_names,
    )
इससे "अटैचमेंट बनाएं" पेज जनरेट होता है. यह पेज इस तरह दिखता है:
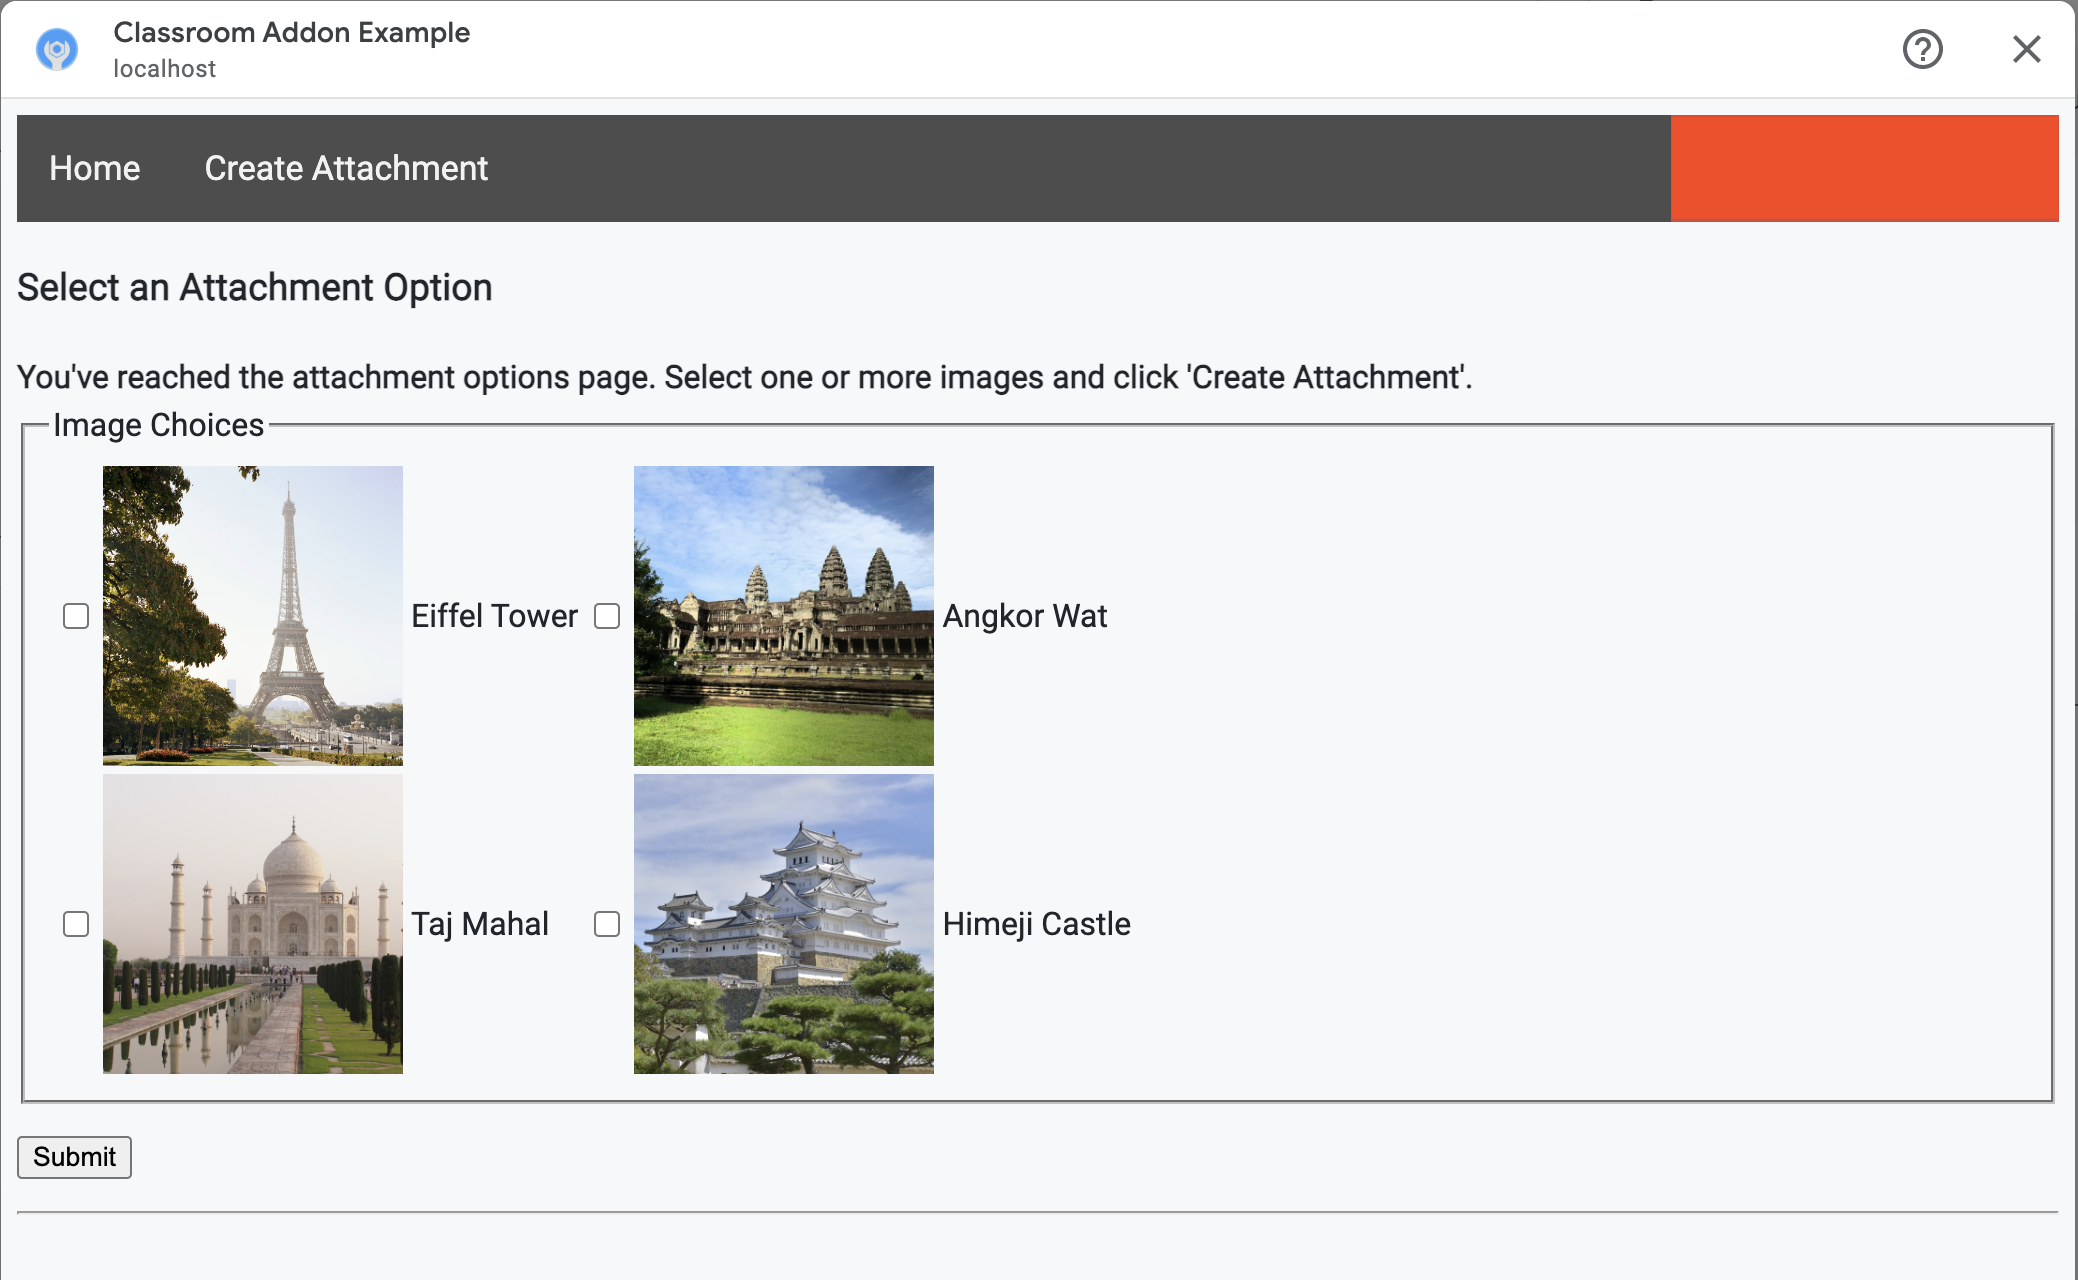
शिक्षक एक से ज़्यादा इमेज चुन सकता है. हर उस इमेज के लिए एक अटैचमेंट बनाएं जिसे शिक्षक ने create_attachments तरीके से चुना है.
अटैचमेंट बनाने के अनुरोध सबमिट करना
अब आपको पता चल गया है कि शिक्षक को कौनसे कॉन्टेंट अटैच करने हैं. इसलिए, Classroom API को अनुरोध भेजें, ताकि हमारे असाइनमेंट में अटैचमेंट बनाए जा सकें. Classroom API से जवाब मिलने के बाद, अटैचमेंट की जानकारी को अपने डेटाबेस में सेव करें.
Classroom सेवा का इंस्टेंस पाने के लिए, यह तरीका अपनाएं:
Python
हमने जो उदाहरण दिया है उसमें यह webapp/attachment_routes.py फ़ाइल में है.
def create_attachments(filename_caption_pairs):
    """
    Create attachments and show an acknowledgement page.

    Args:
        filename_caption_pairs: A dictionary that maps image filenames to
            captions.
    """
    # Get the Google Classroom service.
    classroom_service = googleapiclient.discovery.build(
        serviceName="classroom",
        version="v1",
        credentials=credentials)
courses.courseWork.addOnAttachments एंडपॉइंट पर CREATE अनुरोध भेजें. शिक्षक की चुनी गई हर इमेज के लिए, सबसे पहले एक AddOnAttachment ऑब्जेक्ट बनाएं:
Python
हमारे दिए गए उदाहरण में, यह create_attachments तरीके का इस्तेमाल जारी रखने का तरीका है.
# Create a new attachment for each image that was selected.
attachment_count = 0
for key, value in filename_caption_pairs.items():
    attachment_count += 1

    # Create a dictionary with values for the AddOnAttachment object fields.
    attachment = {
        # Specifies the route for a teacher user.
        "teacherViewUri": {
            "uri":
                flask.url_for(
                    "load_content_attachment", _scheme='https', _external=True),
        },
        # Specifies the route for a student user.
        "studentViewUri": {
            "uri":
                flask.url_for(
                    "load_content_attachment", _scheme='https', _external=True)
        },
        # The title of the attachment.
        "title": f"Attachment {attachment_count}",
    }
हर अटैचमेंट के लिए, कम से कम teacherViewUri, studentViewUri, और title फ़ील्ड की वैल्यू देना ज़रूरी है. teacherViewUri और studentViewUri, उन यूआरएल को दिखाते हैं जो अटैचमेंट को खोलने पर लोड होते हैं. हालांकि, ये यूआरएल उपयोगकर्ता के टाइप के हिसाब से अलग-अलग होते हैं.
अनुरोध के मुख्य हिस्से में मौजूद AddOnAttachment ऑब्जेक्ट को सही addOnAttachments एंडपॉइंट पर भेजें. हर अनुरोध के साथ courseId, itemId, itemType, और addOnToken आइडेंटिफ़ायर की वैल्यू दें.
Python
हमारे दिए गए उदाहरण में, यह create_attachments तरीके का इस्तेमाल जारी रखने का तरीका है.
# Use the itemType to determine which stream item type the teacher created
match flask.session["itemType"]:
    case "announcements":
        parent = classroom_service.courses().announcements()
    case "courseWorkMaterials":
        parent = classroom_service.courses().courseWorkMaterials()
    case _:
        parent = classroom_service.courses().courseWork()

# Issue a request to create the attachment.
resp = parent.addOnAttachments().create(
    courseId=flask.session["courseId"],
    itemId=flask.session["itemId"],
    addOnToken=flask.session["addOnToken"],
    body=attachment).execute()
अपने लोकल डेटाबेस में इस अटैचमेंट के लिए एक एंट्री बनाएं, ताकि बाद में सही कॉन्टेंट लोड किया जा सके. क्लासरूम, क्लास बनाने के अनुरोध के जवाब में एक यूनीक id वैल्यू दिखाता है. इसलिए, इसे हमारे डेटाबेस में प्राइमरी कुंजी के तौर पर इस्तेमाल करें. यह भी ध्यान दें कि Classroom, शिक्षक और छात्र-छात्राओं के व्यू खोलते समय attachmentId
query parameter पास करता है:
Python
हमारे दिए गए उदाहरण में, यह create_attachments तरीके का इस्तेमाल जारी रखने का तरीका है.
# Store the value by id.
new_attachment = Attachment(
    # The new attachment's unique ID, returned in the CREATE response.
    attachment_id=resp.get("id"),
    image_filename=key,
    image_caption=value)
db.session.add(new_attachment)
db.session.commit()
इस समय, उपयोगकर्ता को पुष्टि करने वाले पेज पर ले जाएं. साथ ही, यह पुष्टि करें कि अटैचमेंट बनाने की प्रोसेस पूरी हो गई है.
अपने ऐड-ऑन से अटैचमेंट भेजने की अनुमति देना
अब Google Workspace Marketplace SDK टूल के ऐप्लिकेशन कॉन्फ़िगरेशन पेज पर, 'अनुमति वाले अटैचमेंट के यूआरआई प्रीफ़िक्स' फ़ील्ड में सही पते जोड़ने का सही समय है. आपका ऐड-ऑन, इस पेज पर दिए गए यूआरआई प्रीफ़िक्स में से सिर्फ़ एक से अटैचमेंट बना सकता है. यह सुरक्षा से जुड़ा एक तरीका है. इससे मैन इन द मिडल हमलों की आशंका को कम करने में मदद मिलती है.
सबसे आसान तरीका यह है कि इस फ़ील्ड में अपना टॉप-लेवल डोमेन डालें. उदाहरण के लिए, https://example.com. अगर वेब सर्वर के तौर पर अपनी लोकल मशीन का इस्तेमाल किया जा रहा है, तो https://localhost:<your port number>/ काम करेगा.
शिक्षक और छात्र-छात्राओं के लिए रूट जोड़ना
ऐसे चार आईफ़्रेम होते हैं जिनमें Google Classroom का ऐड-ऑन लोड किया जा सकता है. आपने अब तक सिर्फ़ ऐसे रूट बनाए हैं जो अटैचमेंट डिस्कवरी व्यू iframe को दिखाते हैं. इसके बाद, Teacher और Student View iframe को भी सेवा देने के लिए, रूट जोड़ें.
छात्र-छात्राओं को मिलने वाले अनुभव की झलक दिखाने के लिए, शिक्षक के लिए उपलब्ध व्यू iframe का इस्तेमाल करना ज़रूरी है. हालांकि, इसमें अतिरिक्त जानकारी या बदलाव करने की सुविधाएं शामिल की जा सकती हैं.
छात्र-छात्राओं के लिए उपलब्ध व्यू वह पेज होता है जो हर छात्र-छात्रा को तब दिखता है, जब वे ऐड-ऑन अटैचमेंट खोलते हैं.
इस काम के लिए, एक ऐसा /load-content-attachment
रास्ता बनाएं जो शिक्षक और छात्र-छात्रा, दोनों के व्यू के लिए काम करे. पेज लोड होने पर, यह पता लगाने के लिए Classroom API के तरीकों का इस्तेमाल करें कि उपयोगकर्ता शिक्षक है या छात्र/छात्रा.
Python
हमने जो उदाहरण दिया है उसमें यह webapp/attachment_routes.py फ़ाइल में है.
@app.route("/load-content-attachment")
def load_content_attachment():
    """
    Load the attachment for the user's role."""

    # Since this is a landing page for the Teacher and Student View iframes, we
    # need to preserve the incoming query parameters.
    if flask.request.args.get("itemId"):
        flask.session["itemId"] = flask.request.args.get("itemId")
    if flask.request.args.get("itemType"):
        flask.session["itemType"] = flask.request.args.get("itemType")
    if flask.request.args.get("courseId"):
        flask.session["courseId"] = flask.request.args.get("courseId")
    if flask.request.args.get("attachmentId"):
        flask.session["attachmentId"] = flask.request.args.get("attachmentId")
ध्यान रखें कि आपको इस समय उपयोगकर्ता की पुष्टि भी करनी चाहिए. आपको यहां login_hint क्वेरी पैरामीटर को भी मैनेज करना चाहिए. साथ ही, अगर ज़रूरी हो, तो उपयोगकर्ता को अनुमति देने के फ़्लो पर रीडायरेक्ट करना चाहिए. इस फ़्लो के बारे में ज़्यादा जानने के लिए, लॉगिन करने से जुड़े दिशा-निर्देशों की जानकारी देखें. इसके बारे में पिछले वॉकथ्रू में बताया गया है.
इसके बाद, आइटम के टाइप से मेल खाने वाले getAddOnContext एंडपॉइंट पर अनुरोध भेजें.
Python
हमारे दिए गए उदाहरण में, यह load_content_attachment तरीके का इस्तेमाल जारी रखने का तरीका है.
# Create an instance of the Classroom service.
classroom_service = googleapiclient.discovery.build(
    serviceName="classroom"
    version="v1",
    credentials=credentials)

# Use the itemType to determine which stream item type the teacher created
match flask.session["itemType"]:
    case "announcements":
        parent = classroom_service.courses().announcements()
    case "courseWorkMaterials":
        parent = classroom_service.courses().courseWorkMaterials()
    case _:
        parent = classroom_service.courses().courseWork()

addon_context_response = parent.getAddOnContext(
    courseId=flask.session["courseId"],
    itemId=flask.session["itemId"]).execute()
इस तरीके से, क्लास में मौजूद मौजूदा उपयोगकर्ता की भूमिका के बारे में जानकारी मिलती है.
उपयोगकर्ता की भूमिका के हिसाब से, उसे दिखने वाले व्यू में बदलाव करें. response object में, studentContext या teacherContext फ़ील्ड में से किसी एक को भरा गया हो. इनकी जांच करके यह तय करें कि उपयोगकर्ता की समस्या को कैसे हल किया जाए.
किसी भी मामले में, attachmentId क्वेरी पैरामीटर वैल्यू का इस्तेमाल करके यह पता लगाएं कि हमारे डेटाबेस से कौनसी अटैचमेंट वापस लानी है. यह क्वेरी पैरामीटर तब दिया जाता है, जब शिक्षक या छात्र-छात्रा के व्यू वाले यूआरआई खोले जाते हैं.
Python
हमारे दिए गए उदाहरण में, यह load_content_attachment तरीके का इस्तेमाल जारी रखने का तरीका है.
# Determine which view we are in by testing the returned context type.
user_context = "student" if addon_context_response.get(
    "studentContext") else "teacher"

# Look up the attachment in the database.
attachment = Attachment.query.get(flask.session["attachmentId"])

# Set the text for the next page depending on the user's role.
message_str = f"I see that you're a {user_context}! "
message_str += (
    f"I've loaded the attachment with ID {attachment.attachment_id}. "
    if user_context == "teacher" else
    "Please enjoy this image of a famous landmark!")

# Show the content with the customized message text.
return flask.render_template(
    "show-content-attachment.html",
    message=message_str,
    image_filename=attachment.image_filename,
    image_caption=attachment.image_caption,
    responses=response_strings)
ऐड-ऑन की जांच करना
अटैचमेंट बनाने की सुविधा को आज़माने के लिए, यह तरीका अपनाएं:
- टेस्ट यूज़र के तौर पर, [Google Classroom] में शिक्षक के तौर पर साइन इन करें.
- क्लासवर्क टैब पर जाएं और नया असाइनमेंट बनाएं.
- टेक्स्ट एरिया के नीचे मौजूद, ऐड-ऑन बटन पर क्लिक करें. इसके बाद, अपना ऐड-ऑन चुनें. आईफ़्रेम खुलता है और ऐड-ऑन, अटैचमेंट सेटअप यूआरआई लोड करता है. यह यूआरआई, Google Workspace Marketplace SDK के ऐप्लिकेशन कॉन्फ़िगरेशन पेज पर सेट किया जाता है.
- असाइनमेंट में अटैच करने के लिए कोई कॉन्टेंट चुनें.
- अटैचमेंट बनाने की प्रोसेस पूरी होने के बाद, iframe को बंद करें.
आपको Google Classroom में असाइनमेंट बनाने वाले यूज़र इंटरफ़ेस (यूआई) में, अटैचमेंट कार्ड दिखेगा. टीचर व्यू वाला iframe खोलने के लिए, कार्ड पर क्लिक करें. इसके बाद, पुष्टि करें कि सही अटैचमेंट दिख रहा हो. असाइन करें बटन पर क्लिक करें.
छात्र-छात्राओं को मिलने वाले अनुभव को टेस्ट करने के लिए, यह तरीका अपनाएं:
- इसके बाद, Classroom में छात्र-छात्राओं के लिए उपलब्ध टेस्ट खाते से साइन इन करें. यह खाता, शिक्षक के लिए उपलब्ध टेस्ट खाते वाली क्लास में होना चाहिए.
- क्लासवर्क टैब में जाकर, टेस्ट असाइनमेंट ढूंढें.
- असाइनमेंट को बड़ा करें और अटैचमेंट कार्ड पर क्लिक करके, छात्र-छात्राओं को दिखने वाला iframe खोलें.
पुष्टि करें कि छात्र-छात्रा को सही अटैचमेंट दिख रहा हो.
बधाई हो! अब आप अगले चरण पर जा सकते हैं: गतिविधि के टाइप के हिसाब से अटैचमेंट बनाना.