Как реагировать на инциденты с помощью Google Chat, Vertex AI и Google Apps Script

В этом руководстве рассказывается, как создать приложение Google Chat, которое реагирует на инциденты в реальном времени. При реагировании на инцидент приложение создает и заполняет чат-группу, помогает устранить инцидент с помощью сообщений, команд приложения и диалоговых окон, а также использует ИИ для создания сводки по реагированию на инцидент в документе Google.

В этом руководстве используются области авторизации, начинающиеся с https://www.googleapis.com/auth/chat.app.*. Чтобы приложение Chat могло использовать эти области действия, вам нужно получить однократное одобрение администратора.

Инцидент – это событие, требующее немедленного внимания команды специалистов. Примеры инцидентов:

  • В CRM-системе создается срочный запрос, требующий совместной работы команды поддержки.
  • Система переходит в офлайн-режим, и группа специалистов по контролю надежности сайтов (SRE) получает оповещение, чтобы они могли совместно восстановить ее работу.
  • Произошло сильное землетрясение, и сотрудникам экстренных служб нужно скоординировать свои действия.

В этом руководстве оповещение об инциденте запускается, когда пользователь сообщает о нем, нажав кнопку на веб-странице. На веб-странице имитируется инцидент. Пользователям предлагается ввести основную информацию о нем: название, описание и адреса электронной почты ответственных лиц.

Посмотрите, как работает приложение "Управление инцидентами":

  • Сайт, на котором произошел инцидент.
    Рисунок 1. Сайт, на котором можно сообщить об инциденте.
  • Уведомление о том, что создана чат-группа для инцидента.
    Рисунок 2. Уведомление о том, что создана чат-группа для инцидента.
  • Чат-группа для реагирования на инциденты.
    Рисунок 3. Чат-группа для реагирования на инциденты.
  • Устранение инцидента с помощью слеш-команды.
    Рисунок 4. Как устранить инцидент с помощью слеш-команды
  • Диалоговое окно "Разрешение инцидента".
    Рисунок 5. Диалоговое окно для устранения инцидента.
  • Документ Google Документов с информацией об устранении инцидента, которым поделились в чат-группе.
    Рисунок 6. Документ Google Документов с информацией об устранении инцидента, которым поделились в чат-группе.
  • Документ Google с обзором от ИИ по устранению инцидентов.
    Рисунок 7. Документ Google Документов с кратким пересказом инцидента от ИИ.

Требования

Если вам нужно включить какие-либо из этих требований для вашей организации, попросите администратора Google Workspace сделать это:

  • Аккаунт Google Workspace версии Business или Enterprise с доступом к Google Chat.
  • В Google Workspace должен быть включен каталог (совместное использование контактов). Приложение для регистрации инцидентов использует каталог, чтобы найти контактную информацию ответственных лиц, например имя и адрес электронной почты. Участники группы реагирования на инциденты должны иметь аккаунт Chat в организации Google Workspace.

Цели

  • Создайте приложение Chat, которое реагирует на инциденты.
  • Чтобы помочь пользователям реагировать на инциденты, выполните следующие действия:
    • Создание чат-групп для реагирования на инциденты.
    • Публикация сообщений с кратким описанием инцидентов и ответов.
    • Поддержка совместной работы с помощью интерактивных функций чат-приложения.
  • Краткий пересказ разговоров и решений с помощью Vertex AI.

Архитектура

На диаграмме ниже показана архитектура ресурсов Google Workspace и Google Cloud, используемых приложением Chat для реагирования на инциденты.
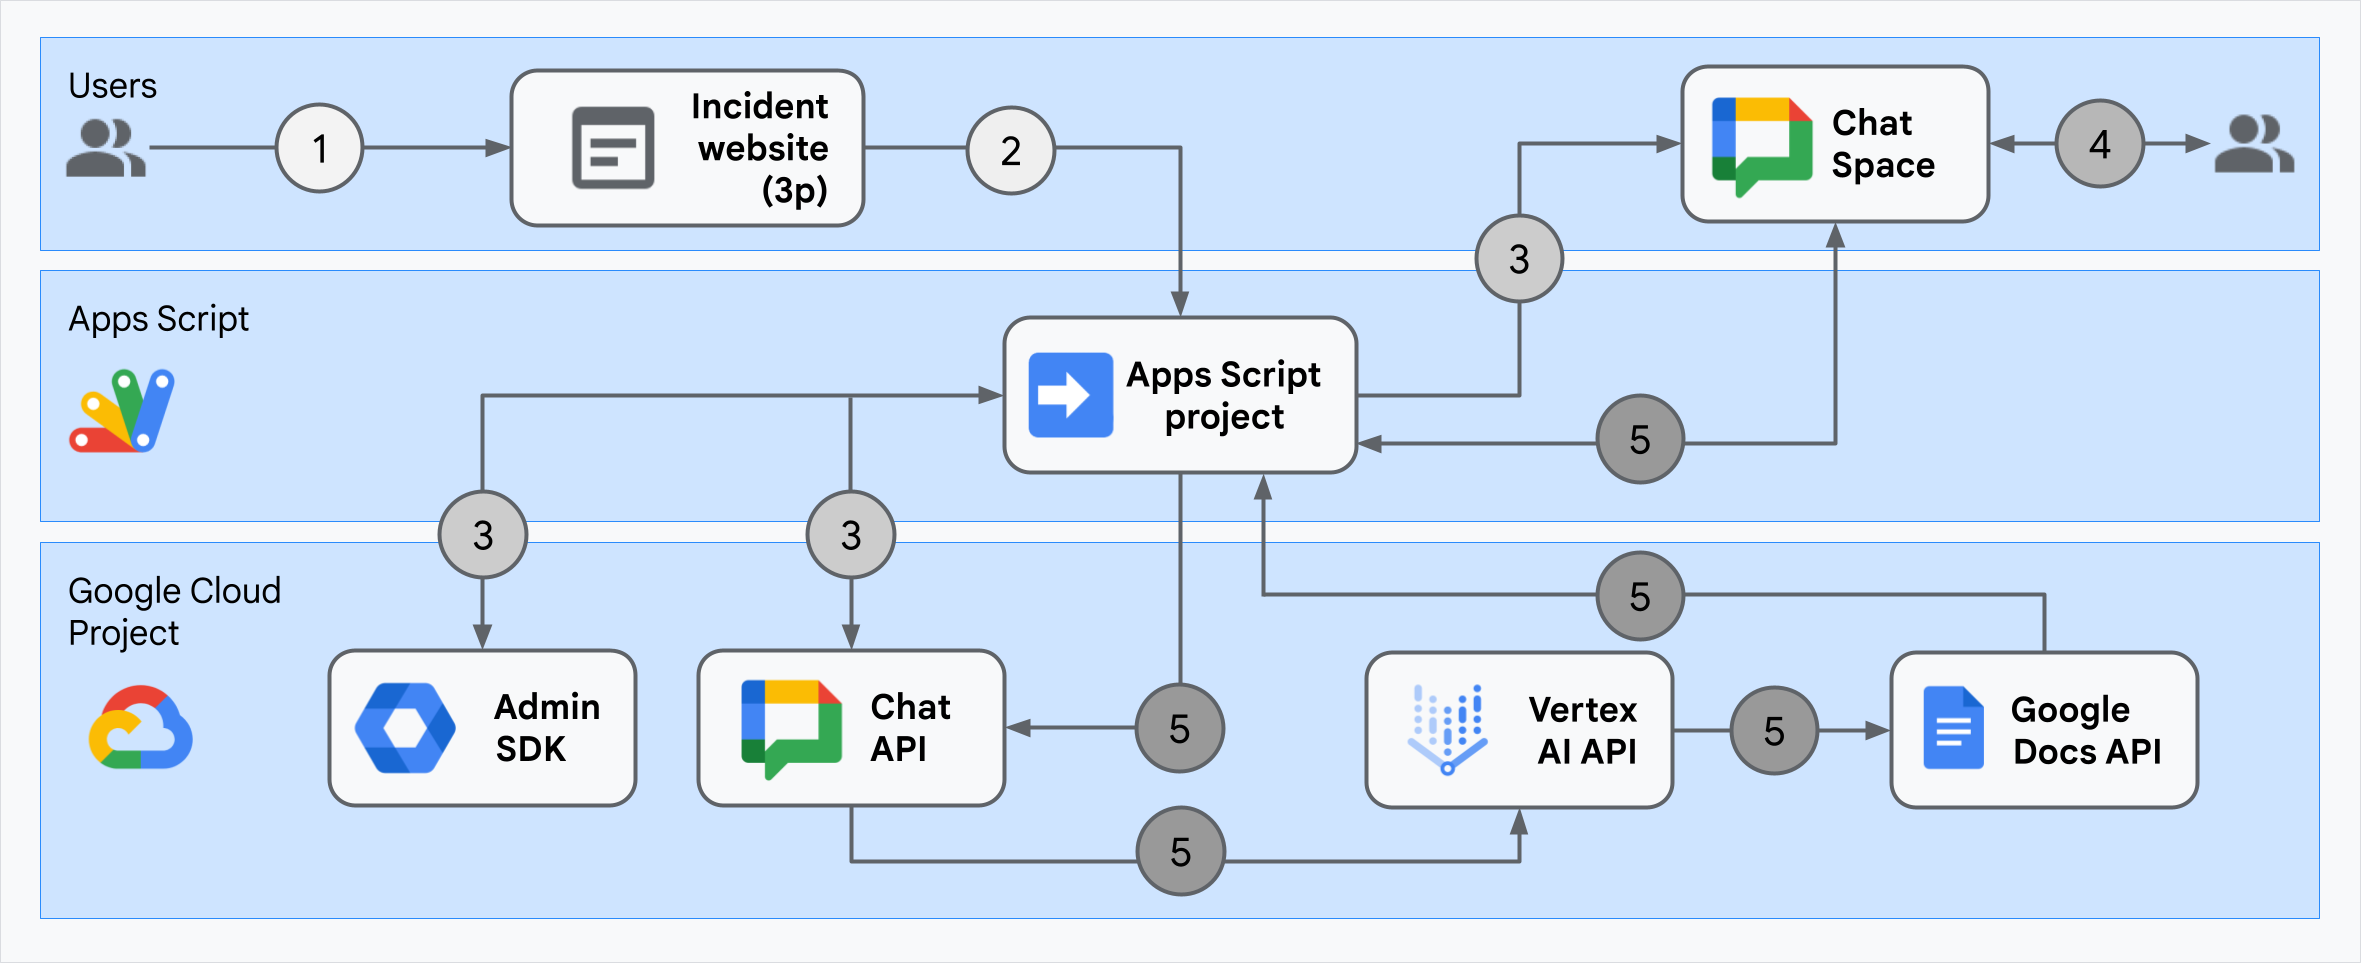
Архитектура приложения Chat для реагирования на инциденты

На схеме показано, как приложение Chat для реагирования на инциденты обрабатывает инцидент и его устранение.

  1. Пользователь запускает инцидент с внешнего сайта, размещенного в Apps Script.

  2. Сайт отправляет асинхронный HTTP-запрос приложению Chat, которое также размещено в Apps Script.

  3. Приложение Chat для реагирования на инциденты обрабатывает запрос:

    1. Сервис Admin SDK Apps Script получает информацию о членах команды, например идентификатор пользователя и адрес электронной почты.

    2. С помощью набора HTTP-запросов к Chat API, используя расширенный сервис Apps Script Advanced Chat, приложение Chat для реагирования на инциденты создает чат-группу для инцидента, добавляет в нее участников команды и отправляет сообщение в чат-группу.

  4. Участники команды обсуждают инцидент в чат-группе.

  5. Сотрудник команды вызывает быструю команду, чтобы сообщить о решении инцидента.

    1. Вызов HTTP к Chat API с помощью сервиса Apps Script Advanced Chat перечисляет все сообщения чат-группы Chat.

    2. Vertex AI получает перечисленные сообщения и создает их краткий пересказ.

    3. Сервис Apps Script DocumentApp создает документ Google Документов и добавляет в него краткий пересказ от Vertex AI.

    4. Приложение Chat для реагирования на инциденты вызывает Chat API, чтобы отправить сообщение со ссылкой на документ Google Документов с кратким описанием.

Подготовка среды

В этом разделе рассказывается, как создать и настроить проект Google Cloud для приложения Chat.

Как создать проект Google Cloud

Google API Console

  1. В Google API Console нажмите на значок меню > IAM & Admin (IAM и администрирование) > Create a Project (Создать проект).

    Создайте проект

  2. В поле Project Name (Имя проекта) введите информативное название проекта.

    Чтобы изменить идентификатор проекта, нажмите Изменить. Идентификатор проекта нельзя изменить после его создания, поэтому выберите подходящий вариант, так как он будет связан с проектом на протяжении всего периода его действия.

  3. В поле Местоположение нажмите Обзор, чтобы посмотреть возможные местоположения для проекта. Затем нажмите Выбрать.
  4. Нажмите Создать. Google API Console перейдет на страницу "Панель управления", и ваш проект будет создан в течение нескольких минут.

gcloud CLI

В одной из следующих сред разработки получите доступ к Google Cloud CLI (gcloud):

  • Cloud Shell: Чтобы использовать онлайн-терминал с уже настроенным gcloud CLI, активируйте Cloud Shell.
    Активировать Cloud Shell
  • Локальная оболочка. Чтобы использовать локальную среду разработки, установите и инициализируйте gcloud CLI.
    Чтобы создать облачный проект, используйте команду gcloud projects create:
    gcloud projects create PROJECT_ID
    Замените PROJECT_ID, указав идентификатор проекта, который хотите создать.

Включите оплату для облачного проекта

Google API Console

  1. В Google API Console выберите Оплата. Нажмите Меню > Оплата > Мои проекты.

    Перейти к оплате проектов

  2. В разделе Выберите организацию выберите организацию, связанную с вашим облачным проектом Google Cloud.
  3. В строке проекта откройте меню Действия (), нажмите Изменить платежные данные и выберите платежный аккаунт Cloud.
  4. Нажмите Выбрать аккаунт.

gcloud CLI

  1. Чтобы получить список доступных платежных аккаунтов, выполните следующую команду:
    gcloud billing accounts list
  2. Чтобы связать платежный аккаунт с проектом Google Cloud:
    gcloud billing projects link PROJECT_ID --billing-account=BILLING_ACCOUNT_ID

    Замените следующее:

    • PROJECT_ID – это идентификатор проекта для облачного проекта, для которого вы хотите включить оплату.
    • BILLING_ACCOUNT_ID – это идентификатор платежного аккаунта, который нужно связать с проектом Google Cloud.

Включение API

Google API Console

  1. В Google API Console включите Google Chat API, Google Документы API, Admin SDK API, Google Workspace Marketplace SDK и Vertex AI API.

    Как включить API

  2. Убедитесь, что вы включаете API в нужном облачном проекте, и нажмите Далее.

  3. Убедитесь, что вы включаете нужные API, и нажмите Включить.

gcloud CLI

  1. При необходимости задайте текущий облачный проект, созданный с помощью команды gcloud config set project:

    gcloud config set project PROJECT_ID

    Замените PROJECT_ID на идентификатор проекта облачного проекта, который вы создали.

  2. Включите Google Chat API, Google Документы API, Admin SDK API, Google Workspace Marketplace SDK и Vertex AI API с помощью команды gcloud services enable:

    gcloud services enable chat.googleapis.com docs.googleapis.com admin.googleapis.com aiplatform.googleapis.com appsmarket-component.googleapis.com

Настройка аутентификации и авторизации

Приложение Chat получает доступ к Google Chat API, используя учетные данные приложения Chat. Приложение получает доступ к Admin SDK API и Google Документы API с учетными данными пользователя.

Как настроить аутентификацию и авторизацию пользователей

Аутентификация и авторизация позволяют приложению Chat получать доступ к ресурсам в Google Workspace и Google Cloud для обработки инцидентов. В частности, аутентификация пользователя используется для вызова Docs API и Admin SDK API.

В этом руководстве вы опубликуете приложение в домене Workspace, поэтому можно использовать информацию-заполнитель. Прежде чем публиковать приложение, замените в окне запроса согласия информацию-заполнитель на реальную.

  1. В консоли API Google выберите "Меню > Платформа аутентификации Google > Брендинг".

    Перейти к брендингу

  2. Если вы уже настроили платформу Google Auth, вы можете задать следующие настройки окна запроса доступа OAuth в разделах Брендинг, Аудитория и Доступ к данным. Если вы видите сообщение Google Auth platform not configured yet (Платформа аутентификации Google ещё не настроена), нажмите Get Started (Начать):

    1. В разделе Информация о приложении в поле Название приложения введите Incident Management.
    2. В поле Электронный адрес службы поддержки выберите свой адрес электронной почты или подходящую группу Google.
    3. Нажмите Далее.
    4. В разделе Аудитория выберите Внутренние. Если вы не можете выбрать Внутренний, выберите Внешний.
    5. Нажмите Далее.
    6. В разделе Контактная информация укажите адрес электронной почты, на который вы хотите получать уведомления об изменениях в проекте.
    7. Нажмите Далее.
    8. В разделе Завершение ознакомьтесь с правилами в отношении пользовательских данных сервисов API Google и, если вы согласны с ними, выберите Я принимаю правила в отношении пользовательских данных сервисов API Google.
    9. Нажмите Продолжить.
    10. Нажмите Создать.
    11. Если в качестве типа пользователя вы выбрали Внешний, добавьте тестовых пользователей:
      1. Нажмите Аудитория.
      2. В разделе Тестировщики нажмите Добавить пользователей.
      3. Введите свой адрес электронной почты и адреса других авторизованных тестировщиков, а затем нажмите Сохранить.
  3. Нажмите Доступ к данным > Добавить или удалить области действия. Появится панель со списком областей действия для каждого API, включенного в облачном проекте Google Cloud.

    1. В разделе Добавить области действия вручную вставьте следующие области действия:

      • https://www.googleapis.com/auth/documents
      • https://www.googleapis.com/auth/admin.directory.user.readonly
      • https://www.googleapis.com/auth/script.external_request
      • https://www.googleapis.com/auth/userinfo.email
      • https://www.googleapis.com/auth/cloud-platform
    2. Нажмите Добавить в таблицу.

    3. Нажмите Обновить.

    4. Выбрав нужные области действия, на странице Доступ к данным нажмите Сохранить.

Как настроить аутентификацию и авторизацию приложений

Для вызова API Chat используется аутентификация приложений.

Как создать сервисный аккаунт в консоли Google Cloud

Чтобы создать сервисный аккаунт, выполните следующие действия:

Google Cloud Console

  1. В консоли Google Cloud нажмите на значок меню > IAM и администрирование > Сервисные аккаунты.

    Перейти на страницу сервисных аккаунтов

    Остальные действия выполняются в консоли Google Cloud.

  2. Выберите проект Google Cloud.
  3. Нажмите Создать сервисный аккаунт.
  4. Введите название сервисного аккаунта, которое будет показываться в консоли Google Cloud.
  5. Если вы не хотите настраивать контроль доступа сейчас, нажмите Готово, чтобы завершить создание сервисного аккаунта. Чтобы настроить контроль доступа сейчас, нажмите Создать и продолжить и перейдите к следующему шагу.
  6. Необязательно: назначьте сервисному аккаунту роли, чтобы предоставить доступ к ресурсам проекта Google Cloud в дополнение к ресурсам Google Workspace. Подробнее об управлении доступом к проектам, папкам и организациям…
  7. Нажмите Продолжить.
  8. Необязательно: укажите пользователей или группы, которые могут управлять этим сервисным аккаунтом и выполнять с ним действия. Подробнее о представлении сервисного аккаунта…
  9. Нажмите Готово, чтобы завершить создание сервисного аккаунта.

    Запишите адрес электронной почты сервисного аккаунта.

gcloud CLI

  1. Создайте сервисный аккаунт:
    gcloud iam service-accounts create SERVICE_ACCOUNT_NAME \
      --display-name="SERVICE_ACCOUNT_NAME"
  2. Необязательно: назначьте сервисному аккаунту роли, чтобы предоставить доступ к ресурсам проекта Google Cloud в дополнение к ресурсам Google Workspace. Подробнее об управлении доступом к проектам, папкам и организациям…

Сервисный аккаунт появится на странице сервисных аккаунтов. Затем создайте закрытый ключ для сервисного аккаунта.

Как создать закрытый ключ

Чтобы создать и скачать закрытый ключ для сервисного аккаунта, выполните следующие действия:

  1. В консоли Google Cloud перейдите в меню > IAM и администрирование > Сервисные аккаунты.

    Перейти на страницу сервисных аккаунтов

    Остальные действия выполняются в консоли Google Cloud.

  2. Выберите проект Google Cloud.
  3. Нажмите на адрес электронной почты сервисного аккаунта, для которого вы хотите создать ключ.
  4. Откройте вкладку Ключи.
  5. Нажмите на раскрывающееся меню Добавить ключ и выберите Создать ключ.
  6. В качестве типа ключа выберите JSON и нажмите Создать.

    Будет сгенерирована новая пара открытого и закрытого ключей, которая будет скачана на ваш компьютер в виде файла ключа сервисного аккаунта. Сохраните скачанный JSON-файл как credentials.json в рабочем каталоге. Этот файл – единственная копия ключа. После того как вы скачаете файл ключа, повторно скачать его будет нельзя. Информацию о том, как безопасно хранить ключ, можно найти в статье Рекомендации по управлению ключами сервисных аккаунтов.

Дополнительную информацию о сервисных аккаунтах можно найти в документации по Google Cloud IAM.

Как создать клиент OAuth, совместимый с Google Workspace Marketplace

Чтобы создать клиент OAuth, совместимый с Google Workspace Marketplace, выполните следующие действия:

  1. В Google API Console перейдите в меню > IAM и администрирование > Сервисные аккаунты.

    Перейти на страницу сервисных аккаунтов

  2. Нажмите на сервисный аккаунт, созданный для приложения Chat.

  3. Нажмите Расширенные настройки.

  4. Нажмите Создать клиент OAuth, совместимый с Google Workspace Marketplace.

  5. Нажмите Продолжить.

Появится сообщение о том, что создан клиент OAuth, совместимый с Google Workspace Marketplace.

Как создать и развернуть приложение Chat

В следующем разделе вы скопируете и обновите весь проект Apps Script, содержащий код приложения Chat, поэтому вам не придется копировать и вставлять каждый файл по отдельности.

В конце названий некоторых функций есть подчеркивание, например concatenateAllSpaceMessages_() из ChatApp.gs. Подчеркивание скрывает функцию на веб-странице инициализации инцидента, когда она открыта в браузере. Подробнее о частных функциях…

Apps Script поддерживает два типа файлов: скрипты .gs и файлы .html. Чтобы обеспечить поддержку, клиентский JavaScript приложения включается в теги <script />, а CSS – в теги <style /> в HTML-файле.

При желании вы можете посмотреть весь проект на GitHub.

Посмотреть на GitHub

Ниже приведена информация о каждом файле.

Consts.gs

Определяет константы, на которые ссылаются другие файлы кода, в том числе идентификатор проекта Cloud, идентификатор местоположения Vertex AI, учетные данные приложения для сервисного аккаунта и идентификатор быстрой команды для закрытия инцидента.

Посмотреть Consts.gs код

apps-script/chat/incident-response-app-auth/Consts.gs
const PROJECT_ID = 'replace-with-your-project-id';
const APP_CREDENTIALS = 'replace-with-your-app-credentials';
const APP_CREDENTIALS_SCOPES = 'https://www.googleapis.com/auth/chat.bot https://www.googleapis.com/auth/chat.app.memberships https://www.googleapis.com/auth/chat.app.spaces.create';
const VERTEX_AI_LOCATION_ID = 'us-central1';
const CLOSE_INCIDENT_COMMAND_ID = 1;
const MODEL_ID = 'gemini-2.5-flash-lite';
ChatApp.gs

Обрабатывает события взаимодействия с Chat, в том числе сообщения, нажатия кнопок, команды приложений (onAppCommand) и диалоговые окна. Отвечает на быструю команду Close incident, открывая диалоговое окно для сбора информации об устранении инцидента. Читает сообщения в чат-группе, вызывая метод spaces.messages.list в Chat API. Получает идентификаторы пользователей с помощью службы каталогов Admin SDK в Apps Script.

Посмотреть ChatApp.gs код

apps-script/chat/incident-response-app-auth/ChatApp.gs
/**
 * Responds to a MESSAGE event in Google Chat.
 * 
 * It always responds with a simple "Hello" text message.
 *
 * @param {Object} event the event object from Google Chat
 */
function onMessage(event) {
  return { hostAppDataAction: { chatDataAction: { createMessageAction: { message: {
    text: "Hello from Incident Response app!"
  }}}}};
}

/**
 * Responds to an APP_COMMAND event in Google Chat.
 *
 * @param {Object} event the event object from Google Chat
 */
function onAppCommand(event) {
  if (event.chat.appCommandPayload.appCommandMetadata.appCommandId != CLOSE_INCIDENT_COMMAND_ID) {
    return { hostAppDataAction: { chatDataAction: { createMessageAction: { message: {
      text: "Command not recognized. Use the quick command `Close incident` to close the incident managed by this space."
    }}}}};
  }
  return { action: { navigations: [{ pushCard: { sections: [{
    header: "Close Incident",
    widgets: [{
      textInput: {
        label: "Please describe the incident resolution",
        type: "MULTIPLE_LINE",
        name: "description"
      }
    }, {
      buttonList: { buttons: [{
        text: "Close Incident",
        onClick: { action: { function: "closeIncident" }}
      }]}
    }]
  }]}}]}};
}

/**
 * Responds to a BUTTON_CLICKED event in Google Chat from Close Incident dialog.
 *
 * @param {Object} event the event object from Google Chat
 */
function closeIncident(event) {
  if (event.chat.buttonClickedPayload.isDialogEvent) {
    if (event.chat.buttonClickedPayload.dialogEventType == 'SUBMIT_DIALOG') {
      return processSubmitDialog_(event);
    }
    return { action: { navigations: [{ endNavigation: {
      action: "CLOSE_DIALOG" }
    }]}};
  }
}

/**
 * Responds to a BUTTON_CLICKED event in Google Chat from Close Incident dialog submission.
 *
 * It creates a Doc with a summary of the incident information and posts a message
 * to the space with a link to the Doc.
 *
 * @param {Object} event the event object from Google Chat
 */
function processSubmitDialog_(event) {
  const resolution = event.commonEventObject.formInputs.description.stringInputs.value[0];
  const space = event.chat.buttonClickedPayload.space;
  const chatHistory = concatenateAllSpaceMessages_(space.name);
  const chatSummary = summarizeChatHistory_(chatHistory);
  const docUrl = createDoc_(space.displayName, resolution, chatHistory, chatSummary);
  return { hostAppDataAction: { chatDataAction: { createMessageAction: { message: {
    text: `Incident closed with the following resolution: ${resolution}\n\nHere is the automatically generated post-mortem:\n${docUrl}`
  }}}}};
}

/**
 * Lists all the messages in the Chat space, then concatenate all of them into
 * a single text containing the full Chat history.
 *
 * For simplicity for this demo, it only fetches the first 100 messages.
 *
 * @return {string} a text containing all the messages in the space in the format:
 *          Sender's name: Message
 */
function concatenateAllSpaceMessages_(spaceName) {
  // Call Chat API method spaces.messages.list
  const response = Chat.Spaces.Messages.list(spaceName, { 'pageSize': 100 });
  const messages = response.messages;
  // Fetch the display names of the message senders and returns a text
  // concatenating all the messages.
  let userMap = new Map();
  return messages
    .map(message => `${getUserDisplayName_(userMap, message.sender.name)}: ${message.text}`)
    .join('\n');
}

/**
 * Obtains the display name of a user by using the Admin Directory API.
 *
 * The fetched display name is cached in the provided map, so we only call the API
 * once per user.
 *
 * If the user does not have a display name, then the full name is used.
 *
 * @param {Map} userMap a map containing the display names previously fetched
 * @param {string} userName the resource name of the user
 * @return {string} the user's display name
 */
function getUserDisplayName_(userMap, userName) {
  if (userMap.has(userName)) {
    return userMap.get(userName);
  }
  let displayName = 'Unknown User';
  try {
    const user = AdminDirectory.Users.get(
      userName.replace("users/", ""),
      { projection: 'BASIC', viewType: 'domain_public' });
    displayName = user.name.displayName ? user.name.displayName : user.name.fullName;
  } catch (e) {
    // Ignore error if the API call fails (for example, because it's an
    // out-of-domain user or Chat app) and just use 'Unknown User'.
  }
  userMap.set(userName, displayName);
  return displayName;
}
ChatSpaceCreator.gs

Получает данные из формы, которую пользователи заполняют на веб-странице инициализации инцидента, и использует их для настройки чат-группы, создавая и заполняя ее, а затем публикует сообщение об инциденте.

Посмотреть ChatSpaceCreator.gs код

apps-script/chat/incident-response-app-auth/ChatSpaceCreator.gs
/**
 * Handles an incident by creating a chat space with the provided title and members, and posting a message.
 * All the actions are done using application credentials.
 *
 * @param {Object} formData - The data submitted by the user. It should contain the fields:
 *                           - title: The display name of the chat space.
 *                           - description: The description of the incident.
 *                           - users: A comma-separated string of user emails to be added to the space.
 * @return {string} The resource name of the new space.
 */
function handleIncident(formData) {
  const users = formData.users.trim().length > 0 ? formData.users.split(',') : [];
  const service = getService_();
  if (!service.hasAccess()) {
    console.error(service.getLastError());
    return;
   }
  const spaceName = createChatSpace_(formData.title, service);
  createHumanMembership_(spaceName, getUserEmail(), service);
  for (const user of users ){
    createHumanMembership_(spaceName, user, service);
  }
  createMessage_(spaceName, formData.description, service);
  return spaceName;
}

/**
 * Creates a chat space.
 *
 * @param {string} displayName - The name of the chat space.
 * @param {object} service - The credentials of the service account.
 * @returns {string} The resource name of the new space.
*/
function createChatSpace_(displayName, service) {
  try {
    // For private apps, the alias can be used
    const my_customer_alias = "customers/my_customer";
    // Specify the space to create.
    const space = {
        displayName: displayName,
        spaceType: 'SPACE',                
        customer: my_customer_alias
    };
    // Call Chat API with a service account to create a message.
    const createdSpace = Chat.Spaces.create(
        space,
        {},
        // Authenticate with the service account token.
        {'Authorization': 'Bearer ' + service.getAccessToken()});
    return createdSpace.name;
  } catch (err) {
    // TODO (developer) - Handle exception.
    console.log('Failed to create space with error %s', err.message);
  }
}


/**
 * Creates a human membership in a chat space.
 *
 * @param {string} spaceName - The resource name of the space.
 * @param {string} email - The email of the user to be added.
 * @param {object} service - The credentials of the service account.
 */
function createHumanMembership_(spaceName, email, service){
  try{
    const membership = {
      member: {
        name: 'users/'+email,
        // User type for the membership
        type: 'HUMAN'
      }
    };
    const result = Chat.Spaces.Members.create(
      membership,
      spaceName,
      {},
      {'Authorization': 'Bearer ' + service.getAccessToken()}
    );
  } catch (err){
    console.log('Failed to create membership with error %s', err.message)
  }

}

/**
 * Creates a chat message.
 *
 * @param {string} spaceName - The resource name of the space.
 * @param {string} message - The text to be posted.
 * @param {object} service - The credentials of the service account.
 * @return {string} the resource name of the new message.
 */
function createMessage_(spaceName, message, service) {
  try {
    const request = {
      text: message
    };
    // Call Chat API with a service account to create a message.
    const result = Chat.Spaces.Messages.create(
        request,
        spaceName,
        {},
        // Authenticate with the service account token.
        {'Authorization': 'Bearer ' + service.getAccessToken()});
    return result.name;
  } catch (err) {
    // TODO (developer) - Handle exception.
    console.log('Failed to create message with error %s', err.message);
  }
}

/**
 * Creates a service for the service account.
 * @return {object}  - The credentials of the service account.
 */
function getService_() {
  return OAuth2.createService(APP_CREDENTIALS.client_email)
      .setTokenUrl('https://oauth2.googleapis.com/token')
      .setPrivateKey(APP_CREDENTIALS.private_key)
      .setIssuer(APP_CREDENTIALS.client_email)
      .setSubject(APP_CREDENTIALS.client_email)
      .setScope(APP_CREDENTIALS_SCOPES)
      .setPropertyStore(PropertiesService.getScriptProperties());
}
DocsApi.gs

Вызывает Docs API, чтобы создать документ Google в Google Диске пользователя и записать в него краткую информацию об инциденте, созданную в VertexAiApi.gs.

Посмотреть DocsApi.gs код

apps-script/chat/incident-response-app-auth/DocsApi.gs
/**
 * Creates a Doc in the user's Google Drive and writes a summary of the incident information to it.
 *
 * @param {string} title The title of the incident
 * @param {string} resolution Incident resolution described by the user
 * @param {string} chatHistory The whole Chat history be included in the document
 * @param {string} chatSummary A summary of the Chat conversation to be included in the document
 * @return {string} the URL of the created Doc
 */
function createDoc_(title, resolution, chatHistory, chatSummary) {
  let doc = DocumentApp.create(title);
  let body = doc.getBody();
  body.appendParagraph(`Post-Mortem: ${title}`).setHeading(DocumentApp.ParagraphHeading.TITLE);
  body.appendParagraph("Resolution").setHeading(DocumentApp.ParagraphHeading.HEADING1);
  body.appendParagraph(resolution);
  body.appendParagraph("Summary of the conversation").setHeading(DocumentApp.ParagraphHeading.HEADING1);
  body.appendParagraph(chatSummary);
  body.appendParagraph("Full Chat history").setHeading(DocumentApp.ParagraphHeading.HEADING1);
  body.appendParagraph(chatHistory);
  return doc.getUrl();
}
VertexAiApi.gs

Создает краткий пересказ обсуждения в чат-группе с помощью Vertex AI API. Краткий пересказ будет опубликован в специально созданном документе в DocsAPI.gs.

Посмотреть VertexAiApi.gs код

apps-script/chat/incident-response-app-auth/VertexAiApi.gs
/**
 * Summarizes a Chat conversation using the Vertex AI text prediction API.
 *
 * @param {string} chatHistory The Chat history that will be summarized.
 * @return {string} The content from the text prediction response.
 */
function summarizeChatHistory_(chatHistory) {
  const API_ENDPOINT = `https://${VERTEX_AI_LOCATION_ID}-aiplatform.googleapis.com/v1/projects/${PROJECT_ID}/locations/${VERTEX_AI_LOCATION_ID}/publishers/google/models/${MODEL_ID}:generateContent`;
  const prompt =
    "Summarize the following conversation between Engineers resolving an incident"
      + " in a few sentences. Use only the information from the conversation.\n\n"
      + chatHistory;
  // Get the access token.
  const accessToken = ScriptApp.getOAuthToken();

  const headers = {
    'Authorization': 'Bearer ' + accessToken,
    'Content-Type': 'application/json',
  };
  const payload = {
    'contents': {
      'role': 'user',
      'parts' : [
        {
          'text': prompt
        }
      ]
    }
  }
  const options = {
    'method': 'post',
    'headers': headers,
    'payload': JSON.stringify(payload),
    'muteHttpExceptions': true,
  };
  try {
    const response = UrlFetchApp.fetch(API_ENDPOINT, options);
    const responseCode = response.getResponseCode();
    const responseText = response.getContentText();

    if (responseCode === 200) {
      const jsonResponse = JSON.parse(responseText);
      console.log(jsonResponse)
      if (jsonResponse.candidates && jsonResponse.candidates.length > 0) {
        return jsonResponse.candidates[0].content.parts[0].text; // Access the summarized text
      } else {
        return "No summary found in response.";
      }

    } else {
      console.error("Vertex AI API Error:", responseCode, responseText);
      return `Error: ${responseCode} - ${responseText}`;
    }
  } catch (e) {
    console.error("UrlFetchApp Error:", e);
    return "Error: " + e.toString();
  }
}
WebController.gs

Обслуживает сайт инициализации инцидента.

Посмотреть WebController.gs код

apps-script/chat/incident-response-app-auth/WebController.gs
/**
 * Serves the web page from Index.html.
 */
function doGet() {
  return HtmlService
    .createTemplateFromFile('Index')
    .evaluate();
}

/**
 * Serves the web content from the specified filename.
 */
function include(filename) {
  return HtmlService
    .createHtmlOutputFromFile(filename)
    .getContent();
}

/**
 * Returns the email address of the user running the script.
 */
function getUserEmail() {
  return Session.getActiveUser().getEmail();
}
Index.html

HTML-код сайта, на котором инициализируется инцидент.

Посмотреть Index.html код

apps-script/chat/incident-response-app-auth/Index.html
<!DOCTYPE html>
<html>
  <head>
    <base target="_top">
    <link href='https://fonts.googleapis.com/css?family=Roboto' rel='stylesheet'>
    <?!= include('Stylesheet'); ?>
  </head>
  <body>
    <div class="container">
      <div class="content">
        <h1>Incident Manager</h1>
        <form id="incident-form" onsubmit="handleFormSubmit(this)">
          <div id="form">
            <p>
              <label for="title">Incident title</label><br/>
              <input type="text" name="title" id="title" />
            </p>
            <p>
              <label for="users">Incident responders</label><br/>
              <small>
                Please enter a comma-separated list of email addresses of the users
                that should be added to the space.
                Do not include <?= getUserEmail() ?> as it will be added automatically.
              </small><br/>
              <input type="text" name="users" id="users" />
            </p>
            <p>
              <label for="description">Initial message</label></br>
              <small>This message will be posted after the space is created.</small><br/>
              <textarea name="description" id="description"></textarea>
            </p>
            <p class="text-center">
              <input type="submit" value="CREATE CHAT SPACE" />
            </p>
          </div>
          <div id="output" class="hidden"></div>
          <div id="clear" class="hidden">
            <input type="reset" value="CREATE ANOTHER INCIDENT" onclick="onReset()" />
          </div>
        </form>
      </div>
    </div>
    <?!= include('JavaScript'); ?>
  </body>
</html>
JavaScript.html

Обрабатывает поведение форм, включая отправку, ошибки и очистку, для сайта инициализации инцидента. Она включается в Index.html с помощью специальной функции include в WebController.gs.

Посмотреть JavaScript.html код

apps-script/chat/incident-response-app-auth/JavaScript.html
<script>
  var formDiv = document.getElementById('form');
  var outputDiv = document.getElementById('output');
  var clearDiv = document.getElementById('clear');

  function handleFormSubmit(formObject) {
    event.preventDefault();
    outputDiv.innerHTML = 'Please wait while we create the space...';
    hide(formDiv);
    show(outputDiv);
    google.script.run
      .withSuccessHandler(updateOutput)
      .withFailureHandler(onFailure)
      .handleIncident(formObject);
  }

  function updateOutput(response) {
    var spaceId = response.replace('spaces/', '');
    outputDiv.innerHTML =
      '<p>Space created!</p><p><a href="https://mail.google.com/chat/#chat/space/'
        + spaceId
        + '" target="_blank">Open space</a></p>';
    show(outputDiv);
    show(clearDiv);
  }

  function onFailure(error) {
    outputDiv.innerHTML = 'ERROR: ' + error.message;
    outputDiv.classList.add('error');
    show(outputDiv);
    show(clearDiv);
  }

  function onReset() {
    outputDiv.innerHTML = '';
    outputDiv.classList.remove('error');
    show(formDiv);
    hide(outputDiv);
    hide(clearDiv);
  }

  function hide(element) {
    element.classList.add('hidden');
  }

  function show(element) {
    element.classList.remove('hidden');
  }
</script>
Stylesheet.html

CSS для сайта инициализации инцидента. Он включен в Index.html с помощью специальной функции include в WebController.gs.

Посмотреть Stylesheet.html код

apps-script/chat/incident-response-app-auth/Stylesheet.html
<style>
  * {
    box-sizing: border-box;
  }
  body {
    font-family: Roboto, Arial, Helvetica, sans-serif;
  }
  div.container {
    display: flex;
    justify-content: center;
    align-items: center;
    position: absolute;
    top: 0; bottom: 0; left: 0; right: 0;
  }
  div.content {
    width: 80%;
    max-width: 1000px;
    padding: 1rem;
    border: 1px solid #999;
    border-radius: 0.25rem;
    box-shadow: 0 2px 2px 0 rgba(66, 66, 66, 0.08), 0 2px 4px 2px rgba(66, 66, 66, 0.16);
  }
  h1 {
    text-align: center;
    padding-bottom: 1rem;
    margin: 0 -1rem 1rem -1rem;
    border-bottom: 1px solid #999;
  }
 #output {
    text-align: center;
    min-height: 250px;
  }
  div#clear {
    text-align: center;
    padding-top: 1rem;
    margin: 1rem -1rem 0 -1rem;
    border-top: 1px solid #999;
  }
  input[type=text], textarea {
    width: 100%;
    padding: 1rem 0.5rem;
    margin: 0.5rem 0;
    border: 0;
    border-bottom: 1px solid #999;
    background-color: #f0f0f0;
  }
  textarea {
    height: 5rem;
  }
  small {
    color: #999;
  }
  input[type=submit], input[type=reset] {
    padding: 1rem;
    border: none;
    background-color: #6200ee;
    color: #fff;
    border-radius: 0.25rem;
    width: 25%;
  }
  .hidden {
    display: none;
  }
  .text-center {
    text-align: center;
  }
  .error {
    color: red;
  }
</style>

Как найти номер и идентификатор облачного проекта

  1. В Google API Console перейдите к своему облачному проекту.

    Перейти в Google API Console

  2. Нажмите "Настройки и утилиты" > Настройки проекта.

  3. Запишите значения в полях Номер проекта и Идентификатор проекта. Вы будете использовать их в следующих разделах.

Как создать проект Apps Script

Чтобы создать проект Apps Script и подключить его к облачному проекту, выполните следующие действия:

  1. Нажмите на кнопку ниже, чтобы открыть проект Apps Script Respond to incidents with Google Chat (Реагирование на инциденты с помощью Google Chat).
    Открыть проект
  2. Нажмите Обзор.
  3. На обзорной странице нажмите Значок копирования Создать копию.
  4. Укажите название копии проекта Apps Script:

    1. Нажмите Копия "Как реагировать на инциденты с помощью Google Chat".

    2. В поле Название проекта введите Incident Management Chat app.

    3. Нажмите Переименовать.

  5. В копии проекта Apps Script перейдите к файлу Consts.gs и замените YOUR_PROJECT_ID на идентификатор своего облачного проекта.

Как задать облачный проект для проекта Apps Script

  1. В проекте Apps Script нажмите Значок настроек проекта Настройки проекта.
  2. В разделе Проект Google Cloud Platform (GCP) нажмите Изменить проект.
  3. В поле Номер проекта GCP вставьте номер облачного проекта.
  4. Нажмите Настроить проект. Облачный проект и проект Apps Script теперь связаны.

Как создать развертывание Apps Script

Теперь, когда весь код добавлен, разверните проект Apps Script. Идентификатор развертывания используется при настройке приложения Chat в Google Cloud.

  1. В Apps Script откройте проект приложения для реагирования на инциденты.

    Перейти в Apps Script

  2. Нажмите Развернуть > Новое развертывание.

  3. Если Дополнение и Веб-приложение ещё не выбраны, рядом с пунктом Выберите тип нажмите на типы развертывания Значок настроек проекта и выберите Дополнение и Веб-приложение.

  4. В поле Описание введите описание этой версии, например: Complete version of incident management app.

  5. В разделе Выполнить как выберите Пользователь, который обращается к веб-приложению.

  6. В разделе У кого есть доступ выберите Все в организации Workspace, где "организация Workspace" – это название вашей организации Google Workspace.

  7. Нажмите Развернуть. Apps Script сообщит об успешном развертывании и предоставит идентификатор развертывания и URL веб-страницы инициализации инцидента.

  8. Запишите URL веб-приложения, чтобы перейти по нему, когда начнете инцидент. Скопируйте идентификатор развертывания. Этот идентификатор используется при настройке приложения Chat в Google API Console.

  9. Нажмите Готово.

Как настроить приложение Chat в Google API Console

В этом разделе рассказывается, как настроить Google Chat API в Google API Console, указав информацию о приложении Chat, в том числе идентификатор развертывания, созданного в проекте Apps Script.

  1. В Google API Console нажмите Меню > API и сервисы > Включенные API и сервисы > Google Chat API > Конфигурация.

    Перейти к настройке Chat API

  2. В поле Название приложения введите Incident Management.

  3. В поле URL аватара введите https://developers.google.com/chat/images/quickstart-app-avatar.png.

  4. В поле Описание введите Responds to incidents..

  5. Переведите переключатель Включить интерактивные функции в положение "Включено".

  6. В разделе Функциональность выберите Присоединяться к чат-группам и групповым чатам.

  7. В разделе Настройки подключения выберите Скрипт приложений.

  8. В поле Deployment ID (Идентификатор развертывания) вставьте идентификатор развертывания Apps Script, скопированный ранее из развертывания проекта Apps Script.

  9. В разделе Триггеры настройте onAppCommand для триггера Команда приложения.

  10. Зарегистрируйте быструю команду, которую использует полностью реализованное приложение Chat:

    1. В разделе Команды нажмите Добавить команду.

    2. В поле Идентификатор команды введите 1.

    3. В поле Описание введите: Closes the incident being discussed in the space.

    4. В разделе Тип команды выберите Быстрая команда.

    5. В поле Название быстрой команды введите Close incident.

    6. Выберите Открывает диалоговое окно или Диалоговое окно.

    7. Нажмите Готово. Команда зарегистрирована и указана в списке.

  11. В разделе Видимость выберите Сделать это чат-приложение доступным для определенных пользователей и групп в домене Workspace и введите свой адрес электронной почты.

  12. В разделе Журналы выберите Регистрировать ошибки в Logging.

  13. Нажмите Сохранить. Появится сообщение о том, что конфигурация сохранена. Это означает, что приложение готово к тестированию.

Получить одобрение администратора

Чтобы получить одобрение администратора, необходимо настроить приложение Chat в Google Workspace Marketplace SDK.

Как настроить приложение Chat в Google Workspace Marketplace SDK

Чтобы настроить приложение Chat в Google Workspace Marketplace SDK, выполните следующие действия:

  1. В Google API Console нажмите Меню > APIs & Services (API и сервисы) > Enabled APIs & services (Включенные API и сервисы) > Google Workspace Marketplace SDK > App Configuration (Конфигурация приложения).

    Перейти к настройкам приложения

  2. Заполните страницу "Конфигурация приложения". Настройки приложения Chat зависят от целевой аудитории и других факторов. Инструкции по заполнению страницы конфигурации приложения приведены в разделе Настройка приложения в SDK. В этом руководстве мы будем использовать следующие данные:

    1. В разделе Видимость приложения выберите Частное.
    2. В разделе Настройки установки выберите Установка администратором.
    3. В разделе Интеграции приложений выберите Приложение Chat.
    4. В разделе Области действия OAuth введите следующие области действия:
      • https://www.googleapis.com/auth/chat.app.spaces
      • https://www.googleapis.com/auth/chat.app.memberships
    5. В разделе Информация о разработчике укажите название разработчика, URL сайта разработчика и адрес электронной почты разработчика.
    6. Нажмите Save draft (Сохранить проект).

После настройки приложения обновите страницу в Google Play:

  1. В консоли Google Cloud нажмите Меню > API и сервисы > Включенные API и сервисы > Google Workspace Marketplace SDK > Страница приложения в магазине.
  2. В разделе О приложении выберите категорию "Веб-разработка".
  3. В разделе Графические объекты загрузите значки приложений в нужных форматах.
  4. В разделе Скриншоты загрузите скриншот приложения.
  5. В разделе Ссылки на поддержку укажите URL для условий использования, политики конфиденциальности и поддержки.
  6. В разделе Распространение выберите регионы, в которых будет доступно приложение.
  7. Нажмите Опубликовать.

Как получить одобрение администратора

Теперь, когда сервисный аккаунт настроен на получение одобрения администратора, запросите его у администратора Google Workspace, который может предоставить одобрение, выполнив инструкции в разделе Как настроить авторизацию для приложений Chat.

Как протестировать приложение Chat

Чтобы протестировать приложение Chat для управления инцидентами, запустите инцидент на веб-странице и убедитесь, что приложение Chat работает должным образом:

  1. Перейдите по URL веб-приложения, развернутого с помощью Apps Script.

  2. Когда Apps Script запросит разрешение на доступ к вашим данным, нажмите Проверить разрешения, войдите в подходящий аккаунт Google в домене Google Workspace и нажмите Разрешить.

  3. Откроется веб-страница инициализации инцидента. Введите информацию о тесте:

    1. В поле Incident title (Название инцидента) введите The First Incident.
    2. При необходимости в разделе Специалисты по реагированию на инциденты введите адреса электронной почты других специалистов. Это должны быть пользователи с аккаунтом Google Chat в вашей организации Google Workspace, иначе создать чат-группу не получится. Не указывайте свой адрес электронной почты, так как он будет добавлен автоматически.
    3. В поле Начальное сообщение введите Testing the incident management Chat app..
  4. Нажмите Создать чат-группу. Появится сообщение creating space.

  5. После создания чат-группы появится сообщение Space created!. Нажмите Открыть чат-группу. Чат-группа откроется в Chat на новой вкладке.

  6. При необходимости вы и другие специалисты по реагированию на инциденты можете отправлять сообщения в чат-группу. Приложение кратко пересказывает эти сообщения с помощью Vertex AI и создает документ с ретроспективой.

  7. Чтобы завершить реагирование на инцидент и начать процесс устранения неполадок, в чат-группе запустите быструю команду Close incident. Откроется диалоговое окно управления инцидентами.

  8. В поле Закрыть инцидент введите описание решения инцидента, например Test complete.

  9. Нажмите Закрыть инцидент.

Приложение "Управление инцидентами" перечисляет сообщения в чат-группе, создает их краткое содержание с помощью Vertex AI, вставляет его в документ Google Документов и делится этим документом в чат-группе.

Организовать

Чтобы избежать списания средств с аккаунта Google Cloud за ресурсы, использованные в этом руководстве, рекомендуем удалить облачный проект.

  1. В Google API Console перейдите на страницу Управление ресурсами. Нажмите Меню > IAM и администрирование > Управление ресурсами.

    Перейти в Менеджер ресурсов

  2. В списке проектов выберите проект, который хотите удалить, и нажмите Удалить .
  3. В диалоговом окне введите идентификатор проекта и нажмите Закрыть, чтобы удалить проект.
  • Приложение для реагирования на инциденты проходит аутентификацию с использованием учетных данных пользователя, чтобы вызывать API и сервисы Google Cloud, такие как Chat API и Vertex AI API. Это означает, что у пользователя, инициирующего инцидент, должен быть доступ к этим сервисам. Чтобы повысить надежность приложения, рекомендуем вызывать Vertex AI API с помощью сервисного аккаунта, а не учетных данных пользователя, который вызывает быструю команду Close incident. Информацию о том, как настроить сервисный аккаунт для Vertex AI API, можно найти в разделе Как использовать специальный сервисный аккаунт.

Приложения для чата, не являющиеся дополнениями: реагируйте на инциденты с помощью Google Chat, Vertex AI и Google Apps Script (аутентификация приложений)

Приведенные ниже инструкции и примеры кода относятся к приложению Chat, которое не является дополнением Google Workspace (посмотреть на GitHub).

Как создать и настроить проект Apps Script

  1. Откройте проект Apps Script Respond to incidents with Google Chat (Реагирование на инциденты с помощью Google Chat) для приложения Chat, которое не является дополнением, и создайте его копию.
  2. При настройке Chat API в Google API Console: снимите флажок Создать это приложение Chat как дополнение Google Workspace. Откроется диалоговое окно с запросом на подтверждение. В диалоговом окне нажмите Отключить.
  3. Зарегистрируйте слеш-команду /closeIncident (идентификатор команды 1, выберите Открывает диалоговое окно) и введите /closeIncident в пространстве, чтобы устранить инцидент.

Исходный код

Consts.gs
apps-script/incident-response-app-auth/Consts.gs
const PROJECT_ID = 'replace-with-your-project-id';
const CLOSE_INCIDENT_COMMAND_ID = 1;
const APP_CREDENTIALS = 'replace-with-your-app-credentials';
const APP_CREDENTIALS_SCOPES = 'https://www.googleapis.com/auth/chat.bot https://www.googleapis.com/auth/chat.app.memberships https://www.googleapis.com/auth/chat.app.spaces.create';
const VERTEX_AI_LOCATION_ID = 'us-central1';
const MODEL_ID = 'gemini-1.5-flash-002';
ChatApp.gs
apps-script/incident-response-app-auth/ChatApp.gs
/**
 * Responds to a MESSAGE event in Google Chat.
 *
 * This app only responds to a slash command with the ID 1 ("/closeIncident").
 * It will respond to any other message with a simple "Hello" text message.
 *
 * @param {Object} event the event object from Google Chat
 */
function onMessage(event) {
  if (event.message.slashCommand) {
    return processSlashCommand_(event);
  }
  return { "text": "Hello from Incident Response app!" };
}

/**
 * Responds to a CARD_CLICKED event in Google Chat.
 *
 * This app only responds to one kind of dialog (Close Incident).
 *
 * @param {Object} event the event object from Google Chat
 */
function onCardClick(event) {
  if (event.isDialogEvent) {
    if (event.dialogEventType == 'SUBMIT_DIALOG') {
      return processSubmitDialog_(event);
    }
    return {
      actionResponse: {
        type: "DIALOG",
        dialogAction: {
          actionStatus: "OK"
        }
      }
    };
  }
}

/**
 * Responds to a MESSAGE event with a Slash command in Google Chat.
 *
 * This app only responds to a slash command with the ID 1 ("/closeIncident")
 * by returning a Dialog.
 *
 * @param {Object} event the event object from Google Chat
 */
function processSlashCommand_(event) {
  if (event.message.slashCommand.commandId != CLOSE_INCIDENT_COMMAND_ID) {
    return {
      "text": "Command not recognized. Use the command `/closeIncident` to close the incident managed by this space."
    };
  }
  const sections = [
    {
      header: "Close Incident",
      widgets: [
        {
          textInput: {
            label: "Please describe the incident resolution",
            type: "MULTIPLE_LINE",
            name: "description"
          }
        },
        {
          buttonList: {
            buttons: [
              {
                text: "Close Incident",
                onClick: {
                  action: {
                    function: "closeIncident"
                  }
                }
              }
            ]
          }
        }
      ]
    }
  ];
  return {
    actionResponse: {
      type: "DIALOG",
      dialogAction: {
        dialog: {
          body: {
            sections,
          }
        }
      }
    }
  };
}

/**
 * Responds to a CARD_CLICKED event with a Dialog submission in Google Chat.
 *
 * This app only responds to one kind of dialog (Close Incident).
 * It creates a Doc with a summary of the incident information and posts a message
 * to the space with a link to the Doc.
 *
 * @param {Object} event the event object from Google Chat
 */
function processSubmitDialog_(event) {
  const resolution = event.common.formInputs.description[""].stringInputs.value[0];
  const chatHistory = concatenateAllSpaceMessages_(event.space.name);
  const chatSummary = summarizeChatHistory_(chatHistory);
  const docUrl = createDoc_(event.space.displayName, resolution, chatHistory, chatSummary);
  return {
    actionResponse: {
      type: "NEW_MESSAGE",
    },
    text: `Incident closed with the following resolution: ${resolution}\n\nHere is the automatically generated post-mortem:\n${docUrl}`
  };
}

/**
 * Lists all the messages in the Chat space, then concatenate all of them into
 * a single text containing the full Chat history.
 *
 * For simplicity for this demo, it only fetches the first 100 messages.
 *
 * Messages with slash commands are filtered out, so the returned history will
 * contain only the conversations between users and not app command invocations.
 *
 * @return {string} a text containing all the messages in the space in the format:
 *          Sender's name: Message
 */
function concatenateAllSpaceMessages_(spaceName) {
  // Call Chat API method spaces.messages.list
  const response = Chat.Spaces.Messages.list(spaceName, { 'pageSize': 100 });
  const messages = response.messages;
  // Fetch the display names of the message senders and returns a text
  // concatenating all the messages.
  let userMap = new Map();
  return messages
    .filter(message => message.slashCommand === undefined)
    .map(message => `${getUserDisplayName_(userMap, message.sender.name)}: ${message.text}`)
    .join('\n');
}

/**
 * Obtains the display name of a user by using the Admin Directory API.
 *
 * The fetched display name is cached in the provided map, so we only call the API
 * once per user.
 *
 * If the user does not have a display name, then the full name is used.
 *
 * @param {Map} userMap a map containing the display names previously fetched
 * @param {string} userName the resource name of the user
 * @return {string} the user's display name
 */
function getUserDisplayName_(userMap, userName) {
  if (userMap.has(userName)) {
    return userMap.get(userName);
  }
  let displayName = 'Unknown User';
  try {
    const user = AdminDirectory.Users.get(
      userName.replace("users/", ""),
      { projection: 'BASIC', viewType: 'domain_public' });
    displayName = user.name.displayName ? user.name.displayName : user.name.fullName;
  } catch (e) {
    // Ignore error if the API call fails (for example, because it's an
    // out-of-domain user or Chat app)) and just use 'Unknown User'.
  }
  userMap.set(userName, displayName);
  return displayName;
}
ChatSpaceCreator.gs
apps-script/incident-response-app-auth/ChatSpaceCreator.gs
/**
 * Handles an incident by creating a chat space, adding members, and posting a message.
 * All the actions are done using application credentials.
 *
 * @param {Object} formData - The data submitted by the user. It should contain the fields:
 *                           - title: The display name of the chat space.
 *                           - description: The description of the incident.
 *                           - users: A comma-separated string of user emails to be added to the space.
 * @return {string} The resource name of the new space.
 */
function handleIncident(formData) {
  const users = formData.users.trim().length > 0 ? formData.users.split(',') : [];
  const service = getService_();
  if (!service.hasAccess()) {
    console.error(service.getLastError());
    return;
   }
  const spaceName = createChatSpace_(formData.title, service);
  createHumanMembership_(spaceName, getUserEmail(), service);
  for (const user of users ){
    createHumanMembership_(spaceName, user, service);
  }
  createMessage_(spaceName, formData.description, service);
  return spaceName;
}
/**
 * Creates a chat space with application credentials.
 *
 * @param {string} displayName - The name of the chat space.
 * @param {object} service - The credentials of the service account.
 * @returns {string} The resource name of the new space.
*/
function createChatSpace_(displayName, service) {
  try {
    // For private apps, the alias can be used
    const my_customer_alias = "customers/my_customer";
    // Specify the space to create.
    const space = {
        displayName: displayName,
        spaceType: 'SPACE',                
        customer: my_customer_alias
    };
    // Call Chat API with a service account to create a message.
    const createdSpace = Chat.Spaces.create(
        space,
        {},
        // Authenticate with the service account token.
        {'Authorization': 'Bearer ' + service.getAccessToken()});
    return createdSpace.name;
  } catch (err) {
    // TODO (developer) - Handle exception.
    console.log('Failed to create space with error %s', err.message);
  }
}
/*
 * Creates a chat message with application credentials.
 *
 * @param {string} spaceName - The resource name of the space.
 * @param {string} message - The text to be posted.
 * @param {object} service - The credentials of the service account.
 * @return {string} the resource name of the new space.
 */
function createMessage_(spaceName, message, service) {
  try {
    // Call Chat API with a service account to create a message.
    const result = Chat.Spaces.Messages.create(
        {'text': message},
        spaceName,
        {},
        // Authenticate with the service account token.
        {'Authorization': 'Bearer ' + service.getAccessToken()});

  } catch (err) {
    // TODO (developer) - Handle exception.
    console.log('Failed to create message with error %s', err.message);
  }
}
/**
 * Creates a human membership in a chat space with application credentials.
 *
 * @param {string} spaceName - The resource name of the space.
 * @param {string} email - The email of the user to be added.
 * @param {object} service - The credentials of the service account.
 */
function createHumanMembership_(spaceName, email, service){
  try{
    const membership = {
      member: {
        name: 'users/'+email,
        // User type for the membership
        type: 'HUMAN'
      }
    };
    const result = Chat.Spaces.Members.create(
      membership,
      spaceName,
      {},
      {'Authorization': 'Bearer ' + service.getAccessToken()}
    );
  } catch (err){
    console.log('Failed to create membership with error %s', err.message)
  }

}

 /*
 * Creates a service for the service account.
 * @return {object}  - The credentials of the service account.
 */
function getService_() {
  return OAuth2.createService(APP_CREDENTIALS.client_email)
      .setTokenUrl('https://oauth2.googleapis.com/token')
      .setPrivateKey(APP_CREDENTIALS.private_key)
      .setIssuer(APP_CREDENTIALS.client_email)
      .setSubject(APP_CREDENTIALS.client_email)
      .setScope(APP_CREDENTIALS_SCOPES)
      .setPropertyStore(PropertiesService.getScriptProperties());
}
DocsApi.gs
apps-script/incident-response-app-auth/DocsApi.gs
/**
 * Creates a Doc in the user's Google Drive and writes a summary of the incident information to it.
 *
 * @param {string} title The title of the incident
 * @param {string} resolution Incident resolution described by the user
 * @param {string} chatHistory The whole Chat history be included in the document
 * @param {string} chatSummary A summary of the Chat conversation to be included in the document
 * @return {string} the URL of the created Doc
 */
function createDoc_(title, resolution, chatHistory, chatSummary) {
  let doc = DocumentApp.create(title);
  let body = doc.getBody();
  body.appendParagraph(`Post-Mortem: ${title}`).setHeading(DocumentApp.ParagraphHeading.TITLE);
  body.appendParagraph("Resolution").setHeading(DocumentApp.ParagraphHeading.HEADING1);
  body.appendParagraph(resolution);
  body.appendParagraph("Summary of the conversation").setHeading(DocumentApp.ParagraphHeading.HEADING1);
  body.appendParagraph(chatSummary);
  body.appendParagraph("Full Chat history").setHeading(DocumentApp.ParagraphHeading.HEADING1);
  body.appendParagraph(chatHistory);
  return doc.getUrl();
}
VertexAiApi.gs
apps-script/incident-response-app-auth/VertexAiApi.gs
/**
 * Summarizes a Chat conversation using the Vertex AI text prediction API.
 *
 * @param {string} chatHistory The Chat history that will be summarized.
 * @return {string} The content from the text prediction response.
 */


function summarizeChatHistory_(chatHistory) {

  const API_ENDPOINT = `https://${VERTEX_AI_LOCATION_ID}-aiplatform.googleapis.com/v1/projects/${PROJECT_ID}/locations/${VERTEX_AI_LOCATION_ID}/publishers/google/models/${MODEL_ID}:generateContent`;
  const prompt = "Summarize the following conversation between Engineers resolving an incident"
      + " in a few sentences. Use only the information from the conversation.\n\n" + chatHistory;
  // Get the access token.
  const accessToken = ScriptApp.getOAuthToken();

  const headers = {
    'Authorization': 'Bearer ' + accessToken,
    'Content-Type': 'application/json',
  };
  const payload = {
    'contents': {
      'role': 'user',
      'parts' : [
        {
          'text': prompt
        }
      ]
    }
  }
  const options = {
    'method': 'post',
    'headers': headers,
    'payload': JSON.stringify(payload),
    'muteHttpExceptions': true,
  };
  try {
    const response = UrlFetchApp.fetch(API_ENDPOINT, options);
    const responseCode = response.getResponseCode();
    const responseText = response.getContentText();

    if (responseCode === 200) {
      const jsonResponse = JSON.parse(responseText);
      console.log(jsonResponse)
      if (jsonResponse.candidates && jsonResponse.candidates.length > 0) {
        return jsonResponse.candidates[0].content.parts[0].text; // Access the summarized text
      } else {
        return "No summary found in response.";
      }

    } else {
      console.error("Vertex AI API Error:", responseCode, responseText);
      return `Error: ${responseCode} - ${responseText}`;
    }
  } catch (e) {
    console.error("UrlFetchApp Error:", e);
    return "Error: " + e.toString();
  }
}
WebController.gs
apps-script/incident-response-app-auth/WebController.gs
/**
 * Serves the web page from Index.html.
 */
function doGet() {
  return HtmlService
    .createTemplateFromFile('Index')
    .evaluate();
}

/**
 * Serves the web content from the specified filename.
 */
function include(filename) {
  return HtmlService
    .createHtmlOutputFromFile(filename)
    .getContent();
}

/**
 * Returns the email address of the user running the script.
 */
function getUserEmail() {
  return Session.getActiveUser().getEmail();
}
Index.html
apps-script/incident-response-app-auth/Index.html
<!DOCTYPE html>
<html>
  <head>
    <base target="_top">
    <link href='https://fonts.googleapis.com/css?family=Roboto' rel='stylesheet'>
    <?!= include('Stylesheet'); ?>
  </head>
  <body>
    <div class="container">
      <div class="content">
        <h1>Incident Manager</h1>
        <form id="incident-form" onsubmit="handleFormSubmit(this)">
          <div id="form">
            <p>
              <label for="title">Incident title</label><br/>
              <input type="text" name="title" id="title" />
            </p>
            <p>
              <label for="users">Incident responders</label><br/>
              <small>
                Please enter a comma-separated list of email addresses of the users
                that should be added to the space.
                Do not include <?= getUserEmail() ?> as it will be added automatically.
              </small><br/>
              <input type="text" name="users" id="users" />
            </p>
            <p>
              <label for="description">Initial message</label></br>
              <small>This message will be posted after the space is created.</small><br/>
              <textarea name="description" id="description"></textarea>
            </p>
            <p class="text-center">
              <input type="submit" value="CREATE CHAT SPACE" />
            </p>
          </div>
          <div id="output" class="hidden"></div>
          <div id="clear" class="hidden">
            <input type="reset" value="CREATE ANOTHER INCIDENT" onclick="onReset()" />
          </div>
        </form>
      </div>
    </div>
    <?!= include('JavaScript'); ?>
  </body>
</html>
JavaScript.html
apps-script/incident-response-app-auth/JavaScript.html
<script>
  var formDiv = document.getElementById('form');
  var outputDiv = document.getElementById('output');
  var clearDiv = document.getElementById('clear');

  function handleFormSubmit(formObject) {
    event.preventDefault();
    outputDiv.innerHTML = 'Please wait while we create the space...';
    hide(formDiv);
    show(outputDiv);
    google.script.run
      .withSuccessHandler(updateOutput)
      .withFailureHandler(onFailure)
      .handleIncident(formObject);
  }

  function updateOutput(response) {
    var spaceId = response.replace('spaces/', '');
    outputDiv.innerHTML =
      '<p>Space created!</p><p><a href="https://mail.google.com/chat/#chat/space/'
        + spaceId
        + '" target="_blank">Open space</a></p>';
    show(outputDiv);
    show(clearDiv);
  }

  function onFailure(error) {
    outputDiv.innerHTML = 'ERROR: ' + error.message;
    outputDiv.classList.add('error');
    show(outputDiv);
    show(clearDiv);
  }

  function onReset() {
    outputDiv.innerHTML = '';
    outputDiv.classList.remove('error');
    show(formDiv);
    hide(outputDiv);
    hide(clearDiv);
  }

  function hide(element) {
    element.classList.add('hidden');
  }

  function show(element) {
    element.classList.remove('hidden');
  }
</script>
Stylesheet.html
apps-script/incident-response-app-auth/Stylesheet.html
<style>
  * {
    box-sizing: border-box;
  }
  body {
    font-family: Roboto, Arial, Helvetica, sans-serif;
  }
  div.container {
    display: flex;
    justify-content: center;
    align-items: center;
    position: absolute;
    top: 0; bottom: 0; left: 0; right: 0;
  }
  div.content {
    width: 80%;
    max-width: 1000px;
    padding: 1rem;
    border: 1px solid #999;
    border-radius: 0.25rem;
    box-shadow: 0 2px 2px 0 rgba(66, 66, 66, 0.08), 0 2px 4px 2px rgba(66, 66, 66, 0.16);
  }
  h1 {
    text-align: center;
    padding-bottom: 1rem;
    margin: 0 -1rem 1rem -1rem;
    border-bottom: 1px solid #999;
  }
 #output {
    text-align: center;
    min-height: 250px;
  }
  div#clear {
    text-align: center;
    padding-top: 1rem;
    margin: 1rem -1rem 0 -1rem;
    border-top: 1px solid #999;
  }
  input[type=text], textarea {
    width: 100%;
    padding: 1rem 0.5rem;
    margin: 0.5rem 0;
    border: 0;
    border-bottom: 1px solid #999;
    background-color: #f0f0f0;
  }
  textarea {
    height: 5rem;
  }
  small {
    color: #999;
  }
  input[type=submit], input[type=reset] {
    padding: 1rem;
    border: none;
    background-color: #6200ee;
    color: #fff;
    border-radius: 0.25rem;
    width: 25%;
  }
  .hidden {
    display: none;
  }
  .text-center {
    text-align: center;
  }
  .error {
    color: red;
  }
</style>