
การเริ่มต้นอย่างรวดเร็วนี้จะสอนวิธีสร้างขั้นตอนที่กำหนดเองสำหรับ Workspace Flows โดยใช้ Google Apps Script ขั้นตอนที่กำหนดเองจะรับตัวเลข 2 ตัวและการดำเนินการทางคณิตศาสตร์ เป็นอินพุต ทำการคำนวณ และแสดงผลลัพธ์
วัตถุประสงค์
- สร้างขั้นตอนที่กำหนดเองสำหรับ Workspace Flows ด้วย Google Apps Script
- นําขั้นตอนที่กําหนดเองไปใช้กับองค์กร Google Workspace ของคุณเอง
- ทดสอบขั้นตอนโฟลว์ที่กำหนดเองใน Workspace Flows
ข้อกำหนดเบื้องต้น
- บัญชี Google ที่มีสิทธิ์เข้าถึง Workspace Flows ผ่านโปรแกรม Gemini เวอร์ชันอัลฟ่า
ตั้งค่าสคริปต์
หากต้องการตั้งค่าสคริปต์ ให้สร้างโปรเจ็กต์ Apps Script ใหม่ แล้วเชื่อมต่อกับโปรเจ็กต์ระบบคลาวด์
คลิกปุ่มต่อไปนี้เพื่อเปิดโปรเจ็กต์ Apps Script ของคู่มือเริ่มต้นใช้งานเครื่องคำนวณโฟลว์
คลิก ภาพรวม
ในหน้าภาพรวม ให้คลิก
 ทำสำเนา
ตั้งชื่อสำเนาโปรเจ็กต์ Apps Script โดยทำดังนี้
คลิกสำเนาของคู่มือเริ่มต้นใช้งานเครื่องคำนวณโฟลว์
ในชื่อโปรเจ็กต์ ให้พิมพ์
Flows calculator quickstartคลิกเปลี่ยนชื่อ
ไม่บังคับ: ตรวจสอบโค้ดเริ่มต้นอย่างรวดเร็ว
ในส่วนก่อนหน้า คุณได้คัดลอกทั้งโปรเจ็กต์ Apps Script ซึ่งมีโค้ดแอปพลิเคชันที่จำเป็นทั้งหมดสำหรับขั้นตอนที่กำหนดเองของโฟลว์ ดังนั้นจึงไม่จำเป็นต้องคัดลอกและวางแต่ละไฟล์
นอกจากนี้ คุณยังตรวจสอบแต่ละไฟล์ที่คัดลอกในส่วนก่อนหน้าได้ที่นี่
appsscript.jsonไฟล์ Manifest ไฟล์ JSON พิเศษที่ระบุ ข้อมูลโปรเจ็กต์พื้นฐานที่ Apps Script ต้องใช้เพื่อเรียกใช้ สคริปต์
ดูรหัส
appsscript.json{ "timeZone": "America/Los_Angeles", "exceptionLogging": "STACKDRIVER", "runtimeVersion": "V8", "addOns": { "common": { "name": "Calculator", "logoUrl": "https://www.gstatic.com/images/branding/productlogos/calculator_search/v1/web-24dp/logo_calculator_search_color_1x_web_24dp.png", "useLocaleFromApp": true }, "flows": { "workflowElements": [ { "id": "actionElement", "state": "ACTIVE", "name": "Calculate", "description": "Asks the user for two values and a math operation, then performs the math operation on the values and outputs the result.", "workflowAction": { "inputs": [ { "id": "value1", "description": "value1", "cardinality": "SINGLE", "dataType": { "basicType": "INTEGER" } }, { "id": "value2", "description": "value2", "cardinality": "SINGLE", "dataType": { "basicType": "INTEGER" } }, { "id": "operation", "description": "operation", "cardinality": "SINGLE", "dataType": { "basicType": "STRING" } } ], "outputs": [ { "id": "result", "description": "Calculated result", "cardinality": "SINGLE", "dataType": { "basicType": "INTEGER" } }, { "id": "log", "description": "Logged result of flow event.", "cardinality": "SINGLE", "dataType": { "basicType": "STRING" } } ], "onConfigFunction": "onConfigCalculateFunction", "onExecuteFunction": "onExecuteCalculateFunction" } } ] } } }
Calculator.gsกำหนดขั้นตอนที่กำหนดเองสำหรับ Google Workspace Flows ขั้นตอนที่ชื่อ "คำนวณ" รับตัวเลข 2 จำนวนและการดำเนินการเป็นอินพุต และแสดงผลลัพธ์ของ การคำนวณ
ดูรหัส
Calculator.gs/** * This script defines a custom step for Google Workspace Flows. * The step, named "Calculate", takes two numbers and an operation as input * and returns the result of the calculation. * * The script includes functions to: * * 1. Define the configuration UI for the step using Card objects: * * - `onConfigCalculateFunction()`: Generates the main configuration card. * - Helper functions like `pushCard()`, `saveButton()` to build card components. * * 2. Handle the execution of the step. * * - `onExecuteCalculateFunction()`: Retrieves inputs, performs the calculation, * and returns outputs. * * To learn more, see the following quickstart guide: * https://developers.google.com/workspace/add-ons/workflows/quickstart */ /** * Creates an action response to push a new card onto the card stack. * * This function generates an action object that, when returned, causes the * provided card to be pushed onto the card stack, making it the currently * displayed card in the configuration UI. * @param {Object} card The Card object to push. * @return {Object} The action response object. */ function pushCard(card) { return { "action": { "navigations": [{ "push_card": card } ] } }; } /** * Creates an action response to update the currently displayed card. * * This function generates an action object that, when returned, causes the * currently displayed card to be replaced with the provided card in the * configuration UI. * @param {Object} card The Card object to update. * @return {Object} The render actions object. */ function updateCard(card) { return { "render_actions": { "action": { "navigations": [{ "update_card": card } ] } } }; } /** * Creates a button configuration object for saving the workflow. * * This function generates a button definition that, when clicked, triggers * a save action for the current workflow configuration. * @return {Object} The button widget object. */ function saveButton() { return { "text": "Save", "onClick": { "hostAppAction" : { "workflowAction" : { "saveWorkflowAction" : {} } } }, }; } /** * Creates a button configuration object for a refresh action. * * This function generates a button definition that, when clicked, triggers * a function to refresh the current card. * @param {string} functionName The name of the Apps Script function to call on click. * @return {Object} The button widget object. */ function refreshButton(functionName) { return { "text": "Refresh", "onClick": { "action" : { "function" : functionName } }, }; } /** * Generates and displays a configuration card for the sample calculation action. * * This function creates a card with input fields for two values and a dropdown * for selecting an arithmetic operation. The card also includes a "Save" * button to save the action configuration for the workflow. * * The input fields are configured to let the user select outputs from previous * workflow steps as input values using the `hostAppDataSource` property. * This function is called when the user adds or edits the "Calculate" step in the Flows UI. * @return {Object} The action response object containing the card to display. */ function onConfigCalculateFunction() { var card = { "sections": [ { "header": "Action sample: Calculate", "widgets": [ { "textInput": { "name": "value1", "label": "First value", "hostAppDataSource" : { "workflowDataSource" : { "includeVariables" : true } } } }, { "selectionInput": { "name": "operation", "label": "Operation", "type": "DROPDOWN", "items": [ { "text": "+", "value": "+", }, { "text": "-", "value": "-", }, { "text": "x", "value": "x", }, { "text": "/", "value": "/", } ] } }, { "textInput": { "name": "value2", "label": "Second value", "hostAppDataSource" : { "workflowDataSource" : { "includeVariables" : true } } } } ] } ] }; return pushCard(card); } /** * Gets an integer value from variable data, handling both string and integer formats. * * This function attempts to extract an integer value from the provided variable data. * It checks if the data contains string values and, if so, parses the first string * as an integer. If integer values are present, it returns the first integer. * @param {Object} variableData The variable data object from the event. * @return {number} The extracted integer value. */ function getIntValue(variableData) { if (variableData.stringValues) { return parseInt(variableData.stringValues[0]); } return variableData.integerValues[0]; } /** * Executes the calculation action based on the inputs from a workflow event. * * This function retrieves input values ("value1", "value2") and the "operation" * from the workflow event, performs the calculation, and returns the "result" and * "log" as output variables. * This function is called when the workflow execution reaches this custom step. * @param {Object} event The event object passed by the Flows runtime. * @return {Object} The output variables object. */ function onExecuteCalculateFunction(event) { console.log("output: " + JSON.stringify(event)); var calculatedValue = 0; var value1 = getIntValue(event.workflow.actionInvocation.inputs["value1"]); var value2 = getIntValue(event.workflow.actionInvocation.inputs["value2"]); var operation = event.workflow.actionInvocation.inputs["operation"].stringValues[0]; if (operation == "+") { calculatedValue = value1 + value2; } else if (operation == "-") { calculatedValue = value1 - value2; } else if (operation == "x") { calculatedValue = value1 * value2; } else if (operation == "/") { calculatedValue = value1 / value2; } var renderAction = { "hostAppAction" : { "workflowAction" : { "returnOutputVariablesAction" : { "variableValues" : [ { "variableId": "result", "integerValues": [ calculatedValue ] } ] } } } }; }
ติดตั้งใช้งานและทดสอบขั้นตอน
หากต้องการทดสอบขั้นตอน ให้ตั้งค่าการทดสอบการติดตั้งใช้งานสำหรับ ส่วนเสริม เพิ่มขั้นตอนลงในโฟลว์ แล้วเรียกใช้โฟลว์
ตั้งค่าการทำให้ใช้งานได้สำหรับการทดสอบสำหรับส่วนเสริม
- เปิดโปรเจ็กต์สคริปต์ในเครื่องมือแก้ไข Apps Script
- คลิกทำให้ใช้งานได้ > การนำการทดสอบไปใช้งาน
- คลิกติดตั้ง
- คลิกเสร็จสิ้นที่ด้านล่าง
คุณอนุญาตให้ผู้ใช้รายอื่นทดสอบส่วนเสริมได้โดยแชร์โปรเจ็กต์ Apps Script กับบัญชีของผู้ใช้ (ต้องมีสิทธิ์เข้าถึงระดับแก้ไข) จากนั้นแจ้งให้ผู้ใช้ทำตามขั้นตอนก่อนหน้า
เมื่อติดตั้งแล้ว ส่วนเสริมจะพร้อมใช้งานในโฟลว์ทันที คุณอาจต้องรีเฟรช Flows ก่อนที่ ส่วนเสริมจะปรากฏ คุณต้อง ให้สิทธิ์ส่วนเสริมก่อนใช้งานด้วย
ดูข้อมูลเพิ่มเติมเกี่ยวกับการติดตั้งใช้งานเวอร์ชันทดสอบได้ที่ ติดตั้งส่วนเสริมที่ยังไม่ได้เผยแพร่
เปิดโฟลว์
สร้างโฟลว์ที่มีขั้นตอนของคุณ
- คลิก โฟลว์ใหม่
- เลือกวิธีเริ่มโฟลว์ เมื่อทดสอบ ขั้นตอน ให้เลือกเงื่อนไขเริ่มต้นที่คุณสามารถตั้งค่าได้ด้วยตัวเอง เช่น การส่งอีเมลถึงตัวคุณเอง หากขั้นตอนต้องใช้ตัวแปรอินพุต ให้กำหนดค่าตัวแปรอินพุตเป็นส่วนหนึ่งของเอาต์พุตของตัวเริ่มต้น
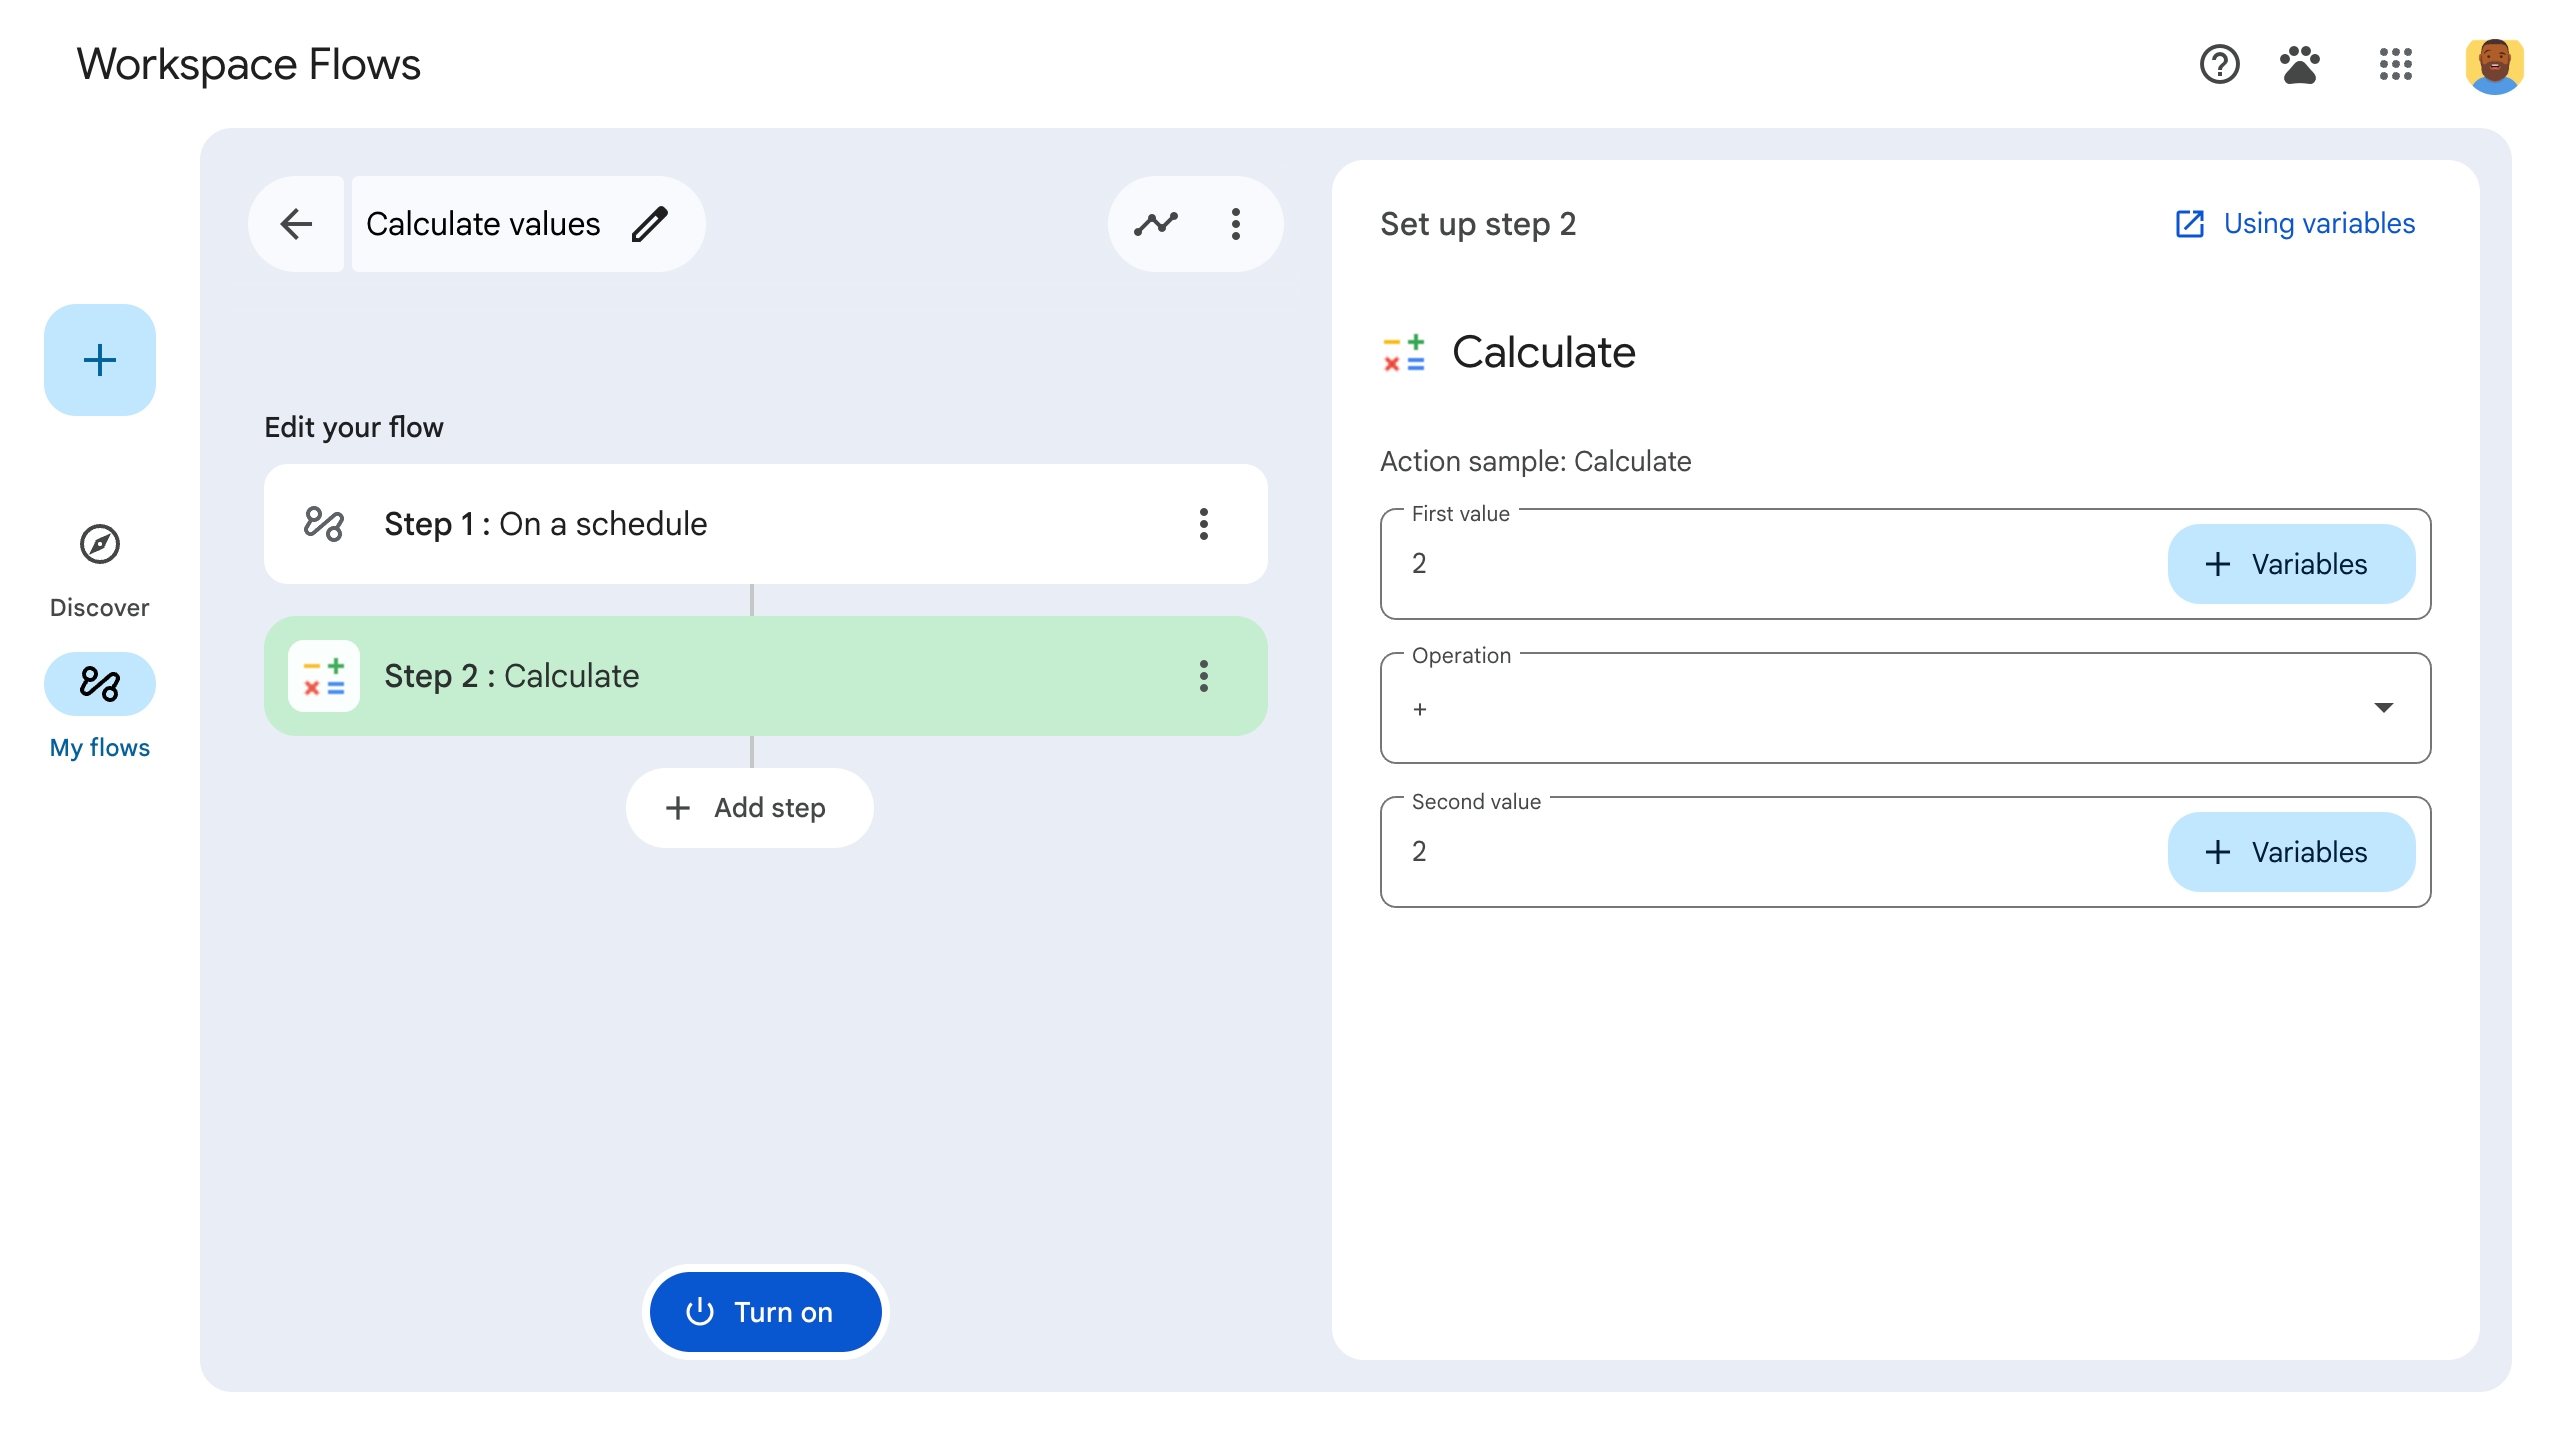
- คลิกเพิ่มขั้นตอน เลือกขั้นตอนที่คุณสร้างหรืออัปเดต ซึ่งเรียกว่าคำนวณ
- กำหนดค่าขั้นตอน สําหรับขั้นตอนการคํานวณ ให้เลือกค่า 2 ค่าและ การดําเนินการทางคณิตศาสตร์ ระบบจะบันทึกขั้นตอนโดยอัตโนมัติ
- หากต้องการทดสอบเอาต์พุตของขั้นตอน ให้เพิ่มอีกขั้นตอน เช่น หากต้องการเพิ่มเอาต์พุต ลงในข้อความอีเมล คุณอาจเพิ่มขั้นตอนส่งข้อความ ของ Gmail ในข้อความ ให้คลิก ตัวแปร แล้วเลือกเอาต์พุตของ ขั้นตอน สำหรับขั้นตอนการคำนวณ ให้เลือก ตัวแปร > ขั้นตอนที่ 2: ผลลัพธ์ที่คำนวณแล้ว > ผลลัพธ์ที่คำนวณแล้ว ตัวแปรจะปรากฏเป็นชิปในช่องข้อความ
- คลิกเปิด โฟลว์พร้อม เรียกใช้แล้ว
เรียกใช้โฟลว์โดยการตั้งค่าตัวเริ่มต้นของโฟลว์ เช่น หากโฟลว์เริ่มต้นเมื่อคุณได้รับอีเมล ให้ส่งอีเมลถึงตัวคุณเอง
ตรวจสอบว่าโฟลว์ทำงานตามที่คาดไว้ ตรวจสอบบันทึกโดย ไปที่แท็บกิจกรรมของเครื่องมือสร้างโฟลว์ ดูวิธีสร้างบันทึกที่กําหนดเองในแท็บกิจกรรมได้ที่บันทึกกิจกรรม
ขั้นตอนถัดไป
คุณสร้างและทดสอบขั้นตอนโฟลว์ที่กำหนดเองสำหรับ Workspace Flows เรียบร้อยแล้ว คุณทำสิ่งต่อไปนี้ได้แล้ว
ปรับแต่งขั้นตอนต่อโดยการแจ้ง Gemini ให้ช่วยคุณใช้ตรรกะที่ซับซ้อนมากขึ้น
สร้างการ์ดการกำหนดค่า เพื่อปรับแต่งการกำหนดค่าขั้นตอน
บันทึกกิจกรรมและข้อผิดพลาดเพื่อ บันทึกและแก้ปัญหาการเรียกใช้ขั้นตอน
ตรวจสอบออบเจ็กต์เหตุการณ์โฟลว์เพื่อ ตรวจสอบเพย์โหลด JSON ที่โฟลว์ส่งและรับขณะที่โฟลว์ทํางาน