
이 빠른 시작에서는 Google Apps Script를 사용하여 Workspace Flows의 맞춤 단계를 만드는 방법을 알아봅니다. 맞춤 단계는 두 개의 숫자와 산술 연산을 입력으로 받아 계산을 실행하고 결과를 출력합니다.
목표
- Google Apps Script를 사용하여 Workspace Flows의 맞춤 단계를 만드세요.
- 맞춤 단계를 자체 Google Workspace 조직에 배포합니다.
- Workspace Flows에서 맞춤 흐름 단계를 테스트합니다.
기본 요건
- Gemini 알파 프로그램을 통해 Workspace Flows에 액세스할 수 있는 Google 계정
스크립트 설정
스크립트를 설정하려면 새 Apps Script 프로젝트를 만든 다음 Cloud 프로젝트에 연결하세요.
다음 버튼을 클릭하여 흐름 계산기 빠른 시작 Apps Script 프로젝트를 엽니다.
개요를 클릭합니다.
개요 페이지에서
 사본 만들기를 클릭합니다.
Apps Script 프로젝트 사본의 이름을 지정합니다.
흐름 계산기 빠른 시작 사본을 클릭합니다.
프로젝트 제목에
Flows calculator quickstart을 입력합니다.이름 바꾸기를 클릭합니다.
선택사항: 빠른 시작 코드 검토
이전 섹션에서는 흐름의 맞춤 단계에 필요한 모든 애플리케이션 코드가 포함된 전체 Apps Script 프로젝트를 복사했으므로 각 파일을 복사하여 붙여넣을 필요가 없습니다.
원하는 경우 이전 섹션에서 복사한 각 파일을 여기에서 검토할 수 있습니다.
appsscript.json매니페스트 파일입니다. Apps Script가 스크립트를 실행하는 데 필요한 기본 프로젝트 정보를 지정하는 특수 JSON 파일입니다.
appsscript.json코드 보기{ "timeZone": "America/Los_Angeles", "exceptionLogging": "STACKDRIVER", "runtimeVersion": "V8", "addOns": { "common": { "name": "Calculator", "logoUrl": "https://www.gstatic.com/images/branding/productlogos/calculator_search/v1/web-24dp/logo_calculator_search_color_1x_web_24dp.png", "useLocaleFromApp": true }, "flows": { "workflowElements": [ { "id": "actionElement", "state": "ACTIVE", "name": "Calculate", "description": "Asks the user for two values and a math operation, then performs the math operation on the values and outputs the result.", "workflowAction": { "inputs": [ { "id": "value1", "description": "value1", "cardinality": "SINGLE", "dataType": { "basicType": "INTEGER" } }, { "id": "value2", "description": "value2", "cardinality": "SINGLE", "dataType": { "basicType": "INTEGER" } }, { "id": "operation", "description": "operation", "cardinality": "SINGLE", "dataType": { "basicType": "STRING" } } ], "outputs": [ { "id": "result", "description": "Calculated result", "cardinality": "SINGLE", "dataType": { "basicType": "INTEGER" } }, { "id": "log", "description": "Logged result of flow event.", "cardinality": "SINGLE", "dataType": { "basicType": "STRING" } } ], "onConfigFunction": "onConfigCalculateFunction", "onExecuteFunction": "onExecuteCalculateFunction" } } ] } } }
Calculator.gsGoogle Workspace Flows의 맞춤 단계를 정의합니다. 'Calculate'라는 단계는 두 개의 숫자와 연산을 입력으로 받아 계산 결과를 반환합니다.
Calculator.gs코드 보기/** * This script defines a custom step for Google Workspace Flows. * The step, named "Calculate", takes two numbers and an operation as input * and returns the result of the calculation. * * The script includes functions to: * * 1. Define the configuration UI for the step using Card objects: * * - `onConfigCalculateFunction()`: Generates the main configuration card. * - Helper functions like `pushCard()`, `saveButton()` to build card components. * * 2. Handle the execution of the step. * * - `onExecuteCalculateFunction()`: Retrieves inputs, performs the calculation, * and returns outputs. * * To learn more, see the following quickstart guide: * https://developers.google.com/workspace/add-ons/workflows/quickstart */ /** * Creates an action response to push a new card onto the card stack. * * This function generates an action object that, when returned, causes the * provided card to be pushed onto the card stack, making it the currently * displayed card in the configuration UI. * @param {Object} card The Card object to push. * @return {Object} The action response object. */ function pushCard(card) { return { "action": { "navigations": [{ "push_card": card } ] } }; } /** * Creates an action response to update the currently displayed card. * * This function generates an action object that, when returned, causes the * currently displayed card to be replaced with the provided card in the * configuration UI. * @param {Object} card The Card object to update. * @return {Object} The render actions object. */ function updateCard(card) { return { "render_actions": { "action": { "navigations": [{ "update_card": card } ] } } }; } /** * Creates a button configuration object for saving the workflow. * * This function generates a button definition that, when clicked, triggers * a save action for the current workflow configuration. * @return {Object} The button widget object. */ function saveButton() { return { "text": "Save", "onClick": { "hostAppAction" : { "workflowAction" : { "saveWorkflowAction" : {} } } }, }; } /** * Creates a button configuration object for a refresh action. * * This function generates a button definition that, when clicked, triggers * a function to refresh the current card. * @param {string} functionName The name of the Apps Script function to call on click. * @return {Object} The button widget object. */ function refreshButton(functionName) { return { "text": "Refresh", "onClick": { "action" : { "function" : functionName } }, }; } /** * Generates and displays a configuration card for the sample calculation action. * * This function creates a card with input fields for two values and a dropdown * for selecting an arithmetic operation. The card also includes a "Save" * button to save the action configuration for the workflow. * * The input fields are configured to let the user select outputs from previous * workflow steps as input values using the `hostAppDataSource` property. * This function is called when the user adds or edits the "Calculate" step in the Flows UI. * @return {Object} The action response object containing the card to display. */ function onConfigCalculateFunction() { var card = { "sections": [ { "header": "Action sample: Calculate", "widgets": [ { "textInput": { "name": "value1", "label": "First value", "hostAppDataSource" : { "workflowDataSource" : { "includeVariables" : true } } } }, { "selectionInput": { "name": "operation", "label": "Operation", "type": "DROPDOWN", "items": [ { "text": "+", "value": "+", }, { "text": "-", "value": "-", }, { "text": "x", "value": "x", }, { "text": "/", "value": "/", } ] } }, { "textInput": { "name": "value2", "label": "Second value", "hostAppDataSource" : { "workflowDataSource" : { "includeVariables" : true } } } } ] } ] }; return pushCard(card); } /** * Gets an integer value from variable data, handling both string and integer formats. * * This function attempts to extract an integer value from the provided variable data. * It checks if the data contains string values and, if so, parses the first string * as an integer. If integer values are present, it returns the first integer. * @param {Object} variableData The variable data object from the event. * @return {number} The extracted integer value. */ function getIntValue(variableData) { if (variableData.stringValues) { return parseInt(variableData.stringValues[0]); } return variableData.integerValues[0]; } /** * Executes the calculation action based on the inputs from a workflow event. * * This function retrieves input values ("value1", "value2") and the "operation" * from the workflow event, performs the calculation, and returns the "result" and * "log" as output variables. * This function is called when the workflow execution reaches this custom step. * @param {Object} event The event object passed by the Flows runtime. * @return {Object} The output variables object. */ function onExecuteCalculateFunction(event) { console.log("output: " + JSON.stringify(event)); var calculatedValue = 0; var value1 = getIntValue(event.workflow.actionInvocation.inputs["value1"]); var value2 = getIntValue(event.workflow.actionInvocation.inputs["value2"]); var operation = event.workflow.actionInvocation.inputs["operation"].stringValues[0]; if (operation == "+") { calculatedValue = value1 + value2; } else if (operation == "-") { calculatedValue = value1 - value2; } else if (operation == "x") { calculatedValue = value1 * value2; } else if (operation == "/") { calculatedValue = value1 / value2; } var renderAction = { "hostAppAction" : { "workflowAction" : { "returnOutputVariablesAction" : { "variableValues" : [ { "variableId": "result", "integerValues": [ calculatedValue ] } ] } } } }; }
단계 배포 및 테스트
단계를 테스트하려면 애드온의 테스트 배포를 설정하고 흐름에 단계를 추가한 후 흐름을 실행합니다.
부가기능의 테스트 배포를 설정합니다.
- Apps Script 편집기에서 스크립트 프로젝트를 엽니다.
- 배포 > 테스트 배포를 클릭합니다.
- 설치를 클릭합니다.
- 하단에서 완료를 클릭합니다.
다른 사용자가 애드온을 테스트하도록 하려면 해당 사용자의 계정과 Apps Script 프로젝트를 공유하면 됩니다 (수정 액세스 권한 필요). 그런 다음 사용자에게 이전 단계를 따르도록 안내합니다.
설치되면 Flows에서 부가기능을 즉시 사용할 수 있습니다. 부가기능이 표시되려면 플로우를 새로고침해야 할 수도 있습니다. 부가기능을 사용하기 전에 승인해야 합니다.
테스트 배포에 대해 자세히 알아보려면 게시되지 않은 부가기능 설치를 참고하세요.
흐름을 엽니다.
단계를 포함하는 흐름을 만듭니다.
- 새 흐름을 클릭합니다.
- 흐름이 시작되는 방식을 선택합니다. 단계를 테스트할 때는 이메일을 보내는 등 직접 시작할 수 있는 트리거를 선택하세요. 단계에 입력 변수가 필요한 경우 스타터의 출력의 일부로 입력 변수를 구성합니다.
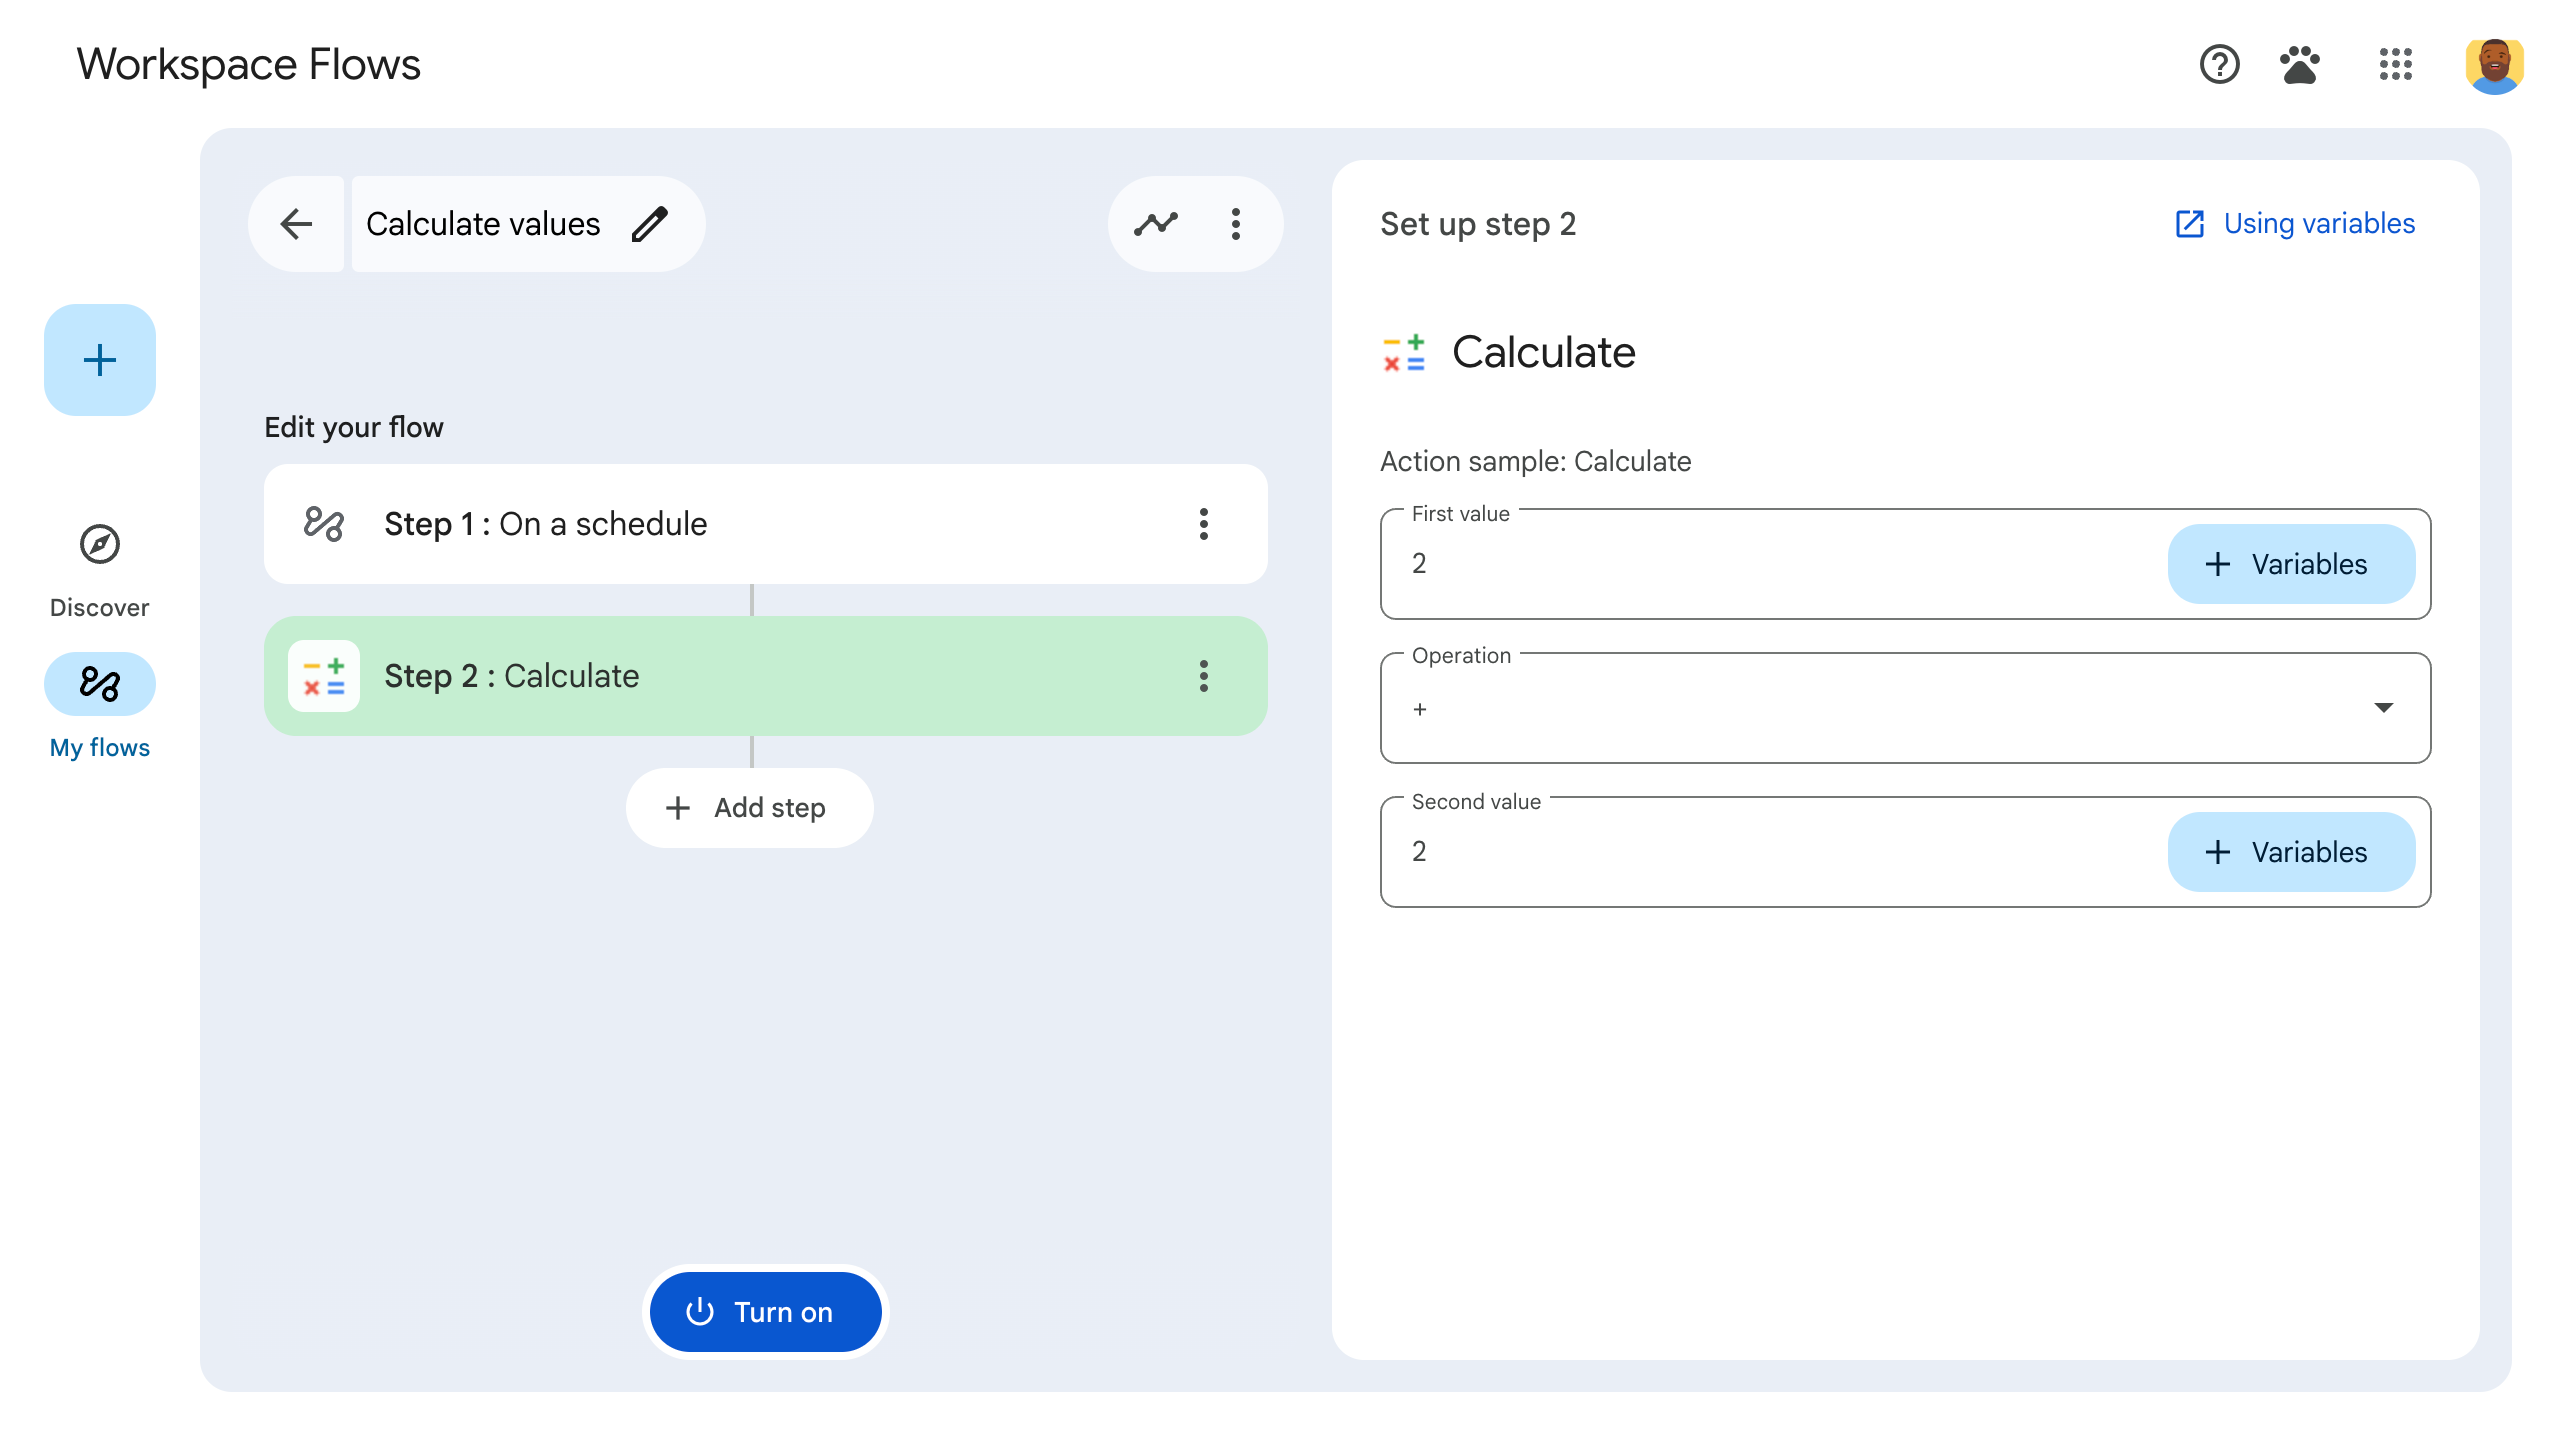
- 단계 추가를 클릭합니다. 빌드하거나 업데이트한 단계(Calculate)를 선택합니다.
- 단계를 구성합니다. 계산 단계에서 두 값과 수학 연산을 선택합니다. 단계는 자동으로 저장됩니다.
- 단계의 출력을 테스트하려면 다른 단계를 추가하세요. 예를 들어 이메일 메시지에 출력을 추가하려면 Gmail의 메일 보내기 단계를 추가하면 됩니다. 메시지에서 변수를 클릭하고 단계의 출력을 선택합니다. 계산 단계에서는 변수 > 2단계: 계산된 결과 > 계산된 결과를 선택합니다. 변수가 메시지 필드에 칩으로 표시됩니다.
- 사용 설정을 클릭합니다. 흐름을 실행할 준비가 되었습니다.
흐름의 시작 조건을 트리거하여 흐름을 실행합니다. 예를 들어 이메일을 수신할 때 흐름이 시작되는 경우 자신에게 이메일을 보냅니다.
흐름이 예상대로 실행되는지 확인합니다. 흐름 빌더의 활동 탭을 방문하여 로그를 확인합니다. 활동 탭에서 맞춤 로그를 만드는 방법을 알아보려면 활동 로그를 참고하세요.
다음 단계
Workspace 흐름의 맞춤 흐름 단계를 만들고 테스트했습니다. 이제 다음과 작업을 수행할 수 있습니다.
Gemini에 더 복잡한 로직을 구현하도록 요청하여 단계를 계속 맞춤설정합니다.
구성 카드를 빌드하여 단계 구성을 맞춤설정합니다.
활동 및 오류를 로깅하여 단계 실행을 기록하고 문제를 해결합니다.
흐름 이벤트 객체 검토를 통해 흐름이 실행될 때 흐름에서 보내고 받는 JSON 페이로드를 검토합니다.