
במדריך למתחילים הזה נסביר איך ליצור שלב מותאם אישית ב-Workspace Flows באמצעות Google Apps Script. השלב המותאם אישית מקבל שני מספרים ופעולה אריתמטית כקלט, מבצע את החישוב ומחזיר את התוצאה.
מטרות
- אפשר ליצור שלב מותאם אישית ל-Workspace Flows באמצעות Google Apps Script.
- פורסים את השלב המותאם אישית בארגון Google Workspace שלכם.
- בודקים את השלב המותאם אישית בתהליך העבודה ב-Workspace Flows.
דרישות מוקדמות
- חשבון Google עם גישה ל-Workspace Flows דרך תוכנית Gemini אלפא.
הגדרת הסקריפט
כדי להגדיר את הסקריפט, צריך ליצור פרויקט חדש של Apps Script ואז לקשר אותו לפרויקט ב-Cloud.
לוחצים על הלחצן הבא כדי לפתוח את המדריך להתחלה מהירה של מחשבון התקציבים בפרויקט Apps Script.
לוחצים על סקירה כללית.
בדף הסקירה הכללית, לוחצים על
 יצירת עותק.
נותנים שם לעותק של פרויקט Apps Script:
לוחצים על Copy of Flows calculator quickstart (העתקה של מדריך למתחילים בנושא מחשבון של זרימות).
בשדה שם הפרויקט, כותבים
Flows calculator quickstart.לוחצים על Rename.
אופציונלי: בדיקת הקוד למתחילים
בקטע הקודם העתקתם פרויקט שלם של Apps Script שמכיל את כל קוד האפליקציה הנדרש לשלב המותאם אישית בתהליך, כך שאין צורך להעתיק ולהדביק כל קובץ בנפרד.
אפשר גם לבדוק כל קובץ שהעתקתם בקטע הקודם:
appsscript.jsonקובץ המניפסט. קובץ JSON מיוחד שמציין מידע בסיסי על הפרויקט שנדרש ל-Apps Script כדי להריץ את הסקריפט.
הצגת קוד
appsscript.json{ "timeZone": "America/Los_Angeles", "exceptionLogging": "STACKDRIVER", "runtimeVersion": "V8", "addOns": { "common": { "name": "Calculator", "logoUrl": "https://www.gstatic.com/images/branding/productlogos/calculator_search/v1/web-24dp/logo_calculator_search_color_1x_web_24dp.png", "useLocaleFromApp": true }, "flows": { "workflowElements": [ { "id": "actionElement", "state": "ACTIVE", "name": "Calculate", "description": "Asks the user for two values and a math operation, then performs the math operation on the values and outputs the result.", "workflowAction": { "inputs": [ { "id": "value1", "description": "value1", "cardinality": "SINGLE", "dataType": { "basicType": "INTEGER" } }, { "id": "value2", "description": "value2", "cardinality": "SINGLE", "dataType": { "basicType": "INTEGER" } }, { "id": "operation", "description": "operation", "cardinality": "SINGLE", "dataType": { "basicType": "STRING" } } ], "outputs": [ { "id": "result", "description": "Calculated result", "cardinality": "SINGLE", "dataType": { "basicType": "INTEGER" } }, { "id": "log", "description": "Logged result of flow event.", "cardinality": "SINGLE", "dataType": { "basicType": "STRING" } } ], "onConfigFunction": "onConfigCalculateFunction", "onExecuteFunction": "onExecuteCalculateFunction" } } ] } } }
Calculator.gsהגדרת שלב מותאם אישית ב-Google Workspace Flows. השלב שנקרא Calculate (חישוב) מקבל שני מספרים ופעולה כקלט ומחזיר את תוצאת החישוב.
הצגת קוד
Calculator.gs/** * This script defines a custom step for Google Workspace Flows. * The step, named "Calculate", takes two numbers and an operation as input * and returns the result of the calculation. * * The script includes functions to: * * 1. Define the configuration UI for the step using Card objects: * * - `onConfigCalculateFunction()`: Generates the main configuration card. * - Helper functions like `pushCard()`, `saveButton()` to build card components. * * 2. Handle the execution of the step. * * - `onExecuteCalculateFunction()`: Retrieves inputs, performs the calculation, * and returns outputs. * * To learn more, see the following quickstart guide: * https://developers.google.com/workspace/add-ons/workflows/quickstart */ /** * Creates an action response to push a new card onto the card stack. * * This function generates an action object that, when returned, causes the * provided card to be pushed onto the card stack, making it the currently * displayed card in the configuration UI. * @param {Object} card The Card object to push. * @return {Object} The action response object. */ function pushCard(card) { return { "action": { "navigations": [{ "push_card": card } ] } }; } /** * Creates an action response to update the currently displayed card. * * This function generates an action object that, when returned, causes the * currently displayed card to be replaced with the provided card in the * configuration UI. * @param {Object} card The Card object to update. * @return {Object} The render actions object. */ function updateCard(card) { return { "render_actions": { "action": { "navigations": [{ "update_card": card } ] } } }; } /** * Creates a button configuration object for saving the workflow. * * This function generates a button definition that, when clicked, triggers * a save action for the current workflow configuration. * @return {Object} The button widget object. */ function saveButton() { return { "text": "Save", "onClick": { "hostAppAction" : { "workflowAction" : { "saveWorkflowAction" : {} } } }, }; } /** * Creates a button configuration object for a refresh action. * * This function generates a button definition that, when clicked, triggers * a function to refresh the current card. * @param {string} functionName The name of the Apps Script function to call on click. * @return {Object} The button widget object. */ function refreshButton(functionName) { return { "text": "Refresh", "onClick": { "action" : { "function" : functionName } }, }; } /** * Generates and displays a configuration card for the sample calculation action. * * This function creates a card with input fields for two values and a dropdown * for selecting an arithmetic operation. The card also includes a "Save" * button to save the action configuration for the workflow. * * The input fields are configured to let the user select outputs from previous * workflow steps as input values using the `hostAppDataSource` property. * This function is called when the user adds or edits the "Calculate" step in the Flows UI. * @return {Object} The action response object containing the card to display. */ function onConfigCalculateFunction() { var card = { "sections": [ { "header": "Action sample: Calculate", "widgets": [ { "textInput": { "name": "value1", "label": "First value", "hostAppDataSource" : { "workflowDataSource" : { "includeVariables" : true } } } }, { "selectionInput": { "name": "operation", "label": "Operation", "type": "DROPDOWN", "items": [ { "text": "+", "value": "+", }, { "text": "-", "value": "-", }, { "text": "x", "value": "x", }, { "text": "/", "value": "/", } ] } }, { "textInput": { "name": "value2", "label": "Second value", "hostAppDataSource" : { "workflowDataSource" : { "includeVariables" : true } } } } ] } ] }; return pushCard(card); } /** * Gets an integer value from variable data, handling both string and integer formats. * * This function attempts to extract an integer value from the provided variable data. * It checks if the data contains string values and, if so, parses the first string * as an integer. If integer values are present, it returns the first integer. * @param {Object} variableData The variable data object from the event. * @return {number} The extracted integer value. */ function getIntValue(variableData) { if (variableData.stringValues) { return parseInt(variableData.stringValues[0]); } return variableData.integerValues[0]; } /** * Executes the calculation action based on the inputs from a workflow event. * * This function retrieves input values ("value1", "value2") and the "operation" * from the workflow event, performs the calculation, and returns the "result" and * "log" as output variables. * This function is called when the workflow execution reaches this custom step. * @param {Object} event The event object passed by the Flows runtime. * @return {Object} The output variables object. */ function onExecuteCalculateFunction(event) { console.log("output: " + JSON.stringify(event)); var calculatedValue = 0; var value1 = getIntValue(event.workflow.actionInvocation.inputs["value1"]); var value2 = getIntValue(event.workflow.actionInvocation.inputs["value2"]); var operation = event.workflow.actionInvocation.inputs["operation"].stringValues[0]; if (operation == "+") { calculatedValue = value1 + value2; } else if (operation == "-") { calculatedValue = value1 - value2; } else if (operation == "x") { calculatedValue = value1 * value2; } else if (operation == "/") { calculatedValue = value1 / value2; } var renderAction = { "hostAppAction" : { "workflowAction" : { "returnOutputVariablesAction" : { "variableValues" : [ { "variableId": "result", "integerValues": [ calculatedValue ] } ] } } } }; }
פריסה ובדיקה של השלב
כדי לבדוק את השלב, מגדירים פריסת בדיקה לתוסף, מוסיפים את השלב לזרימת עבודה ומריצים את זרימת העבודה.
מגדירים פריסת בדיקה לתוסף:
- פותחים את פרויקט הסקריפט בכלי לעריכת סקריפטים של Apps Script.
- לוחצים על פריסה > בדיקת פריסות.
- לוחצים על התקנה.
- למטה, לוחצים על סיום.
אתם יכולים לשתף את פרויקט Apps Script עם חשבון של משתמש אחר (נדרשת גישת עריכה) כדי לאפשר לו לבדוק את התוסף. לאחר מכן, מבקשים מהמשתמשים לפעול לפי השלבים הקודמים.
אחרי ההתקנה, התוסף זמין מיד ב-Flows. יכול להיות שתצטרכו לרענן את Flows כדי שהתוסף יופיע. צריך גם לאשר את התוסף לפני שמשתמשים בו.
מידע נוסף על פריסות לצורך בדיקה זמין במאמר בנושא התקנה של תוסף שלא פורסם.
פותחים את Flows.
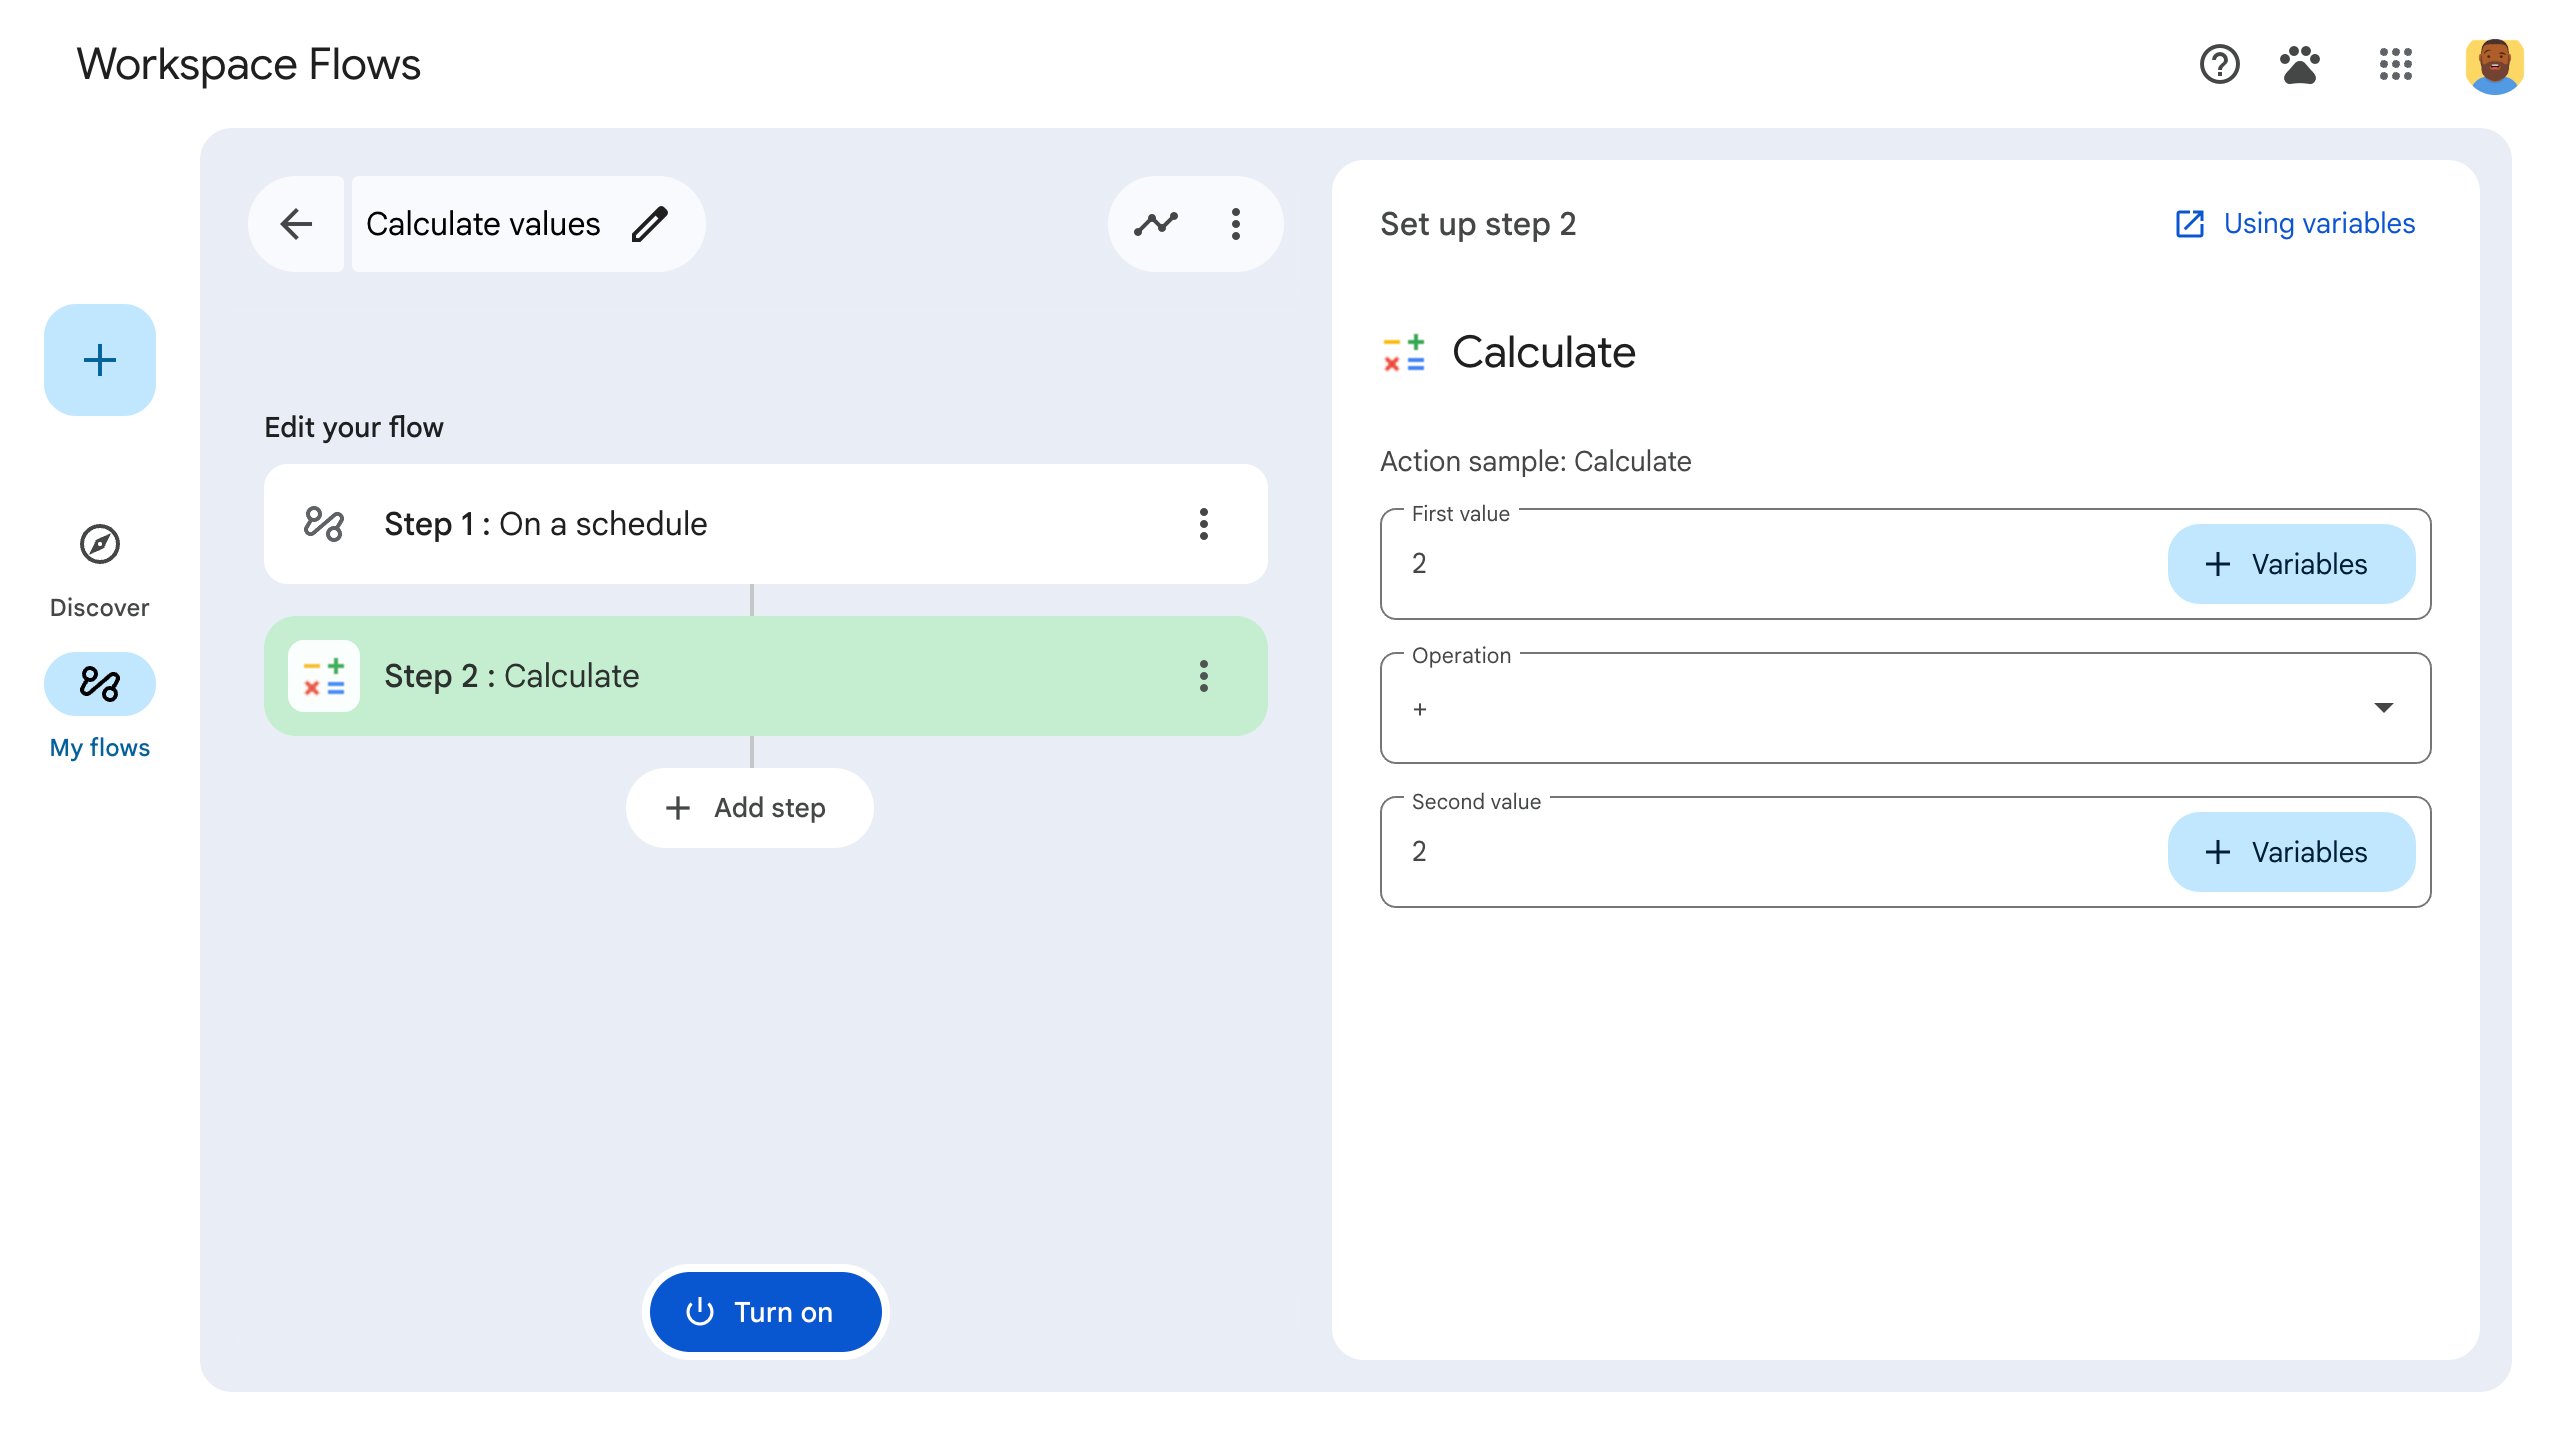
יוצרים תהליך שכולל את השלב:
- לוחצים על New flow (יצירת תהליך חדש).
- בוחרים איך התהליך יתחיל. כשבודקים שלב, בוחרים סימן לתחילת פעולה שאפשר להפעיל לבד, כמו שליחת אימייל לעצמכם. אם השלב דורש משתנה קלט, צריך להגדיר את משתנה הקלט כחלק מהפלט של ה-starter.
- לוחצים על הוספת שלב. בוחרים את השלב שיצרתם או עדכנתם, שנקרא Calculate (חישוב).
- מגדירים את השלב. בשלב החישוב, בוחרים שני ערכים ופעולה מתמטית. השלב נשמר באופן אוטומטי.
- כדי לבדוק את הפלט של השלב, מוסיפים עוד שלב. לדוגמה, כדי להוסיף פלט להודעת אימייל, אפשר להוסיף את השלב שליחת הודעה של Gmail. בקטע הודעה, לוחצים על משתנים ובוחרים את הפלט של השלב. בשלב החישוב, בוחרים באפשרות משתנים > שלב 2: תוצאה מחושבת > תוצאה מחושבת. המשתנה מופיע כצ'יפ בשדה הודעה.
- לוחצים על הפעלה. התהליך מוכן להרצה.
מפעילים את התהליך על ידי הפעלת הסימן לתחילת הפעולה של התהליך. לדוגמה, אם התהליך מתחיל כשמקבלים אימייל, שולחים לעצמכם אימייל.
מוודאים שהזרימה פועלת כמצופה. כדי לבדוק את היומנים, עוברים לכרטיסייה פעילות בכלי ליצירת תהליכים. במאמר יומני פעילות מוסבר איך יוצרים יומנים בהתאמה אישית בכרטיסייה 'פעילות'.
השלבים הבאים
יצרת ובדקת בהצלחה שלב מותאם אישית בתהליך ב-Workspace Flows. מעכשיו אפשר:
כדי להמשיך להתאים אישית את השלב, אפשר לבקש מ-Gemini לעזור לכם להטמיע לוגיקה מורכבת יותר.
יוצרים כרטיס הגדרה כדי להתאים אישית את הגדרת השלב.
תיעוד פעילות ושגיאות כדי לתעד את הפעלות השלבים ולפתור בעיות שקשורות אליהן.
בודקים את אובייקטי האירועים של התהליך כדי לראות את מטען ה-JSON הייעודי שהתהליך שולח ומקבל בזמן שהוא פועל.