
এই কুইকস্টার্ট আপনাকে শেখাবে কিভাবে গুগল অ্যাপস স্ক্রিপ্ট ব্যবহার করে ওয়ার্কস্পেস স্টুডিওর জন্য একটি কাস্টম ধাপ তৈরি করতে হয়। কাস্টম ধাপে দুটি সংখ্যা এবং একটি গাণিতিক ক্রিয়া ইনপুট হিসেবে নেওয়া হয়, গণনা সম্পাদন করে এবং ফলাফল আউটপুট দেয়।
উদ্দেশ্য
- Google Apps স্ক্রিপ্ট ব্যবহার করে Workspace Studio-এর জন্য একটি কাস্টম ধাপ তৈরি করুন।
- আপনার নিজস্ব Google Workspace প্রতিষ্ঠানে কাস্টম ধাপটি প্রয়োগ করুন।
- ওয়ার্কস্পেস স্টুডিওতে কাস্টম ধাপটি পরীক্ষা করুন।
পূর্বশর্ত
- Workspace Studio-তে অ্যাক্সেস সহ একটি Google অ্যাকাউন্ট।
স্ক্রিপ্ট সেট আপ করুন
স্ক্রিপ্ট সেট আপ করতে, একটি নতুন অ্যাপস স্ক্রিপ্ট প্রকল্প তৈরি করুন এবং তারপর এটি আপনার ক্লাউড প্রকল্পের সাথে সংযুক্ত করুন।
ক্যালকুলেটর কুইকস্টার্ট অ্যাপস স্ক্রিপ্ট প্রকল্পটি খুলতে নিম্নলিখিত বোতামটি ক্লিক করুন।
ওভারভিউতে ক্লিক করুন।
ওভারভিউ পৃষ্ঠায়, ক্লিক করুন
 একটি কপি তৈরি করুন ।
আপনার অ্যাপস স্ক্রিপ্ট প্রজেক্টের কপিটির নাম দিন:
ক্যালকুলেটরের কপি কুইকস্টার্টে ক্লিক করুন।
প্রকল্পের শিরোনামে ,
Calculator quickstartটাইপ করুন।পুনঃনামকরণ ক্লিক করুন।
ঐচ্ছিক: কুইকস্টার্ট কোডটি পর্যালোচনা করুন
আগের অংশে, আপনি একটি সম্পূর্ণ অ্যাপস স্ক্রিপ্ট প্রকল্প অনুলিপি করেছেন যাতে আপনার প্রবাহের কাস্টম ধাপের জন্য প্রয়োজনীয় সমস্ত অ্যাপ্লিকেশন কোড রয়েছে, তাই প্রতিটি ফাইল কপি এবং পেস্ট করার প্রয়োজন নেই।
ঐচ্ছিকভাবে, আপনি পূর্ববর্তী বিভাগে অনুলিপি করা প্রতিটি ফাইল এখানে পর্যালোচনা করতে পারেন:
-
appsscript.json ম্যানিফেস্ট ফাইল। একটি বিশেষ JSON ফাইল যা স্ক্রিপ্ট চালানোর জন্য অ্যাপস স্ক্রিপ্টের প্রয়োজনীয় একটি মৌলিক প্রকল্পের তথ্য নির্দিষ্ট করে।
appsscript.jsonকোড দেখুন{ "timeZone": "America/Los_Angeles", "exceptionLogging": "STACKDRIVER", "runtimeVersion": "V8", "addOns": { "common": { "name": "Calculator", "logoUrl": "https://www.gstatic.com/images/branding/productlogos/calculator_search/v1/web-24dp/logo_calculator_search_color_1x_web_24dp.png", "useLocaleFromApp": true }, "flows": { "workflowElements": [ { "id": "actionElement", "state": "ACTIVE", "name": "Calculate", "description": "Asks the user for two values and a math operation, then performs the math operation on the values and outputs the result.", "workflowAction": { "inputs": [ { "id": "value1", "description": "value1", "cardinality": "SINGLE", "dataType": { "basicType": "INTEGER" } }, { "id": "value2", "description": "value2", "cardinality": "SINGLE", "dataType": { "basicType": "INTEGER" } }, { "id": "operation", "description": "operation", "cardinality": "SINGLE", "dataType": { "basicType": "STRING" } } ], "outputs": [ { "id": "result", "description": "Calculated result", "cardinality": "SINGLE", "dataType": { "basicType": "INTEGER" } } ], "onConfigFunction": "onConfigCalculateFunction", "onExecuteFunction": "onExecuteCalculateFunction" } } ] } } }
-
Calculator.gs Google Workspace Studio-এর জন্য একটি কাস্টম ধাপ নির্ধারণ করে। "Calculate" নামক ধাপটি ইনপুট হিসেবে দুটি সংখ্যা এবং একটি অপারেশন নেয় এবং গণনার ফলাফল প্রদান করে।
Calculator.gsকোড দেখুন/** * This script defines a custom step for Google Workspace Studio. * The step, named "Calculate", takes two numbers and an operation as input * and returns the result of the calculation. * * The script includes functions to: * * 1. Define the configuration UI for the step using Card objects: * * - `onConfigCalculateFunction()`: Generates the main configuration card. * - Helper functions like `pushCard()`, `saveButton()` to build card components. * * 2. Handle the execution of the step. * * - `onExecuteCalculateFunction()`: Retrieves inputs, performs the calculation, * and returns outputs. * * To learn more, see the following quickstart guide: * https://developers.google.com/workspace/add-ons/studio/quickstart */ /** * Creates an action response to push a new card onto the card stack. * * This function generates an action object that, when returned, causes the * provided card to be pushed onto the card stack, making it the currently * displayed card in the configuration UI. * @param {Object} card The Card object to push. * @return {Object} The action response object. */ function pushCard(card) { return { "action": { "navigations": [{ "push_card": card } ] } }; } /** * Creates an action response to update the currently displayed card. * * This function generates an action object that, when returned, causes the * currently displayed card to be replaced with the provided card in the * configuration UI. * @param {Object} card The Card object to update. * @return {Object} The render actions object. */ function updateCard(card) { return { "render_actions": { "action": { "navigations": [{ "update_card": card } ] } } }; } /** * Creates a button configuration object for saving the step. * * This function generates a button definition that, when clicked, triggers * a save action for the current step configuration. * @return {Object} The button widget object. */ function saveButton() { return { "text": "Save", "onClick": { "hostAppAction" : { "workflowAction" : { "saveWorkflowAction" : {} } } }, }; } /** * Creates a button configuration object for a refresh action. * * This function generates a button definition that, when clicked, triggers * a function to refresh the current card. * @param {string} functionName The name of the Apps Script function to call on click. * @return {Object} The button widget object. */ function refreshButton(functionName) { return { "text": "Refresh", "onClick": { "action" : { "function" : functionName } }, }; } /** * Generates and displays a configuration card for the sample calculation action. * * This function creates a card with input fields for two values and a dropdown * for selecting an arithmetic operation. The card also includes a "Save" * button to save the action configuration for the step. * * The input fields are configured to let the user select outputs from previous * steps as input values using the `hostAppDataSource` property. * This function is called when the user adds or edits the "Calculate" step in the UI. * @return {Object} The action response object containing the card to display. */ function onConfigCalculateFunction() { var card = { "sections": [ { "header": "Action sample: Calculate", "widgets": [ { "textInput": { "name": "value1", "label": "First value", "hostAppDataSource" : { "workflowDataSource" : { "includeVariables" : true } } } }, { "selectionInput": { "name": "operation", "label": "Operation", "type": "DROPDOWN", "items": [ { "text": "+", "value": "+", }, { "text": "-", "value": "-", }, { "text": "x", "value": "x", }, { "text": "/", "value": "/", } ] } }, { "textInput": { "name": "value2", "label": "Second value", "hostAppDataSource" : { "workflowDataSource" : { "includeVariables" : true } } } } ] } ] }; return pushCard(card); } /** * Gets an integer value from variable data, handling both string and integer formats. * * This function attempts to extract an integer value from the provided variable data. * It checks if the data contains string values and, if so, parses the first string * as an integer. If integer values are present, it returns the first integer. * @param {Object} variableData The variable data object from the event. * @return {number} The extracted integer value. */ function getIntValue(variableData) { if (variableData.stringValues) { return parseInt(variableData.stringValues[0]); } return variableData.integerValues[0]; } /** * Returns output variables from a step. * * This function constructs an object that, when returned, sends the * provided variable values as output from the current step. * The variable values are logged to the console for debugging purposes. */ function outputVariables(variableDataMap) { const workflowAction = AddOnsResponseService.newReturnOutputVariablesAction() .setVariableDataMap(variableDataMap); const hostAppAction = AddOnsResponseService.newHostAppAction() .setWorkflowAction(workflowAction); const renderAction = AddOnsResponseService.newRenderActionBuilder() .setHostAppAction(hostAppAction) .build(); return renderAction; } /** * Executes the calculation action based on the inputs from an event. * * This function retrieves input values ("value1", "value2") and the "operation" * from the event, performs the calculation, and returns the "result" and * "log" as output variables. * This function is called when the flow reaches this custom step. * @param {Object} event The event object passed by the runtime. * @return {Object} The output variables object. */ function onExecuteCalculateFunction(event) { console.log("output: " + JSON.stringify(event)); var calculatedValue = 0; var value1 = event.workflow.actionInvocation.inputs["value1"].integerValues[0]; var value2 = event.workflow.actionInvocation.inputs["value2"].integerValues[0]; var operation = event.workflow.actionInvocation.inputs["operation"].stringValues[0]; if (operation == "+") { calculatedValue = value1 + value2; } else if (operation == "-") { calculatedValue = value1 - value2; } else if (operation == "x") { calculatedValue = value1 * value2; } else if (operation == "/") { calculatedValue = value1 / value2; } const variableDataMap = { "result": AddOnsResponseService.newVariableData().addIntegerValue(calculatedValue) }; return outputVariables(variableDataMap); }
আপনার পদক্ষেপ স্থাপন করুন এবং পরীক্ষা করুন
আপনার স্টেপ পরীক্ষা করার জন্য, আপনার অ্যাড-অনের জন্য একটি পরীক্ষামূলক স্থাপনা সেট আপ করুন, একটি ফ্লোতে স্টেপটি যোগ করুন এবং তারপর ফ্লোটি চালান।
আপনার অ্যাড-অনের জন্য একটি পরীক্ষামূলক স্থাপনা সেট আপ করুন:
- অ্যাপস স্ক্রিপ্ট এডিটরে স্ক্রিপ্ট প্রজেক্টটি খুলুন।
- স্থাপন > পরীক্ষা স্থাপন ক্লিক করুন।
- ইনস্টল করুন এ ক্লিক করুন।
- নিচে, সম্পন্ন ক্লিক করুন।
আপনি অন্যান্য ব্যবহারকারীদের তাদের অ্যাকাউন্টের সাথে অ্যাপস স্ক্রিপ্ট প্রকল্পটি ভাগ করে অ্যাড-অনটি পরীক্ষা করার সুযোগ দিতে পারেন (সম্পাদনার অ্যাক্সেস প্রয়োজন)। তারপর ব্যবহারকারীদের পূর্ববর্তী পদক্ষেপগুলি অনুসরণ করতে অনুরোধ করুন।
একবার ইনস্টল হয়ে গেলে, অ্যাড-অনটি তৎক্ষণাৎ Flows-এ উপলব্ধ হয়ে যাবে। অ্যাড-অনটি প্রদর্শিত হওয়ার আগে আপনাকে Flows রিফ্রেশ করতে হতে পারে। এটি ব্যবহার করার আগে আপনাকে অ্যাড-অনটি অনুমোদন করতে হবে।
পরীক্ষামূলক স্থাপনা সম্পর্কে আরও জানতে, একটি অপ্রকাশিত অ্যাড-অন ইনস্টল করুন দেখুন।
খোলা প্রবাহ।
আপনার পদক্ষেপ অন্তর্ভুক্ত করে এমন একটি প্রবাহ তৈরি করুন:
- নতুন প্রবাহ এ ক্লিক করুন।
- প্রবাহ কীভাবে শুরু হবে তা নির্বাচন করুন। যদি আপনার ধাপে একটি ইনপুট ভেরিয়েবলের প্রয়োজন হয়, তাহলে স্টার্টারের আউটপুটের অংশ হিসাবে ইনপুট ভেরিয়েবলটি কনফিগার করুন।
- ধাপ যোগ ক্লিক করুন। আপনার তৈরি বা আপডেট করা ধাপটি নির্বাচন করুন, যাকে বলা হয় Calculate ।
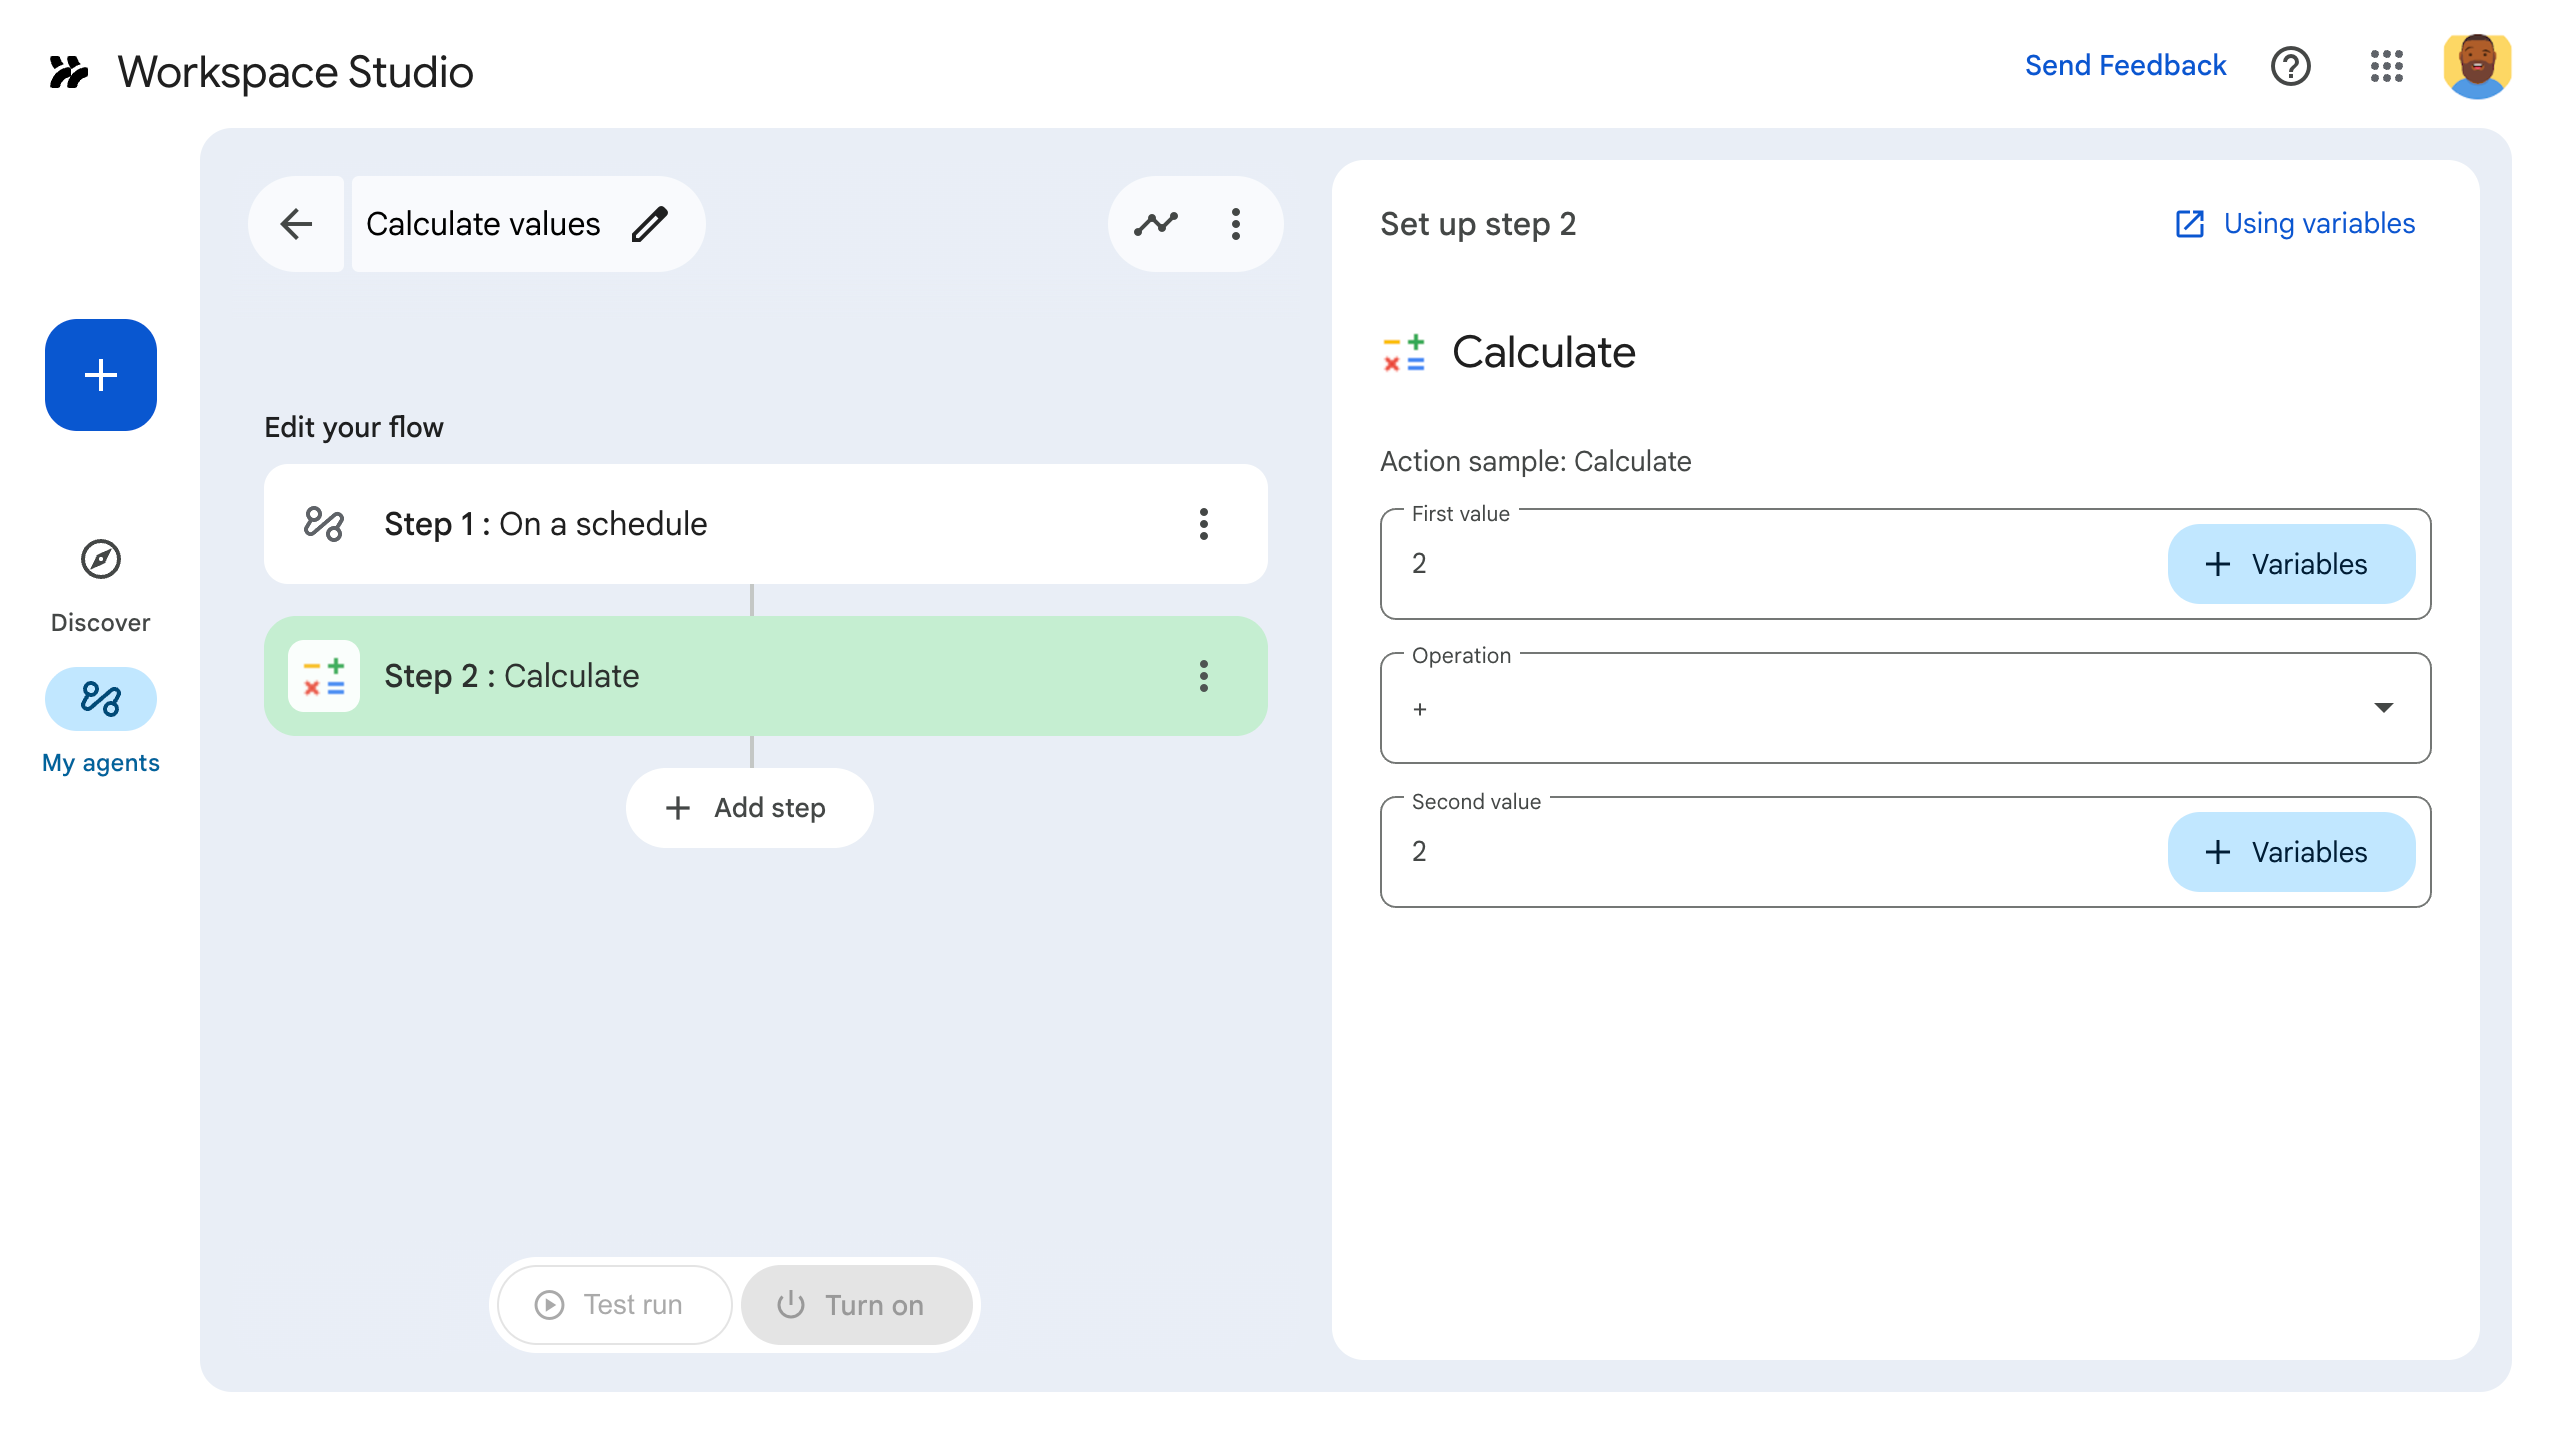
- আপনার ধাপটি কনফিগার করুন। গণনা ধাপের জন্য, দুটি মান এবং একটি গাণিতিক ক্রিয়া নির্বাচন করুন। ধাপটি স্বয়ংক্রিয়ভাবে সংরক্ষণ করা হবে।
- আপনার ধাপের আউটপুট পরীক্ষা করতে, আরেকটি ধাপ যোগ করুন। উদাহরণস্বরূপ, একটি Google Chat বার্তায় আউটপুট যোগ করতে, Chat এর Notify me in Chat ধাপ যোগ করুন। Message এ, Variables এ ক্লিক করুন এবং আপনার ধাপের আউটপুট নির্বাচন করুন। calculate ধাপের জন্য, Variables > Step 2: Calculate > Calculated result নির্বাচন করুন। পরিবর্তনশীলটি Message ক্ষেত্রে একটি চিপ হিসাবে প্রদর্শিত হবে।
- চালু করুন ক্লিক করুন। আপনার প্রবাহ চালানোর জন্য প্রস্তুত।
আপনার ফ্লো'র স্টার্টার সেট অফ করে ফ্লো চালান। উদাহরণস্বরূপ, যদি আপনার ফ্লো একটি সময়সূচীতে শুরু হয়, তাহলে এটি নির্দিষ্ট তারিখ এবং সময়ে চলবে।
ফ্লো প্রত্যাশা অনুযায়ী চলছে কিনা তা যাচাই করুন। ফ্লো বিল্ডারের অ্যাক্টিভিটি ট্যাবে গিয়ে লগগুলি পরীক্ষা করুন। অ্যাক্টিভিটি ট্যাবে কাস্টম লগ তৈরি করতে শিখতে, অ্যাক্টিভিটি লগগুলি দেখুন।
পরবর্তী পদক্ষেপ
আপনি ওয়ার্কস্পেস স্টুডিওর জন্য একটি কাস্টম ধাপ সফলভাবে তৈরি এবং পরীক্ষা করেছেন। আপনি এখন করতে পারেন:
আরও জটিল যুক্তি বাস্তবায়নে সাহায্য করার জন্য জেমিনিকে অনুরোধ করে ধাপটি কাস্টমাইজ করা চালিয়ে যান।
ধাপ কনফিগারেশন কাস্টমাইজ করতে একটি কনফিগারেশন কার্ড তৈরি করুন ।
আপনার স্টেপ রান রেকর্ড এবং সমস্যা সমাধানের জন্য কার্যকলাপ এবং ত্রুটি লগ করুন ।
ধাপগুলি চালানোর সাথে সাথে প্রেরণ এবং গ্রহণ প্রবাহিত JSON পেলোড পর্যালোচনা করতে ইভেন্ট অবজেক্টগুলি পর্যালোচনা করুন ।