

이 가이드에서는 입력 변수를 만드는 방법을 설명합니다.
실행하려면 단계에 특정 정보가 필요합니다. 예를 들어 이메일을 보내려면 이메일 주소가 필요합니다. 단계에 필요한 이 정보를 제공하려면 입력 변수를 정의합니다. 정의된 입력 변수는 일반적으로 사용자가 단계를 설정하는 동안 단계의 구성 카드에서 사용자가 설정합니다.
입력 변수는 두 위치에서 정의합니다. 부가기능의 매니페스트 파일과 사용자가 입력 변수 값을 입력할 수 있는 구성 카드가 있는 코드입니다.
매니페스트 파일에서 입력 변수 정의
매니페스트 파일에서 inputs[] 배열을 사용하여 입력 변수를 지정합니다. inputs[] 배열의 각 항목에는 다음과 같은 속성이 있습니다.
id: 입력 변수의 고유 식별자입니다. 흐름에서 구성 카드 입력 요소를 이 입력 변수와 연결하도록 허용하려면 가 상응하는 카드 요소의 이름과 일치해야 합니다.description: 최종 사용자에게 표시할 입력 변수의 설명입니다.cardinality: 허용되는 값의 수입니다. 가능한 값은 다음과 같습니다.SINGLE: 하나의 값만 허용됩니다.
dataType: 허용되는 값의 유형입니다.dataType에는 데이터 유형을 정의하는basicType속성이 있습니다. 유효한 값으로 다음이 포함되어 있습니다.STRING: 영숫자 문자열입니다.INTEGER: 숫자입니다.TIMESTAMP: 'Unix 에포크 이후 밀리초' 형식의 타임스탬프입니다. 예를 들어 2025년 11월 27일 16:49:02 UTC는1764262142988로 표시됩니다.BOOLEAN: true 또는 false입니다.EMAIL_ADDRESS:dana@example.com형식의 이메일 주소입니다.
다음 예에서는 계산기 단계의 입력 변수 3개를 정의합니다. 처음 두 입력 변수는 정수이고 세 번째는 산술 연산입니다.
JSON
{
  "timeZone": "America/Los_Angeles",
  "exceptionLogging": "STACKDRIVER",
  "runtimeVersion": "V8",
  "addOns": {
    "common": {
      "name": "Calculator",
      "logoUrl": "https://www.gstatic.com/images/branding/productlogos/calculator_search/v1/web-24dp/logo_calculator_search_color_1x_web_24dp.png",
      "useLocaleFromApp": true
    },
    "flows": {
      "workflowElements": [
        {
          "id": "calculatorDemo",
          "state": "ACTIVE",
          "name": "Calculate",
          "description": "Asks the user for two values and a math operation, then performs the math operation on the values and outputs the result.",
          "workflowAction": {
            "inputs": [
              {
                "id": "value1",
                "description": "value1",
                "cardinality": "SINGLE",
                "dataType": {
                  "basicType": "INTEGER"
                }
              },
              {
                "id": "value2",
                "description": "value2",
                "cardinality": "SINGLE",
                "dataType": {
                  "basicType": "INTEGER"
                }
              },
              {
                "id": "operation",
                "description": "operation",
                "cardinality": "SINGLE",
                "dataType": {
                  "basicType": "STRING"
                }
              }
            ],
            "outputs": [
              {
                "id": "result",
                "description": "Calculated result",
                "cardinality": "SINGLE",
                "dataType": {
                  "basicType": "INTEGER"
                }
              }
            ],
            "onConfigFunction": "onConfigCalculate",
            "onExecuteFunction": "onExecuteCalculate"
          }
        }
      ]
    }
  }
}
코드에서 입력 변수 정의
단계의 코드에는 매니페스트 파일의 inputs[] 배열에 정의된 각 입력 변수에 대해 하나의 입력 카드 위젯을 정의하는 구성 카드를 반환하는 onConfigFunction()이라는 함수가 포함되어 있습니다.
구성 카드에 정의된 입력 위젯에는 다음과 같은 요구사항이 있습니다.
- 각 입력 위젯의
name은 매니페스트 파일에서 상응하는 입력 변수의id와 일치해야 합니다. - 입력 위젯의 cardinality는 매니페스트 파일에서 입력 변수의
cardinality와 일치해야 합니다. - 입력 위젯의 데이터 유형은 매니페스트 파일에서 입력 변수의
dataType과 일치해야 합니다. 입력 변수의dataType이 정수인 경우 문자열을 포함할 수 없습니다.
카드 인터페이스를 빌드하는 데 도움이 필요하면 다음 옵션 중 하나를 참고하세요.
- 카드 빌더: 카드를 빌드하고 정의하는 데 사용할 수 있는 대화형 도구 입니다.
- 카드: Google Workspace 부가기능 API 참조 문서에 있습니다.
- 카드 서비스: 스크립트에서 카드를 구성하고 빌드할 수 있는 Apps Script 서비스입니다.
- 카드 기반 인터페이스 개요: Google Workspace 부가기능 개발자 문서에 있습니다.
다음 예에서는 매니페스트 파일에서 입력 변수 정의에 정의된 각 입력 위젯의 구성 카드를 반환합니다.
Apps Script
/**
* Generates and displays a configuration card for the sample calculation step.
*
* This function creates a card with input fields for two values and a drop-down
* for selecting an arithmetic operation.
*
* The input fields are configured to let the user select outputs from previous
* workflow steps as input values using the `hostAppDataSource` property.
*/
function onConfigCalculate() {
  const firstInput = CardService.newTextInput()
    .setFieldName("value1") // "FieldName" must match an "id" in the manifest file's inputs[] array.
    .setTitle("First Value")
    .setHostAppDataSource(
      CardService.newHostAppDataSource()
        .setWorkflowDataSource(
          CardService.newWorkflowDataSource()
            .setIncludeVariables(true)
        )
    );

  const secondInput = CardService.newTextInput()
    .setFieldName("value2") // "FieldName" must match an "id" in the manifest file's inputs[] array.
    .setTitle("Second Value")
    .setHostAppDataSource(
      CardService.newHostAppDataSource()
        .setWorkflowDataSource(
          CardService.newWorkflowDataSource()
            .setIncludeVariables(true)
        )
    );

  const selectionInput = CardService.newSelectionInput()
    .setTitle("operation")
    .setFieldName("operation") // "FieldName" must match an "id" in the manifest file's inputs[] array.
    .setType(CardService.SelectionInputType.DROPDOWN)
    .addItem("+", "+", false)
    .addItem("-", "-", true)
    .addItem("x", "x", false)
    .addItem("/", "/", false);

  const sections = CardService.newCardSection()
    .setHeader("Action_sample: Calculate")
    .setId("section_1")
    .addWidget(firstInput)
    .addWidget(selectionInput)
    .addWidget(secondInput)

  let card = CardService.newCardBuilder()
    .addSection(sections)
    .build();

  return card;
}
이전 단계의 출력 변수 사용
워크플로의 이전 단계에서 출력 변수를 허용하도록 입력 변수를 구성할 수 있습니다.
변수 선택 사용 설정
사용자가 이전 단계에서 변수를 선택하도록 하려면 TextInput 및 SelectionInput 위젯에서 includeVariables 속성을 사용합니다.
TextInput 및 SelectionInput 위젯에는 다음과 같은 Workspace Studio 관련 기능이 있습니다.
includeVariables: 사용자가 이전 단계에서 변수를 선택할 수 있는 불리언 속성입니다. 변수 선택 도구가 이후 단계에 표시되려면 시작 이벤트와 하나 이상의 상응하는 출력 변수 가 모두 변수에 매핑되어야 합니다.type: 추천 검색어를 자동 완성하는 열거된 값입니다. 지원되는 값은 다음과 같습니다.USER: 사용자 연락처에 있는 사용자의 자동 완성 추천 검색어를 제공합니다.SPACE: 사용자가 회원으로 속한 Google Chat 스페이스의 자동 완성 추천 검색어를 제공합니다.
includeVariables와 type이 모두 설정되면 입력 필드에서 두 환경을 결합합니다. 사용자는 드롭다운 메뉴에서 일치하는 type의 변수를 선택하고 자동 완성 추천 검색어를 볼 수 있습니다.
-
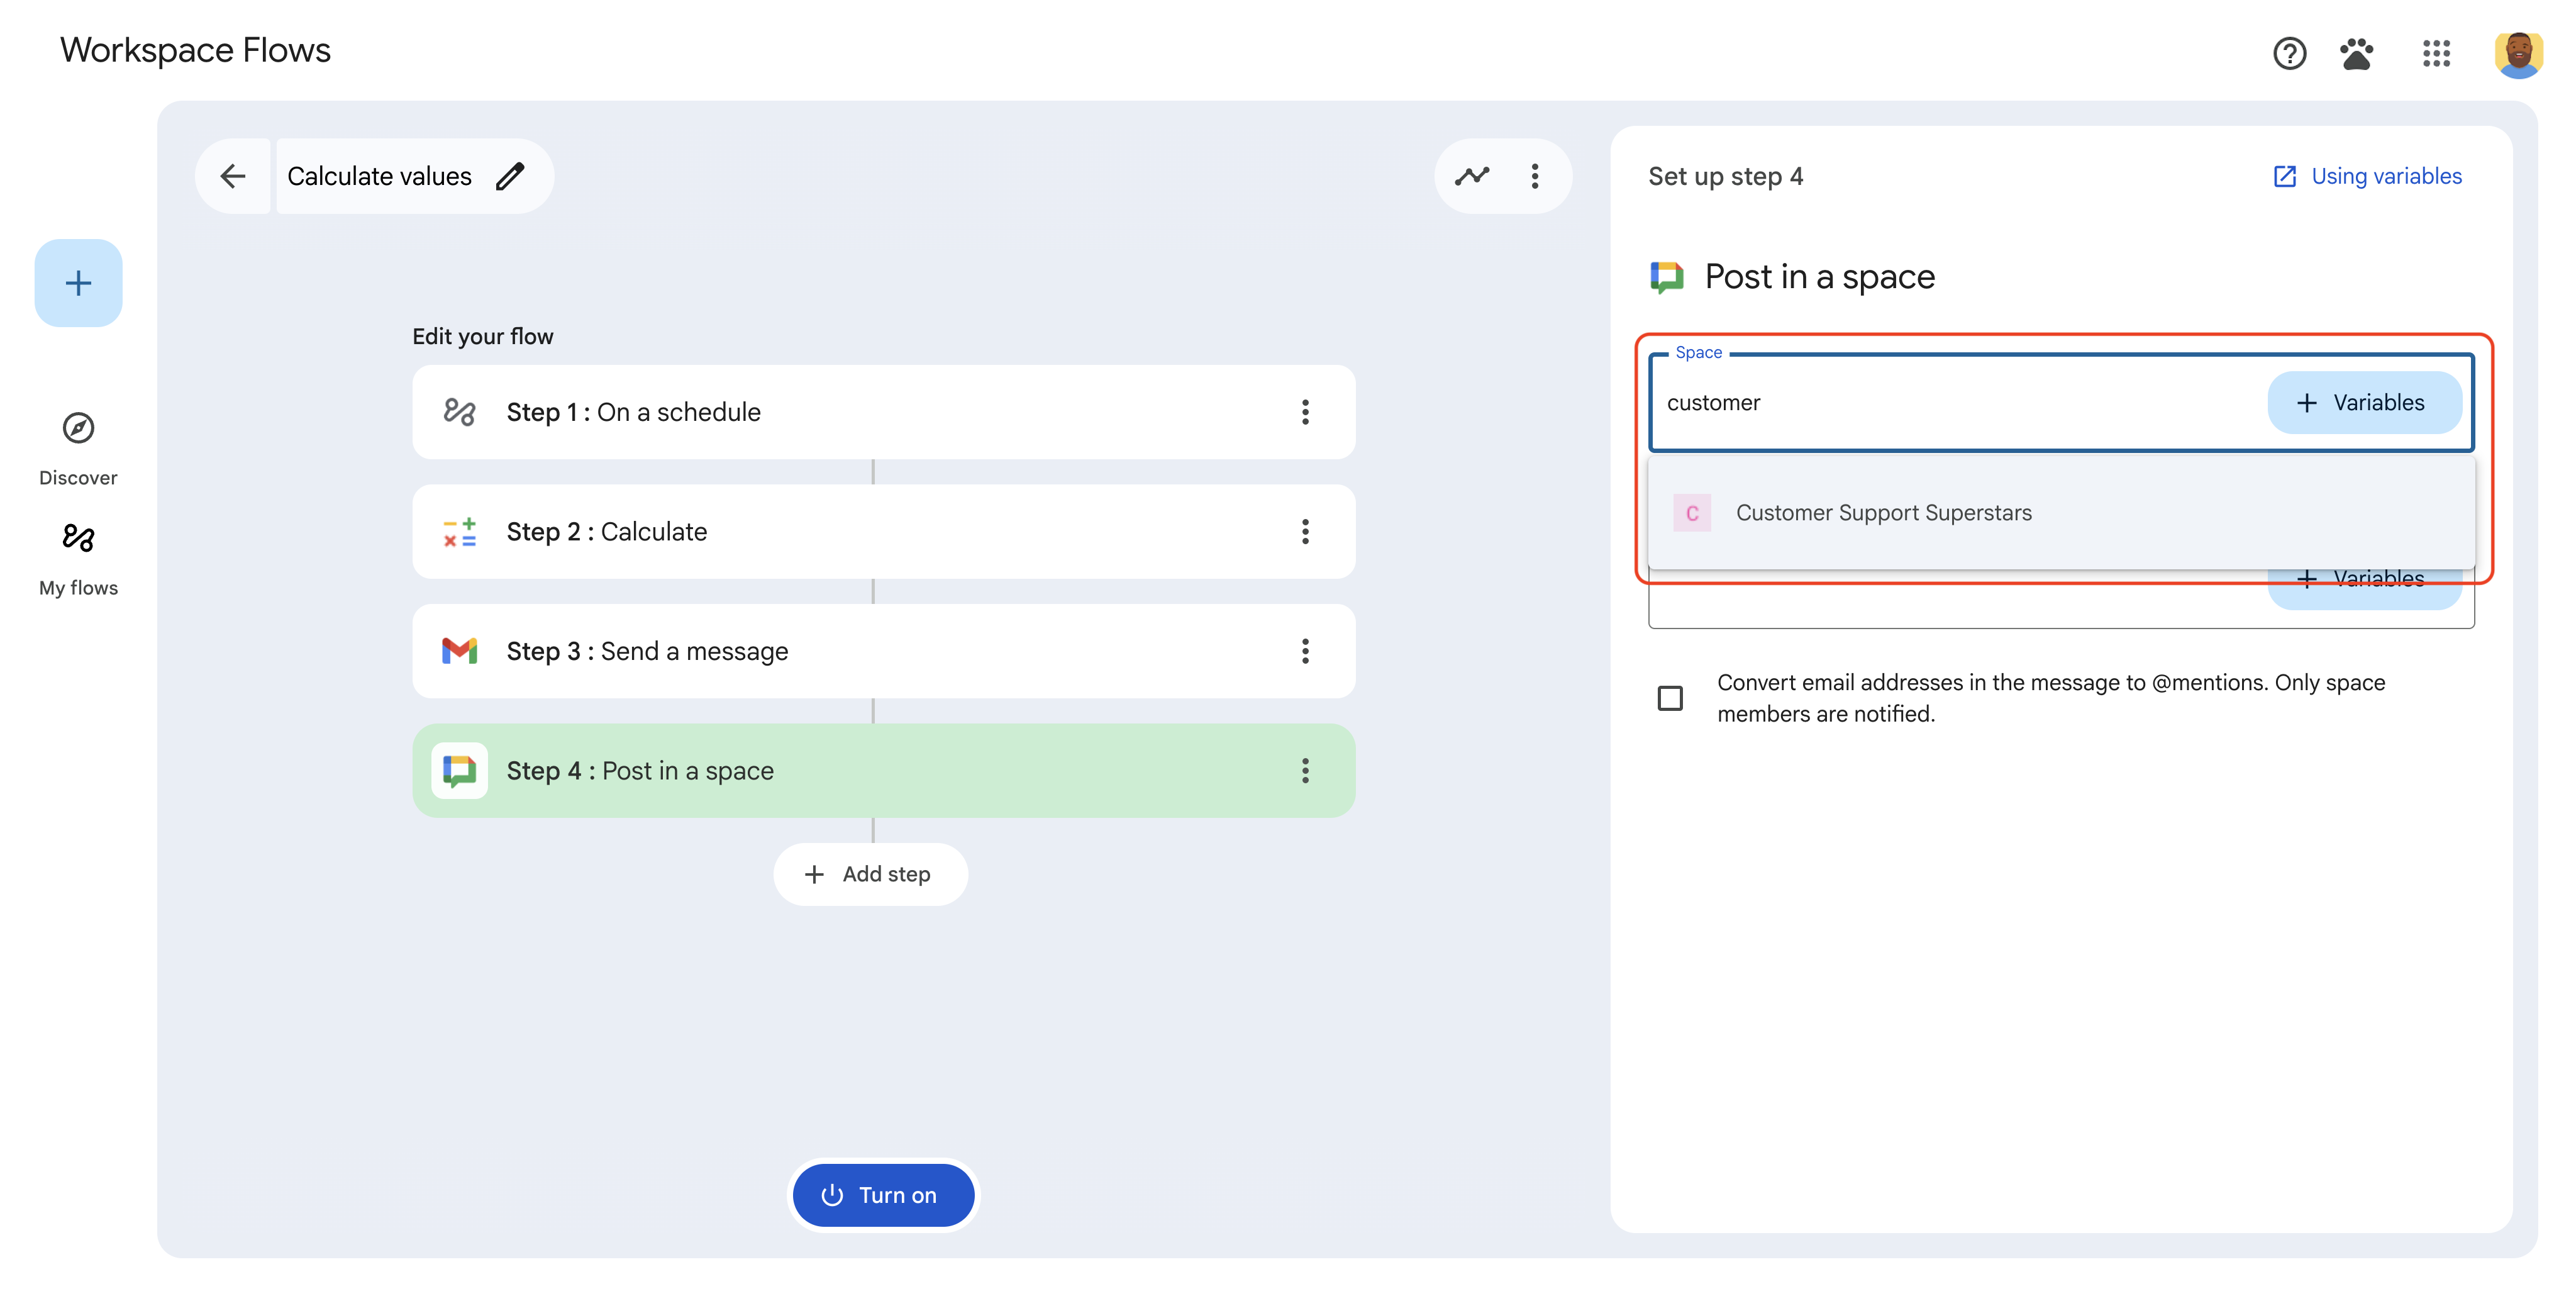
그림 4: 사용자가 스페이스를 선택할 때 자동 완성 추천 검색어를 검토합니다. -
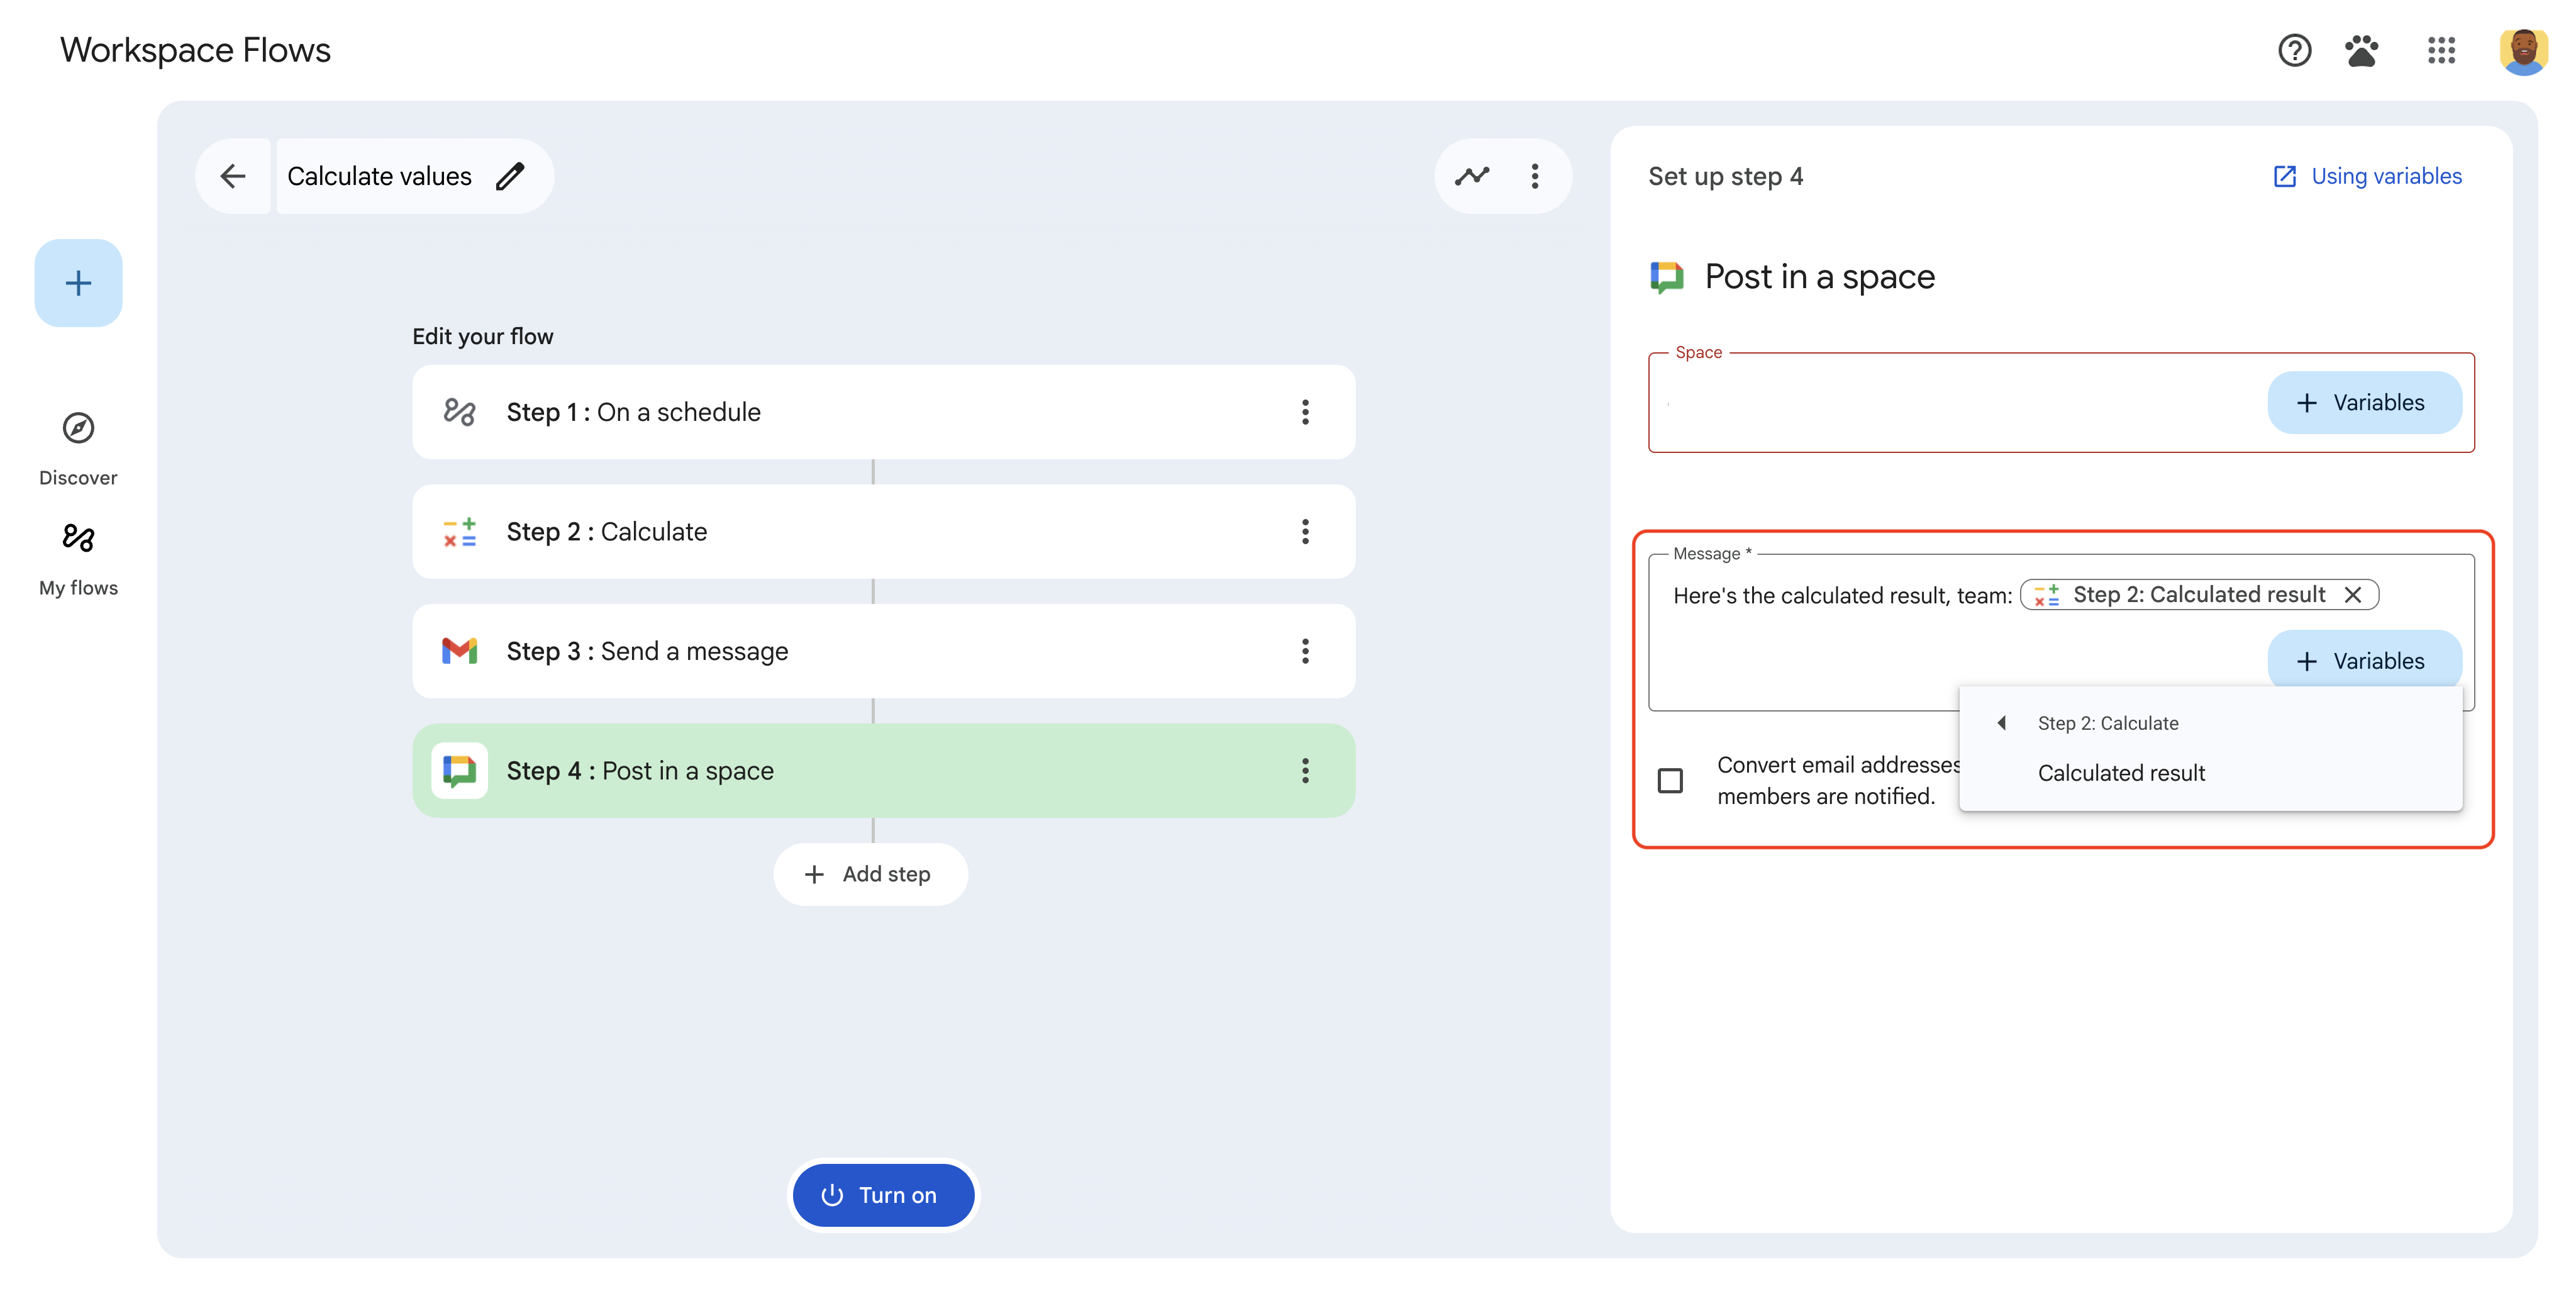
그림 5: 사용자가 ➕변수 드롭다운에서 이전 단계의 출력 변수를 선택합니다.
더보기 메뉴로 출력 변수 하나만 선택
오버플로 메뉴를 사용하여 사용자가 이전 단계에서 단일 출력 변수
를 선택할 수 있도록 SelectionInput
위젯을 구성할 수 있습니다.
SelectionInputType을 OVERFLOW_MENU로 설정하면 위젯이 전용 변수 선택 도구 역할을 합니다. 변수 값을 문자열로 변환하는 TextInput과 함께 includeVariables를 사용하는 것과 달리 OVERFLOW_MENU는 선택한 변수의 원래 데이터 유형을 유지합니다.
Apps Script
const selectionInput = CardService.newSelectionInput()
  .setFieldName("variable_picker_1")
  .setTitle("Variable Picker")
  .setType(
    CardService.SelectionInputType.OVERFLOW_MENU
  );
사용자가 텍스트와 출력 변수를 결합하도록 허용
TextInput
위젯을 사용하여 사용자가 텍스트 및
출력 변수와 상호작용하는 방식을 제어하도록 구성할 수 있습니다.
setInputMode().
RICH_TEXT: 사용자가 텍스트와 출력 변수를 결합할 수 있습니다. 결과는 연결된 단일 문자열입니다.PLAIN_TEXT: 입력을 제한합니다. 사용자는 텍스트를 입력하거나 단일 출력 변수를 선택할 수 있습니다. 변수를 선택하면 기존 텍스트가 대체됩니다. 이 모드를 사용하여 매니페스트에 정의된 특정 데이터 유형을 적용합니다.
다음 이미지는 두 개의 TextInput 위젯을 보여줍니다. 첫 번째는 RICH_TEXT로 구성되어 있으며 텍스트와 출력 변수가 있습니다. 두 번째는 PLAIN_TEXT로 구성되어 있으며 출력 변수만 허용합니다.
-
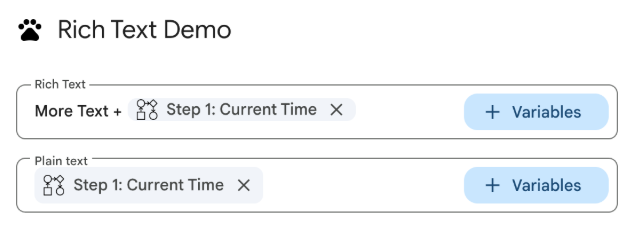
그림 3: RICH_TEXT및PLAIN_TEXT로 구성된 텍스트 입력 위젯
모든 TextInput 위젯의 입력 모드를 명시적으로 설정하는 것이 좋습니다.
다음은 다양한 입력 모드로 TextInput 위젯을 구성하기 위한 매니페스트 파일입니다.
JSON
{
  "timeZone": "America/Toronto",
  "dependencies": {},
  "exceptionLogging": "STACKDRIVER",
  "runtimeVersion": "V8",
  "addOns": {
    "common": {
      "name": "Text and output variable demo",
      "logoUrl": "https://www.gstatic.com/images/icons/material/system/1x/pets_black_48dp.png",
      "useLocaleFromApp": true
    },
    "flows": {
      "workflowElements": [
        {
          "id": "richTextDemo",
          "state": "ACTIVE",
          "name": "Rich Text Demo",
          "description": "Show the difference between rich text and plain text TextInput widgets",
          "workflowAction": {
            "inputs": [
              {
                "id": "value1",
                "description": "First user input",
                "cardinality": "SINGLE",
                "dataType": {
                  "basicType": "STRING"
                }
              },
              {
                "id": "value2",
                "description": "Second user input",
                "cardinality": "SINGLE",
                "dataType": {
                  "basicType": "STRING"
                }
              }
            ],
            "onConfigFunction": "onConfiguration",
            "onExecuteFunction": "onExecution"
          }
        }
      ]
    }
  }
}
다음은 다양한 입력 모드로 TextInput 위젯을 구성하기 위한 코드입니다.
Apps Script
function onConfiguration() {
  const input1 = CardService.newTextInput()
    .setFieldName("value1")
    .setId("value1")
    .setTitle("Rich Text")
    .setHostAppDataSource(
      CardService.newHostAppDataSource()
        .setWorkflowDataSource(
          CardService.newWorkflowDataSource()
            .setIncludeVariables(true)
        )
    )
    // Set input mode to RICH_TEXT to allow mixed text and variables.
    .setInputMode(CardService.TextInputMode.RICH_TEXT);

  const input2 = CardService.newTextInput()
    .setFieldName("value2")
    .setId("value2")
    .setTitle("Plain text")
    .setHostAppDataSource(
      CardService.newHostAppDataSource()
        .setWorkflowDataSource(
          CardService.newWorkflowDataSource()
            .setIncludeVariables(true)
        )
    )
    // Set input mode to PLAIN_TEXT to enforce single variable selection.
    .setInputMode(CardService.TextInputMode.PLAIN_TEXT);

  const section = CardService.newCardSection()
    .addWidget(input1)
    .addWidget(input2);

  const card = CardService.newCardBuilder()
    .addSection(section)
    .build();

  return card;
}

function onExecution(e) {
}
변수 선택 도구 버튼 맞춤설정
버튼 크기와 라벨을 설정하여 변수 선택 도구 버튼을 맞춤설정할 수 있습니다.
버튼 크기
버튼 크기를 설정하려면 다음 VariableButtonSize enum 중 하나와 함께 setVariableButtonSize()를 사용합니다.
UNSPECIFIED: 기본값입니다. 버튼은 측면 패널에서 작고 다른 컨텍스트에서는 전체 크기입니다.COMPACT: 버튼에 더하기 기호 (+)만 표시됩니다.FULL_SIZE: 버튼에 전체 텍스트 라벨이 표시됩니다.
버튼 라벨
버튼 텍스트를 설정하려면 setVariableButtonLabel()을 사용합니다.
예: 변수 선택 도구 맞춤설정
다음 예에서는 다양한 변수 선택 도구 버튼 크기와 맞춤 라벨로 TextInput 위젯을 구성하는 방법을 보여줍니다.
-
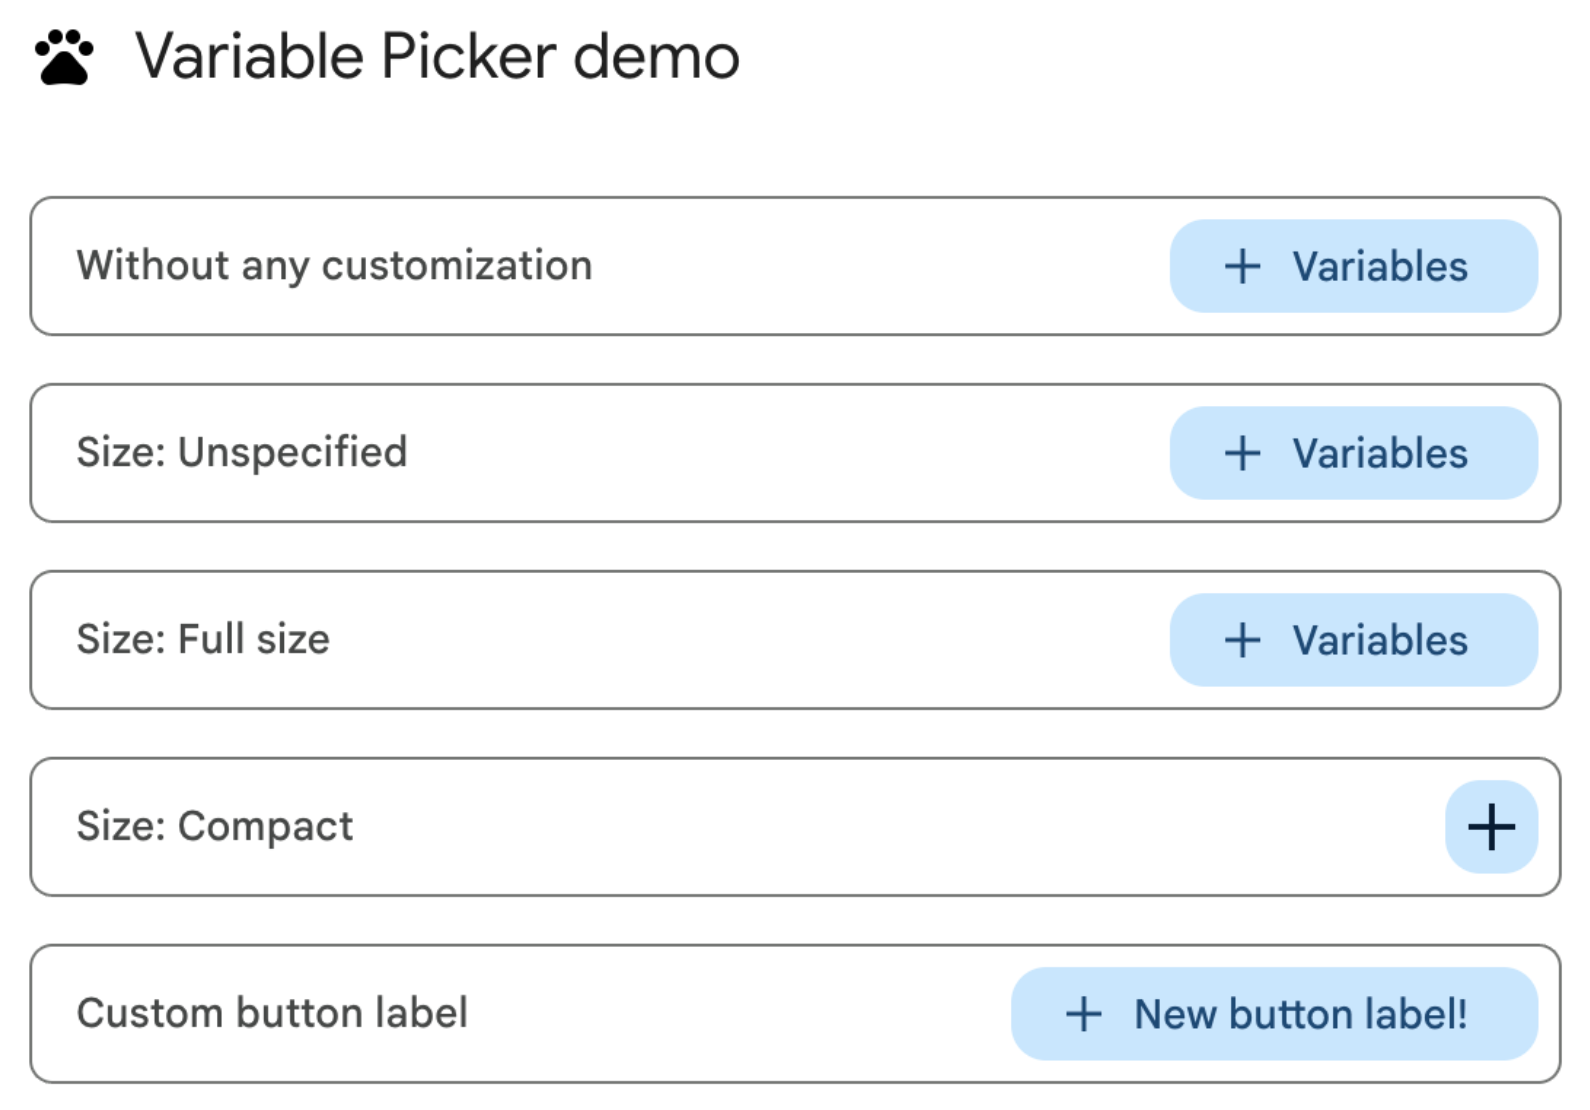
그림 1: 웹의 변수 선택 도구 버튼 맞춤설정 -
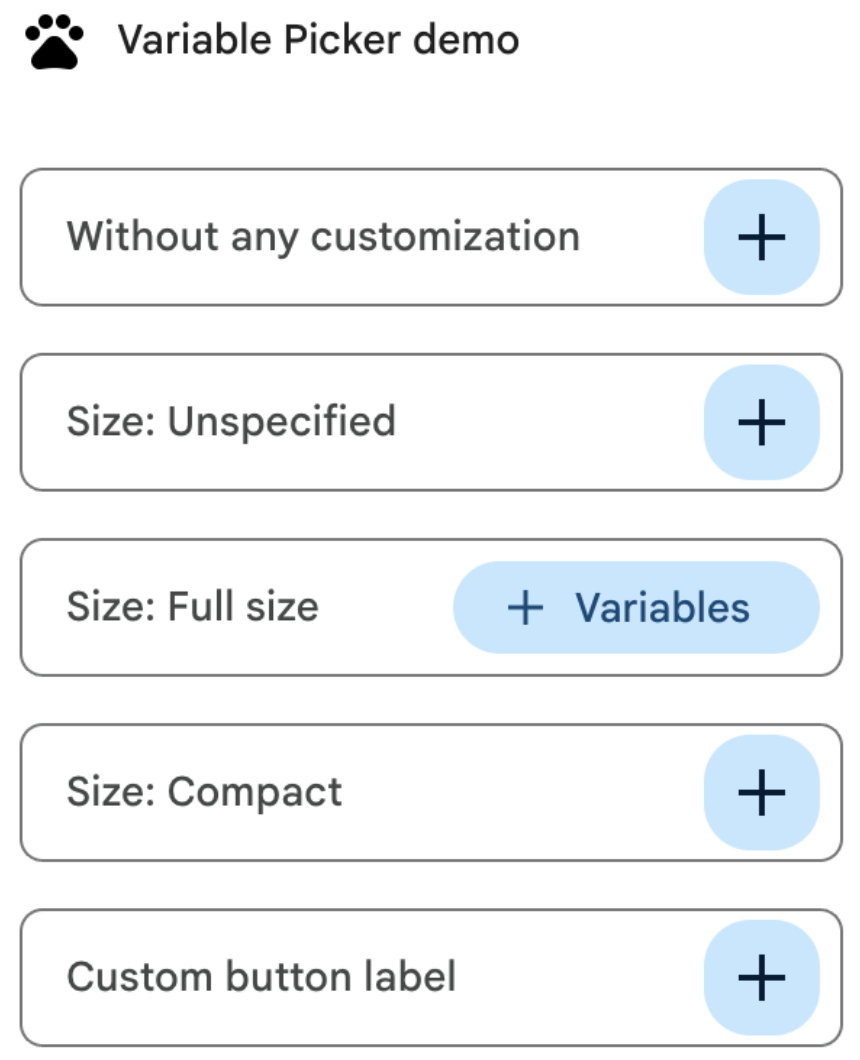
그림 2: 부가기능 측면 패널의 변수 선택 도구 버튼 맞춤설정
다음은 변수 선택 도구 버튼을 맞춤설정하기 위한 매니페스트 파일입니다.
JSON
{
  "timeZone": "America/Los_Angeles",
  "dependencies": {},
  "exceptionLogging": "STACKDRIVER",
  "runtimeVersion": "V8",
  "oauthScopes": [
    "https://www.googleapis.com/auth/script.locale"
  ],
  "addOns": {
    "common": {
      "name": "Variable button customization",
      "logoUrl": "https://www.gstatic.com/images/icons/material/system/1x/pets_black_48dp.png",
      "useLocaleFromApp": true
    },
    "flows": {
      "workflowElements": [
        {
          "id": "variable_picker_customization",
          "state": "ACTIVE",
          "name": "Variable Picker demo",
          "description": "List all possible variable picker customization options",
          "workflowAction": {
            "onConfigFunction": "onUpdateCardConfigFunction",
            "onExecuteFunction": "onUpdateCardExecuteFunction"
          }
        }
      ]
    }
  }
}
다음은 변수 선택 도구 버튼을 맞춤설정하기 위한 코드입니다.
Apps Script
function onUpdateCardConfigFunction(event) {
  const textInput1 = CardService.newTextInput()
    .setFieldName("value1")
    .setTitle("Regular variable picker button")
    .setHostAppDataSource(
      CardService.newHostAppDataSource().setWorkflowDataSource(
        CardService.newWorkflowDataSource()
          .setIncludeVariables(true)
          .setVariableButtonSize(CardService.VariableButtonSize.UNSPECIFIED)
      )
    );

  const textInput2 = CardService.newTextInput()
    .setFieldName("value2")
    .setTitle("Size: Unspecified")
    .setHostAppDataSource(
      CardService.newHostAppDataSource().setWorkflowDataSource(
        CardService.newWorkflowDataSource()
          .setIncludeVariables(true)
          .setVariableButtonSize(CardService.VariableButtonSize.UNSPECIFIED)
      )
    );

  const textInput3 = CardService.newTextInput()
    .setFieldName("value3")
    .setTitle("Size: Full size")
    .setHostAppDataSource(
      CardService.newHostAppDataSource().setWorkflowDataSource(
        CardService.newWorkflowDataSource()
          .setIncludeVariables(true)
          .setVariableButtonSize(CardService.VariableButtonSize.FULL_SIZE)
      )
    );

  const textInput4 = CardService.newTextInput()
    .setFieldName("value4")
    .setTitle("Size: Compact")
    .setHostAppDataSource(
      CardService.newHostAppDataSource().setWorkflowDataSource(
        CardService.newWorkflowDataSource()
          .setIncludeVariables(true)
          .setVariableButtonSize(CardService.VariableButtonSize.COMPACT)
      )
    );

  const textInput5 = CardService.newTextInput()
    .setFieldName("value5")
    .setTitle("Custom button label")
    .setHostAppDataSource(
      CardService.newHostAppDataSource().setWorkflowDataSource(
        CardService.newWorkflowDataSource()
          .setIncludeVariables(true)
          .setVariableButtonLabel("New button label!")
      )
    );

  var cardSection = CardService.newCardSection()
    .addWidget(textInput1)
    .addWidget(textInput2)
    .addWidget(textInput3)
    .addWidget(textInput4)
    .addWidget(textInput5)
    .setId("section_1");

  var card = CardService.newCardBuilder().addSection(cardSection).build();

  return card;
}

function onUpdateCardExecuteFunction(event) {
}
Google Workspace 데이터 자동 완성 구성
사용자의 Google Workspace 환경 내 데이터에서 자동 완성 추천 검색어를 채울 수도 있습니다.
- Google Workspace 사용자: 동일한 Google Workspace 조직 내 사용자를 채웁니다.
- Google Chat 스페이스: 사용자가 회원으로 속한 Google Chat 스페이스를 채웁니다.
이렇게 구성하려면
PlatformDataSource
위젯에서
SelectionInput
를 설정하고
WorkflowDataSourceType
을 USER 또는 SPACE로 지정합니다.
Apps Script
// User Autocomplete
var multiSelect2 =
  CardService.newSelectionInput()
    .setFieldName("value2")
    .setTitle("User Autocomplete")
    .setType(CardService.SelectionInputType.MULTI_SELECT)
    .setMultiSelectMaxSelectedItems(3)
    .setPlatformDataSource(
      CardService.newPlatformDataSource()
        .setHostAppDataSource(
          CardService.newHostAppDataSource()
            .setWorkflowDataSource(
              CardService.newWorkflowDataSource()
                .setIncludeVariables(true)
                .setType(CardService.WorkflowDataSourceType.USER)
            ))
    );

// Chat Space Autocomplete
var multiSelect3 =
  CardService.newSelectionInput()
    .setFieldName("value3")
    .setTitle("Chat Space Autocomplete")
    .setType(CardService.SelectionInputType.MULTI_SELECT)
    .setMultiSelectMaxSelectedItems(3)
    .setPlatformDataSource(
      CardService.newPlatformDataSource()
        .setHostAppDataSource(
          CardService.newHostAppDataSource()
            .setWorkflowDataSource(
              CardService.newWorkflowDataSource()
                .setIncludeVariables(true)
                .setType(CardService.WorkflowDataSourceType.SPACE)
            ))
    );
예: 자동 완성 유형 결합
다음 예에서는 서버 측, 사용자, 스페이스 자동 완성을 보여주는 SelectionInput 위젯 3개가 있는 카드를 만드는 onConfig 함수를 보여줍니다.
JSON
{
  "timeZone": "America/Los_Angeles",
  "exceptionLogging": "STACKDRIVER",
  "runtimeVersion": "V8",
  "addOns": {
    "common": {
      "name": "Autocomplete Demo",
      "logoUrl": "https://www.gstatic.com/images/icons/material/system/1x/pets_black_48dp.png",
      "useLocaleFromApp": true
    },
    "flows": {
      "workflowElements": [
        {
          "id": "autocomplete_demo",
          "state": "ACTIVE",
          "name": "Autocomplete Demo",
          "description": "Provide autocompletion in input fields",
          "workflowAction": {
            "inputs": [
              {
                "id": "value1",
                "description": "A multi-select field with autocompletion",
                "cardinality": "SINGLE",
                "dataType": {
                  "basicType": "STRING"
                }
              }
            ],
            "onConfigFunction": "onConfigAutocomplete",
            "onExecuteFunction": "onExecuteAutocomplete"
          }
        }
      ]
    }
  }
}
Apps Script
function onConfigAutocompleteTest(event) {
  // Handle autocomplete request
  if (event.workflow && event.workflow.elementUiAutocomplete) {
    return handleAutocompleteRequest(event);
  }

  // Server-side autocomplete widget
  var multiSelect1 =
    CardService.newSelectionInput()
      .setFieldName("value1")
      .setTitle("Server Autocomplete")
      .setType(CardService.SelectionInputType.MULTI_SELECT)
      .setMultiSelectMaxSelectedItems(3)
      .addDataSourceConfig(
        CardService.newDataSourceConfig()
          .setRemoteDataSource(
            CardService.newAction().setFunctionName('getAutocompleteResults')
          )
      )
      .addDataSourceConfig(
        CardService.newDataSourceConfig()
          .setPlatformDataSource(
            CardService.newPlatformDataSource()
              .setHostAppDataSource(
                CardService.newHostAppDataSource()
                  .setWorkflowDataSource(
                    CardService.newWorkflowDataSource()
                      .setIncludeVariables(true)
                  ))
          )
      );

  // User autocomplete widget
  var multiSelect2 =
    CardService.newSelectionInput()
      .setFieldName("value2")
      .setTitle("User Autocomplete")
      .setType(CardService.SelectionInputType.MULTI_SELECT)
      .setMultiSelectMaxSelectedItems(3)
      .setPlatformDataSource(
        CardService.newPlatformDataSource()
          .setHostAppDataSource(
            CardService.newHostAppDataSource()
              .setWorkflowDataSource(
                CardService.newWorkflowDataSource()
                  .setIncludeVariables(true)
                  .setType(CardService.WorkflowDataSourceType.USER)
              ))
      );

  // Space autocomplete widget
  var multiSelect3 =
    CardService.newSelectionInput()
      .setFieldName("value3")
      .setTitle("Chat Space Autocomplete")
      .setType(CardService.SelectionInputType.MULTI_SELECT)
      .setMultiSelectMaxSelectedItems(3)
      .setPlatformDataSource(
        CardService.newPlatformDataSource()
          .setHostAppDataSource(
            CardService.newHostAppDataSource()
              .setWorkflowDataSource(
                CardService.newWorkflowDataSource()
                  .setIncludeVariables(true)
                  .setType(CardService.WorkflowDataSourceType.SPACE)
              ))
      );

  var sectionBuilder =
    CardService.newCardSection()
      .addWidget(multiSelect1)
      .addWidget(multiSelect2)
      .addWidget(multiSelect3);

  var card =
    CardService.newCardBuilder()
      .addSection(sectionBuilder)
      .build();
  return card;
}

function handleAutocompleteRequest(event) {
  var invokedFunction = event.workflow.elementUiAutocomplete.invokedFunction;
  var query = event.workflow.elementUiAutocomplete.query;

  if (invokedFunction != "getAutocompleteResults" || query == undefined || query == "") {
    return {};
  }

  // Query your data source to get results
  let autocompleteResponse = AddOnsResponseService.newUpdateWidget()
    .addSuggestion(
      query + " option 1",
      query + "_option1",
      false,
      "https://developers.google.com/workspace/add-ons/images/person-icon.png",
      "option 1 bottom text"
    )
    .addSuggestion(
      query + " option 2",
      query + "_option2",
      false,
      "https://developers.google.com/workspace/add-ons/images/person-icon.png",
      "option 2 bottom text"
    ).addSuggestion(
      query + " option 3",
      query + "_option3",
      false,
      "https://developers.google.com/workspace/add-ons/images/person-icon.png",
      "option 3 bottom text"
    );

  const modifyAction = AddOnsResponseService.newAction()
    .addModifyCard(
      AddOnsResponseService.newModifyCard()
        .setUpdateWidget(autocompleteResponse)
    );

  return AddOnsResponseService.newRenderActionBuilder()
    .setAction(modifyAction)
    .build();
}
입력 변수 유효성 검사
사용자가 적절한 값을 입력하는지 확인하는 것이 좋습니다. 입력 변수 유효성 검사를 참고하세요.