
คู่มือนี้อธิบายวิธีสร้างตัวแปรอินพุต
ขั้นตอนต่างๆ ต้องใช้ข้อมูลบางอย่างจึงจะทำงานได้ เช่น การส่งอีเมลต้องใช้อีเมลแอดเดรส หากต้องการระบุข้อมูลที่จำเป็นนี้สำหรับขั้นตอนต่างๆ ให้กำหนดตัวแปรอินพุต เมื่อกำหนดแล้ว โดยปกติผู้ใช้จะเป็นผู้ตั้งค่าตัวแปรอินพุตในการ์ดการกำหนดค่าของขั้นตอนขณะที่ผู้ใช้ตั้งค่าขั้นตอน
กำหนดตัวแปรอินพุตใน 2 ที่ ได้แก่ ไฟล์ Manifest ของส่วนเสริม และในโค้ดที่มีการ์ดการกำหนดค่าซึ่งผู้ใช้สามารถป้อนค่าสำหรับตัวแปรอินพุตได้
กำหนดตัวแปรอินพุตในไฟล์ Manifest
ในไฟล์ Manifest ให้ระบุตัวแปรอินพุตด้วยอาร์เรย์ inputs[] โดยแต่ละรายการในอาร์เรย์ inputs[] จะมีพร็อพเพอร์ตี้ต่อไปนี้
id: ตัวระบุที่ไม่ซ้ำกันสำหรับตัวแปรอินพุต หากต้องการให้โฟลว์เชื่อมโยงองค์ประกอบอินพุตของการ์ดการกำหนดค่ากับตัวแปรอินพุตนี้ ต้องตรงกับชื่อขององค์ประกอบการ์ดที่เกี่ยวข้องdescription: คำอธิบายตัวแปรอินพุตที่จะแสดงต่อผู้ใช้ปลายทางcardinality: จำนวนค่าที่อนุญาต ค่าที่เป็นไปได้ ได้แก่SINGLE: อนุญาตค่าเดียวเท่านั้น
dataType: ประเภทค่าที่ยอมรับdataTypeมีพร็อพเพอร์ตี้basicTypeซึ่งกำหนดประเภทข้อมูล ค่าที่ใช้ได้มีดังนี้STRING: สตริงที่เป็นตัวเลขและตัวอักษรINTEGER: ตัวเลขTIMESTAMP: การประทับเวลาในรูปแบบ "มิลลิวินาทีนับตั้งแต่ Epoch ของ Unix" เช่น วันที่ 27 พฤศจิกายน 2025 เวลา 16:49:02 น. UTC จะแสดงเป็น1764262142988BOOLEAN: จริงหรือเท็จEMAIL_ADDRESS: อีเมลในรูปแบบdana@example.com
ตัวอย่างต่อไปนี้กำหนดตัวแปรอินพุต 3 รายการสำหรับขั้นตอนเครื่องคิดเลข โดยตัวแปรอินพุต 2 รายการแรกเป็นจำนวนเต็ม และตัวแปรอินพุตรายการที่ 3 เป็นการดำเนินการทางคณิตศาสตร์
JSON
{
  "timeZone": "America/Los_Angeles",
  "exceptionLogging": "STACKDRIVER",
  "runtimeVersion": "V8",
  "addOns": {
    "common": {
      "name": "Calculator",
      "logoUrl": "https://www.gstatic.com/images/branding/productlogos/calculator_search/v1/web-24dp/logo_calculator_search_color_1x_web_24dp.png",
      "useLocaleFromApp": true
    },
    "flows": {
      "workflowElements": [
        {
          "id": "calculatorDemo",
          "state": "ACTIVE",
          "name": "Calculate",
          "description": "Asks the user for two values and a math operation, then performs the math operation on the values and outputs the result.",
          "workflowAction": {
            "inputs": [
              {
                "id": "value1",
                "description": "value1",
                "cardinality": "SINGLE",
                "dataType": {
                  "basicType": "INTEGER"
                }
              },
              {
                "id": "value2",
                "description": "value2",
                "cardinality": "SINGLE",
                "dataType": {
                  "basicType": "INTEGER"
                }
              },
              {
                "id": "operation",
                "description": "operation",
                "cardinality": "SINGLE",
                "dataType": {
                  "basicType": "STRING"
                }
              }
            ],
            "outputs": [
              {
                "id": "result",
                "description": "Calculated result",
                "cardinality": "SINGLE",
                "dataType": {
                  "basicType": "INTEGER"
                }
              }
            ],
            "onConfigFunction": "onConfigCalculate",
            "onExecuteFunction": "onExecuteCalculate"
          }
        }
      ]
    }
  }
}
กำหนดตัวแปรอินพุตในโค้ด
โค้ดของขั้นตอนมีฟังก์ชันที่เรียกว่า onConfigFunction() ซึ่งแสดงการ์ดการกำหนดค่าที่กำหนดวิดเจ็ตการ์ดอินพุต 1 รายการสำหรับตัวแปรอินพุตแต่ละรายการที่กำหนดไว้ในอาร์เรย์ inputs[] ของไฟล์ Manifest
วิดเจ็ตอินพุตที่กำหนดไว้ในการ์ดการกำหนดค่าต้องเป็นไปตามข้อกำหนดต่อไปนี้
nameของวิดเจ็ตอินพุตแต่ละรายการต้องตรงกับidของตัวแปรอินพุตที่เกี่ยวข้องในไฟล์ Manifestcardinalityของวิดเจ็ตอินพุตต้องตรงกับcardinalityของตัวแปรอินพุตในไฟล์ ManifestdataTypeของวิดเจ็ตอินพุตต้องตรงกับdataTypeของตัวแปรอินพุตในไฟล์ Manifest หากตัวแปรอินพุตมีdataTypeเป็นจำนวนเต็ม ตัวแปรดังกล่าวจะเก็บสตริงไม่ได้
หากต้องการความช่วยเหลือในการสร้างอินเทอร์เฟซการ์ด โปรดดูตัวเลือกใดตัวเลือกหนึ่งต่อไปนี้
- Card Builder: เครื่องมือแบบโต้ตอบที่คุณใช้สร้างและกำหนดการ์ดได้
- การ์ด: ในเอกสารอ้างอิง API ของส่วนเสริม Google Workspace
- Card Service: บริการ Apps Script ที่ช่วยให้สคริปต์กำหนดค่าและสร้างการ์ดได้
- ภาพรวมของอินเทอร์เฟซแบบการ์ด: ใน เอกสารสำหรับนักพัฒนาแอปของส่วนเสริม Google Workspace
ตัวอย่างต่อไปนี้แสดงการ์ดการกำหนดค่าสำหรับวิดเจ็ตอินพุตแต่ละรายการที่กำหนดไว้ ใน หัวข้อกำหนดตัวแปรอินพุตในไฟล์ Manifest
Apps Script
/**
* Generates and displays a configuration card for the sample calculation step.
*
* This function creates a card with input fields for two values and a drop-down
* for selecting an arithmetic operation.
*
* The input fields are configured to let the user select outputs from previous
* workflow steps as input values using the `hostAppDataSource` property.
*/
function onConfigCalculate() {
  const firstInput = CardService.newTextInput()
    .setFieldName("value1") // "FieldName" must match an "id" in the manifest file's inputs[] array.
    .setTitle("First Value")
    .setHostAppDataSource(
      CardService.newHostAppDataSource()
        .setWorkflowDataSource(
          CardService.newWorkflowDataSource()
            .setIncludeVariables(true)
        )
    );

  const secondInput = CardService.newTextInput()
    .setFieldName("value2") // "FieldName" must match an "id" in the manifest file's inputs[] array.
    .setTitle("Second Value")
    .setHostAppDataSource(
      CardService.newHostAppDataSource()
        .setWorkflowDataSource(
          CardService.newWorkflowDataSource()
            .setIncludeVariables(true)
        )
    );

  const selectionInput = CardService.newSelectionInput()
    .setTitle("operation")
    .setFieldName("operation") // "FieldName" must match an "id" in the manifest file's inputs[] array.
    .setType(CardService.SelectionInputType.DROPDOWN)
    .addItem("+", "+", false)
    .addItem("-", "-", true)
    .addItem("x", "x", false)
    .addItem("/", "/", false);

  const sections = CardService.newCardSection()
    .setHeader("Action_sample: Calculate")
    .setId("section_1")
    .addWidget(firstInput)
    .addWidget(selectionInput)
    .addWidget(secondInput)

  let card = CardService.newCardBuilder()
    .addSection(sections)
    .build();

  return card;
}
ใช้ตัวแปรเอาต์พุตจากขั้นตอนก่อนหน้า
คุณสามารถกำหนดค่าตัวแปรอินพุตให้ยอมรับตัวแปรเอาต์พุตจากขั้นตอนก่อนหน้าในเวิร์กโฟลว์ได้
เปิดใช้การเลือกตัวแปร
หากต้องการอนุญาตให้ผู้ใช้เลือกตัวแปรจากขั้นตอนก่อนหน้า ให้ใช้พร็อพเพอร์ตี้ includeVariables ในวิดเจ็ต TextInput และ SelectionInput
วิดเจ็ต TextInput และ SelectionInput มีฟีเจอร์เฉพาะของ Workspace Studio ดังนี้
includeVariables: พร็อพเพอร์ตี้บูลีนที่อนุญาตให้ผู้ใช้เลือกตัวแปรจากขั้นตอนก่อนหน้า ตัวเลือกตัวแปรจะแสดงในขั้นตอนต่อๆ ไปได้ก็ต่อเมื่อทั้ง เหตุการณ์เริ่มต้นและตัวแปรเอาต์พุตที่เกี่ยวข้องอย่างน้อย 1 รายการ แมปกับตัวแปรtype: ค่าที่แจกแจงซึ่งแสดงคำแนะนำที่เติมข้อความอัตโนมัติ ค่าที่รองรับ ได้แก่USER: แสดงคำแนะนำที่เติมข้อความอัตโนมัติสำหรับบุคคลในรายชื่อติดต่อของผู้ใช้SPACE: แสดงคำแนะนำที่เติมข้อความอัตโนมัติสำหรับพื้นที่ใน Google Chat ที่ผู้ใช้เป็นสมาชิก
เมื่อตั้งค่าทั้ง includeVariables และ type ช่องป้อนข้อมูลจะรวมประสบการณ์การใช้งานของทั้ง 2 อย่าง ผู้ใช้สามารถเลือกตัวแปรที่มี type ที่ตรงกันจากเมนูแบบเลื่อนลง และดูคำแนะนำที่เติมข้อความอัตโนมัติสำหรับตัวแปรนั้นได้
-
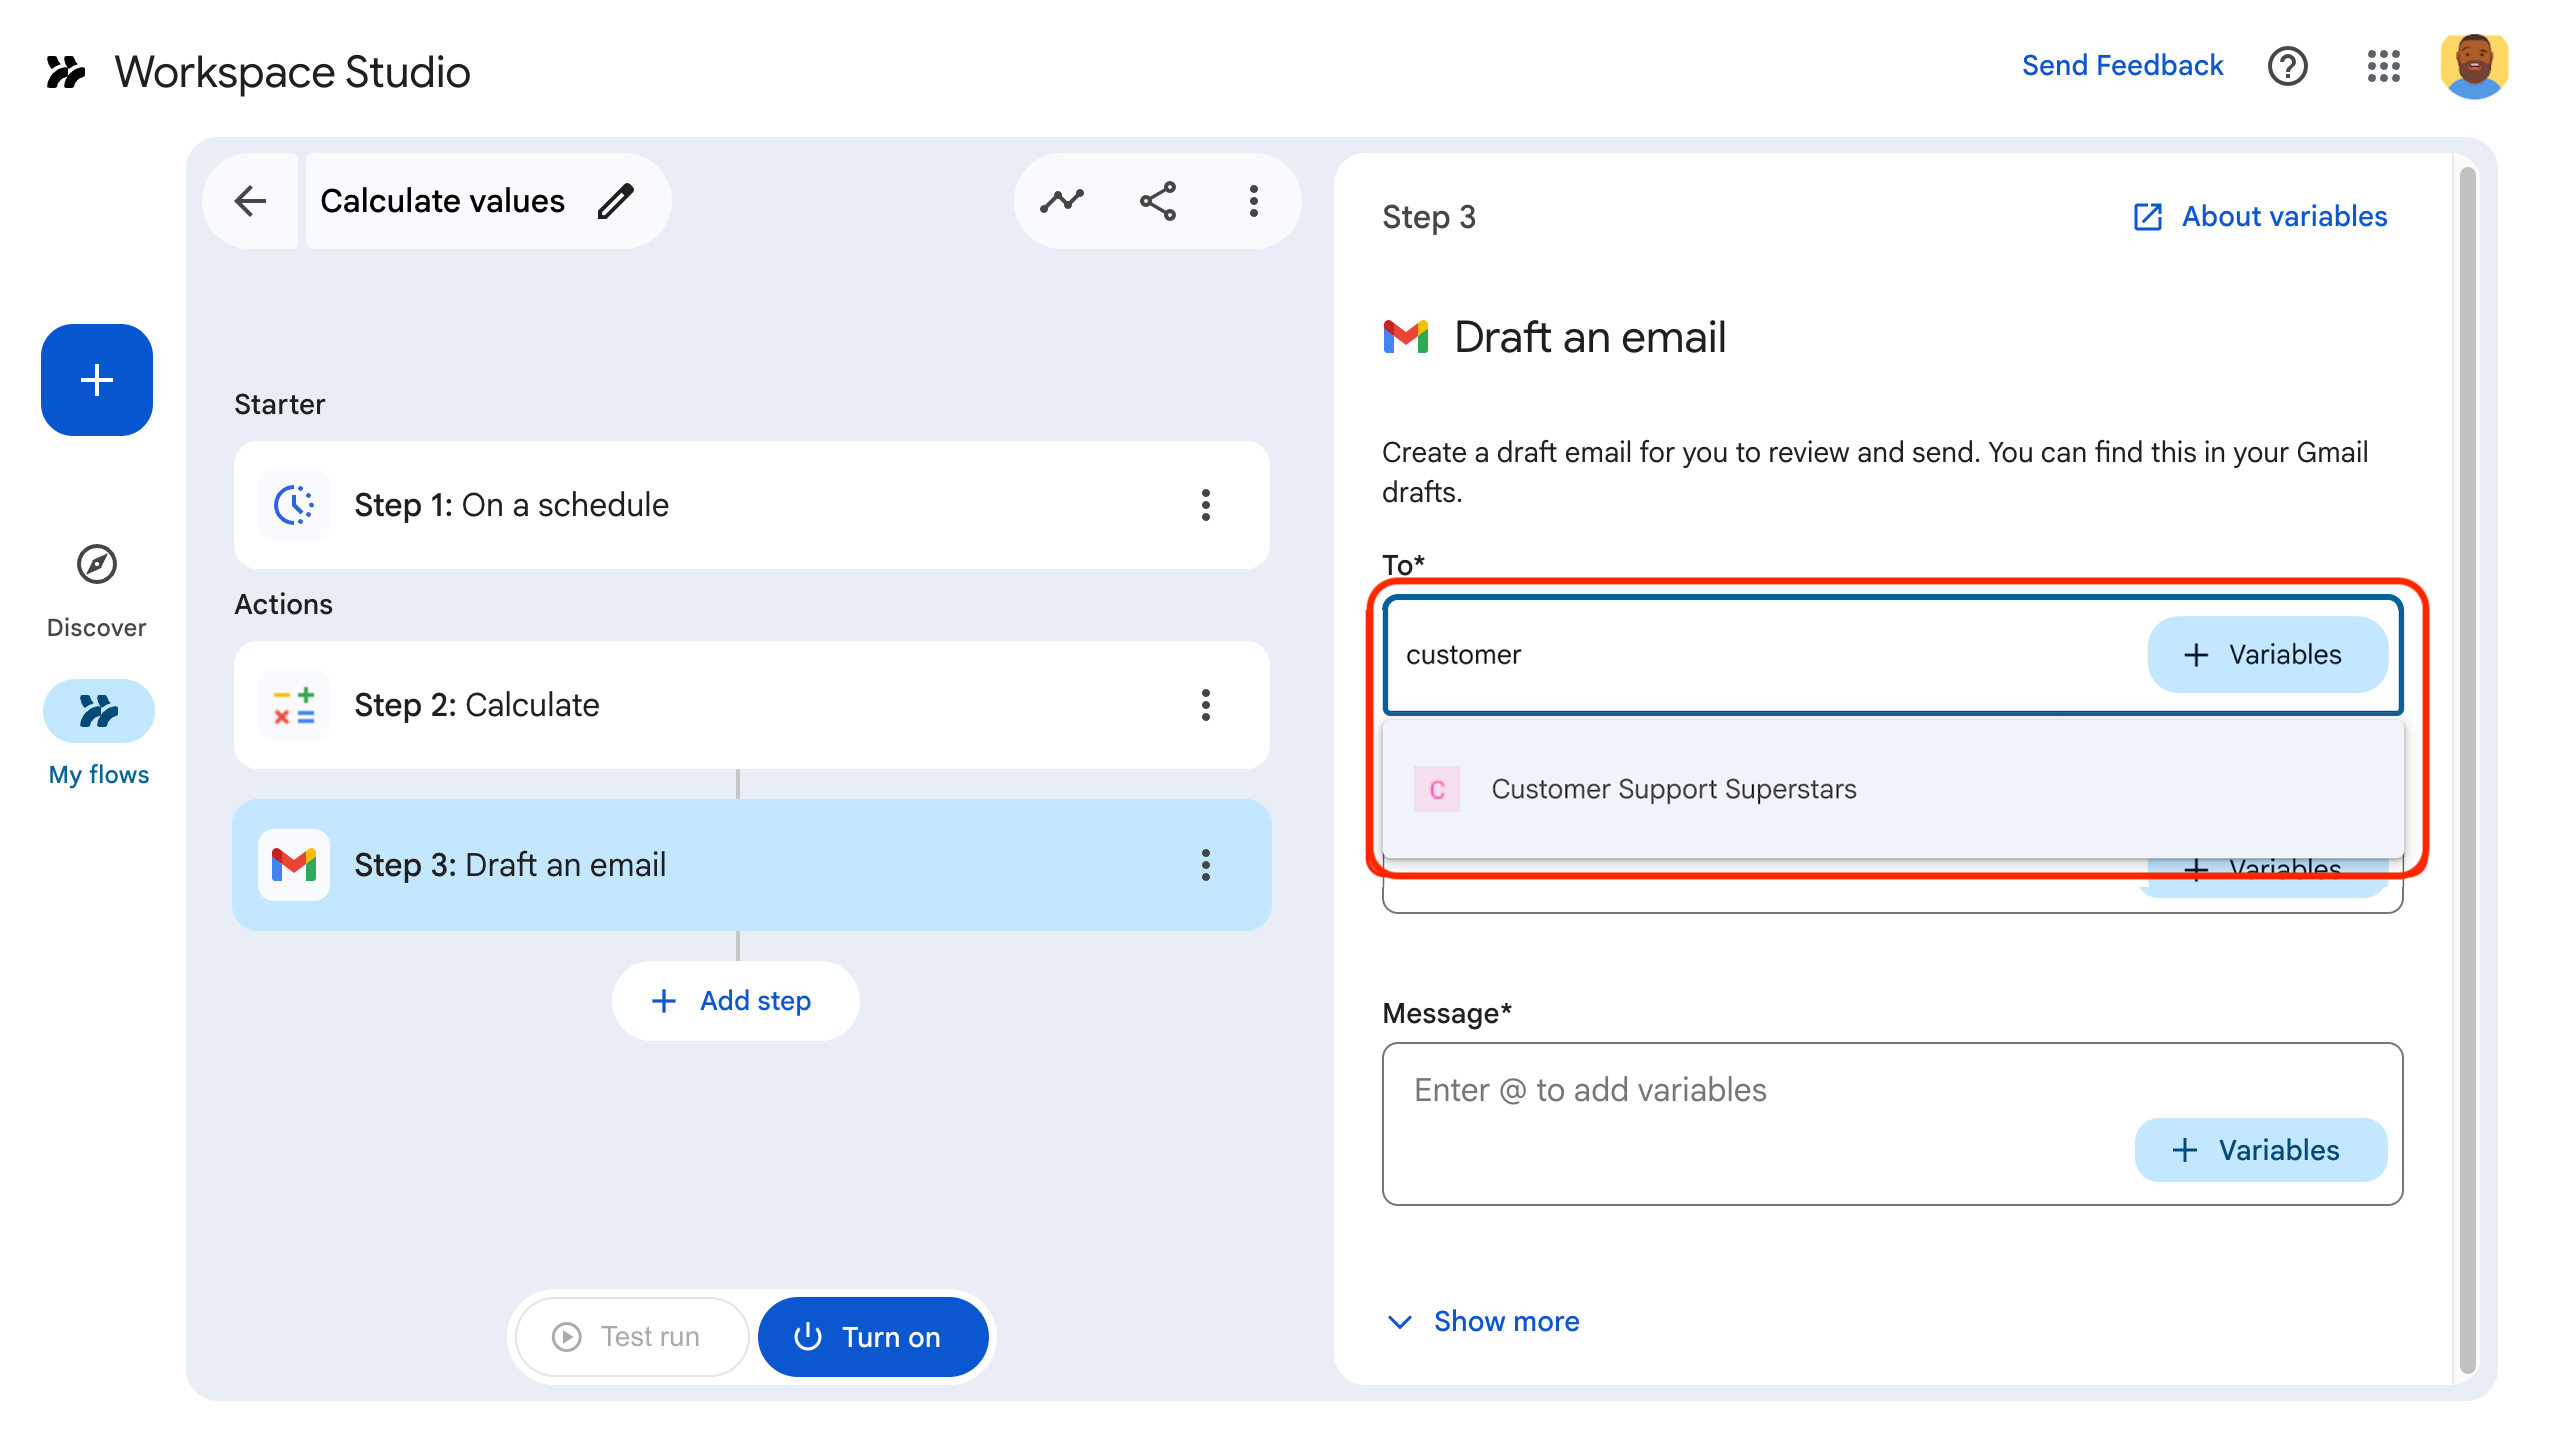
รูปที่ 4: ผู้ใช้ดูคำแนะนำที่เติมข้อความอัตโนมัติเมื่อเลือกพื้นที่ -
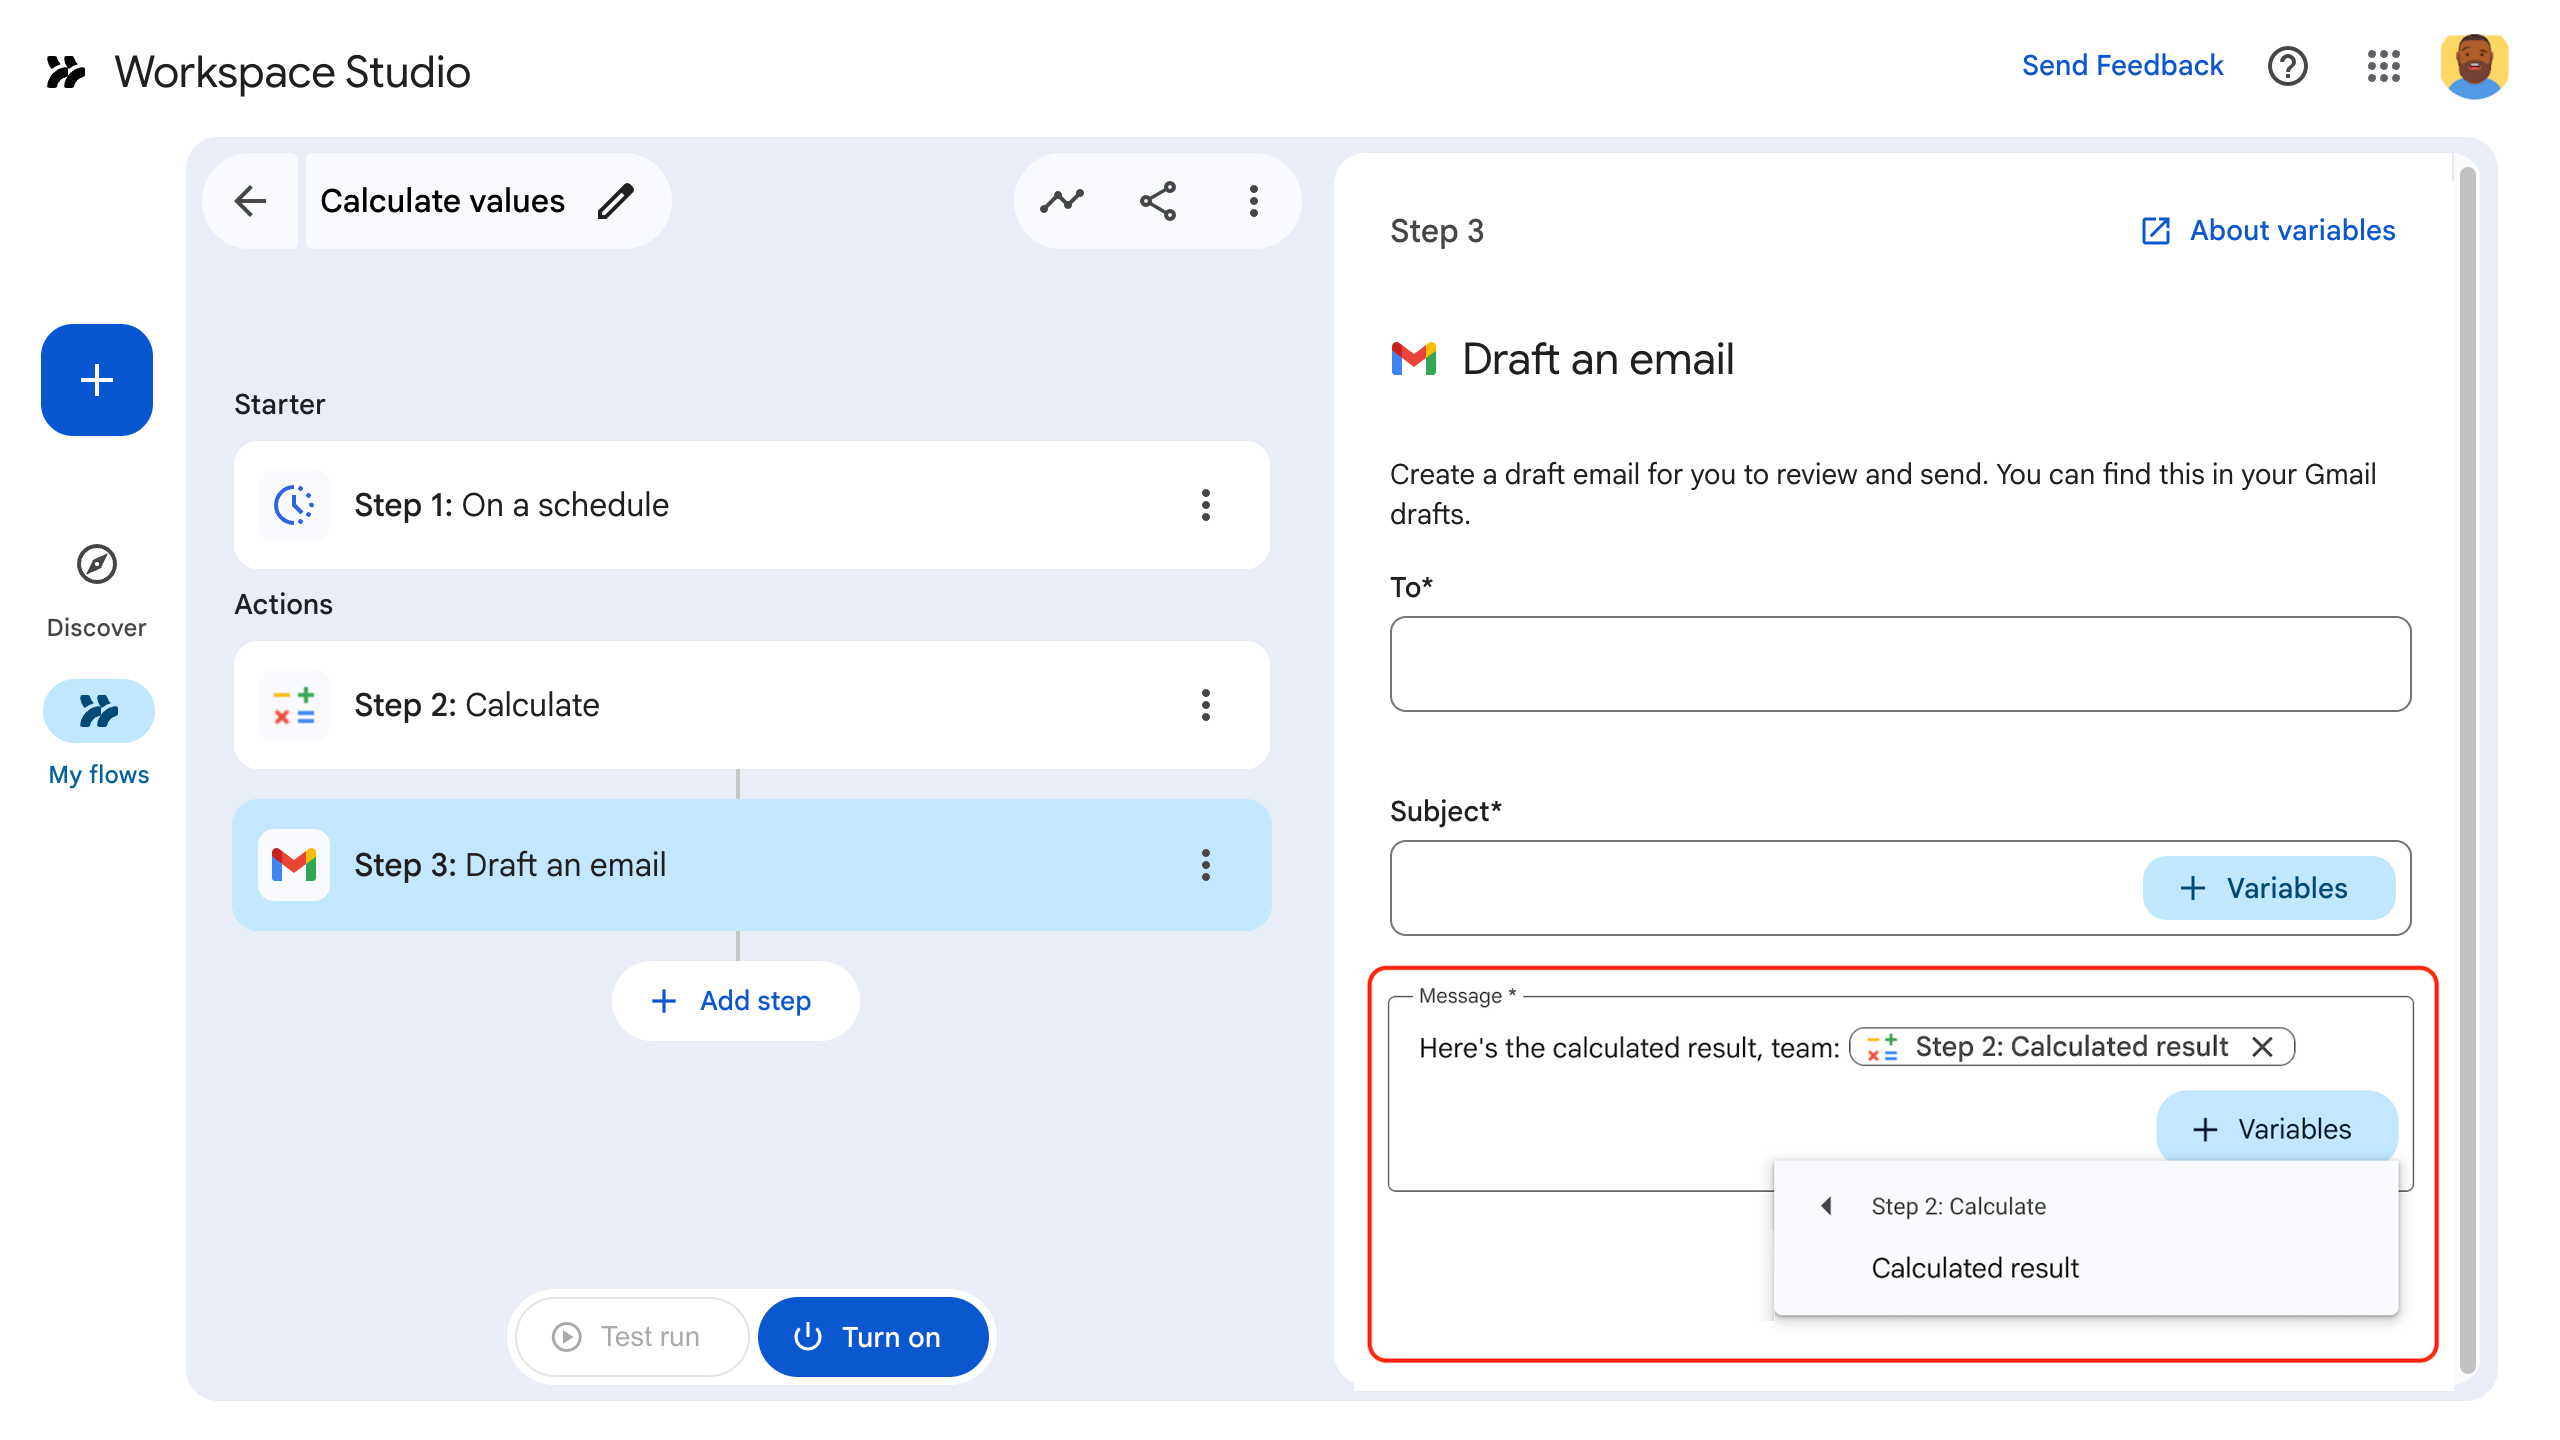
รูปที่ 5: ผู้ใช้เลือกตัวแปรเอาต์พุตของขั้นตอนก่อนหน้าจากเมนูแบบเลื่อนลง ➕ตัวแปร
เลือกตัวแปรเอาต์พุตได้เพียงรายการเดียวด้วยเมนูรายการเพิ่มเติม
คุณสามารถกำหนดค่า SelectionInput
วิดเจ็ตเพื่อให้ผู้ใช้เลือก ตัวแปรเอาต์พุต
รายการเดียวจากขั้นตอนก่อนหน้าได้โดยใช้เมนูรายการเพิ่มเติม
เมื่อตั้งค่า SelectionInputType เป็น OVERFLOW_MENU วิดเจ็ตจะทำหน้าที่เป็นตัวเลือกตัวแปรโดยเฉพาะ OVERFLOW_MENU จะเก็บรักษาประเภทข้อมูลเดิมของตัวแปรที่เลือกไว้ ซึ่งแตกต่างจากการใช้ includeVariables กับ TextInput ซึ่งจะแปลงค่าตัวแปรเป็นสตริง
Apps Script
const selectionInput = CardService.newSelectionInput()
  .setFieldName("variable_picker_1")
  .setTitle("Variable Picker")
  .setType(
    CardService.SelectionInputType.OVERFLOW_MENU
  );
อนุญาตให้ผู้ใช้รวมข้อความและตัวแปรเอาต์พุต
คุณสามารถกำหนดค่า TextInput
วิดเจ็ต เพื่อควบคุมวิธีที่ผู้ใช้โต้ตอบกับข้อความและ
ตัวแปรเอาต์พุต โดยใช้
setInputMode()
RICH_TEXT: อนุญาตให้ผู้ใช้รวมข้อความและตัวแปรเอาต์พุต ผลลัพธ์จะเป็นสตริงเดียวที่เชื่อมกันPLAIN_TEXT: จำกัดอินพุต ผู้ใช้สามารถพิมพ์ข้อความหรือเลือกตัวแปรเอาต์พุตรายการเดียวก็ได้ การเลือกตัวแปรจะแทนที่ข้อความที่มีอยู่ ใช้โหมดนี้เพื่อบังคับใช้ประเภทข้อมูลที่เฉพาะเจาะจงซึ่งกำหนดไว้ใน Manifest
รูปภาพต่อไปนี้แสดงวิดเจ็ต TextInput 2 รายการ โดยวิดเจ็ตรายการแรกกำหนดค่าเป็น RICH_TEXT และมีข้อความและตัวแปรเอาต์พุต ส่วนวิดเจ็ตรายการที่ 2 กำหนดค่าเป็น PLAIN_TEXT และอนุญาตเฉพาะตัวแปรเอาต์พุต
-
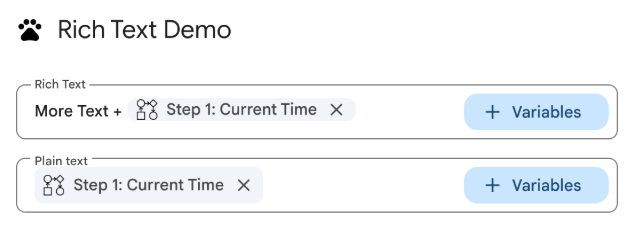
รูปที่ 3: วิดเจ็ตอินพุตข้อความที่กำหนดค่าเป็น RICH_TEXTและPLAIN_TEXTแล้ว
เราขอแนะนำให้คุณตั้งค่าโหมดอินพุตอย่างชัดเจนสำหรับวิดเจ็ต TextInput ทั้งหมด
ต่อไปนี้คือไฟล์ Manifest สำหรับกำหนดค่าวิดเจ็ต TextInput ด้วยโหมดอินพุตต่างๆ
JSON
{
  "timeZone": "America/Toronto",
  "dependencies": {},
  "exceptionLogging": "STACKDRIVER",
  "runtimeVersion": "V8",
  "addOns": {
    "common": {
      "name": "Text and output variable demo",
      "logoUrl": "https://www.gstatic.com/images/icons/material/system/1x/pets_black_48dp.png",
      "useLocaleFromApp": true
    },
    "flows": {
      "workflowElements": [
        {
          "id": "richTextDemo",
          "state": "ACTIVE",
          "name": "Rich Text Demo",
          "description": "Show the difference between rich text and plain text TextInput widgets",
          "workflowAction": {
            "inputs": [
              {
                "id": "value1",
                "description": "First user input",
                "cardinality": "SINGLE",
                "dataType": {
                  "basicType": "STRING"
                }
              },
              {
                "id": "value2",
                "description": "Second user input",
                "cardinality": "SINGLE",
                "dataType": {
                  "basicType": "STRING"
                }
              }
            ],
            "onConfigFunction": "onConfiguration",
            "onExecuteFunction": "onExecution"
          }
        }
      ]
    }
  }
}
ต่อไปนี้คือโค้ดสำหรับกำหนดค่าวิดเจ็ต TextInput ด้วยโหมดอินพุตต่างๆ
Apps Script
function onConfiguration() {
  const input1 = CardService.newTextInput()
    .setFieldName("value1")
    .setId("value1")
    .setTitle("Rich Text")
    .setHostAppDataSource(
      CardService.newHostAppDataSource()
        .setWorkflowDataSource(
          CardService.newWorkflowDataSource()
            .setIncludeVariables(true)
        )
    )
    // Set input mode to RICH_TEXT to allow mixed text and variables.
    .setInputMode(CardService.TextInputMode.RICH_TEXT);

  const input2 = CardService.newTextInput()
    .setFieldName("value2")
    .setId("value2")
    .setTitle("Plain text")
    .setHostAppDataSource(
      CardService.newHostAppDataSource()
        .setWorkflowDataSource(
          CardService.newWorkflowDataSource()
            .setIncludeVariables(true)
        )
    )
    // Set input mode to PLAIN_TEXT to enforce single variable selection.
    .setInputMode(CardService.TextInputMode.PLAIN_TEXT);

  const section = CardService.newCardSection()
    .addWidget(input1)
    .addWidget(input2);

  const card = CardService.newCardBuilder()
    .addSection(section)
    .build();

  return card;
}

function onExecution(e) {
}
ปรับแต่งปุ่มตัวเลือกตัวแปร
คุณสามารถปรับแต่งปุ่มตัวเลือกตัวแปรได้โดยตั้งค่าขนาดและป้ายกำกับของปุ่ม
ขนาดปุ่ม
หากต้องการตั้งค่าขนาดปุ่ม ให้ใช้ setVariableButtonSize() กับ Enum VariableButtonSize รายการใดรายการหนึ่งต่อไปนี้
UNSPECIFIED: ค่าเริ่มต้น ปุ่มจะมีขนาดกะทัดรัดในแผงด้านข้างและมีขนาดเต็มในบริบทอื่นๆCOMPACT: ปุ่มจะแสดงเฉพาะเครื่องหมายบวก (+)FULL_SIZE: ปุ่มจะแสดงป้ายกำกับข้อความแบบเต็ม
ป้ายกำกับของปุ่ม
หากต้องการตั้งค่าข้อความของปุ่ม ให้ใช้ setVariableButtonLabel()
ตัวอย่าง: การปรับแต่งตัวเลือกตัวแปร
ตัวอย่างต่อไปนี้แสดงวิธีในการกำหนดค่าวิดเจ็ต TextInput ด้วยขนาดปุ่มตัวเลือกตัวแปรต่างๆ และป้ายกำกับที่กำหนดเอง
-

รูปที่ 1: การปรับแต่งปุ่มตัวเลือกตัวแปรบนเว็บ -
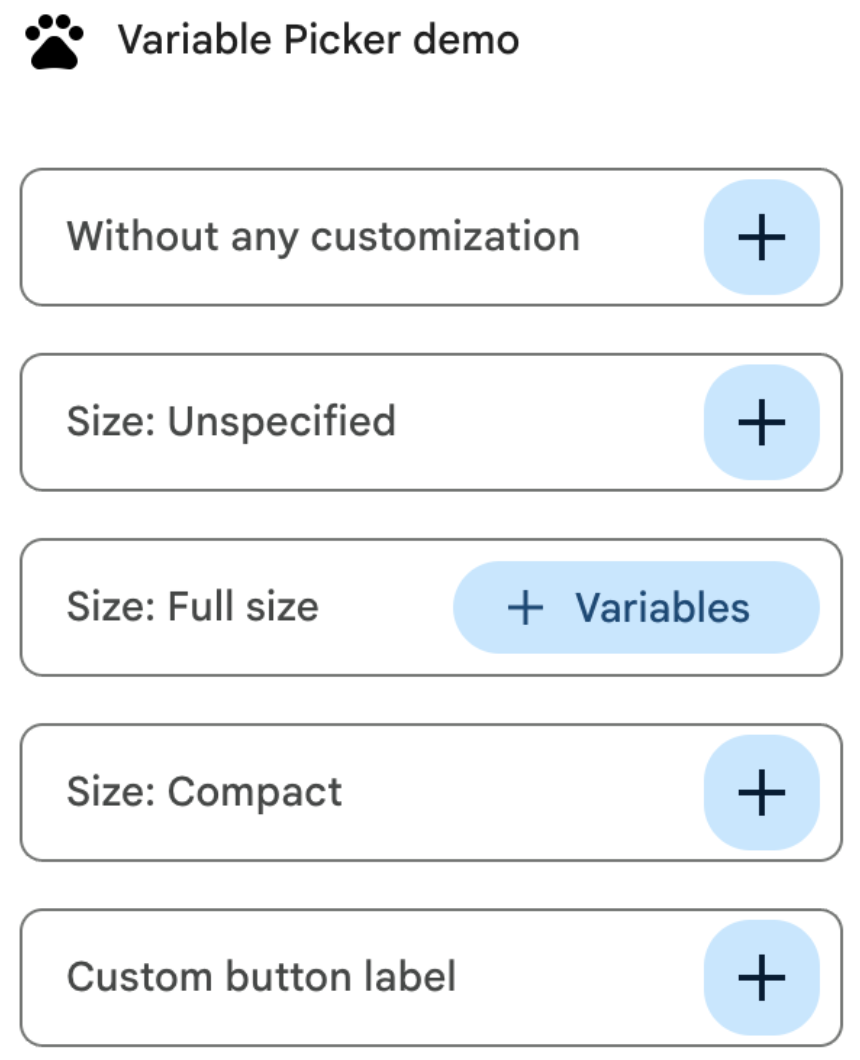
รูปที่ 2: การปรับแต่งปุ่มตัวเลือกตัวแปรในแผงด้านข้างของส่วนเสริม
ต่อไปนี้คือไฟล์ Manifest สำหรับปรับแต่งปุ่มตัวเลือกตัวแปร
JSON
{
  "timeZone": "America/Los_Angeles",
  "dependencies": {},
  "exceptionLogging": "STACKDRIVER",
  "runtimeVersion": "V8",
  "oauthScopes": [
    "https://www.googleapis.com/auth/script.locale"
  ],
  "addOns": {
    "common": {
      "name": "Variable button customization",
      "logoUrl": "https://www.gstatic.com/images/icons/material/system/1x/pets_black_48dp.png",
      "useLocaleFromApp": true
    },
    "flows": {
      "workflowElements": [
        {
          "id": "variable_picker_customization",
          "state": "ACTIVE",
          "name": "Variable Picker demo",
          "description": "List all possible variable picker customization options",
          "workflowAction": {
            "onConfigFunction": "onUpdateCardConfigFunction",
            "onExecuteFunction": "onUpdateCardExecuteFunction"
          }
        }
      ]
    }
  }
}
ต่อไปนี้คือโค้ดสำหรับปรับแต่งปุ่มตัวเลือกตัวแปร
Apps Script
function onUpdateCardConfigFunction(event) {
  const textInput1 = CardService.newTextInput()
    .setFieldName("value1")
    .setTitle("Regular variable picker button")
    .setHostAppDataSource(
      CardService.newHostAppDataSource().setWorkflowDataSource(
        CardService.newWorkflowDataSource()
          .setIncludeVariables(true)
          .setVariableButtonSize(CardService.VariableButtonSize.UNSPECIFIED)
      )
    );

  const textInput2 = CardService.newTextInput()
    .setFieldName("value2")
    .setTitle("Size: Unspecified")
    .setHostAppDataSource(
      CardService.newHostAppDataSource().setWorkflowDataSource(
        CardService.newWorkflowDataSource()
          .setIncludeVariables(true)
          .setVariableButtonSize(CardService.VariableButtonSize.UNSPECIFIED)
      )
    );

  const textInput3 = CardService.newTextInput()
    .setFieldName("value3")
    .setTitle("Size: Full size")
    .setHostAppDataSource(
      CardService.newHostAppDataSource().setWorkflowDataSource(
        CardService.newWorkflowDataSource()
          .setIncludeVariables(true)
          .setVariableButtonSize(CardService.VariableButtonSize.FULL_SIZE)
      )
    );

  const textInput4 = CardService.newTextInput()
    .setFieldName("value4")
    .setTitle("Size: Compact")
    .setHostAppDataSource(
      CardService.newHostAppDataSource().setWorkflowDataSource(
        CardService.newWorkflowDataSource()
          .setIncludeVariables(true)
          .setVariableButtonSize(CardService.VariableButtonSize.COMPACT)
      )
    );

  const textInput5 = CardService.newTextInput()
    .setFieldName("value5")
    .setTitle("Custom button label")
    .setHostAppDataSource(
      CardService.newHostAppDataSource().setWorkflowDataSource(
        CardService.newWorkflowDataSource()
          .setIncludeVariables(true)
          .setVariableButtonLabel("New button label!")
      )
    );

  var cardSection = CardService.newCardSection()
    .addWidget(textInput1)
    .addWidget(textInput2)
    .addWidget(textInput3)
    .addWidget(textInput4)
    .addWidget(textInput5)
    .setId("section_1");

  var card = CardService.newCardBuilder().addSection(cardSection).build();

  return card;
}

function onUpdateCardExecuteFunction(event) {
}
กำหนดค่าการเติมข้อความอัตโนมัติของข้อมูล Google Workspace
นอกจากนี้ คุณยังป้อนคำแนะนำที่เติมข้อความอัตโนมัติจากข้อมูลภายในสภาพแวดล้อม Google Workspace ของผู้ใช้ได้ด้วย
- ผู้ใช้ Google Workspace: ป้อนผู้ใช้ภายในองค์กร Google Workspace เดียวกัน
- พื้นที่ใน Google Chat: ป้อนพื้นที่ใน Google Chat ที่ผู้ใช้เป็นสมาชิก
หากต้องการกำหนดค่านี้ ให้ตั้งค่า
PlatformDataSource
ในวิดเจ็ต
SelectionInput
โดยระบุ
WorkflowDataSourceType
เป็น USER หรือ SPACE
Apps Script
// User Autocomplete
var multiSelect2 =
  CardService.newSelectionInput()
    .setFieldName("value2")
    .setTitle("User Autocomplete")
    .setType(CardService.SelectionInputType.MULTI_SELECT)
    .setMultiSelectMaxSelectedItems(3)
    .setPlatformDataSource(
      CardService.newPlatformDataSource()
        .setHostAppDataSource(
          CardService.newHostAppDataSource()
            .setWorkflowDataSource(
              CardService.newWorkflowDataSource()
                .setIncludeVariables(true)
                .setType(CardService.WorkflowDataSourceType.USER)
            ))
    );

// Chat Space Autocomplete
var multiSelect3 =
  CardService.newSelectionInput()
    .setFieldName("value3")
    .setTitle("Chat Space Autocomplete")
    .setType(CardService.SelectionInputType.MULTI_SELECT)
    .setMultiSelectMaxSelectedItems(3)
    .setPlatformDataSource(
      CardService.newPlatformDataSource()
        .setHostAppDataSource(
          CardService.newHostAppDataSource()
            .setWorkflowDataSource(
              CardService.newWorkflowDataSource()
                .setIncludeVariables(true)
                .setType(CardService.WorkflowDataSourceType.SPACE)
            ))
    );
ตัวอย่าง: การรวมประเภทการเติมข้อความอัตโนมัติ
ตัวอย่างต่อไปนี้แสดงฟังก์ชัน onConfig ที่สร้างการ์ดที่มี
วิดเจ็ต SelectionInput
3 รายการ ซึ่งแสดงการเติมข้อความอัตโนมัติฝั่งเซิร์ฟเวอร์ ผู้ใช้ และพื้นที่
JSON
{
  "timeZone": "America/Los_Angeles",
  "exceptionLogging": "STACKDRIVER",
  "runtimeVersion": "V8",
  "addOns": {
    "common": {
      "name": "Autocomplete Demo",
      "logoUrl": "https://www.gstatic.com/images/icons/material/system/1x/pets_black_48dp.png",
      "useLocaleFromApp": true
    },
    "flows": {
      "workflowElements": [
        {
          "id": "autocomplete_demo",
          "state": "ACTIVE",
          "name": "Autocomplete Demo",
          "description": "Provide autocompletion in input fields",
          "workflowAction": {
            "inputs": [
              {
                "id": "value1",
                "description": "A multi-select field with autocompletion",
                "cardinality": "SINGLE",
                "dataType": {
                  "basicType": "STRING"
                }
              }
            ],
            "onConfigFunction": "onConfigAutocomplete",
            "onExecuteFunction": "onExecuteAutocomplete"
          }
        }
      ]
    }
  }
}
Apps Script
function onConfigAutocompleteTest(event) {
  // Handle autocomplete request
  if (event.workflow && event.workflow.elementUiAutocomplete) {
    return handleAutocompleteRequest(event);
  }

  // Server-side autocomplete widget
  var multiSelect1 =
    CardService.newSelectionInput()
      .setFieldName("value1")
      .setTitle("Server Autocomplete")
      .setType(CardService.SelectionInputType.MULTI_SELECT)
      .setMultiSelectMaxSelectedItems(3)
      .addDataSourceConfig(
        CardService.newDataSourceConfig()
          .setRemoteDataSource(
            CardService.newAction().setFunctionName('getAutocompleteResults')
          )
      )
      .addDataSourceConfig(
        CardService.newDataSourceConfig()
          .setPlatformDataSource(
            CardService.newPlatformDataSource()
              .setHostAppDataSource(
                CardService.newHostAppDataSource()
                  .setWorkflowDataSource(
                    CardService.newWorkflowDataSource()
                      .setIncludeVariables(true)
                  ))
          )
      );

  // User autocomplete widget
  var multiSelect2 =
    CardService.newSelectionInput()
      .setFieldName("value2")
      .setTitle("User Autocomplete")
      .setType(CardService.SelectionInputType.MULTI_SELECT)
      .setMultiSelectMaxSelectedItems(3)
      .setPlatformDataSource(
        CardService.newPlatformDataSource()
          .setHostAppDataSource(
            CardService.newHostAppDataSource()
              .setWorkflowDataSource(
                CardService.newWorkflowDataSource()
                  .setIncludeVariables(true)
                  .setType(CardService.WorkflowDataSourceType.USER)
              ))
      );

  // Space autocomplete widget
  var multiSelect3 =
    CardService.newSelectionInput()
      .setFieldName("value3")
      .setTitle("Chat Space Autocomplete")
      .setType(CardService.SelectionInputType.MULTI_SELECT)
      .setMultiSelectMaxSelectedItems(3)
      .setPlatformDataSource(
        CardService.newPlatformDataSource()
          .setHostAppDataSource(
            CardService.newHostAppDataSource()
              .setWorkflowDataSource(
                CardService.newWorkflowDataSource()
                  .setIncludeVariables(true)
                  .setType(CardService.WorkflowDataSourceType.SPACE)
              ))
      );

  var sectionBuilder =
    CardService.newCardSection()
      .addWidget(multiSelect1)
      .addWidget(multiSelect2)
      .addWidget(multiSelect3);

  var card =
    CardService.newCardBuilder()
      .addSection(sectionBuilder)
      .build();
  return card;
}

function handleAutocompleteRequest(event) {
  var invokedFunction = event.workflow.elementUiAutocomplete.invokedFunction;
  var query = event.workflow.elementUiAutocomplete.query;

  if (invokedFunction != "getAutocompleteResults" || query == undefined || query == "") {
    return {};
  }

  // Query your data source to get results
  let autocompleteResponse = AddOnsResponseService.newUpdateWidget()
    .addSuggestion(
      query + " option 1",
      query + "_option1",
      false,
      "https://developers.google.com/workspace/add-ons/images/person-icon.png",
      "option 1 bottom text"
    )
    .addSuggestion(
      query + " option 2",
      query + "_option2",
      false,
      "https://developers.google.com/workspace/add-ons/images/person-icon.png",
      "option 2 bottom text"
    ).addSuggestion(
      query + " option 3",
      query + "_option3",
      false,
      "https://developers.google.com/workspace/add-ons/images/person-icon.png",
      "option 3 bottom text"
    );

  const modifyAction = AddOnsResponseService.newAction()
    .addModifyCard(
      AddOnsResponseService.newModifyCard()
        .setUpdateWidget(autocompleteResponse)
    );

  return AddOnsResponseService.newRenderActionBuilder()
    .setAction(modifyAction)
    .build();
}
ตรวจสอบตัวแปรอินพุต
แนวทางปฏิบัติแนะนำคือตรวจสอบว่าผู้ใช้ป้อนค่าที่เหมาะสม ดูหัวข้อ ตรวจสอบตัวแปรอินพุต
หัวข้อที่เกี่ยวข้อง
- ตรวจสอบตัวแปรอินพุต
- ตัวแปรเอาต์พุต
- ตัวแปรแบบไดนามิก
- บันทึกกิจกรรมและข้อผิดพลาด
- ออบเจ็กต์เหตุการณ์ Workspace Studio