
本指南說明如何建立輸入變數。
如要執行步驟,必須提供特定資訊。舉例來說,傳送電子郵件時需要電子郵件地址。如要提供這項必要資訊,請定義輸入變數。定義輸入變數後,使用者通常會在設定步驟時,透過步驟的設定卡片設定輸入變數。
在兩個位置定義輸入變數:外掛程式的資訊清單檔案,以及程式碼中的設定資訊卡 (使用者可在其中輸入輸入變數的值)。
在資訊清單檔案中定義輸入變數
在資訊清單檔案中,使用 inputs[] 陣列指定輸入變數。inputs[] 陣列中的每個項目都具有下列屬性:
id:輸入變數的專屬 ID。如要讓流程將設定資訊卡輸入元素與這個輸入變數建立關聯,必須與對應資訊卡元素的名稱相符。description:向使用者顯示的輸入變數說明。cardinality:允許的值數量。可能的值包括:SINGLE:只能輸入一個值。
dataType:可接受的值類型。dataType具有定義資料類型的basicType屬性。有效值包括:STRING:英數字元字串。INTEGER:數字。TIMESTAMP:以「自 Unix 紀元以來的毫秒數」格式表示的時間戳記。舉例來說,2025 年 11 月 27 日世界標準時間 16:49:02 會以1764262142988表示。BOOLEAN:true 或 false。EMAIL_ADDRESS:格式為dana@example.com的電子郵件地址。
以下範例會為計算機步驟定義三個輸入變數。前兩個輸入變數是整數,第三個則是算術運算。
JSON
{
  "timeZone": "America/Los_Angeles",
  "exceptionLogging": "STACKDRIVER",
  "runtimeVersion": "V8",
  "addOns": {
    "common": {
      "name": "Calculator",
      "logoUrl": "https://www.gstatic.com/images/branding/productlogos/calculator_search/v1/web-24dp/logo_calculator_search_color_1x_web_24dp.png",
      "useLocaleFromApp": true
    },
    "flows": {
      "workflowElements": [
        {
          "id": "calculatorDemo",
          "state": "ACTIVE",
          "name": "Calculate",
          "description": "Asks the user for two values and a math operation, then performs the math operation on the values and outputs the result.",
          "workflowAction": {
            "inputs": [
              {
                "id": "value1",
                "description": "value1",
                "cardinality": "SINGLE",
                "dataType": {
                  "basicType": "INTEGER"
                }
              },
              {
                "id": "value2",
                "description": "value2",
                "cardinality": "SINGLE",
                "dataType": {
                  "basicType": "INTEGER"
                }
              },
              {
                "id": "operation",
                "description": "operation",
                "cardinality": "SINGLE",
                "dataType": {
                  "basicType": "STRING"
                }
              }
            ],
            "outputs": [
              {
                "id": "result",
                "description": "Calculated result",
                "cardinality": "SINGLE",
                "dataType": {
                  "basicType": "INTEGER"
                }
              }
            ],
            "onConfigFunction": "onConfigCalculate",
            "onExecuteFunction": "onExecuteCalculate"
          }
        }
      ]
    }
  }
}
在程式碼中定義輸入變數
這個步驟的程式碼包含名為 onConfigFunction() 的函式,該函式會傳回設定資訊卡,為資訊清單檔案 inputs[] 陣列中定義的每個輸入變數定義一個輸入資訊卡小工具。
設定資訊卡中定義的輸入小工具須符合下列規定:
- 每個輸入小工具的
name都必須與資訊清單檔案中對應輸入變數的id相符。 - 輸入小工具的基數必須與資訊清單檔案中的輸入變數
cardinality相符。 - 輸入小工具的資料類型必須與資訊清單檔案中輸入變數的
dataType相符。如果輸入變數具有整數的dataType,就無法保留字串。
如需建構資訊卡介面的相關協助,請參閱下列任一選項:
- 資訊卡建構工具:互動式工具,可用於建構及定義資訊卡。
- 資訊卡: Google Workspace 外掛程式 API 參考文件。
- 資訊卡服務:Apps Script 服務,可讓指令碼設定及建構資訊卡。
- 資訊卡式介面總覽:請參閱 Google Workspace 外掛程式開發人員文件。
下列範例會針對在資訊清單檔案中定義的每個輸入小工具,傳回設定資訊卡。
Apps Script
/**
* Generates and displays a configuration card for the sample calculation step.
*
* This function creates a card with input fields for two values and a drop-down
* for selecting an arithmetic operation.
*
* The input fields are configured to let the user select outputs from previous
* workflow steps as input values using the `hostAppDataSource` property.
*/
function onConfigCalculate() {
  const firstInput = CardService.newTextInput()
    .setFieldName("value1") // "FieldName" must match an "id" in the manifest file's inputs[] array.
    .setTitle("First Value")
    .setHostAppDataSource(
      CardService.newHostAppDataSource()
        .setWorkflowDataSource(
          CardService.newWorkflowDataSource()
            .setIncludeVariables(true)
        )
    );

  const secondInput = CardService.newTextInput()
    .setFieldName("value2") // "FieldName" must match an "id" in the manifest file's inputs[] array.
    .setTitle("Second Value")
    .setHostAppDataSource(
      CardService.newHostAppDataSource()
        .setWorkflowDataSource(
          CardService.newWorkflowDataSource()
            .setIncludeVariables(true)
        )
    );

  const selectionInput = CardService.newSelectionInput()
    .setTitle("operation")
    .setFieldName("operation") // "FieldName" must match an "id" in the manifest file's inputs[] array.
    .setType(CardService.SelectionInputType.DROPDOWN)
    .addItem("+", "+", false)
    .addItem("-", "-", true)
    .addItem("x", "x", false)
    .addItem("/", "/", false);

  const sections = CardService.newCardSection()
    .setHeader("Action_sample: Calculate")
    .setId("section_1")
    .addWidget(firstInput)
    .addWidget(selectionInput)
    .addWidget(secondInput)

  let card = CardService.newCardBuilder()
    .addSection(sections)
    .build();

  return card;
}
使用先前步驟的輸出變數
您可以設定輸入變數,接受工作流程中先前步驟的輸出變數。
啟用變數選取
如要讓使用者從先前的步驟選取變數,請在 TextInput 和 SelectionInput 小工具中使用 includeVariables
屬性。
TextInput 和 SelectionInput 小工具提供下列 Workspace Studio 專屬功能:
includeVariables:布林值屬性,可讓使用者從先前的步驟選取變數。如要在後續步驟中顯示變數選擇器,起始事件和至少一個對應的輸出變數都必須對應至變數。type:列舉值,可自動完成建議。支援的值包括:USER:為使用者聯絡人提供人員自動完成建議。SPACE:提供使用者所屬 Google Chat 聊天室的自動完成建議。
如果同時設定 includeVariables 和 type,輸入欄位會合併兩者的體驗。使用者可以從下拉式選單中選取相符 type 的變數,並查看自動完成建議。
-
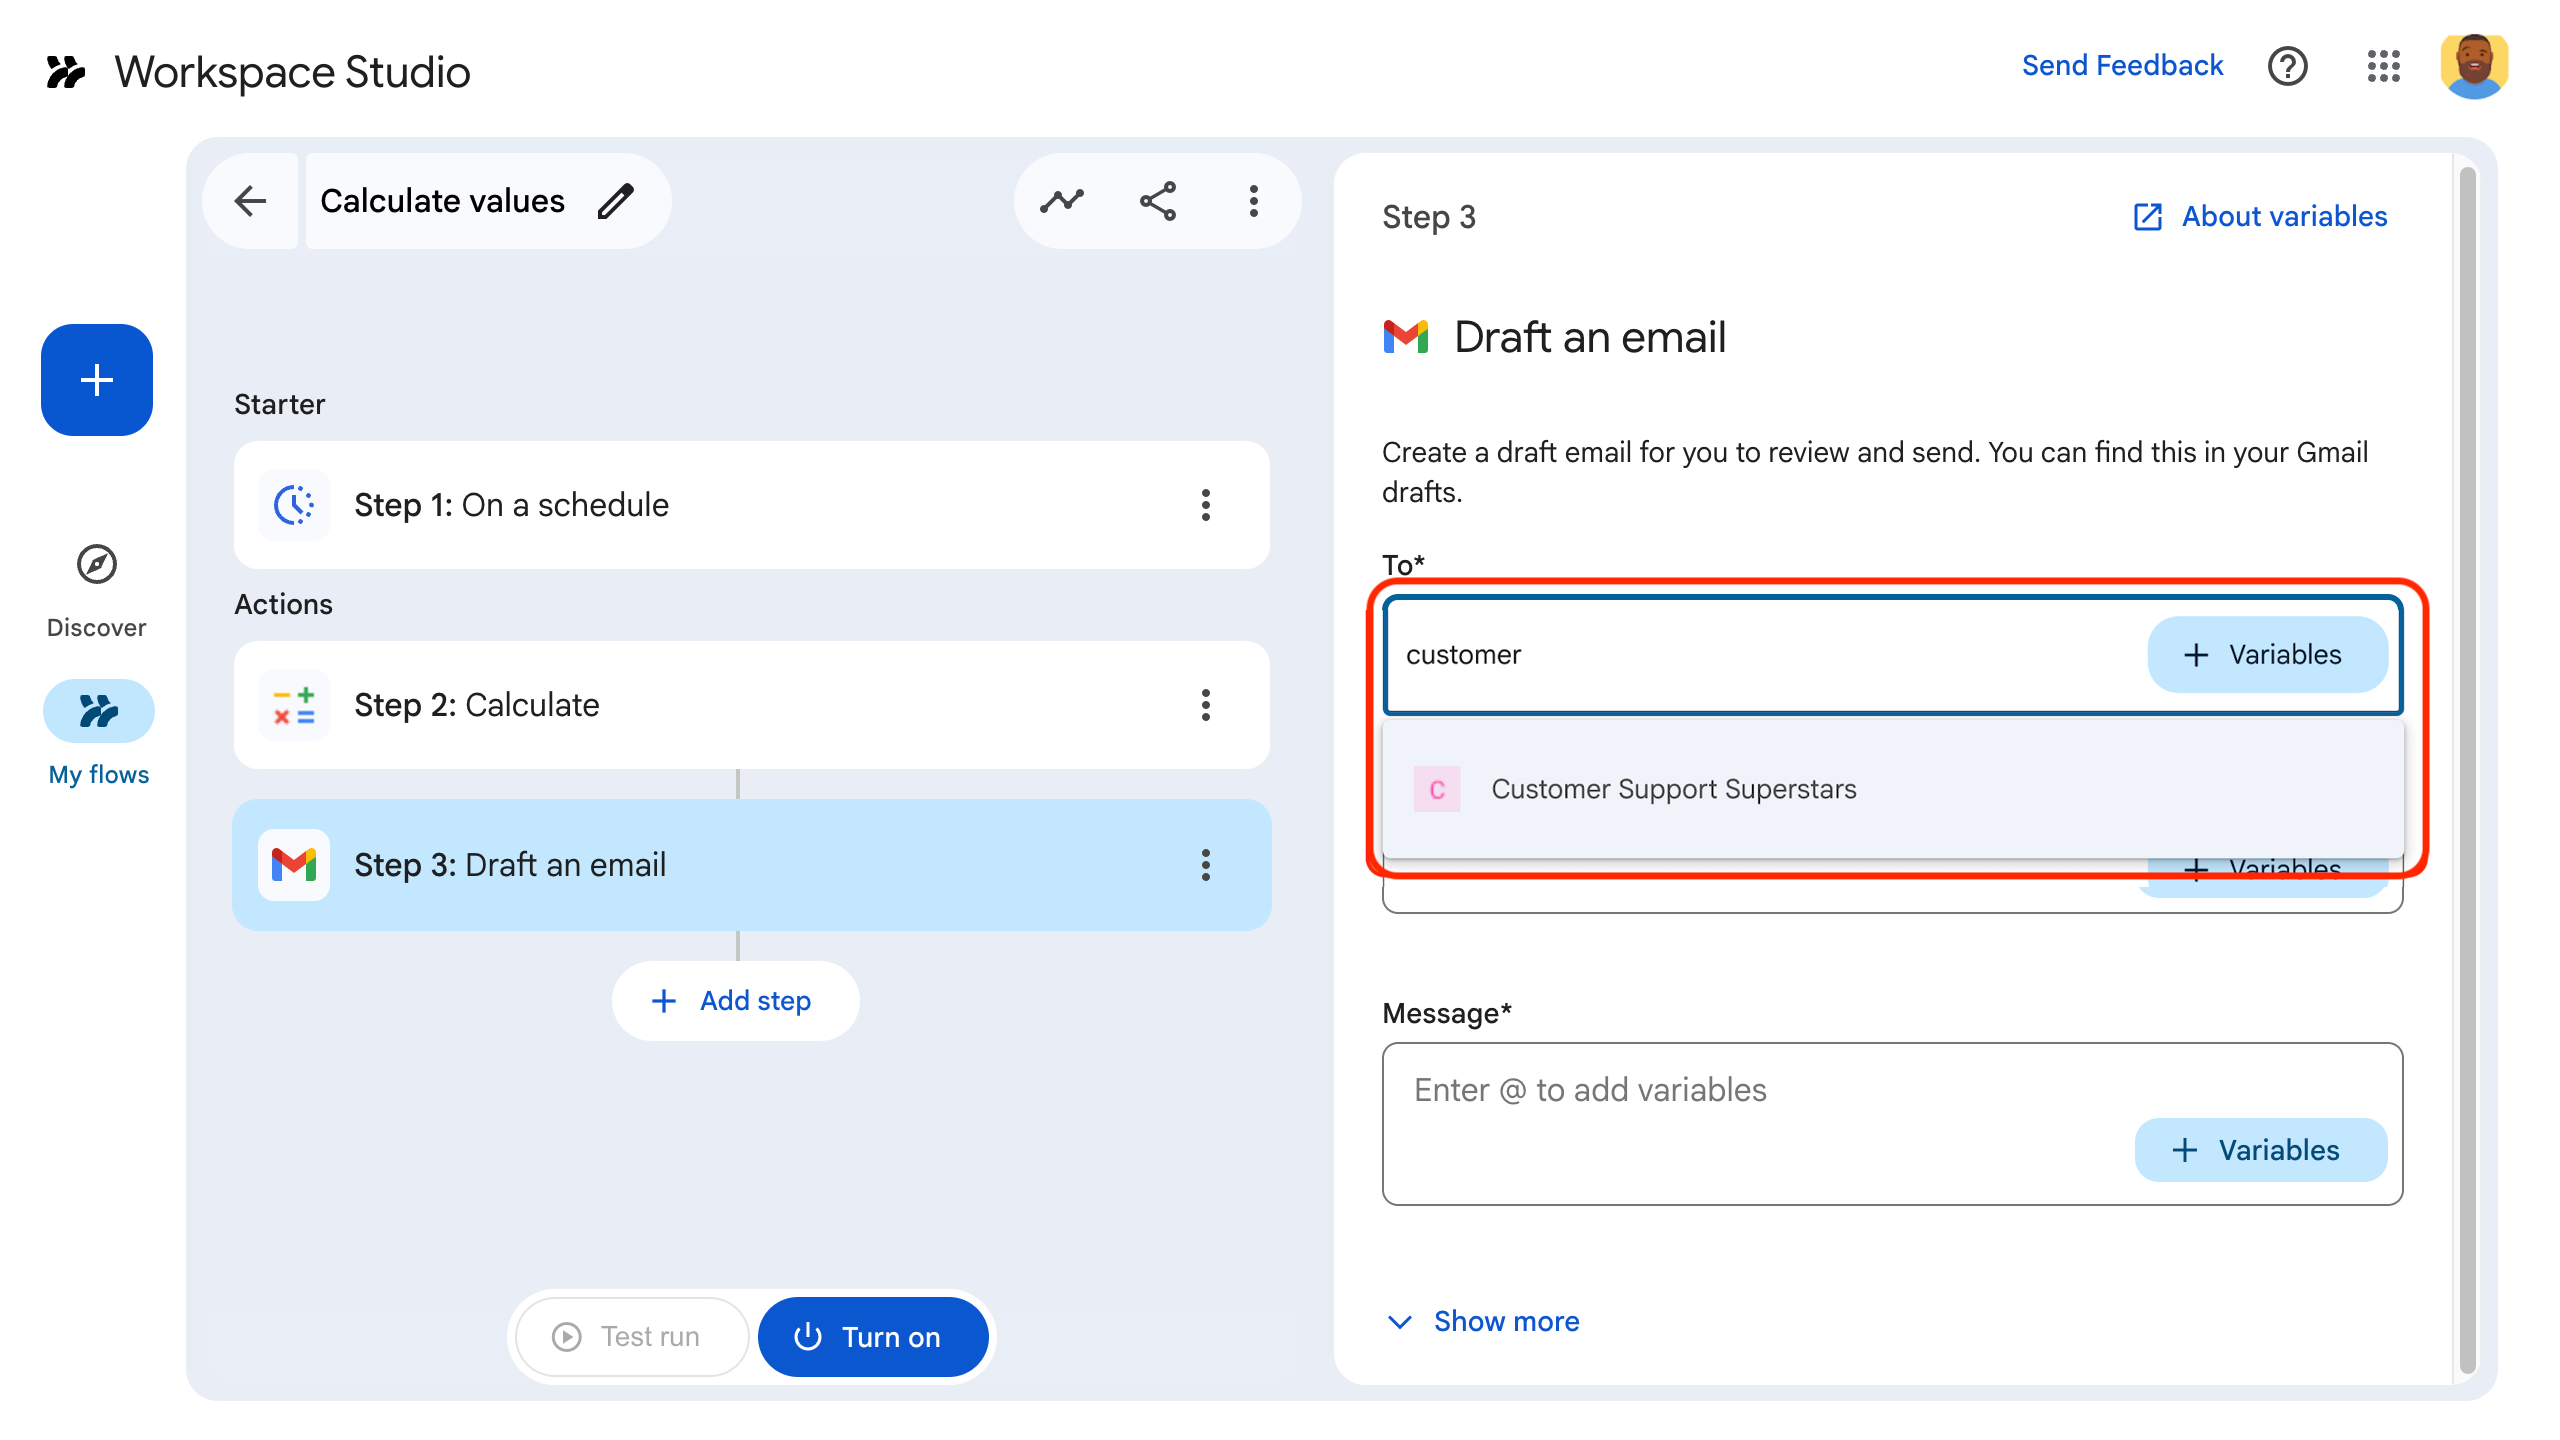
圖 4:使用者選擇空間時,會看到自動完成建議。 -
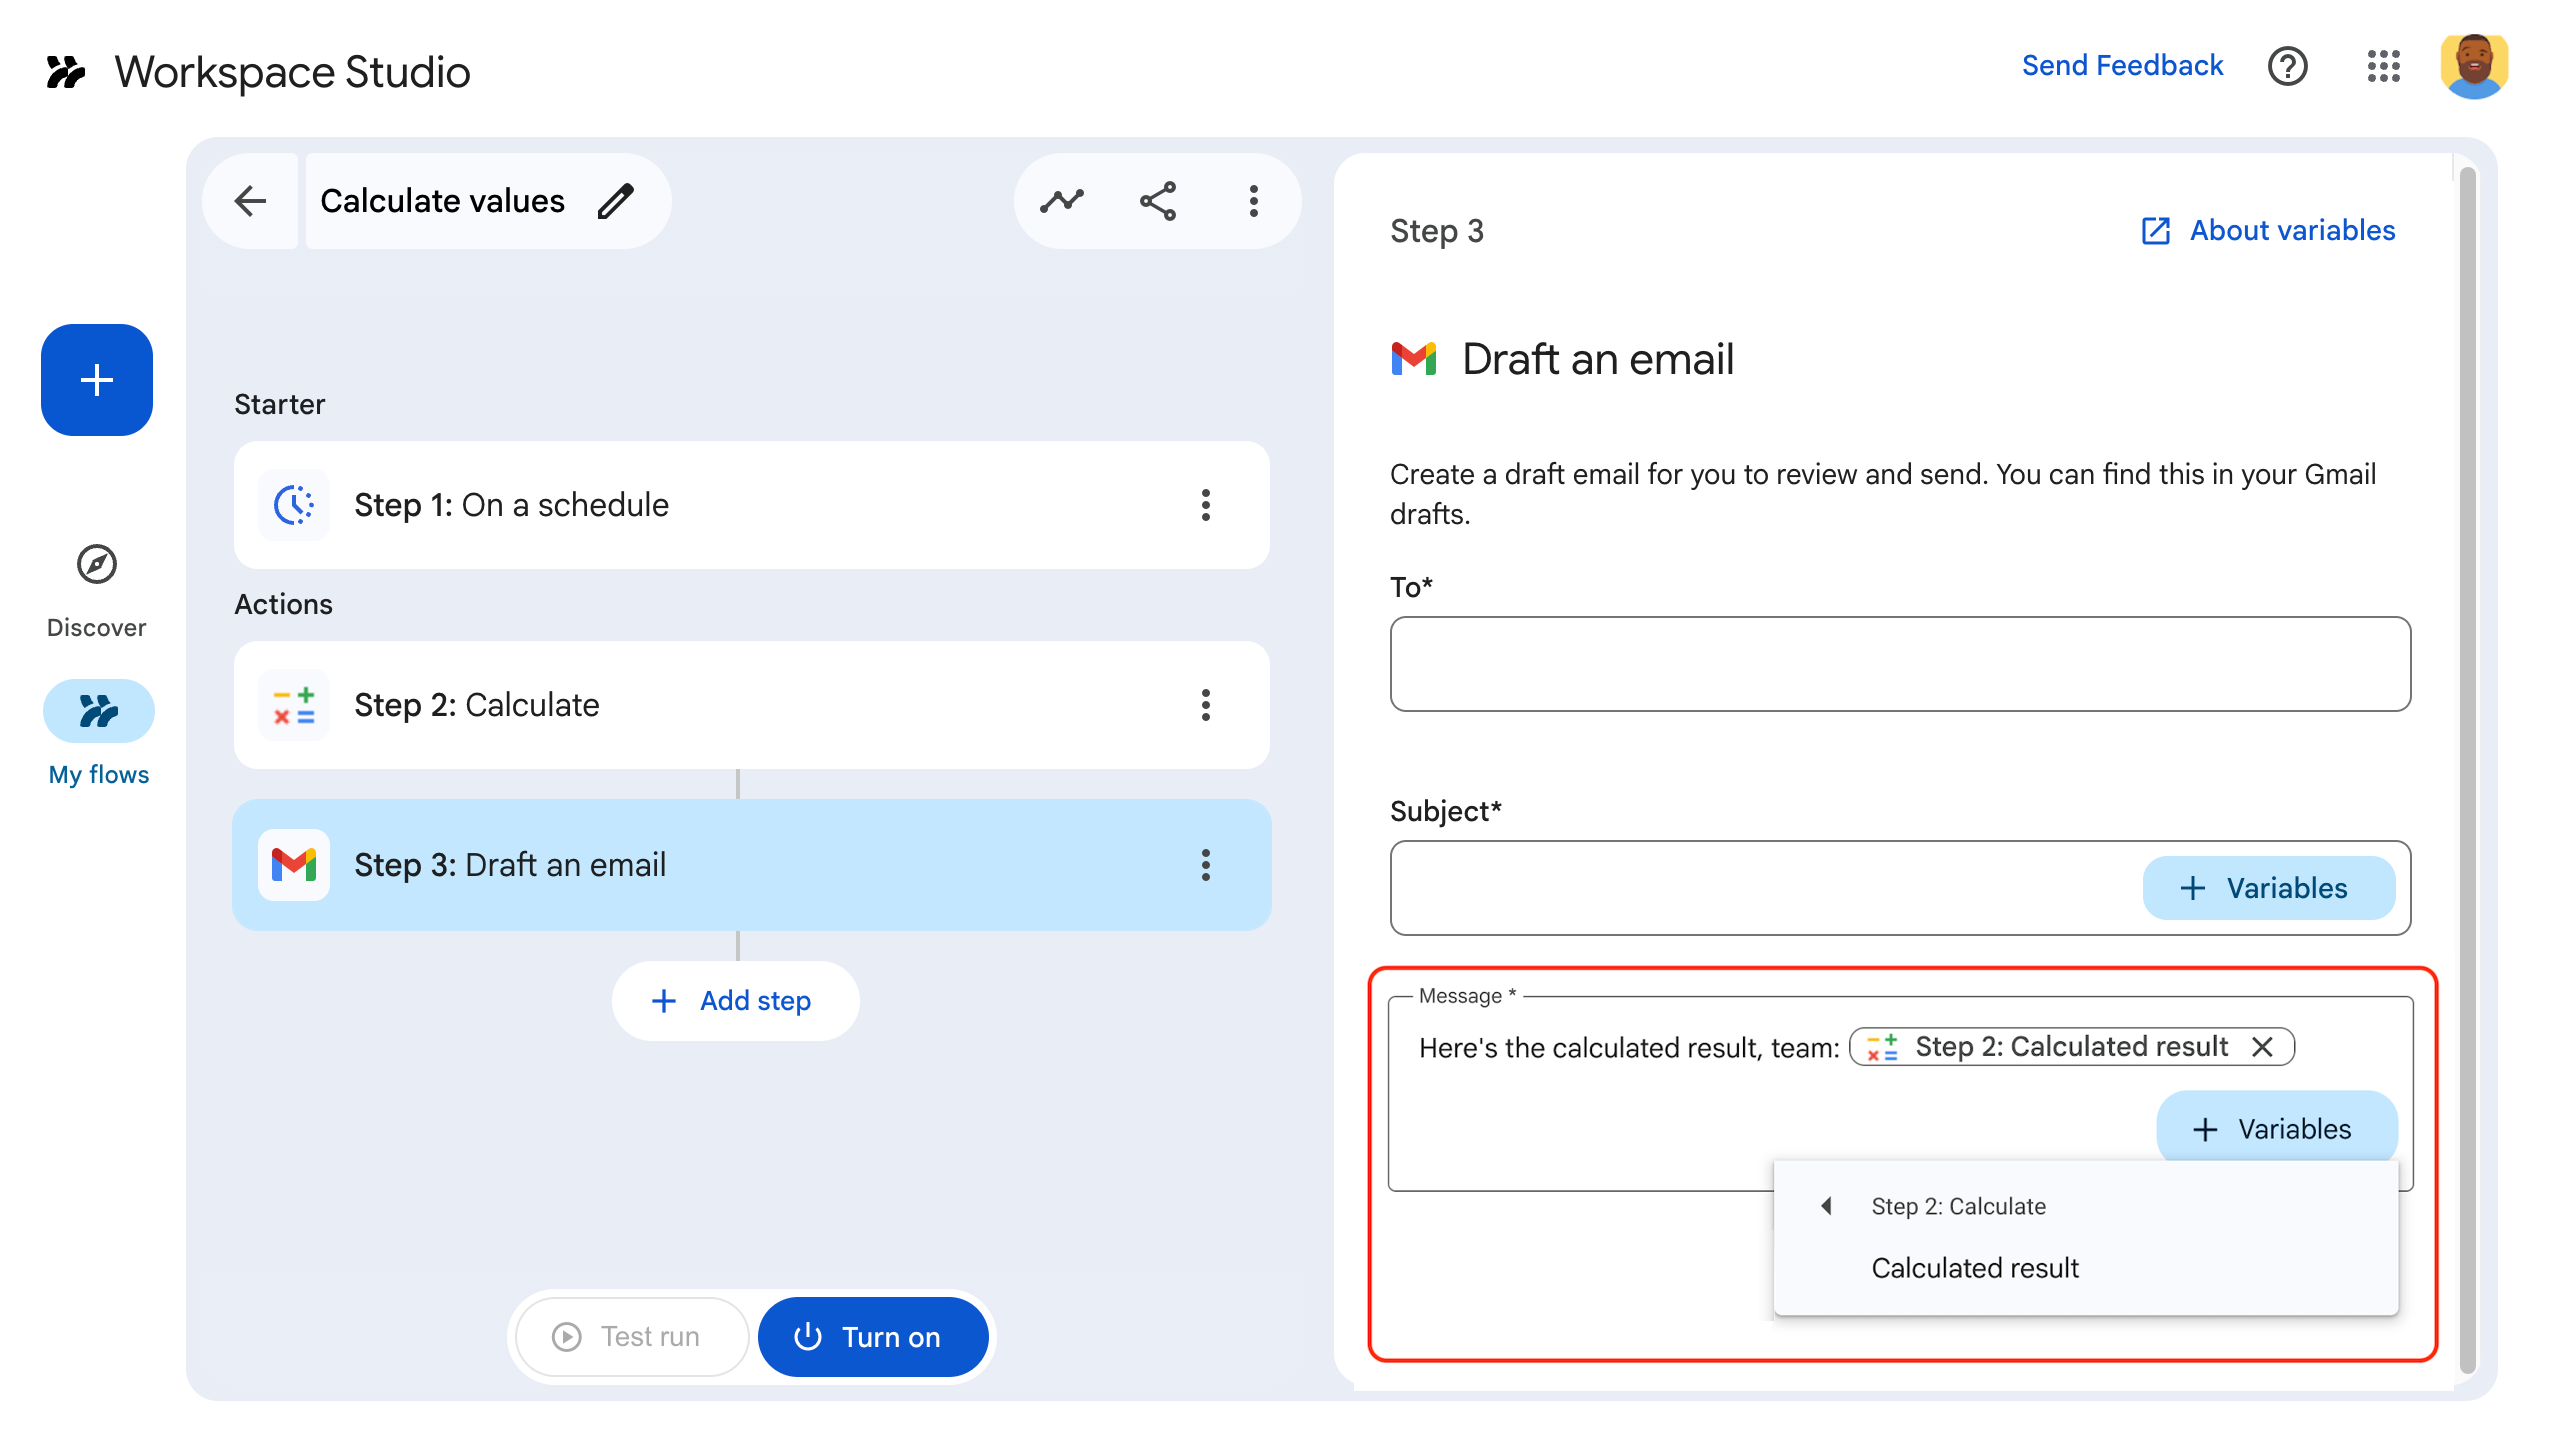
圖 5:使用者從「變數」➕下拉式選單中,選取先前步驟的輸出變數。
使用溢位選單選取一個輸出變數
您可以設定 SelectionInput 小工具,讓使用者透過溢位選單,從上一個步驟選取單一輸出變數。
將 SelectionInputType 設為 OVERFLOW_MENU 時,小工具會做為專用變數選擇器。與搭配 TextInput 使用 includeVariables 不同,後者會將變數值轉換為字串,而 OVERFLOW_MENU 則會保留所選變數的原始資料類型。
Apps Script
const selectionInput = CardService.newSelectionInput()
  .setFieldName("variable_picker_1")
  .setTitle("Variable Picker")
  .setType(
    CardService.SelectionInputType.OVERFLOW_MENU
  );
允許使用者合併文字和輸出變數
您可以設定 TextInput 小工具,控管使用者與文字和輸出變數的互動方式,方法是使用 setInputMode()。
RICH_TEXT:可讓使用者合併文字和輸出變數。結果是單一串連字串。PLAIN_TEXT:限制輸入內容。使用者可以輸入文字或選取單一輸出變數。選取變數會取代所有現有文字。 使用這個模式,強制執行資訊清單中定義的特定資料類型。
下圖顯示兩個 TextInput 小工具。第一個設定為 RICH_TEXT,並包含文字和輸出變數。第二個則設定為 PLAIN_TEXT,且只允許輸出變數。
-
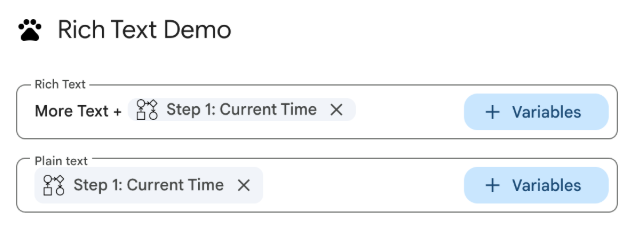
圖 3:設定為 RICH_TEXT和PLAIN_TEXT的文字輸入小工具。
建議您為所有 TextInput 小工具明確設定輸入模式。
以下是資訊清單檔案,用於設定具有不同輸入模式的 TextInput 小工具:
JSON
{
  "timeZone": "America/Toronto",
  "dependencies": {},
  "exceptionLogging": "STACKDRIVER",
  "runtimeVersion": "V8",
  "addOns": {
    "common": {
      "name": "Text and output variable demo",
      "logoUrl": "https://www.gstatic.com/images/icons/material/system/1x/pets_black_48dp.png",
      "useLocaleFromApp": true
    },
    "flows": {
      "workflowElements": [
        {
          "id": "richTextDemo",
          "state": "ACTIVE",
          "name": "Rich Text Demo",
          "description": "Show the difference between rich text and plain text TextInput widgets",
          "workflowAction": {
            "inputs": [
              {
                "id": "value1",
                "description": "First user input",
                "cardinality": "SINGLE",
                "dataType": {
                  "basicType": "STRING"
                }
              },
              {
                "id": "value2",
                "description": "Second user input",
                "cardinality": "SINGLE",
                "dataType": {
                  "basicType": "STRING"
                }
              }
            ],
            "onConfigFunction": "onConfiguration",
            "onExecuteFunction": "onExecution"
          }
        }
      ]
    }
  }
}
以下程式碼用於設定不同輸入模式的 TextInput 小工具:
Apps Script
function onConfiguration() {
  const input1 = CardService.newTextInput()
    .setFieldName("value1")
    .setId("value1")
    .setTitle("Rich Text")
    .setHostAppDataSource(
      CardService.newHostAppDataSource()
        .setWorkflowDataSource(
          CardService.newWorkflowDataSource()
            .setIncludeVariables(true)
        )
    )
    // Set input mode to RICH_TEXT to allow mixed text and variables.
    .setInputMode(CardService.TextInputMode.RICH_TEXT);

  const input2 = CardService.newTextInput()
    .setFieldName("value2")
    .setId("value2")
    .setTitle("Plain text")
    .setHostAppDataSource(
      CardService.newHostAppDataSource()
        .setWorkflowDataSource(
          CardService.newWorkflowDataSource()
            .setIncludeVariables(true)
        )
    )
    // Set input mode to PLAIN_TEXT to enforce single variable selection.
    .setInputMode(CardService.TextInputMode.PLAIN_TEXT);

  const section = CardService.newCardSection()
    .addWidget(input1)
    .addWidget(input2);

  const card = CardService.newCardBuilder()
    .addSection(section)
    .build();

  return card;
}

function onExecution(e) {
}
自訂變數挑選器按鈕
您可以設定按鈕大小和標籤,自訂變數挑選器按鈕。
按鈕大小
如要設定按鈕大小,請使用 setVariableButtonSize() 和下列其中一個 VariableButtonSize 列舉:
UNSPECIFIED:預設值。按鈕在側邊面板中會顯示為精簡版,在其他情況下則會顯示完整大小。COMPACT:按鈕只會顯示加號 (+)。FULL_SIZE:按鈕會顯示完整文字標籤。
按鈕標籤
如要設定按鈕文字,請使用 setVariableButtonLabel()。
範例:自訂變數挑選器
以下範例說明如何設定 TextInput 小工具,並使用不同大小的變數挑選器按鈕和自訂標籤。
-

圖 1:網頁上的變數選擇器按鈕自訂選項。 -
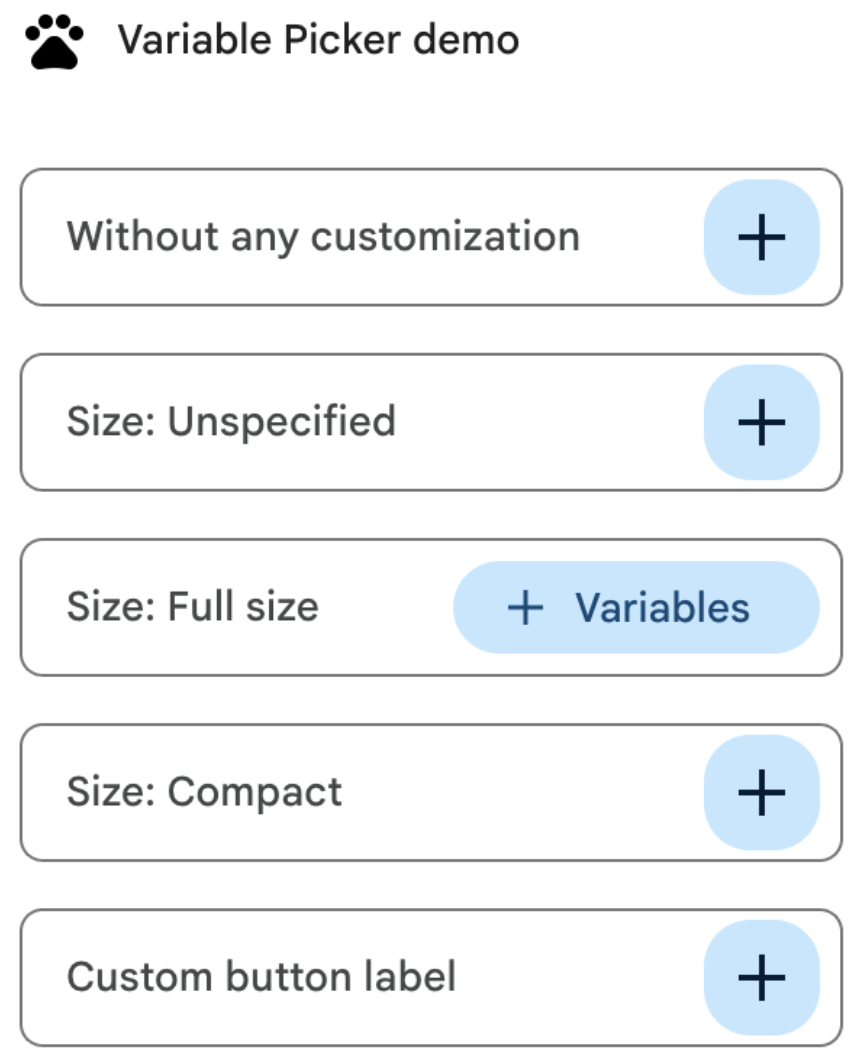
圖 2:外掛程式側邊面板中的變數挑選器按鈕自訂選項。
以下是自訂變數挑選器按鈕的資訊清單檔案:
JSON
{
  "timeZone": "America/Los_Angeles",
  "dependencies": {},
  "exceptionLogging": "STACKDRIVER",
  "runtimeVersion": "V8",
  "oauthScopes": [
    "https://www.googleapis.com/auth/script.locale"
  ],
  "addOns": {
    "common": {
      "name": "Variable button customization",
      "logoUrl": "https://www.gstatic.com/images/icons/material/system/1x/pets_black_48dp.png",
      "useLocaleFromApp": true
    },
    "flows": {
      "workflowElements": [
        {
          "id": "variable_picker_customization",
          "state": "ACTIVE",
          "name": "Variable Picker demo",
          "description": "List all possible variable picker customization options",
          "workflowAction": {
            "onConfigFunction": "onUpdateCardConfigFunction",
            "onExecuteFunction": "onUpdateCardExecuteFunction"
          }
        }
      ]
    }
  }
}
以下是自訂變數挑選器按鈕的程式碼:
Apps Script
function onUpdateCardConfigFunction(event) {
  const textInput1 = CardService.newTextInput()
    .setFieldName("value1")
    .setTitle("Regular variable picker button")
    .setHostAppDataSource(
      CardService.newHostAppDataSource().setWorkflowDataSource(
        CardService.newWorkflowDataSource()
          .setIncludeVariables(true)
          .setVariableButtonSize(CardService.VariableButtonSize.UNSPECIFIED)
      )
    );

  const textInput2 = CardService.newTextInput()
    .setFieldName("value2")
    .setTitle("Size: Unspecified")
    .setHostAppDataSource(
      CardService.newHostAppDataSource().setWorkflowDataSource(
        CardService.newWorkflowDataSource()
          .setIncludeVariables(true)
          .setVariableButtonSize(CardService.VariableButtonSize.UNSPECIFIED)
      )
    );

  const textInput3 = CardService.newTextInput()
    .setFieldName("value3")
    .setTitle("Size: Full size")
    .setHostAppDataSource(
      CardService.newHostAppDataSource().setWorkflowDataSource(
        CardService.newWorkflowDataSource()
          .setIncludeVariables(true)
          .setVariableButtonSize(CardService.VariableButtonSize.FULL_SIZE)
      )
    );

  const textInput4 = CardService.newTextInput()
    .setFieldName("value4")
    .setTitle("Size: Compact")
    .setHostAppDataSource(
      CardService.newHostAppDataSource().setWorkflowDataSource(
        CardService.newWorkflowDataSource()
          .setIncludeVariables(true)
          .setVariableButtonSize(CardService.VariableButtonSize.COMPACT)
      )
    );

  const textInput5 = CardService.newTextInput()
    .setFieldName("value5")
    .setTitle("Custom button label")
    .setHostAppDataSource(
      CardService.newHostAppDataSource().setWorkflowDataSource(
        CardService.newWorkflowDataSource()
          .setIncludeVariables(true)
          .setVariableButtonLabel("New button label!")
      )
    );

  var cardSection = CardService.newCardSection()
    .addWidget(textInput1)
    .addWidget(textInput2)
    .addWidget(textInput3)
    .addWidget(textInput4)
    .addWidget(textInput5)
    .setId("section_1");

  var card = CardService.newCardBuilder().addSection(cardSection).build();

  return card;
}

function onUpdateCardExecuteFunction(event) {
}
設定 Google Workspace 資料自動完成功能
您也可以從使用者 Google Workspace 環境中的資料填入自動完成建議:
- Google Workspace 使用者:填入同一 Google Workspace 機構中的使用者。
- Google Chat 聊天室:填入使用者所屬的 Google Chat 聊天室。
如要設定這項功能,請在 SelectionInput 小工具中設定 PlatformDataSource,並將 WorkflowDataSourceType 指定為 USER 或 SPACE。
Apps Script
// User Autocomplete
var multiSelect2 =
  CardService.newSelectionInput()
    .setFieldName("value2")
    .setTitle("User Autocomplete")
    .setType(CardService.SelectionInputType.MULTI_SELECT)
    .setMultiSelectMaxSelectedItems(3)
    .setPlatformDataSource(
      CardService.newPlatformDataSource()
        .setHostAppDataSource(
          CardService.newHostAppDataSource()
            .setWorkflowDataSource(
              CardService.newWorkflowDataSource()
                .setIncludeVariables(true)
                .setType(CardService.WorkflowDataSourceType.USER)
            ))
    );

// Chat Space Autocomplete
var multiSelect3 =
  CardService.newSelectionInput()
    .setFieldName("value3")
    .setTitle("Chat Space Autocomplete")
    .setType(CardService.SelectionInputType.MULTI_SELECT)
    .setMultiSelectMaxSelectedItems(3)
    .setPlatformDataSource(
      CardService.newPlatformDataSource()
        .setHostAppDataSource(
          CardService.newHostAppDataSource()
            .setWorkflowDataSource(
              CardService.newWorkflowDataSource()
                .setIncludeVariables(true)
                .setType(CardService.WorkflowDataSourceType.SPACE)
            ))
    );
範例:合併自動完成類型
以下範例顯示 onConfig 函式,該函式會建立含有三個 SelectionInput 小工具的資訊卡,示範伺服器端、使用者和空間自動完成功能:
JSON
{
  "timeZone": "America/Los_Angeles",
  "exceptionLogging": "STACKDRIVER",
  "runtimeVersion": "V8",
  "addOns": {
    "common": {
      "name": "Autocomplete Demo",
      "logoUrl": "https://www.gstatic.com/images/icons/material/system/1x/pets_black_48dp.png",
      "useLocaleFromApp": true
    },
    "flows": {
      "workflowElements": [
        {
          "id": "autocomplete_demo",
          "state": "ACTIVE",
          "name": "Autocomplete Demo",
          "description": "Provide autocompletion in input fields",
          "workflowAction": {
            "inputs": [
              {
                "id": "value1",
                "description": "A multi-select field with autocompletion",
                "cardinality": "SINGLE",
                "dataType": {
                  "basicType": "STRING"
                }
              }
            ],
            "onConfigFunction": "onConfigAutocomplete",
            "onExecuteFunction": "onExecuteAutocomplete"
          }
        }
      ]
    }
  }
}
Apps Script
function onConfigAutocompleteTest(event) {
  // Handle autocomplete request
  if (event.workflow && event.workflow.elementUiAutocomplete) {
    return handleAutocompleteRequest(event);
  }

  // Server-side autocomplete widget
  var multiSelect1 =
    CardService.newSelectionInput()
      .setFieldName("value1")
      .setTitle("Server Autocomplete")
      .setType(CardService.SelectionInputType.MULTI_SELECT)
      .setMultiSelectMaxSelectedItems(3)
      .addDataSourceConfig(
        CardService.newDataSourceConfig()
          .setRemoteDataSource(
            CardService.newAction().setFunctionName('getAutocompleteResults')
          )
      )
      .addDataSourceConfig(
        CardService.newDataSourceConfig()
          .setPlatformDataSource(
            CardService.newPlatformDataSource()
              .setHostAppDataSource(
                CardService.newHostAppDataSource()
                  .setWorkflowDataSource(
                    CardService.newWorkflowDataSource()
                      .setIncludeVariables(true)
                  ))
          )
      );

  // User autocomplete widget
  var multiSelect2 =
    CardService.newSelectionInput()
      .setFieldName("value2")
      .setTitle("User Autocomplete")
      .setType(CardService.SelectionInputType.MULTI_SELECT)
      .setMultiSelectMaxSelectedItems(3)
      .setPlatformDataSource(
        CardService.newPlatformDataSource()
          .setHostAppDataSource(
            CardService.newHostAppDataSource()
              .setWorkflowDataSource(
                CardService.newWorkflowDataSource()
                  .setIncludeVariables(true)
                  .setType(CardService.WorkflowDataSourceType.USER)
              ))
      );

  // Space autocomplete widget
  var multiSelect3 =
    CardService.newSelectionInput()
      .setFieldName("value3")
      .setTitle("Chat Space Autocomplete")
      .setType(CardService.SelectionInputType.MULTI_SELECT)
      .setMultiSelectMaxSelectedItems(3)
      .setPlatformDataSource(
        CardService.newPlatformDataSource()
          .setHostAppDataSource(
            CardService.newHostAppDataSource()
              .setWorkflowDataSource(
                CardService.newWorkflowDataSource()
                  .setIncludeVariables(true)
                  .setType(CardService.WorkflowDataSourceType.SPACE)
              ))
      );

  var sectionBuilder =
    CardService.newCardSection()
      .addWidget(multiSelect1)
      .addWidget(multiSelect2)
      .addWidget(multiSelect3);

  var card =
    CardService.newCardBuilder()
      .addSection(sectionBuilder)
      .build();
  return card;
}

function handleAutocompleteRequest(event) {
  var invokedFunction = event.workflow.elementUiAutocomplete.invokedFunction;
  var query = event.workflow.elementUiAutocomplete.query;

  if (invokedFunction != "getAutocompleteResults" || query == undefined || query == "") {
    return {};
  }

  // Query your data source to get results
  let autocompleteResponse = AddOnsResponseService.newUpdateWidget()
    .addSuggestion(
      query + " option 1",
      query + "_option1",
      false,
      "https://developers.google.com/workspace/add-ons/images/person-icon.png",
      "option 1 bottom text"
    )
    .addSuggestion(
      query + " option 2",
      query + "_option2",
      false,
      "https://developers.google.com/workspace/add-ons/images/person-icon.png",
      "option 2 bottom text"
    ).addSuggestion(
      query + " option 3",
      query + "_option3",
      false,
      "https://developers.google.com/workspace/add-ons/images/person-icon.png",
      "option 3 bottom text"
    );

  const modifyAction = AddOnsResponseService.newAction()
    .addModifyCard(
      AddOnsResponseService.newModifyCard()
        .setUpdateWidget(autocompleteResponse)
    );

  return AddOnsResponseService.newRenderActionBuilder()
    .setAction(modifyAction)
    .build();
}
驗證輸入變數
最佳做法是驗證使用者輸入的值是否適當。請參閱「驗證輸入變數」。