
Page Summary
-
Users must install and authorize add-ons before using them within Google Workspace applications.
-
Add-ons request specific permissions during authorization, and users can grant or deny these requests.
-
Add-ons can be authorized for individual users or by domain administrators for all users.
-
Users can unauthorize or uninstall add-ons through their Google Account settings or the Google Workspace Marketplace.
-
Editor add-ons have a separate authorization model based on how they interact with Google Drive files.
Users must install and authorize an add-on before they can open and use it. Because these steps are the first part of the add-on user experience, understand them before you start creating your own add-ons.
Learn how users can install, authorize, and start using add-ons.
Install add-ons
Install an add-on to make it available in the Google Workspace host application it extends.
Install published add-ons from the Google Workspace host application or from the Google Workspace Marketplace. Domain administrators can also install add-ons on behalf of their users from the Google Workspace Marketplace. You can also install unpublished add-ons you're developing so that you can test them. Authorize an installed add-on the first time you use it.
See Publish add-ons.
Authorize add-ons
After you install an add-on, it's available in the Google Workspace host application it extends. When a user first uses the add-on, the host application presents an authorization card or dialog. This card explains what the add-on needs permission to do, such as accessing the content of the current Google Sheet. The user can then grant those permissions and allow the add-on to proceed. If the user denies authorization, they can't use the add-on.
Editor add-ons use a different authorization model than Google Workspace add-ons. Because Editor add-ons operate on Google Drive files, the editor authorization model defines various authorization modes that result when add-ons are used with individual files. When you develop Editor add-ons, understand the different modes and how an add-on moves between them.
Authorize published add-ons
After you install a published add-on, the authorization flow begins:
- Select an account to install the add-on to when prompted.
- Review the list of authorizations that the add-on requires. If you grant authorization, select Allow. This enables the add-on for use.
- Run it from the host application it extends. If the application is already open in a browser tab, refresh the tab for the add-on to become available.
If the add-on you've installed is later updated and requires additional authorizations you have not yet granted, the host application prompts you for those permissions the next time you use the add-on.
Authorize unpublished Google Workspace add-ons
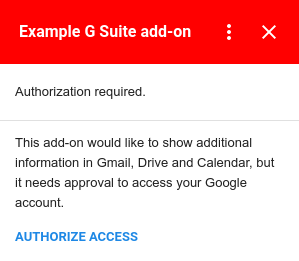
Unpublished add-ons have a different authorization flow than published add-ons because they aren't listed in the Google Workspace Marketplace. After you install an unpublished add-on, the host application doesn't ask you to authorize immediately. Instead, the authorization flow starts when you first use the add-on.
When you run an add-on, it determines if user authorization is needed. If authorization is necessary, the add-on presents an authorization card. Authorization is always required the first time an add-on executes, and might also be required if a new version of the add-on uses a service not previously authorized. The Authorize Access button provides a dialog window to Allow or Deny authorization for the add-on.
Authorize non-Google services for a Google Workspace add-on
If your add-on connects to a third-party service, you must authorize that service separately.
An add-on can connect to a third-party service that requires authorization. Add-ons that connect to these services require two separate actions:
- Authorize the add-on itself when it's installed or first started.
- Authorize the non-Google service when it's first accessed.
If an add-on you develop needs to access a non-Google service using OAuth, configure the connection for that service when you build the add-on.
For more information, see Connect your Google Workspace add-on to a third-party service.
Third-party conferencing systems
This section describes authorizing conferencing solutions added to Google Calendar with a Google Workspace add-on.
If you don't currently maintain a web-based third-party conferencing system, your add-on doesn't need to authorize any conference solutions. This functionality was built for conference providers specifically.
Add-ons that extend Google Calendar can also add additional conferencing solutions that let users select a third-party conferencing system when editing Google Calendar events. If your add-on provides conferencing options that require the user to log into them, your add-on must give the user the ability to do so.
If a user attempts to create a conference with your
add-on without a necessary sign in, the conference
solutions's
onCreateFunction method
should return a
ConferenceData
object containing a
ConferenceError
with an
authentication URL.
Upon receiving this object, Google Calendar creates a LOG IN button in the event edit UI that links to the authentication URL the add-on provides. Users can then use this button to sign in to the third-party system before they use the add-on.
See
Creating third-party conferences
for more details on handling authorization using ConferenceError.
Authorize unpublished Editor add-ons
It's a best practice to test Editor add-ons as you develop them. The authorization flow is identical to that for published Editor add-ons, except that the flow starts when you first attempt to test the add-on. If you later retest the same add-on, you aren't prompted for authorization again.
Unauthorize add-ons
When you develop add-ons, unauthorize them to retest the authorization flow.
To unauthorize an add-on, follow these steps:
- Open your account security console.
- Locate and select the add-on you want to unauthorize.
- Select Remove Access.
When you run the add-on again after unauthorizing it, the authorization flow is presented again.
Uninstall add-ons
To uninstall an add-on that you installed from the Google Workspace Marketplace, refer to Uninstall a Marketplace app or add-on.
To uninstall an unpublished add-on built in Apps Script, see the testing guide.