

Ta strona wyjaśnia, jak utworzyć aplikację Google Chat, która odbiera zdarzenia z Google Chat za pomocą Cloud Pub/Sub. Ta architektura jest przydatna, jeśli aplikacja Google Chat znajduje się za zaporą lub jeśli chcesz wysyłać i odbierać zdarzenia dotyczące pokoju lub użytkownika w Google Chat za pomocą interfejsu Google Workspace Events API.
Poniższy diagram przedstawia architekturę aplikacji Google Chat utworzonej za pomocą Pub/Sub:
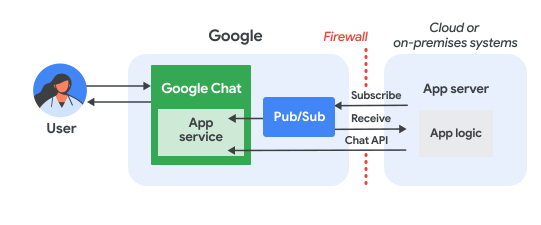
Na powyższym diagramie użytkownik wchodzący w interakcję z aplikacją Google Chat Pub/Sub ma następujący przepływ informacji:
Użytkownik wchodzi w interakcję z aplikacją Google Chat, np. wysyłając do niej wiadomość, wydając polecenie lub dodając ją do pokoju w Google Chat albo usuwając z niego.
Google Chat wysyła wiadomość do tematu Pub/Sub.
Serwer aplikacji, czyli system w chmurze lub lokalny, który zawiera logikę aplikacji Google Chat, subskrybuje temat Pub/Sub, aby odbierać wiadomości przez zaporę.
Opcjonalnie aplikacja Google Chat może wywoływać interfejs Chat API, aby asynchronicznie publikować wiadomości lub wykonywać inne operacje.
Wymagania wstępne
Node.js
- Konto Google Workspace w wersji Business lub Enterprise z dostępem do Google Chat.
- Projekt Google Cloud z włączonymi płatnościami. Aby sprawdzić, czy w istniejącym projekcie włączone są płatności, przeczytaj artykuł Sprawdzanie stanu rozliczeń projektów. Aby utworzyć projekt i skonfigurować płatności, przeczytaj artykuł Tworzenie projektu Google Cloud.
- Node.js w wersji 14 lub nowszej
- Narzędzie do zarządzania pakietami npm
- Zainicjowany projekt Node.js. Aby zainicjować nowy projekt, utwórz nowy folder i przejdź do niego, a następnie w interfejsie wiersza poleceń uruchom to polecenie:
npm init
Python
- Konto Google Workspace w wersji Business lub Enterprise z dostępem do Google Chat.
- Projekt Google Cloud z włączonymi płatnościami. Aby sprawdzić, czy w istniejącym projekcie włączone są płatności, przeczytaj artykuł Sprawdzanie stanu rozliczeń projektów. Aby utworzyć projekt i skonfigurować płatności, przeczytaj artykuł Tworzenie projektu Google Cloud.
- Python w wersji 3.6 lub nowszej
- Narzędzie do zarządzania pakietami pip
Java
- Konto Google Workspace w wersji Business lub Enterprise z dostępem do Google Chat.
- Projekt Google Cloud z włączonymi płatnościami. Aby sprawdzić, czy w istniejącym projekcie włączone są płatności, przeczytaj artykuł Sprawdzanie stanu rozliczeń projektów. Aby utworzyć projekt i skonfigurować płatności, przeczytaj artykuł Tworzenie projektu Google Cloud.
- Java w wersji 11 lub nowszej
- Narzędzie do zarządzania pakietami Maven
Włączanie interfejsów API
Zanim zaczniesz korzystać z interfejsów API Google, musisz je włączyć w projekcie Google Cloud. W jednym projekcie Google Cloud możesz włączyć co najmniej 1 interfejs API.W konsoli Google Cloud włącz interfejs Google Chat API i Pub/Sub API.
Konfigurowanie Pub/Sub
Utwórz temat Pub/Sub do którego interfejs Chat API może wysyłać wiadomości. Zalecamy używanie jednego tematu na aplikację Google Chat.
Utwórz konto usługi dla aplikacji Google Chat, aby autoryzować ją w Pub/Sub i Google Chat, a następnie zapisz plik klucza prywatnego w katalogu roboczym.
Utwórz subskrypcję pull dla tematu.
Przypisz do utworzonego wcześniej konta usługi rolę subskrybenta Pub/Sub w subskrypcji.
Pisanie skryptu
W tej sekcji zdefiniujesz logikę aplikacji Google Chat. Napiszesz skrypt, który uwierzytelnia się w Google Cloud i subskrybuje temat Pub/Sub, aby otrzymywać zdarzenia z Google Chat, np. gdy użytkownik wyśle wiadomość do Twojej aplikacji Google Chat.
Gdy skrypt otrzyma wiadomość, przetworzy dane zdarzenia i użyje interfejsu Google Chat API, aby opublikować odpowiedź dla użytkownika lub pokoju. Ta konfiguracja umożliwia aplikacji Google Chat działanie za zaporą przy jednoczesnym wchodzeniu w interakcje z użytkownikami Google Chat.
Node.js
W interfejsie wiersza poleceń podaj dane logowania konta usługi:
export GOOGLE_APPLICATION_CREDENTIALS=SERVICE_ACCOUNT_FILE_PATHW interfejsie wiersza poleceń podaj identyfikator projektu Google Cloud:
export PROJECT_ID=PROJECT_IDW interfejsie wiersza poleceń podaj identyfikator subskrypcji Pub/Sub utworzonej wcześniej:
export SUBSCRIPTION_ID=SUBSCRIPTION_IDW katalogu roboczym utwórz plik o nazwie
package.json.W pliku
package.jsonwklej ten kod:{ "name": "pub-sub-app", "version": "1.0.0", "description": "Google Chat App that listens for messages via Cloud Pub/Sub", "main": "index.js", "scripts": { "start": "node index.js", "test": "echo \"Error: no test specified\" && exit 1" }, "dependencies": { "@google-apps/chat": "^0.4.0", "@google-cloud/pubsub": "^4.5.0" }, "license": "Apache-2.0" }W katalogu roboczym utwórz plik o nazwie
index.js.W pliku
index.jswklej ten kod:const {ChatServiceClient} = require('@google-apps/chat'); const {MessageReplyOption} = require('@google-apps/chat').protos.google.chat.v1.CreateMessageRequest; const {PubSub} = require('@google-cloud/pubsub'); const {SubscriberClient} = require('@google-cloud/pubsub/build/src/v1'); // Receives messages from a pull subscription. function receiveMessages() { const chat = new ChatServiceClient({ keyFile: process.env.GOOGLE_APPLICATION_CREDENTIALS, scopes: ['https://www.googleapis.com/auth/chat.bot'], }); const subscriptionPath = new SubscriberClient() .subscriptionPath(process.env.PROJECT_ID, process.env.SUBSCRIPTION_ID) const subscription = new PubSub() .subscription(subscriptionPath); // Handle incoming message, then acknowledge the received message const messageHandler = message => { console.log(`Id : ${message.id}`); const event = JSON.parse(message.data); console.log(`Data : ${JSON.stringify(event)}`); // Post the response to Google Chat. const request = formatRequest(event); if (request != null) { chat.createMessage(request); } // Acknowledge the message. message.ack(); } subscription.on('message', messageHandler); console.log(`Listening for messages on ${subscriptionPath}`); // Keep main thread from exiting while waiting for messages setTimeout(() => { subscription.removeListener('message', messageHandler); console.log(`Stopped listening for messages.`); }, 60 * 1000); } // Send message to Google Chat based on the type of event function formatRequest(event) { const chatEvent = event.chat || {}; // If the app was removed, we don't respond. if (chatEvent.removedFromSpacePayload) { console.log(`App removed from space.`); return null; } const payload = chatEvent.messagePayload || chatEvent.addedToSpacePayload; const spaceName = payload?.space?.name; if (!spaceName) { console.log('No space name in event.'); return null; } if (chatEvent.addedToSpacePayload) { // An app can also be added to a space by @mentioning it in a // message. In that case, we fall through to the message case // and let the app respond. If the app was added using the // invite flow, we just post a thank you message in the space. return { parent: spaceName, message: { text: 'Thank you for adding me!' }, }; } else if (chatEvent.messagePayload) { // In case of message, post the response in the same thread. const message = chatEvent.messagePayload.message; return { parent: spaceName, messageReplyOption: MessageReplyOption.REPLY_MESSAGE_FALLBACK_TO_NEW_THREAD, message: { text: 'You said: `' + message.text + '`', thread: { name: message.thread.name }, }, }; } } if (!process.env.PROJECT_ID) { console.log('Missing PROJECT_ID env var.'); process.exit(1); } if (!process.env.SUBSCRIPTION_ID) { console.log('Missing SUBSCRIPTION_ID env var.'); process.exit(1); } if (!process.env.GOOGLE_APPLICATION_CREDENTIALS) { console.log('Missing GOOGLE_APPLICATION_CREDENTIALS env var.'); process.exit(1); } receiveMessages();
Python
W interfejsie wiersza poleceń podaj dane logowania konta usługi:
export GOOGLE_APPLICATION_CREDENTIALS=SERVICE_ACCOUNT_FILE_PATHW interfejsie wiersza poleceń podaj identyfikator projektu Google Cloud:
export PROJECT_ID=PROJECT_IDW interfejsie wiersza poleceń podaj identyfikator subskrypcji Pub/Sub utworzonej wcześniej:
export SUBSCRIPTION_ID=SUBSCRIPTION_IDW katalogu roboczym utwórz plik o nazwie
requirements.txt.W pliku
requirements.txtwklej ten kod:google-cloud-pubsub>=2.23.0 google-apps-chat==0.1.9W katalogu roboczym utwórz plik o nazwie
app.py.W pliku
app.pywklej ten kod:import json import logging import os import sys import time from google.apps import chat_v1 as google_chat from google.cloud import pubsub_v1 from google.oauth2.service_account import Credentials def receive_messages(): """Receives messages from a pull subscription.""" scopes = ['https://www.googleapis.com/auth/chat.bot'] service_account_key_path = os.environ.get('GOOGLE_APPLICATION_CREDENTIALS') creds = Credentials.from_service_account_file(service_account_key_path) chat = google_chat.ChatServiceClient( credentials=creds, client_options={'scopes': scopes} ) project_id = os.environ.get('PROJECT_ID') subscription_id = os.environ.get('SUBSCRIPTION_ID') subscriber = pubsub_v1.SubscriberClient() subscription_path = subscriber.subscription_path(project_id, subscription_id) # Handle incoming message, then acknowledge the received message def callback(message): event = json.loads(message.data) logging.info('Data : %s', event) # Post the response to Google Chat. request = format_request(event) if request is not None: chat.create_message(request) # Acknowledge the message. message.ack() subscriber.subscribe(subscription_path, callback = callback) logging.info('Listening for messages on %s', subscription_path) # Keep main thread from exiting while waiting for messages while True: time.sleep(60) def format_request(event): """Send message to Google Chat based on the type of event. Args: event: A dictionary with the event data. """ chat_event = event.get('chat', {}) # If the app was removed, we don't respond. if 'removedFromSpacePayload' in chat_event: logging.info('App removed from space.') return payload = chat_event.get('messagePayload') or chat_event.get( 'addedToSpacePayload' ) space_name = payload.get('space', {}).get('name') if payload else None if not space_name: logging.warning('No space name in event.') return if 'addedToSpacePayload' in chat_event: # An app can also be added to a space by @mentioning it in a # message. In that case, we fall through to the message case # and let the app respond. If the app was added using the # invite flow, we just post a thank you message in the space. return google_chat.CreateMessageRequest( parent = space_name, message = { 'text': 'Thank you for adding me!' } ) elif 'messagePayload' in chat_event: # In case of message, post the response in the same thread. message = chat_event['messagePayload']['message'] return google_chat.CreateMessageRequest( parent = space_name, message_reply_option = google_chat.CreateMessageRequest.MessageReplyOption.REPLY_MESSAGE_FALLBACK_TO_NEW_THREAD, message = { 'text': 'You said: `' + message['text'] + '`', 'thread': { 'name': message['thread']['name'] } } ) if __name__ == '__main__': if 'PROJECT_ID' not in os.environ: logging.error('Missing PROJECT_ID env var.') sys.exit(1) if 'SUBSCRIPTION_ID' not in os.environ: logging.error('Missing SUBSCRIPTION_ID env var.') sys.exit(1) if 'GOOGLE_APPLICATION_CREDENTIALS' not in os.environ: logging.error('Missing GOOGLE_APPLICATION_CREDENTIALS env var.') sys.exit(1) logging.basicConfig( level=logging.INFO, style='{', format='{levelname:.1}{asctime} {filename}:{lineno}] {message}') receive_messages()
Java
W interfejsie wiersza poleceń podaj dane logowania konta usługi:
export GOOGLE_APPLICATION_CREDENTIALS=SERVICE_ACCOUNT_FILE_PATHW interfejsie wiersza poleceń podaj identyfikator projektu Google Cloud:
export PROJECT_ID=PROJECT_IDW interfejsie wiersza poleceń podaj identyfikator subskrypcji Pub/Sub utworzonej wcześniej:
export SUBSCRIPTION_ID=SUBSCRIPTION_IDW katalogu roboczym utwórz plik o nazwie
pom.xml.W pliku
pom.xmlwklej ten kod:<project xmlns="http://maven.apache.org/POM/4.0.0" xmlns:xsi="http://www.w3.org/2001/XMLSchema-instance" xsi:schemaLocation="http://maven.apache.org/POM/4.0.0 http://maven.apache.org/xsd/maven-4.0.0.xsd"> <modelVersion>4.0.0</modelVersion> <groupId>com.google.chat.addon</groupId> <artifactId>pubsub-addon-chat-app</artifactId> <version>0.1.0</version> <name>pubsub-addon-chat-app-java</name> <properties> <maven.compiler.release>11</maven.compiler.release> <project.build.sourceEncoding>UTF-8</project.build.sourceEncoding> </properties> <dependencyManagement> <dependencies> <dependency> <groupId>com.google.cloud</groupId> <artifactId>libraries-bom</artifactId> <version>26.41.0</version> <!-- Use a recent BOM version --> <type>pom</type> <scope>import</scope> </dependency> </dependencies> </dependencyManagement> <dependencies> <!-- Google Chat GAPIC library --> <dependency> <groupId>com.google.cloud</groupId> <artifactId>google-cloud-chat</artifactId> </dependency> <!-- Google Cloud Pub/Sub library --> <dependency> <groupId>com.google.cloud</groupId> <artifactId>google-cloud-pubsub</artifactId> </dependency> <!-- Google Apps Add-ons Event Object --> <dependency> <groupId>com.google.apps.addons.v1</groupId> <artifactId>google-apps-addons-v1-java</artifactId> <version>0.2.0</version> <!-- Check for latest version --> </dependency> <!-- Protobuf JSON utility --> <dependency> <groupId>com.google.protobuf</groupId> <artifactId>protobuf-java-util</artifactId> </dependency> <!-- Google Auth Library --> <dependency> <groupId>com.google.auth</groupId> <artifactId>google-auth-library-oauth2-http</artifactId> </dependency> <dependency> <groupId>com.google.api</groupId> <artifactId>gax</artifactId> </dependency> <!-- JSON utilities for PubSub message (if needed, though protobuf-java-util is primary for EventObject) --> <dependency> <groupId>com.fasterxml.jackson.core</groupId> <artifactId>jackson-databind</artifactId> <version>2.14.2</version> </dependency> <dependency> <groupId>org.slf4j</groupId> <artifactId>slf4j-jdk14</artifactId> <version>1.7.36</version> <scope>runtime</scope> </dependency> </dependencies> <build> <plugins> <plugin> <groupId>org.apache.maven.plugins</groupId> <artifactId>maven-compiler-plugin</artifactId> <version>3.13.0</version> <configuration> <source>11</source> <target>11</target> </configuration> </plugin> <plugin> <groupId>org.codehaus.mojo</groupId> <artifactId>exec-maven-plugin</artifactId> <version>3.3.0</version> <configuration> <mainClass>Main</mainClass> </configuration> </plugin> </plugins> </build> </project>W katalogu roboczym utwórz strukturę katalogów
src/main/java.W katalogu
src/main/javautwórz plik o nazwieMain.java.W pliku
Main.javawklej ten kod:import com.fasterxml.jackson.databind.JsonNode; import com.fasterxml.jackson.databind.ObjectMapper; import com.google.api.gax.core.FixedCredentialsProvider; import com.google.auth.oauth2.GoogleCredentials; import com.google.chat.v1.ChatServiceClient; import com.google.chat.v1.ChatServiceSettings; import com.google.chat.v1.CreateMessageRequest; import com.google.chat.v1.CreateMessageRequest.MessageReplyOption; import com.google.chat.v1.Message; import com.google.chat.v1.Thread; import com.google.cloud.pubsub.v1.AckReplyConsumer; import com.google.cloud.pubsub.v1.MessageReceiver; import com.google.cloud.pubsub.v1.Subscriber; import com.google.pubsub.v1.ProjectSubscriptionName; import com.google.pubsub.v1.PubsubMessage; import java.io.FileInputStream; import java.util.Collections; public class Main { public static final String PROJECT_ID_ENV_PROPERTY = "PROJECT_ID"; public static final String SUBSCRIPTION_ID_ENV_PROPERTY = "SUBSCRIPTION_ID"; public static final String CREDENTIALS_PATH_ENV_PROPERTY = "GOOGLE_APPLICATION_CREDENTIALS"; public static void main(String[] args) throws Exception { ProjectSubscriptionName subscriptionName = ProjectSubscriptionName.of( System.getenv(Main.PROJECT_ID_ENV_PROPERTY), System.getenv(Main.SUBSCRIPTION_ID_ENV_PROPERTY)); // Instantiate app, which implements an asynchronous message receiver. EchoApp echoApp = new EchoApp(); // Create a subscriber for <var>SUBSCRIPTION_ID</var> bound to the message receiver final Subscriber subscriber = Subscriber.newBuilder(subscriptionName, echoApp).build(); System.out.println("Subscriber is listening to events..."); subscriber.startAsync(); // Wait for termination subscriber.awaitTerminated(); } } /** * A demo app which implements {@link MessageReceiver} to receive messages. * It echoes incoming messages. */ class EchoApp implements MessageReceiver { // Path to the private key JSON file of the service account to be used for posting response // messages to Google Chat. // In this demo, we are using the same service account for authorizing with Cloud Pub/Sub to // receive messages and authorizing with Google Chat to post messages. If you are using // different service accounts, set the path to the private key JSON file of the service // account used to post messages to Google Chat here. private static final String SERVICE_ACCOUNT_KEY_PATH = System.getenv(Main.CREDENTIALS_PATH_ENV_PROPERTY); // Developer code for Google Chat API scope. private static final String GOOGLE_CHAT_API_SCOPE = "https://www.googleapis.com/auth/chat.bot"; private static final String ADDED_RESPONSE = "Thank you for adding me!"; ChatServiceClient chatServiceClient; EchoApp() throws Exception { GoogleCredentials credential = GoogleCredentials.fromStream(new FileInputStream(SERVICE_ACCOUNT_KEY_PATH)) .createScoped(Collections.singleton(GOOGLE_CHAT_API_SCOPE)); // Create the ChatServiceSettings with the app credentials ChatServiceSettings chatServiceSettings = ChatServiceSettings.newBuilder() .setCredentialsProvider(FixedCredentialsProvider.create(credential)) .build(); // Set the Chat service client chatServiceClient = ChatServiceClient.create(chatServiceSettings); } // Called when a message is received by the subscriber. @Override public void receiveMessage(PubsubMessage pubsubMessage, AckReplyConsumer consumer) { System.out.println("Id : " + pubsubMessage.getMessageId()); // Handle incoming message, then acknowledge the received message try { ObjectMapper mapper = new ObjectMapper(); JsonNode dataJson = mapper.readTree(pubsubMessage.getData().toStringUtf8()); System.out.println("Data : " + dataJson.toString()); handle(dataJson); consumer.ack(); } catch (Exception e) { System.out.println(e); // Negative acknowledgement makes Pub/Sub redeliver the message. consumer.nack(); } } // Send message to Google Chat based on the type of event. public void handle(JsonNode eventJson) throws Exception { // Google Chat events for add-ons are wrapped in a 'chat' object. if (!eventJson.has("chat")) { System.out.println("Ignored: Not a Chat event (missing 'chat' field)."); return; } JsonNode chatNode = eventJson.get("chat"); CreateMessageRequest createMessageRequest = null; if (chatNode.has("messagePayload")) { // HANDLE MESSAGE JsonNode messagePayload = chatNode.get("messagePayload"); JsonNode message = messagePayload.get("message"); JsonNode space = messagePayload.get("space"); String spaceName = space.get("name").asText(); String userText = message.has("text") ? message.get("text").asText() : ""; String threadName = message.has("thread") ? message.get("thread").get("name").asText() : ""; System.out.println("Received message in " + spaceName + ": " + userText); createMessageRequest = CreateMessageRequest.newBuilder() .setParent(spaceName) .setMessageReplyOption(MessageReplyOption.REPLY_MESSAGE_FALLBACK_TO_NEW_THREAD) .setMessage( Message.newBuilder() .setText("You said: `" + userText + "`") .setThread(Thread.newBuilder().setName(threadName).build()) .build()) .build(); } else if (chatNode.has("addedToSpacePayload")) { // HANDLE ADDED TO SPACE JsonNode addedPayload = chatNode.get("addedToSpacePayload"); JsonNode space = addedPayload.get("space"); String spaceName = space.get("name").asText(); System.out.println("Added to space: " + spaceName); createMessageRequest = CreateMessageRequest.newBuilder() .setParent(spaceName) .setMessage(Message.newBuilder().setText(ADDED_RESPONSE).build()) .build(); } else if (chatNode.has("removedFromSpacePayload")) { System.out.println("Removed from space."); return; } else { System.out.println("Ignored: Unhandled Chat event type."); return; } if (createMessageRequest != null) { // Post the response to Google Chat. chatServiceClient.createMessage(createMessageRequest); System.out.println("Sent reply."); } } }
Konfigurowanie aplikacji Google Chat
Skonfiguruj aplikację Google Chat w konsoli Google Cloud, aby podać szczegóły takie jak jej nazwa i awatar oraz skonfigurować połączenie z tematem Pub/Sub.
Łącząc się z tematem Pub/Sub, umożliwiasz Google Chat wysyłanie zdarzeń do Twojej aplikacji. Twój skrypt, który subskrybuje temat, może wtedy odbierać te zdarzenia i odpowiadać użytkownikom.
W konsoli Google Cloud otwórz Menu > Interfejsy API i usługi > Włączone interfejsy API i usługi > Google Chat API > Konfiguracja.
Skonfiguruj aplikację Google Chat dla Pub/Sub:
- W polu Nazwa aplikacji wpisz
Add-on Chat App. - W polu URL awatara wpisz
https://developers.google.com/workspace/add-ons/images/quickstart-app-avatar.png. - W polu Opis wpisz
Quickstart app. - W sekcji Funkcje zaznacz Dołączanie do pokoi i rozmów grupowych.
- W sekcji Ustawienia połączenia wybierz Cloud Pub/Sub i wklej nazwę utworzonego wcześniej tematu Pub/Sub.
- W sekcji Widoczność wybierz Udostępnij tę aplikację Google Chat konkretnym osobom i grupom w swojej domenie i wpisz swój adres e-mail.
- W sekcji Logi wybierz Loguj błędy w usłudze Logging.
- W polu Nazwa aplikacji wpisz
Kliknij Zapisz.
Po skonfigurowaniu aplikacji Google Chat musisz zaktualizować konfigurację Pub/Sub.
- Na stronie konfiguracji interfejsu Chat API, w sekcji Ustawienia połączenia skopiuj Adres e-mail konta usługi, który jest unikalnym adresem e-mail wygenerowanym dla Twojego projektu Google Cloud.
Przyznaj Google Chat uprawnienia do publikowania w temacie, przypisując rolę Publikujący Pub/Sub do skopiowanego wcześniej adresu e-mail konta usługi.
Aplikacja jest gotowa do odbierania wiadomości w Google Chat i odpowiadania na nie.
Uruchamianie skryptu
W interfejsie wiersza poleceń przejdź do katalogu roboczego i uruchom skrypt:
Node.js
npm install
npm start
Python
python -m venv env
source env/bin/activate
pip install -r requirements.txt -U
python app.py
Java
mvn compile exec:java -Dexec.mainClass=Main
Gdy uruchomisz kod, aplikacja zacznie nasłuchiwać wiadomości publikowanych w temacie Pub/Sub.
Testowanie aplikacji Google Chat
Aby przetestować aplikację Google Chat, otwórz czat z nią i wyślij wiadomość:
Otwórz Google Chat na koncie Google Workspace, które zostało podane podczas dodawania siebie jako zaufanego testera.
- Kliknij Nowy czat.
- W polu Dodaj co najmniej 1 osobę wpisz nazwę aplikacji Google Chat.
Wybierz aplikację Google Chat z wyników. Otworzy się czat.
- Na nowym czacie z aplikacją wpisz
Helloi naciśnijenter.
Aby dodać zaufanych testerów i dowiedzieć się więcej o testowaniu funkcji interaktywnych, przeczytaj artykuł Testowanie funkcji interaktywnych w aplikacjach Google Chat.
Rozwiązywanie problemów
Gdy aplikacja lub karta Google Chat zwróci błąd, w interfejsie Google Chat pojawi się komunikat „Coś poszło nie tak” lub „Nie można przetworzyć Twojej prośby”. Czasami interfejs Google Chat nie wyświetla żadnego komunikatu o błędzie, ale aplikacja lub karta Google Chat daje nieoczekiwany wynik, np. nie wyświetla się wiadomość na karcie.
Chociaż komunikat o błędzie może się nie wyświetlać w interfejsie Google Chat, dostępne są opisowe komunikaty o błędach i dane logów, które pomogą Ci naprawić błędy gdy włączone jest logowanie błędów w aplikacjach Google Chat. Aby uzyskać pomoc w wyświetlaniu, debugowaniu i naprawianiu błędów, przeczytaj artykuł Rozwiązywanie problemów i naprawianie błędów w Google Chat.
Czyszczenie danych
Aby uniknąć obciążania konta Google Cloud opłatami za zasoby zużyte w tym samouczku, zalecamy usunięcie projektu w chmurze.
- W konsoli Google Cloud otwórz stronę Zarządzanie zasobami. Kliknij Menu > Administracja > Zarządzanie zasobami.
- Na liście projektów wybierz projekt, który chcesz usunąć, a potem kliknij Usuń .
- W oknie wpisz identyfikator projektu i kliknij Wyłącz, aby usunąć projekt.
Powiązane artykuły
Aby dodać więcej funkcji do aplikacji Google Chat, przeczytaj te artykuły: