本頁面說明如何使用 HTTP 服務,建構可在 Google Chat 中運作的 Google Workspace 外掛程式。
本快速入門導覽課程說明如何使用 Google Cloud 服務建構 HTTP 服務。如要建構 Chat 應用程式,請編寫並部署 Cloud Run 函式,供 Chat 應用程式用來回覆使用者訊息。
在 HTTP 架構中,您可以使用 HTTP 設定 Chat,與 Google Cloud 或地端伺服器整合,如下圖所示:
在上圖中,與 HTTP Chat 應用程式互動的使用者會經歷下列資訊流程:
- 使用者在 Chat 中傳送訊息給 Chat 應用程式,無論是透過即時訊息或 Chat 聊天室。
- HTTP 要求會傳送至網路伺服器,該伺服器是包含 Chat 應用程式邏輯的雲端或地端系統。
- 視需要,Chat 應用程式邏輯可以整合 Google Workspace 服務 (例如 Google 日曆和 Google 試算表)、其他 Google 服務 (例如 Google 地圖、YouTube 和 Vertex AI),或是其他網路服務 (例如專案管理系統或票證工具)。
- 網路伺服器會將 HTTP 回應傳回給 Chat 中的 Chat 應用程式服務。
- 系統將回應送達使用者。
- Chat 應用程式可以選擇呼叫 Chat API,以非同步方式發布訊息或執行其他作業。
這項架構可讓您彈性使用系統中現有的程式庫和元件,因為這些 Chat 應用程式可使用不同的程式設計語言設計。
目標
- 設定環境。
- 建立及部署 Cloud Run 函式。
- 為 Chat 擴充應用程式設定 Google Workspace 外掛程式。
- 測試應用程式。
必要條件
- 具有 Google Chat 存取權的 Business 或 Enterprise 版 Google Workspace 帳戶。
- 啟用計費功能的 Google Cloud 專案。如要確認現有專案是否已啟用計費功能,請參閱「驗證專案的計費狀態」。如要建立專案及設定帳單,請參閱「建立 Google Cloud 專案」。
設定環境
使用 Google API 前,請先在 Google Cloud 專案中啟用這些 API。您可以在單一 Google Cloud 專案中啟用一或多個 API。在 Google Cloud 控制台中,啟用 Cloud Build API、Cloud Functions API、Cloud Pub/Sub API、Cloud Logging API、Artifact Registry API 和 Cloud Run API。
建立及部署 Cloud Run 函式
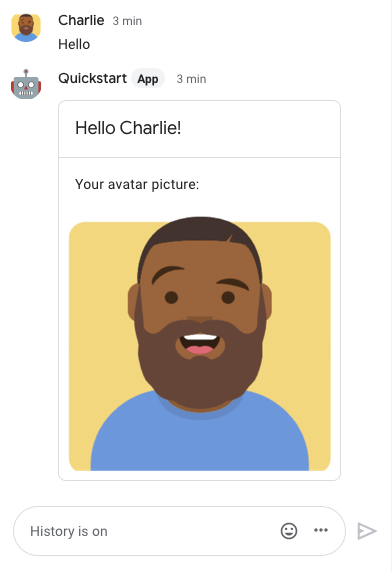
建立並部署 Cloud Run 函式,產生含有傳送者顯示名稱和個人資料相片圖片的 Chat 資訊卡。當 Chat 應用程式收到訊息時,會執行函式並以資訊卡回覆。
如要為 Chat 應用程式建立及部署函式,請完成下列步驟:
Node.js
前往 Google Cloud 控制台的 Cloud Run 頁面:
確認已選取 Chat 應用程式的專案。
按一下「編寫函式」。
在「建立服務」頁面中,設定函式:
- 在「Service name」(服務名稱) 欄位中輸入
addonchatapp
。 - 在「Region」(區域) 清單中選取區域。
- 在「Runtime」(執行階段) 清單中,選取最新版的 Node.js。
- 在「驗證」部分中,選取「需要驗證」。
- 按一下「建立」,然後等待 Cloud Run 建立服務。 控制台會將您重新導向至「來源」分頁。
- 在「Service name」(服務名稱) 欄位中輸入
在「來源」分頁中:
- 在「進入點」中,刪除預設文字並輸入
avatarApp
。 - 將
index.js
的內容替換為下列程式碼:
/** * Google Cloud Run function that responds to messages sent from a * Google Chat space. * * @param {Object} req Request sent from Google Chat space * @param {Object} res Response to send back */ import { http } from '@google-cloud/functions-framework'; http('avatarApp', (req, res) => { if (req.method === 'GET' || !req.body.chat) { return res.send('Hello! This function is meant to be used ' + 'in a Google Chat Space.'); } // Stores the Google Chat event as a variable. const chatMessage = req.body.chat.messagePayload.message; // Replies with the sender's avatar in a card. const displayName = chatMessage.sender.displayName; const avatarUrl = chatMessage.sender.avatarUrl; res.send({ hostAppDataAction: { chatDataAction: { createMessageAction: { message: { text: 'Here\'s your avatar', cardsV2: [{ cardId: 'avatarCard', card: { name: 'Avatar Card', header: { title: `Hello ${displayName}!`, }, sections: [{ widgets: [{ textParagraph: { text: 'Your avatar picture: ' } }, { image: { imageUrl: avatarUrl } }] }] } }] }}}}}); });
- 將
package.json
的內容替換為下列程式碼:
{ "name": "avatar-app", "version": "1.0.0", "description": "Google Chat Avatar App", "main": "index.js", "type": "module", "scripts": { "start": "node index.js" }, "dependencies": { "@google-cloud/functions-framework": "^3.0.0" } }
- 按一下「儲存並重新部署」。
- 在「進入點」中,刪除預設文字並輸入
Python
前往 Google Cloud 控制台的 Cloud Run 頁面:
確認已選取 Chat 應用程式的專案。
按一下「編寫函式」。
在「建立服務」頁面中,設定函式:
- 在「Service name」(服務名稱) 欄位中輸入
addonchatapp
。 - 在「Region」(區域) 清單中選取區域。
- 在「Runtime」清單中,選取最新版本的 Python。
- 在「驗證」部分中,選取「需要驗證」。
- 按一下「建立」,然後等待 Cloud Run 建立服務。 控制台會將您重新導向至「來源」分頁。
- 在「Service name」(服務名稱) 欄位中輸入
在「來源」分頁中:
- 在「進入點」中,刪除預設文字並輸入
avatar_app
。 - 將
main.py
的內容替換為下列程式碼:
from typing import Any, Mapping import flask import functions_framework @functions_framework.http def avatar_app(req: flask.Request) -> Mapping[str, Any]: """Google Cloud Run Function that handles requests from Google Chat Args: flask.Request: the request Returns: Mapping[str, Any]: the response """ if req.method == "GET": return "Hello! This function must be called from Google Chat." request_json = req.get_json(silent=True) # Stores the Google Chat event as a variable. chat_message = request_json["chat"]["messagePayload"]["message"] # Replies with the sender's avatar in a card. display_name = chat_message["sender"]["displayName"] avatar_url = chat_message["sender"]["avatarUrl"] return { "hostAppDataAction": { "chatDataAction": { "createMessageAction": { "message": { "text": "Here's your avatar", "cardsV2": [{ "cardId": "avatarCard", "card": { "name": "Avatar Card", "header": { "title": f"Hello {display_name}!" }, "sections": [{ "widgets": [{ "textParagraph": { "text": "Your avatar picture:" } }, { "image": { "imageUrl": avatar_url } }] }] } }] }}}}}
- 按一下「儲存並重新部署」。
- 在「進入點」中,刪除預設文字並輸入
Java
前往 Google Cloud 控制台的 Cloud Run 頁面:
確認已選取 Chat 應用程式的專案。
按一下「編寫函式」。
在「建立服務」頁面中,設定函式:
- 在「Service name」(服務名稱) 欄位中輸入
addonchatapp
。 - 在「Region」(區域) 清單中選取區域。
- 在「執行階段」清單中,選取最新版本的 Java。
- 在「驗證」部分中,選取「需要驗證」。
- 按一下「建立」,然後等待 Cloud Run 建立服務。 控制台會將您重新導向至「來源」分頁。
- 在「Service name」(服務名稱) 欄位中輸入
在「來源」分頁中:
- 在「進入點」中,刪除預設文字並輸入
AvatarApp
。 - 將預設 Java 檔案重新命名為
src/main/java/gcfv2/AvatarApp.java
。 - 將
AvatarApp.java
的內容替換為下列程式碼:
import java.util.List; import com.google.api.services.chat.v1.model.CardWithId; import com.google.api.services.chat.v1.model.GoogleAppsCardV1Card; import com.google.api.services.chat.v1.model.GoogleAppsCardV1CardHeader; import com.google.api.services.chat.v1.model.GoogleAppsCardV1Image; import com.google.api.services.chat.v1.model.GoogleAppsCardV1Section; import com.google.api.services.chat.v1.model.GoogleAppsCardV1TextParagraph; import com.google.api.services.chat.v1.model.GoogleAppsCardV1Widget; import com.google.api.services.chat.v1.model.Message; import com.google.cloud.functions.HttpFunction; import com.google.cloud.functions.HttpRequest; import com.google.cloud.functions.HttpResponse; import com.google.gson.Gson; import com.google.gson.JsonObject; public class AvatarApp implements HttpFunction { private static final Gson gson = new Gson(); @Override public void service(HttpRequest request, HttpResponse response) throws Exception { JsonObject body = gson.fromJson(request.getReader(), JsonObject.class); if (request.getMethod().equals("GET") || !body.has("chat")) { response.getWriter().write("Hello! This function is meant to be used " + "in a Google Chat Space.."); return; } // Stores the Google Chat event as a variable. JsonObject chatMessage = body.getAsJsonObject("chat") .getAsJsonObject("messagePayload").getAsJsonObject("message"); // Replies with the sender's avatar in a card. String displayName = chatMessage.getAsJsonObject("sender").get("displayName").getAsString(); String avatarUrl = chatMessage.getAsJsonObject("sender").get("avatarUrl").getAsString(); Message message = createMessage(displayName, avatarUrl); JsonObject createMessageAction = new JsonObject(); createMessageAction.add("message", gson.fromJson(gson.toJson(message), JsonObject.class)); JsonObject chatDataAction = new JsonObject(); chatDataAction.add("createMessageAction", createMessageAction); JsonObject hostAppDataAction = new JsonObject(); hostAppDataAction.add("chatDataAction", chatDataAction); JsonObject dataActions = new JsonObject(); dataActions.add("hostAppDataAction", hostAppDataAction); response.getWriter().write(gson.toJson(dataActions)); } Message createMessage(String displayName, String avatarUrl) { GoogleAppsCardV1CardHeader cardHeader = new GoogleAppsCardV1CardHeader(); cardHeader.setTitle(String.format("Hello %s!", displayName)); GoogleAppsCardV1TextParagraph textParagraph = new GoogleAppsCardV1TextParagraph(); textParagraph.setText("Your avatar picture: "); GoogleAppsCardV1Widget avatarWidget = new GoogleAppsCardV1Widget(); avatarWidget.setTextParagraph(textParagraph); GoogleAppsCardV1Image image = new GoogleAppsCardV1Image(); image.setImageUrl(avatarUrl); GoogleAppsCardV1Widget avatarImageWidget = new GoogleAppsCardV1Widget(); avatarImageWidget.setImage(image); GoogleAppsCardV1Section section = new GoogleAppsCardV1Section(); section.setWidgets(List.of(avatarWidget, avatarImageWidget)); GoogleAppsCardV1Card card = new GoogleAppsCardV1Card(); card.setName("Avatar Card"); card.setHeader(cardHeader); card.setSections(List.of(section)); CardWithId cardWithId = new CardWithId(); cardWithId.setCardId("avatarCard"); cardWithId.setCard(card); Message message = new Message(); message.setText("Here's your avatar"); message.setCardsV2(List.of(cardWithId)); return message; } }
- 在「進入點」中,刪除預設文字並輸入
將
pom.xml
的內容替換為下列程式碼:<project xmlns="http://maven.apache.org/POM/4.0.0" xmlns:xsi="http://www.w3.org/2001/XMLSchema-instance" xsi:schemaLocation="http://maven.apache.org/POM/4.0.0 http://maven.apache.org/xsd/maven-4.0.0.xsd"> <modelVersion>4.0.0</modelVersion> <groupId>com.google.chat</groupId> <artifactId>avatar-app</artifactId> <version>1.0-SNAPSHOT</version> <properties> <maven.compiler.target>17</maven.compiler.target> <maven.compiler.source>17</maven.compiler.source> </properties> <dependencies> <dependency> <groupId>com.google.cloud.functions</groupId> <artifactId>functions-framework-api</artifactId> <version>1.0.4</version> </dependency> <!-- https://mvnrepository.com/artifact/com.google.code.gson/gson --> <dependency> <groupId>com.google.code.gson</groupId> <artifactId>gson</artifactId> <version>2.9.1</version> </dependency> <!-- https://mvnrepository.com/artifact/com.google.apis/google-api-services-chat --> <dependency> <groupId>com.google.apis</groupId> <artifactId>google-api-services-chat</artifactId> <version>v1-rev20230115-2.0.0</version> </dependency> </dependencies> <!-- Required for Java functions in the inline editor --> <build> <plugins> <plugin> <groupId>org.apache.maven.plugins</groupId> <artifactId>maven-compiler-plugin</artifactId> <version>3.8.1</version> <configuration> <excludes> <exclude>.google/</exclude> </excludes> </configuration> </plugin> </plugins> </build> </project>
- 按一下「儲存並重新部署」。
Cloud Run 服務詳細資料頁面隨即開啟。等待函式部署完成。
設定外掛程式
部署 Cloud Run 函式後,請按照下列步驟建立外掛程式並部署 Google Chat 應用程式:
前往 Google Cloud 控制台的 Cloud Run 頁面:
請確保選取的是已啟用 Cloud Run 的專案。
在函式清單中,按一下「addonchatapp」addonchatapp。
在「服務詳細資料」頁面中,複製函式的「網址」。網址結尾為
run.app
。在 Google Cloud 搜尋欄位中搜尋「Google Chat API」,然後點選「Google Chat API」,並按一下「管理」。
按一下「設定」,然後設定 Google Chat 應用程式:
- 在「應用程式名稱」中輸入
Add-on Chat app
。 - 在「Avatar URL」中,輸入
https://developers.google.com/workspace/add-ons/images/quickstart-app-avatar.png
。 - 在「Description」(說明) 中輸入
Add-on Chat app
。 - 在「功能」下方,選取「加入聊天室和群組對話」。
- 在「連線設定」下方,選取「HTTP 端點網址」。
- 複製「服務帳戶電子郵件地址」。授權外掛程式叫用函式時,您需要使用這個電子郵件地址。
- 在「觸發條件」下方,選取「為所有觸發條件使用通用的 HTTP 端點網址」,然後將 Cloud Run 函式觸發條件的網址貼到方塊中。
- 在「顯示設定」下方,選取「將這個 Google Chat 擴充應用程式提供給網域中的特定使用者和群組」,然後輸入電子郵件地址。
- 在「記錄」下方,選取「將錯誤記錄至 Logging」。
- 在「應用程式名稱」中輸入
按一下 [儲存]。
接著,授權 Chat 應用程式叫用 Cloud Run 函式。
授權 Google Chat 叫用函式
如要授權 Google Workspace 外掛程式叫用函式,請新增具有 Cloud Run 服務叫用者角色的 Google Workspace 外掛程式服務帳戶。
前往 Google Cloud 控制台的 Cloud Run 頁面:
在 Cloud Run 服務清單中,選取接收函式旁的核取方塊。(請勿點選函式本身)。
按一下 [權限],「Permissions」(權限) 面板隨即開啟。
按一下「新增主體」。
在「新增主體」中,輸入與 Chat 應用程式相關聯的 Google Workspace 外掛程式服務帳戶電子郵件地址。
服務帳戶電子郵件地址位於 Chat API 設定頁面,依序點選「連線設定」 >「HTTP 端點網址」 >「服務帳戶電子郵件」:
在「請選擇角色」中,依序選取「Cloud Run」 >「Cloud Run 服務叫用者」。
按一下 [儲存]。
Chat 應用程式已準備好接收及回覆 Chat 訊息。
測試 Chat 應用程式
如要測試 Chat 應用程式,請開啟與 Chat 應用程式互傳的即時訊息,然後傳送訊息:
使用您在新增自己為信任測試人員時提供的 Google Workspace 帳戶,開啟 Google Chat。
- 按一下 「發起新即時通訊」。
- 在「新增 1 位以上使用者」欄位中,輸入 Chat 應用程式的名稱。
從結果中選取 Chat 應用程式。系統會開啟即時訊息。
- 在與應用程式互傳的新即時訊息中,輸入
Hello
並按下enter
。
Chat 應用程式的訊息包含顯示傳送者名稱和個人資料相片的資訊卡,如下圖所示:
如要新增信任的測試人員,並進一步瞭解如何測試互動式功能,請參閱「測試 Google Chat 應用程式的互動式功能」。
疑難排解
如果 Google Chat 應用程式或資訊卡傳回錯誤,Chat 介面會顯示「發生錯誤」訊息。或「無法處理您的要求」。有時 Chat UI 不會顯示任何錯誤訊息,但 Chat 應用程式或資訊卡會產生非預期結果,例如資訊卡訊息可能不會顯示。
即使 Chat 使用者介面未顯示錯誤訊息,只要開啟 Chat 應用程式的錯誤記錄功能,系統就會提供說明性錯誤訊息和記錄資料,協助您修正錯誤。如需查看、偵錯及修正錯誤的相關協助,請參閱「排解及修正 Google Chat 錯誤」。
清除所用資源
如要避免系統向您的 Google Cloud 帳戶收取本教學課程中所用資源的相關費用,建議您刪除 Cloud 專案。
- 在 Google Cloud 控制台中,前往「管理資源」頁面。依序點選「選單」 「IAM 與管理」「管理資源」。
- 在專案清單中選取要刪除的專案,然後按一下「Delete」(刪除) 圖示 。
- 在對話方塊中輸入專案 ID,然後按一下「Shut down」(關閉) 即可刪除專案。