
本頁說明如何建構可在 Google Chat 中運作的 Google Workspace 外掛程式,並與使用 Agent2Agent (A2A) 通訊協定的 AI 代理互動。您可以使用 Agent Development Kit (ADK) 開發代理,並在 Vertex AI Agent Engine 中代管。
AI 代理能自主感知環境、推論,並執行複雜的多步驟動作,達成定義的目標。在本教學課程中,您將部署 LLM Auditor 多代理範例,該範例會使用 Gemini 和 Google 搜尋建立基準,藉此評估及修正事實。
下圖顯示架構和訊息傳送模式:

在圖表中,使用者與透過 A2A 代理程式實作的即時通訊應用程式互動時,資訊流程如下:
- 使用者透過即時訊息或 Chat 聊天室傳送訊息給 Chat 應用程式。
- 在 Apps Script 或以 HTTP 端點形式實作的網頁伺服器中,Chat 應用程式邏輯會接收及處理訊息。
- 透過 Vertex AI Agent Engine 代管的 A2A 代理會接收及處理互動。
- 視需要,Chat 應用程式或 AI 代理程式可以與 Google Workspace 服務 (例如 Google 日曆或 Google 試算表) 或其他 Google 服務 (例如 Google 地圖或 YouTube) 整合。
- Chat 應用程式會使用 Google Chat API 傳送非同步回應,告知 AI 代理程式的進度。
- 系統會將回覆傳送給使用者。
目標
- 設定環境。
- 部署 A2A 代理。
- 部署 Chat 應用程式。
- 設定 Chat 應用程式。
- 測試 Chat 應用程式。
必要條件
- 公司或企業專用 Google Workspace 帳戶,且可存取 Google Chat。
- 已啟用計費功能的 Google Cloud 專案。如要確認現有專案是否已啟用計費功能,請參閱「確認專案的帳單狀態」。如要建立專案及設定帳單,請參閱「建立 Google Cloud 專案」。
- LLM 稽核工具 ADK 代理的必要條件
- Python 3.11 以上版本:如要安裝,請按照 Python 官方網站上的操作說明進行。
- Python Poetry:如要安裝,請按照官方 Poetry 網站上的操作說明操作。
- Google Cloud CLI:如要安裝,請按照官方 Google Cloud 網站上的操作說明進行。
設定環境
啟用 Google Cloud API
使用 Google API 前,請先在 Google Cloud 專案中啟用這些 API。 您可以在單一 Google Cloud 專案中啟用一或多個 API。在 Google Cloud 控制台中,啟用 Google Chat、Vertex AI 和 Cloud Resource Manager API。
設定 OAuth 同意畫面
所有使用 OAuth 2.0 的應用程式都必須設定同意畫面。設定應用程式的 OAuth 同意畫面,可決定向使用者和應用程式審查人員顯示的內容,並註冊應用程式,以便日後發布。
- 在 Google API 控制台中,依序前往「Menu」(選單) >「Google Auth platform」(Google 驗證平台) >「Branding」(品牌)。
- 如果您已設定 Google 驗證平台,可以在「Branding」(品牌)、「Audience」(目標對象) 和「Data Access」(資料存取權) 中設定下列 OAuth 同意畫面設定。如果看到「尚未設定 Google 驗證平台」訊息,請按一下「開始使用」:
- 在「應用程式資訊」下方的「應用程式名稱」中,輸入應用程式名稱。
- 在「User support email」(使用者支援電子郵件) 中,選擇支援電子郵件地址,方便使用者在同意聲明方面有任何疑問時與您聯絡。
- 點選 [Next] (下一步)。
- 在「Audience」(目標對象) 下方,選取「Internal」(內部)。
- 點選 [Next] (下一步)。
- 在「Contact Information」(聯絡資訊) 下方,輸入可接收專案異動通知的電子郵件地址。
- 點選 [Next] (下一步)。
- 在「Finish」(完成) 部分,請詳閱《Google API 服務使用者資料政策》,然後選取「我同意《Google API 服務:使用者資料政策》」。
- 按一下 [Continue] (繼續)。
- 按一下「Create」(建立)。
- 目前可以略過新增範圍。 日後建立應用程式供 Google Workspace 機構以外的使用者使用時,請務必將「使用者類型」變更為「外部」。然後新增應用程式所需的授權範圍。詳情請參閱完整的「設定 OAuth 同意畫面」指南。
在 Google Cloud 控制台中建立服務帳戶
按照下列步驟,建立具備 Vertex AI User 角色的新服務帳戶:
Google Cloud Console
-
在 Google Cloud 控制台中,依序前往「選單」圖示
>「IAM 與管理」
>「服務帳戶」。
其餘步驟會顯示在 Google Cloud 控制台。
- 選取 Google Cloud 專案。
- 按一下「建立服務帳戶」。
- 輸入要顯示在 Google Cloud 控制台中的服務帳戶名稱。
- 如果您現在不想設定存取權控管機制,請按一下「Done」(完成) 以完成服務帳戶建立程序。如要立即設定存取權控管,請按一下「Create and continue」(建立並繼續),然後繼續進行下一個步驟。
- 選用:將角色指派給服務帳戶,除了 Google Workspace 資源,也授予 Google Cloud 專案資源的存取權。詳情請參閱「管理專案、資料夾和機構的存取權」。
- 按一下「繼續」。
- 選用:輸入可管理這個服務帳戶並執行動作的使用者或群組。詳情請參閱「服務帳戶模擬」。
- 按一下「Done」(完成),即完成建立服務帳戶。
請記下服務帳戶的電子郵件地址。
gcloud CLI
- 建立服務帳戶:
gcloud iam service-accounts createSERVICE_ACCOUNT_NAME\ --display-name="SERVICE_ACCOUNT_NAME" - 選用:將角色指派給服務帳戶,除了 Google Workspace 資源,也授予 Google Cloud 專案資源的存取權。詳情請參閱「管理專案、資料夾和機構的存取權」。
服務帳戶會顯示在服務帳戶頁面。
建立私密金鑰
如要建立及下載服務帳戶的私密金鑰,請按照下列步驟操作:
-
在 Google Cloud 控制台中,依序前往「選單」圖示
>「IAM 與管理」
>「服務帳戶」。
其餘步驟會顯示在 Google Cloud 控制台。
- 選取 Google Cloud 專案。
- 點選所需的服務帳戶電子郵件地址,以便為其建立金鑰。
- 按一下「Keys」(金鑰) 分頁標籤。
- 按一下「Add key」(新增金鑰) 下拉式選單,然後選取「Create new key」(建立新的金鑰)。
- 選取「JSON」做為金鑰類型,然後按一下「建立」。
接著,系統就會為您產生一對新的公開/私密金鑰,並以服務帳戶金鑰檔案的形式下載至您的電腦中。將下載的 JSON 檔案儲存至工作目錄,並命名為
credentials.json。這個檔案是這組金鑰的唯一副本,金鑰檔案下載後,就不能再次下載。如要瞭解如何安全儲存金鑰,請參閱「管理服務帳戶金鑰的最佳做法」一文。
如要進一步瞭解服務帳戶,請參閱 Google Cloud IAM 說明文件中的服務帳戶。
部署 A2A 代理程式
如果尚未完成,請使用 Google Cloud 帳戶進行驗證,並將 Google Cloud CLI 設為使用您的 Google Cloud 專案。
gcloud auth application-default logingcloud config set project PROJECT_IDgcloud auth application-default set-quota-project PROJECT_ID將 PROJECT_ID 替換為 Cloud 專案的 ID。
使用這個按鈕下載 ADK 範例 GitHub 存放區:
在偏好的本機開發環境中,解壓縮下載的封存檔,然後開啟
adk-samples/python/agents/llm-auditor目錄。unzip adk-samples-main.zipcd adk-samples-main/python/agents/llm-auditor更新實作項目,將 ADK 代理部署為 A2A 遠端代理:
pyproject.toml:在部署群組中新增 ADK 和 A2A SDK 依附元件。
deployment/deploy.py:將 ADK 應用程式部署作業替換為 A2A 代理和卡片。
建立專供 ADK 代理程式使用的新 Cloud Storage bucket。
gcloud storage buckets create gs://CLOUD_STORAGE_BUCKET_NAME --project=PROJECT_ID --location=PROJECT_LOCATION更改下列內容:
- CLOUD_STORAGE_BUCKET_NAME 替換為您要使用的不重複 bucket 名稱。
- 將 PROJECT_ID 替換為 Cloud 專案的 ID。
- 將 PROJECT_LOCATION 改成 Cloud 專案的位置。
請設定下列環境變數:
export GOOGLE_GENAI_USE_VERTEXAI=trueexport GOOGLE_CLOUD_PROJECT=PROJECT_IDexport GOOGLE_CLOUD_LOCATION=PROJECT_LOCATIONexport GOOGLE_CLOUD_STORAGE_BUCKET=CLOUD_STORAGE_BUCKET_NAME更改下列內容:
- CLOUD_STORAGE_BUCKET_NAME 替換為您建立的值區名稱。
- 將 PROJECT_ID 替換為 Cloud 專案的 ID。
- 將 PROJECT_LOCATION 換成 Cloud 專案的位置。
從虛擬環境安裝及部署 ADK 代理程式。
python3 -m venv myenvsource myenv/bin/activatepoetry install --with deploymentpython3 deployment/deploy.py --create擷取代理 ID。稍後設定 Chat 應用程式時會用到。
python3 deployment/deploy.py --list
建立及設定 Chat 應用程式專案
按一下下列按鈕,開啟 A2A AI 代理程式快速入門 Apps Script 專案。
依序點選「總覽」>
 「建立副本」。
在 Apps Script 專案中,依序點選
 「專案設定」>「編輯指令碼屬性」>「新增指令碼屬性」,加入下列指令碼屬性:
- 將
REASONING_ENGINE_RESOURCE_NAME替換為您在先前步驟中複製的 Vertex AI 代理程式資源名稱。 SERVICE_ACCOUNT_KEY,例如{ ... },其中包含先前步驟下載的服務帳戶 JSON 金鑰。
- 將
按一下「儲存指令碼屬性」。
在 Google API 控制台中,依序前往「選單」圖示 >「IAM 與管理」 >「設定」。
在「專案編號」欄位中,複製該值。
在 Apps Script 專案中,按一下
「專案設定」。點選「Google Cloud Platform (GCP) 專案」下方的「變更專案」。
在「GCP 專案編號」中,貼上先前步驟複製的 Google Cloud 專案編號。
點選「設定專案」。Cloud 專案和 Apps Script 專案現已連結。
建立測試部署作業
您需要這個 Apps Script 專案的部署作業 ID,才能在下一個步驟中使用。
如要取得主要部署 ID,請按照下列步驟操作:
- 在 Chat 應用程式的 Apps Script 專案中,依序點選「部署」>「測試部署作業」。
- 在「Head deployment ID」(主要部署作業 ID) 下方,按一下 「複製」。
- 按一下 [完成]。
設定 Chat 應用程式
使用 Apps Script 部署作業,按照下列步驟部署 Google Chat 應用程式以進行測試:
- 在 API 控制台中搜尋
Google Chat API,然後按一下「Google Chat API」。 - 按一下「管理」。
按一下「設定」,然後設定 Chat 應用程式:
- 在「應用程式名稱」欄位中輸入
A2A Quickstart。 - 在「Avatar URL」(大頭貼網址) 欄位中,輸入
https://developers.google.com/workspace/add-ons/images/quickstart-app-avatar.png。 - 在「Description」(說明) 欄位輸入
A2A Quickstart。 - 在「功能」下方,選取「加入聊天室和群組對話」。
- 在「連線設定」下方,選取「Apps Script 專案」。
- 在「Deployment ID」欄位中,貼上您先前複製的 Head 部署作業 ID。
- 在「顯示設定」下方,選取「僅限您網域中的特定使用者和群組」,然後輸入您的電子郵件地址。
- 在「應用程式名稱」欄位中輸入
按一下 [儲存]。
Chat 應用程式已準備好回覆訊息。
測試 Chat 應用程式
如要測試 Chat 應用程式,請開啟與該應用程式互傳的即時訊息,然後傳送訊息:
使用您在新增自己為信任測試人員時提供的 Google Workspace 帳戶,開啟 Google Chat。
- 按一下 「發起新即時通訊」。
- 在「新增 1 位以上使用者」欄位中,輸入 Chat 應用程式的名稱。
從結果中選取 Chat 應用程式。系統會開啟即時訊息。
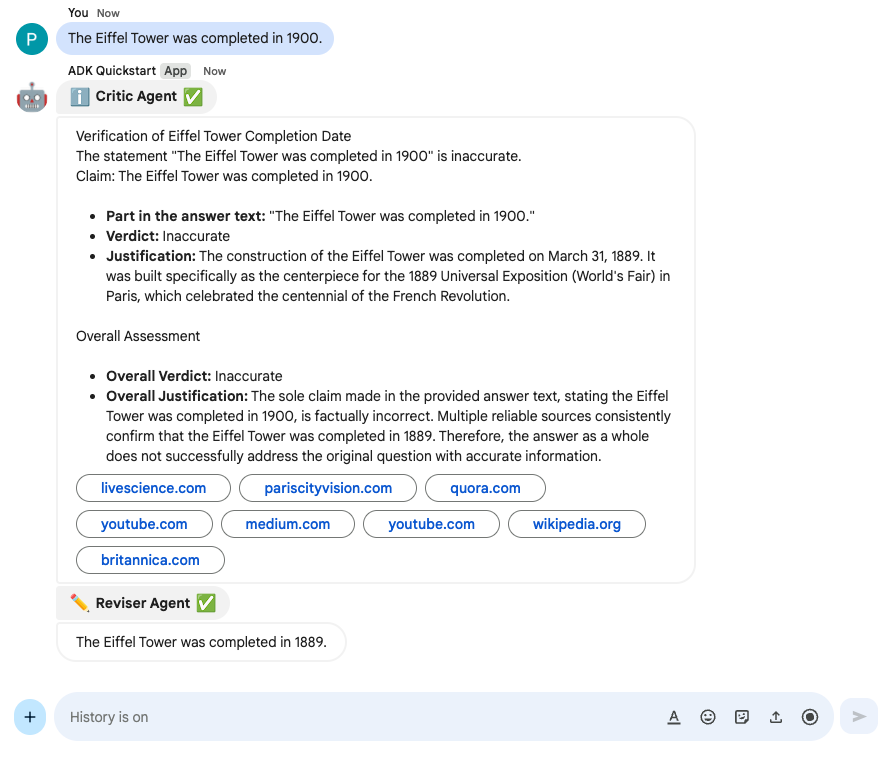
在與應用程式互傳的新即時訊息中輸入
The Eiffel Tower was completed in 1900,然後按下enter。Chat 應用程式會回覆 Critic 和 Reviser 子代理程式的回覆。
如要新增信任的測試人員,並進一步瞭解如何測試互動式功能,請參閱「測試 Google Chat 應用程式的互動式功能」。
疑難排解
如果 Google Chat 應用程式或資訊卡傳回錯誤,Chat 介面會顯示「發生錯誤」訊息。或「無法處理您的要求」。有時 Chat UI 不會顯示任何錯誤訊息,但 Chat 應用程式或資訊卡會產生非預期的結果,例如資訊卡訊息可能不會顯示。
即使 Chat 使用者介面可能不會顯示錯誤訊息,但如果開啟 Chat 應用程式的錯誤記錄功能,系統就會提供說明性錯誤訊息和記錄資料,協助您修正錯誤。如需查看、偵錯及修正錯誤的相關協助,請參閱「排解及修正 Google Chat 錯誤」。
清除所用資源
為避免系統向您的 Google Cloud 帳戶收取本教學課程所用資源的費用,建議您刪除 Cloud 專案。
- 在 Google API 控制台中,前往「管理資源」頁面。依序點選「選單」圖示 >「IAM 與管理」>「管理資源」。
- 在專案清單中選取要刪除的專案,然後按一下「刪除」圖示 。
- 在對話方塊中輸入專案 ID,然後按一下「Shut down」(關閉) 即可刪除專案。
相關主題
- 使用 ADK AI 代理建構 Google Chat 應用程式
- 使用 Gemini Enterprise AI 代理程式建構 Google Chat 應用程式
- 使用 Agent2UI 代理建構 Google Chat 應用程式
- 建構與 Workspace 資料儲存庫、API 和 Chat 應用程式緊密整合的 Gemini Enterprise 代理
- 建構與 Workspace 資料儲存庫、API 和 Chat 應用程式緊密整合的 Vertex AI 代理
- 使用 ADK AI 代理和 Gemini 模型查核陳述內容
- 透過 Google Workspace 存取的 AI 代理程式規劃旅遊行程
- 在 Chat 應用程式中整合 AI 基本概念
- 透過 Gemini AI Chat 擴充應用程式,依據 Chat 對話回答問題
- 運用 Google Chat、Vertex AI、Apps Script 和使用者驗證功能,應對資安事件
- 使用 Google Chat、Vertex AI 和 Firestore 管理專案