

The Google Slides API lets you create and edit a PageElement resource, including text boxes, images, tables, basic shapes, lines, and embedded videos. The examples on this page show some common page element operations using the presentations.batchUpdate method.
В этих примерах используются следующие переменные:
- PRESENTATION_ID — указывает, где вы указываете идентификатор презентации . Значение этого идентификатора можно получить из URL-адреса презентации.
- PAGE_ID — указывает, где вы указываете идентификатор объекта страницы . Вы можете получить его значение из URL-адреса или с помощью запроса на чтение через API.
- PAGE_ELEMENT_ID —Indicates where you provide the page element object ID . You can specify this ID for elements you create (with some restrictions ) or allow the Slides API to automatically create one. Element IDs can be retrieved through an API read request.
These examples are presented as HTTP requests to be language neutral. To learn how to implement a batch update in different languages using the Google API client libraries, see the following guides:
Добавить маркированный список в текстовое поле
Приведенный ниже пример кода presentations.batchUpdate демонстрирует, как использовать метод InsertTextRequest для вставки текста в пустое текстовое поле, заданное значением PAGE_ELEMENT_ID . Затем в примере используется метод CreateParagraphBulletsRequest для преобразования всего текста из текстового поля в маркированный список. Элементы списка разделяются символами \n , а отступы регулируются символами \t .
Ниже представлен протокол запроса для создания презентации:
POST https://slides.googleapis.com/v1/presentations/PRESENTATION_ID:batchUpdate
{
  "requests": [
    {
      "insertText": {
        "objectId": PAGE_ELEMENT_ID,
        "text": "My List\n\tItem 1\n\t\tItem 2\n\t\t\tItem 3",
        "insertionIndex": 0
      },
      "createParagraphBullets": {
        "objectId": PAGE_ELEMENT_ID,
        "bulletPreset": "BULLET_ARROW_DIAMOND_DISC",
        "textRange": {
          "type": "ALL"
        }
      }
    }
  ]
}
Этот запрос может создать маркированный список, который будет выглядеть следующим образом:

Добавить фигуру на слайд
The following presentations.batchUpdate code sample shows how to use the CreateShapeRequest method to add a wave shape to a slide specified by the PAGE_ID . This request specifies the shape type, then scales and positions the shape in the slide. It then uses the InsertTextRequest method to add text to that shape. The request sets the line's ID to PAGE_ELEMENT_ID .
Ниже представлен протокол запроса для добавления фигуры на слайд:
POST https://slides.googleapis.com/v1/presentations/PRESENTATION_ID:batchUpdate
{
  "requests": [
    {
      "createShape": {
        "objectId": PAGE_ELEMENT_ID,
        "elementProperties": {
          "pageObjectId": PAGE_ID,
          "size": {
            "width": {
              "magnitude": 3000000,
              "unit": "EMU"
            },
            "height": {
              "magnitude": 3000000,
              "unit": "EMU"
            }
          },
          "transform": {
            "scaleX": 0.6807,
            "scaleY": 0.4585,
            "translateX": 6583050,
            "translateY": 1673950,
            "unit": "EMU"
          }
        },
        "shapeType": "WAVE"
      }
    },
    {
      "insertText": {
        "objectId": PAGE_ELEMENT_ID,
        "text": "My Wave Shape",
        "insertionIndex": 0
      }
    }
  ]
}
Добавить видео на слайд
Следующий пример кода presentations.batchUpdate демонстрирует, как использовать метод CreateVideoRequest для встраивания видео в слайд, заданный параметром PAGE_ID . Этот запрос масштабирует и позиционирует видео на слайде, а также устанавливает идентификатор видео равным PAGE_ELEMENT_ID . Уникальный идентификатор исходного видео устанавливается равным VIDEO_ID . Например, видео на YouTube по адресу https://www.youtube.com/watch?v=7U3axjORYZ0 имеет идентификатор 7U3axjORYZ0 .
Ниже представлен протокол запроса для добавления видео на слайд:
POST https://slides.googleapis.com/v1/presentations/PRESENTATION_ID:batchUpdate
{
  "requests": [
    {
      "createVideo": {
        "objectId": PAGE_ELEMENT_ID,
        "elementProperties": {
          "pageObjectId": PAGE_ID,
          "size": {
            "width": {
              "magnitude": 12000,
              "unit": "EMU"
            },
            "height": {
              "magnitude": 9000,
              "unit": "EMU"
            }
          },
          "transform": {
            "scaleX": 381,
            "scaleY": 381,
            "translateX": 152400,
            "translateY": 152400,
            "unit": "EMU"
          }
        },
        "source": "YOUTUBE",
        "id": VIDEO_ID
      }
    }
  ]
}
Скопировать и отредактировать элемент
The following presentations.batchUpdate code sample shows how to use the DuplicateObjectRequest method to take an existing shape (specified by the PAGE_ELEMENT_ID ) and make a copy (specified by the COPY_ELEMENT_ID ).
Последующие запросы вносят следующие изменения в дублированный объект:
- Устанавливает цвет фона в соответствии с цветом темы
LIGHT2. - Перемещает копию вниз по странице (от исходного положения фигуры).
- Устанавливает шрифт текста на 18 пунктов (Georgia).
- Изменяет текст на "My Shape Copy".
В приведенных здесь запросах используются маски полей для сохранения неизмененных свойств формы (например, стиля контура). Использование масок полей также повышает производительность.
Для получения дополнительной информации о копировании слайда см. пример «Копирование слайда» .
Ниже представлен протокол запроса для копирования и редактирования элемента:
POST https://slides.googleapis.com/v1/presentations/PRESENTATION_ID:batchUpdate
{
  "requests": [
    {
      "duplicateObject": {
        "objectId": PAGE_ELEMENT_ID,
        "objectIds": {
          PAGE_ELEMENT_ID: COPY_ELEMENT_ID
        }
      }
    },
    {
      "updateShapeProperties": {
        "objectId": COPY_ELEMENT_ID,
        "fields": "shapeBackgroundFill.solidFill.color",
        "shapeProperties": {
          "shapeBackgroundFill": {
            "solidFill": {
              "color": {
                "themeColor": "LIGHT2"
              }
            }
          }
        }
      }
    },
    {
      "updatePageElementTransform": {
        "objectId": COPY_ELEMENT_ID,
        "applyMode": "RELATIVE",
        "transform": {
          "scaleX": 1,
          "scaleY": 1,
          "translateX": 0,
          "translateY": 1250000,
          "unit": "EMU"
        }
      }
    },
    {
      "updateTextStyle": {
        "objectId": COPY_ELEMENT_ID,
        "fields": "fontFamily,fontSize",
        "textRange": {
          "type": "ALL"
        },
        "style": {
          "fontFamily": "Georgia",
          "fontSize": {
            "magnitude": 18,
            "unit": "PT"
          }
        }
      }
    },
    {
      "deleteText": {
        "objectId": COPY_ELEMENT_ID,
        "textRange": {
          "type": "ALL"
        }
      }
    },
    {
      "insertText": {
        "objectId": COPY_ELEMENT_ID,
        "text": "My Shape Copy",
        "insertionIndex": 0
      }
    }
  ]
}
Вот как может выглядеть фигура и её копия после этих обновлений:

Редактирование контура изображения или видео
The following presentations.batchUpdate code sample shows how to use the UpdateImagePropertiesRequest method to update the outline appearance of an image specified by the IMAGE_ELEMENT_ID . It also uses the UpdateVideoPropertiesRequest method to update the outline appearance of an embedded video specified by the VIDEO_ELEMENT_ID .
Запросы вносят следующие изменения в объект:
- Устанавливает цвет контура изображения в соответствии с цветом темы
ACCENT5с частичной прозрачностью. - Устанавливает цвет контура видео в соответствии с цветом темы
ACCENT1без прозрачности. - Устанавливает толщину контура на 3 пункта для обоих элементов.
- Устанавливает стиль контура изображения на
SOLID. - Устанавливает стиль контура видео в значение
DASH_DOT.
Both the UpdateImagePropertiesRequest method and the UpdateVideoPropertiesRequest method can only change the appearance of image and video outlines. All other properties are read-only. The requests here use field masks to specify that only the outline should be changed to protect the code against future API changes. Using field masks also improves performance.
Ниже представлен протокол запроса для редактирования контура изображения или видео:
POST https://slides.googleapis.com/v1/presentations/PRESENTATION_ID:batchUpdate
{
  "requests": [
    {
      "updateImageProperties": {
        "objectId": IMAGE_ELEMENT_ID,
        "fields": "outline",
        "imageProperties": {
          "outline": {
            "dashStyle": "SOLID",
            "outlineFill": {
              "solidFill": {
                "alpha": 0.8,
                "color": {
                  "themeColor": "ACCENT5"
                }
              }
            },
            "weight": {
              "magnitude": 3,
              "unit": "PT"
            }
          }
        }
      }
    },
    {
      "updateVideoProperties": {
        "objectId": VIDEO_ELEMENT_ID,
        "fields": "outline",
        "videoProperties": {
          "outline": {
            "dashStyle": "DASH_DOT",
            "outlineFill": {
              "solidFill": {
                "alpha": 0.8,
                "color": {
                  "themeColor": "ACCENT1"
                }
              }
            },
            "weight": {
              "magnitude": 3,
              "unit": "PT"
            }
          }
        }
      }
    }
  ]
}
Вот как могут выглядеть изображение и встроенное видео после этих обновлений:

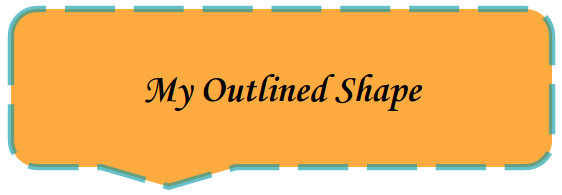
Редактировать контур фигуры
The following presentations.batchUpdate code sample shows how to use the UpdateShapePropertiesRequest method to take an existing shape (specified by the PAGE_ELEMENT_ID ) and updates the appearance of its outline.
Запросы вносят следующие изменения в объект:
- Устанавливает цвет контура в соответствии с цветом темы
ACCENT5с частичной прозрачностью. - Устанавливает толщину контура на 3 пункта.
- Устанавливает стиль контура на
LONG_DASH.
В приведенных здесь запросах используются маски полей для сохранения неизмененных свойств формы (например, цвета заливки формы). Использование масок полей также повышает производительность.
Ниже представлен протокол запроса на редактирование контура фигуры:
POST https://slides.googleapis.com/v1/presentations/PRESENTATION_ID:batchUpdate
{
  "requests": [
    {
      "updateShapeProperties": {
        "objectId": PAGE_ELEMENT_ID,
        "fields": "outline",
        "shapeProperties": {
          "outline": {
            "dashStyle": "LONG_DASH",
            "outlineFill": {
              "solidFill": {
                "alpha": 0.6,
                "color": {
                  "themeColor": "ACCENT5"
                }
              }
            },
            "weight": {
              "magnitude": 3,
              "unit": "PT"
            }
          }
        }
      }
    }
  ]
}
Вот как может выглядеть фигура после этих обновлений:
Форматирование текста в фигуре или текстовом поле.
The following presentations.batchUpdate code sample shows how to use the UpdateTextStyleRequest method to take an existing shape (specified by the PAGE_ELEMENT_ID ) and updates the appearance of its text.
Запросы вносят следующие изменения в объект:
- Устанавливает цвет текста в соответствии с цветом темы
ACCENT5. - Устанавливает жирный, курсивный шрифт Corsiva размером 18 пунктов.
- Подчеркивает текст.
The requests here use field masks to preserve the text style properties that aren't changed (such as the background color, links, or baseline offsets). Using field masks also improves performance.
Ниже представлен протокол запроса для форматирования текста в фигуре или текстовом поле:
POST https://slides.googleapis.com/v1/presentations/PRESENTATION_ID:batchUpdate
{
  "requests": [
    {
      "updateTextStyle": {
        "objectId": PAGE_ELEMENT_ID,
        "fields": "foregroundColor,bold,italic,fontFamily,fontSize,underline",
        "style": {
          "foregroundColor": {
            "opaqueColor": {
              "themeColor": "ACCENT5"
            }
          },
          "bold": true,
          "italic": true,
          "underline": true,
          "fontFamily": "Corsiva",
          "fontSize": {
            "magnitude": 18,
            "unit": "PT"
          }
        },
        "textRange": {
          "type": "ALL"
        }
      }
    }
  ]
}
Вот как может выглядеть текст в виде фигуры после этих обновлений:

Импортировать диаграмму из Google Таблиц
Приведенный ниже пример кода presentations.batchUpdate демонстрирует, как использовать метод CreateSheetsChartRequest для импорта диаграммы из листа и размещения ее на слайде, указанном в поле PAGE_ID .
The request requires the spreadsheet ID (specified by the SPREADSHEET_ID ) and the spreadsheet chart ID (specified by the SPREADSHEET_CHART_ID ). The chart ID within the Slides presentation is specified by the PRESENTATION_CHART_ID .
Этот запрос также устанавливает LinkingMode для диаграммы в слайдах в значение LINKED , чтобы вы могли обновлять встроенную диаграмму, если обновляется диаграмма в исходной электронной таблице.
Ниже представлен протокол запроса для импорта диаграммы из Google Sheets:
POST https://slides.googleapis.com/v1/presentations/PRESENTATION_ID:batchUpdate
{
  "requests": [
    {
      "createSheetsChart": {
        "objectId": PRESENTATION_CHART_ID,
        "spreadsheetId": SPREADSHEET_ID,
        "chartId": SPREADSHEET_CHART_ID,
        "linkingMode": "LINKED",
        "elementProperties": {
          "pageObjectId": PAGE_ID,
          "size": {
            "width": {
              "magnitude": 4000000,
              "unit": "EMU"
            },
            "height": {
              "magnitude": 4000000,
              "unit": "EMU"
            }
          },
          "transform": {
            "scaleX": 1,
            "scaleY": 1,
            "translateX": 100000,
            "translateY": 100000,
            "unit": "EMU"
          }
      }
    }
  ]
}
Обновить диаграмму из Google Таблиц
The following presentations.batchUpdate code sample shows how to use the RefreshSheetsChartRequest method to refresh a linked chart in a presentation, replacing it with the latest version of that chart from the Sheets source spreadsheet. The request requires the chart ID within the Slides presentation (specified by the PRESENTATION_CHART_ID ).
Ниже представлен протокол запроса для обновления диаграммы из Google Sheets:
POST https://slides.googleapis.com/v1/presentations/PRESENTATION_ID:batchUpdate
{
  "requests": [
    {
      "refreshSheetsChart": {
        "objectId": PRESENTATION_CHART_ID
      }
    }
  ]
}