
इस ट्यूटोरियल में बताया गया है कि अपने Android ऐप्लिकेशन में Google मैप कैसे जोड़ा जाए. साथ ही, मैप पर रास्तों और इलाकों को दिखाने के लिए, पॉलीलाइन और पॉलीगॉन का इस्तेमाल कैसे किया जाए.
Android के लिए Maps SDK का इस्तेमाल करके, Android ऐप्लिकेशन बनाने के लिए ट्यूटोरियल देखें. हमारा सुझाव है कि डेवलपमेंट एनवायरमेंट के तौर पर Android Studio का इस्तेमाल करें.
कोड प्राप्त करें
GitHub से Google Maps Android API v2 के सैंपल की रिपॉज़िटरी को क्लोन करें या डाउनलोड करें.
गतिविधि का Java वर्शन देखने के लिए:
    // Copyright 2020 Google LLC
//
// Licensed under the Apache License, Version 2.0 (the "License");
// you may not use this file except in compliance with the License.
// You may obtain a copy of the License at
//
//      http://www.apache.org/licenses/LICENSE-2.0
//
// Unless required by applicable law or agreed to in writing, software
// distributed under the License is distributed on an "AS IS" BASIS,
// WITHOUT WARRANTIES OR CONDITIONS OF ANY KIND, either express or implied.
// See the License for the specific language governing permissions and
// limitations under the License.

package com.example.polygons;

import android.os.Bundle;
import android.widget.Toast;
import androidx.appcompat.app.AppCompatActivity;
import com.google.android.gms.maps.CameraUpdateFactory;
import com.google.android.gms.maps.GoogleMap;
import com.google.android.gms.maps.OnMapReadyCallback;
import com.google.android.gms.maps.SupportMapFragment;
import com.google.android.gms.maps.model.BitmapDescriptorFactory;
import com.google.android.gms.maps.model.CustomCap;
import com.google.android.gms.maps.model.Dash;
import com.google.android.gms.maps.model.Dot;
import com.google.android.gms.maps.model.Gap;
import com.google.android.gms.maps.model.JointType;
import com.google.android.gms.maps.model.LatLng;
import com.google.android.gms.maps.model.PatternItem;
import com.google.android.gms.maps.model.Polygon;
import com.google.android.gms.maps.model.PolygonOptions;
import com.google.android.gms.maps.model.Polyline;
import com.google.android.gms.maps.model.PolylineOptions;
import com.google.android.gms.maps.model.RoundCap;
import java.util.Arrays;
import java.util.List;


/**
 * An activity that displays a Google map with polylines to represent paths or routes,
 * and polygons to represent areas.
 */
public class PolyActivity extends AppCompatActivity
        implements
                OnMapReadyCallback,
                GoogleMap.OnPolylineClickListener,
                GoogleMap.OnPolygonClickListener {

    @Override
    protected void onCreate(Bundle savedInstanceState) {
        super.onCreate(savedInstanceState);

        // Retrieve the content view that renders the map.
        setContentView(R.layout.activity_maps);

        // Get the SupportMapFragment and request notification when the map is ready to be used.
        SupportMapFragment mapFragment = (SupportMapFragment) getSupportFragmentManager()
                .findFragmentById(R.id.map);
        mapFragment.getMapAsync(this);
    }

    /**
     * Manipulates the map when it's available.
     * The API invokes this callback when the map is ready to be used.
     * This is where we can add markers or lines, add listeners or move the camera.
     * In this tutorial, we add polylines and polygons to represent routes and areas on the map.
     */
    @Override
    public void onMapReady(GoogleMap googleMap) {

        // Add polylines to the map.
        // Polylines are useful to show a route or some other connection between points.
        Polyline polyline1 = googleMap.addPolyline(new PolylineOptions()
                .clickable(true)
                .add(
                        new LatLng(-35.016, 143.321),
                        new LatLng(-34.747, 145.592),
                        new LatLng(-34.364, 147.891),
                        new LatLng(-33.501, 150.217),
                        new LatLng(-32.306, 149.248),
                        new LatLng(-32.491, 147.309)));
        // Store a data object with the polyline, used here to indicate an arbitrary type.
        polyline1.setTag("A");
        // Style the polyline.
        stylePolyline(polyline1);

        Polyline polyline2 = googleMap.addPolyline(new PolylineOptions()
                .clickable(true)
                .add(
                        new LatLng(-29.501, 119.700),
                        new LatLng(-27.456, 119.672),
                        new LatLng(-25.971, 124.187),
                        new LatLng(-28.081, 126.555),
                        new LatLng(-28.848, 124.229),
                        new LatLng(-28.215, 123.938)));
        polyline2.setTag("B");
        stylePolyline(polyline2);

        // Add polygons to indicate areas on the map.
        Polygon polygon1 = googleMap.addPolygon(new PolygonOptions()
                .clickable(true)
                .add(
                        new LatLng(-27.457, 153.040),
                        new LatLng(-33.852, 151.211),
                        new LatLng(-37.813, 144.962),
                        new LatLng(-34.928, 138.599)));
        // Store a data object with the polygon, used here to indicate an arbitrary type.
        polygon1.setTag("alpha");
        // Style the polygon.
        stylePolygon(polygon1);

        Polygon polygon2 = googleMap.addPolygon(new PolygonOptions()
                .clickable(true)
                .add(
                        new LatLng(-31.673, 128.892),
                        new LatLng(-31.952, 115.857),
                        new LatLng(-17.785, 122.258),
                        new LatLng(-12.4258, 130.7932)));
        polygon2.setTag("beta");
        stylePolygon(polygon2);

        // Position the map's camera near Alice Springs in the center of Australia,
        // and set the zoom factor so most of Australia shows on the screen.
        googleMap.moveCamera(CameraUpdateFactory.newLatLngZoom(new LatLng(-23.684, 133.903), 4));

        // Set listeners for click events.
        googleMap.setOnPolylineClickListener(this);
        googleMap.setOnPolygonClickListener(this);
    }

    private static final int COLOR_BLACK_ARGB = 0xff000000;
    private static final int POLYLINE_STROKE_WIDTH_PX = 12;

    /**
     * Styles the polyline, based on type.
     * @param polyline The polyline object that needs styling.
     */
    private void stylePolyline(Polyline polyline) {
        String type = "";
        // Get the data object stored with the polyline.
        if (polyline.getTag() != null) {
            type = polyline.getTag().toString();
        }

        switch (type) {
            // If no type is given, allow the API to use the default.
            case "A":
                // Use a custom bitmap as the cap at the start of the line.
                polyline.setStartCap(
                        new CustomCap(
                                BitmapDescriptorFactory.fromResource(R.drawable.ic_arrow), 10));
                break;
            case "B":
                // Use a round cap at the start of the line.
                polyline.setStartCap(new RoundCap());
                break;
        }

        polyline.setEndCap(new RoundCap());
        polyline.setWidth(POLYLINE_STROKE_WIDTH_PX);
        polyline.setColor(COLOR_BLACK_ARGB);
        polyline.setJointType(JointType.ROUND);
    }

    private static final int PATTERN_GAP_LENGTH_PX = 20;
    private static final PatternItem DOT = new Dot();
    private static final PatternItem GAP = new Gap(PATTERN_GAP_LENGTH_PX);

    // Create a stroke pattern of a gap followed by a dot.
    private static final List<PatternItem> PATTERN_POLYLINE_DOTTED = Arrays.asList(GAP, DOT);

    /**
     * Listens for clicks on a polyline.
     * @param polyline The polyline object that the user has clicked.
     */
    @Override
    public void onPolylineClick(Polyline polyline) {
        // Flip from solid stroke to dotted stroke pattern.
        if ((polyline.getPattern() == null) || (!polyline.getPattern().contains(DOT))) {
            polyline.setPattern(PATTERN_POLYLINE_DOTTED);
        } else {
            // The default pattern is a solid stroke.
            polyline.setPattern(null);
        }

        Toast.makeText(this, "Route type " + polyline.getTag().toString(),
                Toast.LENGTH_SHORT).show();
    }

    /**
     * Listens for clicks on a polygon.
     * @param polygon The polygon object that the user has clicked.
     */
    @Override
    public void onPolygonClick(Polygon polygon) {
        // Flip the values of the red, green, and blue components of the polygon's color.
        int color = polygon.getStrokeColor() ^ 0x00ffffff;
        polygon.setStrokeColor(color);
        color = polygon.getFillColor() ^ 0x00ffffff;
        polygon.setFillColor(color);

        Toast.makeText(this, "Area type " + polygon.getTag().toString(), Toast.LENGTH_SHORT).show();
    }

    private static final int COLOR_WHITE_ARGB = 0xffffffff;
    private static final int COLOR_DARK_GREEN_ARGB = 0xff388E3C;
    private static final int COLOR_LIGHT_GREEN_ARGB = 0xff81C784;
    private static final int COLOR_DARK_ORANGE_ARGB = 0xffF57F17;
    private static final int COLOR_LIGHT_ORANGE_ARGB = 0xffF9A825;

    private static final int POLYGON_STROKE_WIDTH_PX = 8;
    private static final int PATTERN_DASH_LENGTH_PX = 20;
    private static final PatternItem DASH = new Dash(PATTERN_DASH_LENGTH_PX);

    // Create a stroke pattern of a gap followed by a dash.
    private static final List<PatternItem> PATTERN_POLYGON_ALPHA = Arrays.asList(GAP, DASH);

    // Create a stroke pattern of a dot followed by a gap, a dash, and another gap.
    private static final List<PatternItem> PATTERN_POLYGON_BETA =
        Arrays.asList(DOT, GAP, DASH, GAP);

    /**
     * Styles the polygon, based on type.
     * @param polygon The polygon object that needs styling.
     */
    private void stylePolygon(Polygon polygon) {
        String type = "";
        // Get the data object stored with the polygon.
        if (polygon.getTag() != null) {
            type = polygon.getTag().toString();
        }

        List<PatternItem> pattern = null;
        int strokeColor = COLOR_BLACK_ARGB;
        int fillColor = COLOR_WHITE_ARGB;

        switch (type) {
            // If no type is given, allow the API to use the default.
            case "alpha":
                // Apply a stroke pattern to render a dashed line, and define colors.
                pattern = PATTERN_POLYGON_ALPHA;
                strokeColor = COLOR_DARK_GREEN_ARGB;
                fillColor = COLOR_LIGHT_GREEN_ARGB;
                break;
            case "beta":
                // Apply a stroke pattern to render a line of dots and dashes, and define colors.
                pattern = PATTERN_POLYGON_BETA;
                strokeColor = COLOR_DARK_ORANGE_ARGB;
                fillColor = COLOR_LIGHT_ORANGE_ARGB;
                break;
        }

        polygon.setStrokePattern(pattern);
        polygon.setStrokeWidth(POLYGON_STROKE_WIDTH_PX);
        polygon.setStrokeColor(strokeColor);
        polygon.setFillColor(fillColor);
    }
}
गतिविधि का Kotlin वर्शन देखने के लिए:
    // Copyright 2020 Google LLC
//
// Licensed under the Apache License, Version 2.0 (the "License");
// you may not use this file except in compliance with the License.
// You may obtain a copy of the License at
//
//      http://www.apache.org/licenses/LICENSE-2.0
//
// Unless required by applicable law or agreed to in writing, software
// distributed under the License is distributed on an "AS IS" BASIS,
// WITHOUT WARRANTIES OR CONDITIONS OF ANY KIND, either express or implied.
// See the License for the specific language governing permissions and
// limitations under the License.
package com.example.polygons

import android.os.Bundle
import android.widget.Toast
import androidx.appcompat.app.AppCompatActivity
import com.google.android.gms.maps.CameraUpdateFactory
import com.google.android.gms.maps.GoogleMap
import com.google.android.gms.maps.GoogleMap.OnPolygonClickListener
import com.google.android.gms.maps.GoogleMap.OnPolylineClickListener
import com.google.android.gms.maps.OnMapReadyCallback
import com.google.android.gms.maps.SupportMapFragment
import com.google.android.gms.maps.model.BitmapDescriptorFactory
import com.google.android.gms.maps.model.CustomCap
import com.google.android.gms.maps.model.Dash
import com.google.android.gms.maps.model.Dot
import com.google.android.gms.maps.model.Gap
import com.google.android.gms.maps.model.JointType
import com.google.android.gms.maps.model.LatLng
import com.google.android.gms.maps.model.PatternItem
import com.google.android.gms.maps.model.Polygon
import com.google.android.gms.maps.model.PolygonOptions
import com.google.android.gms.maps.model.Polyline
import com.google.android.gms.maps.model.PolylineOptions
import com.google.android.gms.maps.model.RoundCap

/**
 * An activity that displays a Google map with polylines to represent paths or routes,
 * and polygons to represent areas.
 */
class PolyActivity : AppCompatActivity(), OnMapReadyCallback, OnPolylineClickListener, OnPolygonClickListener {

    override fun onCreate(savedInstanceState: Bundle?) {
        super.onCreate(savedInstanceState)

        // Retrieve the content view that renders the map.
        setContentView(R.layout.activity_maps)

        // Get the SupportMapFragment and request notification when the map is ready to be used.
        val mapFragment = supportFragmentManager
            .findFragmentById(R.id.map) as SupportMapFragment?
        mapFragment?.getMapAsync(this)
    }

    /**
     * Manipulates the map when it's available.
     * The API invokes this callback when the map is ready to be used.
     * This is where we can add markers or lines, add listeners or move the camera.
     * In this tutorial, we add polylines and polygons to represent routes and areas on the map.
     */
    override fun onMapReady(googleMap: GoogleMap) {

        // Add polylines to the map.
        // Polylines are useful to show a route or some other connection between points.
        val polyline1 = googleMap.addPolyline(PolylineOptions()
            .clickable(true)
            .add(
                LatLng(-35.016, 143.321),
                LatLng(-34.747, 145.592),
                LatLng(-34.364, 147.891),
                LatLng(-33.501, 150.217),
                LatLng(-32.306, 149.248),
                LatLng(-32.491, 147.309)))
        // Store a data object with the polyline, used here to indicate an arbitrary type.
        polyline1.tag = "A"
        // Style the polyline.
        stylePolyline(polyline1)

        val polyline2 = googleMap.addPolyline(PolylineOptions()
            .clickable(true)
            .add(
                LatLng(-29.501, 119.700),
                LatLng(-27.456, 119.672),
                LatLng(-25.971, 124.187),
                LatLng(-28.081, 126.555),
                LatLng(-28.848, 124.229),
                LatLng(-28.215, 123.938)))
        polyline2.tag = "B"
        stylePolyline(polyline2)

        // Add polygons to indicate areas on the map.
        val polygon1 = googleMap.addPolygon(PolygonOptions()
            .clickable(true)
            .add(
                LatLng(-27.457, 153.040),
                LatLng(-33.852, 151.211),
                LatLng(-37.813, 144.962),
                LatLng(-34.928, 138.599)))
        // Store a data object with the polygon, used here to indicate an arbitrary type.
        polygon1.tag = "alpha"
        // Style the polygon.
        stylePolygon(polygon1)

        val polygon2 = googleMap.addPolygon(PolygonOptions()
            .clickable(true)
            .add(
                LatLng(-31.673, 128.892),
                LatLng(-31.952, 115.857),
                LatLng(-17.785, 122.258),
                LatLng(-12.4258, 130.7932)))
        polygon2.tag = "beta"
        stylePolygon(polygon2)

        // Position the map's camera near Alice Springs in the center of Australia,
        // and set the zoom factor so most of Australia shows on the screen.
        googleMap.moveCamera(CameraUpdateFactory.newLatLngZoom(LatLng(-23.684, 133.903), 4f))

        // Set listeners for click events.
        googleMap.setOnPolylineClickListener(this)
        googleMap.setOnPolygonClickListener(this)
    }

    private val COLOR_BLACK_ARGB = -0x1000000
    private val POLYLINE_STROKE_WIDTH_PX = 12

    /**
     * Styles the polyline, based on type.
     * @param polyline The polyline object that needs styling.
     */
    private fun stylePolyline(polyline: Polyline) {
        // Get the data object stored with the polyline.
        val type = polyline.tag?.toString() ?: ""
        when (type) {
            "A" -> {
                // Use a custom bitmap as the cap at the start of the line.
                polyline.startCap = CustomCap(
                    BitmapDescriptorFactory.fromResource(R.drawable.ic_arrow), 10f)
            }
            "B" -> {
               // Use a round cap at the start of the line.
                polyline.startCap = RoundCap()
            }
        }
        polyline.endCap = RoundCap()
        polyline.width = POLYLINE_STROKE_WIDTH_PX.toFloat()
        polyline.color = COLOR_BLACK_ARGB
        polyline.jointType = JointType.ROUND
    }

    private val PATTERN_GAP_LENGTH_PX = 20
    private val DOT: PatternItem = Dot()
    private val GAP: PatternItem = Gap(PATTERN_GAP_LENGTH_PX.toFloat())

    // Create a stroke pattern of a gap followed by a dot.
    private val PATTERN_POLYLINE_DOTTED = listOf(GAP, DOT)

    /**
     * Listens for clicks on a polyline.
     * @param polyline The polyline object that the user has clicked.
     */
    override fun onPolylineClick(polyline: Polyline) {
        // Flip from solid stroke to dotted stroke pattern.
        if (polyline.pattern == null || !polyline.pattern!!.contains(DOT)) {
            polyline.pattern = PATTERN_POLYLINE_DOTTED
        } else {
            // The default pattern is a solid stroke.
            polyline.pattern = null
        }
        Toast.makeText(this, "Route type " + polyline.tag.toString(),
            Toast.LENGTH_SHORT).show()
    }

    /**
     * Listens for clicks on a polygon.
     * @param polygon The polygon object that the user has clicked.
     */
    override fun onPolygonClick(polygon: Polygon) {
        // Flip the values of the red, green, and blue components of the polygon's color.
        var color = polygon.strokeColor xor 0x00ffffff
        polygon.strokeColor = color
        color = polygon.fillColor xor 0x00ffffff
        polygon.fillColor = color
        Toast.makeText(this, "Area type ${polygon.tag?.toString()}", Toast.LENGTH_SHORT).show()
    }

    private val COLOR_WHITE_ARGB = -0x1
    private val COLOR_DARK_GREEN_ARGB = -0xc771c4
    private val COLOR_LIGHT_GREEN_ARGB = -0x7e387c
    private val COLOR_DARK_ORANGE_ARGB = -0xa80e9
    private val COLOR_LIGHT_ORANGE_ARGB = -0x657db
    private val POLYGON_STROKE_WIDTH_PX = 8
    private val PATTERN_DASH_LENGTH_PX = 20

    private val DASH: PatternItem = Dash(PATTERN_DASH_LENGTH_PX.toFloat())

    // Create a stroke pattern of a gap followed by a dash.
    private val PATTERN_POLYGON_ALPHA = listOf(GAP, DASH)

    // Create a stroke pattern of a dot followed by a gap, a dash, and another gap.
    private val PATTERN_POLYGON_BETA = listOf(DOT, GAP, DASH, GAP)

    /**
     * Styles the polygon, based on type.
     * @param polygon The polygon object that needs styling.
     */
    private fun stylePolygon(polygon: Polygon) {
        // Get the data object stored with the polygon.
        val type = polygon.tag?.toString() ?: ""
        var pattern: List<PatternItem>? = null
        var strokeColor = COLOR_BLACK_ARGB
        var fillColor = COLOR_WHITE_ARGB
        when (type) {
            "alpha" -> {
                // Apply a stroke pattern to render a dashed line, and define colors.
                pattern = PATTERN_POLYGON_ALPHA
                strokeColor = COLOR_DARK_GREEN_ARGB
                fillColor = COLOR_LIGHT_GREEN_ARGB
            }
            "beta" -> {
                // Apply a stroke pattern to render a line of dots and dashes, and define colors.
                pattern = PATTERN_POLYGON_BETA
                strokeColor = COLOR_DARK_ORANGE_ARGB
                fillColor = COLOR_LIGHT_ORANGE_ARGB
            }
        }
        polygon.strokePattern = pattern
        polygon.strokeWidth = POLYGON_STROKE_WIDTH_PX.toFloat()
        polygon.strokeColor = strokeColor
        polygon.fillColor = fillColor
    }
}
अपना डेवलपमेंट प्रोजेक्ट सेट अप करना
Android Studio में ट्यूटोरियल प्रोजेक्ट बनाने के लिए, यह तरीका अपनाएं.
- Android Studio को डाउनलोड और इंस्टॉल करें.
- Android Studio में Google Play services पैकेज जोड़ें.
- अगर आपने इस ट्यूटोरियल को पढ़ते समय, Google Maps Android API v2 के सैंपल की रिपॉज़िटरी को क्लोन या डाउनलोड नहीं किया है, तो ऐसा करें.
ट्यूटोरियल प्रोजेक्ट इंपोर्ट करें:
- Android Studio में, File > New > Import Project को चुनें.
- उस जगह पर जाएं जहां आपने Google Maps Android API v2 Samples रिपॉज़िटरी को डाउनलोड करने के बाद सेव किया था.
- इस जगह पर Polygons प्रोजेक्ट ढूंढें:
PATH-TO-SAVED-REPO/android-samples/tutorials/java/Polygons(Java) या
PATH-TO-SAVED-REPO/android-samples/tutorials/kotlin/Polygons(Kotlin) - प्रोजेक्ट डायरेक्ट्री चुनें. इसके बाद, खोलें पर क्लिक करें. Android Studio अब Gradle बिल्ड टूल का इस्तेमाल करके, आपके प्रोजेक्ट को बनाता है.
ज़रूरी एपीआई चालू करें और एपीआई पासकोड पाएं
इस ट्यूटोरियल को पूरा करने के लिए, आपके पास ज़रूरी एपीआई चालू किया गया Google Cloud प्रोजेक्ट होना चाहिए. साथ ही, आपके पास एक ऐसी एपीआई कुंजी होनी चाहिए जिसे Maps SDK for Android का इस्तेमाल करने की अनुमति मिली हो. ज़्यादा जानकारी के लिए, यह लेख पढ़ें:
अपने ऐप्लिकेशन में एपीआई पासकोड जोड़ना
- अपने प्रोजेक्ट की
local.propertiesफ़ाइल खोलें. नीचे दी गई स्ट्रिंग जोड़ें. इसके बाद,
YOUR_API_KEYको अपनी एपीआई कुंजी की वैल्यू से बदलें:MAPS_API_KEY=YOUR_API_KEYऐप्लिकेशन बनाते समय, Android के लिए सीक्रेट ग्रेडल प्लग इन एपीआई पासकोड को कॉपी करेगा और उसे Android मेनिफ़ेस्ट में बिल्ड वैरिएबल के तौर पर उपलब्ध कराएगा. इसके बारे में यहां बताया गया है.
ऐप्लिकेशन बनाना और उसे चलाना
ऐप्लिकेशन बनाने और चलाने के लिए:
किसी Android डिवाइस को अपने कंप्यूटर से कनेक्ट करें. अपने Android डिवाइस पर डेवलपर के लिए सेटिंग और टूल चालू करने के लिए, निर्देशों का पालन करें. साथ ही, डिवाइस का पता लगाने के लिए अपने सिस्टम को कॉन्फ़िगर करें.
इसके अलावा, वर्चुअल डिवाइस को कॉन्फ़िगर करने के लिए, Android वर्चुअल डिवाइस (AVD) मैनेजर का इस्तेमाल किया जा सकता है. एम्युलेटर चुनते समय, पक्का करें कि आपने ऐसी इमेज चुनी हो जिसमें Google API शामिल हों. ज़्यादा जानकारी के लिए, Android Studio प्रोजेक्ट सेट अप करना लेख पढ़ें.
Android Studio में, Run मेन्यू विकल्प (या प्ले बटन आइकॉन) पर क्लिक करें. स्क्रीन पर दिए गए निर्देशों के मुताबिक, कोई डिवाइस चुनें.
Android Studio, ऐप्लिकेशन बनाने के लिए Gradle को शुरू करता है. इसके बाद, ऐप्लिकेशन को डिवाइस या एम्युलेटर पर चलाता है.
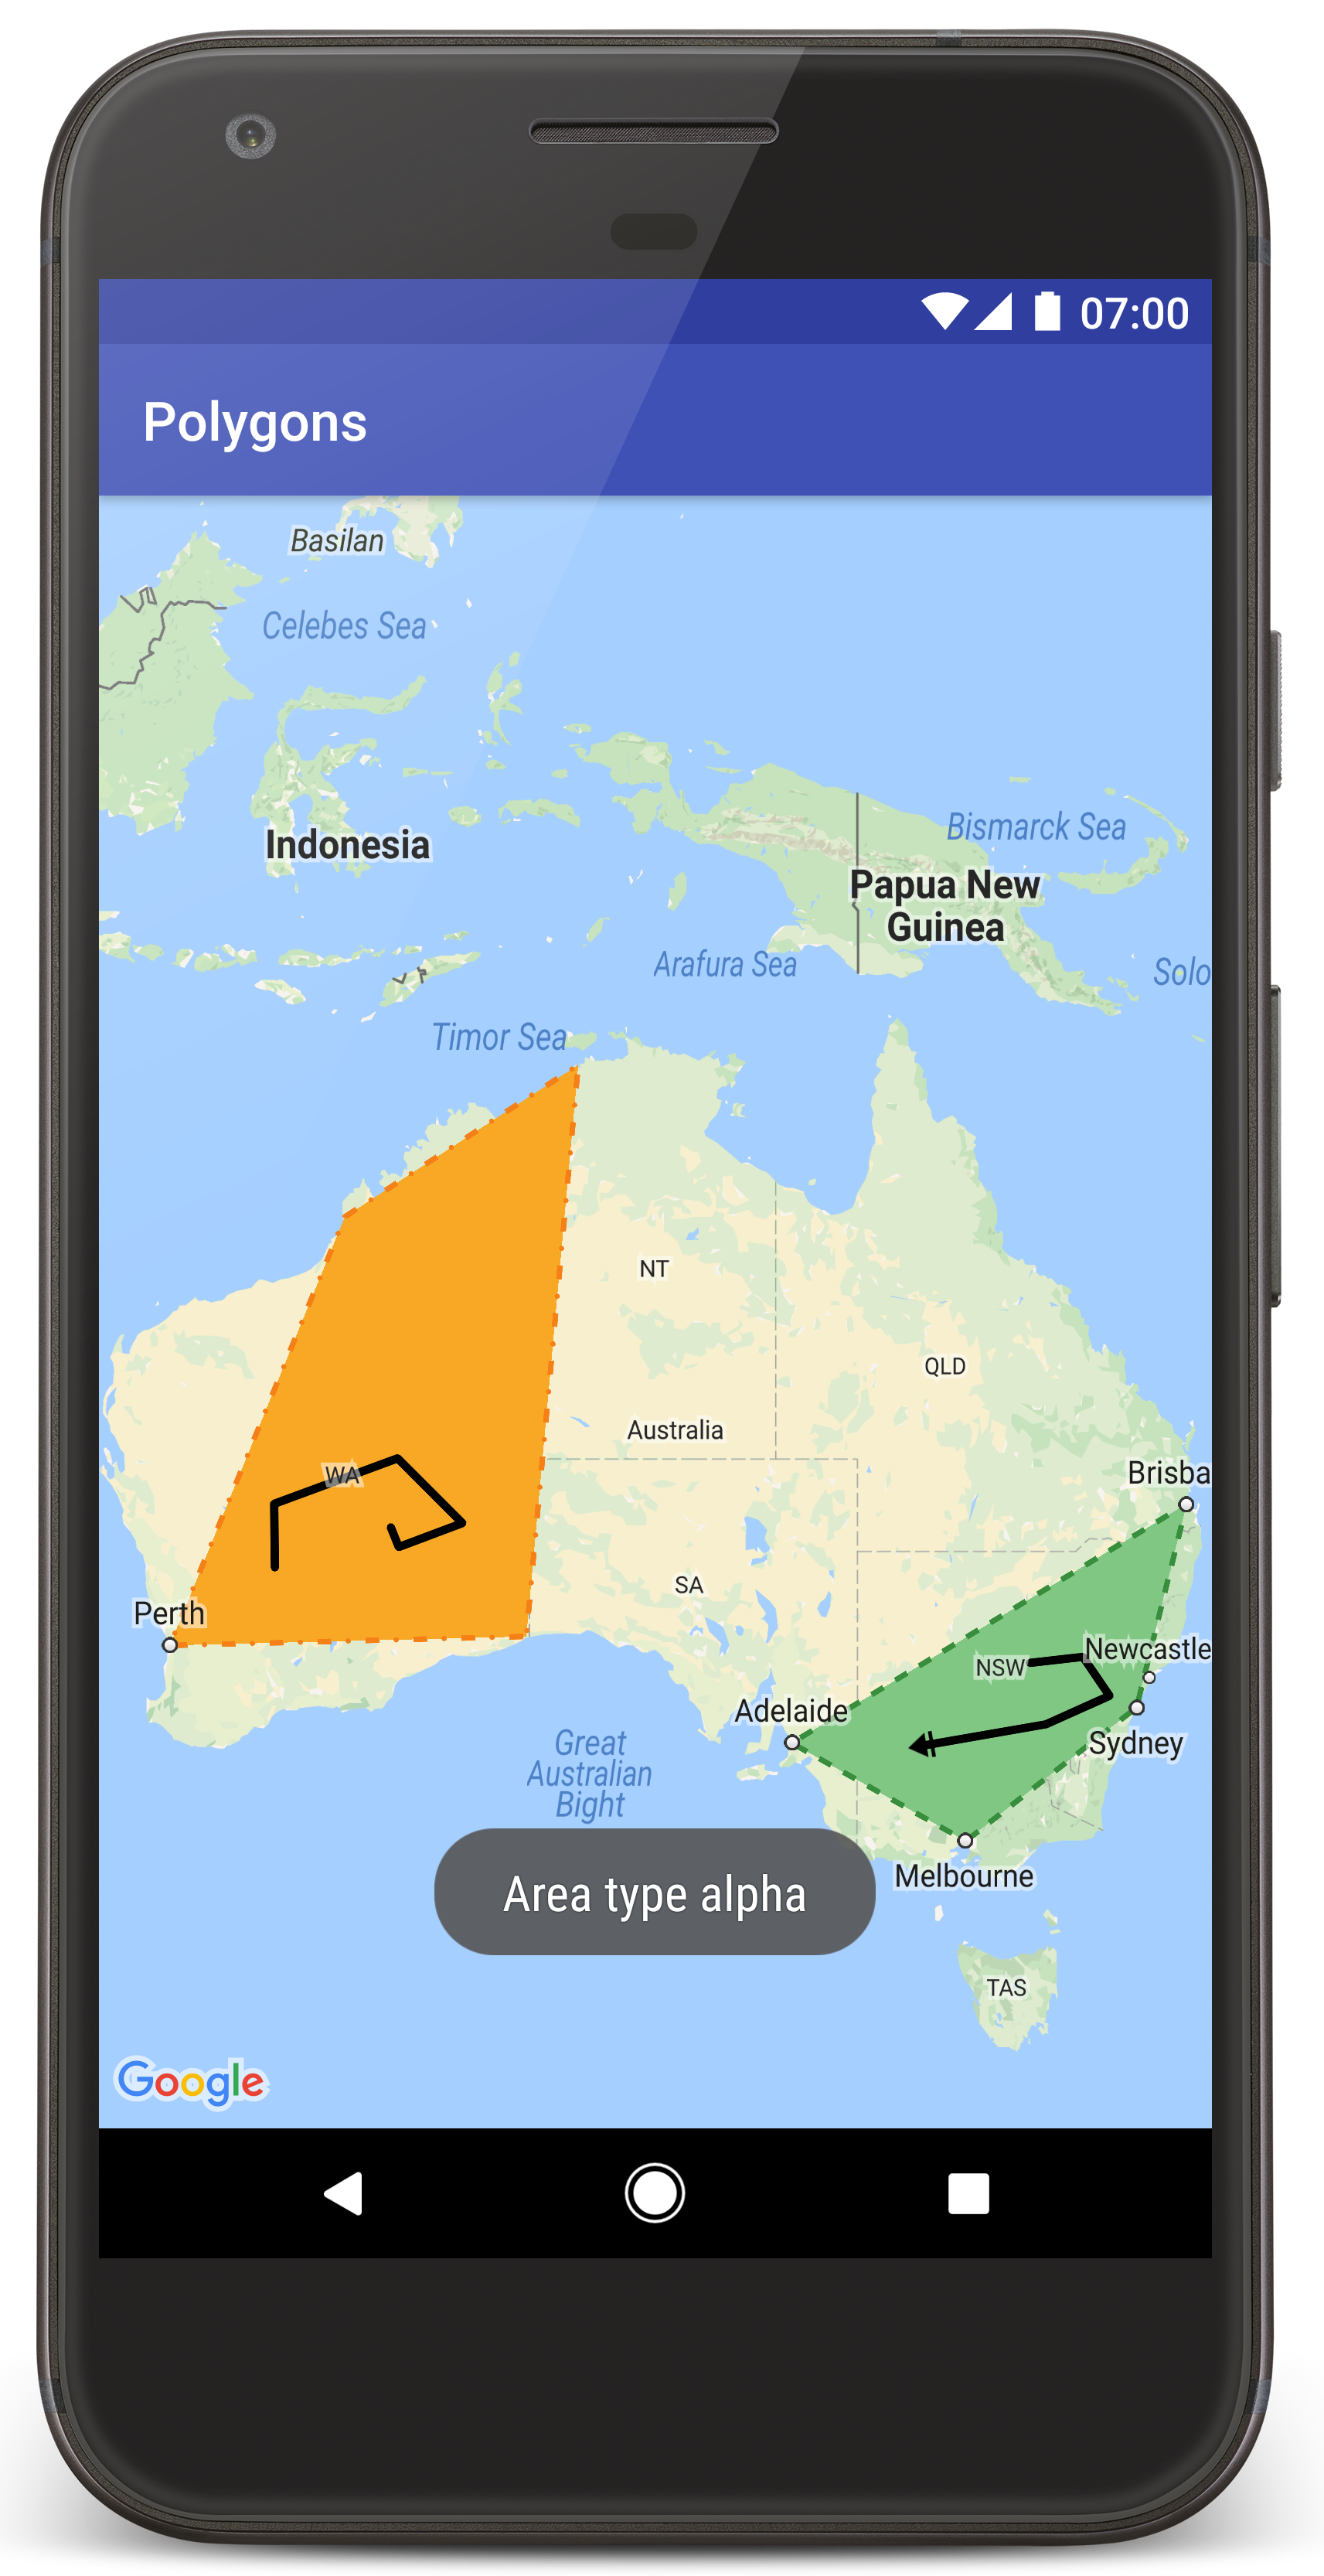
आपको ऑस्ट्रेलिया के ऊपर दो पॉलीगॉन वाला मैप दिखेगा. यह इस पेज पर मौजूद इमेज की तरह होगा.
समस्या का हल:
- अगर आपको कोई मैप नहीं दिखता है, तो पक्का करें कि आपने एपीआई पासकोड हासिल कर लिया हो और उसे ऐप्लिकेशन में जोड़ दिया हो. इसके बारे में ऊपर बताया गया है. Android Studio के Android Monitor में लॉग इन करके, एपीआई पासकोड से जुड़ी गड़बड़ी के मैसेज देखें.
- लॉग देखने और ऐप्लिकेशन को डीबग करने के लिए, Android Studio के डीबगिंग टूल का इस्तेमाल करें.
कोड को समझना
ट्यूटोरियल के इस हिस्से में, Polygons ऐप्लिकेशन के सबसे अहम हिस्सों के बारे में बताया गया है. इससे आपको यह समझने में मदद मिलेगी कि इसी तरह का ऐप्लिकेशन कैसे बनाया जाए.
Android मेनिफ़ेस्ट की जांच करना
अपने ऐप्लिकेशन की AndroidManifest.xml फ़ाइल में इन एलिमेंट पर ध्यान दें:
Google Play services के उस वर्शन को एम्बेड करने के लिए,
meta-dataएलिमेंट जोड़ें जिससे ऐप्लिकेशन को कंपाइल किया गया था.<meta-data android:name="com.google.android.gms.version" android:value="@integer/google_play_services_version" />अपनी एपीआई कुंजी के बारे में बताने वाला
meta-dataएलिमेंट जोड़ें. इस ट्यूटोरियल के साथ दिए गए सैंपल में, एपीआई कुंजी की वैल्यू को उस बिल्ड वैरिएबल पर मैप किया जाता है जो पहले तय की गई कुंजी के नाम से मेल खाता है,MAPS_API_KEY. ऐप्लिकेशन बनाते समय, Android के लिए Secrets Gradle Plugin आपकीlocal.propertiesफ़ाइल में मौजूद कुंजियों को मेनिफ़ेस्ट बिल्ड वैरिएबल के तौर पर उपलब्ध कराएगा.<meta-data android:name="com.google.android.geo.API_KEY" android:value="${MAPS_API_KEY}" />आपकी
build.gradleफ़ाइल में, यहां दी गई लाइन आपकी एपीआई कुंजी को Android मेनिफ़ेस्ट में भेजती है.id 'com.google.android.libraries.mapsplatform.secrets-gradle-plugin'
यहां मेनिफ़ेस्ट का पूरा उदाहरण दिया गया है:
  <?xml version="1.0" encoding="utf-8"?>
<!--
 Copyright 2020 Google LLC

 Licensed under the Apache License, Version 2.0 (the "License");
 you may not use this file except in compliance with the License.
 You may obtain a copy of the License at

      http://www.apache.org/licenses/LICENSE-2.0

 Unless required by applicable law or agreed to in writing, software
 distributed under the License is distributed on an "AS IS" BASIS,
 WITHOUT WARRANTIES OR CONDITIONS OF ANY KIND, either express or implied.
 See the License for the specific language governing permissions and
 limitations under the License.
-->

<manifest xmlns:android="http://schemas.android.com/apk/res/android">

    <application
        android:allowBackup="true"
        android:icon="@mipmap/ic_launcher"
        android:label="@string/app_name"
        android:supportsRtl="true"
        android:theme="@style/AppTheme">

        <meta-data
            android:name="com.google.android.gms.version"
            android:value="@integer/google_play_services_version" />

        <!--
             The API key for Google Maps-based APIs.
        -->
        <meta-data
            android:name="com.google.android.geo.API_KEY"
            android:value="${MAPS_API_KEY}" />

        <activity
            android:name="com.example.polygons.PolyActivity"
            android:exported="true"
            android:label="@string/title_activity_maps">
            <intent-filter>
                <action android:name="android.intent.action.MAIN" />
                <category android:name="android.intent.category.LAUNCHER" />
            </intent-filter>
        </activity>
    </application>
</manifest>
मैप जोड़ना
Android के लिए Maps SDK का इस्तेमाल करके, मैप दिखाएं.
अपनी गतिविधि की लेआउट फ़ाइल में
<fragment>एलिमेंट जोड़ें,activity_maps.xml. यह एलिमेंट,SupportMapFragmentको मैप के लिए कंटेनर के तौर पर काम करने औरGoogleMapऑब्जेक्ट का ऐक्सेस देने के लिए तय करता है. इस ट्यूटोरियल में, Android के पुराने वर्शन के साथ काम करने वाले मैप फ़्रैगमेंट के Android सपोर्ट लाइब्रेरी वर्शन का इस्तेमाल किया गया है.<!-- Copyright 2020 Google LLC Licensed under the Apache License, Version 2.0 (the "License"); you may not use this file except in compliance with the License. You may obtain a copy of the License at http://www.apache.org/licenses/LICENSE-2.0 Unless required by applicable law or agreed to in writing, software distributed under the License is distributed on an "AS IS" BASIS, WITHOUT WARRANTIES OR CONDITIONS OF ANY KIND, either express or implied. See the License for the specific language governing permissions and limitations under the License. --> <fragment xmlns:android="http://schemas.android.com/apk/res/android" xmlns:tools="http://schemas.android.com/tools" android:id="@+id/map" android:name="com.google.android.gms.maps.SupportMapFragment" android:layout_width="match_parent" android:layout_height="match_parent" tools:context="com.example.polygons.PolyActivity" />
अपनी ऐक्टिविटी के
onCreate()तरीके में, लेआउट फ़ाइल को कॉन्टेंट व्यू के तौर पर सेट करें.FragmentManager.findFragmentById()को कॉल करके, मैप फ़्रैगमेंट का हैंडल पाएं. इसके बाद, मैप कॉलबैक के लिए रजिस्टर करने के लिए,getMapAsync()का इस्तेमाल करें:Java
@Override protected void onCreate(Bundle savedInstanceState) { super.onCreate(savedInstanceState); // Retrieve the content view that renders the map. setContentView(R.layout.activity_maps); // Get the SupportMapFragment and request notification when the map is ready to be used. SupportMapFragment mapFragment = (SupportMapFragment) getSupportFragmentManager() .findFragmentById(R.id.map); mapFragment.getMapAsync(this); }
Kotlin
override fun onCreate(savedInstanceState: Bundle?) { super.onCreate(savedInstanceState) // Retrieve the content view that renders the map. setContentView(R.layout.activity_maps) // Get the SupportMapFragment and request notification when the map is ready to be used. val mapFragment = supportFragmentManager .findFragmentById(R.id.map) as SupportMapFragment? mapFragment?.getMapAsync(this) }
OnMapReadyCallbackइंटरफ़ेस लागू करें औरonMapReady()तरीके को ओवरराइड करें.GoogleMapऑब्जेक्ट उपलब्ध होने पर, एपीआई इस कॉलबैक को शुरू करता है. इससे, मैप में ऑब्जेक्ट जोड़े जा सकते हैं. साथ ही, इसे अपने ऐप्लिकेशन के हिसाब से पसंद के मुताबिक बनाया जा सकता है:Java
public class PolyActivity extends AppCompatActivity implements OnMapReadyCallback, GoogleMap.OnPolylineClickListener, GoogleMap.OnPolygonClickListener { @Override protected void onCreate(Bundle savedInstanceState) { super.onCreate(savedInstanceState); // Retrieve the content view that renders the map. setContentView(R.layout.activity_maps); // Get the SupportMapFragment and request notification when the map is ready to be used. SupportMapFragment mapFragment = (SupportMapFragment) getSupportFragmentManager() .findFragmentById(R.id.map); mapFragment.getMapAsync(this); } /** * Manipulates the map when it's available. * The API invokes this callback when the map is ready to be used. * This is where we can add markers or lines, add listeners or move the camera. * In this tutorial, we add polylines and polygons to represent routes and areas on the map. */ @Override public void onMapReady(GoogleMap googleMap) { // Add polylines to the map. // Polylines are useful to show a route or some other connection between points. Polyline polyline1 = googleMap.addPolyline(new PolylineOptions() .clickable(true) .add( new LatLng(-35.016, 143.321), new LatLng(-34.747, 145.592), new LatLng(-34.364, 147.891), new LatLng(-33.501, 150.217), new LatLng(-32.306, 149.248), new LatLng(-32.491, 147.309))); // Position the map's camera near Alice Springs in the center of Australia, // and set the zoom factor so most of Australia shows on the screen. googleMap.moveCamera(CameraUpdateFactory.newLatLngZoom(new LatLng(-23.684, 133.903), 4)); // Set listeners for click events. googleMap.setOnPolylineClickListener(this); googleMap.setOnPolygonClickListener(this); }
Kotlin
class PolyActivity : AppCompatActivity(), OnMapReadyCallback, OnPolylineClickListener, OnPolygonClickListener { override fun onCreate(savedInstanceState: Bundle?) { super.onCreate(savedInstanceState) // Retrieve the content view that renders the map. setContentView(R.layout.activity_maps) // Get the SupportMapFragment and request notification when the map is ready to be used. val mapFragment = supportFragmentManager .findFragmentById(R.id.map) as SupportMapFragment? mapFragment?.getMapAsync(this) } /** * Manipulates the map when it's available. * The API invokes this callback when the map is ready to be used. * This is where we can add markers or lines, add listeners or move the camera. * In this tutorial, we add polylines and polygons to represent routes and areas on the map. */ override fun onMapReady(googleMap: GoogleMap) { // Add polylines to the map. // Polylines are useful to show a route or some other connection between points. val polyline1 = googleMap.addPolyline(PolylineOptions() .clickable(true) .add( LatLng(-35.016, 143.321), LatLng(-34.747, 145.592), LatLng(-34.364, 147.891), LatLng(-33.501, 150.217), LatLng(-32.306, 149.248), LatLng(-32.491, 147.309))) // Position the map's camera near Alice Springs in the center of Australia, // and set the zoom factor so most of Australia shows on the screen. googleMap.moveCamera(CameraUpdateFactory.newLatLngZoom(LatLng(-23.684, 133.903), 4f)) // Set listeners for click events. googleMap.setOnPolylineClickListener(this) googleMap.setOnPolygonClickListener(this) }
मैप पर लाइन बनाने के लिए, पॉलीलाइन जोड़ना
Polyline, आपस में जुड़े लाइन सेगमेंट की एक सीरीज़ होती है. पॉलीलाइन, मैप पर रास्तों, पाथ या जगहों के बीच अन्य कनेक्शन दिखाने के लिए काम की होती हैं.
PolylineOptionsऑब्जेक्ट बनाएं और उसमें पॉइंट जोड़ें. हर पॉइंट, मैप पर किसी जगह को दिखाता है. इसे अक्षांश और देशांतर की वैल्यू वालेLatLngऑब्जेक्ट से तय किया जाता है. नीचे दिए गए कोड के सैंपल से, छह पॉइंट वाली एक पॉलीलाइन बनती है.मैप में पॉलीलाइन जोड़ने के लिए,
GoogleMap.addPolyline()पर कॉल करें.Java
Polyline polyline1 = googleMap.addPolyline(new PolylineOptions() .clickable(true) .add( new LatLng(-35.016, 143.321), new LatLng(-34.747, 145.592), new LatLng(-34.364, 147.891), new LatLng(-33.501, 150.217), new LatLng(-32.306, 149.248), new LatLng(-32.491, 147.309)));
Kotlin
val polyline1 = googleMap.addPolyline(PolylineOptions() .clickable(true) .add( LatLng(-35.016, 143.321), LatLng(-34.747, 145.592), LatLng(-34.364, 147.891), LatLng(-33.501, 150.217), LatLng(-32.306, 149.248), LatLng(-32.491, 147.309)))
अगर आपको पॉलीलाइन पर क्लिक इवेंट मैनेज करने हैं, तो पॉलीलाइन के clickable विकल्प को true पर सेट करें. इस ट्यूटोरियल में, इवेंट हैंडलिंग के बारे में ज़्यादा जानकारी बाद में दी गई है.
किसी पॉलीलाइन के साथ मनमुताबिक डेटा सेव करना
पॉलीलाइन और अन्य ज्यामिति ऑब्जेक्ट के साथ, किसी भी डेटा ऑब्जेक्ट को सेव किया जा सकता है.
पॉलीलाइन के साथ डेटा ऑब्जेक्ट को सेव करने के लिए,
Polyline.setTag()को कॉल करें. यहां दिए गए कोड में, आर्बिट्ररी टैग (A) के बारे में बताया गया है. यह एक तरह की पॉलीलाइन को दिखाता है.Java
Polyline polyline1 = googleMap.addPolyline(new PolylineOptions()
    .clickable(true)
    .add(
            new LatLng(-35.016, 143.321),
            new LatLng(-34.747, 145.592),
            new LatLng(-34.364, 147.891),
            new LatLng(-33.501, 150.217),
            new LatLng(-32.306, 149.248),
            new LatLng(-32.491, 147.309)));
// Store a data object with the polyline, used here to indicate an arbitrary type.
polyline1.setTag("A");
Kotlin
val polyline1 = googleMap.addPolyline(PolylineOptions()
.clickable(true)
.add(
    LatLng(-35.016, 143.321),
    LatLng(-34.747, 145.592),
    LatLng(-34.364, 147.891),
    LatLng(-33.501, 150.217),
    LatLng(-32.306, 149.248),
    LatLng(-32.491, 147.309)))
// Store a data object with the polyline, used here to indicate an arbitrary type.
polyline1.tag = "A
Polyline.getTag()का इस्तेमाल करके डेटा वापस पाएं. इसके बारे में अगले सेक्शन में बताया गया है.
अपनी पॉलीलाइन में कस्टम स्टाइलिंग जोड़ना
PolylineOptions ऑब्जेक्ट में, स्टाइलिंग की अलग-अलग प्रॉपर्टी तय की जा सकती हैं. स्टाइलिंग के विकल्पों में स्ट्रोक का रंग, स्ट्रोक की चौड़ाई, स्ट्रोक का पैटर्न, जॉइंट टाइप, और शुरू और खत्म होने वाले कैप शामिल हैं. किसी प्रॉपर्टी की वैल्यू न देने पर, एपीआई उस प्रॉपर्टी के लिए डिफ़ॉल्ट वैल्यू का इस्तेमाल करता है.
नीचे दिए गए कोड में, लाइन के आखिर में गोल कैप लगाया गया है. साथ ही, पॉलीलाइन के टाइप के हिसाब से अलग-अलग स्टार्ट कैप लगाए गए हैं. यहां टाइप, पॉलीलाइन के डेटा ऑब्जेक्ट में सेव की गई कोई प्रॉपर्टी है. इस सैंपल में स्ट्रोक की चौड़ाई, स्ट्रोक का रंग, और जॉइंट टाइप भी बताया गया है:
Java
private static final int COLOR_BLACK_ARGB = 0xff000000; private static final int POLYLINE_STROKE_WIDTH_PX = 12; /** * Styles the polyline, based on type. * @param polyline The polyline object that needs styling. */ private void stylePolyline(Polyline polyline) { String type = ""; // Get the data object stored with the polyline. if (polyline.getTag() != null) { type = polyline.getTag().toString(); } switch (type) { // If no type is given, allow the API to use the default. case "A": // Use a custom bitmap as the cap at the start of the line. polyline.setStartCap( new CustomCap( BitmapDescriptorFactory.fromResource(R.drawable.ic_arrow), 10)); break; case "B": // Use a round cap at the start of the line. polyline.setStartCap(new RoundCap()); break; } polyline.setEndCap(new RoundCap()); polyline.setWidth(POLYLINE_STROKE_WIDTH_PX); polyline.setColor(COLOR_BLACK_ARGB); polyline.setJointType(JointType.ROUND); }
Kotlin
private val COLOR_BLACK_ARGB = -0x1000000 private val POLYLINE_STROKE_WIDTH_PX = 12 /** * Styles the polyline, based on type. * @param polyline The polyline object that needs styling. */ private fun stylePolyline(polyline: Polyline) { // Get the data object stored with the polyline. val type = polyline.tag?.toString() ?: "" when (type) { "A" -> { // Use a custom bitmap as the cap at the start of the line. polyline.startCap = CustomCap( BitmapDescriptorFactory.fromResource(R.drawable.ic_arrow), 10f) } "B" -> { // Use a round cap at the start of the line. polyline.startCap = RoundCap() } } polyline.endCap = RoundCap() polyline.width = POLYLINE_STROKE_WIDTH_PX.toFloat() polyline.color = COLOR_BLACK_ARGB polyline.jointType = JointType.ROUND }
ऊपर दिए गए कोड में, टाइप A पॉलीलाइन के स्टार्ट कैप के लिए कस्टम बिटमैप तय किया गया है. साथ ही, इसमें स्ट्रोक की चौड़ाई का रेफ़रंस 10 पिक्सल तय किया गया है. एपीआई, स्ट्रोक की चौड़ाई के हिसाब से बिटमैप को स्केल करता है. रेफ़रंस स्ट्रोक की चौड़ाई तय करते समय, उस चौड़ाई की जानकारी दें जिसका इस्तेमाल आपने बिटमैप इमेज को डिज़ाइन करते समय किया था. साथ ही, इमेज के ओरिजनल डाइमेंशन की जानकारी भी दें. अहम जानकारी: इमेज एडिटर में अपनी बिटमैप इमेज को 100% ज़ूम करके खोलें. इसके बाद, इमेज के हिसाब से लाइन स्ट्रोक की मनचाही चौड़ाई को प्लॉट करें.
लाइन कैप और आकृतियों को पसंद के मुताबिक बनाने के अन्य विकल्पों के बारे में ज़्यादा जानें.
पॉलीलाइन पर क्लिक इवेंट मैनेज करना
Polyline.setClickable()को कॉल करके, पॉलीलाइन को क्लिक करने लायक़ बनाएं. (डिफ़ॉल्ट रूप से, पॉलीलाइन पर क्लिक नहीं किया जा सकता. साथ ही, जब उपयोगकर्ता किसी पॉलीलाइन पर टैप करता है, तो आपके ऐप्लिकेशन को सूचना नहीं मिलेगी.)OnPolylineClickListenerइंटरफ़ेस लागू करें और मैप पर लिसनर सेट करने के लिए,GoogleMap.setOnPolylineClickListener()को कॉल करें:Java
public class PolyActivity extends AppCompatActivity implements OnMapReadyCallback, GoogleMap.OnPolylineClickListener, GoogleMap.OnPolygonClickListener { @Override protected void onCreate(Bundle savedInstanceState) { super.onCreate(savedInstanceState); // Retrieve the content view that renders the map. setContentView(R.layout.activity_maps); // Get the SupportMapFragment and request notification when the map is ready to be used. SupportMapFragment mapFragment = (SupportMapFragment) getSupportFragmentManager() .findFragmentById(R.id.map); mapFragment.getMapAsync(this); } /** * Manipulates the map when it's available. * The API invokes this callback when the map is ready to be used. * This is where we can add markers or lines, add listeners or move the camera. * In this tutorial, we add polylines and polygons to represent routes and areas on the map. */ @Override public void onMapReady(GoogleMap googleMap) { // Add polylines to the map. // Polylines are useful to show a route or some other connection between points. Polyline polyline1 = googleMap.addPolyline(new PolylineOptions() .clickable(true) .add( new LatLng(-35.016, 143.321), new LatLng(-34.747, 145.592), new LatLng(-34.364, 147.891), new LatLng(-33.501, 150.217), new LatLng(-32.306, 149.248), new LatLng(-32.491, 147.309))); // Position the map's camera near Alice Springs in the center of Australia, // and set the zoom factor so most of Australia shows on the screen. googleMap.moveCamera(CameraUpdateFactory.newLatLngZoom(new LatLng(-23.684, 133.903), 4)); // Set listeners for click events. googleMap.setOnPolylineClickListener(this); googleMap.setOnPolygonClickListener(this); }
Kotlin
class PolyActivity : AppCompatActivity(), OnMapReadyCallback, OnPolylineClickListener, OnPolygonClickListener { override fun onCreate(savedInstanceState: Bundle?) { super.onCreate(savedInstanceState) // Retrieve the content view that renders the map. setContentView(R.layout.activity_maps) // Get the SupportMapFragment and request notification when the map is ready to be used. val mapFragment = supportFragmentManager .findFragmentById(R.id.map) as SupportMapFragment? mapFragment?.getMapAsync(this) } /** * Manipulates the map when it's available. * The API invokes this callback when the map is ready to be used. * This is where we can add markers or lines, add listeners or move the camera. * In this tutorial, we add polylines and polygons to represent routes and areas on the map. */ override fun onMapReady(googleMap: GoogleMap) { // Add polylines to the map. // Polylines are useful to show a route or some other connection between points. val polyline1 = googleMap.addPolyline(PolylineOptions() .clickable(true) .add( LatLng(-35.016, 143.321), LatLng(-34.747, 145.592), LatLng(-34.364, 147.891), LatLng(-33.501, 150.217), LatLng(-32.306, 149.248), LatLng(-32.491, 147.309))) // Position the map's camera near Alice Springs in the center of Australia, // and set the zoom factor so most of Australia shows on the screen. googleMap.moveCamera(CameraUpdateFactory.newLatLngZoom(LatLng(-23.684, 133.903), 4f)) // Set listeners for click events. googleMap.setOnPolylineClickListener(this) googleMap.setOnPolygonClickListener(this) }
onPolylineClick()कॉलबैक के तरीके को बदलें. यहां दिए गए उदाहरण में, उपयोगकर्ता के पॉलीलाइन पर क्लिक करने पर, लाइन के स्ट्रोक पैटर्न को सॉलिड और डॉटेड के बीच बदल दिया जाता है:Java
private static final int PATTERN_GAP_LENGTH_PX = 20; private static final PatternItem DOT = new Dot(); private static final PatternItem GAP = new Gap(PATTERN_GAP_LENGTH_PX); // Create a stroke pattern of a gap followed by a dot. private static final List<PatternItem> PATTERN_POLYLINE_DOTTED = Arrays.asList(GAP, DOT); /** * Listens for clicks on a polyline. * @param polyline The polyline object that the user has clicked. */ @Override public void onPolylineClick(Polyline polyline) { // Flip from solid stroke to dotted stroke pattern. if ((polyline.getPattern() == null) || (!polyline.getPattern().contains(DOT))) { polyline.setPattern(PATTERN_POLYLINE_DOTTED); } else { // The default pattern is a solid stroke. polyline.setPattern(null); } Toast.makeText(this, "Route type " + polyline.getTag().toString(), Toast.LENGTH_SHORT).show(); }
Kotlin
private val PATTERN_GAP_LENGTH_PX = 20 private val DOT: PatternItem = Dot() private val GAP: PatternItem = Gap(PATTERN_GAP_LENGTH_PX.toFloat()) // Create a stroke pattern of a gap followed by a dot. private val PATTERN_POLYLINE_DOTTED = listOf(GAP, DOT) /** * Listens for clicks on a polyline. * @param polyline The polyline object that the user has clicked. */ override fun onPolylineClick(polyline: Polyline) { // Flip from solid stroke to dotted stroke pattern. if (polyline.pattern == null || !polyline.pattern!!.contains(DOT)) { polyline.pattern = PATTERN_POLYLINE_DOTTED } else { // The default pattern is a solid stroke. polyline.pattern = null } Toast.makeText(this, "Route type " + polyline.tag.toString(), Toast.LENGTH_SHORT).show() }
मैप पर इलाकों को दिखाने के लिए पॉलीगॉन जोड़ना
Polygon एक ऐसा आकार होता है जिसमें क्रम से लगाए गए कोऑर्डिनेट की एक सीरीज़ होती है. यह Polyline की तरह ही होता है. इन दोनों में यह अंतर है कि पॉलीगॉन, एक बंद जगह को दिखाता है. इसमें अंदर का हिस्सा भरा जा सकता है. वहीं, पॉलीलाइन का कोई भी हिस्सा बंद नहीं होता.
PolygonOptionsऑब्जेक्ट बनाएं और उसमें पॉइंट जोड़ें. हर पॉइंट, मैप पर किसी जगह को दिखाता है. इसे अक्षांश और देशांतर की वैल्यू वालेLatLngऑब्जेक्ट से तय किया जाता है. यहां दिए गए कोड के सैंपल में, चार पॉइंट वाला पॉलीगॉन बनाया गया है.Polygon.setClickable()को कॉल करके, पॉलीगॉन को क्लिक करने लायक़ बनाएं. (डिफ़ॉल्ट रूप से, पॉलीगॉन पर क्लिक नहीं किया जा सकता. साथ ही, जब उपयोगकर्ता किसी पॉलीगॉन पर टैप करेगा, तब आपके ऐप्लिकेशन को सूचना नहीं मिलेगी.) पॉलीगॉन पर क्लिक इवेंट को हैंडल करने का तरीका, पॉलीलाइन पर इवेंट को हैंडल करने के तरीके जैसा ही होता है. इसके बारे में इस ट्यूटोरियल में पहले बताया गया है.मैप में पॉलीगॉन जोड़ने के लिए,
GoogleMap.addPolygon()पर कॉल करें.पॉलीगॉन के साथ डेटा ऑब्जेक्ट को सेव करने के लिए,
Polygon.setTag()को कॉल करें. यहां दिए गए कोड में, पॉलीगॉन के लिए एक आर्बिट्ररी टाइप (alpha) तय किया गया है.Java
// Add polygons to indicate areas on the map. Polygon polygon1 = googleMap.addPolygon(new PolygonOptions() .clickable(true) .add( new LatLng(-27.457, 153.040), new LatLng(-33.852, 151.211), new LatLng(-37.813, 144.962), new LatLng(-34.928, 138.599))); // Store a data object with the polygon, used here to indicate an arbitrary type. polygon1.setTag("alpha");
Kotlin
// Add polygons to indicate areas on the map. val polygon1 = googleMap.addPolygon(PolygonOptions() .clickable(true) .add( LatLng(-27.457, 153.040), LatLng(-33.852, 151.211), LatLng(-37.813, 144.962), LatLng(-34.928, 138.599))) // Store a data object with the polygon, used here to indicate an arbitrary type. polygon1.tag = "alpha" // Style the polygon.
अपने पॉलीगॉन में कस्टम स्टाइलिंग जोड़ना
PolygonOptions ऑब्जेक्ट में, स्टाइलिंग की कई प्रॉपर्टी तय की जा सकती हैं. स्टाइलिंग के विकल्पों में स्ट्रोक का रंग, स्ट्रोक की चौड़ाई, स्ट्रोक का पैटर्न, स्ट्रोक के जॉइंट टाइप, और रंग भरने का विकल्प शामिल है. किसी प्रॉपर्टी की वैल्यू न देने पर, एपीआई उस प्रॉपर्टी के लिए डिफ़ॉल्ट वैल्यू का इस्तेमाल करता है.
यहां दिए गए कोड में, पॉलीगॉन के type के हिसाब से खास रंग और स्ट्रोक पैटर्न लागू किए जाते हैं. टाइप, पॉलीगॉन के डेटा ऑब्जेक्ट में सेव की गई कोई प्रॉपर्टी होती है:
Java
private static final int COLOR_WHITE_ARGB = 0xffffffff; private static final int COLOR_DARK_GREEN_ARGB = 0xff388E3C; private static final int COLOR_LIGHT_GREEN_ARGB = 0xff81C784; private static final int COLOR_DARK_ORANGE_ARGB = 0xffF57F17; private static final int COLOR_LIGHT_ORANGE_ARGB = 0xffF9A825; private static final int POLYGON_STROKE_WIDTH_PX = 8; private static final int PATTERN_DASH_LENGTH_PX = 20; private static final PatternItem DASH = new Dash(PATTERN_DASH_LENGTH_PX); // Create a stroke pattern of a gap followed by a dash. private static final List<PatternItem> PATTERN_POLYGON_ALPHA = Arrays.asList(GAP, DASH); // Create a stroke pattern of a dot followed by a gap, a dash, and another gap. private static final List<PatternItem> PATTERN_POLYGON_BETA = Arrays.asList(DOT, GAP, DASH, GAP); /** * Styles the polygon, based on type. * @param polygon The polygon object that needs styling. */ private void stylePolygon(Polygon polygon) { String type = ""; // Get the data object stored with the polygon. if (polygon.getTag() != null) { type = polygon.getTag().toString(); } List<PatternItem> pattern = null; int strokeColor = COLOR_BLACK_ARGB; int fillColor = COLOR_WHITE_ARGB; switch (type) { // If no type is given, allow the API to use the default. case "alpha": // Apply a stroke pattern to render a dashed line, and define colors. pattern = PATTERN_POLYGON_ALPHA; strokeColor = COLOR_DARK_GREEN_ARGB; fillColor = COLOR_LIGHT_GREEN_ARGB; break; case "beta": // Apply a stroke pattern to render a line of dots and dashes, and define colors. pattern = PATTERN_POLYGON_BETA; strokeColor = COLOR_DARK_ORANGE_ARGB; fillColor = COLOR_LIGHT_ORANGE_ARGB; break; } polygon.setStrokePattern(pattern); polygon.setStrokeWidth(POLYGON_STROKE_WIDTH_PX); polygon.setStrokeColor(strokeColor); polygon.setFillColor(fillColor); }
Kotlin
private val COLOR_WHITE_ARGB = -0x1 private val COLOR_DARK_GREEN_ARGB = -0xc771c4 private val COLOR_LIGHT_GREEN_ARGB = -0x7e387c private val COLOR_DARK_ORANGE_ARGB = -0xa80e9 private val COLOR_LIGHT_ORANGE_ARGB = -0x657db private val POLYGON_STROKE_WIDTH_PX = 8 private val PATTERN_DASH_LENGTH_PX = 20 private val DASH: PatternItem = Dash(PATTERN_DASH_LENGTH_PX.toFloat()) // Create a stroke pattern of a gap followed by a dash. private val PATTERN_POLYGON_ALPHA = listOf(GAP, DASH) // Create a stroke pattern of a dot followed by a gap, a dash, and another gap. private val PATTERN_POLYGON_BETA = listOf(DOT, GAP, DASH, GAP) /** * Styles the polygon, based on type. * @param polygon The polygon object that needs styling. */ private fun stylePolygon(polygon: Polygon) { // Get the data object stored with the polygon. val type = polygon.tag?.toString() ?: "" var pattern: List<PatternItem>? = null var strokeColor = COLOR_BLACK_ARGB var fillColor = COLOR_WHITE_ARGB when (type) { "alpha" -> { // Apply a stroke pattern to render a dashed line, and define colors. pattern = PATTERN_POLYGON_ALPHA strokeColor = COLOR_DARK_GREEN_ARGB fillColor = COLOR_LIGHT_GREEN_ARGB } "beta" -> { // Apply a stroke pattern to render a line of dots and dashes, and define colors. pattern = PATTERN_POLYGON_BETA strokeColor = COLOR_DARK_ORANGE_ARGB fillColor = COLOR_LIGHT_ORANGE_ARGB } } polygon.strokePattern = pattern polygon.strokeWidth = POLYGON_STROKE_WIDTH_PX.toFloat() polygon.strokeColor = strokeColor polygon.fillColor = fillColor }
स्ट्रोक पैटर्न और आकृतियों को पसंद के मुताबिक बनाने के अन्य विकल्पों के बारे में ज़्यादा जानें.
अगले चरण
Circle ऑब्जेक्ट के बारे में जानें. सर्कल, पॉलीगॉन की तरह होते हैं. हालांकि, इनमें ऐसी प्रॉपर्टी होती हैं जो सर्कल के आकार को दिखाती हैं.