

במדריך הזה מוסבר איך להוסיף מפת Google לאפליקציה ל-Android, ואיך להשתמש בקווים פוליגוניים ובפוליגונים כדי לייצג מסלולים ואזורים במפה.
פועלים לפי ההדרכה כדי ליצור אפליקציה ל-Android באמצעות ה-SDK של מפות ל-Android. סביבת הפיתוח המומלצת היא Android Studio.
קבל את הקוד
משכפלים או מורידים את המאגר Google Maps Android API v2 Samples מ-GitHub.
הצגת גרסת ה-Java של הפעילות:
    // Copyright 2020 Google LLC
//
// Licensed under the Apache License, Version 2.0 (the "License");
// you may not use this file except in compliance with the License.
// You may obtain a copy of the License at
//
//      http://www.apache.org/licenses/LICENSE-2.0
//
// Unless required by applicable law or agreed to in writing, software
// distributed under the License is distributed on an "AS IS" BASIS,
// WITHOUT WARRANTIES OR CONDITIONS OF ANY KIND, either express or implied.
// See the License for the specific language governing permissions and
// limitations under the License.

package com.example.polygons;

import android.os.Bundle;
import android.widget.Toast;
import androidx.appcompat.app.AppCompatActivity;
import com.google.android.gms.maps.CameraUpdateFactory;
import com.google.android.gms.maps.GoogleMap;
import com.google.android.gms.maps.OnMapReadyCallback;
import com.google.android.gms.maps.SupportMapFragment;
import com.google.android.gms.maps.model.BitmapDescriptorFactory;
import com.google.android.gms.maps.model.CustomCap;
import com.google.android.gms.maps.model.Dash;
import com.google.android.gms.maps.model.Dot;
import com.google.android.gms.maps.model.Gap;
import com.google.android.gms.maps.model.JointType;
import com.google.android.gms.maps.model.LatLng;
import com.google.android.gms.maps.model.PatternItem;
import com.google.android.gms.maps.model.Polygon;
import com.google.android.gms.maps.model.PolygonOptions;
import com.google.android.gms.maps.model.Polyline;
import com.google.android.gms.maps.model.PolylineOptions;
import com.google.android.gms.maps.model.RoundCap;
import java.util.Arrays;
import java.util.List;

/**
 * An activity that displays a Google map with polylines to represent paths or routes, and polygons
 * to represent areas.
 */
public class PolyActivity extends AppCompatActivity
        implements OnMapReadyCallback,
                GoogleMap.OnPolylineClickListener,
                GoogleMap.OnPolygonClickListener {

    @Override
    protected void onCreate(Bundle savedInstanceState) {
        super.onCreate(savedInstanceState);

        // Retrieve the content view that renders the map.
        setContentView(R.layout.activity_maps);

        // Get the SupportMapFragment and request notification when the map is ready to be used.
        SupportMapFragment mapFragment =
                (SupportMapFragment) getSupportFragmentManager().findFragmentById(R.id.map);
        mapFragment.getMapAsync(this);
    }


    /**
     * Manipulates the map when it's available. The API invokes this callback when the map is ready
     * to be used. This is where we can add markers or lines, add listeners or move the camera. In
     * this tutorial, we add polylines and polygons to represent routes and areas on the map.
     */
    @Override
    public void onMapReady(GoogleMap googleMap) {

        // Add polylines to the map.
        // Polylines are useful to show a route or some other connection between points.
        Polyline polyline1 =
                googleMap.addPolyline(
                        new PolylineOptions()
                                .clickable(true)
                                .add(
                                        new LatLng(-35.016, 143.321),
                                        new LatLng(-34.747, 145.592),
                                        new LatLng(-34.364, 147.891),
                                        new LatLng(-33.501, 150.217),
                                        new LatLng(-32.306, 149.248),
                                        new LatLng(-32.491, 147.309)));
        // Store a data object with the polyline, used here to indicate an arbitrary type.
        polyline1.setTag("A");
        // Style the polyline.
        stylePolyline(polyline1);

        Polyline polyline2 =
                googleMap.addPolyline(
                        new PolylineOptions()
                                .clickable(true)
                                .add(
                                        new LatLng(-29.501, 119.700),
                                        new LatLng(-27.456, 119.672),
                                        new LatLng(-25.971, 124.187),
                                        new LatLng(-28.081, 126.555),
                                        new LatLng(-28.848, 124.229),
                                        new LatLng(-28.215, 123.938)));
        polyline2.setTag("B");
        stylePolyline(polyline2);

        // Add polygons to indicate areas on the map.
        Polygon polygon1 =
                googleMap.addPolygon(
                        new PolygonOptions()
                                .clickable(true)
                                .add(
                                        new LatLng(-27.457, 153.040),
                                        new LatLng(-33.852, 151.211),
                                        new LatLng(-37.813, 144.962),
                                        new LatLng(-34.928, 138.599)));
        // Store a data object with the polygon, used here to indicate an arbitrary type.
        polygon1.setTag("alpha");
        // Style the polygon.
        stylePolygon(polygon1);

        Polygon polygon2 =
                googleMap.addPolygon(
                        new PolygonOptions()
                                .clickable(true)
                                .add(
                                        new LatLng(-31.673, 128.892),
                                        new LatLng(-31.952, 115.857),
                                        new LatLng(-17.785, 122.258),
                                        new LatLng(-12.4258, 130.7932)));
        polygon2.setTag("beta");
        stylePolygon(polygon2);

        // Position the map's camera near Alice Springs in the center of Australia,
        // and set the zoom factor so most of Australia shows on the screen.
        googleMap.moveCamera(CameraUpdateFactory.newLatLngZoom(new LatLng(-23.684, 133.903), 4));

        // Set listeners for click events.
        googleMap.setOnPolylineClickListener(this);
        googleMap.setOnPolygonClickListener(this);
    }


    private static final int COLOR_BLACK_ARGB = 0xff000000;
    private static final int POLYLINE_STROKE_WIDTH_PX = 12;

    /**
     * Styles the polyline, based on type.
     *
     * @param polyline The polyline object that needs styling.
     */
    private void stylePolyline(Polyline polyline) {
        String type = "";
        // Get the data object stored with the polyline.
        if (polyline.getTag() != null) {
            type = polyline.getTag().toString();
        }

        switch (type) {
            // If no type is given, allow the API to use the default.
            case "A":
                // Use a custom bitmap as the cap at the start of the line.
                polyline.setStartCap(
                        new CustomCap(
                                BitmapDescriptorFactory.fromResource(R.drawable.ic_arrow), 10));
                break;
            case "B":
                // Use a round cap at the start of the line.
                polyline.setStartCap(new RoundCap());
                break;
        }

        polyline.setEndCap(new RoundCap());
        polyline.setWidth(POLYLINE_STROKE_WIDTH_PX);
        polyline.setColor(COLOR_BLACK_ARGB);
        polyline.setJointType(JointType.ROUND);
    }


    private static final int PATTERN_GAP_LENGTH_PX = 20;
    private static final PatternItem DOT = new Dot();
    private static final PatternItem GAP = new Gap(PATTERN_GAP_LENGTH_PX);

    // Create a stroke pattern of a gap followed by a dot.
    private static final List<PatternItem> PATTERN_POLYLINE_DOTTED = Arrays.asList(GAP, DOT);

    /**
     * Listens for clicks on a polyline.
     *
     * @param polyline The polyline object that the user has clicked.
     */
    @Override
    public void onPolylineClick(Polyline polyline) {
        // Flip from solid stroke to dotted stroke pattern.
        if ((polyline.getPattern() == null) || (!polyline.getPattern().contains(DOT))) {
            polyline.setPattern(PATTERN_POLYLINE_DOTTED);
        } else {
            // The default pattern is a solid stroke.
            polyline.setPattern(null);
        }

        Toast.makeText(this, "Route type " + polyline.getTag().toString(), Toast.LENGTH_SHORT)
                .show();
    }


    /**
     * Listens for clicks on a polygon.
     *
     * @param polygon The polygon object that the user has clicked.
     */
    @Override
    public void onPolygonClick(Polygon polygon) {
        // Flip the values of the red, green, and blue components of the polygon's color.
        int color = polygon.getStrokeColor() ^ 0x00ffffff;
        polygon.setStrokeColor(color);
        color = polygon.getFillColor() ^ 0x00ffffff;
        polygon.setFillColor(color);

        Toast.makeText(this, "Area type " + polygon.getTag().toString(), Toast.LENGTH_SHORT).show();
    }

    private static final int COLOR_WHITE_ARGB = 0xffffffff;
    private static final int COLOR_DARK_GREEN_ARGB = 0xff388E3C;
    private static final int COLOR_LIGHT_GREEN_ARGB = 0xff81C784;
    private static final int COLOR_DARK_ORANGE_ARGB = 0xffF57F17;
    private static final int COLOR_LIGHT_ORANGE_ARGB = 0xffF9A825;

    private static final int POLYGON_STROKE_WIDTH_PX = 8;
    private static final int PATTERN_DASH_LENGTH_PX = 20;
    private static final PatternItem DASH = new Dash(PATTERN_DASH_LENGTH_PX);

    // Create a stroke pattern of a gap followed by a dash.
    private static final List<PatternItem> PATTERN_POLYGON_ALPHA = Arrays.asList(GAP, DASH);

    // Create a stroke pattern of a dot followed by a gap, a dash, and another gap.
    private static final List<PatternItem> PATTERN_POLYGON_BETA =
            Arrays.asList(DOT, GAP, DASH, GAP);

    /**
     * Styles the polygon, based on type.
     *
     * @param polygon The polygon object that needs styling.
     */
    private void stylePolygon(Polygon polygon) {
        String type = "";
        // Get the data object stored with the polygon.
        if (polygon.getTag() != null) {
            type = polygon.getTag().toString();
        }

        List<PatternItem> pattern = null;
        int strokeColor = COLOR_BLACK_ARGB;
        int fillColor = COLOR_WHITE_ARGB;

        switch (type) {
            // If no type is given, allow the API to use the default.
            case "alpha":
                // Apply a stroke pattern to render a dashed line, and define colors.
                pattern = PATTERN_POLYGON_ALPHA;
                strokeColor = COLOR_DARK_GREEN_ARGB;
                fillColor = COLOR_LIGHT_GREEN_ARGB;
                break;
            case "beta":
                // Apply a stroke pattern to render a line of dots and dashes, and define colors.
                pattern = PATTERN_POLYGON_BETA;
                strokeColor = COLOR_DARK_ORANGE_ARGB;
                fillColor = COLOR_LIGHT_ORANGE_ARGB;
                break;
        }

        polygon.setStrokePattern(pattern);
        polygon.setStrokeWidth(POLYGON_STROKE_WIDTH_PX);
        polygon.setStrokeColor(strokeColor);
        polygon.setFillColor(fillColor);
    }
}
צפייה בגרסת Kotlin של הפעילות:
    // Copyright 2026 Google LLC
//
// Licensed under the Apache License, Version 2.0 (the "License");
// you may not use this file except in compliance with the License.
// You may obtain a copy of the License at
//
//      http://www.apache.org/licenses/LICENSE-2.0
//
// Unless required by applicable law or agreed to in writing, software
// distributed under the License is distributed on an "AS IS" BASIS,
// WITHOUT WARRANTIES OR CONDITIONS OF ANY KIND, either express or implied.
// See the License for the specific language governing permissions and
// limitations under the License.
package com.example.polygons

import android.os.Bundle
import android.widget.Toast
import androidx.appcompat.app.AppCompatActivity
import com.google.android.gms.maps.CameraUpdateFactory
import com.google.android.gms.maps.GoogleMap
import com.google.android.gms.maps.GoogleMap.OnPolygonClickListener
import com.google.android.gms.maps.GoogleMap.OnPolylineClickListener
import com.google.android.gms.maps.OnMapReadyCallback
import com.google.android.gms.maps.SupportMapFragment
import com.google.android.gms.maps.model.BitmapDescriptorFactory
import com.google.android.gms.maps.model.CustomCap
import com.google.android.gms.maps.model.Dash
import com.google.android.gms.maps.model.Dot
import com.google.android.gms.maps.model.Gap
import com.google.android.gms.maps.model.JointType
import com.google.android.gms.maps.model.LatLng
import com.google.android.gms.maps.model.PatternItem
import com.google.android.gms.maps.model.Polygon
import com.google.android.gms.maps.model.PolygonOptions
import com.google.android.gms.maps.model.Polyline
import com.google.android.gms.maps.model.PolylineOptions
import com.google.android.gms.maps.model.RoundCap

/**
 * An activity that displays a Google map with polylines to represent paths or routes,
 * and polygons to represent areas.
 */
class PolyActivity :
    AppCompatActivity(),
    OnMapReadyCallback,
    OnPolylineClickListener,
    OnPolygonClickListener {

    override fun onCreate(savedInstanceState: Bundle?) {
        super.onCreate(savedInstanceState)

        // Retrieve the content view that renders the map.
        setContentView(R.layout.activity_maps)

        // Get the SupportMapFragment and request notification when the map is ready to be used.
        val mapFragment = supportFragmentManager
            .findFragmentById(R.id.map) as SupportMapFragment?
        mapFragment?.getMapAsync(this)
    }

    /**
     * Manipulates the map when it's available.
     * The API invokes this callback when the map is ready to be used.
     * This is where we can add markers or lines, add listeners or move the camera.
     * In this tutorial, we add polylines and polygons to represent routes and areas on the map.
     */
    override fun onMapReady(googleMap: GoogleMap) {
        // Add polylines to the map.
        // Polylines are useful to show a route or some other connection between points.
        val polyline1 = googleMap.addPolyline(
            PolylineOptions()
                .clickable(true)
                .add(
                    LatLng(-35.016, 143.321),
                    LatLng(-34.747, 145.592),
                    LatLng(-34.364, 147.891),
                    LatLng(-33.501, 150.217),
                    LatLng(-32.306, 149.248),
                    LatLng(-32.491, 147.309),
                ),
        )
        // Store a data object with the polyline, used here to indicate an arbitrary type.
        polyline1.tag = "A"
        // Style the polyline.
        stylePolyline(polyline1)

        val polyline2 = googleMap.addPolyline(
            PolylineOptions()
                .clickable(true)
                .add(
                    LatLng(-29.501, 119.700),
                    LatLng(-27.456, 119.672),
                    LatLng(-25.971, 124.187),
                    LatLng(-28.081, 126.555),
                    LatLng(-28.848, 124.229),
                    LatLng(-28.215, 123.938),
                ),
        )
        polyline2.tag = "B"
        stylePolyline(polyline2)

        // Add polygons to indicate areas on the map.
        val polygon1 = googleMap.addPolygon(
            PolygonOptions()
                .clickable(true)
                .add(
                    LatLng(-27.457, 153.040),
                    LatLng(-33.852, 151.211),
                    LatLng(-37.813, 144.962),
                    LatLng(-34.928, 138.599),
                ),
        )
        // Store a data object with the polygon, used here to indicate an arbitrary type.
        polygon1.tag = "alpha"
        // Style the polygon.
        stylePolygon(polygon1)

        val polygon2 = googleMap.addPolygon(
            PolygonOptions()
                .clickable(true)
                .add(
                    LatLng(-31.673, 128.892),
                    LatLng(-31.952, 115.857),
                    LatLng(-17.785, 122.258),
                    LatLng(-12.4258, 130.7932),
                ),
        )
        polygon2.tag = "beta"
        stylePolygon(polygon2)

        // Position the map's camera near Alice Springs in the center of Australia,
        // and set the zoom factor so most of Australia shows on the screen.
        googleMap.moveCamera(CameraUpdateFactory.newLatLngZoom(LatLng(-23.684, 133.903), 4f))

        // Set listeners for click events.
        googleMap.setOnPolylineClickListener(this)
        googleMap.setOnPolygonClickListener(this)
    }

    private val COLOR_BLACK_ARGB = -0x1000000
    private val POLYLINE_STROKE_WIDTH_PX = 12

    /**
     * Styles the polyline, based on type.
     * @param polyline The polyline object that needs styling.
     */
    private fun stylePolyline(polyline: Polyline) {
        // Get the data object stored with the polyline.
        val type = polyline.tag?.toString() ?: ""
        when (type) {
            "A" -> {
                // Use a custom bitmap as the cap at the start of the line.
                polyline.startCap = CustomCap(BitmapDescriptorFactory.fromResource(R.drawable.ic_arrow), 10f)
            }

            "B" -> {
                // Use a round cap at the start of the line.
                polyline.startCap = RoundCap()
            }
        }
        polyline.endCap = RoundCap()
        polyline.width = POLYLINE_STROKE_WIDTH_PX.toFloat()
        polyline.color = COLOR_BLACK_ARGB
        polyline.jointType = JointType.ROUND
    }

    private val PATTERN_GAP_LENGTH_PX = 20
    private val DOT: PatternItem = Dot()
    private val GAP: PatternItem = Gap(PATTERN_GAP_LENGTH_PX.toFloat())

    // Create a stroke pattern of a gap followed by a dot.
    private val PATTERN_POLYLINE_DOTTED = listOf(GAP, DOT)

    /**
     * Listens for clicks on a polyline.
     * @param polyline The polyline object that the user has clicked.
     */
    override fun onPolylineClick(polyline: Polyline) {
        // Flip from solid stroke to dotted stroke pattern.
        if (polyline.pattern == null || !polyline.pattern!!.contains(DOT)) {
            polyline.pattern = PATTERN_POLYLINE_DOTTED
        } else {
            // The default pattern is a solid stroke.
            polyline.pattern = null
        }
        Toast.makeText(
            this,
            "Route type ${polyline.tag}",
            Toast.LENGTH_SHORT,
        ).show()
    }

    /**
     * Listens for clicks on a polygon.
     * @param polygon The polygon object that the user has clicked.
     */
    override fun onPolygonClick(polygon: Polygon) {
        // Flip the values of the red, green, and blue components of the polygon's color.
        var color = polygon.strokeColor xor 0x00ffffff
        polygon.strokeColor = color
        color = polygon.fillColor xor 0x00ffffff
        polygon.fillColor = color
        Toast.makeText(this, "Area type ${polygon.tag?.toString()}", Toast.LENGTH_SHORT).show()
    }

    private val COLOR_WHITE_ARGB = -0x1
    private val COLOR_DARK_GREEN_ARGB = -0xc771c4
    private val COLOR_LIGHT_GREEN_ARGB = -0x7e387c
    private val COLOR_DARK_ORANGE_ARGB = -0xa80e9
    private val COLOR_LIGHT_ORANGE_ARGB = -0x657db
    private val POLYGON_STROKE_WIDTH_PX = 8
    private val PATTERN_DASH_LENGTH_PX = 20

    private val DASH: PatternItem = Dash(PATTERN_DASH_LENGTH_PX.toFloat())

    // Create a stroke pattern of a gap followed by a dash.
    private val PATTERN_POLYGON_ALPHA = listOf(GAP, DASH)

    // Create a stroke pattern of a dot followed by a gap, a dash, and another gap.
    private val PATTERN_POLYGON_BETA = listOf(DOT, GAP, DASH, GAP)

    /**
     * Styles the polygon, based on type.
     * @param polygon The polygon object that needs styling.
     */
    private fun stylePolygon(polygon: Polygon) {
        // Get the data object stored with the polygon.
        val type = polygon.tag?.toString() ?: ""
        var pattern: List<PatternItem>? = null
        var strokeColor = COLOR_BLACK_ARGB
        var fillColor = COLOR_WHITE_ARGB
        when (type) {
            "alpha" -> {
                // Apply a stroke pattern to render a dashed line, and define colors.
                pattern = PATTERN_POLYGON_ALPHA
                strokeColor = COLOR_DARK_GREEN_ARGB
                fillColor = COLOR_LIGHT_GREEN_ARGB
            }

            "beta" -> {
                // Apply a stroke pattern to render a line of dots and dashes, and define colors.
                pattern = PATTERN_POLYGON_BETA
                strokeColor = COLOR_DARK_ORANGE_ARGB
                fillColor = COLOR_LIGHT_ORANGE_ARGB
            }
        }
        polygon.strokePattern = pattern
        polygon.strokeWidth = POLYGON_STROKE_WIDTH_PX.toFloat()
        polygon.strokeColor = strokeColor
        polygon.fillColor = fillColor
    }
}
הגדרת פרויקט הפיתוח
כדי ליצור את פרויקט המדריך ב-Android Studio, פועלים לפי השלבים הבאים.
- מורידים ומתקינים את Android Studio.
- מוסיפים את החבילה Google Play Services ל-Android Studio.
- משכפלים או מורידים את מאגר הדוגמאות של Google Maps Android API v2, אם לא עשיתם את זה כשהתחלתם לקרוא את המדריך הזה.
מייבאים את פרויקט המדריך:
- ב-Android Studio, בוחרים באפשרות File > New > Import Project (קובץ > חדש > ייבוא פרויקט).
- עוברים למיקום שבו שמרתם את מאגר הדוגמאות של Google Maps Android API v2 אחרי שהורדתם אותו.
- הפרויקט Polygons נמצא במיקום הזה:
PATH-TO-SAVED-REPO/android-samples/tutorials/java/Polygons(Java) או
PATH-TO-SAVED-REPO/android-samples/tutorials/kotlin/Polygons(Kotlin) - בוחרים את ספריית הפרויקט ולוחצים על Open. עכשיו Android Studio יוצר את הפרויקט באמצעות כלי ה-build של Gradle.
הפעלת ממשקי ה-API הנדרשים וקבלת מפתח API
כדי להשלים את המדריך הזה, אתם צריכים פרויקט ב-Google Cloud שבו מופעלים ממשקי ה-API הנדרשים, ומפתח API שמורשה להשתמש ב-SDK של מפות ל-Android. לפרטים נוספים:
הוספת מפתח ה-API לאפליקציה
- פותחים את הקובץ
local.propertiesשל הפרויקט. מוסיפים את המחרוזת הבאה ומחליפים את הערך
YOUR_API_KEYבערך של מפתח ה-API:MAPS_API_KEY=YOUR_API_KEYכשיוצרים את האפליקציה, הפלאגין Secrets Gradle ל-Android מעתיק את מפתח ה-API והופך אותו לזמין כמשתנה build במניפסט של Android, כמו שמוסבר בהמשך.
יוצרים ומריצים את האפליקציה
כדי ליצור ולהפעיל את האפליקציה:
מחברים מכשיר Android למחשב. פועלים לפי ההוראות כדי להפעיל את אפשרויות למפתחים במכשיר Android ולהגדיר את המערכת לזיהוי המכשיר.
לחלופין, אתם יכולים להשתמש ב-Android Virtual Device (AVD) Manager כדי להגדיר מכשיר וירטואלי. כשבוחרים אמולטור, חשוב לבחור קובץ אימג' שכולל את Google APIs. לפרטים נוספים, קראו את המאמר הגדרת פרויקט ב-Android Studio .
ב-Android Studio, לוחצים על האפשרות Run בתפריט (או על סמל ההפעלה). בוחרים מכשיר לפי ההנחיות.
Android Studio מפעיל את Gradle כדי ליצור את האפליקציה, ואז מריץ את האפליקציה במכשיר או באמולטור.
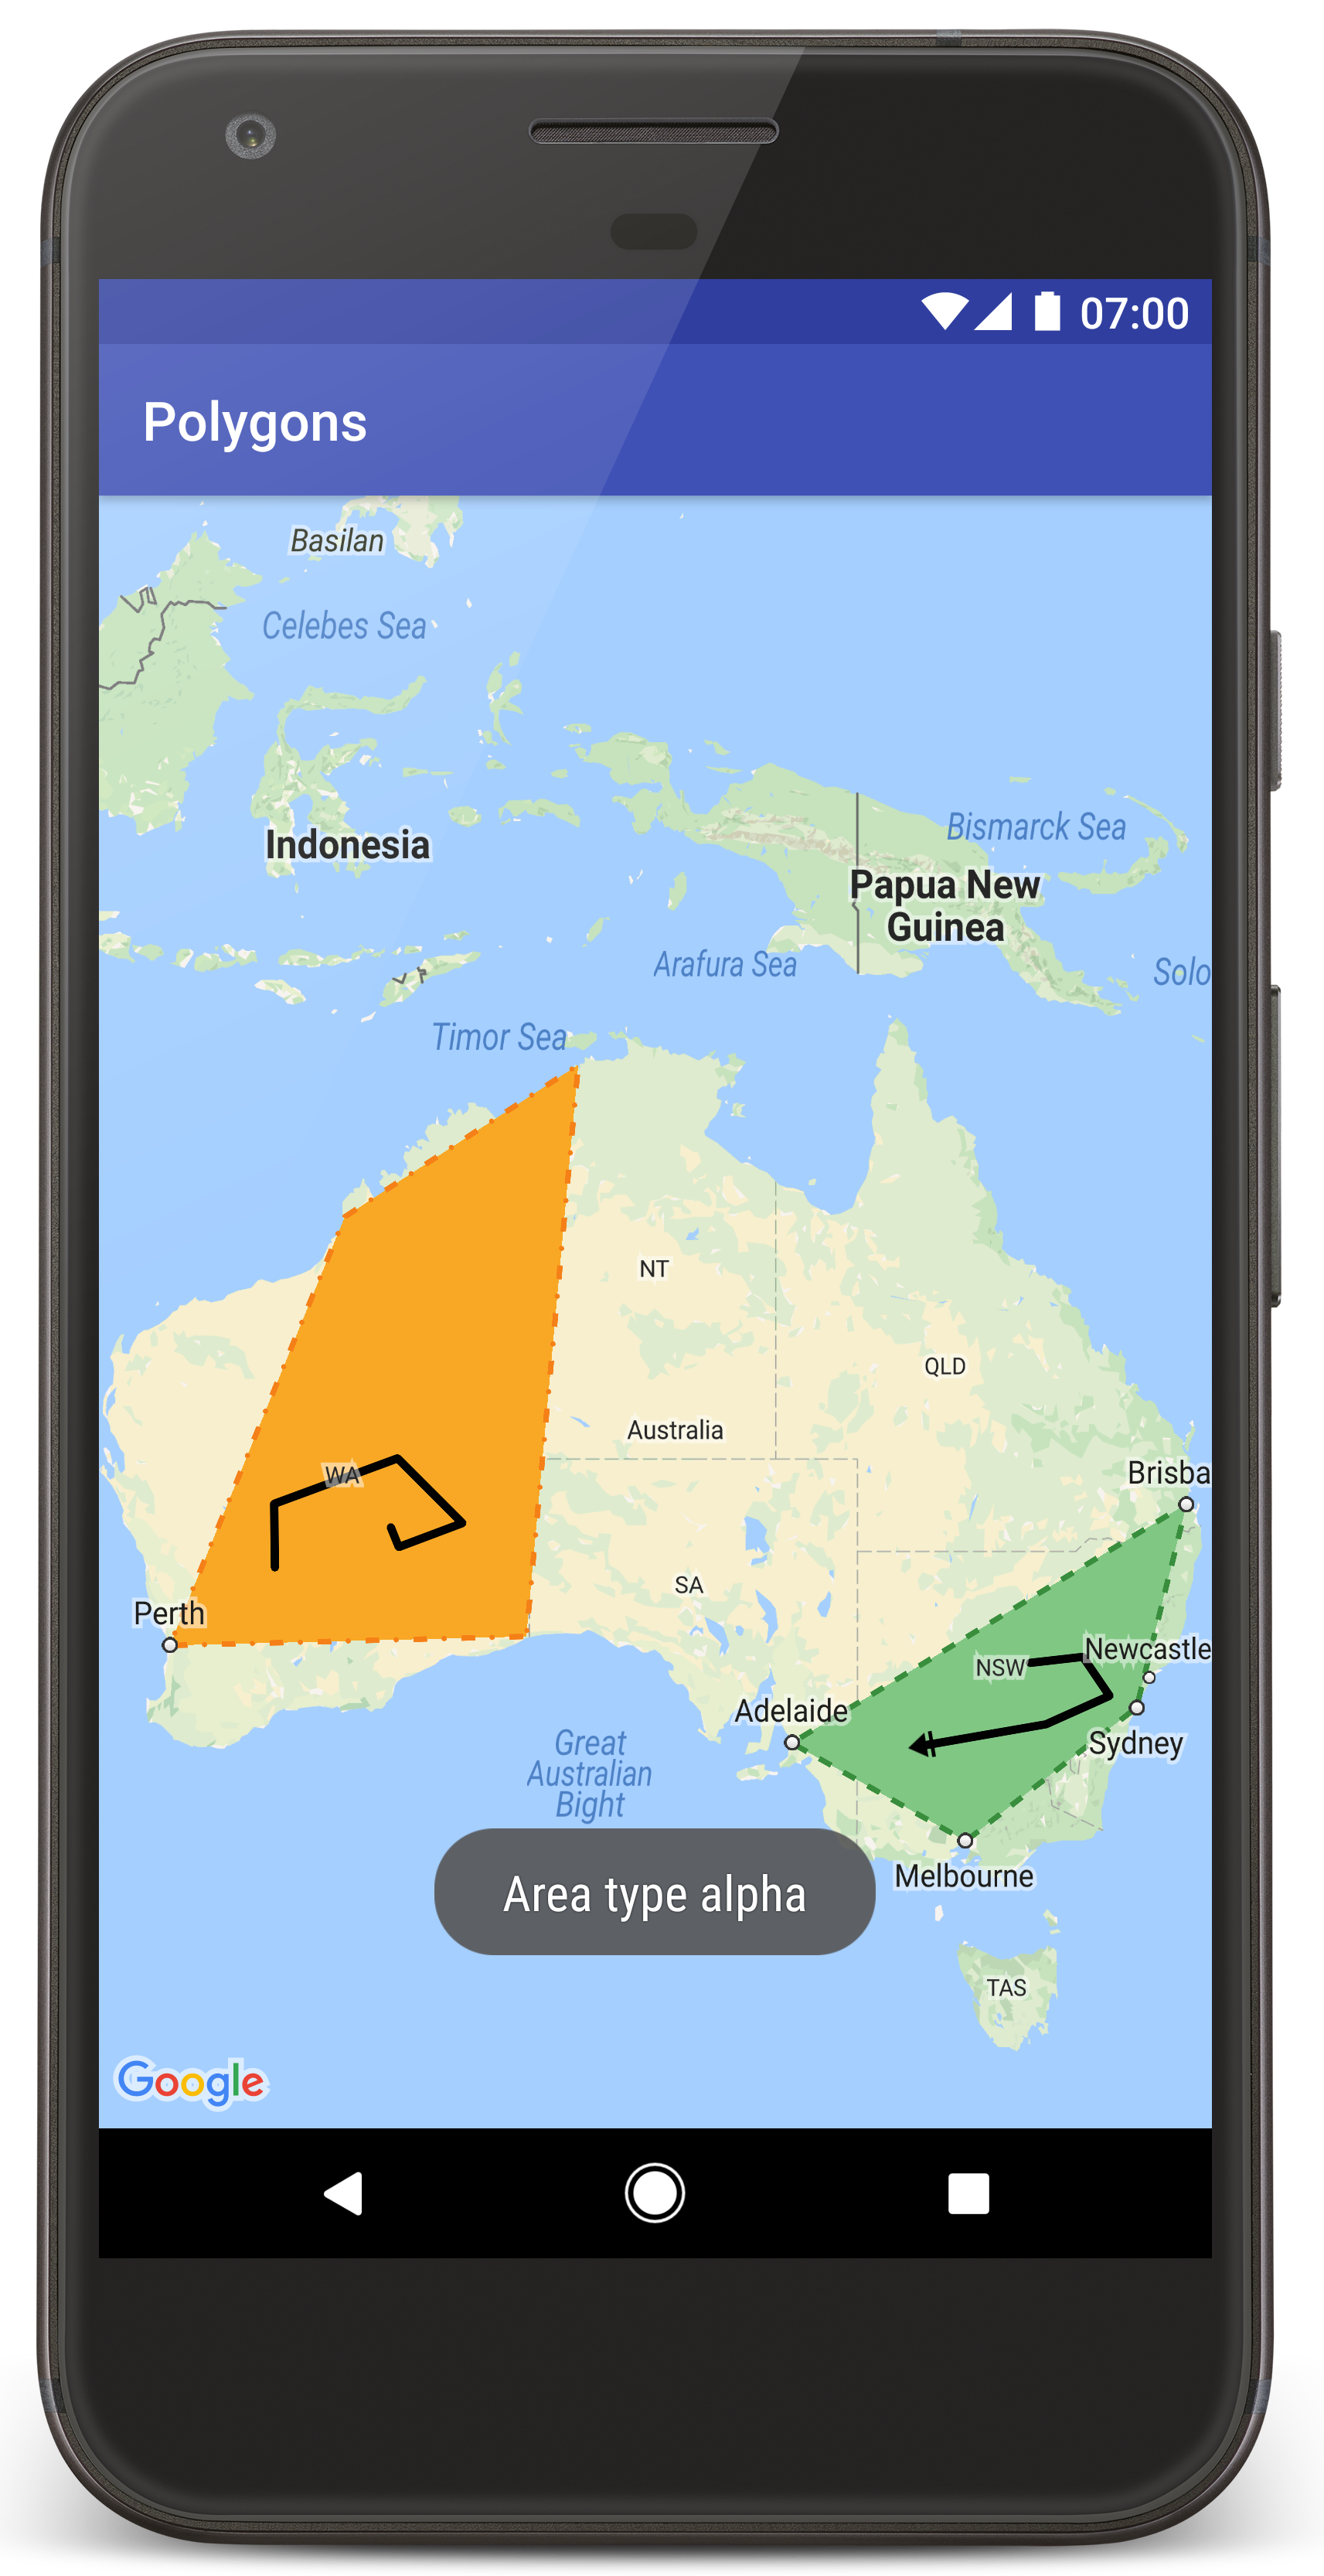
אמורה להופיע מפה עם שני פוליגונים מעל אוסטרליה, כמו בתמונה שבדף הזה.
פתרון בעיות:
- אם המפה לא מופיעה, צריך לוודא שקיבלתם מפתח API והוספתם אותו לאפליקציה, כמו שמתואר למעלה. בודקים את היומן ב-Android Monitor של Android Studio כדי לראות אם יש הודעות שגיאה לגבי מפתח ה-API.
- משתמשים בכלים לניפוי באגים של Android Studio כדי להציג יומנים ולנפות באגים באפליקציה.
הבנת הקוד
בחלק הזה של המדריך מוסברים החלקים החשובים ביותר של האפליקציה Polygons, כדי לעזור לכם להבין איך לבנות אפליקציה דומה.
בדיקת המניפסט של Android
שימו לב לרכיבים הבאים בקובץ AndroidManifest.xml של האפליקציה:
מוסיפים רכיב
meta-dataכדי להטמיע את הגרסה של Google Play Services שאיתה האפליקציה עברה הידור.<meta-data android:name="com.google.android.gms.version" android:value="@integer/google_play_services_version" />מוסיפים רכיב
meta-dataשמציין את מפתח ה-API. הדוגמה שמצורפת למדריך הזה ממפה את הערך של מפתח ה-API למשתנה build שתואם לשם המפתח שהגדרתם קודם,MAPS_API_KEY. כשמפתחים את האפליקציה, הפלאגין Secrets Gradle ל-Android הופך את המפתחות בקובץlocal.propertiesלוריאנט build של המניפסט.<meta-data android:name="com.google.android.geo.API_KEY" android:value="${MAPS_API_KEY}" />בקובץ
build.gradle, השורה הבאה מעבירה את מפתח ה-API למניפסט של Android.id 'com.google.android.libraries.mapsplatform.secrets-gradle-plugin'
דוגמה פתורה מלאה של קובץ מניפסט:
  <?xml version="1.0" encoding="utf-8"?>
<!--
 Copyright 2020 Google LLC

 Licensed under the Apache License, Version 2.0 (the "License");
 you may not use this file except in compliance with the License.
 You may obtain a copy of the License at

      http://www.apache.org/licenses/LICENSE-2.0

 Unless required by applicable law or agreed to in writing, software
 distributed under the License is distributed on an "AS IS" BASIS,
 WITHOUT WARRANTIES OR CONDITIONS OF ANY KIND, either express or implied.
 See the License for the specific language governing permissions and
 limitations under the License.
-->

<manifest xmlns:android="http://schemas.android.com/apk/res/android">

    <application
        android:allowBackup="true"
        android:icon="@mipmap/ic_launcher"
        android:label="@string/app_name"
        android:supportsRtl="true"
        android:theme="@style/AppTheme">

        <meta-data
            android:name="com.google.android.gms.version"
            android:value="@integer/google_play_services_version" />

        <!--
             The API key for Google Maps-based APIs.
        -->
        <meta-data
            android:name="com.google.android.geo.API_KEY"
            android:value="${MAPS_API_KEY}" />

        <activity
            android:name="com.example.polygons.PolyActivity"
            android:exported="true"
            android:label="@string/title_activity_maps">
            <intent-filter>
                <action android:name="android.intent.action.MAIN" />
                <category android:name="android.intent.category.LAUNCHER" />
            </intent-filter>
        </activity>
    </application>
</manifest>
הוספת מפה
להציג מפה באמצעות SDK של מפות ל-Android.
מוסיפים רכיב
<fragment>לקובץ הפריסה של הפעילות,activity_maps.xml. הרכיב הזה מגדירSupportMapFragmentשישמש כקונטיינר למפה ויספק גישה לאובייקטGoogleMap. במדריך נעשה שימוש בגרסה של ספריית התמיכה של Android של מקטע המפה, כדי להבטיח תאימות לדורות קודמים עם גרסאות קודמות של מסגרת Android.<!-- Copyright 2020 Google LLC Licensed under the Apache License, Version 2.0 (the "License"); you may not use this file except in compliance with the License. You may obtain a copy of the License at http://www.apache.org/licenses/LICENSE-2.0 Unless required by applicable law or agreed to in writing, software distributed under the License is distributed on an "AS IS" BASIS, WITHOUT WARRANTIES OR CONDITIONS OF ANY KIND, either express or implied. See the License for the specific language governing permissions and limitations under the License. --> <fragment xmlns:android="http://schemas.android.com/apk/res/android" xmlns:tools="http://schemas.android.com/tools" android:id="@+id/map" android:name="com.google.android.gms.maps.SupportMapFragment" android:layout_width="match_parent" android:layout_height="match_parent" tools:context="com.example.polygons.PolyActivity" />
ב-method
onCreate()של הפעילות, מגדירים את קובץ הפריסה בתור תצוגת התוכן. מקבלים נקודת אחיזה לקטע המפה באמצעות קריאה ל-FragmentManager.findFragmentById(). אחר כך משתמשים ב-getMapAsync()כדי להירשם לקריאה החוזרת (callback) של המפה:Java
@Override protected void onCreate(Bundle savedInstanceState) { super.onCreate(savedInstanceState); // Retrieve the content view that renders the map. setContentView(R.layout.activity_maps); // Get the SupportMapFragment and request notification when the map is ready to be used. SupportMapFragment mapFragment = (SupportMapFragment) getSupportFragmentManager().findFragmentById(R.id.map); mapFragment.getMapAsync(this); }
Kotlin
override fun onCreate(savedInstanceState: Bundle?) { super.onCreate(savedInstanceState) // Retrieve the content view that renders the map. setContentView(R.layout.activity_maps) // Get the SupportMapFragment and request notification when the map is ready to be used. val mapFragment = supportFragmentManager .findFragmentById(R.id.map) as SupportMapFragment? mapFragment?.getMapAsync(this) }
מטמיעים את הממשק
OnMapReadyCallbackומבטלים את ה-methodonMapReady(). ה-API מפעיל את פונקציית ה-callback הזו כשהאובייקטGoogleMapזמין, כדי שתוכלו להוסיף אובייקטים למפה ולהתאים אותה אישית לאפליקציה:Java
public class PolyActivity extends AppCompatActivity implements OnMapReadyCallback, GoogleMap.OnPolylineClickListener, GoogleMap.OnPolygonClickListener { @Override protected void onCreate(Bundle savedInstanceState) { super.onCreate(savedInstanceState); // Retrieve the content view that renders the map. setContentView(R.layout.activity_maps); // Get the SupportMapFragment and request notification when the map is ready to be used. SupportMapFragment mapFragment = (SupportMapFragment) getSupportFragmentManager().findFragmentById(R.id.map); mapFragment.getMapAsync(this); } /** * Manipulates the map when it's available. The API invokes this callback when the map is ready * to be used. This is where we can add markers or lines, add listeners or move the camera. In * this tutorial, we add polylines and polygons to represent routes and areas on the map. */ @Override public void onMapReady(GoogleMap googleMap) { // Add polylines to the map. // Polylines are useful to show a route or some other connection between points. Polyline polyline1 = googleMap.addPolyline( new PolylineOptions() .clickable(true) .add( new LatLng(-35.016, 143.321), new LatLng(-34.747, 145.592), new LatLng(-34.364, 147.891), new LatLng(-33.501, 150.217), new LatLng(-32.306, 149.248), new LatLng(-32.491, 147.309))); // Position the map's camera near Alice Springs in the center of Australia, // and set the zoom factor so most of Australia shows on the screen. googleMap.moveCamera(CameraUpdateFactory.newLatLngZoom(new LatLng(-23.684, 133.903), 4)); // Set listeners for click events. googleMap.setOnPolylineClickListener(this); googleMap.setOnPolygonClickListener(this); }
Kotlin
class PolyActivity : AppCompatActivity(), OnMapReadyCallback, OnPolylineClickListener, OnPolygonClickListener { override fun onCreate(savedInstanceState: Bundle?) { super.onCreate(savedInstanceState) // Retrieve the content view that renders the map. setContentView(R.layout.activity_maps) // Get the SupportMapFragment and request notification when the map is ready to be used. val mapFragment = supportFragmentManager .findFragmentById(R.id.map) as SupportMapFragment? mapFragment?.getMapAsync(this) } /** * Manipulates the map when it's available. * The API invokes this callback when the map is ready to be used. * This is where we can add markers or lines, add listeners or move the camera. * In this tutorial, we add polylines and polygons to represent routes and areas on the map. */ override fun onMapReady(googleMap: GoogleMap) { // Add polylines to the map. // Polylines are useful to show a route or some other connection between points. val polyline1 = googleMap.addPolyline( PolylineOptions() .clickable(true) .add( LatLng(-35.016, 143.321), LatLng(-34.747, 145.592), LatLng(-34.364, 147.891), LatLng(-33.501, 150.217), LatLng(-32.306, 149.248), LatLng(-32.491, 147.309), ), ) // Position the map's camera near Alice Springs in the center of Australia, // and set the zoom factor so most of Australia shows on the screen. googleMap.moveCamera(CameraUpdateFactory.newLatLngZoom(LatLng(-23.684, 133.903), 4f)) // Set listeners for click events. googleMap.setOnPolylineClickListener(this) googleMap.setOnPolygonClickListener(this) }
הוספת קו פוליגוני כדי לשרטט קו במפה
Polyline הוא סדרה של מקטעי קווים מחוברים. קווים פוליגוניים שימושיים לייצוג מסלולים, נתיבים או חיבורים אחרים בין מיקומים במפה.
יוצרים אובייקט
PolylineOptionsומוסיפים לו נקודות. כל נקודה מייצגת מיקום במפה, שאתם מגדירים באמצעות אובייקטLatLngשמכיל ערכים של קו רוחב וקו אורך. דוגמת הקוד הבאה יוצרת קו פוליגוני עם 6 נקודות.קוראים לפונקציה
GoogleMap.addPolyline()כדי להוסיף את הקו הפוליגוני למפה.Java
Polyline polyline1 = googleMap.addPolyline( new PolylineOptions() .clickable(true) .add( new LatLng(-35.016, 143.321), new LatLng(-34.747, 145.592), new LatLng(-34.364, 147.891), new LatLng(-33.501, 150.217), new LatLng(-32.306, 149.248), new LatLng(-32.491, 147.309)));
Kotlin
val polyline1 = googleMap.addPolyline( PolylineOptions() .clickable(true) .add( LatLng(-35.016, 143.321), LatLng(-34.747, 145.592), LatLng(-34.364, 147.891), LatLng(-33.501, 150.217), LatLng(-32.306, 149.248), LatLng(-32.491, 147.309), ), )
מגדירים את האפשרות clickable של הקו הפוליגוני לערך true אם רוצים לטפל באירועים מסוג קליק על הקו הפוליגוני. בהמשך המדריך נרחיב על טיפול באירועים.
אחסון נתונים שרירותיים באמצעות קו פוליגוני
אתם יכולים לאחסן אובייקטים של נתונים שרירותיים עם קווים פוליגוניים ואובייקטים גיאומטריים אחרים.
שולחים קריאה אל
Polyline.setTag()כדי לאחסן אובייקט נתונים עם הקו הפוליגוני. הקוד הבא מגדיר תג שרירותי (A) שמציין סוג של קו פוליגוני.Java
Polyline polyline1 = googleMap.addPolyline(new PolylineOptions()
    .clickable(true)
    .add(
            new LatLng(-35.016, 143.321),
            new LatLng(-34.747, 145.592),
            new LatLng(-34.364, 147.891),
            new LatLng(-33.501, 150.217),
            new LatLng(-32.306, 149.248),
            new LatLng(-32.491, 147.309)));
// Store a data object with the polyline, used here to indicate an arbitrary type.
polyline1.setTag("A");
Kotlin
val polyline1 = googleMap.addPolyline(PolylineOptions()
.clickable(true)
.add(
    LatLng(-35.016, 143.321),
    LatLng(-34.747, 145.592),
    LatLng(-34.364, 147.891),
    LatLng(-33.501, 150.217),
    LatLng(-32.306, 149.248),
    LatLng(-32.491, 147.309)))
// Store a data object with the polyline, used here to indicate an arbitrary type.
polyline1.tag = "A
אחזור הנתונים באמצעות
Polyline.getTag(), כמו שמוסבר בקטע הבא.
הוספת סגנון אישי לקו פוליגוני
אפשר לציין מאפייני סגנון שונים באובייקט PolylineOptions. אפשרויות העיצוב כוללות את צבע הקו, רוחב הקו, תבנית הקו, סוגי החיבורים וקצוות ההתחלה והסיום. אם לא מציינים מאפיין מסוים, ה-API משתמש בברירת המחדל של אותו מאפיין.
הקוד הבא מחיל קצה מעוגל על סוף הקו, וקצה התחלה שונה בהתאם לסוג הקו הפוליגוני, כאשר הסוג הוא מאפיין שרירותי שמאוחסן באובייקט הנתונים של הקו הפוליגוני. בדוגמה הזו מצוינים גם רוחב הקו, צבע הקו וסוג החיבור:
Java
private static final int COLOR_BLACK_ARGB = 0xff000000; private static final int POLYLINE_STROKE_WIDTH_PX = 12; /** * Styles the polyline, based on type. * * @param polyline The polyline object that needs styling. */ private void stylePolyline(Polyline polyline) { String type = ""; // Get the data object stored with the polyline. if (polyline.getTag() != null) { type = polyline.getTag().toString(); } switch (type) { // If no type is given, allow the API to use the default. case "A": // Use a custom bitmap as the cap at the start of the line. polyline.setStartCap( new CustomCap( BitmapDescriptorFactory.fromResource(R.drawable.ic_arrow), 10)); break; case "B": // Use a round cap at the start of the line. polyline.setStartCap(new RoundCap()); break; } polyline.setEndCap(new RoundCap()); polyline.setWidth(POLYLINE_STROKE_WIDTH_PX); polyline.setColor(COLOR_BLACK_ARGB); polyline.setJointType(JointType.ROUND); }
Kotlin
private val COLOR_BLACK_ARGB = -0x1000000 private val POLYLINE_STROKE_WIDTH_PX = 12 /** * Styles the polyline, based on type. * @param polyline The polyline object that needs styling. */ private fun stylePolyline(polyline: Polyline) { // Get the data object stored with the polyline. val type = polyline.tag?.toString() ?: "" when (type) { "A" -> { // Use a custom bitmap as the cap at the start of the line. polyline.startCap = CustomCap(BitmapDescriptorFactory.fromResource(R.drawable.ic_arrow), 10f) } "B" -> { // Use a round cap at the start of the line. polyline.startCap = RoundCap() } } polyline.endCap = RoundCap() polyline.width = POLYLINE_STROKE_WIDTH_PX.toFloat() polyline.color = COLOR_BLACK_ARGB polyline.jointType = JointType.ROUND }
הקוד שלמעלה מציין מפת סיביות (bitmap) בהתאמה אישית לקצה ההתחלה של הקו הפוליגוני מסוג A, ומציין רוחב קו עזר של 10 פיקסלים. ה-API משנה את קנה המידה של מפת הסיביות על סמך רוחב קו הייחוס. כשמציינים את רוחב קו המתאר, צריך לציין את הרוחב שבו השתמשתם כשעיצבתם את תמונת מפת הסיביות, בממדים המקוריים של התמונה. טיפ: פתחו את תמונת מפת הסיביות בזום של 100% בכלי לעריכת תמונות, ושרטטו את רוחב הקו הרצוי ביחס לתמונה.
מידע נוסף על קצוות של קווים ואפשרויות אחרות ל התאמה אישית של צורות
טיפול באירועים מסוג קליק על הקו הפוליגוני
כדי להפוך את הקו הפוליגוני לניתן ללחיצה, שולחים קריאה אל
Polyline.setClickable(). (כברירת מחדל, אי אפשר ללחוץ על קווים פוליגוניים והאפליקציה לא תקבל התראה כשהמשתמש ילחץ על קו פוליגוני).מטמיעים את הממשק
OnPolylineClickListenerוקוראים ל-GoogleMap.setOnPolylineClickListener()כדי להגדיר את המאזין במפה:Java
public class PolyActivity extends AppCompatActivity implements OnMapReadyCallback, GoogleMap.OnPolylineClickListener, GoogleMap.OnPolygonClickListener { @Override protected void onCreate(Bundle savedInstanceState) { super.onCreate(savedInstanceState); // Retrieve the content view that renders the map. setContentView(R.layout.activity_maps); // Get the SupportMapFragment and request notification when the map is ready to be used. SupportMapFragment mapFragment = (SupportMapFragment) getSupportFragmentManager().findFragmentById(R.id.map); mapFragment.getMapAsync(this); } /** * Manipulates the map when it's available. The API invokes this callback when the map is ready * to be used. This is where we can add markers or lines, add listeners or move the camera. In * this tutorial, we add polylines and polygons to represent routes and areas on the map. */ @Override public void onMapReady(GoogleMap googleMap) { // Add polylines to the map. // Polylines are useful to show a route or some other connection between points. Polyline polyline1 = googleMap.addPolyline( new PolylineOptions() .clickable(true) .add( new LatLng(-35.016, 143.321), new LatLng(-34.747, 145.592), new LatLng(-34.364, 147.891), new LatLng(-33.501, 150.217), new LatLng(-32.306, 149.248), new LatLng(-32.491, 147.309))); // Position the map's camera near Alice Springs in the center of Australia, // and set the zoom factor so most of Australia shows on the screen. googleMap.moveCamera(CameraUpdateFactory.newLatLngZoom(new LatLng(-23.684, 133.903), 4)); // Set listeners for click events. googleMap.setOnPolylineClickListener(this); googleMap.setOnPolygonClickListener(this); }
Kotlin
class PolyActivity : AppCompatActivity(), OnMapReadyCallback, OnPolylineClickListener, OnPolygonClickListener { override fun onCreate(savedInstanceState: Bundle?) { super.onCreate(savedInstanceState) // Retrieve the content view that renders the map. setContentView(R.layout.activity_maps) // Get the SupportMapFragment and request notification when the map is ready to be used. val mapFragment = supportFragmentManager .findFragmentById(R.id.map) as SupportMapFragment? mapFragment?.getMapAsync(this) } /** * Manipulates the map when it's available. * The API invokes this callback when the map is ready to be used. * This is where we can add markers or lines, add listeners or move the camera. * In this tutorial, we add polylines and polygons to represent routes and areas on the map. */ override fun onMapReady(googleMap: GoogleMap) { // Add polylines to the map. // Polylines are useful to show a route or some other connection between points. val polyline1 = googleMap.addPolyline( PolylineOptions() .clickable(true) .add( LatLng(-35.016, 143.321), LatLng(-34.747, 145.592), LatLng(-34.364, 147.891), LatLng(-33.501, 150.217), LatLng(-32.306, 149.248), LatLng(-32.491, 147.309), ), ) // Position the map's camera near Alice Springs in the center of Australia, // and set the zoom factor so most of Australia shows on the screen. googleMap.moveCamera(CameraUpdateFactory.newLatLngZoom(LatLng(-23.684, 133.903), 4f)) // Set listeners for click events. googleMap.setOnPolylineClickListener(this) googleMap.setOnPolygonClickListener(this) }
מבטלים את שיטת הקריאה החוזרת (callback)
onPolylineClick(). בדוגמה הבאה, תבנית הקו של הקו הפוליגוני משתנה בין קו רציף לקו מקווקו בכל פעם שהמשתמש לוחץ על הקו הפוליגוני:Java
private static final int PATTERN_GAP_LENGTH_PX = 20; private static final PatternItem DOT = new Dot(); private static final PatternItem GAP = new Gap(PATTERN_GAP_LENGTH_PX); // Create a stroke pattern of a gap followed by a dot. private static final List<PatternItem> PATTERN_POLYLINE_DOTTED = Arrays.asList(GAP, DOT); /** * Listens for clicks on a polyline. * * @param polyline The polyline object that the user has clicked. */ @Override public void onPolylineClick(Polyline polyline) { // Flip from solid stroke to dotted stroke pattern. if ((polyline.getPattern() == null) || (!polyline.getPattern().contains(DOT))) { polyline.setPattern(PATTERN_POLYLINE_DOTTED); } else { // The default pattern is a solid stroke. polyline.setPattern(null); } Toast.makeText(this, "Route type " + polyline.getTag().toString(), Toast.LENGTH_SHORT) .show(); }
Kotlin
private val PATTERN_GAP_LENGTH_PX = 20 private val DOT: PatternItem = Dot() private val GAP: PatternItem = Gap(PATTERN_GAP_LENGTH_PX.toFloat()) // Create a stroke pattern of a gap followed by a dot. private val PATTERN_POLYLINE_DOTTED = listOf(GAP, DOT) /** * Listens for clicks on a polyline. * @param polyline The polyline object that the user has clicked. */ override fun onPolylineClick(polyline: Polyline) { // Flip from solid stroke to dotted stroke pattern. if (polyline.pattern == null || !polyline.pattern!!.contains(DOT)) { polyline.pattern = PATTERN_POLYLINE_DOTTED } else { // The default pattern is a solid stroke. polyline.pattern = null } Toast.makeText( this, "Route type ${polyline.tag}", Toast.LENGTH_SHORT, ).show() }
הוספת פוליגונים כדי לייצג אזורים במפה
Polygon היא צורה שמורכבת מסדרה של קואורדינטות ברצף מסודר, בדומה לPolyline. ההבדל הוא שפוליגון מגדיר אזור סגור עם שטח פנימי שאפשר למלא, ואילו קו פוליגוני הוא פתוח.
יוצרים אובייקט
PolygonOptionsומוסיפים לו נקודות. כל נקודה מייצגת מיקום במפה, שאתם מגדירים באמצעות אובייקטLatLngשמכיל ערכים של קו רוחב וקו אורך. דוגמת הקוד הבאה יוצרת פוליגון עם 4 נקודות.כדי להפוך את הפוליגון לניתן ללחיצה, צריך לשלוח קריאה אל
Polygon.setClickable(). (כברירת מחדל, אי אפשר ללחוץ על מצולעים והאפליקציה לא תקבל התראה כשהמשתמש ילחץ על מצולע). הטיפול באירועי מסוג קליק על פוליגונים דומה לטיפול באירועים על קווים פוליגוניים, שמתואר למעלה במדריך הזה.קוראים לפונקציה
GoogleMap.addPolygon()כדי להוסיף את הפוליגון למפה.שולחים קריאה אל
Polygon.setTag()כדי לאחסן אובייקט נתונים עם הפוליגון. הקוד הבא מגדיר סוג שרירותי (alpha) לפוליגון.Java
// Add polygons to indicate areas on the map. Polygon polygon1 = googleMap.addPolygon( new PolygonOptions() .clickable(true) .add( new LatLng(-27.457, 153.040), new LatLng(-33.852, 151.211), new LatLng(-37.813, 144.962), new LatLng(-34.928, 138.599))); // Store a data object with the polygon, used here to indicate an arbitrary type. polygon1.setTag("alpha");
Kotlin
// Add polygons to indicate areas on the map. val polygon1 = googleMap.addPolygon( PolygonOptions() .clickable(true) .add( LatLng(-27.457, 153.040), LatLng(-33.852, 151.211), LatLng(-37.813, 144.962), LatLng(-34.928, 138.599), ), ) // Store a data object with the polygon, used here to indicate an arbitrary type. polygon1.tag = "alpha" // Style the polygon.
הוספת סגנון אישי לפוליגון
אפשר לציין כמה מאפייני סגנון באובייקט PolygonOptions. אפשרויות העיצוב כוללות את צבע הקו, רוחב הקו, דפוס הקו, סוגי החיבורים של הקו וצבע המילוי. אם לא מציינים מאפיין מסוים, ה-API משתמש בברירת המחדל של אותו מאפיין.
הקוד הבא מחיל צבעים ודפוסי קווים ספציפיים בהתאם ל-type של הפוליגון, כאשר הסוג הוא מאפיין שרירותי שמאוחסן באובייקט הנתונים של הפוליגון:
Java
private static final int COLOR_WHITE_ARGB = 0xffffffff; private static final int COLOR_DARK_GREEN_ARGB = 0xff388E3C; private static final int COLOR_LIGHT_GREEN_ARGB = 0xff81C784; private static final int COLOR_DARK_ORANGE_ARGB = 0xffF57F17; private static final int COLOR_LIGHT_ORANGE_ARGB = 0xffF9A825; private static final int POLYGON_STROKE_WIDTH_PX = 8; private static final int PATTERN_DASH_LENGTH_PX = 20; private static final PatternItem DASH = new Dash(PATTERN_DASH_LENGTH_PX); // Create a stroke pattern of a gap followed by a dash. private static final List<PatternItem> PATTERN_POLYGON_ALPHA = Arrays.asList(GAP, DASH); // Create a stroke pattern of a dot followed by a gap, a dash, and another gap. private static final List<PatternItem> PATTERN_POLYGON_BETA = Arrays.asList(DOT, GAP, DASH, GAP); /** * Styles the polygon, based on type. * * @param polygon The polygon object that needs styling. */ private void stylePolygon(Polygon polygon) { String type = ""; // Get the data object stored with the polygon. if (polygon.getTag() != null) { type = polygon.getTag().toString(); } List<PatternItem> pattern = null; int strokeColor = COLOR_BLACK_ARGB; int fillColor = COLOR_WHITE_ARGB; switch (type) { // If no type is given, allow the API to use the default. case "alpha": // Apply a stroke pattern to render a dashed line, and define colors. pattern = PATTERN_POLYGON_ALPHA; strokeColor = COLOR_DARK_GREEN_ARGB; fillColor = COLOR_LIGHT_GREEN_ARGB; break; case "beta": // Apply a stroke pattern to render a line of dots and dashes, and define colors. pattern = PATTERN_POLYGON_BETA; strokeColor = COLOR_DARK_ORANGE_ARGB; fillColor = COLOR_LIGHT_ORANGE_ARGB; break; } polygon.setStrokePattern(pattern); polygon.setStrokeWidth(POLYGON_STROKE_WIDTH_PX); polygon.setStrokeColor(strokeColor); polygon.setFillColor(fillColor); }
Kotlin
private val COLOR_WHITE_ARGB = -0x1 private val COLOR_DARK_GREEN_ARGB = -0xc771c4 private val COLOR_LIGHT_GREEN_ARGB = -0x7e387c private val COLOR_DARK_ORANGE_ARGB = -0xa80e9 private val COLOR_LIGHT_ORANGE_ARGB = -0x657db private val POLYGON_STROKE_WIDTH_PX = 8 private val PATTERN_DASH_LENGTH_PX = 20 private val DASH: PatternItem = Dash(PATTERN_DASH_LENGTH_PX.toFloat()) // Create a stroke pattern of a gap followed by a dash. private val PATTERN_POLYGON_ALPHA = listOf(GAP, DASH) // Create a stroke pattern of a dot followed by a gap, a dash, and another gap. private val PATTERN_POLYGON_BETA = listOf(DOT, GAP, DASH, GAP) /** * Styles the polygon, based on type. * @param polygon The polygon object that needs styling. */ private fun stylePolygon(polygon: Polygon) { // Get the data object stored with the polygon. val type = polygon.tag?.toString() ?: "" var pattern: List<PatternItem>? = null var strokeColor = COLOR_BLACK_ARGB var fillColor = COLOR_WHITE_ARGB when (type) { "alpha" -> { // Apply a stroke pattern to render a dashed line, and define colors. pattern = PATTERN_POLYGON_ALPHA strokeColor = COLOR_DARK_GREEN_ARGB fillColor = COLOR_LIGHT_GREEN_ARGB } "beta" -> { // Apply a stroke pattern to render a line of dots and dashes, and define colors. pattern = PATTERN_POLYGON_BETA strokeColor = COLOR_DARK_ORANGE_ARGB fillColor = COLOR_LIGHT_ORANGE_ARGB } } polygon.strokePattern = pattern polygon.strokeWidth = POLYGON_STROKE_WIDTH_PX.toFloat() polygon.strokeColor = strokeColor polygon.fillColor = fillColor }
כאן אפשר לקרוא מידע נוסף על תבניות קווים ואפשרויות אחרות להתאמה אישית של צורות.
השלבים הבאים
מידע על האובייקט Circle. מעגלים דומים לפוליגונים, אבל יש להם מאפיינים שמשקפים את הצורה של מעגל.