

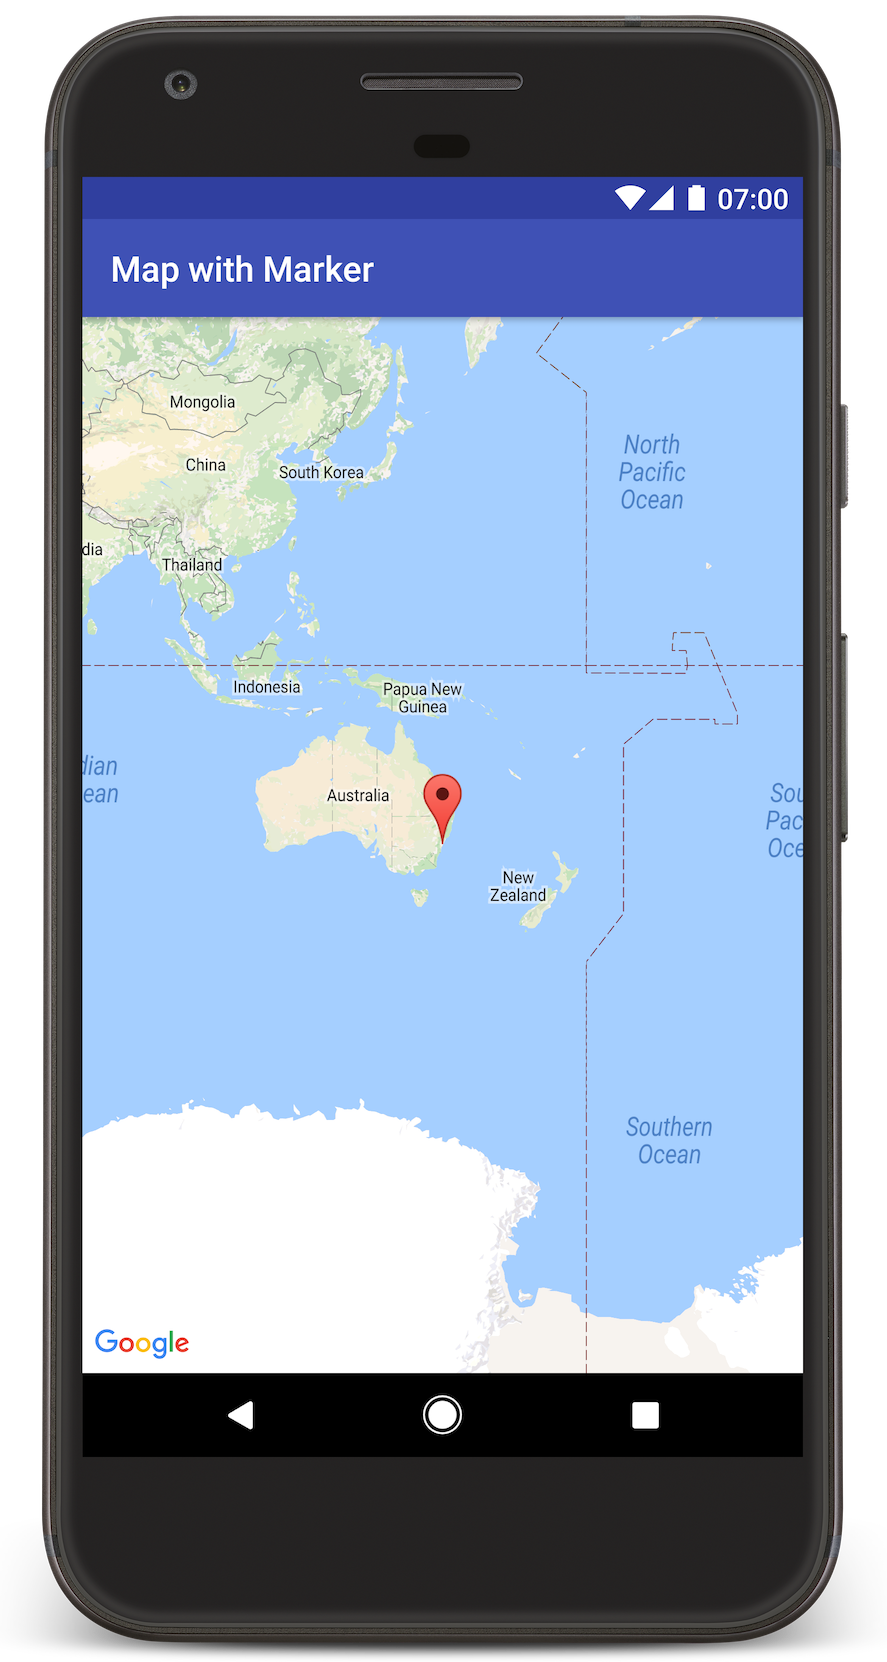
Bu eğitimde, Android uygulamanıza nasıl Google haritası ekleyeceğiniz gösterilmektedir. Haritada, belirli bir konumu belirtmek için raptiye olarak da adlandırılan bir işaretçi bulunur.
Android için Haritalar SDK'sını kullanarak Android uygulaması oluşturmak için eğitimdeki adımları uygulayın. Önerilen geliştirme ortamı Android Studio'dur.
Kodu alın
GitHub'dan Google Haritalar Android API v2 Samples deposunu kopyalayın veya indirin.
Etkinliğin Java sürümünü görüntüleyin:
// Copyright 2020 Google LLC // // Licensed under the Apache License, Version 2.0 (the "License"); // you may not use this file except in compliance with the License. // You may obtain a copy of the License at // // http://www.apache.org/licenses/LICENSE-2.0 // // Unless required by applicable law or agreed to in writing, software // distributed under the License is distributed on an "AS IS" BASIS, // WITHOUT WARRANTIES OR CONDITIONS OF ANY KIND, either express or implied. // See the License for the specific language governing permissions and // limitations under the License. package com.example.mapwithmarker; import android.os.Bundle; import androidx.appcompat.app.AppCompatActivity; import com.google.android.gms.maps.CameraUpdateFactory; import com.google.android.gms.maps.GoogleMap; import com.google.android.gms.maps.OnMapReadyCallback; import com.google.android.gms.maps.SupportMapFragment; import com.google.android.gms.maps.model.LatLng; import com.google.android.gms.maps.model.MarkerOptions; /** An activity that displays a Google map with a marker (pin) to indicate a particular location. */ public class MapsMarkerActivity extends AppCompatActivity implements OnMapReadyCallback { @Override protected void onCreate(Bundle savedInstanceState) { super.onCreate(savedInstanceState); // Retrieve the content view that renders the map. setContentView(R.layout.activity_maps); // Get the SupportMapFragment and request notification when the map is ready to be used. SupportMapFragment mapFragment = (SupportMapFragment) getSupportFragmentManager().findFragmentById(R.id.map); mapFragment.getMapAsync(this); } /** * Manipulates the map when it's available. The API invokes this callback when the map is ready * to be used. This is where we can add markers or lines, add listeners or move the camera. In * this case, we just add a marker near Sydney, Australia. If Google Play services is not * installed on the device, the user receives a prompt to install Play services inside the * SupportMapFragment. The API invokes this method after the user has installed Google Play * services and returned to the app. */ @Override public void onMapReady(GoogleMap googleMap) { // Add a marker in Sydney, Australia, // and move the map's camera to the same location. LatLng sydney = new LatLng(-33.852, 151.211); googleMap.addMarker(new MarkerOptions().position(sydney).title("Marker in Sydney")); googleMap.moveCamera(CameraUpdateFactory.newLatLng(sydney)); } }
Etkinliğin Kotlin sürümünü görüntüleyin:
// Copyright 2020 Google LLC // // Licensed under the Apache License, Version 2.0 (the "License"); // you may not use this file except in compliance with the License. // You may obtain a copy of the License at // // http://www.apache.org/licenses/LICENSE-2.0 // // Unless required by applicable law or agreed to in writing, software // distributed under the License is distributed on an "AS IS" BASIS, // WITHOUT WARRANTIES OR CONDITIONS OF ANY KIND, either express or implied. // See the License for the specific language governing permissions and // limitations under the License. package com.example.mapwithmarker import android.os.Bundle import android.widget.Toast import androidx.appcompat.app.AppCompatActivity import com.google.android.gms.maps.CameraUpdateFactory import com.google.android.gms.maps.GoogleMap import com.google.android.gms.maps.OnMapReadyCallback import com.google.android.gms.maps.SupportMapFragment import com.google.android.gms.maps.model.LatLng import com.google.android.gms.maps.model.MarkerOptions /** * An activity that displays a Google map with a marker (pin) to indicate a particular location. */ class MapsMarkerActivity : AppCompatActivity(), OnMapReadyCallback { override fun onCreate(savedInstanceState: Bundle?) { super.onCreate(savedInstanceState) // Retrieve the content view that renders the map. setContentView(R.layout.activity_maps) // Get the SupportMapFragment and request notification when the map is ready to be used. val mapFragment = supportFragmentManager.findFragmentById(R.id.map) as? SupportMapFragment mapFragment?.getMapAsync(this) } override fun onMapReady(googleMap: GoogleMap) { val sydney = LatLng(-33.852, 151.211) googleMap.addMarker( MarkerOptions() .position(sydney) .title("Marker in Sydney"), ) googleMap.moveCamera(CameraUpdateFactory.newLatLng(sydney)) } }
Geliştirme projenizi oluşturma
Android Studio'da eğitim projesini oluşturmak için aşağıdaki adımları uygulayın.
- Android Studio'yu indirip yükleyin.
- Android Studio'ya Google Play Hizmetleri paketini ekleyin.
- Bu eğiticiyi okumaya başladığınızda yapmadıysanız Google Haritalar Android API v2 Samples deposunu kopyalayın veya indirin.
Eğitim projesini içe aktarın:
- Android Studio'da File > New > Import Project'i (Dosya > Yeni > Projeyi İçe Aktar) seçin.
- İndirdikten sonra Google Haritalar Android API v2 Örnekleri deposunu kaydettiğiniz konuma gidin.
- MapWithMarker projesini şu konumda bulabilirsiniz:
PATH-TO-SAVED-REPO/android-samples/tutorials/java/MapWithMarker(Java) veya
PATH-TO-SAVED-REPO/android-samples/tutorials/kotlin/MapWithMarker(Kotlin) - Proje dizinini seçin ve Open'ı (Aç) tıklayın. Android Studio, Gradle derleme aracını kullanarak projenizi derler.
Gerekli API'leri etkinleştirme ve API anahtarı alma
Bu eğitimi tamamlamak için gerekli API'lerin etkinleştirildiği bir Google Cloud projeniz ve Android için Haritalar SDK'sını kullanma yetkisine sahip bir API anahtarınız olmalıdır. Daha fazla bilgi için:
API anahtarını uygulamanıza ekleme
- Projenizin
local.propertiesdosyasını açın. Aşağıdaki dizeyi ekleyin ve
YOUR_API_KEYkısmını API anahtarınızın değeriyle değiştirin:MAPS_API_KEY=YOUR_API_KEYUygulamanızı oluşturduğunuzda Android için Secrets Gradle Plugin, API anahtarını kopyalar ve aşağıda açıklandığı gibi Android manifest dosyasında derleme değişkeni olarak kullanılabilir hale getirir.
Uygulamanızı derleyip çalıştırma
Uygulamayı derleyip çalıştırmak için:
Android cihazınızı bilgisayarınıza bağlayın. Android cihazınızda geliştirici seçeneklerini etkinleştirmek ve sisteminizi cihazı algılayacak şekilde yapılandırmak için talimatları uygulayın.
Alternatif olarak, sanal cihaz yapılandırmak için Android Sanal Cihazı (AVD) Yöneticisi'ni kullanabilirsiniz. Emülatör seçerken Google API'lerini içeren bir görüntü seçtiğinizden emin olun. Daha fazla bilgi için Android Studio Projesi Oluşturma başlıklı makaleyi inceleyin.
Android Studio'da Run (Çalıştır) menü seçeneğini (veya oynat düğmesi simgesini) tıklayın. İstendiğinde bir cihaz seçin.
Android Studio, uygulamayı derlemek için Gradle'ı çağırır ve ardından uygulamayı cihazda veya emülatörde çalıştırır. Bu sayfadaki resme benzer şekilde, Avustralya'nın doğu kıyısındaki Sidney'i gösteren bir işaretçinin bulunduğu bir harita görürsünüz.
Sorun Giderme:
- Harita görmüyorsanız bir API anahtarı aldığınızdan ve bu anahtarı yukarıda açıklandığı gibi uygulamaya eklediğinizden emin olun. API anahtarıyla ilgili hata mesajları için Android Studio'nun Android Monitor bölümündeki günlüğü kontrol edin.
- Günlükleri görüntülemek ve uygulamada hata ayıklamak için Android Studio hata ayıklama araçlarını kullanın.
Kodu anlama
Eğitimin bu bölümünde, benzer bir uygulamayı nasıl oluşturacağınızı anlamanıza yardımcı olmak için MapWithMarker uygulamasının en önemli kısımları açıklanmaktadır.
Android manifest dosyanızı kontrol etme
Uygulamanızın AndroidManifest.xml dosyasındaki aşağıdaki öğelere dikkat edin:
Uygulamanın derlendiği Google Play Hizmetleri sürümünü yerleştirmek için bir
meta-dataöğesi ekleyin.<meta-data android:name="com.google.android.gms.version" android:value="@integer/google_play_services_version" />API anahtarınızı belirten bir
meta-dataöğesi ekleyin. Bu eğitimle birlikte sunulan örnek, API anahtarının değerini daha önce tanımladığınız anahtarın adıyla eşleşen bir derleme değişkeniyle (MAPS_API_KEY) eşler. Uygulamanızı derlediğinizde Android için Secrets Gradle Plugin,local.propertiesdosyanızdaki anahtarları manifest derleme değişkenleri olarak kullanılabilir hale getirir.<meta-data android:name="com.google.android.geo.API_KEY" android:value="${MAPS_API_KEY}" />build.gradledosyanızda aşağıdaki satır, API anahtarınızı Android manifest dosyanıza iletir.id 'com.google.android.libraries.mapsplatform.secrets-gradle-plugin'
Aşağıda tam bir manifest örneği verilmiştir:
<?xml version="1.0" encoding="utf-8"?>
<!--
 Copyright 2020 Google LLC

 Licensed under the Apache License, Version 2.0 (the "License");
 you may not use this file except in compliance with the License.
 You may obtain a copy of the License at

      http://www.apache.org/licenses/LICENSE-2.0

 Unless required by applicable law or agreed to in writing, software
 distributed under the License is distributed on an "AS IS" BASIS,
 WITHOUT WARRANTIES OR CONDITIONS OF ANY KIND, either express or implied.
 See the License for the specific language governing permissions and
 limitations under the License.
-->

<manifest xmlns:android="http://schemas.android.com/apk/res/android">

    <application
        android:allowBackup="true"
        android:icon="@mipmap/ic_launcher"
        android:label="@string/app_name"
        android:supportsRtl="true"
        android:theme="@style/AppTheme">

        <meta-data
            android:name="com.google.android.gms.version"
            android:value="@integer/google_play_services_version" />

        <!--
             The API key for Google Maps-based APIs.
        -->
        <meta-data
            android:name="com.google.android.geo.API_KEY"
            android:value="${MAPS_API_KEY}" />

        <activity
            android:name=".MapsMarkerActivity"
            android:label="@string/title_activity_maps"
            android:exported="true">
            <intent-filter>
                <action android:name="android.intent.action.MAIN" />

                <category android:name="android.intent.category.LAUNCHER" />
            </intent-filter>
        </activity>
    </application>

</manifest>
Harita ekleme
Android için Haritalar SDK'sını kullanarak harita görüntüleme
Etkinliğinizin düzen dosyasına (
activity_maps.xml) bir<fragment>öğesi ekleyin. Bu öğe, harita için kapsayıcı görevi görecek veGoogleMapnesnesine erişim sağlayacak birSupportMapFragmenttanımlar. Eğitimde, Android çerçevesinin önceki sürümleriyle geriye dönük uyumluluk sağlamak için harita parçasının Android Destek Kitaplığı sürümü kullanılır.<!-- Copyright 2020 Google LLC Licensed under the Apache License, Version 2.0 (the "License"); you may not use this file except in compliance with the License. You may obtain a copy of the License at http://www.apache.org/licenses/LICENSE-2.0 Unless required by applicable law or agreed to in writing, software distributed under the License is distributed on an "AS IS" BASIS, WITHOUT WARRANTIES OR CONDITIONS OF ANY KIND, either express or implied. See the License for the specific language governing permissions and limitations under the License. --> <fragment xmlns:android="http://schemas.android.com/apk/res/android" xmlns:tools="http://schemas.android.com/tools" android:id="@+id/map" android:name="com.google.android.gms.maps.SupportMapFragment" android:layout_width="match_parent" android:layout_height="match_parent" tools:context="com.example.mapwithmarker.MapsMarkerActivity" />
Etkinliğinizin
onCreate()yönteminde, düzen dosyasını içerik görünümü olarak ayarlayın.FragmentManager.findFragmentById()yöntemini çağırarak harita parçasına bir tanıtıcı alın. Ardından, harita geri çağırma işlevine kaydolmak içingetMapAsync()kullanın:Java
@Override protected void onCreate(Bundle savedInstanceState) { super.onCreate(savedInstanceState); // Retrieve the content view that renders the map. setContentView(R.layout.activity_maps); // Get the SupportMapFragment and request notification when the map is ready to be used. SupportMapFragment mapFragment = (SupportMapFragment) getSupportFragmentManager().findFragmentById(R.id.map); mapFragment.getMapAsync(this); }
Kotlin
override fun onCreate(savedInstanceState: Bundle?) { super.onCreate(savedInstanceState) // Retrieve the content view that renders the map. setContentView(R.layout.activity_maps) // Get the SupportMapFragment and request notification when the map is ready to be used. val mapFragment = supportFragmentManager.findFragmentById(R.id.map) as? SupportMapFragment mapFragment?.getMapAsync(this) }
GoogleMapnesnesi kullanılabilir olduğunda haritayı ayarlamak içinOnMapReadyCallbackarayüzünü uygulayın veonMapReady()yöntemini geçersiz kılın:Java
public class MapsMarkerActivity extends AppCompatActivity implements OnMapReadyCallback { // ... @Override public void onMapReady(GoogleMap googleMap) { LatLng sydney = new LatLng(-33.852, 151.211); googleMap.addMarker(new MarkerOptions().position(sydney).title("Marker in Sydney")); } }
Kotlin
class MapsMarkerActivity : AppCompatActivity(), OnMapReadyCallback { // ... override fun onMapReady(googleMap: GoogleMap) { val sydney = LatLng(-33.852, 151.211) googleMap.addMarker( MarkerOptions() .position(sydney) .title("Marker in Sydney"), ) } }
Android için Haritalar SDK'sı, varsayılan olarak kullanıcı bir işaretçiye dokunduğunda bilgi penceresinin içeriğini gösterir. Varsayılan davranışı kullanmak istiyorsanız işaretçi için tıklama dinleyici eklemeniz gerekmez.
Sonraki adımlar
Harita nesnesi ve işaretçilerle neler yapabileceğiniz hakkında daha fazla bilgi edinin.