

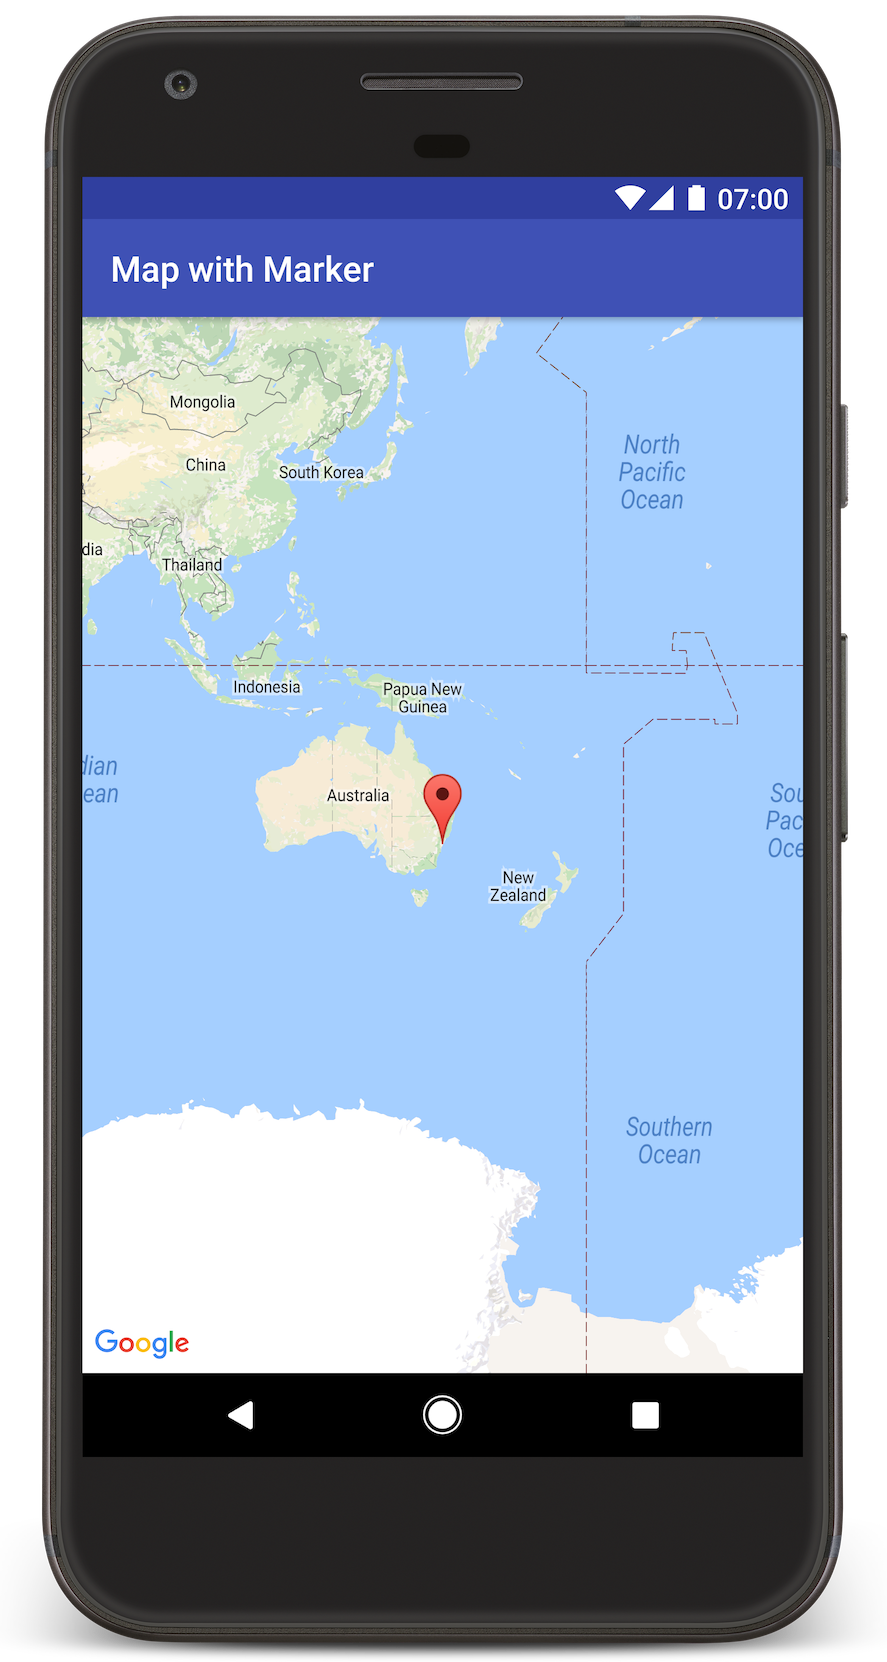
يوضّح لك هذا الدليل التوجيهي كيفية إضافة خريطة Google إلى تطبيق Android. تتضمّن الخريطة علامة، تُعرف أيضًا باسم دبوس، للإشارة إلى موقع جغرافي معيّن.
اتّبِع البرنامج التعليمي لإنشاء تطبيق Android باستخدام "حزمة تطوير البرامج بالاستناد إلى بيانات خرائط Google للتطبيقات المتوافقة مع Android". بيئة التطوير المقترَحة هي استوديو Android.
الحصول على الشفرة
استنسِخ أو نزِّل مستودع عيّنات الإصدار 2 من Google Maps Android API من GitHub.
عرض إصدار Java من النشاط:
// Copyright 2020 Google LLC // // Licensed under the Apache License, Version 2.0 (the "License"); // you may not use this file except in compliance with the License. // You may obtain a copy of the License at // // http://www.apache.org/licenses/LICENSE-2.0 // // Unless required by applicable law or agreed to in writing, software // distributed under the License is distributed on an "AS IS" BASIS, // WITHOUT WARRANTIES OR CONDITIONS OF ANY KIND, either express or implied. // See the License for the specific language governing permissions and // limitations under the License. package com.example.mapwithmarker; import android.os.Bundle; import androidx.appcompat.app.AppCompatActivity; import com.google.android.gms.maps.CameraUpdateFactory; import com.google.android.gms.maps.GoogleMap; import com.google.android.gms.maps.OnMapReadyCallback; import com.google.android.gms.maps.SupportMapFragment; import com.google.android.gms.maps.model.LatLng; import com.google.android.gms.maps.model.MarkerOptions; /** An activity that displays a Google map with a marker (pin) to indicate a particular location. */ public class MapsMarkerActivity extends AppCompatActivity implements OnMapReadyCallback { @Override protected void onCreate(Bundle savedInstanceState) { super.onCreate(savedInstanceState); // Retrieve the content view that renders the map. setContentView(R.layout.activity_maps); // Get the SupportMapFragment and request notification when the map is ready to be used. SupportMapFragment mapFragment = (SupportMapFragment) getSupportFragmentManager().findFragmentById(R.id.map); mapFragment.getMapAsync(this); } /** * Manipulates the map when it's available. The API invokes this callback when the map is ready * to be used. This is where we can add markers or lines, add listeners or move the camera. In * this case, we just add a marker near Sydney, Australia. If Google Play services is not * installed on the device, the user receives a prompt to install Play services inside the * SupportMapFragment. The API invokes this method after the user has installed Google Play * services and returned to the app. */ @Override public void onMapReady(GoogleMap googleMap) { // Add a marker in Sydney, Australia, // and move the map's camera to the same location. LatLng sydney = new LatLng(-33.852, 151.211); googleMap.addMarker(new MarkerOptions().position(sydney).title("Marker in Sydney")); googleMap.moveCamera(CameraUpdateFactory.newLatLng(sydney)); } }
عرض نسخة Kotlin من النشاط:
// Copyright 2020 Google LLC // // Licensed under the Apache License, Version 2.0 (the "License"); // you may not use this file except in compliance with the License. // You may obtain a copy of the License at // // http://www.apache.org/licenses/LICENSE-2.0 // // Unless required by applicable law or agreed to in writing, software // distributed under the License is distributed on an "AS IS" BASIS, // WITHOUT WARRANTIES OR CONDITIONS OF ANY KIND, either express or implied. // See the License for the specific language governing permissions and // limitations under the License. package com.example.mapwithmarker import android.os.Bundle import android.widget.Toast import androidx.appcompat.app.AppCompatActivity import com.google.android.gms.maps.CameraUpdateFactory import com.google.android.gms.maps.GoogleMap import com.google.android.gms.maps.OnMapReadyCallback import com.google.android.gms.maps.SupportMapFragment import com.google.android.gms.maps.model.LatLng import com.google.android.gms.maps.model.MarkerOptions /** * An activity that displays a Google map with a marker (pin) to indicate a particular location. */ class MapsMarkerActivity : AppCompatActivity(), OnMapReadyCallback { override fun onCreate(savedInstanceState: Bundle?) { super.onCreate(savedInstanceState) // Retrieve the content view that renders the map. setContentView(R.layout.activity_maps) // Get the SupportMapFragment and request notification when the map is ready to be used. val mapFragment = supportFragmentManager.findFragmentById(R.id.map) as? SupportMapFragment mapFragment?.getMapAsync(this) } override fun onMapReady(googleMap: GoogleMap) { val sydney = LatLng(-33.852, 151.211) googleMap.addMarker( MarkerOptions() .position(sydney) .title("Marker in Sydney"), ) googleMap.moveCamera(CameraUpdateFactory.newLatLng(sydney)) } }
إعداد مشروع التطوير
اتّبِع الخطوات التالية لإنشاء مشروع البرنامج التعليمي في "استوديو Android".
- نزِّل "استوديو Android" وثبِّته.
- أضِف حزمة خدمات Google Play إلى Android Studio.
- استنسِخ أو نزِّل مستودع نماذج Google Maps Android API v2 إذا لم تكن قد فعلت ذلك عند بدء قراءة هذا الدليل التعليمي.
استيراد مشروع الدليل التوجيهي:
- في "استوديو Android"، انقر على ملف > جديد > استيراد مشروع.
- انتقِل إلى الموقع الجغرافي الذي حفظت فيه مستودع نماذج الإصدار 2 من Google Maps Android API بعد تنزيله.
- ابحث عن مشروع MapWithMarker في هذا الموقع:
PATH-TO-SAVED-REPO/android-samples/tutorials/java/MapWithMarker(Java) أو
PATH-TO-SAVED-REPO/android-samples/tutorials/kotlin/MapWithMarker(Kotlin) - اختَر دليل المشروع، ثم انقر على فتح. ينشئ "استوديو Android" الآن مشروعك باستخدام أداة الإصدار Gradle.
تفعيل واجهات برمجة التطبيقات اللازمة والحصول على مفتاح واجهة برمجة التطبيقات
لإكمال هذا الدليل التعليمي، تحتاج إلى مشروع على Google Cloud مع تفعيل واجهات برمجة التطبيقات اللازمة ومفتاح واجهة برمجة تطبيقات مصرَّح له باستخدام حزمة تطوير البرامج بالاستناد إلى بيانات خرائط Google للتطبيقات المتوافقة مع Android. لمزيد من التفاصيل، يُرجى الاطّلاع على:
إضافة مفتاح واجهة برمجة التطبيقات إلى تطبيقك
- افتح ملف
local.propertiesالخاص بمشروعك. أضِف السلسلة التالية ثم استبدِل
YOUR_API_KEYبقيمة مفتاح واجهة برمجة التطبيقات:MAPS_API_KEY=YOUR_API_KEYعند إنشاء تطبيقك، سيقوم المكوّن الإضافي Secrets Gradle لأجهزة Android بنسخ مفتاح واجهة برمجة التطبيقات وإتاحته كمتغيّر تنويعة التصميم في ملف Android manifest، كما هو موضّح أدناه.
إنشاء تطبيقك وتشغيله
لإنشاء التطبيق وتشغيله:
وصِّل جهاز Android بالكمبيوتر. اتّبِع التعليمات لتفعيل خيارات المطوّرين على جهاز Android وضبط النظام لرصد الجهاز.
بدلاً من ذلك، يمكنك استخدام أداة إدارة أجهزة Android الافتراضية (AVD) لضبط جهاز افتراضي. عند اختيار محاكي، تأكد من اختيار صورة تتضمن واجهات برمجة تطبيقات Google. لمزيد من التفاصيل، يُرجى الاطّلاع على إعداد مشروع في "استوديو Android" .
في استوديو Android، انقر على خيار القائمة تشغيل (أو رمز زر التشغيل). اختَر جهازًا كما هو مطلوب.
يستدعي "استوديو Android" أداة Gradle لإنشاء التطبيق، ثم يشغّل التطبيق على الجهاز أو على المحاكي. من المفترض أن تظهر لك خريطة مع علامة تشير إلى سيدني على الساحل الشرقي لأستراليا، على غرار الصورة في هذه الصفحة.
تحرّي الخلل وإصلاحه:
- إذا لم تظهر لك خريطة، تأكَّد من حصولك على مفتاح واجهة برمجة التطبيقات وإضافته إلى التطبيق، كما هو موضّح أعلاه. اطّلِع على السجلّ في Android Monitor في Android Studio بحثًا عن رسائل خطأ حول مفتاح واجهة برمجة التطبيقات.
- استخدِم أدوات تصحيح الأخطاء في "استوديو Android" لعرض السجلّات وتصحيح أخطاء التطبيق.
فهم الرمز البرمجي
يشرح هذا الجزء من البرنامج التعليمي أهم أجزاء تطبيق MapWithMarker، لمساعدتك في فهم كيفية إنشاء تطبيق مماثل.
التحقّق من ملف بيان Android
يُرجى ملاحظة العناصر التالية في ملف AndroidManifest.xml الخاص بتطبيقك:
أضِف عنصر
meta-dataلتضمين إصدار "خدمات Google Play" الذي تم تجميع التطبيق باستخدامه.<meta-data android:name="com.google.android.gms.version" android:value="@integer/google_play_services_version" />أضِف عنصر
meta-dataيحدّد مفتاح واجهة برمجة التطبيقات. يربط النموذج المصاحب لهذا الدليل التعليمي قيمة مفتاح واجهة برمجة التطبيقات بمتغيّر إصدار يتطابق مع اسم المفتاح الذي حدّدته سابقًا، وهوMAPS_API_KEY. عند إنشاء تطبيقك، سيجعل المكوّن الإضافي Secrets Gradle لأجهزة Android المفاتيح في ملفlocal.propertiesمتاحة كمتغيّرات تنويعة التصميم.<meta-data android:name="com.google.android.geo.API_KEY" android:value="${MAPS_API_KEY}" />في ملف
build.gradle، يمرّر السطر التالي مفتاح واجهة برمجة التطبيقات إلى ملف بيان Android.id 'com.google.android.libraries.mapsplatform.secrets-gradle-plugin'
في ما يلي مثال على ملف بيان كامل:
<?xml version="1.0" encoding="utf-8"?>
<!--
 Copyright 2020 Google LLC

 Licensed under the Apache License, Version 2.0 (the "License");
 you may not use this file except in compliance with the License.
 You may obtain a copy of the License at

      http://www.apache.org/licenses/LICENSE-2.0

 Unless required by applicable law or agreed to in writing, software
 distributed under the License is distributed on an "AS IS" BASIS,
 WITHOUT WARRANTIES OR CONDITIONS OF ANY KIND, either express or implied.
 See the License for the specific language governing permissions and
 limitations under the License.
-->

<manifest xmlns:android="http://schemas.android.com/apk/res/android">

    <application
        android:allowBackup="true"
        android:icon="@mipmap/ic_launcher"
        android:label="@string/app_name"
        android:supportsRtl="true"
        android:theme="@style/AppTheme">

        <meta-data
            android:name="com.google.android.gms.version"
            android:value="@integer/google_play_services_version" />

        <!--
             The API key for Google Maps-based APIs.
        -->
        <meta-data
            android:name="com.google.android.geo.API_KEY"
            android:value="${MAPS_API_KEY}" />

        <activity
            android:name=".MapsMarkerActivity"
            android:label="@string/title_activity_maps"
            android:exported="true">
            <intent-filter>
                <action android:name="android.intent.action.MAIN" />

                <category android:name="android.intent.category.LAUNCHER" />
            </intent-filter>
        </activity>
    </application>

</manifest>
إضافة خريطة
عرض خريطة باستخدام حزمة تطوير البرامج بالاستناد إلى بيانات "خرائط Google" للتطبيقات المتوافقة مع Android
أضِف عنصر
<fragment>إلى ملف تنسيق نشاطك،activity_maps.xml. يحدّد هذا العنصرSupportMapFragmentليكون بمثابة حاوية للخريطة ويوفّر إمكانية الوصول إلى عنصرGoogleMap. يستخدم البرنامج التعليمي إصدار مكتبة دعم Android من جزء الخريطة، لضمان التوافق مع الإصدارات السابقة من إطار عمل Android.<!-- Copyright 2020 Google LLC Licensed under the Apache License, Version 2.0 (the "License"); you may not use this file except in compliance with the License. You may obtain a copy of the License at http://www.apache.org/licenses/LICENSE-2.0 Unless required by applicable law or agreed to in writing, software distributed under the License is distributed on an "AS IS" BASIS, WITHOUT WARRANTIES OR CONDITIONS OF ANY KIND, either express or implied. See the License for the specific language governing permissions and limitations under the License. --> <fragment xmlns:android="http://schemas.android.com/apk/res/android" xmlns:tools="http://schemas.android.com/tools" android:id="@+id/map" android:name="com.google.android.gms.maps.SupportMapFragment" android:layout_width="match_parent" android:layout_height="match_parent" tools:context="com.example.mapwithmarker.MapsMarkerActivity" />
في إجراء
onCreate()الخاص بالنشاط، اضبط ملف التنسيق كعرض المحتوى. احصل على مؤشر إلى جزء الخريطة من خلال استدعاءFragmentManager.findFragmentById(). بعد ذلك، استخدِمgetMapAsync()للتسجيل في دالّة ردّ الاتصال بالخريطة:جافا
@Override protected void onCreate(Bundle savedInstanceState) { super.onCreate(savedInstanceState); // Retrieve the content view that renders the map. setContentView(R.layout.activity_maps); // Get the SupportMapFragment and request notification when the map is ready to be used. SupportMapFragment mapFragment = (SupportMapFragment) getSupportFragmentManager().findFragmentById(R.id.map); mapFragment.getMapAsync(this); }
Kotlin
override fun onCreate(savedInstanceState: Bundle?) { super.onCreate(savedInstanceState) // Retrieve the content view that renders the map. setContentView(R.layout.activity_maps) // Get the SupportMapFragment and request notification when the map is ready to be used. val mapFragment = supportFragmentManager.findFragmentById(R.id.map) as? SupportMapFragment mapFragment?.getMapAsync(this) }
نفِّذ واجهة
OnMapReadyCallbackوتجاوز طريقةonMapReady()لإعداد الخريطة عندما يكون عنصرGoogleMapمتاحًا:جافا
public class MapsMarkerActivity extends AppCompatActivity implements OnMapReadyCallback { // ... @Override public void onMapReady(GoogleMap googleMap) { LatLng sydney = new LatLng(-33.852, 151.211); googleMap.addMarker(new MarkerOptions().position(sydney).title("Marker in Sydney")); } }
Kotlin
class MapsMarkerActivity : AppCompatActivity(), OnMapReadyCallback { // ... override fun onMapReady(googleMap: GoogleMap) { val sydney = LatLng(-33.852, 151.211) googleMap.addMarker( MarkerOptions() .position(sydney) .title("Marker in Sydney"), ) } }
تعرض حزمة تطوير البرامج بالاستناد إلى بيانات خرائط Google للتطبيقات المتوافقة مع Android تلقائيًا محتوى نافذة المعلومات عندما ينقر المستخدم على علامة. ليس عليك إضافة متتبِّع نقرات للعلامة إذا كنت تريد استخدام الإعداد التلقائي.
الخطوات التالية
مزيد من المعلومات حول عنصر الخريطة والإجراءات التي يمكنك اتّخاذها باستخدام العلامات