您可能想將網頁內廣告 HTML 廣告版位與影片或重疊廣告版位建立關聯。相關聯廣告空間之間的這種關係稱為「主要/隨播」關係。
除了請求影片和重疊主廣告,您也可以使用 IMA SDK 顯示隨播 HTML 廣告。這類廣告會顯示在 HTML 環境中
使用隨播廣告
如要使用隨播廣告,請按照下列步驟操作:
1. 預訂隨播廣告
您必須先預訂要與主要廣告一起顯示的隨播廣告。您可以在 Ad Manager 中投放隨播廣告。每個主要廣告最多可放送六個隨播廣告。如果單一買方控管網頁上的所有廣告,這種做法也稱為路障型廣告。
2. 請求隨播廣告
根據預設,每個廣告請求都會啟用隨播廣告。
3. 顯示隨播多媒體廣告
顯示隨播廣告的方式有兩種:
-
如果您使用 GPT 實作隨播廣告,只要在 HTML 網頁上宣告隨播廣告版位,並向 API 註冊這些廣告 (也就是 JavaScript 和 HTML 中的 div ID 必須相符),系統就會自動顯示隨播廣告。使用 GPT 的好處包括:
- 可感知隨播廣告版位。
- 如果 VAST 回應內含的隨播廣告數量少於 HTML 網頁上定義的廣告空間數量,就會以來自發布商聯播網的廣告候補。
- 如果缺少影片廣告,系統會自動填入隨播廣告。
- 隨點即播影片播放器預先載入的隨播廣告版位。
- 自動顯示隨播廣告,包括
HTMLResource和iFrameResource。
搭配 Google 發布商廣告代碼使用隨播廣告
Google 發布商廣告代碼 (GPT) 會自動在網站上顯示 HTML 隨播廣告。我們建議大多數發布商使用 GPT。如果 GPT 是在主要網頁 (而非 IFrame) 上載入,HTML5 SDK 就會辨識 GPT 版位。如要進一步瞭解如何透過 IMA SDK 使用 GPT,請參閱 GPT 文件。
在 IFrame 中代管 HTML5 SDK
如果符合下列兩項條件,您必須加入額外的 Proxy 指令碼,GPT 隨播廣告才能正確顯示:
- 在 IFrame 中載入 HTML5 SDK。
- 在主要網頁 (iframe 外部) 載入 GPT。
如要在這種情況下顯示隨播廣告,您必須先載入 GPT Proxy 指令碼,再載入 SDK:
<script src="https://imasdk.googleapis.com/js/sdkloader/gpt_proxy.js"></script>
重要注意事項:
- 載入 SDK 的 IFrame 內不應載入 GPT。
- GPT 必須載入頂層網頁,而非其他 IFrame。
- Proxy 指令碼必須與 GPT 載入於相同框架 (即主要網頁)。
在 HTML 中宣告隨播廣告位置
本節說明如何使用 GPT 在 HTML 中宣告隨播廣告,並提供不同情境的程式碼範例。如果是 HTML5 SDK,您需要在 HTML 網頁中加入一些 JavaScript,並宣告隨播廣告位置。
範例 1:基本廣告版位實作
以下程式碼範例顯示如何在 HTML 網頁中加入 gpt.js 檔案,並宣告廣告版位。聲明的廣告版位為 728x90 像素。GPT 會嘗試使用 VAST 回應中與這個大小相符的任何隨播廣告,填滿廣告空間。宣告廣告空間後,googletag.display() 函式即可在網頁上呼叫的位置算繪廣告空間。因為這些是隨播廣告版位,廣告不會立即顯示。而是會與主影片廣告一起顯示。
以下是實作範例:
<html>
  <head>
    <!-- Uncomment the line below for the HTML5 SDK caveat proxy -->
    <!--<script src="https://imasdk.googleapis.com/js/sdkloader/gpt_proxy.js"></script>-->
    <!-- HEAD part -->
    <!-- Initialize the tagging library -->
    <script async src="https://securepubads.g.doubleclick.net/tag/js/gpt.js"></script>

    <!-- Register your companion slots -->
    <script>
       window.googletag = window.googletag || { cmd: [] };

       googletag.cmd.push(function() {
         // Supply YOUR_NETWORK and YOUR_UNIT_PATH.
         googletag.defineSlot('/YOUR_NETWORK/YOUR_UNIT_PATH', [728, 90], 'companionDiv')
             .addService(googletag.companionAds())
             .addService(googletag.pubads());
         googletag.companionAds().setRefreshUnfilledSlots(true);
         googletag.pubads().enableVideoAds();
         googletag.enableServices();
       });
    </script>
  </head>

  <body>
    <!-- BODY part -->
    <!-- Declare a div where you want the companion to appear. Use
          googletag.display() to make sure the ad is displayed. -->
    <div id="companionDiv" style="width:728px; height:90px;">
      <script>
         // Using the command queue to enable asynchronous loading.
         // The unit does not actually display now - it displays when
         // the video player is displaying the ads.
         googletag.cmd.push(function() { googletag.display('companionDiv'); });
      </script>
    </div>
  <body>
</html>
立即試用
如需實際運作的實作方式,請參閱下列 Codepen。
範例 2:動態廣告版位實作
有時您可能要等到網頁內容顯示後,才會知道網頁上有多少廣告空間。下列程式碼範例說明如何在網頁算繪時定義廣告空間。這個範例與範例 1 相同,但會註冊實際顯示廣告的廣告空間。
<html>
  <head>
    <!-- Uncomment the line below for the HTML5 SDK caveat proxy -->
    <!-- <script src="https://imasdk.googleapis.com/js/sdkloader/gpt_proxy.js"></script> -->
    <script async src="https://securepubads.g.doubleclick.net/tag/js/gpt.js"></script>
    <!-- HEAD part -->
    <!-- Initialize the tagging library -->
    <script>
      window.googletag = window.googletag || { cmd: [] };

      googletag.cmd.push(function() {
        googletag.companionAds().setRefreshUnfilledSlots(true);
        googletag.pubads().enableVideoAds();
        googletag.enableServices();
      });
    </script>
  </head>

  <body>
    <!-- BODY part -->
    <!-- Declare a div where you want the companion to appear. Use
        googletag.display() to make sure the ad is displayed. -->
    <div id="companionDiv" style="width:728px; height:90px;">
      <script>
        // Using the command queue to enable asynchronous loading.
        // The unit does not actually display now - it displays when
        // the video player is displaying the ads.
        googletag.cmd.push(function() {
          // Supply YOUR_NETWORK and YOUR_UNIT_PATH.
          googletag.defineSlot('/YOUR_NETWORK/YOUR_UNIT_PATH', [728, 90], 'companionDiv')
              .addService(googletag.companionAds())
              .addService(googletag.pubads());
          googletag.display('companionDiv');
        });
      </script>
    </div>
  <body>
</html>
立即試用
如要瞭解如何實作,請參閱下列程式碼。
範例 3:預先載入的廣告版位
在某些情況下,您可能需要在要求隨播廣告之前,在廣告版位中顯示某些內容。隨播廣告通常會與影片廣告一起請求。這項要求可能會在網頁載入後發生。舉例來說,隨播廣告可能只會在使用者點按「隨點即播」影片後載入。在這種情況下,您需要能夠請求一般廣告,在隨播廣告請求前填滿廣告版位。為支援這個用途,您可以在隨附廣告版位顯示標準網路廣告。確認網頁廣告指定隨播廣告版位。 指定隨播廣告版位的方式,與指定標準網頁廣告版位相同。
以下是上述實作的範例:
<html>
  <head>
    ...
    <!-- Register your companion slots -->
    <script>
      window.googletag = window.googletag || { cmd: [] };

      googletag.cmd.push(function() {
        // Supply YOUR_PRELOAD_NETWORK and YOUR_PRELOAD_UNIT_PATH.
        googletag.defineSlot('/YOUR_PRELOAD_NETWORK/YOUR_PRELOAD_UNIT_PATH', [728, 90], 'companionDiv')
            .addService(googletag.companionAds())
            .addService(googletag.pubads());
        googletag.companionAds().setRefreshUnfilledSlots(true);
        googletag.pubads().enableVideoAds();
        googletag.enableServices();
      });
    </script>
  </head>
  ...
</html>
立即試用
如需有效實作方式,請參閱下列 CodePen。
使用 Ad API 搭配隨播廣告
本節說明如何使用 Ad API 顯示隨播廣告。
顯示隨播多媒體廣告
如要顯示隨播廣告,請先透過 AdsManager 傳送的任何 AdEvent 事件,取得 Ad 物件的參照。建議使用 AdEvent.STARTED 事件,因為顯示隨播廣告時,應同時顯示主要廣告。
接著,使用這個 Ad 物件呼叫 getCompanionAds(),取得 CompanionAd 物件的陣列。您可以在這裡指定CompanionAdSelectionSettings,根據廣告素材類型、接近程度百分比、資源類型和大小條件,設定隨播廣告的篩選器。如要進一步瞭解這些設定,請參閱 IMA CompanionAdSelectionSettings API 說明文件。
現在可以使用 getCompanionAds 傳回的 CompanionAd 物件,按照下列指南在網頁上顯示隨播廣告:
- 在網頁上建立所需大小的隨播廣告版位
<div>。 - 在
STARTED事件的事件處理常式中,呼叫getAd()擷取Ad物件。 - 使用
getCompanionAds()取得符合隨播廣告版位大小和CompanionAdSelectionSettings,且與主要廣告素材序號相同的隨播廣告清單。如果廣告素材缺少序列屬性,系統會視為序列編號 0。 - 從
CompanionAd執行個體取得內容,並將其設為該廣告空間<div>的內部 HTML。
程式碼範例
<!--Set a companion ad div in html page. -->
<div id="companion-ad-300-250" width="300" height="250"></div>

<script>

  // Listen to the STARTED event.
  adsManager.addEventListener(
    google.ima.AdEvent.Type.STARTED,
    onAdEvent);

  function onAdEvent(adEvent) {
    switch (adEvent.type) {
      case google.ima.AdEvent.Type.STARTED:
        // Get the ad from the event.
        var ad = adEvent.getAd();
        var selectionCriteria = new google.ima.CompanionAdSelectionSettings();
        selectionCriteria.resourceType = google.ima.CompanionAdSelectionSettings.ResourceType.STATIC;
        selectionCriteria.creativeType = google.ima.CompanionAdSelectionSettings.CreativeType.IMAGE;
        selectionCriteria.sizeCriteria = google.ima.CompanionAdSelectionSettings.SizeCriteria.IGNORE;
        // Get a list of companion ads for an ad slot size and CompanionAdSelectionSettings
        var companionAds = ad.getCompanionAds(300, 250, selectionCriteria);
        var companionAd = companionAds[0];
        // Get HTML content from the companion ad.
        var content = companionAd.getContent();
        // Write the content to the companion ad slot.
        var div = document.getElementById('companion-ad-300-250');
        div.innerHTML = content;
        break;
    }
  }
</script>
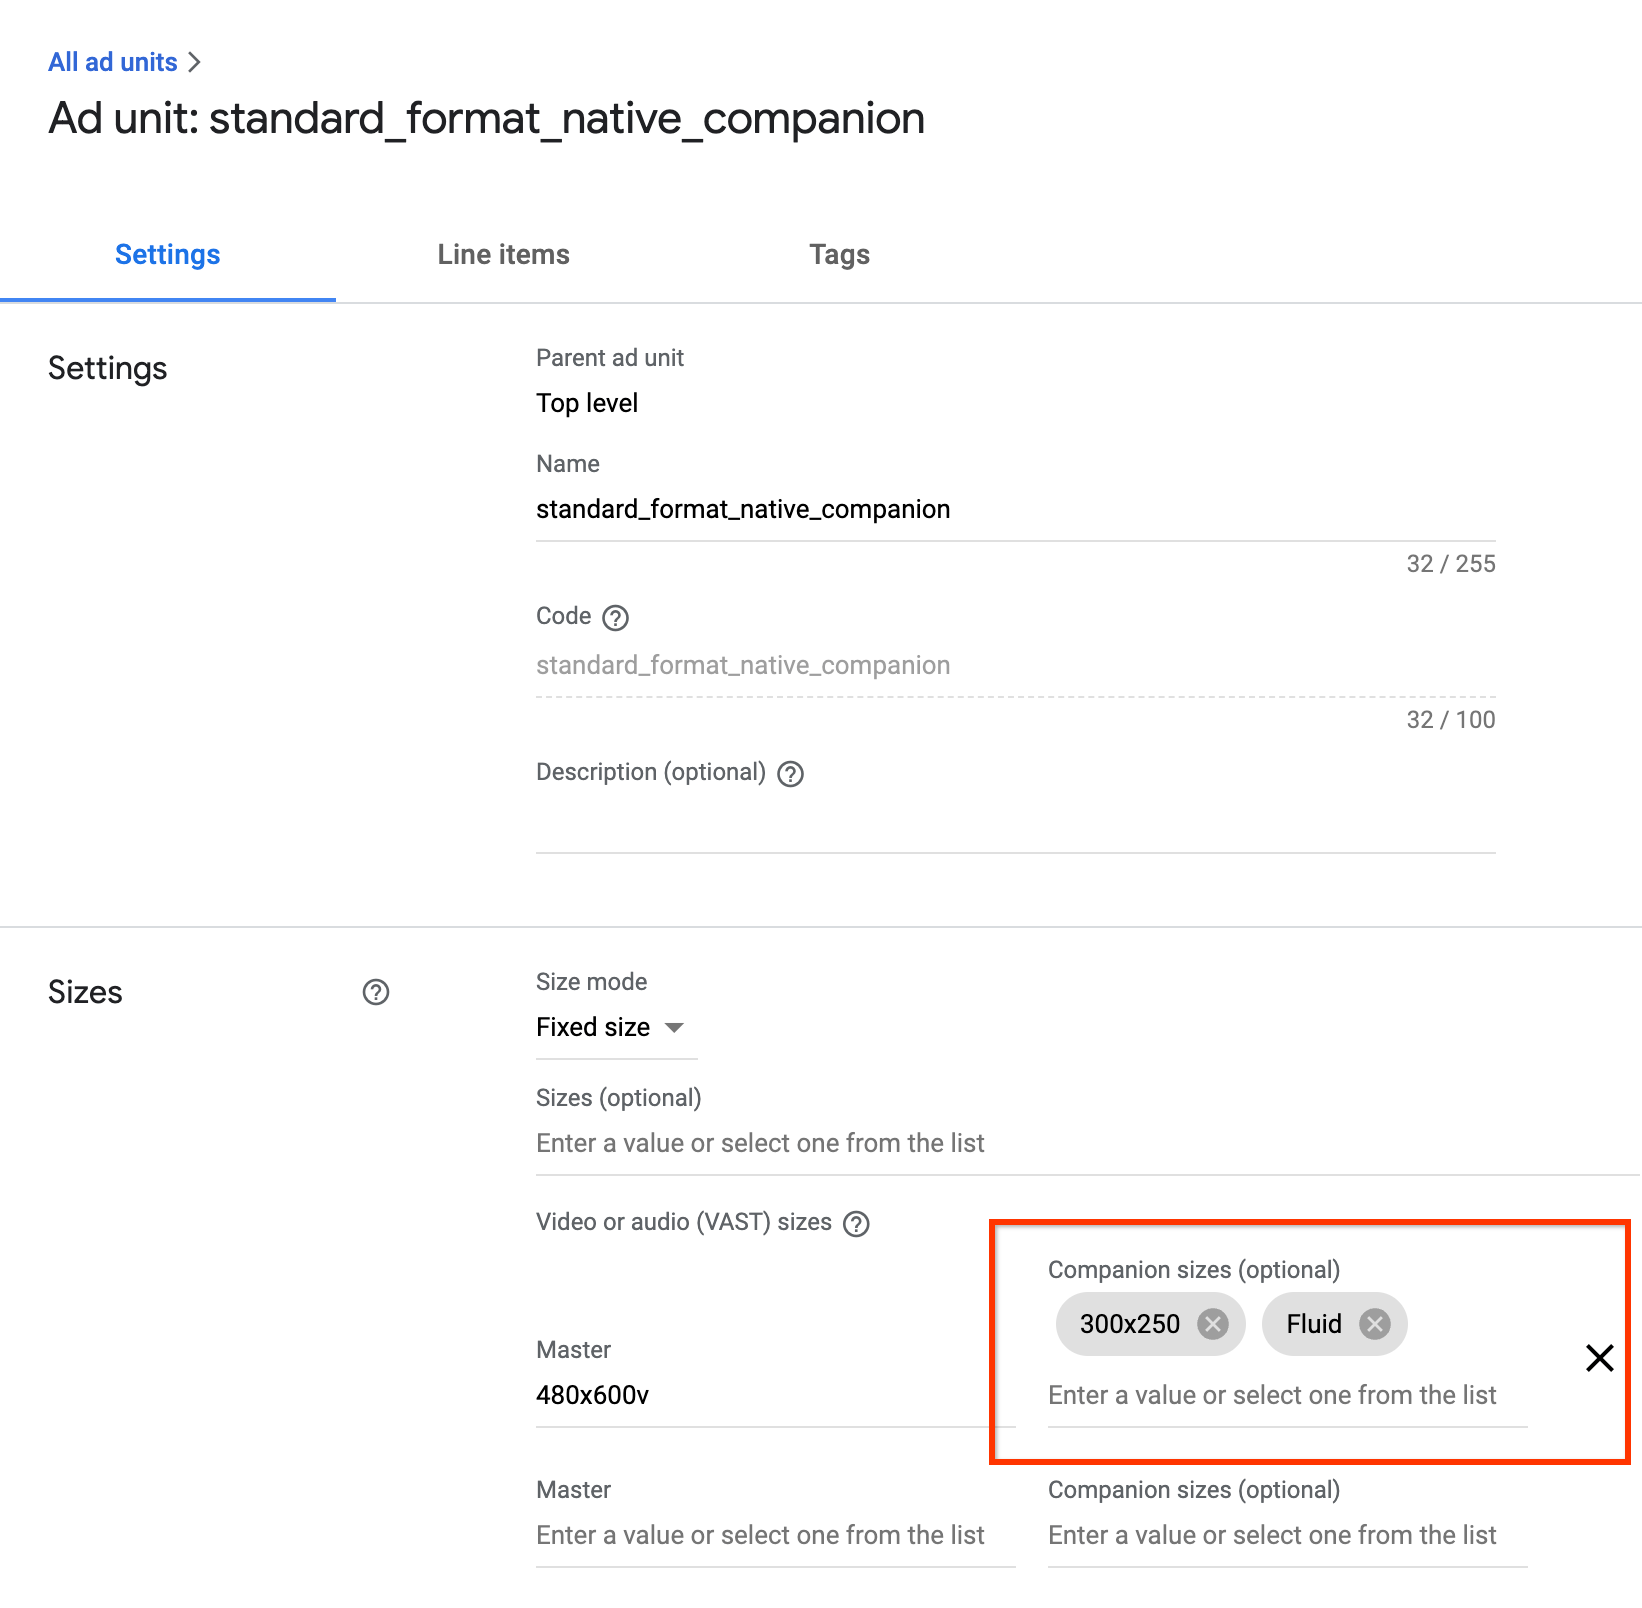
顯示自動調整隨播廣告
IMA 現在支援自動調整大小的隨播廣告。這些隨播廣告可調整大小,以符合廣告版位的大小。這些元素會填滿父項 div 的 100% 寬度,然後調整高度以配合隨附內容。您可以在 Ad Manager 中使用Fluid隨播廣告大小設定。請參閱下圖,瞭解如何設定這個值。
GPT 流體隨播廣告
使用 GPT 夥伴時,您可以更新 defineSlot() 方法的第二個參數,宣告流動夥伴廣告空間。
<!-- Register your companion slots -->
<script>
  googletag.cmd.push(function() {
    // Supply YOUR_NETWORK and YOUR_UNIT_PATH.
    googletag.defineSlot('/YOUR_NETWORK/YOUR_UNIT_PATH', ['fluid'], 'companionDiv')
        .addService(googletag.companionAds())
        .addService(googletag.pubads());
    googletag.companionAds().setRefreshUnfilledSlots(true);
    googletag.pubads().enableVideoAds();
    googletag.enableServices();
  });
</script>
Ad API 隨機顯示的隨播廣告
使用 Ad API 放送隨播廣告時,您可以將 google.ima.CompanionAdSelectionSettings.SizeCriteria 更新為 SELECT_FLUID 值,宣告流動隨播廣告空間。
<script>

  ...
    // Get the ad from the event.
    var ad = adEvent.getAd();
    var selectionCriteria = new google.ima.CompanionAdSelectionSettings();
    selectionCriteria.resourceType = google.ima.CompanionAdSelectionSettings.ResourceType.STATIC;
    selectionCriteria.creativeType = google.ima.CompanionAdSelectionSettings.CreativeType.IMAGE;
    selectionCriteria.sizeCriteria = google.ima.CompanionAdSelectionSettings.SizeCriteria.SELECT_FLUID;
    // Get a list of companion ads for an ad slot size and CompanionAdSelectionSettings
    // Note: Companion width and height are irrelevant when fluid size is used.
    var companionAds = ad.getCompanionAds(0, 0, selectionCriteria);
    var companionAd = companionAds[0];
  ...
    }
  }
</script>